-
深度学习_4_实战_直线最优解
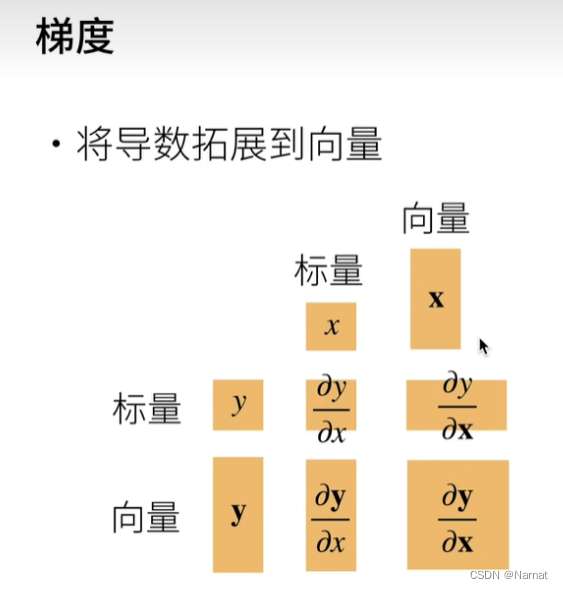
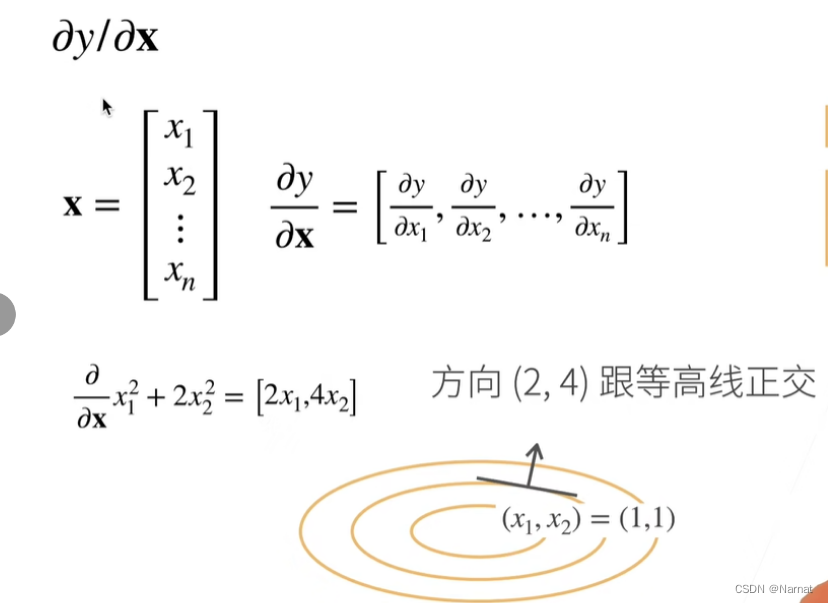
梯度

实战


代码:
# %matplotlib inline import random import torch import matplotlib.pyplot as plt # from d21 import torch as d21 def synthetic_data(w, b, num_examples): """生成 Y = XW + b + 噪声。""" X = torch.normal(0, 1, (num_examples, len(w)))# 均值为0,方差为1的随机数,n个样本,列数为w的长度 y = torch.matmul(X, w) + b # y = x * w + b y += torch.normal(0, 0.01, y.shape) # 加入随机噪音,均值为0.。形状与y的一样 return X, y.reshape((-1, 1))# x, y做成列向量返回 true_w = torch.tensor([2, -3.4]) true_b = 4.2 features, labels = synthetic_data(true_w, true_b, 1000) #读取小批量,输出batch_size的小批量,随机选取 def data_iter(batch_size, features, labels): num_examples = len(features) indices = list(range(num_examples))#转成list random.shuffle(indices)#打乱 for i in range(0, num_examples, batch_size):# batch_indices = torch.tensor(indices[i:min(i + batch_size, num_examples)])#取 yield features[batch_indices], labels[batch_indices]#不断返回 # #print(features) # #print(labels) # # batch_size = 10 # # for x, y in data_iter(batch_size, features,labels): # print(x, '\n', y) # break # # 提取第一列特征作为x轴,第二列特征作为y轴 # x = features[:, 1].detach().numpy() #将特征和标签转换为NumPy数组,以便能够在Matplotlib中使用。 # y = labels.detach().numpy() # # # 绘制散点图 # plt.scatter(x, y, 1) # plt.xlabel('Feature 1') # plt.ylabel('Feature 2') # plt.title('Synthetic Data') # plt.show() # # #定义初始化模型 w = torch.normal(0, 0.01, size=(2, 1), requires_grad=True) b = torch.zeros(1, requires_grad = True) def linreg(x, w, b): return torch.matmul(x, w) + b #定义损失函数 def squared_loss(y_hat, y): return (y_hat - y.reshape(y_hat.shape))**2 / 2 #弄成一样的形状 # 定义优化算法 def sgd(params, lr, batch_size): """小批量随梯度下降""" with torch.no_grad():#节省内存和计算资源。 for param in params: param -= lr * param.grad / batch_size param.grad.zero_()#用于清空张量param的梯度信息。 print("训练函数") lr = 0.03 #学习率 num_ecopchs = 300 #数据扫描三遍 net = linreg #指定模型 loss = squared_loss #损失 for epoch in range(num_ecopchs):#扫描数据 for x, y in data_iter(batch_size, features, labels): #拿出x, y l = loss(net(x, w, b), y)#求损失,预测net,真实y l.sum().backward()#算梯度 sgd([w, b], lr, batch_size)#使用参数的梯度更新参数 with torch.no_grad(): train_l = loss(net(features, w, b), labels) print(f'epoch {epoch + 1},loss {float(train_l.mean()):f}')- 1
- 2
- 3
- 4
- 5
- 6
- 7
- 8
- 9
- 10
- 11
- 12
- 13
- 14
- 15
- 16
- 17
- 18
- 19
- 20
- 21
- 22
- 23
- 24
- 25
- 26
- 27
- 28
- 29
- 30
- 31
- 32
- 33
- 34
- 35
- 36
- 37
- 38
- 39
- 40
- 41
- 42
- 43
- 44
- 45
- 46
- 47
- 48
- 49
- 50
- 51
- 52
- 53
- 54
- 55
- 56
- 57
- 58
- 59
- 60
- 61
- 62
- 63
- 64
- 65
- 66
- 67
- 68
- 69
- 70
- 71
- 72
- 73
- 74
- 75
- 76
- 77
- 78
- 79
- 80
- 81
- 82
- 83
- 84
- 85
- 86
运行效果:

-
相关阅读:
Django学习笔记二:数据库配置
『Element Plus の 百科大全』
[源码解析] TensorFlow 分布式环境(4) --- WorkerCache
【跟晓月学数据库】基于book库的mysql进阶实战
Mongo聚合分析命令浅析
使用 SAP ABAP 代码生成 PDF 文件,填充以业务数据并显示在 SAPGUI 里
PHP从多维数组中删除重复的值
2022年互联网网络爬虫框架TOP10分析
Kotlin的协程:上下文
使用pushd高效的切换目录
- 原文地址:https://blog.csdn.net/xyint/article/details/133978878
