-
Mybatis 相关模块以及设计模式分析
一、缓存模块
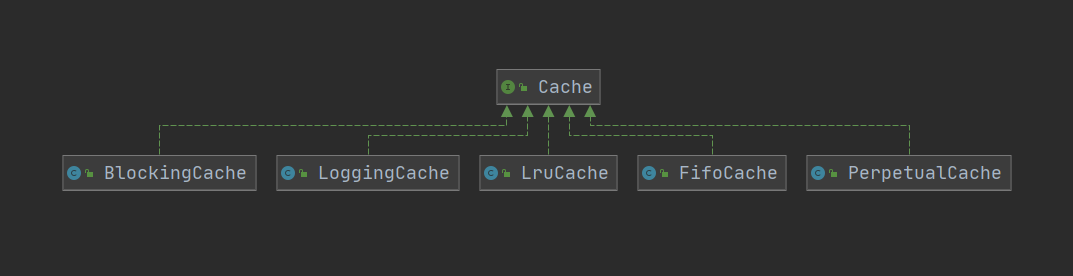
MyBatis作为一个强大的持久层框架,缓存是其必不可少的功能之一,Mybatis中的缓存分为一级缓存和二级缓存。但本质上是一样的,都是使用Cache接口实现的。缓存位于 org.apache.ibatis.cache包下。

通过结构我们能够发现Cache其实使用到了装饰器模式来实现缓存的处理。
“装饰者模式(Decorator Pattern)是指在不改变原有对象的基础之上,将功能附加到对象上,提供了比继承更有弹性的替代方案(扩展原有对象的功能)。”
1. Cache接口
Cache接口是缓存模块中最核心的接口,它定义了所有缓存的基本行为,Cache接口的定义如下:- 1
public interface Cache { /** * 缓存对象的 ID * @return The identifier of this cache */ String getId(); /** * 向缓存中添加数据,一般情况下 key是CacheKey value是查询结果 * @param key Can be any object but usually it is a {@link CacheKey} * @param value The result of a select. */ void putObject(Object key, Object value); /** * 根据指定的key,在缓存中查找对应的结果对象 * @param key The key * @return The object stored in the cache. */ Object getObject(Object key); Object removeObject(Object key); /** * Clears this cache instance. * 清空缓存 */ void clear(); /** * Optional. This method is not called by the core. * 缓存的个数。 * @return The number of elements stored in the cache (not its capacity). */ int getSize(); /** * Optional. As of 3.2.6 this method is no longer called by the core. ** Any locking needed by the cache must be provided internally by the cache provider. * 获取读写锁 * @return A ReadWriteLock */
default ReadWriteLock getReadWriteLock() { return null; } }- 1
- 2
- 3
- 4
- 5
- 6
- 7
- 8
- 9
- 10
- 11
- 12
- 13
- 14
- 15
- 16
- 17
- 18
- 19
- 20
- 21
- 22
- 23
- 24
- 25
- 26
- 27
- 28
- 29
- 30
- 31
- 32
- 33
- 34
- 35
- 36
- 37
- 38
- 39
- 40
- 41
- 42
- 43
- 44
- 45
- 46
- 47
- 48
- 49
Cache接口的实现类很多,但是大部分都是装饰器,只有PerpetualCache提供了Cache接口的基本实现。

2. PerpetualCache
PerpetualCache在缓存模块中扮演了ConcreteComponent的角色,其实现比较简单,底层使用HashMap记录缓存项,具体的实现如下:
/** * 在装饰器模式用 用来被装饰的对象 * 缓存中的 基本缓存处理的实现 * 其实就是一个 HashMap 的基本操作 * @author Clinton Begin */ public class PerpetualCache implements Cache { private final String id; // Cache 对象的唯一标识 // 用于记录缓存的Map对象 private final Map<Object, Object> cache = new HashMap<>(); public PerpetualCache(String id) { this.id = id; } @Override public String getId() { return id; } @Override public int getSize() { return cache.size(); } @Override public void putObject(Object key, Object value) { cache.put(key, value); } @Override public Object getObject(Object key) { return cache.get(key); } @Override public Object removeObject(Object key) { return cache.remove(key); } @Override public void clear() { cache.clear(); } @Override public boolean equals(Object o) { if (getId() == null) { throw new CacheException("Cache instances require an ID."); } if (this == o) { return true; } if (!(o instanceof Cache)) { return false; } Cache otherCache = (Cache) o; // 只关心ID return getId().equals(otherCache.getId()); } @Override public int hashCode() { if (getId() == null) { throw new CacheException("Cache instances require an ID."); } // 只关心ID return getId().hashCode(); } }- 1
- 2
- 3
- 4
- 5
- 6
- 7
- 8
- 9
- 10
- 11
- 12
- 13
- 14
- 15
- 16
- 17
- 18
- 19
- 20
- 21
- 22
- 23
- 24
- 25
- 26
- 27
- 28
- 29
- 30
- 31
- 32
- 33
- 34
- 35
- 36
- 37
- 38
- 39
- 40
- 41
- 42
- 43
- 44
- 45
- 46
- 47
- 48
- 49
- 50
- 51
- 52
- 53
- 54
- 55
- 56
- 57
- 58
- 59
- 60
- 61
- 62
- 63
- 64
- 65
- 66
- 67
- 68
- 69
- 70
- 71
- 72
- 73
然后我们可以来看看cache.decorators包下提供的装饰器。他们都实现了Cache接口。这些装饰器都在PerpetualCache的基础上提供了一些额外的功能,通过多个组合实现一些特殊的需求。
3. BlockingCache
通过名称我们能看出来是一个阻塞同步的缓存,它保证只有一个线程到缓存中查找指定的key对应的数据。
public class BlockingCache implements Cache { private long timeout; // 阻塞超时时长 private final Cache delegate; // 被装饰的底层 Cache 对象 // 每个key 都有对象的 ReentrantLock 对象 private final ConcurrentHashMap<Object, ReentrantLock> locks; public BlockingCache(Cache delegate) { // 被装饰的 Cache 对象 this.delegate = delegate; this.locks = new ConcurrentHashMap<>(); } @Override public String getId() { return delegate.getId(); } @Override public int getSize() { return delegate.getSize(); } @Override public void putObject(Object key, Object value) { try { // 执行 被装饰的 Cache 中的方法 delegate.putObject(key, value); } finally { // 释放锁 releaseLock(key); } } @Override public Object getObject(Object key) { acquireLock(key); // 获取锁 Object value = delegate.getObject(key); // 获取缓存数据 if (value != null) { // 有数据就释放掉锁,否则继续持有锁 releaseLock(key); } return value; } @Override public Object removeObject(Object key) { // despite of its name, this method is called only to release locks releaseLock(key); return null; } @Override public void clear() { delegate.clear(); } private ReentrantLock getLockForKey(Object key) { return locks.computeIfAbsent(key, k -> new ReentrantLock()); } private void acquireLock(Object key) { Lock lock = getLockForKey(key); if (timeout > 0) { try { boolean acquired = lock.tryLock(timeout, TimeUnit.MILLISECONDS); if (!acquired) { throw new CacheException("Couldn't get a lock in " + timeout + " for the key " + key + " at the cache " + delegate.getId()); } } catch (InterruptedException e) { throw new CacheException("Got interrupted while trying to acquire lock for key " + key, e); } } else { lock.lock(); } } private void releaseLock(Object key) { ReentrantLock lock = locks.get(key); if (lock.isHeldByCurrentThread()) { lock.unlock(); } } public long getTimeout() { return timeout; } public void setTimeout(long timeout) { this.timeout = timeout; } }- 1
- 2
- 3
- 4
- 5
- 6
- 7
- 8
- 9
- 10
- 11
- 12
- 13
- 14
- 15
- 16
- 17
- 18
- 19
- 20
- 21
- 22
- 23
- 24
- 25
- 26
- 27
- 28
- 29
- 30
- 31
- 32
- 33
- 34
- 35
- 36
- 37
- 38
- 39
- 40
- 41
- 42
- 43
- 44
- 45
- 46
- 47
- 48
- 49
- 50
- 51
- 52
- 53
- 54
- 55
- 56
- 57
- 58
- 59
- 60
- 61
- 62
- 63
- 64
- 65
- 66
- 67
- 68
- 69
- 70
- 71
- 72
- 73
- 74
- 75
- 76
- 77
- 78
- 79
- 80
- 81
- 82
- 83
- 84
- 85
- 86
- 87
- 88
- 89
- 90
- 91
- 92
通过源码我们能够发现,BlockingCache本质上就是在我们操作缓存数据的前后通过 ReentrantLock对象来实现了加锁和解锁操作。其他的具体实现类,大家可以自行查阅
缓存实现类 描述 作用 装饰条件 基本缓存 缓存基本实现类 默认是PerpetualCache,也可以自定义比如RedisCache、EhCache等,具备基本功能的缓存类 无 LruCache LRU策略的缓存 当缓存到达上限时候,删除最近最少使用的缓存(Least Recently Use) eviction=“LRU”(默认) FifoCache FIFO策略的缓存 当缓存到达上限时候,删除最先入队的缓存 eviction=“FIFO” SoftCacheWeakCache 带清理策略的缓存 通过JVM的软引用和弱引用来实现缓存,当JVM内存不足时,会自动清理掉这些缓存,基于SoftReference和WeakReference eviction="SOFT"eviction=“WEAK” LoggingCache 带日志功能的缓存 比如:输出缓存命中率 基本 SynchronizedCache 同步缓存 基于synchronized关键字实现,解决并发问题 基本 BlockingCache 阻塞缓存 通过在get/put方式中加锁,保证只有一个线程操作缓存,基于Java重入锁实现 blocking=true SerializedCache 支持序列化的缓存 将对象序列化以后存到缓存中,取出时反序列化 readOnly=false(默认) ScheduledCache 定时调度的缓存 在进行get/put/remove/getSize等操作前,判断缓存时间是否超过了设置的最长缓存时间(默认是一小时),如果是则清空缓存–即每隔一段时间清空一次缓存 flushInterval不为空 TransactionalCache 事务缓存 在二级缓存中使用,可一次存入多个缓存,移除多个缓存 在TransactionalCacheManager中用Map维护对应关系 4. 缓存的应用
4.1 缓存对应的初始化
在Configuration初始化的时候会为我们的各种Cache实现注册对应的别名

在解析settings标签的时候,设置的默认值有如下- 1

cacheEnabled默认为true,localCacheScope默认为 SESSION
在解析映射文件的时候会解析我们相关的cache标签
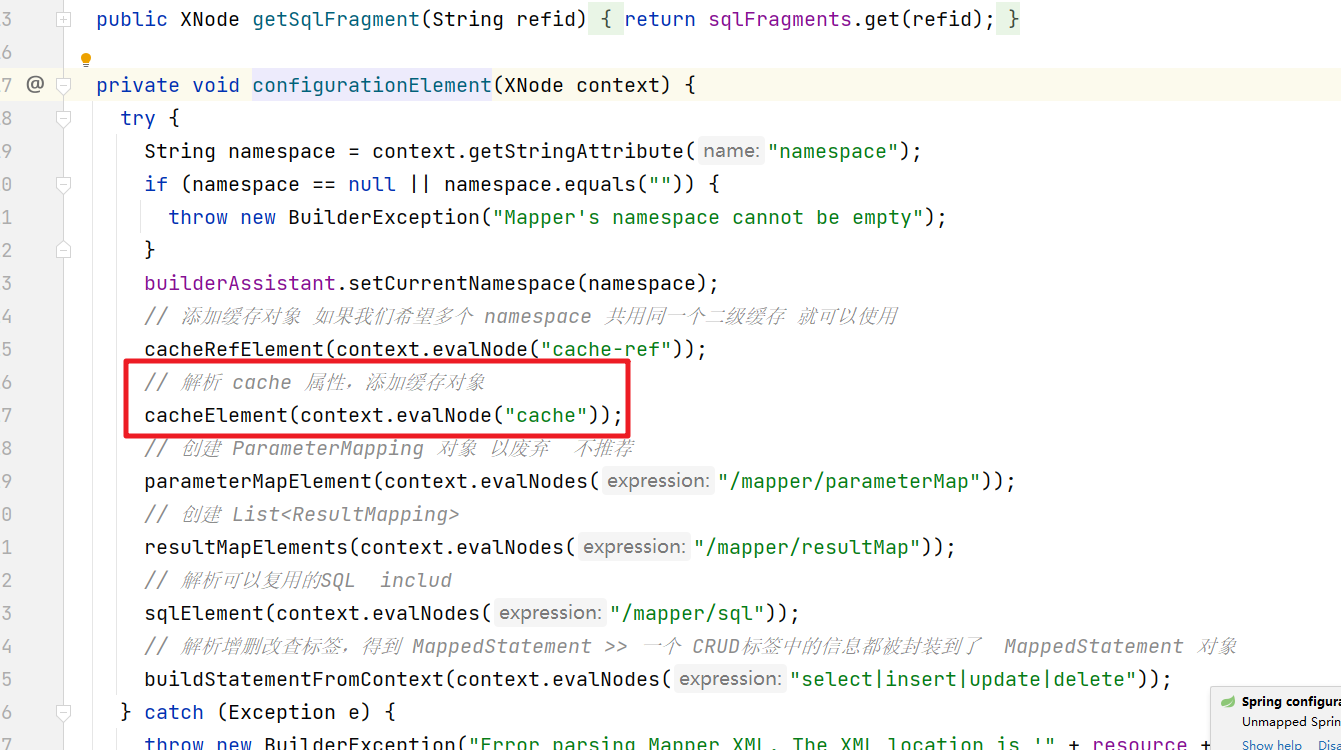
然后解析映射文件的cache标签后会在Configuration对象中添加对应的数据在
private void cacheElement(XNode context) { // 只有 cache 标签不为空才解析 if (context != null) { String type = context.getStringAttribute("type", "PERPETUAL"); Class<? extends Cache> typeClass = typeAliasRegistry.resolveAlias(type); String eviction = context.getStringAttribute("eviction", "LRU"); Class<? extends Cache> evictionClass = typeAliasRegistry.resolveAlias(eviction); Long flushInterval = context.getLongAttribute("flushInterval"); Integer size = context.getIntAttribute("size"); boolean readWrite = !context.getBooleanAttribute("readOnly", false); boolean blocking = context.getBooleanAttribute("blocking", false); Properties props = context.getChildrenAsProperties(); builderAssistant.useNewCache(typeClass, evictionClass, flushInterval, size, readWrite, blocking, props); } }- 1
- 2
- 3
- 4
- 5
- 6
- 7
- 8
- 9
- 10
- 11
- 12
- 13
- 14
- 15
继续

然后我们可以发现 如果存储 cache 标签,那么对应的 Cache对象会被保存在 currentCache 属性中。
进而在 Cache 对象 保存在了 MapperStatement 对象的 cache 属性中。
然后我们再看看openSession的时候又做了哪些操作,在创建对应的执行器的时候会有缓存的操作
public Executor newExecutor(Transaction transaction, ExecutorType executorType) { executorType = executorType == null ? defaultExecutorType : executorType; executorType = executorType == null ? ExecutorType.SIMPLE : executorType; Executor executor; if (ExecutorType.BATCH == executorType) { executor = new BatchExecutor(this, transaction); } else if (ExecutorType.REUSE == executorType) { executor = new ReuseExecutor(this, transaction); } else { // 默认 SimpleExecutor executor = new SimpleExecutor(this, transaction); } // 二级缓存开关,settings 中的 cacheEnabled 默认是 true if (cacheEnabled) { executor = new CachingExecutor(executor); } // 植入插件的逻辑,至此,四大对象已经全部拦截完毕 executor = (Executor) interceptorChain.pluginAll(executor); return executor; }- 1
- 2
- 3
- 4
- 5
- 6
- 7
- 8
- 9
- 10
- 11
- 12
- 13
- 14
- 15
- 16
- 17
- 18
- 19
- 20
也就是如果 cacheEnabled 为 true 就会通过 CachingExecutor 来装饰executor 对象,然后就是在执行SQL操作的时候会涉及到缓存的具体使用。这个就分为一级缓存和二级缓存,这个我们来分别介绍
4.2 一级缓存
一级缓存也叫本地缓存(Local Cache),MyBatis的一级缓存是在会话(SqlSession)层面进行缓存的。MyBatis的一级缓存是默认开启的,不需要任何的配置(如果要关闭,localCacheScope设置为STATEMENT)。在BaseExecutor对象的query方法中有关闭一级缓存的逻辑

然后我们需要考虑下在一级缓存中的 PerpetualCache 对象在哪创建的,因为一级缓存是Session级别的缓存,肯定需要在Session范围内创建,其实PerpetualCache的实例化是在BaseExecutor的构造方法中创建的- 1
protected BaseExecutor(Configuration configuration, Transaction transaction) { this.transaction = transaction; this.deferredLoads = new ConcurrentLinkedQueue<>(); this.localCache = new PerpetualCache("LocalCache"); this.localOutputParameterCache = new PerpetualCache("LocalOutputParameterCache"); this.closed = false; this.configuration = configuration; this.wrapper = this; }- 1
- 2
- 3
- 4
- 5
- 6
- 7
- 8
- 9

一级缓存的具体实现也是在BaseExecutor的query方法中来实现的
public <E> List<E> query(MappedStatement ms, Object parameter, RowBounds rowBounds, ResultHandler resultHandler, CacheKey key, BoundSql boundSql) throws SQLException { // 异常体系之 ErrorContext ErrorContext.instance().resource(ms.getResource()).activity("executing a query").object(ms.getId()); if (closed) { throw new ExecutorException("Executor was closed."); } if (queryStack == 0 && ms.isFlushCacheRequired()) { // flushCache="true"时,即使是查询,也清空一级缓存 clearLocalCache(); } List<E> list; try { // 防止递归查询重复处理缓存 queryStack++; // 查询一级缓存 // ResultHandler 和 ResultSetHandler的区别 list = resultHandler == null ? (List<E>) localCache.getObject(key) : null; if (list != null) { handleLocallyCachedOutputParameters(ms, key, parameter, boundSql); } else { // 真正的查询流程 list = queryFromDatabase(ms, parameter, rowBounds, resultHandler, key, boundSql); } } finally { queryStack--; } if (queryStack == 0) { for (DeferredLoad deferredLoad : deferredLoads) { deferredLoad.load(); } // issue #601 deferredLoads.clear(); if (configuration.getLocalCacheScope() == LocalCacheScope.STATEMENT) { // issue #482 clearLocalCache(); } } return list; }- 1
- 2
- 3
- 4
- 5
- 6
- 7
- 8
- 9
- 10
- 11
- 12
- 13
- 14
- 15
- 16
- 17
- 18
- 19
- 20
- 21
- 22
- 23
- 24
- 25
- 26
- 27
- 28
- 29
- 30
- 31
- 32
- 33
- 34
- 35
- 36
- 37
- 38
- 39

一级缓存的验证:
同一个Session中的多个相同操作
@Test public void test1() throws Exception{ // 1.获取配置文件 InputStream in = Resources.getResourceAsStream("mybatis-config.xml"); // 2.加载解析配置文件并获取SqlSessionFactory对象 SqlSessionFactory factory = new SqlSessionFactoryBuilder().build(in); // 3.根据SqlSessionFactory对象获取SqlSession对象 SqlSession sqlSession = factory.openSession(); // 4.通过SqlSession中提供的 API方法来操作数据库 List<User> list = sqlSession.selectList("com.gupaoedu.mapper.UserMapper.selectUserList"); System.out.println(list.size()); // 一级缓存测试 System.out.println("---------"); list = sqlSession.selectList("com.gupaoedu.mapper.UserMapper.selectUserList"); System.out.println(list.size()); // 5.关闭会话 sqlSession.close(); }- 1
- 2
- 3
- 4
- 5
- 6
- 7
- 8
- 9
- 10
- 11
- 12
- 13
- 14
- 15
- 16
- 17
- 18
输出日志
Setting autocommit to false on JDBC Connection [com.mysql.cj.jdbc.ConnectionImpl@477b4cdf] ==> Preparing: select * from t_user ==> Parameters: <== Columns: id, user_name, real_name, password, age, d_id <== Row: 1, zhangsan, 张三, 123456, 18, null <== Row: 2, lisi, 李四, 11111, 19, null <== Row: 3, wangwu, 王五, 111, 22, 1001 <== Row: 4, wangwu, 王五, 111, 22, 1001 <== Row: 5, wangwu, 王五, 111, 22, 1001 <== Row: 6, wangwu, 王五, 111, 22, 1001 <== Row: 7, wangwu, 王五, 111, 22, 1001 <== Row: 8, aaa, bbbb, null, null, null <== Row: 9, aaa, bbbb, null, null, null <== Row: 10, aaa, bbbb, null, null, null <== Row: 11, aaa, bbbb, null, null, null <== Row: 12, aaa, bbbb, null, null, null <== Row: 666, hibernate, 持久层框架, null, null, null <== Total: 13 13 --------- 13- 1
- 2
- 3
- 4
- 5
- 6
- 7
- 8
- 9
- 10
- 11
- 12
- 13
- 14
- 15
- 16
- 17
- 18
- 19
- 20
- 21
可以看到第二次查询没有经过数据库操作
不同Session的相同操作
@Test public void test2() throws Exception{ // 1.获取配置文件 InputStream in = Resources.getResourceAsStream("mybatis-config.xml"); // 2.加载解析配置文件并获取SqlSessionFactory对象 SqlSessionFactory factory = new SqlSessionFactoryBuilder().build(in); // 3.根据SqlSessionFactory对象获取SqlSession对象 SqlSession sqlSession = factory.openSession(); // 4.通过SqlSession中提供的 API方法来操作数据库 List<User> list = sqlSession.selectList("com.gupaoedu.mapper.UserMapper.selectUserList"); System.out.println(list.size()); sqlSession.close(); sqlSession = factory.openSession(); // 一级缓存测试 System.out.println("---------"); list = sqlSession.selectList("com.gupaoedu.mapper.UserMapper.selectUserList"); System.out.println(list.size()); // 5.关闭会话 sqlSession.close(); }- 1
- 2
- 3
- 4
- 5
- 6
- 7
- 8
- 9
- 10
- 11
- 12
- 13
- 14
- 15
- 16
- 17
- 18
- 19
- 20
输出结果
Setting autocommit to false on JDBC Connection [com.mysql.cj.jdbc.ConnectionImpl@477b4cdf] ==> Preparing: select * from t_user ==> Parameters: <== Columns: id, user_name, real_name, password, age, d_id <== Row: 1, zhangsan, 张三, 123456, 18, null <== Row: 2, lisi, 李四, 11111, 19, null <== Row: 3, wangwu, 王五, 111, 22, 1001 <== Row: 4, wangwu, 王五, 111, 22, 1001 <== Row: 5, wangwu, 王五, 111, 22, 1001 <== Row: 6, wangwu, 王五, 111, 22, 1001 <== Row: 7, wangwu, 王五, 111, 22, 1001 <== Row: 8, aaa, bbbb, null, null, null <== Row: 9, aaa, bbbb, null, null, null <== Row: 10, aaa, bbbb, null, null, null <== Row: 11, aaa, bbbb, null, null, null <== Row: 12, aaa, bbbb, null, null, null <== Row: 666, hibernate, 持久层框架, null, null, null <== Total: 13 13 Resetting autocommit to true on JDBC Connection [com.mysql.cj.jdbc.ConnectionImpl@477b4cdf] Closing JDBC Connection [com.mysql.cj.jdbc.ConnectionImpl@477b4cdf] Returned connection 1199262943 to pool. --------- Opening JDBC Connection Checked out connection 1199262943 from pool. Setting autocommit to false on JDBC Connection [com.mysql.cj.jdbc.ConnectionImpl@477b4cdf] ==> Preparing: select * from t_user ==> Parameters: <== Columns: id, user_name, real_name, password, age, d_id <== Row: 1, zhangsan, 张三, 123456, 18, null <== Row: 2, lisi, 李四, 11111, 19, null <== Row: 3, wangwu, 王五, 111, 22, 1001 <== Row: 4, wangwu, 王五, 111, 22, 1001 <== Row: 5, wangwu, 王五, 111, 22, 1001 <== Row: 6, wangwu, 王五, 111, 22, 1001 <== Row: 7, wangwu, 王五, 111, 22, 1001 <== Row: 8, aaa, bbbb, null, null, null <== Row: 9, aaa, bbbb, null, null, null <== Row: 10, aaa, bbbb, null, null, null <== Row: 11, aaa, bbbb, null, null, null <== Row: 12, aaa, bbbb, null, null, null <== Row: 666, hibernate, 持久层框架, null, null, null <== Total: 13 13 Resetting autocommit to true on JDBC Connection [com.mysql.cj.jdbc.ConnectionImpl@477b4cdf] Closing JDBC Connection [com.mysql.cj.jdbc.ConnectionImpl@477b4cdf] Returned connection 1199262943 to pool.- 1
- 2
- 3
- 4
- 5
- 6
- 7
- 8
- 9
- 10
- 11
- 12
- 13
- 14
- 15
- 16
- 17
- 18
- 19
- 20
- 21
- 22
- 23
- 24
- 25
- 26
- 27
- 28
- 29
- 30
- 31
- 32
- 33
- 34
- 35
- 36
- 37
- 38
- 39
- 40
- 41
- 42
- 43
- 44
- 45
- 46
- 47
通过输出我们能够发现,不同的Session中的相同操作,一级缓存是没有起作用的。
4.3 二级缓存
二级缓存是用来解决一级缓存不能跨会话共享的问题的,范围是namespace级别的,可以被多个SqlSession共享(只要是同一个接口里面的相同方法,都可以共享),生命周期和应用同步。
二级缓存的设置,首先是settings中的cacheEnabled要设置为true,当然默认的就是为true,这个步骤决定了在创建Executor对象的时候是否通过CachingExecutor来装饰。

那么设置了cacheEnabled标签为true是否就意味着 二级缓存是否一定可用呢?当然不是,我们还需要在 对应的映射文件中添加 cache 标签才行。
<cache type="org.apache.ibatis.cache.impl.PerpetualCache" size="1024" > eviction="LRU" <!—回收策略--> flushInterval="120000" <!—自动刷新时间 ms,未配置时只有调用时刷新--> readOnly="false"/> <!—默认是false(安全),改为true可读写时,对象必须支持序列化 -->- 1
- 2
- 3
- 4
- 5
- 6
cache属性详解:
属性 含义 取值 type 缓存实现类 需要实现Cache接口,默认是PerpetualCache,可以使用第三方缓存 size 最多缓存对象个数 默认1024 eviction 回收策略(缓存淘汰算法) LRU – 最近最少使用的:移除最长时间不被使用的对象(默认)。FIFO – 先进先出:按对象进入缓存的顺序来移除它们。SOFT – 软引用:移除基于垃圾回收器状态和软引用规则的对象。WEAK – 弱引用:更积极地移除基于垃圾收集器状态和弱引用规则的对象。 flushInterval 定时自动清空缓存间隔 自动刷新时间,单位 ms,未配置时只有调用时刷新 readOnly 是否只读 true:只读缓存;会给所有调用者返回缓存对象的相同实例。因此这些对象不能被修改。这提供了很重要的性能优势。false:读写缓存;会返回缓存对象的拷贝(通过序列化),不会共享。这会慢一些,但是安全,因此默认是 false。改为false可读写时,对象必须支持序列化。 blocking 启用阻塞缓存 通过在get/put方式中加锁,保证只有一个线程操作缓存,基于Java重入锁实现 再来看下cache标签在源码中的体现,创建cacheKey
@Override public <E> List<E> query(MappedStatement ms, Object parameterObject, RowBounds rowBounds, ResultHandler resultHandler) throws SQLException { // 获取SQL BoundSql boundSql = ms.getBoundSql(parameterObject); // 创建CacheKey:什么样的SQL是同一条SQL? >> CacheKey key = createCacheKey(ms, parameterObject, rowBounds, boundSql); return query(ms, parameterObject, rowBounds, resultHandler, key, boundSql); }- 1
- 2
- 3
- 4
- 5
- 6
- 7
- 8
createCacheKey自行进去查看


而这看到的和我们前面在缓存初始化时看到的 cache 标签解析操作是对应上的。所以我们要开启二级缓存两个条件都要满足。


这样的设置表示当前的映射文件中的相关查询操作都会触发二级缓存,但如果某些个别方法我们不希望走二级缓存怎么办呢?我们可以在标签中添加一个 useCache=false 来实现的设置不使用二级缓存

还有就是当我们执行的对应的DML操作,在MyBatis中会清空对应的二级缓存和一级缓存。
private void flushCacheIfRequired(MappedStatement ms) { Cache cache = ms.getCache(); // 增删改查的标签上有属性:flushCache="true" (select语句默认是false) // 一级二级缓存都会被清理 if (cache != null && ms.isFlushCacheRequired()) { tcm.clear(cache); } }- 1
- 2
- 3
- 4
- 5
- 6
- 7
- 8
在解析映射文件的时候DML操作flushCacheRequired为true

二、日志模块
首先日志在我们开发过程中占据了一个非常重要的地位,是开发和运维管理之间的桥梁,在Java中的日志框架也非常多,Log4j,Log4j2,Apache Commons Log,java.util.logging,slf4j等,这些工具对外的接口也都不尽相同,为了统一这些工具,MyBatis定义了一套统一的日志接口供上层使用。首先大家对于适配器模式要了解下哦。
1、Log
Log接口中定义了四种日志级别, 相比较其他的日志框架的多种日志级别显得非常的精简, 但也能够满足大多数常见的使用了- 1
- 2
- 3
public interface Log { boolean isDebugEnabled(); boolean isTraceEnabled(); void error(String s, Throwable e); void error(String s); void debug(String s); void trace(String s); void warn(String s); }- 1
- 2
- 3
- 4
- 5
- 6
- 7
- 8
- 9
- 10
- 11
- 12
- 13
- 14
- 15
- 16
- 17
2、LogFactory
LogFactory工厂类负责创建日志组件适配器,- 1

在LogFactory类加载时会执行其静态代码块,其逻辑是按序加载并实例化对应日志组件的适配器,然后使用LogFactory.logConstructor这个静态字段,记录当前使用的第三方日志组件的适配器。具体代码如下,每个方法都比较简单就不一一赘述了。
3、日志应用
那么在MyBatis系统启动的时候日志框架是如何选择的呢? 首先我们在全局配置文件中我们可以设置对应的日志类型选择- 1
- 2

这个"STDOUT_LOGGING"是怎么来的呢?在Configuration的构造方法中其实是设置的各个日志实现的别名的

然后在解析全局配置文件的时候就会处理日志的设置

进入方法private void loadCustomLogImpl(Properties props) { // 获取 logImpl设置的 日志 类型 Class<? extends Log> logImpl = resolveClass(props.getProperty("logImpl")); // 设置日志 configuration.setLogImpl(logImpl); }- 1
- 2
- 3
- 4
- 5
- 6
进入setLogImpl方法中
public void setLogImpl(Class<? extends Log> logImpl) { if (logImpl != null) { this.logImpl = logImpl; // 记录日志的类型 // 设置 适配选择 LogFactory.useCustomLogging(this.logImpl); } }- 1
- 2
- 3
- 4
- 5
- 6
- 7
再进入useCustomLogging方法
public static synchronized void useCustomLogging(Class<? extends Log> clazz) { setImplementation(clazz); }- 1
- 2
- 3
再进入
private static void setImplementation(Class<? extends Log> implClass) { try { // 获取指定适配器的构造方法 Constructor<? extends Log> candidate = implClass.getConstructor(String.class); // 实例化适配器 Log log = candidate.newInstance(LogFactory.class.getName()); if (log.isDebugEnabled()) { log.debug("Logging initialized using '" + implClass + "' adapter."); } // 初始化 logConstructor 字段 logConstructor = candidate; } catch (Throwable t) { throw new LogException("Error setting Log implementation. Cause: " + t, t); } }- 1
- 2
- 3
- 4
- 5
- 6
- 7
- 8
- 9
- 10
- 11
- 12
- 13
- 14
- 15
这就关联上了我们前面在LogFactory中看到的代码,启动测试方法看到的日志也和源码中的对应上来了,还有就是我们自己设置的会覆盖掉默认的sl4j日志框架的配置

4、JDBC 日志
当我们开启了 STDOUT的日志管理后,当我们执行SQL操作时我们发现在控制台中可以打印出相关的日志信息- 1

那这些日志信息是怎么打印出来的呢?原来在MyBatis中的日志模块中包含了一个jdbc包,它并不是将日志信息通过jdbc操作保存到数据库中,而是通过JDK动态代理的方式,将JDBC操作通过指定的日志框架打印出来。下面我们就来看看它是如何实现的。- 1
4.1 BaseJdbcLogger
BaseJdbcLogger是一个抽象类,它是jdbc包下其他Logger的父类。继承关系如下- 1

从图中我们也可以看到4个实现都实现了InvocationHandler接口。属性含义如下- 1
// 记录 PreparedStatement 接口中定义的常用的set*() 方法 protected static final Set<String> SET_METHODS; // 记录了 Statement 接口和 PreparedStatement 接口中与执行SQL语句有关的方法 protected static final Set<String> EXECUTE_METHODS = new HashSet<>(); // 记录了PreparedStatement.set*() 方法设置的键值对 private final Map<Object, Object> columnMap = new HashMap<>(); // 记录了PreparedStatement.set*() 方法设置的键 key private final List<Object> columnNames = new ArrayList<>(); // 记录了PreparedStatement.set*() 方法设置的值 Value private final List<Object> columnValues = new ArrayList<>(); protected final Log statementLog;// 用于日志输出的Log对象 protected final int queryStack; // 记录了SQL的层数,用于格式化输出SQL- 1
- 2
- 3
- 4
- 5
- 6
- 7
- 8
- 9
- 10
- 11
- 12
- 13
- 14
4.2 ConnectionLogger
ConnectionLogger的作用是记录数据库连接相关的日志信息,在实现中是创建了一个Connection的代理对象,在每次Connection操作的前后我们都可以实现日志的操作。- 1
public final class ConnectionLogger extends BaseJdbcLogger implements InvocationHandler { // 真正的Connection对象 private final Connection connection; private ConnectionLogger(Connection conn, Log statementLog, int queryStack) { super(statementLog, queryStack); this.connection = conn; } @Override public Object invoke(Object proxy, Method method, Object[] params) throws Throwable { try { // 如果是调用从Object继承过来的方法,就直接调用 toString,hashCode,equals等 if (Object.class.equals(method.getDeclaringClass())) { return method.invoke(this, params); } // 如果调用的是 prepareStatement方法 if ("prepareStatement".equals(method.getName())) { if (isDebugEnabled()) { debug(" Preparing: " + removeBreakingWhitespace((String) params[0]), true); } // 创建 PreparedStatement PreparedStatement stmt = (PreparedStatement) method.invoke(connection, params); // 然后创建 PreparedStatement 的代理对象 增强 stmt = PreparedStatementLogger.newInstance(stmt, statementLog, queryStack); return stmt; // 同上 } else if ("prepareCall".equals(method.getName())) { if (isDebugEnabled()) { debug(" Preparing: " + removeBreakingWhitespace((String) params[0]), true); } PreparedStatement stmt = (PreparedStatement) method.invoke(connection, params); stmt = PreparedStatementLogger.newInstance(stmt, statementLog, queryStack); return stmt; // 同上 } else if ("createStatement".equals(method.getName())) { Statement stmt = (Statement) method.invoke(connection, params); stmt = StatementLogger.newInstance(stmt, statementLog, queryStack); return stmt; } else { return method.invoke(connection, params); } } catch (Throwable t) { throw ExceptionUtil.unwrapThrowable(t); } } /** * Creates a logging version of a connection. * * @param conn - the original connection * @return - the connection with logging */ public static Connection newInstance(Connection conn, Log statementLog, int queryStack) { InvocationHandler handler = new ConnectionLogger(conn, statementLog, queryStack); ClassLoader cl = Connection.class.getClassLoader(); // 创建了 Connection的 代理对象 目的是 增强 Connection对象 给他添加了日志功能 return (Connection) Proxy.newProxyInstance(cl, new Class[]{Connection.class}, handler); } /** * return the wrapped connection. * * @return the connection */ public Connection getConnection() { return connection; } }- 1
- 2
- 3
- 4
- 5
- 6
- 7
- 8
- 9
- 10
- 11
- 12
- 13
- 14
- 15
- 16
- 17
- 18
- 19
- 20
- 21
- 22
- 23
- 24
- 25
- 26
- 27
- 28
- 29
- 30
- 31
- 32
- 33
- 34
- 35
- 36
- 37
- 38
- 39
- 40
- 41
- 42
- 43
- 44
- 45
- 46
- 47
- 48
- 49
- 50
- 51
- 52
- 53
- 54
- 55
- 56
- 57
- 58
- 59
- 60
- 61
- 62
- 63
- 64
- 65
- 66
- 67
- 68
- 69
- 70
- 71
- 72
其他几个xxxxLogger的实现和ConnectionLogger几乎是一样的就不在次赘述了,请自行观看。
4.3 应用实现
在实际处理的时候,日志模块是如何工作的,我们来看看。- 1
在我们要执行SQL语句前需要获取Statement对象,而Statement对象是通过Connection获取的,所以我们在SimpleExecutor中就可以看到相关的代码
private Statement prepareStatement(StatementHandler handler, Log statementLog) throws SQLException { Statement stmt; Connection connection = getConnection(statementLog); // 获取 Statement 对象 stmt = handler.prepare(connection, transaction.getTimeout()); // 为 Statement 设置参数 handler.parameterize(stmt); return stmt; }- 1
- 2
- 3
- 4
- 5
- 6
- 7
- 8
- 9
先进入如到getConnection方法中
protected Connection getConnection(Log statementLog) throws SQLException { Connection connection = transaction.getConnection(); if (statementLog.isDebugEnabled()) { // 创建Connection的日志代理对象 return ConnectionLogger.newInstance(connection, statementLog, queryStack); } else { return connection; } }- 1
- 2
- 3
- 4
- 5
- 6
- 7
- 8
- 9
在进入到handler.prepare方法中
@Override protected Statement instantiateStatement(Connection connection) throws SQLException { String sql = boundSql.getSql(); if (mappedStatement.getKeyGenerator() instanceof Jdbc3KeyGenerator) { String[] keyColumnNames = mappedStatement.getKeyColumns(); if (keyColumnNames == null) { return connection.prepareStatement(sql, PreparedStatement.RETURN_GENERATED_KEYS); } else { // 在执行 prepareStatement 方法的时候会进入进入到ConnectionLogger的invoker方法中 return connection.prepareStatement(sql, keyColumnNames); } } else if (mappedStatement.getResultSetType() == ResultSetType.DEFAULT) { return connection.prepareStatement(sql); } else { return connection.prepareStatement(sql, mappedStatement.getResultSetType().getValue(), ResultSet.CONCUR_READ_ONLY); } }- 1
- 2
- 3
- 4
- 5
- 6
- 7
- 8
- 9
- 10
- 11
- 12
- 13
- 14
- 15
- 16
- 17

在执行sql语句的时候@Override public <E> List<E> query(Statement statement, ResultHandler resultHandler) throws SQLException { PreparedStatement ps = (PreparedStatement) statement; // 到了JDBC的流程 ps.execute(); // 本质上 ps 也是 日志代理对象 // 处理结果集 return resultSetHandler.handleResultSets(ps); }- 1
- 2
- 3
- 4
- 5
- 6
- 7
- 8
如果是查询操作,后面的ResultSet结果集操作,其他是也通过ResultSetLogger来处理的,前面的清楚了,后面的就很容易的。
三、反射模块

https://www.processon.com/view/link/62ea3de3637689072efdd2581.反射模块
MyBatis在进行参数处理、结果集映射等操作时会使用到大量的反射操作,Java中的反射功能虽然强大,但是代码编写起来比较复杂且容易出错,为了简化反射操作的相关代码,MyBatis提供了专门的反射模块,该模块位于org.apache.ibatis.reflection包下,它对常见的反射操作做了进一步的封装,提供了更加简洁方便的反射API。

1.1 Reflector
Reflector是反射模块的基础,每个Reflector对象都对应一个类,在Reflector中缓存了反射需要使用的类的元信息
1.1.1 属性
首先来看下Reflector中提供的相关属性的含义
// 对应的Class 类型 private final Class<?> type; // 可读属性的名称集合 可读属性就是存在 getter方法的属性,初始值为null private final String[] readablePropertyNames; // 可写属性的名称集合 可写属性就是存在 setter方法的属性,初始值为null private final String[] writablePropertyNames; // 记录了属性相应的setter方法,key是属性名称,value是Invoker方法 // 他是对setter方法对应Method对象的封装 private final Map<String, Invoker> setMethods = new HashMap<>(); // 属性相应的getter方法 private final Map<String, Invoker> getMethods = new HashMap<>(); // 记录了相应setter方法的参数类型,key是属性名称 value是setter方法的参数类型 private final Map<String, Class<?>> setTypes = new HashMap<>(); // 和上面的对应 private final Map<String, Class<?>> getTypes = new HashMap<>(); // 记录了默认的构造方法 private Constructor<?> defaultConstructor; // 记录了所有属性名称的集合 private Map<String, String> caseInsensitivePropertyMap = new HashMap<>();- 1
- 2
- 3
- 4
- 5
- 6
- 7
- 8
- 9
- 10
- 11
- 12
- 13
- 14
- 15
- 16
- 17
- 18
- 19
- 20
1.1.2 构造方法
在Reflector的构造器中会完成相关的属性的初始化操作
// 解析指定的Class类型 并填充上述的集合信息 public Reflector(Class<?> clazz) { type = clazz; // 初始化 type字段 addDefaultConstructor(clazz);// 设置默认的构造方法 addGetMethods(clazz);// 获取getter方法 addSetMethods(clazz); // 获取setter方法 addFields(clazz); // 处理没有getter/setter方法的字段 // 初始化 可读属性名称集合 readablePropertyNames = getMethods.keySet().toArray(new String[0]); // 初始化 可写属性名称集合 writablePropertyNames = setMethods.keySet().toArray(new String[0]); // caseInsensitivePropertyMap记录了所有的可读和可写属性的名称 也就是记录了所有的属性名称 for (String propName : readablePropertyNames) { // 属性名称转大写 caseInsensitivePropertyMap.put(propName.toUpperCase(Locale.ENGLISH), propName); } for (String propName : writablePropertyNames) { // 属性名称转大写 caseInsensitivePropertyMap.put(propName.toUpperCase(Locale.ENGLISH), propName); } }- 1
- 2
- 3
- 4
- 5
- 6
- 7
- 8
- 9
- 10
- 11
- 12
- 13
- 14
- 15
- 16
- 17
- 18
- 19
- 20
- 21
反射我们也可以在项目中我们直接拿来使用,定义一个普通的Bean对象。
/** * 反射工具箱 * 测试用例 */ public class Person { private Integer id; private String name; public Person(Integer id) { this.id = id; } public Person(Integer id, String name) { this.id = id; this.name = name; } }- 1
- 2
- 3
- 4
- 5
- 6
- 7
- 8
- 9
- 10
- 11
- 12
- 13
- 14
- 15
- 16
- 17
- 18
- 19
1.1.3 公共的API方法
然后我们可以看看Reflector中提供的公共的API方法
方法名称 作用 getType 获取Reflector表示的Class getDefaultConstructor 获取默认的构造器 hasDefaultConstructor 判断是否有默认的构造器 getSetInvoker 根据属性名称获取对应的Invoker 对象 getGetInvoker 根据属性名称获取对应的Invoker对象 getSetterType 获取属性对应的类型 比如:
String name; // getSetterType(“name”) --> java.lang.StringgetGetterType 与上面是对应的 getGetablePropertyNames 获取所有的可读属性名称的集合 getSetablePropertyNames 获取所有的可写属性名称的集合 hasSetter 判断是否具有某个可写的属性 hasGetter 判断是否具有某个可读的属性 findPropertyName 根据名称查找属性 了解了Reflector对象的基本信息后我们需要如何来获取Reflector对象呢?在MyBatis中给我们提供了一个ReflectorFactory工厂对象。所以我们先来简单了解下ReflectorFactory对象,当然你也可以直接new 出来,像上面的案例一样,
1.2 ReflectorFactory
ReflectorFactory接口主要实现了对Reflector对象的创建和缓存。
1.2.1 ReflectorFactory接口的定义
接口的定义如下
public interface ReflectorFactory { // 检测该ReflectorFactory是否缓存了Reflector对象 boolean isClassCacheEnabled(); // 设置是否缓存Reflector对象 void setClassCacheEnabled(boolean classCacheEnabled); // 创建指定了Class的Reflector对象 Reflector findForClass(Class<?> type); }- 1
- 2
- 3
- 4
- 5
- 6
- 7
- 8
然后我们来看看它的具体实现
1.2.2 DefaultReflectorFactory
MyBatis只为该接口提供了DefaultReflectorFactory这一个实现类。他与Reflector的关系如下:

DefaultReflectorFactory中的实现,代码比较简单,我们直接贴出来public class DefaultReflectorFactory implements ReflectorFactory { private boolean classCacheEnabled = true; // 实现对 Reflector 对象的缓存 private final ConcurrentMap<Class<?>, Reflector> reflectorMap = new ConcurrentHashMap<>(); public DefaultReflectorFactory() { } @Override public boolean isClassCacheEnabled() { return classCacheEnabled; } @Override public void setClassCacheEnabled(boolean classCacheEnabled) { this.classCacheEnabled = classCacheEnabled; } @Override public Reflector findForClass(Class<?> type) { if (classCacheEnabled) {// 开启缓存 // synchronized (type) removed see issue #461 return reflectorMap.computeIfAbsent(type, Reflector::new); } else { // 没有开启缓存就直接创建 return new Reflector(type); } } }- 1
- 2
- 3
- 4
- 5
- 6
- 7
- 8
- 9
- 10
- 11
- 12
- 13
- 14
- 15
- 16
- 17
- 18
- 19
- 20
- 21
- 22
- 23
- 24
- 25
- 26
- 27
- 28
- 29
1.2.3 使用演示
通过上面的介绍,我们可以具体的来使用下,加深对其的理解,先准备一个JavaBean,
package com.boge.domain; public class Student { public Integer getId() { return 6; } public void setId(Integer id) { System.out.println(id); } public String getUserName() { return "张三"; } }- 1
- 2
- 3
- 4
- 5
- 6
- 7
- 8
- 9
- 10
- 11
- 12
- 13
- 14
- 15
- 16
这个Bean我们做了简单的处理
@Test public void test02() throws Exception{ ReflectorFactory factory = new DefaultReflectorFactory(); Reflector reflector = factory.findForClass(Student.class); System.out.println("可读属性:"+Arrays.toString(reflector.getGetablePropertyNames())); System.out.println("可写属性:"+Arrays.toString(reflector.getSetablePropertyNames())); System.out.println("是否具有默认的构造器:" + reflector.hasDefaultConstructor()); System.out.println("Reflector对应的Class:" + reflector.getType()); }- 1
- 2
- 3
- 4
- 5
- 6
- 7
- 8
- 9
1.3 Invoker
针对于Class中Field和Method的调用,在MyBatis中封装了Invoker对象来统一处理(有使用到适配器模式)
1.3.1 接口说明
/** * @author Clinton Begin */ public interface Invoker { // 执行Field或者Method Object invoke(Object target, Object[] args) throws IllegalAccessException, InvocationTargetException; // 返回属性相应的类型 Class<?> getType(); }- 1
- 2
- 3
- 4
- 5
- 6
- 7
- 8
- 9
- 10
该接口有对应的三个实现

1.3.2 效果演示
使用效果演示,还是通过上面的案例来介绍
package com.boge.domain; public class Student { public Integer getId() { System.out.println("读取id"); return 6; } public void setId(Integer id) { System.out.println("写入id:"+id); } public String getUserName() { return "张三"; } }- 1
- 2
- 3
- 4
- 5
- 6
- 7
- 8
- 9
- 10
- 11
- 12
- 13
- 14
- 15
- 16
- 17
- 18
- 19
测试代码
public void test03() throws Exception{ ReflectorFactory factory = new DefaultReflectorFactory(); Reflector reflector = factory.findForClass(Student.class); // 获取构造器 生成对应的对象 Object o = reflector.getDefaultConstructor().newInstance(); MethodInvoker invoker1 = (MethodInvoker) reflector.getSetInvoker("id"); invoker1.invoke(o,new Object[]{999}); // 读取 Invoker invoker2 = reflector.getGetInvoker("id"); invoker2.invoke(o,null); }- 1
- 2
- 3
- 4
- 5
- 6
- 7
- 8
- 9
- 10
- 11
1.4 MetaClass
在Reflector中可以针对普通的属性操作,但是如果出现了比较复杂的属性,比如 private Person person; 这种,我们要查找的表达式 person.userName.针对这种表达式的处理,这时就可以通过MetaClass来处理了。我们来看看主要的属性和构造方法
/** * 通过 Reflector 和 ReflectorFactory 的组合使用 实现对复杂的属性表达式的解析 * @author Clinton Begin */ public class MetaClass { // 缓存 Reflector private final ReflectorFactory reflectorFactory; // 创建 MetaClass时 会指定一个Class reflector会记录该类的相关信息 private final Reflector reflector; private MetaClass(Class<?> type, ReflectorFactory reflectorFactory) { this.reflectorFactory = reflectorFactory; this.reflector = reflectorFactory.findForClass(type); } // .... }- 1
- 2
- 3
- 4
- 5
- 6
- 7
- 8
- 9
- 10
- 11
- 12
- 13
- 14
- 15
- 16
效果演示,准备Bean对象
package com.boge.domain; import java.util.ArrayList; import java.util.HashMap; import java.util.List; import java.util.Map; public class RichType { private RichType richType; private String richField; private String richProperty; private Map richMap = new HashMap(); private List richList = new ArrayList() { { add("bar"); } }; public RichType getRichType() { return richType; } public void setRichType(RichType richType) { this.richType = richType; } public String getRichProperty() { return richProperty; } public void setRichProperty(String richProperty) { this.richProperty = richProperty; } public List getRichList() { return richList; } public void setRichList(List richList) { this.richList = richList; } public Map getRichMap() { return richMap; } public void setRichMap(Map richMap) { this.richMap = richMap; } }- 1
- 2
- 3
- 4
- 5
- 6
- 7
- 8
- 9
- 10
- 11
- 12
- 13
- 14
- 15
- 16
- 17
- 18
- 19
- 20
- 21
- 22
- 23
- 24
- 25
- 26
- 27
- 28
- 29
- 30
- 31
- 32
- 33
- 34
- 35
- 36
- 37
- 38
- 39
- 40
- 41
- 42
- 43
- 44
- 45
- 46
- 47
- 48
- 49
- 50
- 51
- 52
- 53
- 54
- 55
测试代码
@Test public void test7(){ ReflectorFactory reflectorFactory = new DefaultReflectorFactory(); MetaClass meta = MetaClass.forClass(RichType.class, reflectorFactory); System.out.println(meta.hasGetter("richField")); System.out.println(meta.hasGetter("richProperty")); System.out.println(meta.hasGetter("richList")); System.out.println(meta.hasGetter("richMap")); System.out.println(meta.hasGetter("richList[0]")); System.out.println(meta.hasGetter("richType")); System.out.println(meta.hasGetter("richType.richField")); System.out.println(meta.hasGetter("richType.richProperty")); System.out.println(meta.hasGetter("richType.richList")); System.out.println(meta.hasGetter("richType.richMap")); System.out.println(meta.hasGetter("richType.richList[0]")); // findProperty 只能处理 . 的表达式 System.out.println(meta.findProperty("richType.richProperty")); System.out.println(meta.findProperty("richType.richProperty1")); System.out.println(meta.findProperty("richList[0]")); System.out.println(Arrays.toString(meta.getGetterNames())); }- 1
- 2
- 3
- 4
- 5
- 6
- 7
- 8
- 9
- 10
- 11
- 12
- 13
- 14
- 15
- 16
- 17
- 18
- 19
- 20
- 21
- 22
- 23
输出结果
true true true true true true true true true true true richType.richProperty richType. null [richType, richProperty, richMap, richList, richField]- 1
- 2
- 3
- 4
- 5
- 6
- 7
- 8
- 9
- 10
- 11
- 12
- 13
- 14
- 15
1.5 MetaObject
我们可以通过MetaObject对象解析复杂的表达式来对提供的对象进行操作。具体的通过案例来演示会更直观些
@Test public void shouldGetAndSetField() { RichType rich = new RichType(); MetaObject meta = SystemMetaObject.forObject(rich); meta.setValue("richField", "foo"); System.out.println(meta.getValue("richField")); } @Test public void shouldGetAndSetNestedField() { RichType rich = new RichType(); MetaObject meta = SystemMetaObject.forObject(rich); meta.setValue("richType.richField", "foo"); System.out.println(meta.getValue("richType.richField")); } @Test public void shouldGetAndSetMapPairUsingArraySyntax() { RichType rich = new RichType(); MetaObject meta = SystemMetaObject.forObject(rich); meta.setValue("richMap[key]", "foo"); System.out.println(meta.getValue("richMap[key]")); }- 1
- 2
- 3
- 4
- 5
- 6
- 7
- 8
- 9
- 10
- 11
- 12
- 13
- 14
- 15
- 16
- 17
- 18
- 19
- 20
- 21
- 22
- 23
以上三个方法的输出结果都是
foo- 1
1.6 反射模块应用
然后我们来看下在MyBatis的核心处理层中的实际应用
1.6.1 SqlSessionFactory
在创建SqlSessionFactory操作的时候会完成Configuration对象的创建,而在Configuration中默认定义的ReflectorFactory的实现就是DefaultReflectorFactory对象

然后在解析全局配置文件的代码中,给用户提供了ReflectorFactory的扩展,也就是我们在全局配置文件中可以通过
reflectorFactory标签来使用我们自定义的ReflectorFactory1.6.2 SqlSession
无相关操作
1.6.3 Mapper
无相关操作
1.6.4 执行SQL
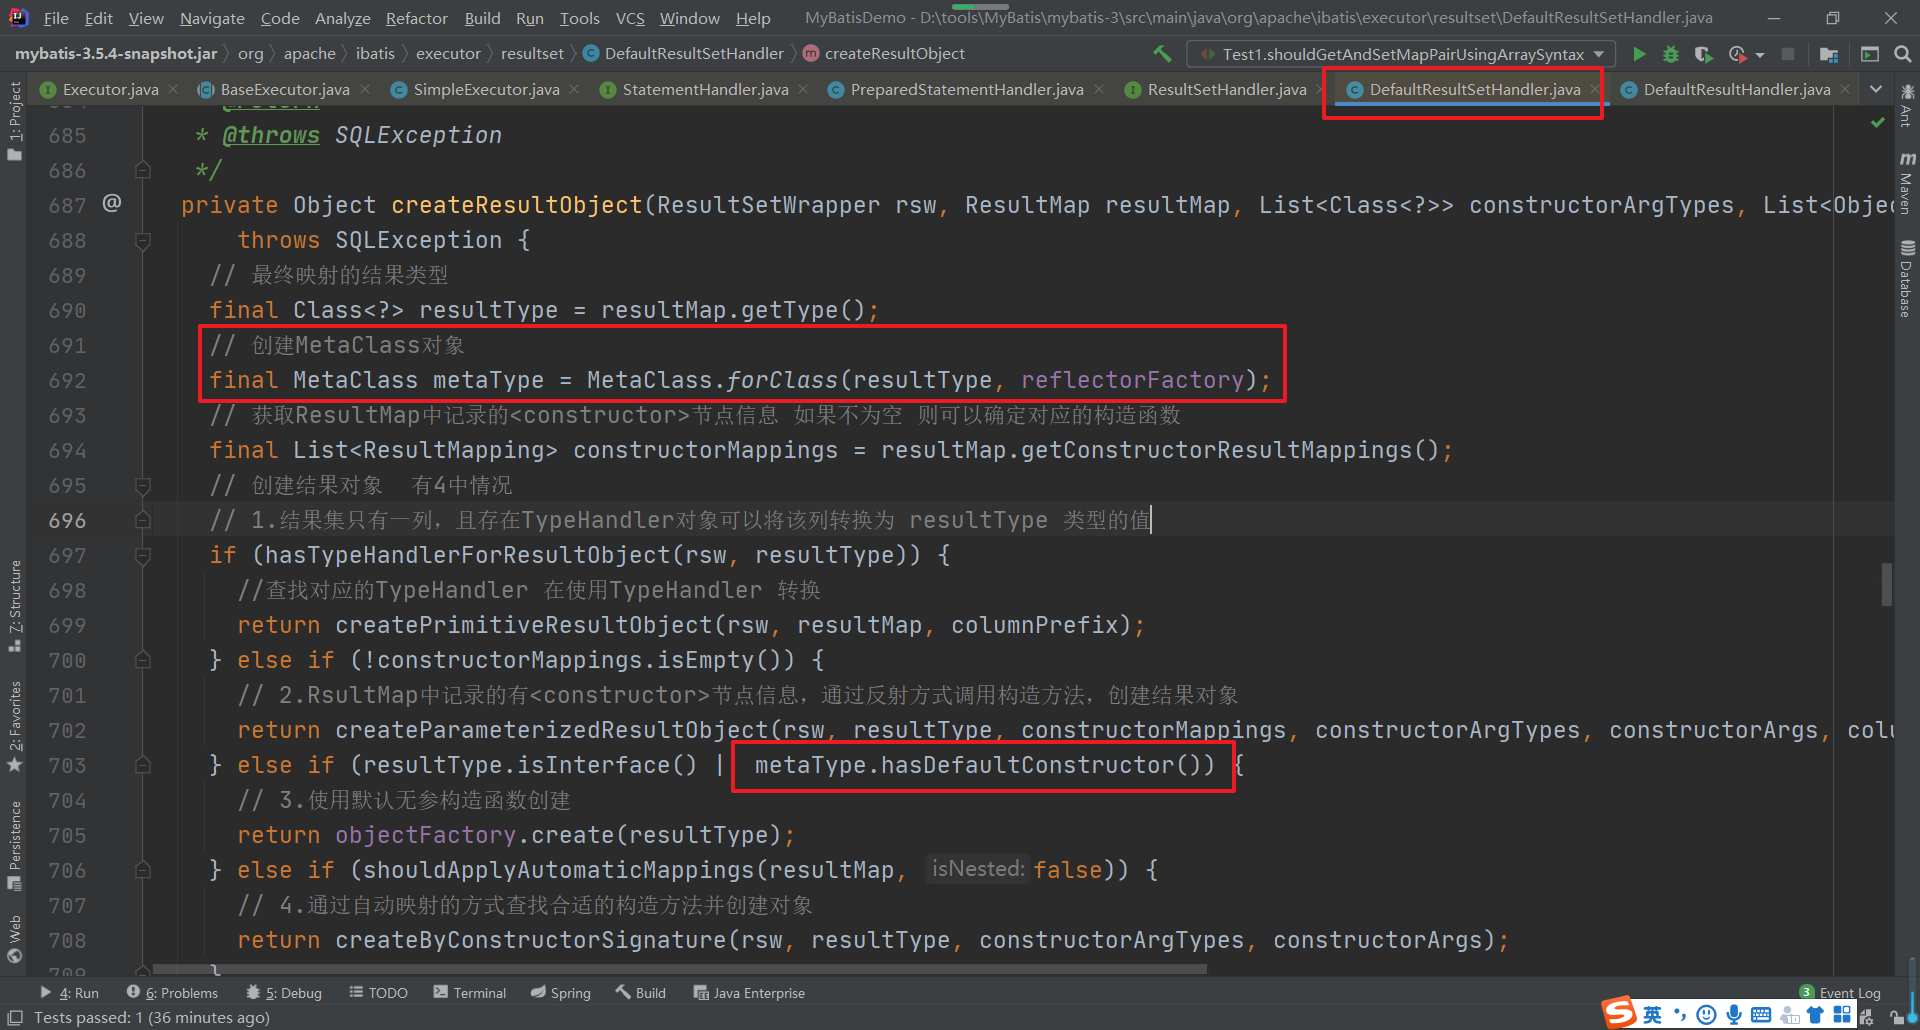
在Statement获取结果集后,在做结果集映射的使用有使用到,在DefaultResultSetHandler的createResultObject方法中。
然后在DefaultResultSetHandler的getRowValue方法中在做自动映射的时候

继续跟踪,在createAutomaticMappings方法中

四、类型转换模块
1.类型转换模块
String sql = "SELECT id,user_name,real_name,password,age,d_id from t_user where id = ? and user_name = ?"; ps = conn.prepareStatement(sql); ps.setInt(1,2); ps.setString(2,"张三");- 1
- 2
- 3
- 4
MyBatis是一个持久层框架ORM框架,实现数据库中数据和Java对象中的属性的双向映射,那么不可避免的就会碰到类型转换的问题,在PreparedStatement为SQL语句绑定参数时,需要从Java类型转换为JDBC类型,而从结果集中获取数据时,则需要从JDBC类型转换为Java类型,所以我们来看下在MyBatis中是如何实现类型的转换的。

1.1 TypeHandler
MyBatis中的所有的类型转换器都继承了TypeHandler接口,在TypeHandler中定义了类型转换器的最基本的功能。
/** * @author Clinton Begin */ public interface TypeHandler<T> { /** * 负责将Java类型转换为JDBC的类型 * 本质上执行的就是JDBC操作中的 如下操作 * String sql = "SELECT id,user_name,real_name,password,age,d_id from t_user where id = ? and user_name = ?"; * ps = conn.prepareStatement(sql); * ps.setInt(1,2); * ps.setString(2,"张三"); * @param ps * @param i 对应占位符的 位置 * @param parameter 占位符对应的值 * @param jdbcType 对应的 jdbcType 类型 * @throws SQLException */ void setParameter(PreparedStatement ps, int i, T parameter, JdbcType jdbcType) throws SQLException; /** * 从ResultSet中获取数据时会调用此方法,会将数据由JdbcType转换为Java类型 * @param columnName Colunm name, when configurationuseColumnLabelisfalse*/ T getResult(ResultSet rs, String columnName) throws SQLException; T getResult(ResultSet rs, int columnIndex) throws SQLException; T getResult(CallableStatement cs, int columnIndex) throws SQLException; }- 1
- 2
- 3
- 4
- 5
- 6
- 7
- 8
- 9
- 10
- 11
- 12
- 13
- 14
- 15
- 16
- 17
- 18
- 19
- 20
- 21
- 22
- 23
- 24
- 25
- 26
- 27
- 28
- 29
- 30
- 31
- 32
1.2 BaseTypeHandler
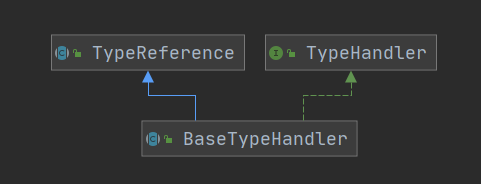
为了方便用户自定义TypeHandler的实现,在MyBatis中提供了BaseTypeHandler这个抽象类,它实现了TypeHandler接口,并继承了TypeReference类,
在BaseTypeHandler中的实现方法中实现了对null的处理,非空的处理是交给各个子类去实现的。这个在代码中很清楚的体现了出来
1.3 TypeHandler实现类
TypeHandler的实现类比较多,而且实现也都比较简单。

以Integer为例
/** * @author Clinton Begin */ public class IntegerTypeHandler extends BaseTypeHandler<Integer> { @Override public void setNonNullParameter(PreparedStatement ps, int i, Integer parameter, JdbcType jdbcType) throws SQLException { ps.setInt(i, parameter); // 实现参数的绑定 } @Override public Integer getNullableResult(ResultSet rs, String columnName) throws SQLException { int result = rs.getInt(columnName); // 获取指定列的值 return result == 0 && rs.wasNull() ? null : result; } @Override public Integer getNullableResult(ResultSet rs, int columnIndex) throws SQLException { int result = rs.getInt(columnIndex); // 获取指定列的值 return result == 0 && rs.wasNull() ? null : result; } @Override public Integer getNullableResult(CallableStatement cs, int columnIndex) throws SQLException { int result = cs.getInt(columnIndex); // 获取指定列的值 return result == 0 && cs.wasNull() ? null : result; } }- 1
- 2
- 3
- 4
- 5
- 6
- 7
- 8
- 9
- 10
- 11
- 12
- 13
- 14
- 15
- 16
- 17
- 18
- 19
- 20
- 21
- 22
- 23
- 24
- 25
- 26
- 27
- 28
- 29
- 30
- 31
- 32
1.4 TypeHandlerRegistry
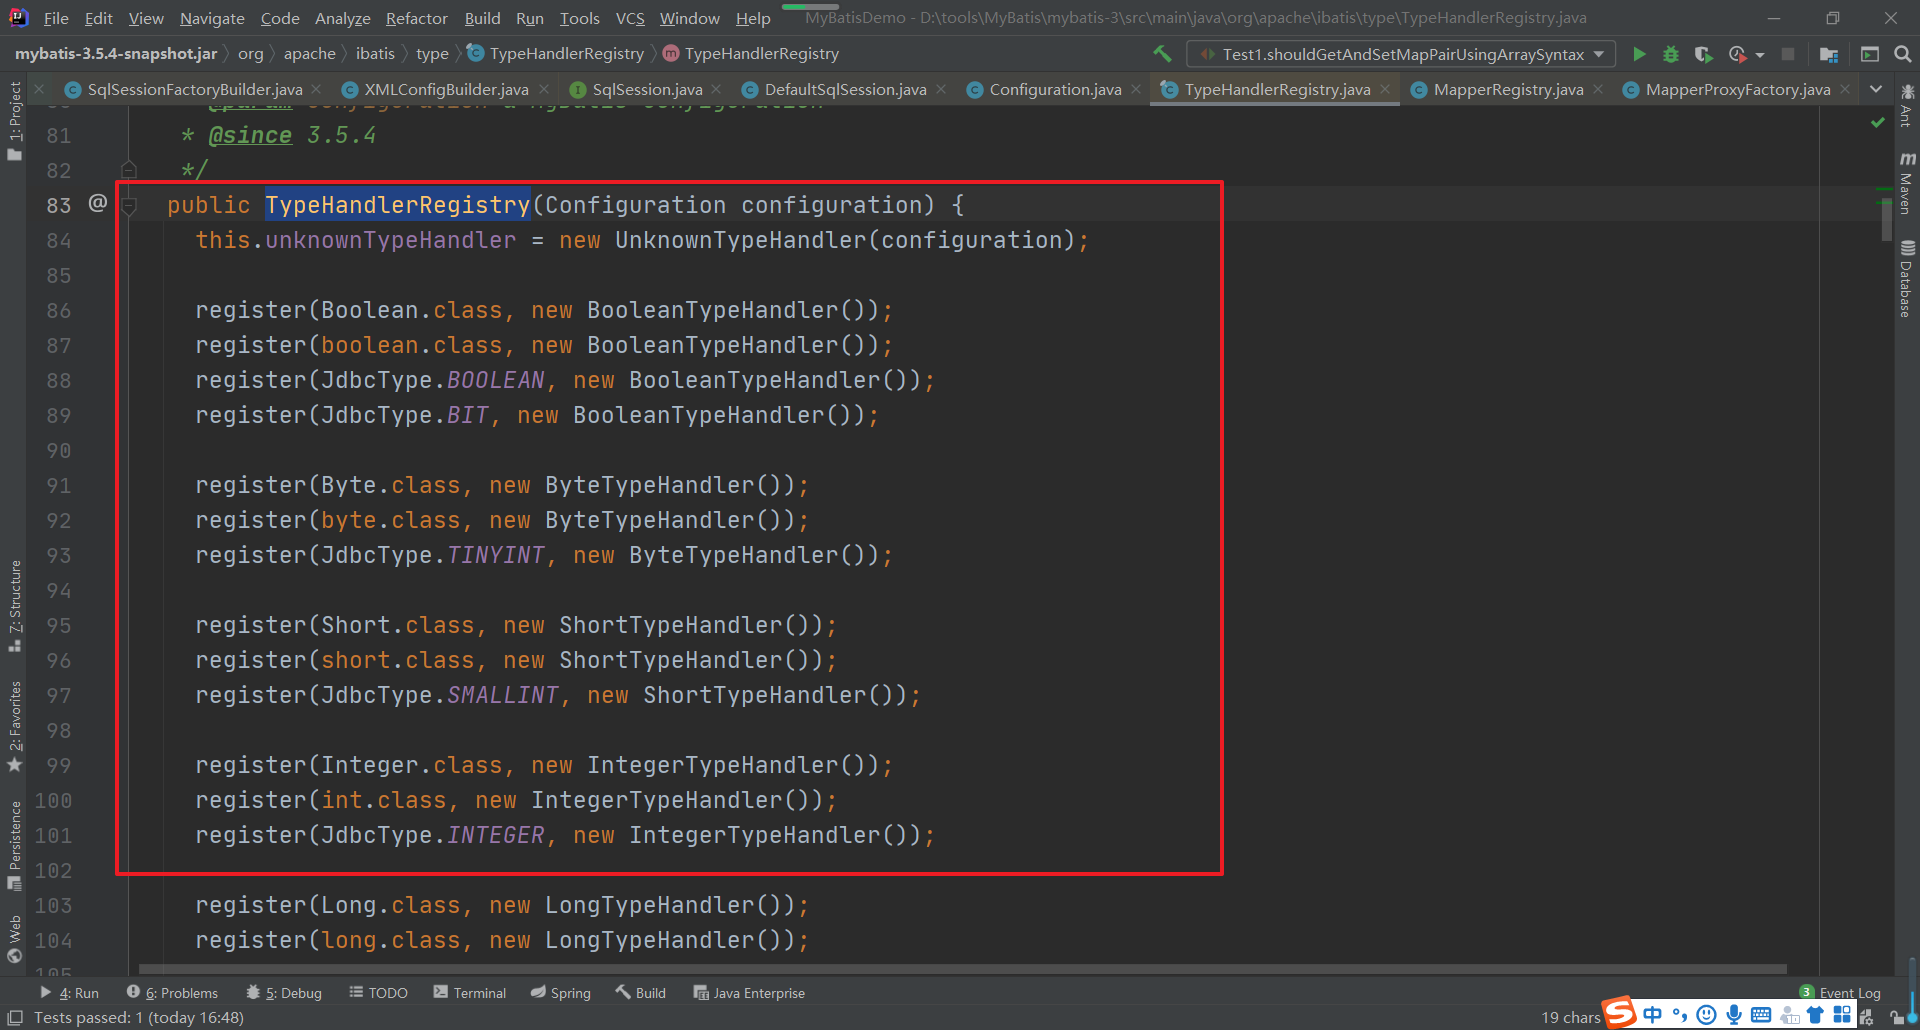
通过前面的介绍我们发现在MyBatis中给我们提供的具体的类型转换器实在是太多了,那么在实际的使用时我们是如何知道使用哪个转换器类处理的呢?实际上再MyBatis中是将所有的TypeHandler都保存注册在了TypeHandlerRegistry中的。首先注意声明的相关属性
// 记录JdbcType和TypeHandle的对应关系 private final Map<JdbcType, TypeHandler<?>> jdbcTypeHandlerMap = new EnumMap<>(JdbcType.class); // 记录Java类型向指定的JdbcType转换时需要使用到的TypeHandle private final Map<Type, Map<JdbcType, TypeHandler<?>>> typeHandlerMap = new ConcurrentHashMap<>(); private final TypeHandler<Object> unknownTypeHandler; // 记录全部的TypeHandle类型及对应的TypeHandle对象 private final Map<Class<?>, TypeHandler<?>> allTypeHandlersMap = new HashMap<>(); // 空TypeHandle的标识 private static final Map<JdbcType, TypeHandler<?>> NULL_TYPE_HANDLER_MAP = Collections.emptyMap();- 1
- 2
- 3
- 4
- 5
- 6
- 7
- 8
- 9
- 10
然后在器构造方法中完成了系统提供的TypeHandler的注册

代码太长,请自行查阅。注意的是register()方法, 关键几个实现如下
private <T> void register(Type javaType, TypeHandler<? extends T> typeHandler) { // 获取@MappedJdbcTypes注解 MappedJdbcTypes mappedJdbcTypes = typeHandler.getClass().getAnnotation(MappedJdbcTypes.class); if (mappedJdbcTypes != null) { // 遍历获取注解中指定的 JdbcType 类型 for (JdbcType handledJdbcType : mappedJdbcTypes.value()) { // 调用下一个重载的方法 register(javaType, handledJdbcType, typeHandler); } if (mappedJdbcTypes.includeNullJdbcType()) { // JdbcType类型为空的情况 register(javaType, null, typeHandler); } } else { register(javaType, null, typeHandler); } } private void register(Type javaType, JdbcType jdbcType, TypeHandler<?> handler) { if (javaType != null) {// 如果不为空 // 从 TypeHandle集合中根据Java类型来获取对应的集合 Map<JdbcType, TypeHandler<?>> map = typeHandlerMap.get(javaType); if (map == null || map == NULL_TYPE_HANDLER_MAP) { // 如果没有就创建一个新的 map = new HashMap<>(); } // 把对应的jdbc类型和处理器添加到map集合中 map.put(jdbcType, handler); // 然后将 java类型和上面的map集合保存到TypeHandle的容器中 typeHandlerMap.put(javaType, map); } // 同时也把这个处理器添加到了 保存有所有处理器的容器中 allTypeHandlersMap.put(handler.getClass(), handler); }- 1
- 2
- 3
- 4
- 5
- 6
- 7
- 8
- 9
- 10
- 11
- 12
- 13
- 14
- 15
- 16
- 17
- 18
- 19
- 20
- 21
- 22
- 23
- 24
- 25
- 26
- 27
- 28
- 29
- 30
- 31
- 32
- 33
- 34
有注册的方法,当然也有从注册器中获取TypeHandler的方法,getTypeHandler方法,这个方法也有多个重载的方法,这里重载的方法最终都会执行的方法是
/** * 根据对应的Java类型和Jdbc类型来查找对应的TypeHandle */ private <T> TypeHandler<T> getTypeHandler(Type type, JdbcType jdbcType) { if (ParamMap.class.equals(type)) { return null; } // 根据Java类型获取对应的 Jdbc类型和TypeHandle的集合容器 Map<JdbcType, TypeHandler<?>> jdbcHandlerMap = getJdbcHandlerMap(type); TypeHandler<?> handler = null; if (jdbcHandlerMap != null) { // 根据Jdbc类型获取对应的 处理器 handler = jdbcHandlerMap.get(jdbcType); if (handler == null) { // 获取null对应的处理器 handler = jdbcHandlerMap.get(null); } if (handler == null) { // #591 handler = pickSoleHandler(jdbcHandlerMap); } } // type drives generics here return (TypeHandler<T>) handler; }- 1
- 2
- 3
- 4
- 5
- 6
- 7
- 8
- 9
- 10
- 11
- 12
- 13
- 14
- 15
- 16
- 17
- 18
- 19
- 20
- 21
- 22
- 23
- 24
- 25
- 26
当然除了使用系统提供的TypeHandler以外,我们还可以创建我们自己的TypeHandler了,之前讲解案例的时候已经带大家写过了,如果忘记可以复习下。
1.5 TypeAliasRegistry
我们在MyBatis的应用的时候会经常用到别名,这能大大简化我们的代码,其实在MyBatis中是通过TypeAliasRegistry类管理的。首先在构造方法中会注入系统常见类型的别名

注册的方法逻辑也比较简单
public void registerAlias(String alias, Class<?> value) { if (alias == null) { throw new TypeException("The parameter alias cannot be null"); } // issue #748 别名统一转换为小写 String key = alias.toLowerCase(Locale.ENGLISH); // 检测别名是否存在 if (typeAliases.containsKey(key) && typeAliases.get(key) != null && !typeAliases.get(key).equals(value)) { throw new TypeException("The alias '" + alias + "' is already mapped to the value '" + typeAliases.get(key).getName() + "'."); } // 将 别名 和 类型 添加到 Map 集合中 typeAliases.put(key, value); }- 1
- 2
- 3
- 4
- 5
- 6
- 7
- 8
- 9
- 10
- 11
- 12
- 13
那么我们在实际使用时通过package指定别名路径和通过@Alisa注解来指定别名的操作是如何实现的呢?也在TypeAliasRegistry中有实现
/** * 根据 packagename 来指定 * @param packageName * @param superType */ public void registerAliases(String packageName, Class<?> superType) { ResolverUtil<Class<?>> resolverUtil = new ResolverUtil<>(); resolverUtil.find(new ResolverUtil.IsA(superType), packageName); Set<Class<? extends Class<?>>> typeSet = resolverUtil.getClasses(); for (Class<?> type : typeSet) { // Ignore inner classes and interfaces (including package-info.java) // Skip also inner classes. See issue #6 if (!type.isAnonymousClass() && !type.isInterface() && !type.isMemberClass()) { registerAlias(type); } } } /** * 扫描 @Alias注解 * @param type */ public void registerAlias(Class<?> type) { String alias = type.getSimpleName(); // 扫描 @Alias注解 Alias aliasAnnotation = type.getAnnotation(Alias.class); if (aliasAnnotation != null) { // 获取注解中定义的别名名称 alias = aliasAnnotation.value(); } registerAlias(alias, type); }- 1
- 2
- 3
- 4
- 5
- 6
- 7
- 8
- 9
- 10
- 11
- 12
- 13
- 14
- 15
- 16
- 17
- 18
- 19
- 20
- 21
- 22
- 23
- 24
- 25
- 26
- 27
- 28
- 29
- 30
- 31
1.6 TypeHandler的应用
1.6.1 SqlSessionFactory
在构建SqlSessionFactory时,在Configuration对象实例化的时候在成员变量中完成了TypeHandlerRegistry和TypeAliasRegistry的实例化

在TypeHandlerRegistry的构造方法中完成了常用类型的TypeHandler的注册
在TypeAliasRegistry中完成了常用Java类型别名的注册

在Configuration的构造方法中会为各种常用的类型向TypeAliasRegistry中注册类型别名数据

以上步骤完成了TypeHandlerRegistry和TypeAliasRegistry的初始化操作
然后在解析全局配置文件时会通过解析
标签和 标签,可以注册我们添加的别名和TypeHandler。 
具体解析的两个方法很简单,大家打开源码查看一下就清楚了。
因为我们在全局配置文件中指定了对应的别名,那么我们在映射文件中就可以简写我们的类型了,这样在解析映射文件时,我们同样也是需要做别名的处理的。在XMLStatementBuilder中

这个parameterType就可以是我们定义的别名,然后在 resolveClass中就会做对应的处理
protected <T> Class<? extends T> resolveClass(String alias) { if (alias == null) { return null; } try { return resolveAlias(alias); // 别名处理 } catch (Exception e) { throw new BuilderException("Error resolving class. Cause: " + e, e); } } protected <T> Class<? extends T> resolveAlias(String alias) { return typeAliasRegistry.resolveAlias(alias); // 根据别名查找真实的类型 }- 1
- 2
- 3
- 4
- 5
- 6
- 7
- 8
- 9
- 10
- 11
- 12
- 13
- 14
1.6.2 执行SQL语句
TypeHandler类型处理器使用比较多的地方应该是在给SQL语句中参数绑定值和查询结果和对象中属性映射的地方用到的比较多,
我们首先进入DefaultParameterHandler中看看参数是如何处理的
/** * 为 SQL 语句中的 ? 占位符 绑定实参 */ @Override public void setParameters(PreparedStatement ps) { ErrorContext.instance().activity("setting parameters").object(mappedStatement.getParameterMap().getId()); // 取出SQL中的参数映射列表 List<ParameterMapping> parameterMappings = boundSql.getParameterMappings(); // 获取对应的占位符 if (parameterMappings != null) { for (int i = 0; i < parameterMappings.size(); i++) { ParameterMapping parameterMapping = parameterMappings.get(i); if (parameterMapping.getMode() != ParameterMode.OUT) { // 过滤掉存储过程中的 输出参数 Object value; String propertyName = parameterMapping.getProperty(); if (boundSql.hasAdditionalParameter(propertyName)) { // issue #448 ask first for additional params value = boundSql.getAdditionalParameter(propertyName); } else if (parameterObject == null) { value = null; } else if (typeHandlerRegistry.hasTypeHandler(parameterObject.getClass())) { // value = parameterObject; } else { MetaObject metaObject = configuration.newMetaObject(parameterObject); value = metaObject.getValue(propertyName); } // 获取 参数类型 对应的 类型处理器 TypeHandler typeHandler = parameterMapping.getTypeHandler(); JdbcType jdbcType = parameterMapping.getJdbcType(); if (value == null && jdbcType == null) { jdbcType = configuration.getJdbcTypeForNull(); } try { // 通过TypeHandler 处理参数 typeHandler.setParameter(ps, i + 1, value, jdbcType); } catch (TypeException | SQLException e) { throw new TypeException("Could not set parameters for mapping: " + parameterMapping + ". Cause: " + e, e); } } } } }- 1
- 2
- 3
- 4
- 5
- 6
- 7
- 8
- 9
- 10
- 11
- 12
- 13
- 14
- 15
- 16
- 17
- 18
- 19
- 20
- 21
- 22
- 23
- 24
- 25
- 26
- 27
- 28
- 29
- 30
- 31
- 32
- 33
- 34
- 35
- 36
- 37
- 38
- 39
- 40
然后进入到DefaultResultSetHandler中的getRowValue方法中

然后再进入applyAutomaticMappings方法中查看

根据对应的TypeHandler返回对应类型的值。
五、MyBatis插件
插件是一种常见的扩展方式,大多数开源框架也都支持用户通过添加自定义插件的方式来扩展或者改变原有的功能,MyBatis中也提供的有插件,虽然叫插件,但是实际上是通过拦截器(Interceptor)实现的,在MyBatis的插件模块中涉及到责任链模式和JDK动态代理,这两种设计模式的技术知识也是大家要提前掌握的。- 1
1. 自定义插件
首先我们来看下一个自定义的插件我们要如何来实现。- 1
1.1 创建Interceptor实现类
我们创建的拦截器必须要实现Interceptor接口,Interceptor接口的定义为- 1
public interface Interceptor { // 执行拦截逻辑的方法 Object intercept(Invocation invocation) throws Throwable; // 决定是否触发 intercept()方法 default Object plugin(Object target) { return Plugin.wrap(target, this); } // 根据配置 初始化 Intercept 对象 default void setProperties(Properties properties) { // NOP } }- 1
- 2
- 3
- 4
- 5
- 6
- 7
- 8
- 9
- 10
- 11
- 12
- 13
- 14
- 15
- 16
在MyBatis中Interceptor允许拦截的内容是- 1
- Executor (update, query, flushStatements, commit, rollback, getTransaction, close, isClosed)
- ParameterHandler (getParameterObject, setParameters)
- ResultSetHandler (handleResultSets, handleOutputParameters)
- StatementHandler (prepare, parameterize, batch, update, query)
我们创建一个拦截Executor中的query和close的方法
package com.boboedu.interceptor; import org.apache.ibatis.executor.Executor; import org.apache.ibatis.mapping.MappedStatement; import org.apache.ibatis.plugin.*; import org.apache.ibatis.session.ResultHandler; import org.apache.ibatis.session.RowBounds; import java.util.Properties; /** * 自定义的拦截器 * @Signature 注解就可以表示一个方法签名, 唯一确定一个方法 */ @Intercepts({ @Signature( type = Executor.class // 需要拦截的类型 ,method = "query" // 需要拦截的方法 // args 中指定 被拦截方法的 参数列表 ,args={MappedStatement.class,Object.class, RowBounds.class, ResultHandler.class} ), @Signature( type = Executor.class ,method = "close" ,args = {boolean.class} ) }) public class FirstInterceptor implements Interceptor { private int testProp; /** * 执行拦截逻辑的方法 * @param invocation * @return * @throws Throwable */ @Override public Object intercept(Invocation invocation) throws Throwable { System.out.println("FirtInterceptor 拦截之前 ...."); Object obj = invocation.proceed(); System.out.println("FirtInterceptor 拦截之后 ...."); return obj; } /** * 决定是否触发 intercept方法 * @param target * @return */ @Override public Object plugin(Object target) { return Plugin.wrap(target,this); } @Override public void setProperties(Properties properties) { System.out.println("---->"+properties.get("testProp")); } public int getTestProp() { return testProp; } public void setTestProp(int testProp) { this.testProp = testProp; } }- 1
- 2
- 3
- 4
- 5
- 6
- 7
- 8
- 9
- 10
- 11
- 12
- 13
- 14
- 15
- 16
- 17
- 18
- 19
- 20
- 21
- 22
- 23
- 24
- 25
- 26
- 27
- 28
- 29
- 30
- 31
- 32
- 33
- 34
- 35
- 36
- 37
- 38
- 39
- 40
- 41
- 42
- 43
- 44
- 45
- 46
- 47
- 48
- 49
- 50
- 51
- 52
- 53
- 54
- 55
- 56
- 57
- 58
- 59
- 60
- 61
- 62
- 63
- 64
- 65
- 66
- 67
- 68
- 69
1.2 配置拦截器
创建好自定义的拦截器后,我们需要在全局配置文件中添加自定义插件的注册- 1
<plugins> <plugin interceptor="com.bobo.interceptor.FirstInterceptor"> <property name="testProp" value="1000"/> plugin> plugins>- 1
- 2
- 3
- 4
- 5
1.3 运行程序
然后我们执行对应的查询操作。- 1
@Test public void test1() throws Exception{ // 1.获取配置文件 InputStream in = Resources.getResourceAsStream("mybatis-config.xml"); // 2.加载解析配置文件并获取SqlSessionFactory对象 SqlSessionFactory factory = new SqlSessionFactoryBuilder().build(in); // 3.根据SqlSessionFactory对象获取SqlSession对象 SqlSession sqlSession = factory.openSession(); // 4.通过SqlSession中提供的 API方法来操作数据库 List<User> list = sqlSession.selectList("com.bobo.mapper.UserMapper.selectUserList"); for (User user : list) { System.out.println(user); } // 5.关闭会话 sqlSession.close(); }- 1
- 2
- 3
- 4
- 5
- 6
- 7
- 8
- 9
- 10
- 11
- 12
- 13
- 14
- 15
- 16
拦截的query方法和close方法的源码位置在如下:


2. 插件实现原理
自定义插件的步骤还是比较简单的,接下来我们分析下插件的实现原理是怎么回事。- 1
2.1 初始化操作
首先我们来看下在全局配置文件加载解析的时候做了什么操作。- 1

进入方法内部可以看到具体的解析操作- 1
private void pluginElement(XNode parent) throws Exception { if (parent != null) { for (XNode child : parent.getChildren()) { // 获取节点的 interceptor 属性的值 String interceptor = child.getStringAttribute("interceptor"); // 获取下的所有的properties子节点 Properties properties = child.getChildrenAsProperties(); // 获取 Interceptor 对象 Interceptor interceptorInstance = (Interceptor) resolveClass(interceptor).getDeclaredConstructor().newInstance(); // 设置 interceptor的 属性 interceptorInstance.setProperties(properties); // Configuration中记录 Interceptor configuration.addInterceptor(interceptorInstance); } } }- 1
- 2
- 3
- 4
- 5
- 6
- 7
- 8
- 9
- 10
- 11
- 12
- 13
- 14
- 15
- 16
该方法用来解析全局配置文件中的plugins标签,然后对应的创建Interceptor对象,并且封装对应的属性信息。最后调用了Configuration对象中的方法。 configuration.addInterceptor(interceptorInstance)- 1
public void addInterceptor(Interceptor interceptor) { interceptorChain.addInterceptor(interceptor); }- 1
- 2
- 3
通过这个代码我们发现我们自定义的拦截器最终是保存在了InterceptorChain这个对象中。而InterceptorChain的定义为- 1
public class InterceptorChain { // 保存所有的 Interceptor 也就我所有的插件是保存在 Interceptors 这个List集合中的 private final List<Interceptor> interceptors = new ArrayList<>(); // public Object pluginAll(Object target) { for (Interceptor interceptor : interceptors) { // 获取拦截器链中的所有拦截器 target = interceptor.plugin(target); // 创建对应的拦截器的代理对象 } return target; } public void addInterceptor(Interceptor interceptor) { interceptors.add(interceptor); } public List<Interceptor> getInterceptors() { return Collections.unmodifiableList(interceptors); } }- 1
- 2
- 3
- 4
- 5
- 6
- 7
- 8
- 9
- 10
- 11
- 12
- 13
- 14
- 15
- 16
- 17
- 18
- 19
- 20
- 21
- 22
2.2 如何创建代理对象
在解析的时候创建了对应的Interceptor对象,并保存在了InterceptorChain中,那么这个拦截器是如何和对应的目标对象进行关联的呢?首先拦截器可以拦截的对象是 Executor,ParameterHandler,ResultSetHandler,StatementHandler.那么我们来看下这四个对象在创建的时候又什么要注意的- 1
2.2.1 Executor

我们可以看到Executor在装饰完二级缓存后会通过pluginAll来创建Executor的代理对象。
public Object pluginAll(Object target) { for (Interceptor interceptor : interceptors) { // 获取拦截器链中的所有拦截器 target = interceptor.plugin(target); // 创建对应的拦截器的代理对象 } return target; }- 1
- 2
- 3
- 4
- 5
- 6
进入plugin方法中,我们会进入到
// 决定是否触发 intercept()方法 default Object plugin(Object target) { return Plugin.wrap(target, this); }- 1
- 2
- 3
- 4
然后进入到MyBatis给我们提供的Plugin工具类的实现 wrap方法中。
/** * 创建目标对象的代理对象 * 目标对象 Executor ParameterHandler ResultSetHandler StatementHandler * @param target 目标对象 * @param interceptor 拦截器 * @return */ public static Object wrap(Object target, Interceptor interceptor) { // 获取用户自定义 Interceptor中@Signature注解的信息 // getSignatureMap 负责处理@Signature 注解 Map<Class<?>, Set<Method>> signatureMap = getSignatureMap(interceptor); // 获取目标类型 Class<?> type = target.getClass(); // 获取目标类型 实现的所有的接口 Class<?>[] interfaces = getAllInterfaces(type, signatureMap); // 如果目标类型有实现的接口 就创建代理对象 if (interfaces.length > 0) { return Proxy.newProxyInstance( type.getClassLoader(), interfaces, new Plugin(target, interceptor, signatureMap)); } // 否则原封不动的返回目标对象 return target; }- 1
- 2
- 3
- 4
- 5
- 6
- 7
- 8
- 9
- 10
- 11
- 12
- 13
- 14
- 15
- 16
- 17
- 18
- 19
- 20
- 21
- 22
- 23
- 24
- 25
Plugin中的各个方法的作用
public class Plugin implements InvocationHandler { private final Object target; // 目标对象 private final Interceptor interceptor; // 拦截器 private final Map<Class<?>, Set<Method>> signatureMap; // 记录 @Signature 注解的信息 private Plugin(Object target, Interceptor interceptor, Map<Class<?>, Set<Method>> signatureMap) { this.target = target; this.interceptor = interceptor; this.signatureMap = signatureMap; } /** * 创建目标对象的代理对象 * 目标对象 Executor ParameterHandler ResultSetHandler StatementHandler * @param target 目标对象 * @param interceptor 拦截器 * @return */ public static Object wrap(Object target, Interceptor interceptor) { // 获取用户自定义 Interceptor中@Signature注解的信息 // getSignatureMap 负责处理@Signature 注解 Map<Class<?>, Set<Method>> signatureMap = getSignatureMap(interceptor); // 获取目标类型 Class<?> type = target.getClass(); // 获取目标类型 实现的所有的接口 Class<?>[] interfaces = getAllInterfaces(type, signatureMap); // 如果目标类型有实现的接口 就创建代理对象 if (interfaces.length > 0) { return Proxy.newProxyInstance( type.getClassLoader(), interfaces, new Plugin(target, interceptor, signatureMap)); } // 否则原封不动的返回目标对象 return target; } /** * 代理对象方法被调用时执行的代码 * @param proxy * @param method * @param args * @return * @throws Throwable */ @Override public Object invoke(Object proxy, Method method, Object[] args) throws Throwable { try { // 获取当前方法所在类或接口中,可被当前Interceptor拦截的方法 Set<Method> methods = signatureMap.get(method.getDeclaringClass()); if (methods != null && methods.contains(method)) { // 当前调用的方法需要被拦截 执行拦截操作 return interceptor.intercept(new Invocation(target, method, args)); } // 不需要拦截 则调用 目标对象中的方法 return method.invoke(target, args); } catch (Exception e) { throw ExceptionUtil.unwrapThrowable(e); } } private static Map<Class<?>, Set<Method>> getSignatureMap(Interceptor interceptor) { Intercepts interceptsAnnotation = interceptor.getClass().getAnnotation(Intercepts.class); // issue #251 if (interceptsAnnotation == null) { throw new PluginException("No @Intercepts annotation was found in interceptor " + interceptor.getClass().getName()); } Signature[] sigs = interceptsAnnotation.value(); Map<Class<?>, Set<Method>> signatureMap = new HashMap<>(); for (Signature sig : sigs) { Set<Method> methods = signatureMap.computeIfAbsent(sig.type(), k -> new HashSet<>()); try { Method method = sig.type().getMethod(sig.method(), sig.args()); methods.add(method); } catch (NoSuchMethodException e) { throw new PluginException("Could not find method on " + sig.type() + " named " + sig.method() + ". Cause: " + e, e); } } return signatureMap; } private static Class<?>[] getAllInterfaces(Class<?> type, Map<Class<?>, Set<Method>> signatureMap) { Set<Class<?>> interfaces = new HashSet<>(); while (type != null) { for (Class<?> c : type.getInterfaces()) { if (signatureMap.containsKey(c)) { interfaces.add(c); } } type = type.getSuperclass(); } return interfaces.toArray(new Class<?>[interfaces.size()]); } }- 1
- 2
- 3
- 4
- 5
- 6
- 7
- 8
- 9
- 10
- 11
- 12
- 13
- 14
- 15
- 16
- 17
- 18
- 19
- 20
- 21
- 22
- 23
- 24
- 25
- 26
- 27
- 28
- 29
- 30
- 31
- 32
- 33
- 34
- 35
- 36
- 37
- 38
- 39
- 40
- 41
- 42
- 43
- 44
- 45
- 46
- 47
- 48
- 49
- 50
- 51
- 52
- 53
- 54
- 55
- 56
- 57
- 58
- 59
- 60
- 61
- 62
- 63
- 64
- 65
- 66
- 67
- 68
- 69
- 70
- 71
- 72
- 73
- 74
- 75
- 76
- 77
- 78
- 79
- 80
- 81
- 82
- 83
- 84
- 85
- 86
- 87
- 88
- 89
- 90
- 91
- 92
- 93
- 94
- 95
- 96
- 97
2.2.2 StatementHandler
在获取StatementHandler的方法中- 1
@Override public <E> List<E> doQuery(MappedStatement ms, Object parameter, RowBounds rowBounds, ResultHandler resultHandler, BoundSql boundSql) throws SQLException { Statement stmt = null; try { Configuration configuration = ms.getConfiguration(); // 注意,已经来到SQL处理的关键对象 StatementHandler >> StatementHandler handler = configuration.newStatementHandler(wrapper, ms, parameter, rowBounds, resultHandler, boundSql); // 获取一个 Statement对象 stmt = prepareStatement(handler, ms.getStatementLog()); // 执行查询 return handler.query(stmt, resultHandler); } finally { // 用完就关闭 closeStatement(stmt); } }- 1
- 2
- 3
- 4
- 5
- 6
- 7
- 8
- 9
- 10
- 11
- 12
- 13
- 14
- 15
- 16
在进入newStatementHandler方法- 1
public StatementHandler newStatementHandler(Executor executor, MappedStatement mappedStatement, Object parameterObject, RowBounds rowBounds, ResultHandler resultHandler, BoundSql boundSql) { StatementHandler statementHandler = new RoutingStatementHandler(executor, mappedStatement, parameterObject, rowBounds, resultHandler, boundSql); // 植入插件逻辑(返回代理对象) statementHandler = (StatementHandler) interceptorChain.pluginAll(statementHandler); return statementHandler; }- 1
- 2
- 3
- 4
- 5
- 6
可以看到statementHandler的代理对象
2.2.3 ParameterHandler
在上面步骤的RoutingStatementHandler方法中,我们来看看- 1
public RoutingStatementHandler(Executor executor, MappedStatement ms, Object parameter, RowBounds rowBounds, ResultHandler resultHandler, BoundSql boundSql) { // StatementType 是怎么来的? 增删改查标签中的 statementType="PREPARED",默认值 PREPARED switch (ms.getStatementType()) { case STATEMENT: delegate = new SimpleStatementHandler(executor, ms, parameter, rowBounds, resultHandler, boundSql); break; case PREPARED: // 创建 StatementHandler 的时候做了什么? >> delegate = new PreparedStatementHandler(executor, ms, parameter, rowBounds, resultHandler, boundSql); break; case CALLABLE: delegate = new CallableStatementHandler(executor, ms, parameter, rowBounds, resultHandler, boundSql); break; default: throw new ExecutorException("Unknown statement type: " + ms.getStatementType()); } }- 1
- 2
- 3
- 4
- 5
- 6
- 7
- 8
- 9
- 10
- 11
- 12
- 13
- 14
- 15
- 16
- 17
- 18
然后我们随便选择一个分支进入,比如PreparedStatementHandler- 1
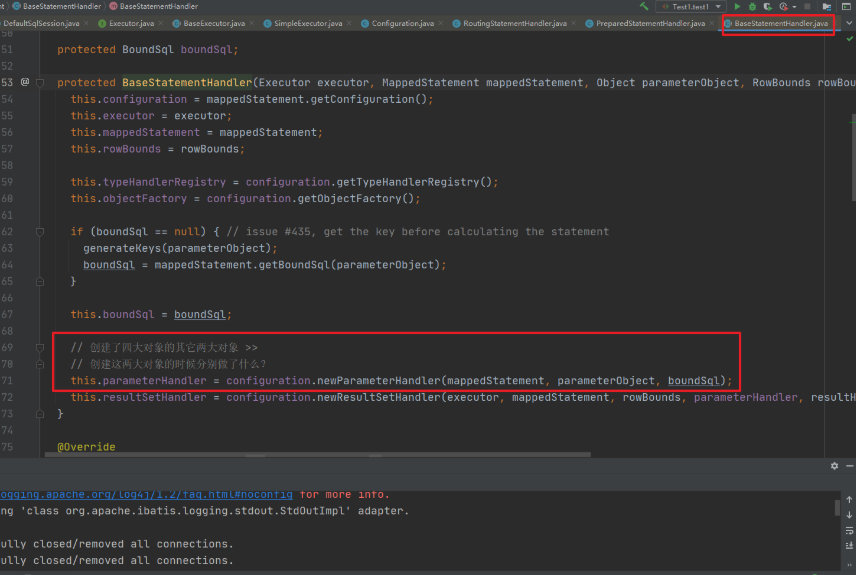
在newParameterHandler的步骤我们可以发现代理对象的创建
public ParameterHandler newParameterHandler(MappedStatement mappedStatement, Object parameterObject, BoundSql boundSql) { ParameterHandler parameterHandler = mappedStatement.getLang().createParameterHandler(mappedStatement, parameterObject, boundSql); // 植入插件逻辑(返回代理对象) parameterHandler = (ParameterHandler) interceptorChain.pluginAll(parameterHandler); return parameterHandler; }- 1
- 2
- 3
- 4
- 5
- 6
2.2.4 ResultSetHandler
在上面的newResultSetHandler()方法中,也可以看到ResultSetHander的代理对象- 1
public ResultSetHandler newResultSetHandler(Executor executor, MappedStatement mappedStatement, RowBounds rowBounds, ParameterHandler parameterHandler, ResultHandler resultHandler, BoundSql boundSql) { ResultSetHandler resultSetHandler = new DefaultResultSetHandler(executor, mappedStatement, parameterHandler, resultHandler, boundSql, rowBounds); // 植入插件逻辑(返回代理对象) resultSetHandler = (ResultSetHandler) interceptorChain.pluginAll(resultSetHandler); return resultSetHandler; }- 1
- 2
- 3
- 4
- 5
- 6
- 7
2.3 执行流程
以Executor的query方法为例,当查询请求到来的时候,Executor的代理对象是如何处理拦截请求的呢?我们来看下。当请求到了executor.query方法的时候- 1

然后会执行Plugin的invoke方法
/** * 代理对象方法被调用时执行的代码 * @param proxy * @param method * @param args * @return * @throws Throwable */ @Override public Object invoke(Object proxy, Method method, Object[] args) throws Throwable { try { // 获取当前方法所在类或接口中,可被当前Interceptor拦截的方法 Set<Method> methods = signatureMap.get(method.getDeclaringClass()); if (methods != null && methods.contains(method)) { // 当前调用的方法需要被拦截 执行拦截操作 return interceptor.intercept(new Invocation(target, method, args)); } // 不需要拦截 则调用 目标对象中的方法 return method.invoke(target, args); } catch (Exception e) { throw ExceptionUtil.unwrapThrowable(e); } }- 1
- 2
- 3
- 4
- 5
- 6
- 7
- 8
- 9
- 10
- 11
- 12
- 13
- 14
- 15
- 16
- 17
- 18
- 19
- 20
- 21
- 22
- 23
然后进入interceptor.intercept 会进入我们自定义的 FirstInterceptor对象中
/** * 执行拦截逻辑的方法 * @param invocation * @return * @throws Throwable */ @Override public Object intercept(Invocation invocation) throws Throwable { System.out.println("FirtInterceptor 拦截之前 ...."); Object obj = invocation.proceed(); // 执行目标方法 System.out.println("FirtInterceptor 拦截之后 ...."); return obj; }- 1
- 2
- 3
- 4
- 5
- 6
- 7
- 8
- 9
- 10
- 11
- 12
- 13
这个就是自定义的拦截器执行的完整流程,
2.4 多拦截器
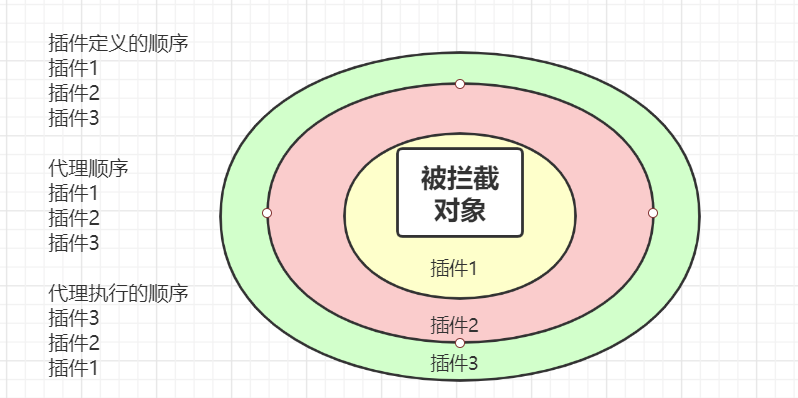
如果我们有多个自定义的拦截器,那么他的执行流程是怎么样的呢?比如我们创建了两个 Interceptor 都是用来拦截 Executor 的query方法,一个是用来执行逻辑A 一个是用来执行逻辑B的。- 1
单个拦截器的执行流程

如果说对象被代理了多次,这里会继续调用下一个插件的逻辑,再走一次Plugin的invoke()方法。这里我们需要关注一下有多个插件的时候的运行顺序。- 1
配置的顺序和执行的顺序是相反的。InterceptorChain的List是按照插件从上往下的顺序解析、添加的。- 1
而创建代理的时候也是按照list的顺序代理。执行的时候当然是从最后代理的对象开始。- 1
这个我们可以通过实际的案例来得到验证,最后来总结下Interceptor的相关对象的作用- 1
对象 作用 Interceptor 自定义插件需要实现接口,实现4个方法 InterceptChain 配置的插件解析后会保存在Configuration的InterceptChain中 Plugin 触发管理类,还可以用来创建代理对象 Invocation 对被代理类进行包装,可以调用proceed()调用到被拦截的方法 3. PageHelper分析
Mybatis的插件使用中分页插件PageHelper应该是我们使用到的比较多的插件应用。我们先来回顾下PageHelper的应用- 1
3.1 PageHelper的应用
添加依赖- 1
<dependency> <groupId>com.github.pagehelpergroupId> <artifactId>pagehelperartifactId> <version>4.1.6version> dependency>- 1
- 2
- 3
- 4
- 5
在全局配置文件中注册- 1
<plugin interceptor="com.github.pagehelper.PageHelper"> <property name="dialect" value="mysql" /> <property name="offsetAsPageNum" value="true" /> <property name="rowBoundsWithCount" value="true" /> <property name="pageSizeZero" value="true" /> <property name="reasonable" value="false" /> <property name="params" value="pageNum=start;pageSize=limit;" /> <property name="returnPageInfo" value="check" /> plugin>- 1
- 2
- 3
- 4
- 5
- 6
- 7
- 8
- 9
- 10
- 11
- 12
- 13
- 14
- 15
- 16
- 17
- 18
- 19
- 20
- 21
- 22
- 23
- 24
- 25
然后就是分页查询操作

查看日志我们能够发现查询出来的只有5条记录

通过MyBatis的分页插件的使用,我们发现我们仅仅是在 执行操作之前设置了一句- 1
PageHelper.startPage(1,5);并没有做其他操作,也就是没有改变任何其他的业务代码。这就是它的优点,那么我再来看下他的实现原理3.2 实现原理剖析
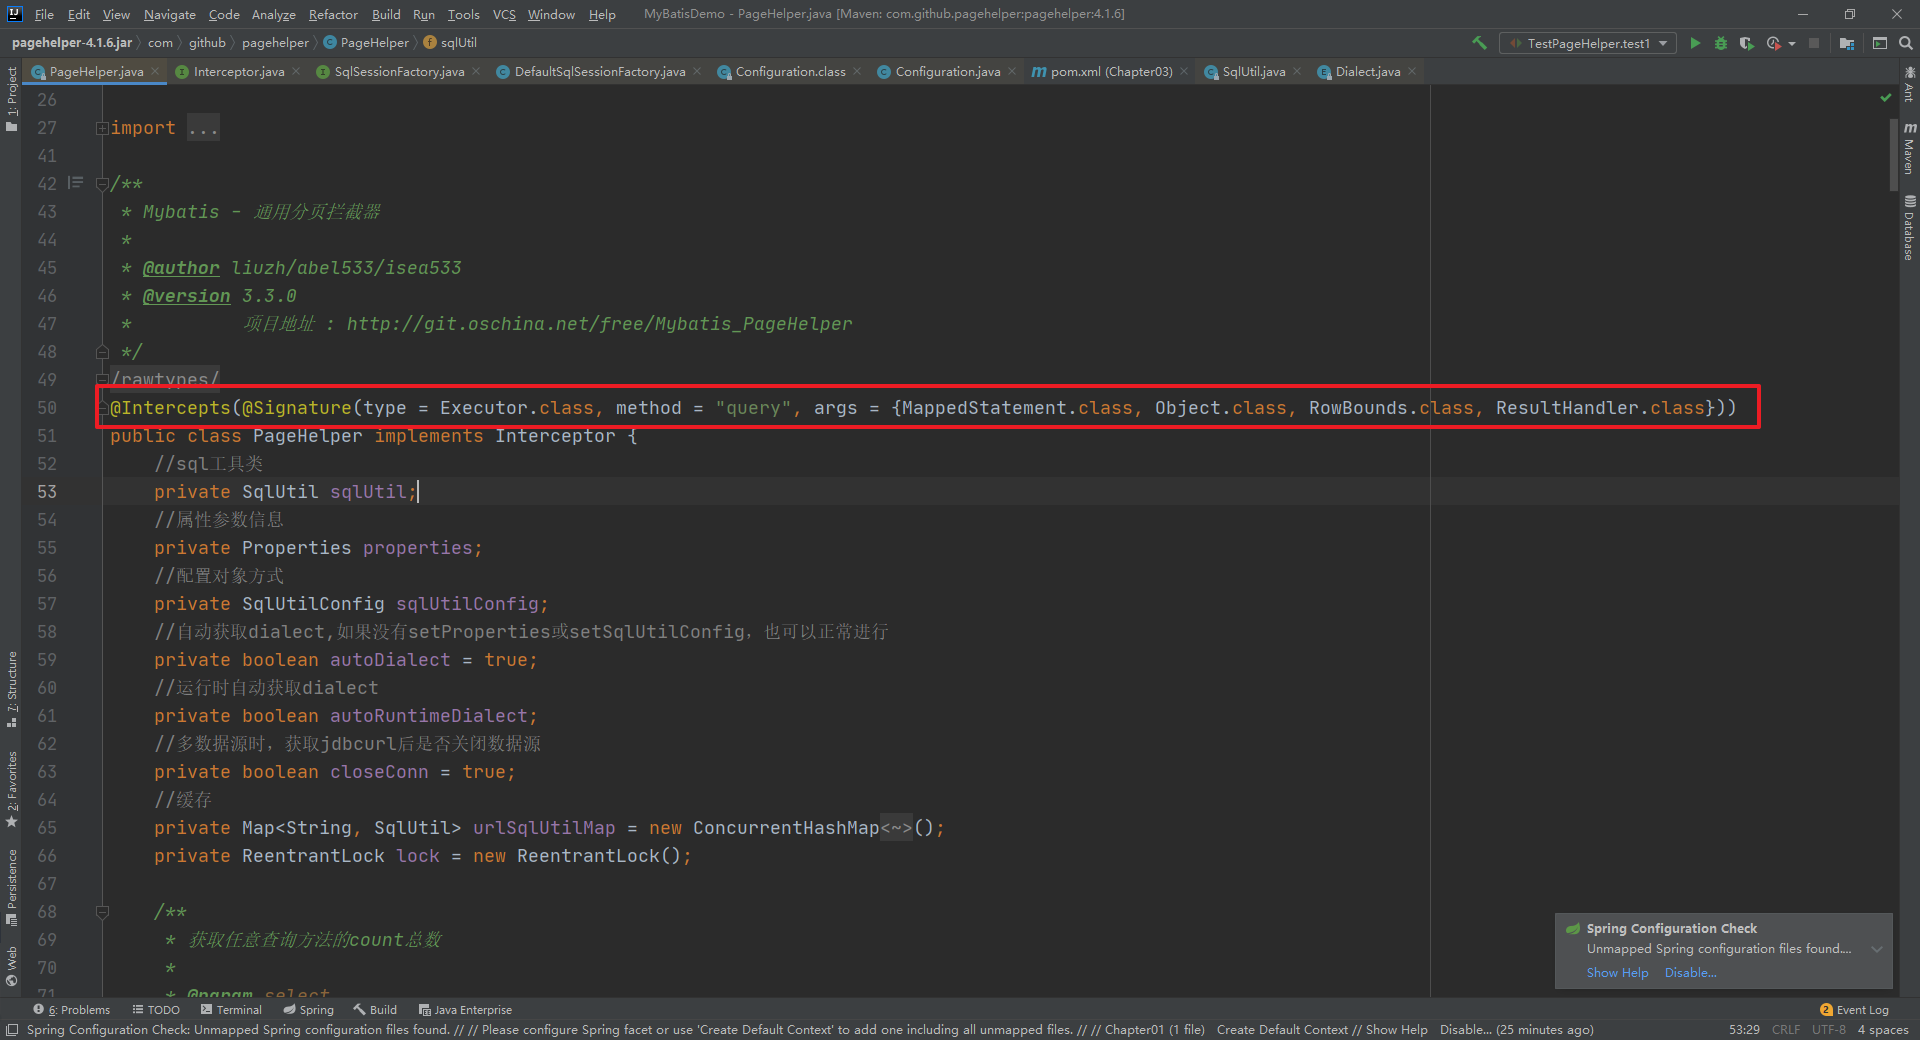
在PageHelper中,肯定有提供Interceptor的实现类,通过源码我们可以发现是PageHelper,而且我们也可以看到在该方法头部添加的注解,声明了该拦截器拦截的是Executor的query方法- 1
然后当我们要执行查询操作的时候,我们知道 Executor.query() 方法的执行本质上是执行 Executor的代理对象的方法。先来看下Plugin中的invoke方法
/** * 代理对象方法被调用时执行的代码 * @param proxy * @param method * @param args * @return * @throws Throwable */ @Override public Object invoke(Object proxy, Method method, Object[] args) throws Throwable { try { // 获取当前方法所在类或接口中,可被当前Interceptor拦截的方法 Set<Method> methods = signatureMap.get(method.getDeclaringClass()); if (methods != null && methods.contains(method)) { // 当前调用的方法需要被拦截 执行拦截操作 return interceptor.intercept(new Invocation(target, method, args)); } // 不需要拦截 则调用 目标对象中的方法 return method.invoke(target, args); } catch (Exception e) { throw ExceptionUtil.unwrapThrowable(e); } }- 1
- 2
- 3
- 4
- 5
- 6
- 7
- 8
- 9
- 10
- 11
- 12
- 13
- 14
- 15
- 16
- 17
- 18
- 19
- 20
- 21
- 22
- 23
interceptor.intercept(new Invocation(target, method, args));方法的执行会进入到 PageHelper的intercept方法中
/** * Mybatis拦截器方法 * * @param invocation 拦截器入参 * @return 返回执行结果 * @throws Throwable 抛出异常 */ public Object intercept(Invocation invocation) throws Throwable { if (autoRuntimeDialect) { SqlUtil sqlUtil = getSqlUtil(invocation); return sqlUtil.processPage(invocation); } else { if (autoDialect) { initSqlUtil(invocation); } return sqlUtil.processPage(invocation); } }- 1
- 2
- 3
- 4
- 5
- 6
- 7
- 8
- 9
- 10
- 11
- 12
- 13
- 14
- 15
- 16
- 17
- 18
intercept方法
/** * Mybatis拦截器方法 * * @param invocation 拦截器入参 * @return 返回执行结果 * @throws Throwable 抛出异常 */ public Object intercept(Invocation invocation) throws Throwable { if (autoRuntimeDialect) { // 多数据源 SqlUtil sqlUtil = getSqlUtil(invocation); return sqlUtil.processPage(invocation); } else { // 单数据源 if (autoDialect) { initSqlUtil(invocation); } return sqlUtil.processPage(invocation); } }- 1
- 2
- 3
- 4
- 5
- 6
- 7
- 8
- 9
- 10
- 11
- 12
- 13
- 14
- 15
- 16
- 17
- 18
在interceptor方法中首先会获取一个SqlUtils对象
SqlUtil:数据库类型专用sql工具类,一个数据库url对应一个SqlUtil实例,SqlUtil内有一个Parser对象,如果是mysql,它是MysqlParser,如果是oracle,它是OracleParser,这个Parser对象是SqlUtil不同实例的主要存在价值。执行count查询、设置Parser对象、执行分页查询、保存Page分页对象等功能,均由SqlUtil来完成。
initSqlUtil 方法
/** * 初始化sqlUtil * * @param invocation */ public synchronized void initSqlUtil(Invocation invocation) { if (this.sqlUtil == null) { this.sqlUtil = getSqlUtil(invocation); if (!autoRuntimeDialect) { properties = null; sqlUtilConfig = null; } autoDialect = false; } }- 1
- 2
- 3
- 4
- 5
- 6
- 7
- 8
- 9
- 10
- 11
- 12
- 13
- 14
- 15
getSqlUtil方法
/** * 根据datasource创建对应的sqlUtil * * @param invocation */ public SqlUtil getSqlUtil(Invocation invocation) { MappedStatement ms = (MappedStatement) invocation.getArgs()[0]; //改为对dataSource做缓存 DataSource dataSource = ms.getConfiguration().getEnvironment().getDataSource(); String url = getUrl(dataSource); if (urlSqlUtilMap.containsKey(url)) { return urlSqlUtilMap.get(url); } try { lock.lock(); if (urlSqlUtilMap.containsKey(url)) { return urlSqlUtilMap.get(url); } if (StringUtil.isEmpty(url)) { throw new RuntimeException("无法自动获取jdbcUrl,请在分页插件中配置dialect参数!"); } String dialect = Dialect.fromJdbcUrl(url); if (dialect == null) { throw new RuntimeException("无法自动获取数据库类型,请通过dialect参数指定!"); } // 创建SqlUtil SqlUtil sqlUtil = new SqlUtil(dialect); if (this.properties != null) { sqlUtil.setProperties(properties); } else if (this.sqlUtilConfig != null) { sqlUtil.setSqlUtilConfig(this.sqlUtilConfig); } urlSqlUtilMap.put(url, sqlUtil); return sqlUtil; } finally { lock.unlock(); } }- 1
- 2
- 3
- 4
- 5
- 6
- 7
- 8
- 9
- 10
- 11
- 12
- 13
- 14
- 15
- 16
- 17
- 18
- 19
- 20
- 21
- 22
- 23
- 24
- 25
- 26
- 27
- 28
- 29
- 30
- 31
- 32
- 33
- 34
- 35
- 36
- 37
- 38
查看SqlUtil的构造方法
/** * 构造方法 * * @param strDialect */ public SqlUtil(String strDialect) { if (strDialect == null || "".equals(strDialect)) { throw new IllegalArgumentException("Mybatis分页插件无法获取dialect参数!"); } Exception exception = null; try { Dialect dialect = Dialect.of(strDialect); // 根据方言创建对应的解析器 parser = AbstractParser.newParser(dialect); } catch (Exception e) { exception = e; //异常的时候尝试反射,允许自己写实现类传递进来 try { Class<?> parserClass = Class.forName(strDialect); if (Parser.class.isAssignableFrom(parserClass)) { parser = (Parser) parserClass.newInstance(); } } catch (ClassNotFoundException ex) { exception = ex; } catch (InstantiationException ex) { exception = ex; } catch (IllegalAccessException ex) { exception = ex; } } if (parser == null) { throw new RuntimeException(exception); } }- 1
- 2
- 3
- 4
- 5
- 6
- 7
- 8
- 9
- 10
- 11
- 12
- 13
- 14
- 15
- 16
- 17
- 18
- 19
- 20
- 21
- 22
- 23
- 24
- 25
- 26
- 27
- 28
- 29
- 30
- 31
- 32
- 33
- 34
创建的解析器
public static Parser newParser(Dialect dialect) { Parser parser = null; switch (dialect) { case mysql: case mariadb: case sqlite: parser = new MysqlParser(); break; case oracle: parser = new OracleParser(); break; case hsqldb: parser = new HsqldbParser(); break; case sqlserver: parser = new SqlServerParser(); break; case sqlserver2012: parser = new SqlServer2012Dialect(); break; case db2: parser = new Db2Parser(); break; case postgresql: parser = new PostgreSQLParser(); break; case informix: parser = new InformixParser(); break; case h2: parser = new H2Parser(); break; default: throw new RuntimeException("分页插件" + dialect + "方言错误!"); } return parser; }- 1
- 2
- 3
- 4
- 5
- 6
- 7
- 8
- 9
- 10
- 11
- 12
- 13
- 14
- 15
- 16
- 17
- 18
- 19
- 20
- 21
- 22
- 23
- 24
- 25
- 26
- 27
- 28
- 29
- 30
- 31
- 32
- 33
- 34
- 35
- 36
- 37
我们可以看到不同的数据库方言,创建了对应的解析器。
然后我们再回到前面的interceptor方法中继续,查看sqlUtil.processPage(invocation);方法
private Object _processPage(Invocation invocation) throws Throwable { final Object[] args = invocation.getArgs(); Page page = null; //支持方法参数时,会先尝试获取Page if (supportMethodsArguments) { page = getPage(args); // 有通过ThreadLocal来获取分页数据信息 } //分页信息 RowBounds rowBounds = (RowBounds) args[2]; //支持方法参数时,如果page == null就说明没有分页条件,不需要分页查询 if ((supportMethodsArguments && page == null) //当不支持分页参数时,判断LocalPage和RowBounds判断是否需要分页 || (!supportMethodsArguments && SqlUtil.getLocalPage() == null && rowBounds == RowBounds.DEFAULT)) { return invocation.proceed(); } else { //不支持分页参数时,page==null,这里需要获取 if (!supportMethodsArguments && page == null) { page = getPage(args); } return doProcessPage(invocation, page, args); } }- 1
- 2
- 3
- 4
- 5
- 6
- 7
- 8
- 9
- 10
- 11
- 12
- 13
- 14
- 15
- 16
- 17
- 18
- 19
- 20
- 21
- 22
doProcessPage进入该方法
private Page doProcessPage(Invocation invocation, Page page, Object[] args) throws Throwable { //保存RowBounds状态 RowBounds rowBounds = (RowBounds) args[2]; //获取原始的ms MappedStatement ms = (MappedStatement) args[0]; //判断并处理为PageSqlSource if (!isPageSqlSource(ms)) { processMappedStatement(ms); } //设置当前的parser,后面每次使用前都会set,ThreadLocal的值不会产生不良影响 ((PageSqlSource)ms.getSqlSource()).setParser(parser); try { //忽略RowBounds-否则会进行Mybatis自带的内存分页 args[2] = RowBounds.DEFAULT; //如果只进行排序 或 pageSizeZero的判断 if (isQueryOnly(page)) { return doQueryOnly(page, invocation); } //简单的通过total的值来判断是否进行count查询 if (page.isCount()) { page.setCountSignal(Boolean.TRUE); //替换MS args[0] = msCountMap.get(ms.getId()); //查询总数 Object result = invocation.proceed(); //还原ms args[0] = ms; //设置总数 page.setTotal((Integer) ((List) result).get(0)); if (page.getTotal() == 0) { return page; } } else { page.setTotal(-1l); } //pageSize>0的时候执行分页查询,pageSize<=0的时候不执行相当于可能只返回了一个count if (page.getPageSize() > 0 && ((rowBounds == RowBounds.DEFAULT && page.getPageNum() > 0) || rowBounds != RowBounds.DEFAULT)) { //将参数中的MappedStatement替换为新的qs page.setCountSignal(null); BoundSql boundSql = ms.getBoundSql(args[1]); // 在 invocation中绑定 分页的数据 args[1] = parser.setPageParameter(ms, args[1], boundSql, page); page.setCountSignal(Boolean.FALSE); //执行分页查询 Object result = invocation.proceed(); //得到处理结果 page.addAll((List) result); } } finally { ((PageSqlSource)ms.getSqlSource()).removeParser(); } //返回结果 return page; }- 1
- 2
- 3
- 4
- 5
- 6
- 7
- 8
- 9
- 10
- 11
- 12
- 13
- 14
- 15
- 16
- 17
- 18
- 19
- 20
- 21
- 22
- 23
- 24
- 25
- 26
- 27
- 28
- 29
- 30
- 31
- 32
- 33
- 34
- 35
- 36
- 37
- 38
- 39
- 40
- 41
- 42
- 43
- 44
- 45
- 46
- 47
- 48
- 49
- 50
- 51
- 52
- 53
- 54
- 55
- 56
- 57
- 58
invocation.proceed();方法会进入 CachingExecutor中的query方法。
@Override public <E> List<E> query(MappedStatement ms, Object parameterObject, RowBounds rowBounds, ResultHandler resultHandler) throws SQLException { // 获取SQL BoundSql boundSql = ms.getBoundSql(parameterObject); // 创建CacheKey:什么样的SQL是同一条SQL? >> CacheKey key = createCacheKey(ms, parameterObject, rowBounds, boundSql); return query(ms, parameterObject, rowBounds, resultHandler, key, boundSql); }- 1
- 2
- 3
- 4
- 5
- 6
- 7
- 8
ms.getBoundSql方法中会完成分页SQL的绑定

进入 PageSqlSource 的getBoundSql方法中

/** * 获取BoundSql * * @param parameterObject * @return */ @Override public BoundSql getBoundSql(Object parameterObject) { Boolean count = getCount(); if (count == null) { return getDefaultBoundSql(parameterObject); } else if (count) { return getCountBoundSql(parameterObject); } else { return getPageBoundSql(parameterObject); } }- 1
- 2
- 3
- 4
- 5
- 6
- 7
- 8
- 9
- 10
- 11
- 12
- 13
- 14
- 15
- 16
- 17
然后进入getPageBoundSql获取分页的SQL语句,在这个方法中大家也可以发现查询总的记录数的SQL生成
@Override protected BoundSql getPageBoundSql(Object parameterObject) { String tempSql = sql; String orderBy = PageHelper.getOrderBy(); if (orderBy != null) { tempSql = OrderByParser.converToOrderBySql(sql, orderBy); } tempSql = localParser.get().getPageSql(tempSql); return new BoundSql(configuration, tempSql, localParser.get().getPageParameterMapping(configuration, original.getBoundSql(parameterObject)), parameterObject); }- 1
- 2
- 3
- 4
- 5
- 6
- 7
- 8
- 9
- 10
最终在这个方法中生成了对应数据库的分页语句

4.应用场景分析
作用 描述 实现方式 水平分表 一张费用表按月度拆分为12张表。fee_202001-202012。当查询条件出现月度(tran_month)时,把select语句中的逻辑表名修改为对应的月份表。 对query update方法进行拦截在接口上添加注解,通过反射获取接口注解,根据注解上配置的参数进行分表,修改原SQL,例如id取模,按月分表 数据脱敏 手机号和身份证在数据库完整存储。但是返回给用户,屏蔽手机号的中间四位。屏蔽身份证号中的出生日期。 query——对结果集脱敏 菜单权限控制 不同的用户登录,查询菜单权限表时获得不同的结果,在前端展示不同的菜单 对query方法进行拦截在方法上添加注解,根据权限配置,以及用户登录信息,在SQL上加上权限过滤条件 黑白名单 有些SQL语句在生产环境中是不允许执行的,比如like %% 对Executor的update和query方法进行拦截,将拦截的SQL语句和黑白名单进行比较,控制SQL语句的执行 全局唯一ID 在高并发的环境下传统的生成ID的方式不太适用,这时我们就需要考虑其他方式了 创建插件拦截Executor的insert方法,通过UUID或者雪花算法来生成ID,并修改SQL中的插入信息 进入方法内部可以看到具体的解析操作- 1
private void pluginElement(XNode parent) throws Exception { if (parent != null) { for (XNode child : parent.getChildren()) { // 获取节点的 interceptor 属性的值 String interceptor = child.getStringAttribute("interceptor"); // 获取下的所有的properties子节点 Properties properties = child.getChildrenAsProperties(); // 获取 Interceptor 对象 Interceptor interceptorInstance = (Interceptor) resolveClass(interceptor).getDeclaredConstructor().newInstance(); // 设置 interceptor的 属性 interceptorInstance.setProperties(properties); // Configuration中记录 Interceptor configuration.addInterceptor(interceptorInstance); } } }- 1
- 2
- 3
- 4
- 5
- 6
- 7
- 8
- 9
- 10
- 11
- 12
- 13
- 14
- 15
- 16
该方法用来解析全局配置文件中的plugins标签,然后对应的创建Interceptor对象,并且封装对应的属性信息。最后调用了Configuration对象中的方法。 configuration.addInterceptor(interceptorInstance)- 1
public void addInterceptor(Interceptor interceptor) { interceptorChain.addInterceptor(interceptor); }- 1
- 2
- 3
通过这个代码我们发现我们自定义的拦截器最终是保存在了InterceptorChain这个对象中。而InterceptorChain的定义为- 1
public class InterceptorChain { // 保存所有的 Interceptor 也就我所有的插件是保存在 Interceptors 这个List集合中的 private final List<Interceptor> interceptors = new ArrayList<>(); // public Object pluginAll(Object target) { for (Interceptor interceptor : interceptors) { // 获取拦截器链中的所有拦截器 target = interceptor.plugin(target); // 创建对应的拦截器的代理对象 } return target; } public void addInterceptor(Interceptor interceptor) { interceptors.add(interceptor); } public List<Interceptor> getInterceptors() { return Collections.unmodifiableList(interceptors); } }- 1
- 2
- 3
- 4
- 5
- 6
- 7
- 8
- 9
- 10
- 11
- 12
- 13
- 14
- 15
- 16
- 17
- 18
- 19
- 20
- 21
- 22
2.2 如何创建代理对象
在解析的时候创建了对应的Interceptor对象,并保存在了InterceptorChain中,那么这个拦截器是如何和对应的目标对象进行关联的呢?首先拦截器可以拦截的对象是 Executor,ParameterHandler,ResultSetHandler,StatementHandler.那么我们来看下这四个对象在创建的时候又什么要注意的- 1
2.2.1 Executor
我们可以看到Executor在装饰完二级缓存后会通过pluginAll来创建Executor的代理对象。
public Object pluginAll(Object target) { for (Interceptor interceptor : interceptors) { // 获取拦截器链中的所有拦截器 target = interceptor.plugin(target); // 创建对应的拦截器的代理对象 } return target; }- 1
- 2
- 3
- 4
- 5
- 6
进入plugin方法中,我们会进入到
// 决定是否触发 intercept()方法 default Object plugin(Object target) { return Plugin.wrap(target, this); }- 1
- 2
- 3
- 4
然后进入到MyBatis给我们提供的Plugin工具类的实现 wrap方法中。
/** * 创建目标对象的代理对象 * 目标对象 Executor ParameterHandler ResultSetHandler StatementHandler * @param target 目标对象 * @param interceptor 拦截器 * @return */ public static Object wrap(Object target, Interceptor interceptor) { // 获取用户自定义 Interceptor中@Signature注解的信息 // getSignatureMap 负责处理@Signature 注解 Map<Class<?>, Set<Method>> signatureMap = getSignatureMap(interceptor); // 获取目标类型 Class<?> type = target.getClass(); // 获取目标类型 实现的所有的接口 Class<?>[] interfaces = getAllInterfaces(type, signatureMap); // 如果目标类型有实现的接口 就创建代理对象 if (interfaces.length > 0) { return Proxy.newProxyInstance( type.getClassLoader(), interfaces, new Plugin(target, interceptor, signatureMap)); } // 否则原封不动的返回目标对象 return target; }- 1
- 2
- 3
- 4
- 5
- 6
- 7
- 8
- 9
- 10
- 11
- 12
- 13
- 14
- 15
- 16
- 17
- 18
- 19
- 20
- 21
- 22
- 23
- 24
- 25
Plugin中的各个方法的作用
public class Plugin implements InvocationHandler { private final Object target; // 目标对象 private final Interceptor interceptor; // 拦截器 private final Map<Class<?>, Set<Method>> signatureMap; // 记录 @Signature 注解的信息 private Plugin(Object target, Interceptor interceptor, Map<Class<?>, Set<Method>> signatureMap) { this.target = target; this.interceptor = interceptor; this.signatureMap = signatureMap; } /** * 创建目标对象的代理对象 * 目标对象 Executor ParameterHandler ResultSetHandler StatementHandler * @param target 目标对象 * @param interceptor 拦截器 * @return */ public static Object wrap(Object target, Interceptor interceptor) { // 获取用户自定义 Interceptor中@Signature注解的信息 // getSignatureMap 负责处理@Signature 注解 Map<Class<?>, Set<Method>> signatureMap = getSignatureMap(interceptor); // 获取目标类型 Class<?> type = target.getClass(); // 获取目标类型 实现的所有的接口 Class<?>[] interfaces = getAllInterfaces(type, signatureMap); // 如果目标类型有实现的接口 就创建代理对象 if (interfaces.length > 0) { return Proxy.newProxyInstance( type.getClassLoader(), interfaces, new Plugin(target, interceptor, signatureMap)); } // 否则原封不动的返回目标对象 return target; } /** * 代理对象方法被调用时执行的代码 * @param proxy * @param method * @param args * @return * @throws Throwable */ @Override public Object invoke(Object proxy, Method method, Object[] args) throws Throwable { try { // 获取当前方法所在类或接口中,可被当前Interceptor拦截的方法 Set<Method> methods = signatureMap.get(method.getDeclaringClass()); if (methods != null && methods.contains(method)) { // 当前调用的方法需要被拦截 执行拦截操作 return interceptor.intercept(new Invocation(target, method, args)); } // 不需要拦截 则调用 目标对象中的方法 return method.invoke(target, args); } catch (Exception e) { throw ExceptionUtil.unwrapThrowable(e); } } private static Map<Class<?>, Set<Method>> getSignatureMap(Interceptor interceptor) { Intercepts interceptsAnnotation = interceptor.getClass().getAnnotation(Intercepts.class); // issue #251 if (interceptsAnnotation == null) { throw new PluginException("No @Intercepts annotation was found in interceptor " + interceptor.getClass().getName()); } Signature[] sigs = interceptsAnnotation.value(); Map<Class<?>, Set<Method>> signatureMap = new HashMap<>(); for (Signature sig : sigs) { Set<Method> methods = signatureMap.computeIfAbsent(sig.type(), k -> new HashSet<>()); try { Method method = sig.type().getMethod(sig.method(), sig.args()); methods.add(method); } catch (NoSuchMethodException e) { throw new PluginException("Could not find method on " + sig.type() + " named " + sig.method() + ". Cause: " + e, e); } } return signatureMap; } private static Class<?>[] getAllInterfaces(Class<?> type, Map<Class<?>, Set<Method>> signatureMap) { Set<Class<?>> interfaces = new HashSet<>(); while (type != null) { for (Class<?> c : type.getInterfaces()) { if (signatureMap.containsKey(c)) { interfaces.add(c); } } type = type.getSuperclass(); } return interfaces.toArray(new Class<?>[interfaces.size()]); } }- 1
- 2
- 3
- 4
- 5
- 6
- 7
- 8
- 9
- 10
- 11
- 12
- 13
- 14
- 15
- 16
- 17
- 18
- 19
- 20
- 21
- 22
- 23
- 24
- 25
- 26
- 27
- 28
- 29
- 30
- 31
- 32
- 33
- 34
- 35
- 36
- 37
- 38
- 39
- 40
- 41
- 42
- 43
- 44
- 45
- 46
- 47
- 48
- 49
- 50
- 51
- 52
- 53
- 54
- 55
- 56
- 57
- 58
- 59
- 60
- 61
- 62
- 63
- 64
- 65
- 66
- 67
- 68
- 69
- 70
- 71
- 72
- 73
- 74
- 75
- 76
- 77
- 78
- 79
- 80
- 81
- 82
- 83
- 84
- 85
- 86
- 87
- 88
- 89
- 90
- 91
- 92
- 93
- 94
- 95
- 96
- 97
2.2.2 StatementHandler
在获取StatementHandler的方法中- 1
@Override public <E> List<E> doQuery(MappedStatement ms, Object parameter, RowBounds rowBounds, ResultHandler resultHandler, BoundSql boundSql) throws SQLException { Statement stmt = null; try { Configuration configuration = ms.getConfiguration(); // 注意,已经来到SQL处理的关键对象 StatementHandler >> StatementHandler handler = configuration.newStatementHandler(wrapper, ms, parameter, rowBounds, resultHandler, boundSql); // 获取一个 Statement对象 stmt = prepareStatement(handler, ms.getStatementLog()); // 执行查询 return handler.query(stmt, resultHandler); } finally { // 用完就关闭 closeStatement(stmt); } }- 1
- 2
- 3
- 4
- 5
- 6
- 7
- 8
- 9
- 10
- 11
- 12
- 13
- 14
- 15
- 16
在进入newStatementHandler方法- 1
public StatementHandler newStatementHandler(Executor executor, MappedStatement mappedStatement, Object parameterObject, RowBounds rowBounds, ResultHandler resultHandler, BoundSql boundSql) { StatementHandler statementHandler = new RoutingStatementHandler(executor, mappedStatement, parameterObject, rowBounds, resultHandler, boundSql); // 植入插件逻辑(返回代理对象) statementHandler = (StatementHandler) interceptorChain.pluginAll(statementHandler); return statementHandler; }- 1
- 2
- 3
- 4
- 5
- 6
可以看到statementHandler的代理对象
2.2.3 ParameterHandler
在上面步骤的RoutingStatementHandler方法中,我们来看看- 1
public RoutingStatementHandler(Executor executor, MappedStatement ms, Object parameter, RowBounds rowBounds, ResultHandler resultHandler, BoundSql boundSql) { // StatementType 是怎么来的? 增删改查标签中的 statementType="PREPARED",默认值 PREPARED switch (ms.getStatementType()) { case STATEMENT: delegate = new SimpleStatementHandler(executor, ms, parameter, rowBounds, resultHandler, boundSql); break; case PREPARED: // 创建 StatementHandler 的时候做了什么? >> delegate = new PreparedStatementHandler(executor, ms, parameter, rowBounds, resultHandler, boundSql); break; case CALLABLE: delegate = new CallableStatementHandler(executor, ms, parameter, rowBounds, resultHandler, boundSql); break; default: throw new ExecutorException("Unknown statement type: " + ms.getStatementType()); } }- 1
- 2
- 3
- 4
- 5
- 6
- 7
- 8
- 9
- 10
- 11
- 12
- 13
- 14
- 15
- 16
- 17
- 18
然后我们随便选择一个分支进入,比如PreparedStatementHandler- 1
在newParameterHandler的步骤我们可以发现代理对象的创建public ParameterHandler newParameterHandler(MappedStatement mappedStatement, Object parameterObject, BoundSql boundSql) { ParameterHandler parameterHandler = mappedStatement.getLang().createParameterHandler(mappedStatement, parameterObject, boundSql); // 植入插件逻辑(返回代理对象) parameterHandler = (ParameterHandler) interceptorChain.pluginAll(parameterHandler); return parameterHandler; }- 1
- 2
- 3
- 4
- 5
- 6
2.2.4 ResultSetHandler
在上面的newResultSetHandler()方法中,也可以看到ResultSetHander的代理对象- 1
public ResultSetHandler newResultSetHandler(Executor executor, MappedStatement mappedStatement, RowBounds rowBounds, ParameterHandler parameterHandler, ResultHandler resultHandler, BoundSql boundSql) { ResultSetHandler resultSetHandler = new DefaultResultSetHandler(executor, mappedStatement, parameterHandler, resultHandler, boundSql, rowBounds); // 植入插件逻辑(返回代理对象) resultSetHandler = (ResultSetHandler) interceptorChain.pluginAll(resultSetHandler); return resultSetHandler; }- 1
- 2
- 3
- 4
- 5
- 6
- 7
2.3 执行流程
以Executor的query方法为例,当查询请求到来的时候,Executor的代理对象是如何处理拦截请求的呢?我们来看下。当请求到了executor.query方法的时候- 1
然后会执行Plugin的invoke方法/** * 代理对象方法被调用时执行的代码 * @param proxy * @param method * @param args * @return * @throws Throwable */ @Override public Object invoke(Object proxy, Method method, Object[] args) throws Throwable { try { // 获取当前方法所在类或接口中,可被当前Interceptor拦截的方法 Set<Method> methods = signatureMap.get(method.getDeclaringClass()); if (methods != null && methods.contains(method)) { // 当前调用的方法需要被拦截 执行拦截操作 return interceptor.intercept(new Invocation(target, method, args)); } // 不需要拦截 则调用 目标对象中的方法 return method.invoke(target, args); } catch (Exception e) { throw ExceptionUtil.unwrapThrowable(e); } }- 1
- 2
- 3
- 4
- 5
- 6
- 7
- 8
- 9
- 10
- 11
- 12
- 13
- 14
- 15
- 16
- 17
- 18
- 19
- 20
- 21
- 22
- 23
然后进入interceptor.intercept 会进入我们自定义的 FirstInterceptor对象中
/** * 执行拦截逻辑的方法 * @param invocation * @return * @throws Throwable */ @Override public Object intercept(Invocation invocation) throws Throwable { System.out.println("FirtInterceptor 拦截之前 ...."); Object obj = invocation.proceed(); // 执行目标方法 System.out.println("FirtInterceptor 拦截之后 ...."); return obj; }- 1
- 2
- 3
- 4
- 5
- 6
- 7
- 8
- 9
- 10
- 11
- 12
- 13
这个就是自定义的拦截器执行的完整流程,
2.4 多拦截器
如果我们有多个自定义的拦截器,那么他的执行流程是怎么样的呢?比如我们创建了两个 Interceptor 都是用来拦截 Executor 的query方法,一个是用来执行逻辑A 一个是用来执行逻辑B的。- 1
单个拦截器的执行流程
如果说对象被代理了多次,这里会继续调用下一个插件的逻辑, 再走一次Plugin的invoke()方法。 这里我们需要关注一下有多个插件的时候的运行顺序。- 1
- 2
- 3
配置的顺序和执行的顺序是相反的。 InterceptorChain的List是按照插件从上往下的顺序解析、添加的。- 1
- 2
而创建代理的时候也是按照list的顺序代理。 执行的时候当然是从最后代理的对象开始。- 1
- 2
这个我们可以通过实际的案例来得到验证,最后来总结下Interceptor的相关对象的作用- 1
对象 作用 Interceptor 自定义插件需要实现接口,实现4个方法 InterceptChain 配置的插件解析后会保存在Configuration的InterceptChain中 Plugin 触发管理类,还可以用来创建代理对象 Invocation 对被代理类进行包装,可以调用proceed()调用到被拦截的方法 3. PageHelper分析
Mybatis的插件使用中分页插件PageHelper应该是我们使用到的比较多的插件应用。我们先来回顾下PageHelper的应用- 1
3.1 PageHelper的应用
添加依赖- 1
<dependency> <groupId>com.github.pagehelpergroupId> <artifactId>pagehelperartifactId> <version>4.1.6version> dependency>- 1
- 2
- 3
- 4
- 5
在全局配置文件中注册- 1
<plugin interceptor="com.github.pagehelper.PageHelper"> <property name="dialect" value="mysql" /> <property name="offsetAsPageNum" value="true" /> <property name="rowBoundsWithCount" value="true" /> <property name="pageSizeZero" value="true" /> <property name="reasonable" value="false" /> <property name="params" value="pageNum=start;pageSize=limit;" /> <property name="returnPageInfo" value="check" /> plugin>- 1
- 2
- 3
- 4
- 5
- 6
- 7
- 8
- 9
- 10
- 11
- 12
- 13
- 14
- 15
- 16
- 17
- 18
- 19
- 20
- 21
- 22
- 23
- 24
- 25
然后就是分页查询操作
查看日志我们能够发现查询出来的只有5条记录
通过MyBatis的分页插件的使用,我们发现我们仅仅是在 执行操作之前设置了一句- 1
PageHelper.startPage(1,5);并没有做其他操作,也就是没有改变任何其他的业务代码。这就是它的优点,那么我再来看下他的实现原理3.2 实现原理剖析
在PageHelper中,肯定有提供Interceptor的实现类,通过源码我们可以发现是PageHelper,而且我们也可以看到在该方法头部添加的注解,声明了该拦截器拦截的是Executor的query方法- 1
然后当我们要执行查询操作的时候,我们知道 Executor.query() 方法的执行本质上是执行 Executor的代理对象的方法。先来看下Plugin中的invoke方法/** * 代理对象方法被调用时执行的代码 * @param proxy * @param method * @param args * @return * @throws Throwable */ @Override public Object invoke(Object proxy, Method method, Object[] args) throws Throwable { try { // 获取当前方法所在类或接口中,可被当前Interceptor拦截的方法 Set<Method> methods = signatureMap.get(method.getDeclaringClass()); if (methods != null && methods.contains(method)) { // 当前调用的方法需要被拦截 执行拦截操作 return interceptor.intercept(new Invocation(target, method, args)); } // 不需要拦截 则调用 目标对象中的方法 return method.invoke(target, args); } catch (Exception e) { throw ExceptionUtil.unwrapThrowable(e); } }- 1
- 2
- 3
- 4
- 5
- 6
- 7
- 8
- 9
- 10
- 11
- 12
- 13
- 14
- 15
- 16
- 17
- 18
- 19
- 20
- 21
- 22
- 23
interceptor.intercept(new Invocation(target, method, args));方法的执行会进入到 PageHelper的intercept方法中
/** * Mybatis拦截器方法 * * @param invocation 拦截器入参 * @return 返回执行结果 * @throws Throwable 抛出异常 */ public Object intercept(Invocation invocation) throws Throwable { if (autoRuntimeDialect) { SqlUtil sqlUtil = getSqlUtil(invocation); return sqlUtil.processPage(invocation); } else { if (autoDialect) { initSqlUtil(invocation); } return sqlUtil.processPage(invocation); } }- 1
- 2
- 3
- 4
- 5
- 6
- 7
- 8
- 9
- 10
- 11
- 12
- 13
- 14
- 15
- 16
- 17
- 18
intercept方法
/** * Mybatis拦截器方法 * * @param invocation 拦截器入参 * @return 返回执行结果 * @throws Throwable 抛出异常 */ public Object intercept(Invocation invocation) throws Throwable { if (autoRuntimeDialect) { // 多数据源 SqlUtil sqlUtil = getSqlUtil(invocation); return sqlUtil.processPage(invocation); } else { // 单数据源 if (autoDialect) { initSqlUtil(invocation); } return sqlUtil.processPage(invocation); } }- 1
- 2
- 3
- 4
- 5
- 6
- 7
- 8
- 9
- 10
- 11
- 12
- 13
- 14
- 15
- 16
- 17
- 18
在interceptor方法中首先会获取一个SqlUtils对象
SqlUtil:数据库类型专用sql工具类,一个数据库url对应一个SqlUtil实例,SqlUtil内有一个Parser对象,如果是mysql,它是MysqlParser,如果是oracle,它是OracleParser,这个Parser对象是SqlUtil不同实例的主要存在价值。执行count查询、设置Parser对象、执行分页查询、保存Page分页对象等功能,均由SqlUtil来完成。
initSqlUtil 方法
/** * 初始化sqlUtil * * @param invocation */ public synchronized void initSqlUtil(Invocation invocation) { if (this.sqlUtil == null) { this.sqlUtil = getSqlUtil(invocation); if (!autoRuntimeDialect) { properties = null; sqlUtilConfig = null; } autoDialect = false; } }- 1
- 2
- 3
- 4
- 5
- 6
- 7
- 8
- 9
- 10
- 11
- 12
- 13
- 14
- 15
getSqlUtil方法
/** * 根据datasource创建对应的sqlUtil * * @param invocation */ public SqlUtil getSqlUtil(Invocation invocation) { MappedStatement ms = (MappedStatement) invocation.getArgs()[0]; //改为对dataSource做缓存 DataSource dataSource = ms.getConfiguration().getEnvironment().getDataSource(); String url = getUrl(dataSource); if (urlSqlUtilMap.containsKey(url)) { return urlSqlUtilMap.get(url); } try { lock.lock(); if (urlSqlUtilMap.containsKey(url)) { return urlSqlUtilMap.get(url); } if (StringUtil.isEmpty(url)) { throw new RuntimeException("无法自动获取jdbcUrl,请在分页插件中配置dialect参数!"); } String dialect = Dialect.fromJdbcUrl(url); if (dialect == null) { throw new RuntimeException("无法自动获取数据库类型,请通过dialect参数指定!"); } // 创建SqlUtil SqlUtil sqlUtil = new SqlUtil(dialect); if (this.properties != null) { sqlUtil.setProperties(properties); } else if (this.sqlUtilConfig != null) { sqlUtil.setSqlUtilConfig(this.sqlUtilConfig); } urlSqlUtilMap.put(url, sqlUtil); return sqlUtil; } finally { lock.unlock(); } }- 1
- 2
- 3
- 4
- 5
- 6
- 7
- 8
- 9
- 10
- 11
- 12
- 13
- 14
- 15
- 16
- 17
- 18
- 19
- 20
- 21
- 22
- 23
- 24
- 25
- 26
- 27
- 28
- 29
- 30
- 31
- 32
- 33
- 34
- 35
- 36
- 37
- 38
查看SqlUtil的构造方法
/** * 构造方法 * * @param strDialect */ public SqlUtil(String strDialect) { if (strDialect == null || "".equals(strDialect)) { throw new IllegalArgumentException("Mybatis分页插件无法获取dialect参数!"); } Exception exception = null; try { Dialect dialect = Dialect.of(strDialect); // 根据方言创建对应的解析器 parser = AbstractParser.newParser(dialect); } catch (Exception e) { exception = e; //异常的时候尝试反射,允许自己写实现类传递进来 try { Class<?> parserClass = Class.forName(strDialect); if (Parser.class.isAssignableFrom(parserClass)) { parser = (Parser) parserClass.newInstance(); } } catch (ClassNotFoundException ex) { exception = ex; } catch (InstantiationException ex) { exception = ex; } catch (IllegalAccessException ex) { exception = ex; } } if (parser == null) { throw new RuntimeException(exception); } }- 1
- 2
- 3
- 4
- 5
- 6
- 7
- 8
- 9
- 10
- 11
- 12
- 13
- 14
- 15
- 16
- 17
- 18
- 19
- 20
- 21
- 22
- 23
- 24
- 25
- 26
- 27
- 28
- 29
- 30
- 31
- 32
- 33
- 34
创建的解析器
public static Parser newParser(Dialect dialect) { Parser parser = null; switch (dialect) { case mysql: case mariadb: case sqlite: parser = new MysqlParser(); break; case oracle: parser = new OracleParser(); break; case hsqldb: parser = new HsqldbParser(); break; case sqlserver: parser = new SqlServerParser(); break; case sqlserver2012: parser = new SqlServer2012Dialect(); break; case db2: parser = new Db2Parser(); break; case postgresql: parser = new PostgreSQLParser(); break; case informix: parser = new InformixParser(); break; case h2: parser = new H2Parser(); break; default: throw new RuntimeException("分页插件" + dialect + "方言错误!"); } return parser; }- 1
- 2
- 3
- 4
- 5
- 6
- 7
- 8
- 9
- 10
- 11
- 12
- 13
- 14
- 15
- 16
- 17
- 18
- 19
- 20
- 21
- 22
- 23
- 24
- 25
- 26
- 27
- 28
- 29
- 30
- 31
- 32
- 33
- 34
- 35
- 36
- 37
我们可以看到不同的数据库方言,创建了对应的解析器。
然后我们再回到前面的interceptor方法中继续,查看sqlUtil.processPage(invocation);方法
private Object _processPage(Invocation invocation) throws Throwable { final Object[] args = invocation.getArgs(); Page page = null; //支持方法参数时,会先尝试获取Page if (supportMethodsArguments) { page = getPage(args); // 有通过ThreadLocal来获取分页数据信息 } //分页信息 RowBounds rowBounds = (RowBounds) args[2]; //支持方法参数时,如果page == null就说明没有分页条件,不需要分页查询 if ((supportMethodsArguments && page == null) //当不支持分页参数时,判断LocalPage和RowBounds判断是否需要分页 || (!supportMethodsArguments && SqlUtil.getLocalPage() == null && rowBounds == RowBounds.DEFAULT)) { return invocation.proceed(); } else { //不支持分页参数时,page==null,这里需要获取 if (!supportMethodsArguments && page == null) { page = getPage(args); } return doProcessPage(invocation, page, args); } }- 1
- 2
- 3
- 4
- 5
- 6
- 7
- 8
- 9
- 10
- 11
- 12
- 13
- 14
- 15
- 16
- 17
- 18
- 19
- 20
- 21
- 22
doProcessPage进入该方法
private Page doProcessPage(Invocation invocation, Page page, Object[] args) throws Throwable { //保存RowBounds状态 RowBounds rowBounds = (RowBounds) args[2]; //获取原始的ms MappedStatement ms = (MappedStatement) args[0]; //判断并处理为PageSqlSource if (!isPageSqlSource(ms)) { processMappedStatement(ms); } //设置当前的parser,后面每次使用前都会set,ThreadLocal的值不会产生不良影响 ((PageSqlSource)ms.getSqlSource()).setParser(parser); try { //忽略RowBounds-否则会进行Mybatis自带的内存分页 args[2] = RowBounds.DEFAULT; //如果只进行排序 或 pageSizeZero的判断 if (isQueryOnly(page)) { return doQueryOnly(page, invocation); } //简单的通过total的值来判断是否进行count查询 if (page.isCount()) { page.setCountSignal(Boolean.TRUE); //替换MS args[0] = msCountMap.get(ms.getId()); //查询总数 Object result = invocation.proceed(); //还原ms args[0] = ms; //设置总数 page.setTotal((Integer) ((List) result).get(0)); if (page.getTotal() == 0) { return page; } } else { page.setTotal(-1l); } //pageSize>0的时候执行分页查询,pageSize<=0的时候不执行相当于可能只返回了一个count if (page.getPageSize() > 0 && ((rowBounds == RowBounds.DEFAULT && page.getPageNum() > 0) || rowBounds != RowBounds.DEFAULT)) { //将参数中的MappedStatement替换为新的qs page.setCountSignal(null); BoundSql boundSql = ms.getBoundSql(args[1]); // 在 invocation中绑定 分页的数据 args[1] = parser.setPageParameter(ms, args[1], boundSql, page); page.setCountSignal(Boolean.FALSE); //执行分页查询 Object result = invocation.proceed(); //得到处理结果 page.addAll((List) result); } } finally { ((PageSqlSource)ms.getSqlSource()).removeParser(); } //返回结果 return page; }- 1
- 2
- 3
- 4
- 5
- 6
- 7
- 8
- 9
- 10
- 11
- 12
- 13
- 14
- 15
- 16
- 17
- 18
- 19
- 20
- 21
- 22
- 23
- 24
- 25
- 26
- 27
- 28
- 29
- 30
- 31
- 32
- 33
- 34
- 35
- 36
- 37
- 38
- 39
- 40
- 41
- 42
- 43
- 44
- 45
- 46
- 47
- 48
- 49
- 50
- 51
- 52
- 53
- 54
- 55
- 56
- 57
- 58
invocation.proceed();方法会进入 CachingExecutor中的query方法。
@Override public <E> List<E> query(MappedStatement ms, Object parameterObject, RowBounds rowBounds, ResultHandler resultHandler) throws SQLException { // 获取SQL BoundSql boundSql = ms.getBoundSql(parameterObject); // 创建CacheKey:什么样的SQL是同一条SQL? >> CacheKey key = createCacheKey(ms, parameterObject, rowBounds, boundSql); return query(ms, parameterObject, rowBounds, resultHandler, key, boundSql); }- 1
- 2
- 3
- 4
- 5
- 6
- 7
- 8
ms.getBoundSql方法中会完成分页SQL的绑定
进入 PageSqlSource 的getBoundSql方法中
/** * 获取BoundSql * * @param parameterObject * @return */ @Override public BoundSql getBoundSql(Object parameterObject) { Boolean count = getCount(); if (count == null) { return getDefaultBoundSql(parameterObject); } else if (count) { return getCountBoundSql(parameterObject); } else { return getPageBoundSql(parameterObject); } }- 1
- 2
- 3
- 4
- 5
- 6
- 7
- 8
- 9
- 10
- 11
- 12
- 13
- 14
- 15
- 16
- 17
然后进入getPageBoundSql获取分页的SQL语句,在这个方法中大家也可以发现查询总的记录数的SQL生成
@Override protected BoundSql getPageBoundSql(Object parameterObject) { String tempSql = sql; String orderBy = PageHelper.getOrderBy(); if (orderBy != null) { tempSql = OrderByParser.converToOrderBySql(sql, orderBy); } tempSql = localParser.get().getPageSql(tempSql); return new BoundSql(configuration, tempSql, localParser.get().getPageParameterMapping(configuration, original.getBoundSql(parameterObject)), parameterObject); }- 1
- 2
- 3
- 4
- 5
- 6
- 7
- 8
- 9
- 10
最终在这个方法中生成了对应数据库的分页语句
4.应用场景分析
作用 描述 实现方式 水平分表 一张费用表按月度拆分为12张表。fee_202001-202012。当查询条件出现月度(tran_month)时,把select语句中的逻辑表名修改为对应的月份表。 对query update方法进行拦截在接口上添加注解,通过反射获取接口注解,根据注解上配置的参数进行分表,修改原SQL,例如id取模,按月分表 数据脱敏 手机号和身份证在数据库完整存储。但是返回给用户,屏蔽手机号的中间四位。屏蔽身份证号中的出生日期。 query——对结果集脱敏 菜单权限控制 不同的用户登录,查询菜单权限表时获得不同的结果,在前端展示不同的菜单 对query方法进行拦截在方法上添加注解,根据权限配置,以及用户登录信息,在SQL上加上权限过滤条件 黑白名单 有些SQL语句在生产环境中是不允许执行的,比如like %% 对Executor的update和query方法进行拦截,将拦截的SQL语句和黑白名单进行比较,控制SQL语句的执行 全局唯一ID 在高并发的环境下传统的生成ID的方式不太适用,这时我们就需要考虑其他方式了 创建插件拦截Executor的insert方法,通过UUID或者雪花算法来生成ID,并修改SQL中的插入信息 -
相关阅读:
Pycharm一直打不开,无任何报错
HTML5 用FileReader对象读取文件内容
计算机毕业设计SSMJAVA高校田径运动会管理【附源码数据库】
4 年 Java 程序员十面阿里终拿下 offer,评级 P6+ 年薪 30-40w 无股票
Java程序猿搬砖笔记(十)
从尾到头打印链表
[CSAWQual 2019]Web_Unagi - 文件上传+XXE注入(XML编码绕过)
【滤波跟踪】基于UKF与KF实现单目标无杂波环境下二维雷达量测的目标跟踪算法附matlab代码
输出心形图案
redis解决缓存与数据库双写一致性问题代码实现
- 原文地址:https://blog.csdn.net/springsdl/article/details/133928543