-
qml之动态元素类型
动画
- QMlL使用插值的方式控制属性的更改。
- 动画是在指定的时间内一些列属性的持续变化。
常用的动画类型元素动画: - PropertyAnimation:属性值改变播放动画
- NumberAnimation:qreal_type值改变播放动画
- ColorAnimation:颜色值改变播放动画
- RotationAnimation:旋转值改变播放的动画
Qt Quick还提供了一些特殊场景下需要使用的动画类型:
PauseAnimation,SequentialAnimation,ParallelAnimation,AnchorAnimation,ParentAnimation,SmoothedAnimation ,SpringAnimation,PathAnimation,Vector3dAnimation
对于更加复杂的动画,可能需要在播放动画时改变属性或者运行脚本。为此,QtQuick提供了action元素: - PropertyAction:在播放动画时改变属性
- ScripAction:在播放动画时运行脚本
例子
import QtQuick import QtQuick.Window Image { id: root source: "../../images/background.png" property int padding: 40 property bool running: false Image { id: qq source: "../../images/qq.png" x:root.padding;y:(root.height-height)/2 NumberAnimation on x{ to:root.width-qq.width-root.padding duration: 3000 running: root.running } RotationAnimator on rotation{ to:360 duration: 3000 running: root.running } OpacityAnimator on opacity{ to:0 duration: 3000 running: root.running } } MouseArea{ anchors.fill: root onClicked: root.running = true } }- 1
- 2
- 3
- 4
- 5
- 6
- 7
- 8
- 9
- 10
- 11
- 12
- 13
- 14
- 15
- 16
- 17
- 18
- 19
- 20
- 21
- 22
- 23
- 24
- 25
- 26
- 27
- 28
- 29
- 30
- 31
- 32
- 33
- 34
- 35
- 36
- 37
- 38
- 39
- 40

- 应用于x和rotation、透明度属性的简单动画。
- 每个动画的持续时间为3000毫秒。
- x:将对象逐渐移动到右边的位置。
- rotation:从当前角度运行到360度。
- 透明度:从1到0
- 三个动画并行运行,并在单击鼠标区域时启动。
应用动画
可以通过多种方式执行动画:
- 属性上的动画:在元素完全加载后自动运行
- 属性上的行为:属性值更改时自动运行
- 独立动画:使用start()显式启动动画或将running设置为true时运行
例子
import QtQuick import QtQuick.Window Window { id:root width: 640 height: 480 visible: true title: qsTr("Hello World") color:"gray" ClickableImageV2{ id:qq1 x:40;y:root.height-height source:"../../images/qq.png" text:"animation on property" NumberAnimation on y{ to:40;duration:3000 } } ClickableImageV2{ id:qq2 x:40+qq1.width+20;y:root.height-height source:"../../images/qq.png" text:"animation on property" Behavior on y{ NumberAnimation{duration:3000} } onClicked: y=40 } ClickableImageV2{ id:qq3 x:40+qq1.width+qq2.x;y:root.height-height source:"../../images/qq.png" text:"animation on property" NumberAnimation{ id:anim target:qq3 from:root.height-qq3.height to:40;duration:3000 property:"y" running:area.pressed } MouseArea{ id:area anchors.fill: parent } } }- 1
- 2
- 3
- 4
- 5
- 6
- 7
- 8
- 9
- 10
- 11
- 12
- 13
- 14
- 15
- 16
- 17
- 18
- 19
- 20
- 21
- 22
- 23
- 24
- 25
- 26
- 27
- 28
- 29
- 30
- 31
- 32
- 33
- 34
- 35
- 36
- 37
- 38
- 39
- 40
- 41
- 42
- 43
- 44
- 45
- 46
- 47
- 48
- 49
- 50
- 51
- 52
- 53
- 54
- 55
- 56
- 57
第一个对象使用on<property>策略进行移动。动画立即开始。
第二个对象使用Behavior on动画。此行为告诉属性它应该为值的每个更改设置动画。可以通过在行为元素上设置enabled:false来禁用该行为。
第三个对象使用standalone动画。动画被定义为其自己的元素,几乎可以位于文档中的任何位置。缓动曲线

属性的值更改可以由动画控制。缓动属性允许影响属性更改的插值曲线。
y轴:property
x轴:duration例子
import QtQuick import QtQuick.Window import QtQuick.Layouts Rectangle{ id:root width: childrenRect.width height: childrenRect.height color:'gray' gradient: Gradient{ GradientStop{position:0.0;color:root.color} GradientStop{position:1.0;color:Qt.lighter(root.color,1.5)} } ColumnLayout{ spacing: 20 Grid{ spacing: 10 columns:5 EasingType{ title:'Linear' easingType: Easing.Linear onClicked: { animation.easing.type=easingType box.toggle=!box.toggle } } EasingType{ title:'InExpo' easingType: Easing.InExpo onClicked: { animation.easing.type=easingType box.toggle=!box.toggle } } EasingType{ title:'OutExpo' easingType: Easing.OutExpo onClicked: { animation.easing.type=easingType box.toggle=!box.toggle } } EasingType{ title:'InOutExpo' easingType: Easing.InOutExpo onClicked: { animation.easing.type=easingType box.toggle=!box.toggle } } EasingType{ title:'InOutCubic' easingType: Easing.InOutCubic onClicked: { animation.easing.type=easingType box.toggle=!box.toggle } } EasingType{ title:'SineCurve' easingType: Easing.SineCurve onClicked: { animation.easing.type=easingType box.toggle=!box.toggle } } EasingType{ title:'InOutCirc' easingType: Easing.InOutCirc onClicked: { animation.easing.type=easingType box.toggle=!box.toggle } } EasingType{ title:'InOutElastic' easingType: Easing.InOutElastic onClicked: { animation.easing.type=easingType box.toggle=!box.toggle } } EasingType{ title:'InOutBack' easingType: Easing.InOutBack onClicked: { animation.easing.type=easingType box.toggle=!box.toggle } } EasingType{ title:'InOutBounce' easingType: Easing.InOutBounce onClicked: { animation.easing.type=easingType box.toggle=!box.toggle } } } Rectangle{ height:100 Layout.fillWidth: true gradient: Gradient{ GradientStop{position:0.0;color:'gray'} GradientStop{position:1.0;color:'green'} } Rectangle{ id:box property bool toggle anchors.verticalCenter: parent.verticalCenter width: 80;height:80 gradient: Gradient{ GradientStop{position:0.0;color:'red'} GradientStop{position:1.0;color:'yellow'} } x:toggle?20:root.width-width-20 Behavior on x{ NumberAnimation{ id:animation duration:1000 } } } } } }- 1
- 2
- 3
- 4
- 5
- 6
- 7
- 8
- 9
- 10
- 11
- 12
- 13
- 14
- 15
- 16
- 17
- 18
- 19
- 20
- 21
- 22
- 23
- 24
- 25
- 26
- 27
- 28
- 29
- 30
- 31
- 32
- 33
- 34
- 35
- 36
- 37
- 38
- 39
- 40
- 41
- 42
- 43
- 44
- 45
- 46
- 47
- 48
- 49
- 50
- 51
- 52
- 53
- 54
- 55
- 56
- 57
- 58
- 59
- 60
- 61
- 62
- 63
- 64
- 65
- 66
- 67
- 68
- 69
- 70
- 71
- 72
- 73
- 74
- 75
- 76
- 77
- 78
- 79
- 80
- 81
- 82
- 83
- 84
- 85
- 86
- 87
- 88
- 89
- 90
- 91
- 92
- 93
- 94
- 95
- 96
- 97
- 98
- 99
- 100
- 101
- 102
- 103
- 104
- 105
- 106
- 107
- 108
- 109
- 110
- 111
- 112
- 113
- 114
- 115
- 116
- 117
- 118
- 119
- 120
- 121
- 122
- 123
- 124
- 125
- 126
- 127
- 128
- 129
- 130
- 131
- 132
- 133
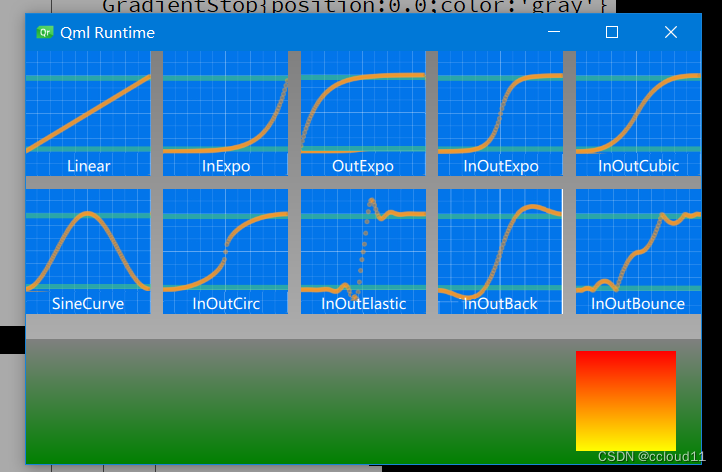
点击不同的曲线会有不同的动画效果。动画分组
分组有两种方式:并行或顺序。
可以使用SequentialAnimation或ParallelAnimation元素,它们充当其他动画元素的动画容器。这些分组动画本身就是动画。

例子
import QtQuick import QtQuick.Window Window { id:root width: 640 height: 480 visible: true title: qsTr("UFO") property int duration: 3000 Image { source: "../../images/background.png" anchors.fill: parent } ClickableImageV3{ id:ufo x:20;y:root.height-height source: "../../images/ufo.png" text:'UFO' onClicked: anim.restart() } ParallelAnimation/*SequentialAnimation*/{ id:anim NumberAnimation{ target: ufo property: 'y' from:root.height-ufo.height to:20 duration: root.duration } NumberAnimation{ target: ufo property: 'x' from:20 to:500 duration: root.duration } } }- 1
- 2
- 3
- 4
- 5
- 6
- 7
- 8
- 9
- 10
- 11
- 12
- 13
- 14
- 15
- 16
- 17
- 18
- 19
- 20
- 21
- 22
- 23
- 24
- 25
- 26
- 27
- 28
- 29
- 30
- 31
- 32
- 33
- 34
- 35
- 36
- 37
- 38
- 39
- 40
- 41
- 42
- 43
- 44
- 45

嵌套动画
分组动画也可以嵌套。例如,一个连续动画可以有两个并行动画作为子动画。我们可以通过一个足球示例:
- 从左到右的x平移(X1)
- 从下到上的y平移(Y1),然后是从上到下的平移(Y2),带有一些弹跳
- 在动画的整个持续时间内旋转360度(ROT1)

即我们可以将y的改变分成一次顺序动画,角度和x的变化与这次顺序动画为一个并行动画即可实现效果。
代码
import QtQuick import QtQuick.Window Item { id:root width: 480 height: 300 property int duration: 3000 Rectangle{ id:sky width: root.width height: 200 gradient: Gradient{ GradientStop{position:0.0;color:"#0080FF"} GradientStop{position:1.0;color:"#66CCFF"} } } Rectangle{ id:ground anchors.top: sky.bottom anchors.bottom:root.bottom width: root.width gradient: Gradient{ GradientStop{position:0.0;color:"#00FF00"} GradientStop{position:1.0;color:"#00803F"} } } Image { id: ball source: "../../images/soccer_ball.png" scale:0.5 x:0;y:root.height-height MouseArea{ anchors.fill: parent onClicked: { ball.x=0 ball.y=root.height-ball.height ball.rotation=0 anim.restart() } } } ParallelAnimation{ id:anim SequentialAnimation{ NumberAnimation{ properties: "y" target: ball to:20 duration: root.duration*0.4 easing.type:Easing.OutCirc } NumberAnimation{ properties: "y" target: ball to:root.height-ball.height duration: root.duration*0.6 easing.type:Easing.OutBounce } } NumberAnimation{ properties: "x" target: ball to:380 duration: root.duration } RotationAnimation{ properties: "rotation" target: ball to:720 duration: root.duration } } }- 1
- 2
- 3
- 4
- 5
- 6
- 7
- 8
- 9
- 10
- 11
- 12
- 13
- 14
- 15
- 16
- 17
- 18
- 19
- 20
- 21
- 22
- 23
- 24
- 25
- 26
- 27
- 28
- 29
- 30
- 31
- 32
- 33
- 34
- 35
- 36
- 37
- 38
- 39
- 40
- 41
- 42
- 43
- 44
- 45
- 46
- 47
- 48
- 49
- 50
- 51
- 52
- 53
- 54
- 55
- 56
- 57
- 58
- 59
- 60
- 61
- 62
- 63
- 64
- 65
- 66
- 67
- 68
- 69
- 70
- 71
- 72
- 73
- 74
- 75
- 76
- 77
- 78
- 79
- 80
- 81
- 82
- 83
- 84
状态和转换
- 状态定义了一组属性的更改,可以由特定条件触发。
- 状态开关可以附加一个转换,该转换定义了这些更改对应的动画,或执行附加的行为。
- 进入状态时也可以执行行为。
例如,两个信号灯。stop用红色,go用绿色。两个灯光不应同时发光。
state: "stop" states: [ State { name: "stop" PropertyChanges { target: light1; color: root.red } PropertyChanges { target: light2; color: root.black } }, State { name: "go" PropertyChanges { target: light1; color: root.black } PropertyChanges { target: light2; color: root.green } } ] MouseArea { anchors.fill: parent onClicked: parent.state = (parent.state == "stop" ? "go" : "stop") }- 1
- 2
- 3
- 4
- 5
- 6
- 7
- 8
- 9
- 10
- 11
- 12
- 13
- 14
- 15
- 16
- 17
- 18
- 19
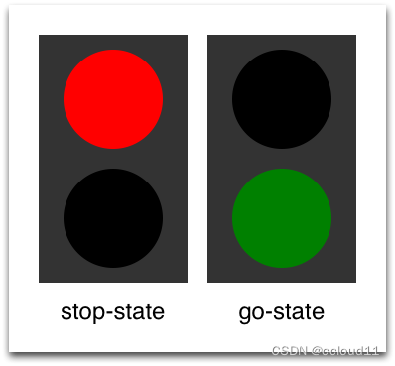
现在能够成功地改变信号灯的状态。为了使UI更具吸引力,应该添加一些带有动画效果的过渡。状态改变可以触发转换。transitions: [ Transition { from: "stop"; to: "go" // from: "*"; to: "*" ColorAnimation { target: light1; properties: "color"; duration: 2000 } ColorAnimation { target: light2; properties: "color"; duration: 2000 } } ]- 1
- 2
- 3
- 4
- 5
- 6
- 7
- 8
rom: “"; to: "” 表示“从任何状态到任何其他状态”,是默认值。
代码
import QtQuick import QtQuick.Window Item { id: root width: 150;height:260 property color black: 'black' property color red: 'red' property color green: 'green' Rectangle{ anchors.fill: parent color:"#333333" } state: "stop" states: [ State { name: "stop" PropertyChanges {target: light1;color:root.red;} PropertyChanges {target: light2;color:root.black;} }, State { name: "go" PropertyChanges {target: light1;color:root.black;} PropertyChanges {target: light2;color:root.green;} } ] transitions: [ Transition { from: "*";to: "*" ColorAnimation { target:light1;duration: 1000;properties: 'color' } ColorAnimation { target:light2;duration: 1000;properties: 'color' } } ] Rectangle{ id:light1 x:25;y:15 width:100;height: width radius: width/2 color:root.black border.color: Qt.lighter(color,1.1) } Rectangle{ id:light2 x:25;y:135 width:100;height: width radius: width/2 color:root.black border.color: Qt.lighter(color,1.1) } MouseArea{ anchors.fill: root onClicked: { parent.state = ((parent.state == "stop")?"go":"stop") } } }- 1
- 2
- 3
- 4
- 5
- 6
- 7
- 8
- 9
- 10
- 11
- 12
- 13
- 14
- 15
- 16
- 17
- 18
- 19
- 20
- 21
- 22
- 23
- 24
- 25
- 26
- 27
- 28
- 29
- 30
- 31
- 32
- 33
- 34
- 35
- 36
- 37
- 38
- 39
- 40
- 41
- 42
- 43
- 44
- 45
- 46
- 47
- 48
- 49
- 50
- 51
- 52
- 53
- 54
- 55
- 56
- 57
- 58
- 59
- 60
- 61
- 62
- 63
- 64
- 65
- 66
- 67
- 68
- 69
-
相关阅读:
反射获取DLL中的字段、属性、方法、泛型方法(C#)
直流有刷电机开环调速基于STM32F302R8+X-NUCLEO-IHM07M1(一)
【无标题】
jQuery效果演示
uniapp项目搭建 请求配置
hadoop2.4.1伪分布式搭建
D - Wall Painting
python机器学习之梯度下降法
一个.Net Core开源缓存中间件,让你更加简单、方便使用缓存
vue2 顶象 安全 验证码的使用
- 原文地址:https://blog.csdn.net/qq_45526401/article/details/133973772
