-
保姆级 Keras 实现 Faster R-CNN 十四 (预测)
保姆级 Keras 实现 Faster R-CNN 十四
上一篇 文章中我们完成了 Faster R-CNN 训练的功能, 现在到了预测部分了
一. 预测模型
因为在预测的时候并不需标签, 所以 RoiLabelLayer 就不需要了, 也不需要将标签与 rcnn_cls, rcnn_reg 组合. 模型变得更简单了. 以下是用于预测的模型, 相对的是 上一篇 文章中的训练模型
# 创建预测模型 # iou_thres: 做 NMS 时 IoU 阈值 def create_predict_model(self, iou_thres = 0.6, summary = True): x_image = keras.layers.Input(shape = (None, None, 3), name = "input") features = self.base_net(x_image) rpn_cls, rpn_reg = self.rpn_net(features) proposals = ProposalLayer(self.base_anchors, stride = self.feature_stride, num_rois = self.train_num, iou_thres = self.nms_thres, name = "proposal")([x_image, rpn_cls, rpn_reg]) pooled_rois = RoiPoolingLayer(name = "roi_pooling")([x_image, features, proposals]) rcnn_cls, rcnn_reg = self.fast_rcnn(pooled_rois, cells = self.dense_cells, num_classes = self.NUM_CLS) targets = TargetLayer(iou_thres = iou_thres, name = "targets")([x_image, proposals, rcnn_reg, rcnn_cls]) self.model = keras.Model(inputs = x_image, outputs = targets, name = "faster_rcnn") if summary: self.model.summary()- 1
- 2
- 3
- 4
- 5
- 6
- 7
- 8
- 9
- 10
- 11
- 12
- 13
- 14
- 15
- 16
- 17
- 18
- 19
- 20
- 21
- 22
- 23
- 24
- 25
- 26
- 27
- 28
二. TargetLayer
在上面的模型中, 我们在后面接了一个 TargetLayer, 有了它可以将模型输出变成我们想要的三个值, 分别是 预测框坐标, 类别与分数, 模型用起来更方便, TargetLayer 代码如下
# 定义 Target Layer class TargetLayer(Layer): # iou_thres: 做 NMS 时 IoU 阈值 def __init__(self, iou_thres = 0.6, **kwargs): self.iou_thres = iou_thres self.ANCHOR_DIMS = 4 super(TargetLayer, self).__init__(**kwargs) def build(self, input_shape): self.targets = input_shape[1][1] # NMS 后剩下的目标数量, 最多为建议框的数量 super(TargetLayer, self).build(input_shape) def call(self, inputs): # inputs 是一个列表, 可以拆分为下面的参数 # image: 输入的原始图像 # boxes: 建议框 # deltas: 修正值 # scores: 类别分数 image, boxes, deltas, scores = inputs batch_size = tf.shape(image)[0] image_shape = tf.shape(image)[1: 3] # 类别序号 class_id = tf.argmax(scores, axis = -1) # 最大类别分数 scores = tf.reduce_max(scores, axis = -1) # 将序号为 0 对应的分数变成 0, 因为是背景, 判断为背景的分数自然就高, NMS 会有问题 mask = tf.cast(class_id > 0, dtype = tf.float32) scores *= mask # 修正建议框 boxes = self.apply_box_deltas(image_shape, boxes, deltas) # 拆分与组合操作 selected_boxes, selected_ids, selected_scores = tf.map_fn( lambda i: self.batch_process(image_shape, tf.reshape(boxes, (batch_size, -1, self.ANCHOR_DIMS)), tf.reshape(scores, (batch_size, -1)), tf.reshape(class_id, (batch_size, -1)), i), tf.range(batch_size, dtype = tf.int32), dtype = (tf.float32, tf.int64, tf.float32), back_prop = False) boxes = tf.reshape(selected_boxes, (batch_size, -1, self.ANCHOR_DIMS)) class_id = tf.reshape(selected_ids, (batch_size, -1, 1)) scores = tf.reshape(selected_scores, (batch_size, -1, 1)) return [boxes, class_id, scores] def compute_output_shape(self, input_shape): return [(input_shape[1][0], self.targets, input_shape[1][2]), (input_shape[3][0], self.targets, 1), (input_shape[3][0], self.targets, 1)] # 修正建议框 def apply_box_deltas(self, image_shape, boxes, deltas): # 宽度和高度 w = boxes[..., 3] - boxes[..., 1] h = boxes[..., 2] - boxes[..., 0] # 中心坐标 x = boxes[..., 1] + w * 0.5 y = boxes[..., 0] + h * 0.5 # 修正 anchor_box x += deltas[..., 0] * w y += deltas[..., 1] * h w *= tf.exp(deltas[..., 2]) h *= tf.exp(deltas[..., 3]) # 转换成 y1, x1, y2, x2 格式 x1 = x - w * 0.5 y1 = y - h * 0.5 x2 = x + w * 0.5 y2 = y + h * 0.5 # 不管是训练还是预测, 超出范围的框分数也可能比较大, 所以都截断保留 x1 = tf.maximum(x1, 0) y1 = tf.maximum(y1, 0) x2 = tf.minimum(x2, tf.cast(image_shape[1], dtype = tf.float32)) y2 = tf.minimum(y2, tf.cast(image_shape[0], dtype = tf.float32)) # 如果用 tf.image.non_max_suppression 的话, 要按 y1, x1, y2, x2 的格式 boxes = tf.stack([y1, x1, y2, x2], axis = -1) return boxes # 数据填充 # pad_num: 填充数量 def data_pad(self, boxes, class_ids, scores, pad_num): padd_boxes = tf.zeros((pad_num, 4), dtype = tf.float32) padd_ids = tf.zeros((pad_num, ), dtype = tf.int64) padd_scores = tf.zeros((pad_num, ), dtype = tf.float32) boxes = tf.concat((boxes, padd_boxes), axis = 0) class_ids = tf.concat((class_ids, padd_ids), axis = 0) scores = tf.concat((scores, padd_scores), axis = 0) return boxes, class_ids, scores # 处理 batch 内一个数据 # boxes: 修正后的建议区域矩形 # scores: 建议框矩形对应的分数 # i: batch 内第几个数据 def batch_process(self, image_shape, boxes, scores, class_ids, i): selected_indices = tf.image.non_max_suppression(boxes[i], scores[i], self.targets, self.iou_thres) selected_boxes = tf.gather(boxes[i], selected_indices) selected_ids = tf.gather(class_ids[i], selected_indices) selected_scores = tf.gather(scores[i], selected_indices) num_selected_boxes = tf.shape(selected_boxes)[0] pad_num = self.targets - num_selected_boxes selected_boxes, selected_ids, selected_scores = tf.cond( num_selected_boxes < self.targets, lambda: self.data_pad(selected_boxes, selected_ids, selected_scores, pad_num), lambda: (selected_boxes, selected_ids, selected_scores)) return selected_boxes, selected_ids, selected_scores- 1
- 2
- 3
- 4
- 5
- 6
- 7
- 8
- 9
- 10
- 11
- 12
- 13
- 14
- 15
- 16
- 17
- 18
- 19
- 20
- 21
- 22
- 23
- 24
- 25
- 26
- 27
- 28
- 29
- 30
- 31
- 32
- 33
- 34
- 35
- 36
- 37
- 38
- 39
- 40
- 41
- 42
- 43
- 44
- 45
- 46
- 47
- 48
- 49
- 50
- 51
- 52
- 53
- 54
- 55
- 56
- 57
- 58
- 59
- 60
- 61
- 62
- 63
- 64
- 65
- 66
- 67
- 68
- 69
- 70
- 71
- 72
- 73
- 74
- 75
- 76
- 77
- 78
- 79
- 80
- 81
- 82
- 83
- 84
- 85
- 86
- 87
- 88
- 89
- 90
- 91
- 92
- 93
- 94
- 95
- 96
- 97
- 98
- 99
- 100
- 101
- 102
- 103
- 104
- 105
- 106
- 107
- 108
- 109
- 110
- 111
- 112
- 113
- 114
- 115
- 116
- 117
- 118
- 119
- 120
代码也不复杂, 和 ProposalLayer 有点像, 可以对比着看
三. 预测
有了完成的模型, 我们就可以预测了, 也定义一个函数方便调用
# 预测 # x: 生成器或图像路径 def predict(self, x): # 如果是图像路径, 那要将图像预处理成网络输入格式 # 如果不是则是 input_reader 返回的图像, 已经满足输入格式 if isinstance(x, str): img_src = cv.imread(x) img_new, scale = self.new_size_image(img_src) x = [img_new] x = np.array(x).astype(np.float32) / 255.0 else: (x, _, __), y = next(x) return x, self.model.predict(x)- 1
- 2
- 3
- 4
- 5
- 6
- 7
- 8
- 9
- 10
- 11
- 12
- 13
- 14
预测的时候, 参数可以是一个生成器或图像的路径, 用图像路径作为参数时, 一次只能预测一张图像
返回值是预测图像, 坐标值, 类别, 分数四. 显示预测结果
有了预测结果, 我们需要将预测的结果标记到图像上
# 显示预测结果 # x: 生成器或图像路径 # show_proposals: 如果 show_proposals > 0, 只显示 show_proposals 个建议框, 否则显示预测结果 # color_list: 显示颜色表 # show_cols: 显示列数 def show_predict(self, x, show_proposals = 0, color_list = None, show_cols = 4): image, (boxes, class_ids, scores) = self.predict(x) print(image.shape, boxes.shape, class_ids.shape) batch_size = image.shape[0] image_shape = image.shape[1: 3] show_list = [] if show_proposals > 0: proposal_model = keras.Model(inputs = self.model.input, outputs = self.model.get_layer("proposal").output) proposals = proposal_model.predict(image) print(proposals.shape) for i in range(batch_size): img_show = image[i].copy() for j, box in enumerate(proposals[i]): if j >= show_proposals: # 显示建议框的数量 break # 预测的 box 的坐标顺序是 (y1, x1, y2, x2), 显示的时候变成(x1, y1, x2, y2) cv.rectangle(img_show, (int(box[1]), int(box[0])), (int(box[3]), int(box[2])), (random.random(), random.random(), random.random()), 2) show_list.append((img_show, show_proposals)) else: # 显示颜色 if None == color_list: color_list = [] for i in range(self.NUM_CLS): color_list.append((random.random(), random.random(), random.random())) for i in range(batch_size): targets = 0 img_show = image[i].copy() for j, box in enumerate(boxes[i]): idx = int(class_ids[i][j]) score = scores[i][j] if idx > 0: targets += 1 # 预测的 box 的坐标顺序是 (y1, x1, y2, x2), 显示的时候变成(x1, y1, x2, y2) cv.rectangle(img_show, (int(box[1]), int(box[0])), (int(box[3]), int(box[2])), color_list[idx], 2) text_x, text_y = int(box[1]), int(box[0]) if text_y <= 24: text_x += 4 text_y += 20 else: text_y -= 8 text = self.categories[idx] + " {0:.2f}".format(float(score)) font = cv.FONT_HERSHEY_COMPLEX_SMALL (w, h), _ = cv.getTextSize(text, font, 1, 1) if text_x + w > image_shape[1]: text_x = image_shape[1] - w text_background = np.ones((h + 8, w, 3), np.float32) * 0.5 img_show[text_y - h - 2: text_y + 6, text_x: text_x + w] = cv.addWeighted( img_show[text_y - h - 2: text_y + 6, text_x: text_x + w], 0.4, text_background, 0.6, 0) cv.putText(img_show, text, (text_x, text_y), font, 1, color_list[idx], 1, cv.LINE_AA) show_list.append((img_show, targets)) figsize = (min(12, max(10, show_cols * 4)), max(6, batch_size // show_cols * 4)) plt.figure("predict_images", figsize = figsize) show_rows = max(1, batch_size // show_cols + (1 if batch_size % show_cols else 0)) for i, (img_show, t) in enumerate(show_list): if batch_size > 1: plt.subplot(show_rows, show_cols, i + 1) plt.title("targets: " + str(t), color = 'gray') plt.imshow(img_show[..., : : -1]) plt.show()- 1
- 2
- 3
- 4
- 5
- 6
- 7
- 8
- 9
- 10
- 11
- 12
- 13
- 14
- 15
- 16
- 17
- 18
- 19
- 20
- 21
- 22
- 23
- 24
- 25
- 26
- 27
- 28
- 29
- 30
- 31
- 32
- 33
- 34
- 35
- 36
- 37
- 38
- 39
- 40
- 41
- 42
- 43
- 44
- 45
- 46
- 47
- 48
- 49
- 50
- 51
- 52
- 53
- 54
- 55
- 56
- 57
- 58
- 59
- 60
- 61
- 62
- 63
- 64
- 65
- 66
- 67
- 68
- 69
- 70
- 71
- 72
- 73
- 74
- 75
- 76
- 77
- 78
- 79
- 80
- 81
- 82
- 83
- 84
- 85
- 86
- 87
- 88
- 89
show_proposals 参数需要提一下, 这个参数是用来控制显示建议框的, 当 show_proposals > 0 时, 只显示指定数量的建议框, 方便查看建议框的效果
五. 加载训练好的参数
预测模型需要加载训练好的参数, 代码如下
# 加载模型与参数 # file_name: 保存的文件名称 # load_model: 是否要加载模型 # load_weight: 是否加载存参数 def load(self, file_name, load_model = False, load_weight = True): if load_model or (True == load_weight and None == self.model): self.model = load_model(osp.join(self.log_path, file_name + "_model.h5")) if load_weight: self.model.load_weights(osp.join(self.log_path, file_name + "_weights.h5"), True)- 1
- 2
- 3
- 4
- 5
- 6
- 7
- 8
- 9
- 10
六. 效果展示
需要预测的时候, 我们只需如下操作即可
# 如果要检测的目标数比较少, 预测时可以把 train_num 改小一点 # faster_rcnn.train_num = 64 faster_rcnn.create_predict_model(iou_thres = 0.6, summary = False) faster_rcnn.load("faster_rcnn", False, True) # 测试集 test_reader = faster_rcnn.input_reader(faster_rcnn.test_set, batch_size = 4, train_mode = False)- 1
- 2
- 3
- 4
- 5
- 6
- 7
# 显示预测结果 # show_proposals > 0 时, 只显示建议框 faster_rcnn.show_predict(test_reader, show_proposals = 0, color_list = BGR_COLOR, show_cols = 2) # test_reader 也可以直接给图像的路径, 比如 # faster_rcnn.show_predict(r"test_set\00001.jpg", show_proposals = 0, color_list = BGR_COLOR, show_cols = 2)- 1
- 2
- 3
- 4
- 5
- 6
以下是 VOC2007 训练集的测试效果, 短边设置为 300, 图像中有黑边是为了同一 batch 中的图有相同的尺寸而做了填充

测试集的效果


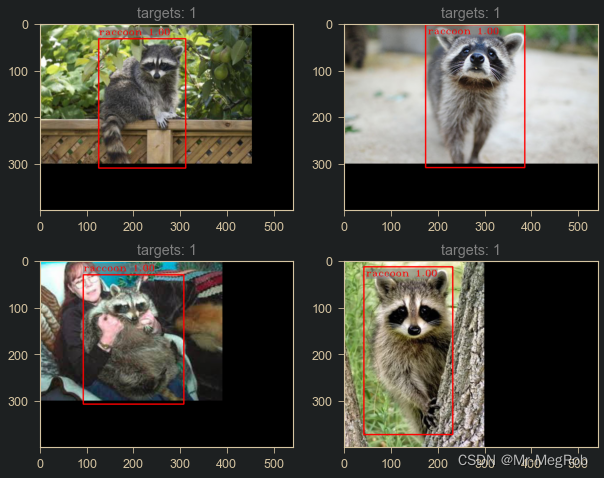
以下是小浣熊的预测效果
训练集数据
从网上下载的图像测试

在前面的文章中用的数据集是 VOC2007, 为了训练快一点, 我们做的数据增强也只有简单的翻转图像. 对于 VOC2007, 这样训练出来的模型在测试集上效果会差一点. 解决这个问题最简单粗暴的方式就是增加训练数据量. 最简单的增加数据量的方法就是做数据增强. 所以我们可以在 data_augment 函数中增加一些 旋转, 缩放, 裁切, 变形, 改变亮度, 改变色温 之类的增强. 这里就不演示了. 只是要注意的是标签要做相应的变化, train 函数的参数 augmented_num 也要修改成对应的值
小浣熊的预测貌似效果还可以, 是因为我挑了一些和训练集比较相似的图像, 如果预测其他背景或者毛色差异比较大的图像, 效果就差很多. 主要是训练的图像只有两百张. 多一点的话, 效果也会好一点
到这里, 《保姆级 Keras 实现 Faster R-CNN》系列文章就结束了
七. 代码下载
示例代码可下载 Jupyter Notebook 示例代码
-
相关阅读:
一分钟了解 ChatGPT 语音对话
产业大数据应用:洞察区域产业实况,把握区域经济脉搏
20T算力打造轻地图方案,这家智驾公司持续内卷
【javaWeb】在webapp中手动发布一个应用
【SpringCloud-学习笔记】Docker基本操作
STL学习笔记(随缘更新)
FinalReference 如何使 GC 过程变得拖拖拉拉
C语言 函数
2022-09-10 C++并发编程(二十一)
CV&NLP基础11之ResNet(深度残差网络)学习
- 原文地址:https://blog.csdn.net/yx123919804/article/details/115053895
