-
Netty系列教程之NIO基础知识
近30集的孙哥视频课程,看完一集整理一集来的,内容有点多,请大家放心食用~
1. 网络通讯的演变
1.1 多线程版网络通讯
在传统的开发模式中,客户端发起一个 HTTP 请求的过程就是建立一个 socket 通信的过程,服务端在建立连接之后,会创建单独的线程来处理当前请求。如下图所示:

其中,客户端示例代码如下:Socket socket = new Socket("127.0.0.1",8080); PrintWriter printWriter = new PrintWriter(socket.getOutputStream()); printWriter.write("send data to server");- 1
- 2
- 3
服务端示例代码如下:
ServerSocket serverSocket = new ServerSocket(8080); Socket socket = null; while (true) { socket = serverSocket.accept(); // 每一个消息都单独创建一个线程去处理 new Thread(new MsgServerHandler(socket)).start(); }- 1
- 2
- 3
- 4
- 5
- 6
- 7
随着越来越多的请求发起,按上述模式,服务端会 对每一个请求单独创建线程 处理:

在这种模式下,会存在以下几个问题:- 线程创建开销:线程是通过 JVM 调用操作系统来创建;
- 内存占用高:线程是占用存储资源的;
- CPU使用率高:(CPU轮转)线程之间上下文切换;
1.2 线程池版网络通讯
为了解决传统网络通讯开发所带来的问题,可通过在服务端 创建线程池 的方式来使得线程的创建可控(不能来一个请求就创建一个线程去处理);

服务端示例代码如下:// 使用线程池,预先创建线程 static{ threadPoolExecutor = new ThreadPoolExecutor(Runtime.getRuntime().availableProcessors(), 20, 120L, TimeUnit.SECONDS, new ArrayBlockingQueue<>(1000)); } ServerSocket serverSocket = new ServerSocket(8080); Socket socket; while (true){ socket = serverSocket.accept(); // 通过提交到线程池处理 threadPoolExecutor.execute(new MsgServerHandler(socket)); }- 1
- 2
- 3
- 4
- 5
- 6
- 7
- 8
- 9
- 10
- 11
- 12
这样一来就解决了传统网络开发中的3个问题,但是又带来了新的问题:
- 当连接池中的线程被占用(由于客户端等待输入或其它操作导致)完,新的请求不能获取到线程,需要进入到队列中进行 等待 ~
1.3 NIO非阻塞网络通讯
可使用 NIO 来解决上述阻塞的问题,在整个数据传输过程中,NIO 与上述两种通讯方式存在以下区别:
- 传统的数据传输方式采用 流(inputStream、outputStream) 而 NIO 采用 管道(channel) 来进行数据传输;
- NIO服务端 除了使用 ServerSocket 外,在网络编程中,NIO 还引入了 选择器(selector) ;

在引入 selector 之后,服务端能对客户端的 Channel 进行监控,如果能正常读写,则分配线程处理,反之发现某些客户端 阻塞 之后,selector 可以释放已分配给当前 Channel 的线程供其它 Channel 使用;
2. NIO的两个核心
2.1 Channel简介
Channel 是 IO 的通讯管道,类似于 InputStream 和 OutputStream ,但没有方向性(流有方向性);

常见的Channel
- 文件操作:
- FileChannel :读写文件中的数据;
- 网络操作:
- SocketChannel :通过TCP读写网络中的数据;
- ServerSocketChannel :监听新进来的 TCP 连接,并对每一个连接都创建 SocketChannel ;
- DatagramChannel :通过 UDP 读写网络中的数据;
2.2 Buffer简介
Channel 读取或写入的数据,都要写到Buffer中,才可以被程序操作!

在文件读取的过程中,由于 Channel 没有方向性,所以 Buffer 为了区分读写,引入了 读模式 、 写模式 进行区分(均站在程序的角度来看),文件通过管道( Channel )将数据存入缓存( Buffer )中供程序操作使用!
- 读模式:将文件数据读取到程序(flip());
- 写模式:将程序中的数据保存到文件(新创建,clear(),compact);
读、写模式只能存在一个,默认新创建为写模式!
常见的Buffer
- ByteBuffer:应用最广泛的Buffer;
- CharBuffer:
- DoubleBuffer:
- FloatBuffer:
- IntBuffer:
- LongBuffer:
- ShortBuffer:
- MapperByteBuffer:ByteBuffer的子类,用于直接内存操作!
3. 初识NIO程序
此处我们通过读取一个文件数据的程序来加深理解 Channel 和 Buffer ~
准备好我们的测试文件 data.txt ,并写入以下的测试数据:
1234567890- 1
创建 Channel 的方式有以下几种:
- FileInputStream
- RandomAccessFile
- FileChannel.open()
3.1 FileInputStream实现
创建并运行以下测试代码:
public class NIOTest { public static void main(String[] args) throws IOException { // 1. 创建Channel FileChannel FileChannel channel = new FileInputStream("D:\\Rivamed\\awesome\\message\\data.txt").getChannel(); // 2. 创建缓冲区,此处分配了10字节 ByteBuffer byteBuffer = ByteBuffer.allocate(10); // 3. 将读取的数据放入缓冲区 channel.read(byteBuffer); // 4. 通过程序读取Buffer中的内容,设置缓冲区为读模式 byteBuffer.flip(); // 5. 循环读取缓冲区中的数据 while (byteBuffer.hasRemaining()){ byte b = byteBuffer.get(); System.out.println("(char)b = " + (char)b); } // 6. 读完之后设置为写模式 byteBuffer.clear(); } }- 1
- 2
- 3
- 4
- 5
- 6
- 7
- 8
- 9
- 10
- 11
- 12
- 13
- 14
- 15
- 16
- 17
- 18
- 19
上述代码能正常运行并读取打印 data.txt 文件中的内容,但如果 data.txt 中的内容超过10位,如:
1234567890abc- 1
则上述代码将不能打印出 abc 这三个字符,原因是我们设置的 ByteBuffer 缓冲区大小为 10 个字节,程序在第一次读取完之后就正常结束了!显然不符合预期~我们需要改造成以下代码来循环读取!
public class NIOTest { public static void main(String[] args) throws IOException { // 1. 创建Channel FileChannel FileChannel channel = new FileInputStream("D:\\Rivamed\\awesome\\message\\data.txt").getChannel(); // 2. 创建缓冲区,此处分配了10字节 ByteBuffer byteBuffer = ByteBuffer.allocate(10); while (true){ // 3. 将读取的数据放入缓冲区,read为实际读取的字节数,如果没有内容则返回 -1 int read = channel.read(byteBuffer); if(read == -1) break; // 4. 通过程序读取Buffer中的内容,设置缓冲区为读模式 byteBuffer.flip(); // 5. 循环读取缓冲区中的数据 while (byteBuffer.hasRemaining()){ byte b = byteBuffer.get(); System.out.println("(char)b = " + (char)b); } // 6. 读完之后设置为写模式 byteBuffer.clear(); } } }- 1
- 2
- 3
- 4
- 5
- 6
- 7
- 8
- 9
- 10
- 11
- 12
- 13
- 14
- 15
- 16
- 17
- 18
- 19
- 20
- 21
- 22
3.2 RandomAccessFile实现
使用 RandomAccessFile 实现文件读取的代码如下所示,并添加异常处理等:
public class NIOTest2 { public static void main(String[] args) { FileChannel fileChannel = null; try { // 1. 创建Channel FileChannel fileChannel = new RandomAccessFile("D:\\Rivamed\\awesome\\message\\data.txt","rw").getChannel(); // 2. 创建缓冲区,此处分配了10字节 ByteBuffer byteBuffer = ByteBuffer.allocate(10); while (true){ // 3. 将读取的数据放入缓冲区,read为实际读取的字节数,如果没有内容则返回 -1 int read = fileChannel.read(byteBuffer); if(read == -1) break; // 4. 通过程序读取Buffer中的内容,设置缓冲区为读模式 byteBuffer.flip(); // 5. 循环读取缓冲区中的数据 while(byteBuffer.hasRemaining()){ byte b = byteBuffer.get(); System.out.println("(char)b = " + (char)b); } // 6. 读完之后设置为写模式 byteBuffer.clear(); } }catch (Exception e){ e.printStackTrace(); }finally { // 7. 关闭通道 if(fileChannel!=null){ try { fileChannel.close(); } catch (IOException e) { throw new RuntimeException(e); } } } } }- 1
- 2
- 3
- 4
- 5
- 6
- 7
- 8
- 9
- 10
- 11
- 12
- 13
- 14
- 15
- 16
- 17
- 18
- 19
- 20
- 21
- 22
- 23
- 24
- 25
- 26
- 27
- 28
- 29
- 30
- 31
- 32
- 33
- 34
- 35
- 36
3.3 FileChannel.open()实现
使用 FileChannel.open() 实现文件读取的代码如下所示:
public class NIOTest3 { public static void main(String[] args) { FileChannel fileChannel = null; try { // 1. 创建Channel FileChannel fileChannel = FileChannel.open(Paths.get("D:\\Rivamed\\awesome\\message\\data.txt"), StandardOpenOption.READ); // 2. 创建缓冲区,此处分配了10字节 ByteBuffer byteBuffer = ByteBuffer.allocate(10); while (true){ // 3. 将读取的数据放入缓冲区,read为实际读取的字节数,如果没有内容则返回 -1 int read = fileChannel.read(byteBuffer); if(read == -1) break; // 4. 通过程序读取Buffer中的内容,设置缓冲区为读模式 byteBuffer.flip(); // 5. 循环读取缓冲区中的数据 while(byteBuffer.hasRemaining()){ byte b = byteBuffer.get(); System.out.println("(char)b = " + (char)b); } // 6. 读完之后设置为写模式 byteBuffer.clear(); } }catch (Exception e){ e.printStackTrace(); }finally { // 7. 关闭通道 if(fileChannel!=null){ try { fileChannel.close(); } catch (IOException e) { throw new RuntimeException(e); } } } } }- 1
- 2
- 3
- 4
- 5
- 6
- 7
- 8
- 9
- 10
- 11
- 12
- 13
- 14
- 15
- 16
- 17
- 18
- 19
- 20
- 21
- 22
- 23
- 24
- 25
- 26
- 27
- 28
- 29
- 30
- 31
- 32
- 33
- 34
- 35
- 36
3.4 使用try-resource重构
在 JDK1.7 之后引入了 try-resource 的机制,它能帮我们自动完成在 finally 块中对资源的关闭操作,如下为改造之后的代码示例:
public class NIOTest4 { public static void main(String[] args) { // 1. 创建Channel FileChannel try(FileChannel fileChannel = FileChannel.open(Paths.get("D:\\Rivamed\\awesome\\message\\data.txt"), StandardOpenOption.READ)) { // 2. 创建缓冲区,此处分配了10字节 ByteBuffer byteBuffer = ByteBuffer.allocate(10); while (true){ // 3. 将读取的数据放入缓冲区,read为实际读取的字节数,如果没有内容则返回 -1 int read = fileChannel.read(byteBuffer); if(read == -1) break; // 4. 通过程序读取Buffer中的内容,设置缓冲区为读模式 byteBuffer.flip(); // 5. 循环读取缓冲区中的数据 while(byteBuffer.hasRemaining()){ byte b = byteBuffer.get(); System.out.println("(char)b = " + (char)b); } // 6. 读完之后设置为写模式 byteBuffer.clear(); } } catch (IOException e) { throw new RuntimeException(e); } } }- 1
- 2
- 3
- 4
- 5
- 6
- 7
- 8
- 9
- 10
- 11
- 12
- 13
- 14
- 15
- 16
- 17
- 18
- 19
- 20
- 21
- 22
- 23
- 24
- 25
注意
ByteBuffer byteBuffer = ByteBuffer.allocate(10);- 1
ByteBuffer 一旦定义就不能动态调整
4. ByteBuffer详解
4.1 ByteBuffer 主要实现类
ByteBuffer 是 抽象类 ,它的主要实现类为:
-
HeadByteBuffer:用的是 JVM 内的堆内存,受 GC (堆内存不够时)的影响,在 IO 操作中效率不高;
-
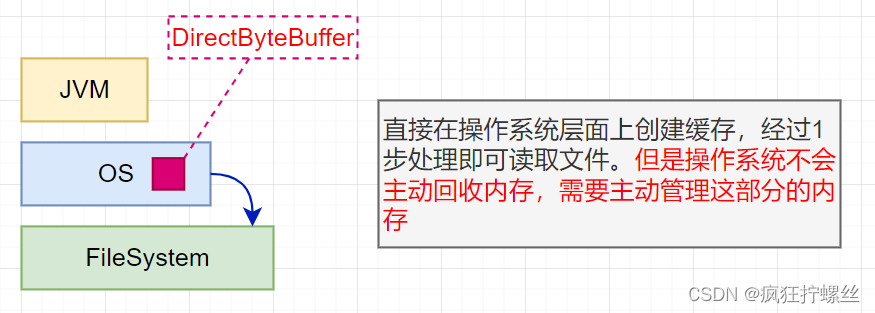
MappedByteBuffer(DirectByteBuffer):用的操作系统上的内存,一步操作文件系统(不会受到 GC 影响,但可能造成内存泄漏);
内存泄漏和内存溢出的区别
-
内存泄漏 :已分配的内存 没有正常释放 或者存在 内存碎片 ,导致后续处理过程中出现所需内存不足的情况;

-
内存溢出 :程序运行或者处理时需要用到的内存大于能提供的最大内存的情况;

4.2 ByteBuffer 核心结构
ByteBuffer 是一个类似数组的结构,在整个结构中包括三个主要的状态:
- Capacity :缓存的容量,类似于数组中的size;
- Position :当前缓存的下标,在读取时记录当前读取的位置,在写操作的时候记录写的位置,从0开始,每读取一次,下标+1;
- Limit :读写限制,在读写操作时,帮我们限制了能读多少数据和还能写多少数据;
读写的本质就是 Position 和 Limit 的相互作用,如下如所示:

不同写模式设置的区别
-
调用 byteBuffer.clear() 设置写模式:

-
调用 compact() 设置写模式:
4.3 ByteBuffer 核心API
使用 ByteBuffer 无非就是数据的存取,即往 buffer 中写和从 buffer 中读;
-
写入数据(创建ByteBuffer、clear()、compact())的方法包含:
1. channel 的 read 方法:从文件、IO中往buffer中写数据; 1. channel.read(buffer) 2. buffer 的 put() 方法:直接写入byte数据; 1. buffer.put(byte) 2. buffer.put(byte[])- 1
- 2
- 3
- 4
- 5
-
读取数据(flip())
1. channel 的 write 方法(从buffer中读数据并往文件写,与上述read相反) 2. buffer 的 get() 方法,每调用一次会影响 Position 的位置; 3. rewind() 方法,可以将Position重置为0,用于复读数据; 4. mark()&reset() 方法,通过mark标记Position,通过reset方法调回标记,从新执行; 5. get(i) 方法,获取特定Position位置上的数据,但是不会对Position位置产生影响且不受读写模式的影响;- 1
- 2
- 3
- 4
- 5
4.4 ByteBuffer 字符串操作
-
字符串存储到buffer中:
public static void main(String[] args) { ByteBuffer byteBuffer = ByteBuffer.allocate(10); // 调用 string 的 getBytes() 方法即可; byteBuffer.put("Lannis".getBytes()); // 设置读模式 byteBuffer.flip(); while (byteBuffer.hasRemaining()){ System.out.println("byteBuffer = " + (char)byteBuffer.get()); } byteBuffer.clear(); }- 1
- 2
- 3
- 4
- 5
- 6
- 7
- 8
- 9
- 10
- 11
也可使用字符集编码处理:
// 将字符串按指定字符集编码之后存储到 ByteBuffer 中 public static void main(String[] args) { //使用encode方法创建ByteBuffer ByteBuffer byteBuffer = StandardCharsets.UTF_8.("lannis"); // 如果使用encode方法时,已经自动设置了读模式,需要省略flip(); // 如果此处加上flip(),limit会设置为上一次的position位置,而上一次position为0,进而导致数据获取不到; // byteBuffer.flip(); while (byteBuffer.hasRemaining()){ byte b = byteBuffer.get(); System.out.println("byteBuffer = " + (char)byteBuffer.get()); } byteBuffer.clear(); }- 1
- 2
- 3
- 4
- 5
- 6
- 7
- 8
- 9
- 10
- 11
- 12
- 13
或者使用 ByteBuffer.wrap() 方法:
public static void main(String[] args) { ByteBuffer byteBuffer = ByteBuffer.wrap("lannis".getBytes()); // 在使用wrap方法时,已经自动设置了读模式,此处需要省略flip() // 如果此处加上flip(),limit会设置为上一次的position位置,而上一次position为0 // byteBuffer.flip(); while (byteBuffer.hasRemaining()){ System.out.println("byteBuffer = " + (char)byteBuffer.get()); } byteBuffer.clear(); }- 1
- 2
- 3
- 4
- 5
- 6
- 7
- 8
- 9
- 10
-
Buffer中的数据转为字符串
public static void main(String[] args) { // 使用encode方法创建ByteBuffer ByteBuffer byteBuffer = StandardCharsets.UTF_8.encode("文明和谐"); // 使用decode方法解码 CharBuffer decode = StandardCharsets.UTF_8.decode(byteBuffer); System.out.println("decode = " + decode); }- 1
- 2
- 3
- 4
- 5
- 6
- 7
粘包和半包
-
粘包:当前接受的数据包含下一次数据的内容;
-
半包:当前接受的数据不完整;
5. NIO的开发使用
5.1 文件读取
读取文件的代码在上面第三节已经演示过,此处不再复述;
5.2 文件写入
以下为将数据写入文件的代码示例:
public static void main(String[] args) throws IOException { // 1. 获得Channel,可通过 FileOutputStream/RandomAccessFile 获得 FileChannel data = new FileOutputStream("data").getChannel(); // 2. 获得buffer ByteBuffer lannis = StandardCharsets.UTF_8.encode("lannis"); // 3. 写文件 data.write(lannis); }- 1
- 2
- 3
- 4
- 5
- 6
- 7
- 8
5.3 文件复制
-
使用输入输出流实现:
public static void main(String[] args) throws IOException { //data1 -> data2 FileInputStream fileInputStream = new FileInputStream("data1"); FileOutputStream fileOutputStream = new FileOutputStream("data2"); byte[] buffer = new byte[1024]; while (true){ int read = fileInputStream.read(buffer); if(read == -1)break; fileOutputStream.write(buffer,0,read); } }- 1
- 2
- 3
- 4
- 5
- 6
- 7
- 8
- 9
- 10
- 11
-
使用commons-io实现:
// 这里引入commons-io依赖 public static void main(String[] args) throws IOException { //data1 -> data2 FileInputStream fileInputStream = new FileInputStream("data1"); FileOutputStream fileOutputStream = new FileOutputStream("data2"); IOUtils.copy(fileInputStream,fileOutputStream) }- 1
- 2
- 3
- 4
- 5
- 6
- 7
-
使用NIO方式实现(零拷贝~效率高):
public static void main(String[] args) throws IOException { FileChannel from = new FileInputStream("data1").getChannel(); FileChannel to = new FileOutputStream("data2").getChannel(); from.transferTo(0,from.size(),to); }- 1
- 2
- 3
- 4
- 5
注意:
需要注意的是,NIO传输存在文件大小上限,最大支持 2G-1kb ,当实际文件大小超过 2GB 之后,只能进行分段拷贝:public static void main(String[] args) throws IOException { FileChannel from = new FileInputStream("data1").getChannel(); FileChannel to = new FileOutputStream("data2").getChannel(); // 还剩多少没有拷贝 long left = from.size(); while (left > 0){ left = left - from.transferTo(from.size()-left,left,to); } }- 1
- 2
- 3
- 4
- 5
- 6
- 7
- 8
- 9
6. NIO网络编程
6.1 代码示例
在 NIO 网络编程中,服务端 中用于接受请求的是 ServerSocketChannel ,进行实际通信的是 SocketChannel ,以下为创建服务端和客户端的相关代码:
/*创建服务端*/ public class NIOServer { public static void main(String[] args) throws IOException { // 创建 ServerSocketChannel ServerSocketChannel serverSocketChannel = ServerSocketChannel.open(); // 设置服务端的监听端口(客户端通过网络进行访问的时候需要IP和端口) serverSocketChannel.bind(new InetSocketAddress(8000)); // 用于保存建立的连接 List<SocketChannel> socketChannels = new ArrayList<>(); ByteBuffer buffer = ByteBuffer.allocate(20); // 接受客户端的连接 while (true){ System.out.println("等待客户端连接... "); // socketChannel 代表服务端和客户端连接的一个通道【连接阻塞】 SocketChannel socketChannel = serverSocketChannel.accept(); System.out.println("已于客户端建立连接...:"+socketChannel); socketChannels.add(socketChannel); // 客户端与服务端通信过程 for (SocketChannel channel : socketChannels) { System.out.println("开始接受处理客户端数据..."); // 读取客户端提交的数据【IO阻塞】 channel.read(buffer); // 设置读模式 buffer.flip(); // 打印输出接收到的消息 System.out.println("客户端消息: " + StandardCharsets.UTF_8.decode(buffer)); // 设置写模式 buffer.clear(); System.out.println("通信已结束..."); } } } }- 1
- 2
- 3
- 4
- 5
- 6
- 7
- 8
- 9
- 10
- 11
- 12
- 13
- 14
- 15
- 16
- 17
- 18
- 19
- 20
- 21
- 22
- 23
- 24
- 25
- 26
- 27
- 28
- 29
- 30
- 31
- 32
- 33
/*NIO客户端*/ public class NIOClient { public static void main(String[] args) throws IOException { // 创建 socketChannel 用于通信连接 SocketChannel socketChannel = SocketChannel.open(); // 连接服务端 socketChannel.connect(new InetSocketAddress(8000)); socketChannel.write(StandardCharsets.UTF_8.encode("Test")); // 此处断点,服务端会出现IO阻塞的情况 System.out.println("--------------------------------------------------------"); } }- 1
- 2
- 3
- 4
- 5
- 6
- 7
- 8
- 9
- 10
- 11
- 12
6.2 阻塞问题
在上述代码运行过程中,服务端存在以下两个阻塞的情况:
-
ServerSocketChannel 阻塞:服务端等待客户端连接,accept() 方法存在阻塞;
// 可通过设置 ServerSocketChannel 为非阻塞 serverSocketChannel.configureBlocking(false);- 1
- 2
设置完之后,serverSocketChannel.accept() 在没有客户端连接的时候,返回值为 null :

同时,如果 socketChannel 不为 null 的时候,放入上述 list 中才有意义,需要进行判断:
... // 只有不为空的时候才添加客户端 if(socketChannel!=null){ socketChannels.add(socketChannel); } ...- 1
- 2
- 3
- 4
- 5
- 6
-
SocketChannel 阻塞:客户端IO通信的阻塞,channel.read() 方法存在阻塞;
// 设置 socketChannel 非阻塞 socketChannel.configureBlocking(false);- 1
- 2
修改调整过后的代码如下(主要在服务端修改):
public class NIOServer { public static void main(String[] args) throws IOException { // 创建 ServerSocketChannel ServerSocketChannel serverSocketChannel = ServerSocketChannel.open(); // 设置 ServerSocketChannel 非阻塞 serverSocketChannel.configureBlocking(false); // 设置服务端的监听端口(客户端通过网络进行访问的时候需要IP和端口) serverSocketChannel.bind(new InetSocketAddress(8000)); // 用于保存建立的连接 List<SocketChannel> socketChannels = new ArrayList<>(); ByteBuffer buffer = ByteBuffer.allocate(20); // 接受客户端的连接 while (true){ System.out.println("等待客户端连接... "); // socketChannel 代表服务端和客户端连接的一个通道【连接阻塞】 SocketChannel socketChannel = serverSocketChannel.accept(); System.out.println("已于客户端建立连接...:"+socketChannel); if(socketChannel!=null){ // 设置 socketChannel 非阻塞 socketChannel.configureBlocking(false); socketChannels.add(socketChannel); } // 客户端与服务端通信过程 for (SocketChannel channel : socketChannels) { System.out.println("开始接受处理客户端数据..."); // 读取客户端提交的数据【网络通讯IO阻塞】 channel.read(buffer); // 设置读模式 buffer.flip(); // 打印输出接收到的消息 System.out.println("客户端消息: " + StandardCharsets.UTF_8.decode(buffer)); // 设置写模式 buffer.clear(); System.out.println("通信已结束..."); } } } }- 1
- 2
- 3
- 4
- 5
- 6
- 7
- 8
- 9
- 10
- 11
- 12
- 13
- 14
- 15
- 16
- 17
- 18
- 19
- 20
- 21
- 22
- 23
- 24
- 25
- 26
- 27
- 28
- 29
- 30
- 31
- 32
- 33
- 34
- 35
- 36
- 37
- 38
::: tip 存在的问题
上述代码虽然解决的 ServerSocketChannel 和 SocketChannel 阻塞的问题,但是存在 空转、死循环 ,会进一步导致CPU占用过高的问题;
故需要引入一个类似于 监管者 的角色(也就是后文的 selector),用来监管连接的创建和IO的通讯,即 ServerSocketChannel 和 SocketChannel !
:::
7. Selector
7.1 基础介绍
在引入 selector 之前,需要对它有一个大概的了解。
selector 并不会实时监管所有的 ServerSocketChannel 和 SocketChannel ,而是在以下(常用)的特定场景(状态)下才会被监管:
- accept():ServerSocketChannel 的连接建立;
- read():SocketChannel 中的读操作;
- write():SocketChannel 中的写操作;
- connect():主要用于客户端中;
- …
并且在实际使用时, selector 只有在非阻塞的情况下才生效,也就是需要添加以下配置才生效:
// 设置 ServerSocketChannel 为非阻塞 serverSocketChannel.configureBlocking(false); // 设置 SocketChannel 为非阻塞 socketChannel.configureBlocking(false);- 1
- 2
- 3
- 4
另外,还需要了解在 selector 中的两个重要属性:
-
keys :将需要监控的所有的 Channel 都注册到这个 keys 属性中;
通过 channel.register() 配置 selector; 通过 interestOps 配置需要监控的状态;- 1
- 2
-
selectionKeys :存储的是实际发生以上监控状态的 Channel ;
通过 selector.select() 去监听发生的特定状态的Channel; 当监听到特定事件之后,会将 keys 中的 Channel 移动到 selectionKeys 中。 后续就可以通过 selectedKeys() 方法获取并处理特定 Channel 事件;- 1
- 2
- 3
由于 SelectionKey 中存在的 Channel 可能是 ServerSocketChannel 或者 SocketChannel,故在后续业务处理中,需要使用以下方法进行区分:
-
key.isAcceptable():如果返回true,则表示当前 selectKey 缓存的是 ServerSocketChannel 对象;
-
key.isReadable():如果返回true,则表示当前 selectKey 缓存的是 SocketChannel 对象;
-
key.isWritable():如果返回true,则表示当前 selectKey 缓存的是 SocketChannel 对象;
7.2 创建连接代码示例
为了进一步说明理解 selector ,接下来,我们将一步一步的结合代码进行测试演示,首先创建服务端的代码,并设置为非阻塞模式:
/*服务端代码*/ public class NIOServer { public static void main(String[] args) throws IOException { // 创建 ServerSocketChannel try (ServerSocketChannel serverSocketChannel = ServerSocketChannel.open()) { // 设置 ServerSocketChannel 非阻塞 serverSocketChannel.configureBlocking(false); // 设置服务端的监听端口(客户端通过网络进行访问的时候需要IP和端口) serverSocketChannel.bind(new InetSocketAddress(8000)); } } }- 1
- 2
- 3
- 4
- 5
- 6
- 7
- 8
- 9
- 10
- 11
- 12
接着,引入 selector :
/*服务端代码*/ public static void main(String[] args) throws IOException { // 创建 ServerSocketChannel try (ServerSocketChannel serverSocketChannel = ServerSocketChannel.open()) { // 设置 ServerSocketChannel 非阻塞 serverSocketChannel.configureBlocking(false); // 设置服务端的监听端口(客户端通过网络进行访问的时候需要IP和端口) serverSocketChannel.bind(new InetSocketAddress(8000)); // 引入 selector Selector selector = Selector.open(); // 将当前 ServerSocketChannel 注册到 selector 中,返回 selectKey SelectionKey selectionKey = serverSocketChannel.register(selector, 0, null); // 配置 selectKey 监听 accept 状态 selectionKey.interestOps(SelectionKey.OP_ACCEPT); while (true) { // 【会阻塞】开始监控,只有监控到有实际连接或读写操作才会处理 selector.select(); } } }- 1
- 2
- 3
- 4
- 5
- 6
- 7
- 8
- 9
- 10
- 11
- 12
- 13
- 14
- 15
- 16
- 17
- 18
- 19
- 20
此时的状态
运行上述服务端代码之后,在上述 12 行代码前后进行断点,执行注册代码前:

执行注册代码后:

接着代码正常运行,会在17行阻塞住,一直等待客户端的连接:

完成上述配置操作后,我们可以启动客户端进行连接,上述 selector.select() 方法在没有客户端连接发生的时候,会一直处于等待的状态,一但有连接发生,它就会将 keys 中监控的当前连接 Channel 复制到 selectionKeys 中,:
接下来,添加对 selectedKeys 中的数据进行处理的方法:/*服务端代码*/ public static void main(String[] args) throws IOException { // 创建 ServerSocketChannel try (ServerSocketChannel serverSocketChannel = ServerSocketChannel.open()) { // 设置 ServerSocketChannel 非阻塞 serverSocketChannel.configureBlocking(false); // 设置服务端的监听端口(客户端通过网络进行访问的时候需要IP和端口) serverSocketChannel.bind(new InetSocketAddress(8000)); // 引入 selector Selector selector = Selector.open(); // 将当前 ServerSocketChannel 注册到 selector 中,返回 selectKeyselector = {WindowsSelectorImpl@910} SelectionKey selectionKey = serverSocketChannel.register(selector, 0, null); // 配置 selectKey 监听 accept 状态 selectionKey.interestOps(SelectionKey.OP_ACCEPT); while (true) { // 【会阻塞】开始监控,只有监控到有实际连接或读写操作才会处理 selector.select(); // 获取所有有效的SelectionKey(需要使用iterator遍历,因为后续会删除,不能使用for循环,for循环不能删除) Iterator<SelectionKey> iterator = selector.selectedKeys().iterator(); // 只有在确认有有效状态的情况下,才会进行以下循环,避免了空转和死循环的问题 while (iterator.hasNext()) { SelectionKey key = iterator.next(); // 用完之后务必删除,否则会出现空指针 iterator.remove(); // 获取对应的 Channel if (key.isAcceptable()) { // 连接 ServerSocketChannel ServerSocketChannel channel = (ServerSocketChannel) key.channel(); SocketChannel socketChannel = channel.accept(); // 或者直接使用上述创建好的 serverSocketChannel // SocketChannel socketChannel = serverSocketChannel.accept(); System.out.println("channel = " + socketChannel); } } } } }- 1
- 2
- 3
- 4
- 5
- 6
- 7
- 8
- 9
- 10
- 11
- 12
- 13
- 14
- 15
- 16
- 17
- 18
- 19
- 20
- 21
- 22
- 23
- 24
- 25
- 26
- 27
- 28
- 29
- 30
- 31
- 32
- 33
- 34
- 35
- 36
- 37
启动客户端之后,服务端正常输出连接信息:

7.3 服务端读消息代码示例
针对客户端的写事件,需要在连接之后进行创建:
/*服务端代码*/ public static void main(String[] args) throws IOException { // 创建 ServerSocketChannel try (ServerSocketChannel serverSocketChannel = ServerSocketChannel.open()) { // 设置 ServerSocketChannel 非阻塞 serverSocketChannel.configureBlocking(false); // 设置服务端的监听端口(客户端通过网络进行访问的时候需要IP和端口) serverSocketChannel.bind(new InetSocketAddress(8000)); // 引入 selector Selector selector = Selector.open(); // 将当前 ServerSocketChannel 注册到 selector 中,返回 selectKeyselector = {WindowsSelectorImpl@910} SelectionKey selectionKey = serverSocketChannel.register(selector, 0, null); // 配置 selectKey 监听 accept 状态 selectionKey.interestOps(SelectionKey.OP_ACCEPT); while (true) { // 【会阻塞】开始监控,只有监控到有实际连接或读写操作才会处理 selector.select(); // 获取所有有效的SelectionKey(需要使用iterator遍历,因为后续会删除,不能使用for循环,for循环不能删除) Iterator<SelectionKey> iterator = selector.selectedKeys().iterator(); // 只有在确认有有效状态的情况下,才会进行以下循环,避免了空转和死循环的问题 while (iterator.hasNext()) { SelectionKey key = iterator.next(); // 用完之后务必删除,否则会出现空指针 iterator.remove(); // 获取对应的 Channel if (key.isAcceptable()) { // 连接 ServerSocketChannel ServerSocketChannel channel = (ServerSocketChannel) key.channel(); SocketChannel socketChannel = channel.accept(); // 或者直接只有上述创建好的 serverSocketChannel // SocketChannel socketChannel = serverSocketChannel.accept(); socketChannel.configureBlocking(false); SelectionKey register = socketChannel.register(selector, 0, null); register.interestOps(SelectionKey.OP_READ); System.out.println("channel = " + socketChannel); }else if(key.isReadable()){ // 读 SocketChannel SocketChannel socketChannel = (SocketChannel) key.channel(); ByteBuffer byteBuffer = ByteBuffer.allocate(20); socketChannel.read(byteBuffer); // 设置读模式 byteBuffer.flip(); System.out.println("msg = " + StandardCharsets.UTF_8.decode(byteBuffer)); } } } } }- 1
- 2
- 3
- 4
- 5
- 6
- 7
- 8
- 9
- 10
- 11
- 12
- 13
- 14
- 15
- 16
- 17
- 18
- 19
- 20
- 21
- 22
- 23
- 24
- 25
- 26
- 27
- 28
- 29
- 30
- 31
- 32
- 33
- 34
- 35
- 36
- 37
- 38
- 39
- 40
- 41
- 42
- 43
- 44
- 45
- 46
- 47
- 48
正常运行客户端服务端之后,服务端打印输出如下:
客户端示例代码如下:
/*NIO客户端*/ public class NIOClient { public static void main(String[] args) throws IOException { // 创建 socketChannel 用于通信连接 SocketChannel socketChannel = SocketChannel.open(); // 连接服务端 socketChannel.connect(new InetSocketAddress(8000)); socketChannel.write(StandardCharsets.UTF_8.encode("Test")); System.out.println("--------------------------------------------------------"); } }- 1
- 2
- 3
- 4
- 5
- 6
- 7
- 8
- 9
- 10
- 11
注意,当客户端发送的数据长度大于服务端Buffer的长度时:
- 客户端只发送一次数据;
- 服务端会多次调用 select() 方法多次处理,直到当前消息处理完毕之后,整个流程才算结束;
在某些特殊操作下,服务器端无法处理,select() 方法就会频繁调用(如在客户端非正常关闭会发送-1的状态,服务端处理不了会一直进行 select() 方法的调用),可通过调用 selectKey.cancel() 来调用,修改调整以下代码:
... }else if(key.isReadable()){ try{ // 读 SocketChannel SocketChannel socketChannel = (SocketChannel) key.channel(); ByteBuffer byteBuffer = ByteBuffer.allocate(20); int read = socketChannel.read(byteBuffer); if(read == -1){ key.cancel(); }else{ // 设置读模式 byteBuffer.flip(); System.out.println("msg = " + StandardCharsets.UTF_8.decode(byteBuffer)); } }catch (Exception e){ e.printStackTrace(); key.cancel(); } } ...- 1
- 2
- 3
- 4
- 5
- 6
- 7
- 8
- 9
- 10
- 11
- 12
- 13
- 14
- 15
- 16
- 17
- 18
- 19
- 20
7.4 半包和粘包
一旦buffer缓冲区设置不合理,就会出现半包和粘包的问题(第6章节的代码亦是),例如以下客户端像服务端发生
Hello World消息的代码:/*客户端代码*/ public static void main(String[] args) throws IOException { // 创建 socketChannel 用于通信连接 SocketChannel socketChannel = SocketChannel.open(); // 连接服务端 socketChannel.connect(new InetSocketAddress(8000)); // 发送数据 socketChannel.write(StandardCharsets.UTF_8.encode("Hello World")); socketChannel.close(); }- 1
- 2
- 3
- 4
- 5
- 6
- 7
- 8
- 9
- 10
为了能演示出效果,此时服务端的代码如下所示:
/*服务端代码*/ public static void main(String[] args) throws IOException { // 创建 ServerSocketChannel try (ServerSocketChannel serverSocketChannel = ServerSocketChannel.open()) { // 设置 ServerSocketChannel 非阻塞 serverSocketChannel.configureBlocking(false); // 设置服务端的监听端口(客户端通过网络进行访问的时候需要IP和端口) serverSocketChannel.bind(new InetSocketAddress(8000)); // 引入 selector Selector selector = Selector.open(); // 将当前 ServerSocketChannel 注册到 selector 中,返回 selectKeyselector = {WindowsSelectorImpl@910} SelectionKey selectionKey = serverSocketChannel.register(selector, 0, null); // 配置 selectKey 监听 accept 状态 selectionKey.interestOps(SelectionKey.OP_ACCEPT); while (true) { // 【会阻塞】开始监控,只有监控到有实际连接或读写操作才会处理 selector.select(); // 获取所有有效的SelectionKey(需要使用iterator遍历,因为后续会删除,不能使用for循环,for循环不能删除) Iterator<SelectionKey> iterator = selector.selectedKeys().iterator(); // 只有在确认有有效状态的情况下,才会进行以下循环,避免了空转和死循环的问题 while (iterator.hasNext()) { SelectionKey key = iterator.next(); // 用完之后务必删除,否则会出现空指针 iterator.remove(); // 获取对应的 Channel if (key.isAcceptable()) { // 连接 ServerSocketChannel ServerSocketChannel channel = (ServerSocketChannel) key.channel(); SocketChannel socketChannel = channel.accept(); // 或者直接只有上述创建好的 serverSocketChannel // SocketChannel socketChannel = serverSocketChannel.accept(); socketChannel.configureBlocking(false); SelectionKey register = socketChannel.register(selector, 0, null); register.interestOps(SelectionKey.OP_READ); System.out.println("channel = " + socketChannel); }else if(key.isReadable()){ // 读 SocketChannel SocketChannel socketChannel = (SocketChannel) key.channel(); ByteBuffer byteBuffer = ByteBuffer.allocate(10); int read = socketChannel.read(byteBuffer); if(read == -1){ key.cancel(); }else{ // 设置读模式 byteBuffer.flip(); System.out.println("msg = " + StandardCharsets.UTF_8.decode(byteBuffer)); } } } } } }- 1
- 2
- 3
- 4
- 5
- 6
- 7
- 8
- 9
- 10
- 11
- 12
- 13
- 14
- 15
- 16
- 17
- 18
- 19
- 20
- 21
- 22
- 23
- 24
- 25
- 26
- 27
- 28
- 29
- 30
- 31
- 32
- 33
- 34
- 35
- 36
- 37
- 38
- 39
- 40
- 41
- 42
- 43
- 44
- 45
- 46
- 47
- 48
- 49
- 50
- 51
- 52
注意上述第 39 行代码,我们分配的 ByteBuffer 大小为 10 个字节,此时运行服务端和客户端之后,服务端会打印输出以下内容:

从运行结果分析可以发现,客户端明明只发了一次消息,但是服务端却打印出两条消息,这显然是不符合业务要求的。
Hello World为11个字节长度,此处我们有两种解决方式可选:- 修改 ByteBuffer 的大小为11,保证能接收到客户端发送的消息;( ByteBuffer 一旦定义就不可修改,故此方法不可靠)
- 通过分割符来甄别一条完整的消息,以此解决半包和粘包的问题;(以下为详细的解决办法)
为了能完整获取客户端发送的数据,需要进行一些数据处理,例如添加分隔符(分隔符的目的是为了甄别一条完整的信息),引入以下方法:/*解决半包粘包问题*/ private static void doLineSplit(ByteBuffer byteBuffer) { // 设置读模式 byteBuffer.flip(); for (int i = 0; i < byteBuffer.limit(); i++) { if ('\n' == byteBuffer.get(i)) { int length = i + 1 - byteBuffer.position(); ByteBuffer target = ByteBuffer.allocate(length); // 取数据 for (int j = 0; j < length; j++) { target.put(byteBuffer.get()); } // 设置读模式 target.flip(); System.out.println("StandardCharsets.UTF_8.decode(target) = " + StandardCharsets.UTF_8.decode(target)); } } byteBuffer.compact(); }- 1
- 2
- 3
- 4
- 5
- 6
- 7
- 8
- 9
- 10
- 11
- 12
- 13
- 14
- 15
- 16
- 17
- 18
- 19
接着修改服务端读取客户端消息部分的方法:
... }else if(key.isReadable()){ // 读 SocketChannel SocketChannel socketChannel = (SocketChannel) key.channel(); ByteBuffer byteBuffer = ByteBuffer.allocate(10); int read = socketChannel.read(byteBuffer); if(read == -1){ key.cancel(); }else{ doLineSplit(byteBuffer); } } ...- 1
- 2
- 3
- 4
- 5
- 6
- 7
- 8
- 9
- 10
- 11
- 12
- 13
修改客户端发送代码,在
Hello World后面增加\n如下所示:public static void main(String[] args) throws IOException { // 创建 socketChannel 用于通信连接 SocketChannel socketChannel = SocketChannel.open(); // 连接服务端 socketChannel.connect(new InetSocketAddress(8000)); // 发送数据 socketChannel.write(StandardCharsets.UTF_8.encode("Hello World\n")); socketChannel.close(); }- 1
- 2
- 3
- 4
- 5
- 6
- 7
- 8
- 9
运行修改过后的代码,服务端输出结果如下:


为什么输出的只有
d,前面的内容哪里去了?别慌,请听我狡辩:在上述的 doLineSplit() 方法中,确实是能通过分隔符 \n 来获取完整的消息的,但是有一个前提就是 ByteBuffer 必须是同一个。 但是在 select() 事件监听并处理的代码中,每一次都是一个新的 ByteBuffer,还记得下面的代码吗? 在每次进入到 key.isReadable() 条件成立的方法后,我们会新建 ByteBuffer: ByteBuffer byteBuffer = ByteBuffer.allocate(10); 这样一来,就会导致select()方法两次调用处理的ByteBuffer没有关联上,第一次不会打印是因为没有读取到 \n 分隔符,在第二次读取的时候亦没有获取到前一次读取的结果,故只读取并打印到 d\n 字符;- 1
- 2
- 3
- 4
- 5
当然,这也有解决办法,那就是将 ByteBuffer 和 Channel 绑定在一起,保证一个 Channel 多次操作中 ByteBuffer 为同一个;
还记得 SelectionKey.register(sql,ops,att) 方法吗?这个方法中有三个参数:
- sql:注册Channel的选择器;
- ops:设置要监听的状态;
- att:需要绑定的附件,可以为空;
我们可以通过如下设置 att 属性来给每一个 Channel 绑定一个 Channel 共享的 ByteBuffer ,修改以下服务端代码:
... if (key.isAcceptable()) { // 连接 ServerSocketChannel ServerSocketChannel channel = (ServerSocketChannel) key.channel(); SocketChannel socketChannel = channel.accept(); socketChannel.configureBlocking(false); // 创建共享 ByteBuffer ByteBuffer byteBuffer = ByteBuffer.allocate(20); SelectionKey register = socketChannel.register(selector, 0, byteBuffer); register.interestOps(SelectionKey.OP_READ); System.out.println("channel = " + socketChannel); }else if(key.isReadable()){ // 读 SocketChannel SocketChannel socketChannel = (SocketChannel) key.channel(); // 获取共享 ByteBuffer ByteBuffer attachment = (ByteBuffer) key.attachment(); int read = socketChannel.read(attachment); if(read == -1){ key.cancel(); }else{ doLineSplit(attachment); } } ...- 1
- 2
- 3
- 4
- 5
- 6
- 7
- 8
- 9
- 10
- 11
- 12
- 13
- 14
- 15
- 16
- 17
- 18
- 19
- 20
- 21
- 22
- 23
- 24
存在的问题:在上述代码调整中,我们创建了共享 ByteBuffer 来保证一个 Channel 中多次操作使用同一个 ByteBuffer ,以此确保消息能够完整的处理;
但是注意,为了避免使用 compact() 方法之后ByteBuffer 中的内容超过容量大小的问题,此处我是修改了 ByteBuffer 的容量大小哦;
这样一来又会带来另外一个问题,我不能动态修改 ByteBuffer 的容量大小,如果传入的消息过长怎么办?
那就需要找一个办法去扩容 ByteBuffer ~~~
7.5 ByteBuffer扩容
当我们调用上述 doLineSplit() 方法对客户端的消息处理完之后,需要判断 Position 和 Limit 的值,如果相等,则说明当前 ByteBuffer 容量不够,需要进行扩容处理,反之则跳过,示例代码如下:
... }else if(key.isReadable()){ // 读 SocketChannel SocketChannel socketChannel = (SocketChannel) key.channel(); ByteBuffer byteBuffer = ByteBuffer.allocate(10); int read = socketChannel.read(byteBuffer); if(read == -1){ key.cancel(); }else{ doLineSplit(byteBuffer); if(byteBuffer.position() == byteBuffer.limit()){ //此时说明容量不够了,需要进行扩容 ByteBuffer newByteBuffer = ByteBuffer.allocate(byteBuffer.capacity() * 2); // 将原始的ByteBuffer中的数据复制到新Buffer中 newByteBuffer.put(byteBuffer); // 重新绑定新ByteBuffer key.attach(newByteBuffer); } } } ...- 1
- 2
- 3
- 4
- 5
- 6
- 7
- 8
- 9
- 10
- 11
- 12
- 13
- 14
- 15
- 16
- 17
- 18
- 19
- 20
- 21
待优化和考虑的地方:
-
ByteBuffer 容量不够的时候,我们进行了扩容处理,但是在后续请求中,可能接受的数据长度远远小于扩容后的大小,在多线程请求中,会造成内存浪费!除了扩容之外,还需要考虑缩容!
-
ByteBuffer 扩容时,旧 Buffer 中的数据往新 Buffer 中的数据写时,效率很低(可通过零拷贝方式解决);
-
为了避免频繁检索上述代码中的
\n分隔符,可以通过头体分离的方式来保证信息完整性:
7.6 服务端写消息代码示例
上述代码已经完成了服务端创建连接并读取客户端发送的数据的代码示例,接下来将继续完善服务端向客户端发送数据的功能;
此处我们在服务端和客户端连接建立之后,随即向客户端发送数据,代码如下所示:
/*NIO服务端*/ public class NIOServer { public static void main(String[] args) throws IOException { ServerSocketChannel serverSocketChannel = ServerSocketChannel.open(); serverSocketChannel.configureBlocking(false); serverSocketChannel.bind(new InetSocketAddress(8000)); Selector selector = Selector.open(); serverSocketChannel.register(selector, SelectionKey.OP_ACCEPT); while (true) { selector.select(); Iterator<SelectionKey> iterator = selector.selectedKeys().iterator(); while (iterator.hasNext()) { SelectionKey selectionKey = iterator.next(); iterator.remove(); if (selectionKey.isAcceptable()) { SocketChannel socketChannel = serverSocketChannel.accept(); socketChannel.configureBlocking(false); SelectionKey skey = socketChannel.register(selector, SelectionKey.OP_READ); //准备数据 StringBuilder sb = new StringBuilder(); for (int i = 0; i < 2000000; i++) { sb.append("abcdabcd"); } ByteBuffer buffer = StandardCharsets.UTF_8.encode(sb.toString()); while (buffer.hasRemaining()){ int write = socketChannel.write(buffer); System.out.println("write = " + write); } } } } } }- 1
- 2
- 3
- 4
- 5
- 6
- 7
- 8
- 9
- 10
- 11
- 12
- 13
- 14
- 15
- 16
- 17
- 18
- 19
- 20
- 21
- 22
- 23
- 24
- 25
- 26
- 27
- 28
- 29
- 30
- 31
- 32
- 33
- 34
/*NIO客户端*/ public class NIOClient { public static void main(String[] args) throws IOException { // 创建 socketChannel 用于通信连接 try (SocketChannel socketChannel = SocketChannel.open()) { // 连接服务端 socketChannel.connect(new InetSocketAddress(8000)); // 接受服务端数据 ByteBuffer buffer = ByteBuffer.allocate(1024); int read = 0; while (true) { read += socketChannel.read(buffer); System.out.println("read = " + read); buffer.clear(); } } } }- 1
- 2
- 3
- 4
- 5
- 6
- 7
- 8
- 9
- 10
- 11
- 12
- 13
- 14
- 15
- 16
- 17
- 18
上述代码运行之后,服务端和客户端控制台打印输出的结果如下图所示:

通过上面的运行结果发现,服务端发送了很多空数据,这是因为受到了发生速率的限制,为了解决这个问题,这个时候我们就可使用 isWriteable() 方法来监听 write 的状态:
... if (selectionKey.isAcceptable()) { SocketChannel socketChannel = serverSocketChannel.accept(); socketChannel.configureBlocking(false); SelectionKey skey = socketChannel.register(selector, SelectionKey.OP_READ); //准备数据 StringBuilder sb = new StringBuilder(); for (int i = 0; i < 2000000; i++) { sb.append("abcdabcd"); } ByteBuffer buffer = StandardCharsets.UTF_8.encode(sb.toString()); // 先写一次 int write = socketChannel.write(buffer); System.out.println("write = " + write); // 判断是否写完 if (buffer.hasRemaining()) { //说明么有写完,为当前的 SocketChannel 增加 write 的监听 // READ 和 Write skey.interestOps(skey.interestOps() + SelectionKey.OP_WRITE); // 把当前操作传给下一个操作 skey.attach(buffer); } } else if (selectionKey.isWritable()) { // 获取客户端 Channel SocketChannel socketChannel = (SocketChannel) selectionKey.channel(); // 获取 Buffer ByteBuffer buffer = (ByteBuffer) selectionKey.attachment(); // 写操作 int write = socketChannel.write(buffer); System.out.println("write = " + write); if (!buffer.hasRemaining()) { //写完了 selectionKey.attach(null); selectionKey.interestOps(selectionKey.interestOps() - SelectionKey.OP_WRITE); } } ...- 1
- 2
- 3
- 4
- 5
- 6
- 7
- 8
- 9
- 10
- 11
- 12
- 13
- 14
- 15
- 16
- 17
- 18
- 19
- 20
- 21
- 22
- 23
- 24
- 25
- 26
- 27
- 28
- 29
- 30
- 31
- 32
- 33
- 34
- 35
- 36
- 37
这样一来,运行改动过后的代码,服务端就不会发生过多的空数据,进而提高了服务端的处理消息的能力,服务端输出结果如下:

8. Reactor 模式
8.1 单线程模式

在单线程模式中,客户端的连接以及后续的读写操作都是由一个线程来完成的,存在效率低的问题;8.2 主从多线程模式

在这种模式下,将客户端连接相关的交由一个独立的(图中Boss)线程处理,后续读写操作交由其它(图中Worker)线程处理;8.3 代码实现
参照上述主从多线程模式的图例,我们需要将IO的读写操作用单个 Worker 线程来处理,故我们首先需要创建 Worker 线程类:
// Worker 线程类 public class Worker implements Runnable { private final String name; private Selector selector; // 多线程环境下的状态需要增加 volatile private volatile boolean created; // 为了传递线程间的变量 private final ConcurrentLinkedDeque<Runnable> concurrentLinkedDeque = new ConcurrentLinkedDeque<>(); public Worker(String name) { this.name = name; } public void register(SocketChannel sc) throws IOException { if (!created){ // 每个 Worker 创建一个线程 Thread thread = new Thread(this, name); selector = Selector.open(); thread.start(); created = true; } // 放到一个线程中保证有序执行 concurrentLinkedDeque.add(()->{ try { sc.register(selector, SelectionKey.OP_READ + SelectionKey.OP_WRITE); } catch (ClosedChannelException e) { throw new RuntimeException(e); } }); // 唤醒阻塞的select.select() selector.wakeup(); } @Override public void run() { while (true) { try { selector.select(); Runnable poll = concurrentLinkedDeque.poll(); if(poll!=null){ poll.run(); } Iterator<SelectionKey> iterator = selector.selectedKeys().iterator(); while (iterator.hasNext()) { SelectionKey scKey = iterator.next(); iterator.remove(); if (scKey.isReadable()) { SocketChannel socketChannel = (SocketChannel) scKey.channel(); ByteBuffer byteBuffer = ByteBuffer.allocate(30); socketChannel.configureBlocking(false); socketChannel.read(byteBuffer); byteBuffer.flip(); System.out.println("Message = " + StandardCharsets.UTF_8.decode(byteBuffer)); byteBuffer.clear(); } } } catch (IOException e) { throw new RuntimeException(e); } } } }- 1
- 2
- 3
- 4
- 5
- 6
- 7
- 8
- 9
- 10
- 11
- 12
- 13
- 14
- 15
- 16
- 17
- 18
- 19
- 20
- 21
- 22
- 23
- 24
- 25
- 26
- 27
- 28
- 29
- 30
- 31
- 32
- 33
- 34
- 35
- 36
- 37
- 38
- 39
- 40
- 41
- 42
- 43
- 44
- 45
- 46
- 47
- 48
- 49
- 50
- 51
- 52
- 53
- 54
- 55
- 56
- 57
- 58
- 59
- 60
接着修改服务端的代码:
// 服务端代码 public class ReactorBossServer { public static void main(String[] args) throws IOException, InterruptedException { ServerSocketChannel ssc = ServerSocketChannel.open(); ssc.configureBlocking(false); ssc.bind(new InetSocketAddress(8000)); Selector selector = Selector.open(); ssc.register(selector, SelectionKey.OP_ACCEPT); // 模拟多线程,此处示例为2个 Worker[] workers = new Worker[2]; for (int i = 0; i < workers.length; i++) { workers[i] = new Worker("worker"+i); } AtomicInteger index = new AtomicInteger(); while (true) { // 监控连接 selector.select(); Iterator<SelectionKey> iterator = selector.selectedKeys().iterator(); while (iterator.hasNext()) { SelectionKey selectionKey = iterator.next(); iterator.remove(); if (selectionKey.isAcceptable()) { ServerSocketChannel serverSocketChannel = (ServerSocketChannel) selectionKey.channel(); SocketChannel socketChannel = serverSocketChannel.accept(); socketChannel.configureBlocking(false); // hash取模 x%2 结果0或1 workers[index.getAndIncrement()%workers.length].register(socketChannel); } } } } }- 1
- 2
- 3
- 4
- 5
- 6
- 7
- 8
- 9
- 10
- 11
- 12
- 13
- 14
- 15
- 16
- 17
- 18
- 19
- 20
- 21
- 22
- 23
- 24
- 25
- 26
- 27
- 28
- 29
- 30
- 31
- 32
最后运行,当多个客户端连接之后,服务端轮转进行处理!(此处自行进行代码测试)
9. 零拷贝
在没有任何优化操作前,以读取文件数据在到写数据的流程为例进行数据拷贝的分析,如下图所示:

在调用 Read() 方法之后,JVM 会通知操作系统,由操作系统调用操作文件相关的 API 来读取硬盘上的数据,随后将数据存储在操作系统的内存 (高速页缓存/内核缓冲区)中,进而过渡传递到 JVM 中的应用缓存【做了2次数据的拷贝】;同理,在调用 write() 写数据时也发生了两次数据拷贝,整个操作下来发生了【4次数据拷贝】,故此效率偏低;
9.1 内存映射
在 NIO 中有个 内存映射 的概念,通过内存映射可以将 高速页缓存 中的数据 共享 给 应用缓存 ,同时减少了数据拷贝的次数,示例图如下:

在代码中可使用以下代码创建直接缓冲区:ByteBuffer.allocateDirect(10);- 1
内存映射 主要用于文件的操作;
使用直接内存的好处如上图所示,就是减少了数据拷贝的次数,但是带来的问题就是需要手动进行内存析构,否则会造成内存浪费9.2 零拷贝
零拷贝:不涉及到虚拟机内存的拷贝;
在 Linux2.1 和 Linux2.4 内核中,存在 sendFile() 方法,其两者的拷贝区别如下:

可以看出在 Linux2.4 的内核中,拷贝次数比 Linux2.1 又少了1次,效率又提高了;在 Java 中使用 file.transferTo() 或 file.transferFrom() 方法即可调用 sendFile() 方法;
-
相关阅读:
人工智能监考 VS 传统方式监考,你更喜欢哪一种?
Gin中间件
C#的Math 类使用说明
SSO(single sign on)模式 --单点登录三种登录方式
尚医通(二)
电脑重装系统记事本打不开提示无法启动此应用程序怎么办
力扣(LeetCode)算法_C++——稀疏矩阵的乘法
自然语言处理-BERT处理框架-transformer
【LeetCode每日一题:1769. 移动所有球到每个盒子所需的最小操作数~~~双重循环遍历模拟】
设计模式(六)适配器
- 原文地址:https://blog.csdn.net/qq_21336651/article/details/133910048
