-
zookeeper应用场景(二)
单机环境下可以利用jvm级别的锁,比如synchronized、Lock等来实现锁,如果是多机部署就需要一个共享数据存储区域来实现分布式锁
一、分布式锁实现方式
1、基于数据库实现分布式锁
可以用数据库唯一索引来实现

2、基于redis实现分布式锁
redis实现的分布式锁始终会有一些问题,即便使用多数写入,主节点挂了,数据丢失还是会存在加锁问题,就是主节点宕机,客户端无法感知

3、基于zookeeper实现分布式锁
1)实现方式一
使用临时节点创建成功获取锁,否则监听临时节点,有个问题,比如1000个线程只有一个会加锁成功,当删除临时节点时999个线程都会去竞争

2)实现方式二
公平锁的实现

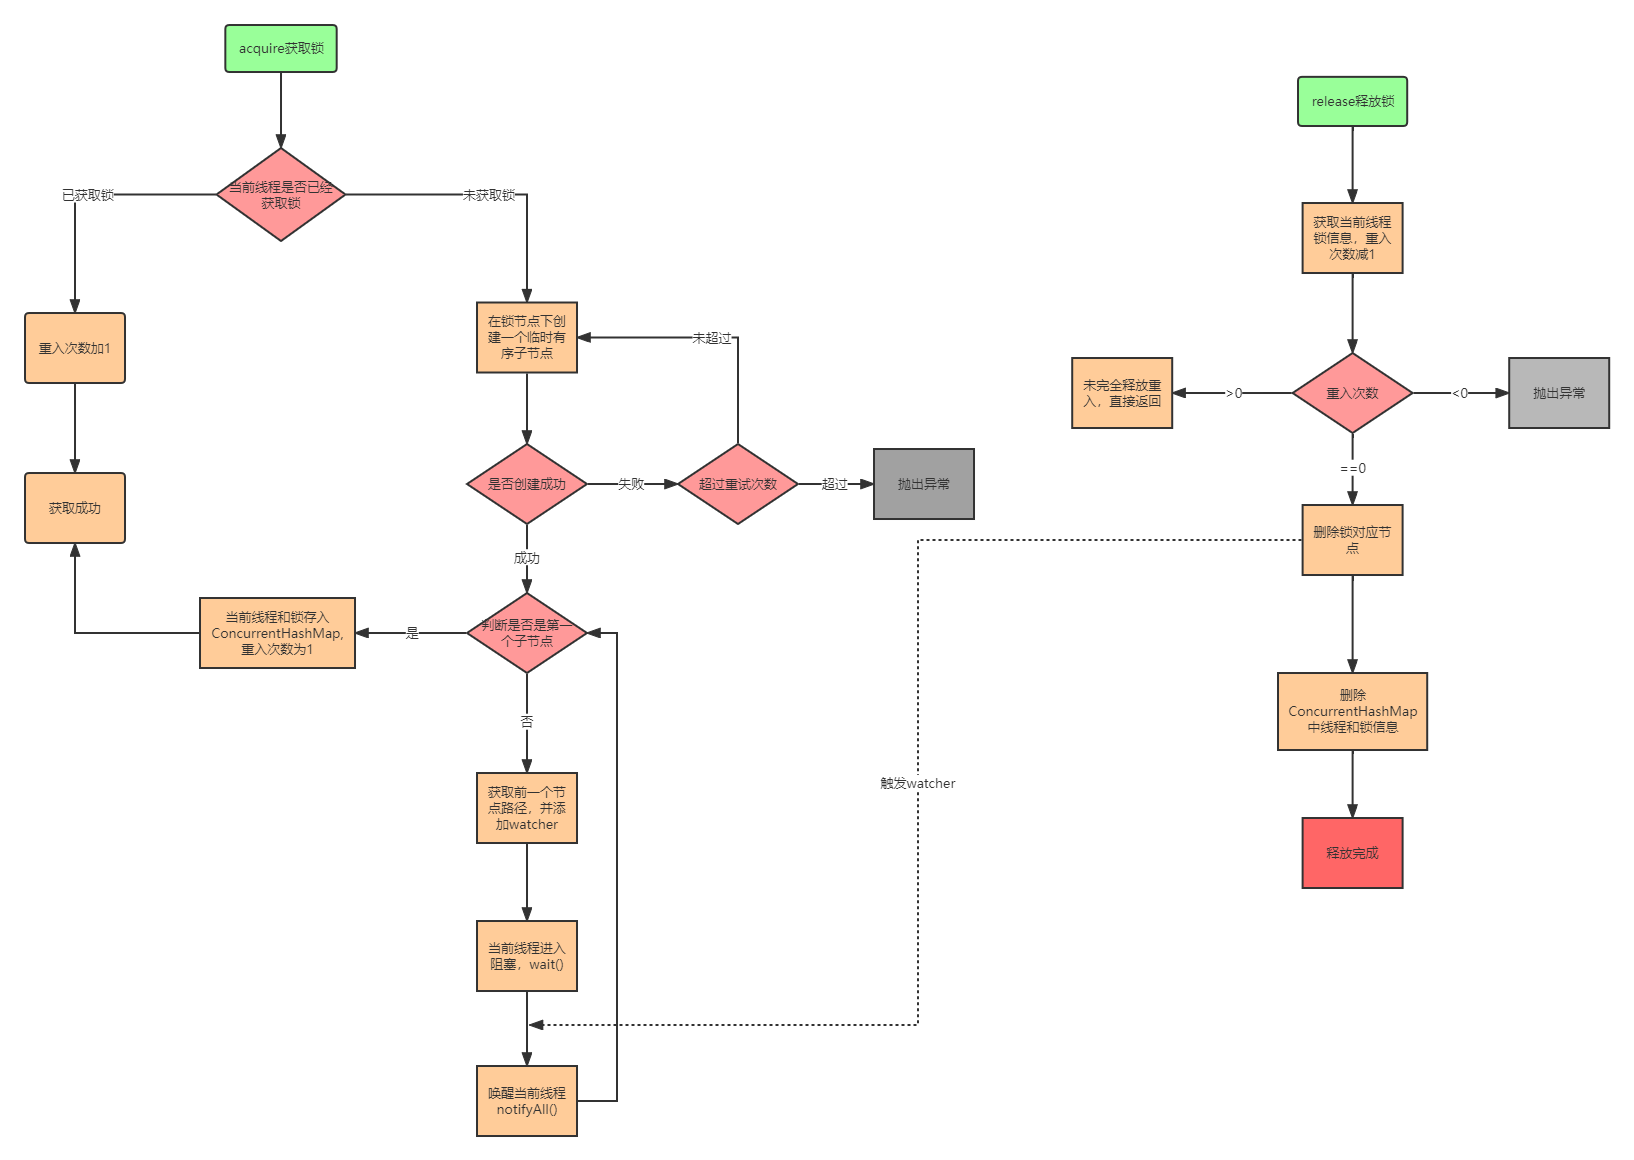
4、Curator可重入分布式锁工作流程
从InterProcessMutex类找到acquire()加锁方法
- public void acquire() throws Exception {
- if (!this.internalLock(-1L, (TimeUnit)null)) {
- throw new IOException("Lost connection while trying to acquire lock: " + this.basePath);
- }
- }
1)加锁
- private boolean internalLock(long time, TimeUnit unit) throws Exception {
- // 获取当前线程
- Thread currentThread = Thread.currentThread();
- // threadData类型是ConcurrentMap,从threadData中去拿LockData加锁对象
- InterProcessMutex.LockData lockData = (InterProcessMutex.LockData)this.threadData.get(currentThread);
- // 如果拿到了 证明之前加锁了,lockCount重入次数+1
- if (lockData != null) {
- lockData.lockCount.incrementAndGet();
- return true;
- } else {
- // 没有拿到开始从zookeeper上创建lock节点
- String lockPath = this.internals.attemptLock(time, unit, this.getLockNodeBytes());
- // 创建成功 加锁成功把对象放到threadData中
- if (lockPath != null) {
- InterProcessMutex.LockData newLockData = new InterProcessMutex.LockData(currentThread, lockPath);
- this.threadData.put(currentThread, newLockData);
- return true;
- } else {
- // 加锁失败
- return false;
- }
- }
- }
- private static class LockData {
- // 持有锁的线程
- final Thread owningThread;
- // 在zookeeper的锁路径
- final String lockPath;
- // 线程加锁次数
- final AtomicInteger lockCount;
- private LockData(Thread owningThread, String lockPath) {
- this.lockCount = new AtomicInteger(1);
- this.owningThread = owningThread;
- this.lockPath = lockPath;
- }
- }
2)创建节点返回路径
- String attemptLock(long time, TimeUnit unit, byte[] lockNodeBytes) throws Exception {
- long startMillis = System.currentTimeMillis();
- Long millisToWait = unit != null ? unit.toMillis(time) : null;
- byte[] localLockNodeBytes = this.revocable.get() != null ? new byte[0] : lockNodeBytes;
- // 重试次数
- int retryCount = 0;
- String ourPath = null;
- boolean hasTheLock = false;
- boolean isDone = false;
- while(!isDone) {
- isDone = true;
- try {
- // 创建临时有序节点
- ourPath = this.driver.createsTheLock(this.client, this.path, localLockNodeBytes);
- // 创建的节点是否为最小节点
- hasTheLock = this.internalLockLoop(startMillis, millisToWait, ourPath);
- } catch (NoNodeException var14) {
- // 加锁失败 重试设置重试策略
- if (!this.client.getZookeeperClient().getRetryPolicy().allowRetry(retryCount++, System.currentTimeMillis() - startMillis, RetryLoop.getDefaultRetrySleeper())) {
- throw var14;
- }
- isDone = false;
- }
- }
- return hasTheLock ? ourPath : null;
- }
- public String createsTheLock(CuratorFramework client, String path, byte[] lockNodeBytes) throws Exception {
- String ourPath;
- // 是否要给节点设置属性 创建的都是临时有序节点
- if (lockNodeBytes != null) {
- ourPath = (String)((ACLBackgroundPathAndBytesable)client.create().creatingParentContainersIfNeeded().withProtection().withMode(CreateMode.EPHEMERAL_SEQUENTIAL)).forPath(path, lockNodeBytes);
- } else {
- ourPath = (String)((ACLBackgroundPathAndBytesable)client.create().creatingParentContainersIfNeeded().withProtection().withMode(CreateMode.EPHEMERAL_SEQUENTIAL)).forPath(path);
- }
- return ourPath;
- }
- private boolean internalLockLoop(long startMillis, Long millisToWait, String ourPath) throws Exception {
- boolean haveTheLock = false;
- boolean doDelete = false;
- try {
- if (this.revocable.get() != null) {
- ((BackgroundPathable)this.client.getData().usingWatcher(this.revocableWatcher)).forPath(ourPath);
- }
- while(this.client.getState() == CuratorFrameworkState.STARTED && !haveTheLock) {
- // 将子节点进行排序
- List
children = this.getSortedChildren(); - // 截取创建的节点的序号
- String sequenceNodeName = ourPath.substring(this.basePath.length() + 1);
- // 判断是否为最小序号
- PredicateResults predicateResults = this.driver.getsTheLock(this.client, children, sequenceNodeName, this.maxLeases);
- if (predicateResults.getsTheLock()) {
- // 加锁成功
- haveTheLock = true;
- } else {
- // 拿到上一个节点的路径
- String previousSequencePath = this.basePath + "/" + predicateResults.getPathToWatch();
- synchronized(this) {
- try {
- // 监听上一个节点
- ((BackgroundPathable)this.client.getData().usingWatcher(this.watcher)).forPath(previousSequencePath);
- if (millisToWait == null) {
- // 等待
- this.wait();
- } else {
- millisToWait = millisToWait - (System.currentTimeMillis() - startMillis);
- startMillis = System.currentTimeMillis();
- if (millisToWait > 0L) {
- // 超时等待
- this.wait(millisToWait);
- } else {
- doDelete = true;
- break;
- }
- }
- } catch (NoNodeException var19) {
- }
- }
- }
- }
- } catch (Exception var21) {
- ThreadUtils.checkInterrupted(var21);
- doDelete = true;
- throw var21;
- } finally {
- if (doDelete) {
- this.deleteOurPath(ourPath);
- }
- }
- return haveTheLock;
- }
3)解锁
- public void release() throws Exception {
- Thread currentThread = Thread.currentThread();
- InterProcessMutex.LockData lockData = (InterProcessMutex.LockData)this.threadData.get(currentThread);
- if (lockData == null) {
- // 分布式场景下什么情况都可能有 所以判断一下
- throw new IllegalMonitorStateException("You do not own the lock: " + this.basePath);
- } else {
- // 重入次数减1
- int newLockCount = lockData.lockCount.decrementAndGet();
- if (newLockCount <= 0) {
- if (newLockCount < 0) {
- throw new IllegalMonitorStateException("Lock count has gone negative for lock: " + this.basePath);
- } else {
- try {
- // 这里之前应该还有个大于0的判断 在curator5.1.0&zookeeper 3.9.0版本去掉了
- this.internals.releaseLock(lockData.lockPath);
- } finally {
- this.threadData.remove(currentThread);
- }
- }
- }
- }
- }
5、总结
优点:Zookeeper分布式锁(如InterProcessMutex),具备高可用、可重入、阻塞锁特性,可解决失效死锁问题
缺点:因为需要频繁的创建和删除节点,性能上不如redis
在高性能、高并发场景下,不建议用Zookeeper的分布式锁。而由于Zookeeper的高可靠性,因此在并发量不是太高的应用场景下,还是推荐使用Zookeeper的分布式锁
二、服务注册与发现
1、设计思路

2、实现注册中心的优缺点
优点:
- 高可用性:ZooKeeper是一个高可用的分布式系统,可以通过配置多个服务器实例来提供容错能力。如果其中一个实例出现故障,其他实例仍然可以继续提供服务。
- 强一致性:ZooKeeper保证了数据的强一致性。当一个更新操作完成时,所有的服务器都将具有相同的数据视图。这使得ZooKeeper非常适合作为服务注册中心,因为可以确保所有客户端看到的服务状态是一致的。
- 实时性:ZooKeeper的监视器(Watcher)机制允许客户端监听节点的变化。当服务提供者的状态发生变化时(例如,上线或下线),客户端会实时收到通知。这使得服务消费者能够快速响应服务的变化,从而实现动态服务发现。
缺点:
- 性能限制:ZooKeeper的性能可能不如一些专为服务注册中心设计的解决方案,如nacos或Consul。尤其是在大量的读写操作或大规模集群的情况下,ZooKeeper可能会遇到性能瓶颈。
3、整合Spring Cloud Zookeeper实现微服务注册中心
第一步:在父pom文件中指定Spring Cloud版本
- <parent>
- <groupId>org.springframework.bootgroupId>
- <artifactId>spring-boot-starter-parentartifactId>
- <version>2.3.2.RELEASEversion>
- <relativePath/>
- parent>
- <properties>
- <java.version>1.8java.version>
- <spring-cloud.version>Hoxton.SR8spring-cloud.version>
- properties>
- <dependencyManagement>
- <dependencies>
- <dependency>
- <groupId>org.springframework.cloudgroupId>
- <artifactId>spring-cloud-dependenciesartifactId>
- <version>${spring-cloud.version}version>
- <type>pomtype>
- <scope>importscope>
- dependency>
- dependencies>
- dependencyManagement>
注意: springboot和springcloud的版本兼容问题
第二步:微服务pom文件中引入Spring Cloud Zookeeper注册中心依赖
- <dependency>
- <groupId>org.springframework.cloudgroupId>
- <artifactId>spring-cloud-starter-zookeeper-discoveryartifactId>
- <exclusions>
- <exclusion>
- <groupId>org.apache.zookeepergroupId>
- <artifactId>zookeeperartifactId>
- exclusion>
- exclusions>
- dependency>
- <dependency>
- <groupId>org.apache.zookeepergroupId>
- <artifactId>zookeeperartifactId>
- <version>3.8.0version>
- dependency>
注意: zookeeper客户端依赖和zookeeper sever的版本兼容问题
Spring Cloud整合Zookeeper注册中心核心源码入口: ZookeeperDiscoveryClientConfiguration
第三步: 微服务配置文件application.yml中配置zookeeper注册中心地址
- spring:
- cloud:
- zookeeper:
- connect-string: localhost:2181
- discovery:
- instance-host: 127.0.0.1
注册到zookeeper的服务实例元数据信息如下:

注意:如果address有问题,会出现找不到服务的情况,可以通过instance-host配置指定
第四步:整合feign进行服务调用
- @RequestMapping(value = "/findOrderByUserId/{id}")
- public R findOrderByUserId(@PathVariable("id") Integer id) {
- log.info("根据userId:"+id+"查询订单信息");
- //feign调用
- R result = orderFeignService.findOrderByUserId(id);
- return result;
- }
-
相关阅读:
信息系统建设和服务能力评估证书CS
CRM系统中联系人管理的十大好处
什么是乌干达COC认证?乌干达COC认证是什么意思?
[每周一更]-(第65期):Docker容器监控工具推荐
七分钟,数据转换器get到了
IMX6ULL学习笔记(7)——通过SD卡启动U-Boot
Vue2.0新手入门-模板语法-计算属性与监听属性的介绍和差异
PostgreSQL技巧之ShareLock死锁处理
GBase 8c数据类型-几何类型
【明解c语言中级篇 第二章练习答案】
- 原文地址:https://blog.csdn.net/gp3056/article/details/133840229
