-
vue打包压缩
参考
注意:方法1和方法2不能同时用
取消打包的map
config/index.js的
productionSourceMap设置为false抽取js
将部分常用又比较大的组件直接抽取为一个单独的js
打开
webpack.base.conf.js,在module.exports.entry中添加想要抽取的组件,其中key是js的名,value是想要抽取的组件//比如 entry: { app: './src/main.js', vendor: ['vue','vuex','jquery','vue-awesome-swiper','vue-cool-select','vue-lazyload','vue-quill-editor','vuex-persistedstate'], leaflet: ['leaflet','leaflet-hotline'], echarts: ['echarts'], }- 1
- 2
- 3
- 4
- 5
- 6
- 7

开启预编译
参考https://cloud.tencent.com/developer/section/1477569
开启之后页面速度会提升
打开
webpack.base.conf.js,在module.exports.plugins中添加new webpack.optimize.ModuleConcatenationPlugin()- 1

压缩
方法1:对js和css单独压缩
uglifyjs-webpack-plugin对js压缩需要dev环境引入
uglifyjs-webpack-pluginnpm install --save-dev uglifyjs-webpack-plugin- 1
找到
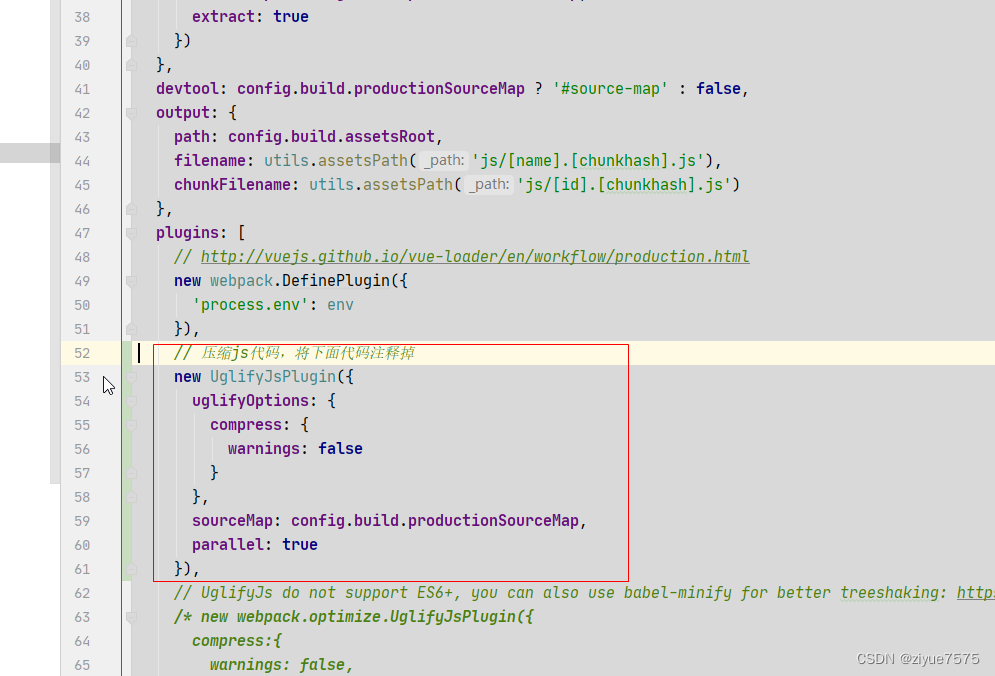
/build/webpack.prod.conf.js文件添加
const UglifyJsPlugin = require('uglifyjs-webpack-plugin') //在 const webpackConfig = merge(baseWebpackConfig, {的 plugins 中添加 new UglifyJsPlugin({ uglifyOptions: { compress: { warnings: false } }, sourceMap: config.build.productionSourceMap, parallel: true }), //将 HtmlWebpackPlugin中的 minify的所有的都改为false- 1
- 2
- 3
- 4
- 5
- 6
- 7
- 8
- 9
- 10
- 11
- 12
- 13
- 14


optimize-css-assets-webpack-plugin图片压缩需要dev环境引入
optimize-css-assets-webpack-pluginnpm install --save-dev optimize-css-assets-webpack-plugin- 1
找到
/build/webpack.prod.conf.js文件添加
const OptimizeCSSPlugin = require('optimize-css-assets-webpack-plugin') //在 const webpackConfig = merge(baseWebpackConfig, {的 plugins 中添加 // css 压缩代码,将下面代码注释掉 new OptimizeCSSPlugin({ cssProcessorOptions: config.build.productionSourceMap ? { safe: true, map: { inline: false } } : { safe: true } }), //将 HtmlWebpackPlugin中的 minify的所有的都改为false- 1
- 2
- 3
- 4
- 5
- 6
- 7
- 8
- 9
- 10
- 11


方法2vue开启Gzip压缩
依赖
npm install --save-dev compression-webpack-plugin- 1
方法1
按照上面的方法 const CompressionWebpackPlugin = require('compression-webpack-plugin'); //在 const webpackConfig = merge(baseWebpackConfig, {的 plugins 中添加 new CompressionWebpackPlugin({ filename: '[path].gz[query]', algorithm: 'gzip', test: new RegExp('\\.(' + ['js', 'css'].join('|') + ')$'), // 匹配文件名 threshold: 102, // 对0.1K以上的数据进行压缩 minRatio: 0.8, deleteOriginalAssets: false /* process.env.NODE_ENV == 'production' // 是否删除源文件 */ });- 1
- 2
- 3
- 4
- 5
- 6
- 7
- 8
- 9
- 10
- 11
- 12
方法2:
if (config.build.productionGzip) { const CompressionWebpackPlugin = require('compression-webpack-plugin') webpackConfig.plugins.push( new CompressionWebpackPlugin({ asset: '[path].gz[query]', algorithm: 'gzip', test: new RegExp( '\\.(' + config.build.productionGzipExtensions.join('|') + ')$' ), threshold: 10240, minRatio: 0.8 }) ) }- 1
- 2
- 3
- 4
- 5
- 6
- 7
- 8
- 9
- 10
- 11
- 12
- 13
- 14
- 15
- 16
- 17

-
相关阅读:
容器内需要编辑文件,但无法下载和使用ed 、vi、vim、nano编辑器
Dubbo+Zookeeper搭建
【Spring Boot 事务管理】
linux 对防火墙开启,关闭,并制定ip和端口进行外界访问
5个节约生命的Python小技巧
WebRTC Native M96编码规范向导(C++ C Python Java Oc Gn)
算法题:分别用c++/python/java实现回文数
2022社交电商(众城优选)最火引流拓客新思路,微三云胡佳东
10月21日绿健简报,星期五,农历九月廿六
Ubuntu20.04安装和编译运行lidar_align来联合标定lidar与imu的外参
- 原文地址:https://blog.csdn.net/qq_36254947/article/details/133809803
