-
StatefulSet 简单实践 Kubernetes
概述
在Kubernetes集群中部署MySQL和Mongodb的StatefulSet服务。
MySQL有官方文档的指引 + 其他网站博客的指引实现
Mongodb修改operator的Deployment进行简单的实现
MySQL-StatefulSet
参考官方文档:运行一个有状态的应用程序 | Kubernetes
深入剖析Kubernetes学习笔记:StatefulSet-MySQL集群(20) - 活的潇洒80 - 博客园 (cnblogs.com)
namespace.yaml
- apiVersion: v1
- kind: Namespace
- metadata:
- labels:
- kubernetes.io/metadata.name: mysql
- name: mysql
- spec:
- finalizers:
- - kubernetes
- status:
- phase: Active
mysql-class.yaml
创建动态存储卷:storeageclass。
存在部署依赖,需要先安装服务:nfs-subdir-external-provisioner
- apiVersion: storage.k8s.io/v1
- kind: StorageClass
- metadata:
- name: nfs-mysql
- namespace: mysql
- annotations:
- storageclass.kubernetes.io/is-default-class: "false" ## 是否设置为默认的storageclass
- provisioner: k8s-sigs.io/nfs-subdir-external-provisioner # or choose another name, must match deployment's env PROVISIONER_NAME'
- #provisioner: nfs-subdir-external-provisioner # or choose another name, must match deployment's env PROVISIONER_NAME'
- parameters:
- archiveOnDelete: "true"
- pathPattern: "${.PVC.namespace}/${.PVC.name}/${.PVC.annotations.nfs.io/storage-path}"
- # pathPattern: "${.PVC.namespace}/${.PVC.annotations.nfs.io/storage-path}"
- # pathPattern: "${.PVC.namespace}-${.PVC.name}"
mysql-pvc.yaml
参考官方文档:存储类 | Kubernetes
存在部署依赖,需要先安装服务:nfs-subdir-external-provisioner
自动创建的,下面data-mysql-0为例子:
- apiVersion: v1
- kind: PersistentVolumeClaim
- metadata:
- annotations:
- pv.kubernetes.io/bind-completed: "yes"
- pv.kubernetes.io/bound-by-controller: "yes"
- volume.beta.kubernetes.io/storage-class: nfs-mysql
- volume.beta.kubernetes.io/storage-provisioner: k8s-sigs.io/nfs-subdir-external-provisioner
- finalizers:
- - kubernetes.io/pvc-protection
- name: data-mysql-0
- namespace: mysql
- spec:
- accessModes:
- - ReadWriteMany
- resources:
- requests:
- storage: 10Mi
- storageClassName: nfs-mysql
- volumeMode: Filesystem

configmap.yaml
参考文档:运行一个有状态的应用程序 | Kubernetes
参考文档:使用StatefulSet搭建MySQL8集群 - 简书 (jianshu.com)
目前使用的是5.7.43的mysql
- apiVersion: v1
- kind: ConfigMap
- metadata:
- name: mysql
- namespace: mysql
- labels:
- app: mysql
- data:
- master.cnf: |
- # Apply this config only on the master.
- [client]
- default-character-set=utf8mb4
- [mysql]
- default-character-set=utf8mb4
- [mysqld]
- # 打开binlog日志
- log-bin
- # binlog_expire_logs_seconds=2592000
- max_connections=10000
- # 在容器里面需要设置下时区
- default-time-zone='+8:00'
- character-set-client-handshake=FALSE
- character-set-server=utf8mb4
- collation-server=utf8mb4_unicode_ci
- init_connect='SET NAMES utf8mb4 COLLATE utf8mb4_unicode_ci'
- slave.cnf: |
- # Apply this config only on slaves.
- [client]
- default-character-set=utf8mb4
- [mysql]
- default-character-set=utf8mb4
- [mysqld]
- # 机器设置只读
- super-read-only
- max_connections=10000
- default-time-zone='+8:00'
- character-set-client-handshake=FALSE
- character-set-server=utf8mb4
- collation-server=utf8mb4_unicode_ci
- init_connect='SET NAMES utf8mb4 COLLATE utf8mb4_unicode_ci'

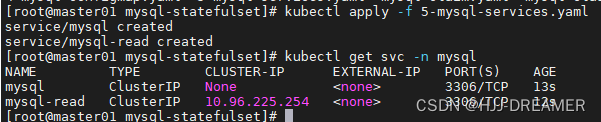
service.yaml
根据官方文档部署svc,无头服务 + ClusterIP
- # 为 StatefulSet 成员提供稳定的 DNS 表项的无头服务(Headless Service)
- apiVersion: v1
- kind: Service
- metadata:
- name: mysql
- namespace: mysql
- labels:
- app: mysql
- app.kubernetes.io/name: mysql
- spec:
- ports:
- - name: mysql
- port: 3306
- clusterIP: None
- selector:
- app: mysql
- ---
- # 用于连接到任一 MySQL 实例执行读操作的客户端服务
- # 对于写操作,你必须连接到主服务器:mysql-0.mysql
- apiVersion: v1
- kind: Service
- metadata:
- name: mysql-read
- namespace: mysql
- labels:
- app: mysql
- app.kubernetes.io/name: mysql
- readonly: "true"
- spec:
- ports:
- - name: mysql
- port: 3306
- selector:
- app: mysql
secret.yaml
官方文档的 MYSQL_ALLOW_EMPTY_PASSWORD 是通过明文的方式传递,需要修复为secret的模式登录,参考文档:Secret | Kubernetes

创建命令:
kubectl create secret generic mysql-secret -n mysql --dry-run=client --from-literal=MYSQL_ALLOW_EMPTY_PASSWORD=1 -o yaml结果输出为:
- apiVersion: v1
- data:
- MYSQL_ALLOW_EMPTY_PASSWORD: MQ==
- kind: Secret
- metadata:
- creationTimestamp: null
- name: mysql-secret
- namespace: mysql

使用 Secret 安全地分发凭据 | Kubernetes 配置statefulset

- ...
- env:
- - name: MYSQL_ALLOW_EMPTY_PASSWORD
- valueFrom:
- secretKeyRef:
- name: mysql-secret
- key: MYSQL_ALLOW_EMPTY_PASSWORD
- ...
详细参考下面的statefulset.yaml
StatefulSet.yaml
修改后的配置文件
与官方的文档主要差异如下:
- 配置了镜像拉取策略:imagePullPolicy: Always
- 密码文件使用secret的环境变量方式传递而非明文:secretKeyRef
- 使用的是image为MySQL:5.7.43
- 缩小了副本数:replicas: 2
- 添加了节点反亲和的策略:nodeAffinity + operator: NotIn
- 更新了镜像地址: image
- 使用了storeageclass的方式记录data:storageClassName + 更新了访问模式ReadWriteMany
- apiVersion: apps/v1
- kind: StatefulSet
- metadata:
- name: mysql
- namespace: mysql
- spec:
- selector:
- matchLabels:
- app: mysql
- app.kubernetes.io/name: mysql
- serviceName: mysql
- replicas: 2
- template:
- metadata:
- labels:
- app: mysql
- app.kubernetes.io/name: mysql
- spec:
- affinity:
- nodeAffinity:
- requiredDuringSchedulingIgnoredDuringExecution:
- nodeSelectorTerms:
- - matchExpressions:
- - key: kubernetes.io/hostname
- operator: NotIn
- values:
- - master01
- initContainers:
- - name: init-mysql
- image: mysql:5.7.43
- command:
- - bash
- - "-c"
- - |
- set -ex
- # 基于 Pod 序号生成 MySQL 服务器的 ID。
- [[ $HOSTNAME =~ -([0-9]+)$ ]] || exit 1
- ordinal=${BASH_REMATCH[1]}
- echo [mysqld] > /mnt/conf.d/server-id.cnf
- # 添加偏移量以避免使用 server-id=0 这一保留值。
- echo server-id=$((100 + $ordinal)) >> /mnt/conf.d/server-id.cnf
- # 将合适的 conf.d 文件从 config-map 复制到 emptyDir。
- if [[ $ordinal -eq 0 ]]; then
- cp /mnt/config-map/master.cnf /mnt/conf.d/
- else
- cp /mnt/config-map/slave.cnf /mnt/conf.d/
- fi
- volumeMounts:
- - name: conf
- mountPath: /mnt/conf.d
- - name: config-map
- mountPath: /mnt/config-map
- - name: clone-mysql
- image: reporsitory:5000/xtrabackup:1.0
- imagePullPolicy: Always
- command:
- - bash
- - "-c"
- - |
- set -ex
- # 如果已有数据,则跳过克隆。
- [[ -d /var/lib/mysql/mysql ]] && exit 0
- # 跳过主实例(序号索引 0)的克隆。
- [[ `hostname` =~ -([0-9]+)$ ]] || exit 1
- ordinal=${BASH_REMATCH[1]}
- [[ $ordinal -eq 0 ]] && exit 0
- # 从原来的对等节点克隆数据。
- ncat --recv-only mysql-$(($ordinal-1)).mysql 3307 | xbstream -x -C /var/lib/mysql
- # 准备备份。
- xtrabackup --prepare --target-dir=/var/lib/mysql
- volumeMounts:
- - name: data
- mountPath: /var/lib/mysql
- subPath: mysql
- - name: conf
- mountPath: /etc/mysql/conf.d
- containers:
- - name: mysql
- image: mysql:5.7.43
- env:
- - name: MYSQL_ALLOW_EMPTY_PASSWORD
- valueFrom:
- secretKeyRef:
- name: mysql-secret
- key: MYSQL_ALLOW_EMPTY_PASSWORD
- ports:
- - name: mysql
- containerPort: 3306
- volumeMounts:
- - name: data
- mountPath: /var/lib/mysql
- subPath: mysql
- - name: conf
- mountPath: /etc/mysql/conf.d
- resources:
- requests:
- cpu: 500m
- memory: 1Gi
- livenessProbe:
- exec:
- command: ["mysqladmin", "ping"]
- initialDelaySeconds: 30
- periodSeconds: 10
- timeoutSeconds: 5
- readinessProbe:
- exec:
- # 检查我们是否可以通过 TCP 执行查询(skip-networking 是关闭的)。
- command: ["mysql", "-h", "127.0.0.1", "-e", "SELECT 1"]
- initialDelaySeconds: 5
- periodSeconds: 2
- timeoutSeconds: 1
- - name: xtrabackup
- image: reporsitory:5000/xtrabackup:1.0
- imagePullPolicy: Always
- ports:
- - name: xtrabackup
- containerPort: 3307
- command:
- - bash
- - "-c"
- - |
- set -ex
- cd /var/lib/mysql
- # 确定克隆数据的 binlog 位置(如果有的话)。
- if [[ -f xtrabackup_slave_info && "x$(
- # XtraBackup 已经生成了部分的 “CHANGE MASTER TO” 查询
- # 因为我们从一个现有副本进行克隆。(需要删除末尾的分号!)
- cat xtrabackup_slave_info | sed -E 's/;$//g' > change_master_to.sql.in
- # 在这里要忽略 xtrabackup_binlog_info (它是没用的)。
- rm -f xtrabackup_slave_info xtrabackup_binlog_info
- elif [[ -f xtrabackup_binlog_info ]]; then
- # 我们直接从主实例进行克隆。解析 binlog 位置。
- [[ `cat xtrabackup_binlog_info` =~ ^(.*?)[[:space:]]+(.*?)$ ]] || exit 1
- rm -f xtrabackup_binlog_info xtrabackup_slave_info
- echo "CHANGE MASTER TO MASTER_LOG_FILE='${BASH_REMATCH[1]}',\
- MASTER_LOG_POS=${BASH_REMATCH[2]}" > change_master_to.sql.in
- fi
- # 检查我们是否需要通过启动复制来完成克隆。
- if [[ -f change_master_to.sql.in ]]; then
- echo "Waiting for mysqld to be ready (accepting connections)"
- until mysql -h 127.0.0.1 -e "SELECT 1"; do sleep 1; done
- echo "Initializing replication from clone position"
- mysql -h 127.0.0.1 \
- -e "$(
- MASTER_HOST='mysql-0.mysql', \
- MASTER_USER='root', \
- MASTER_PASSWORD='', \
- MASTER_CONNECT_RETRY=10; \
- START SLAVE;" || exit 1
- # 如果容器重新启动,最多尝试一次。
- mv change_master_to.sql.in change_master_to.sql.orig
- fi
- # 当对等点请求时,启动服务器发送备份。
- exec ncat --listen --keep-open --send-only --max-conns=1 3307 -c \
- "xtrabackup --backup --slave-info --stream=xbstream --host=127.0.0.1 --user=root"
- volumeMounts:
- - name: data
- mountPath: /var/lib/mysql
- subPath: mysql
- - name: conf
- mountPath: /etc/mysql/conf.d
- resources:
- requests:
- cpu: 100m
- memory: 100Mi
- volumes:
- - name: conf
- emptyDir: {}
- - name: config-map
- configMap:
- name: mysql
- volumeClaimTemplates:
- - metadata:
- name: data
- spec:
- storageClassName: nfs-mysql
- accessModes: ["ReadWriteMany"]
- resources:
- requests:
- storage: 10Mi
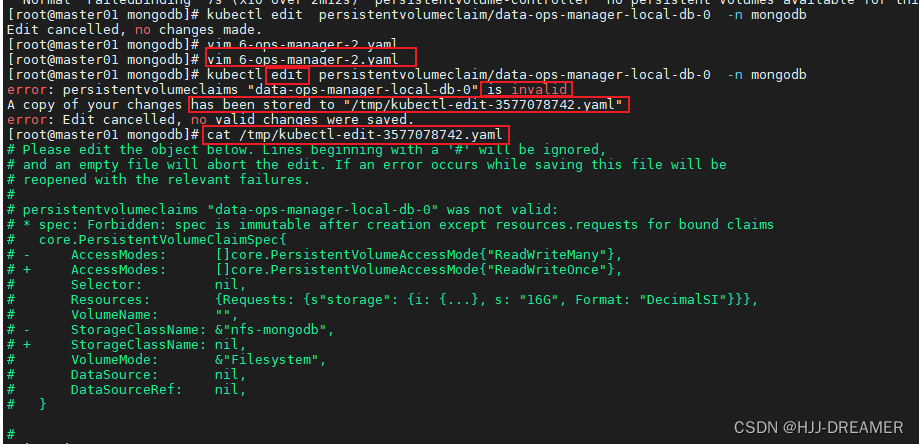
Error: pvc的绑定错误
使用默认的官方的yaml文件会发生报错,需要配置PV-Claim:

一直报错:

修改配置PV-Claim。yaml文件:
这里应该不用修改PVC,因为pvc是自动创建,应该是修改statefulset中的storageClassName: nfs-mysql 实现修复。

Error: pause:3.6 镜像无法下载
Failed to create pod sandbox: rpc error: code = Unknown desc = failed to get sandbox i mage "registry.aliyuncs.com/google_containers/pause:3.6": failed to pull image "registry.aliyuncs.com/google_containers/pause:3.6": failed to pull and unpack imag e "registry.aliyuncs.com/google_containers/pause:3.6": failed to resolve reference "registry.aliyuncs.com/google_containers/pause:3.6": failed to do request: Head "https://registry.aliyuncs.com/v2/google_containers/pause/manifests/3.6": dial tcp: lookup registry.aliyuncs.com on [fe80::10%ens34]:53: read udp [fe80::d21d:3ae :ea99:27c6%ens34]:51322->[fe80::10%ens34]:53: i/o timeout

因为被调度到master01节点,该节点没有pause:3.6镜像,所以启动失败,添加反亲和策略:
解决办法如下:

Error: xtrabackup:1.0镜像下载失败

更换以下镜像源:
使用StatefulSet搭建MySQL8集群 - 简书 (jianshu.com)
mzmuer/xtrabackup:1.0又或者docker search:

但仍然是失败的,核心应该是修改: /etc/containerd/config.toml 。
因为目前集群使用的是containerd,镜像仓库是docker的registry,需要修改对应的配置:

- 在仓库主机中将镜像ist0ne/xtrabackup下载下来
- 使用docker tag 更新标签
- 从新推送到自己的镜像仓库中

Error: init-container 启动失败
官方文档使用的是:primary.cnf + replica.cnf
其他参考文档使用的是:master.cnf + slave.cnf
我参考的是国内其他参考文档的内容,所以要进行修改

Error:The node was low on resource: ephemeral-storage
临时存储空间不足,下载不了镜像

当时master02 --> master03 --> node04 --> node05 顺序集群自动逐步尝试部署。
Error: ErrImagePull
添加镜像拉取策略:imagePullPolicy: Always
修改containerd的配置文件,一般为:/etc/containerd/config.toml
随后重启服务: systemctl restart containerd
因为部署的是docker的镜像仓库:相关的daemon.json如图:

修复后:
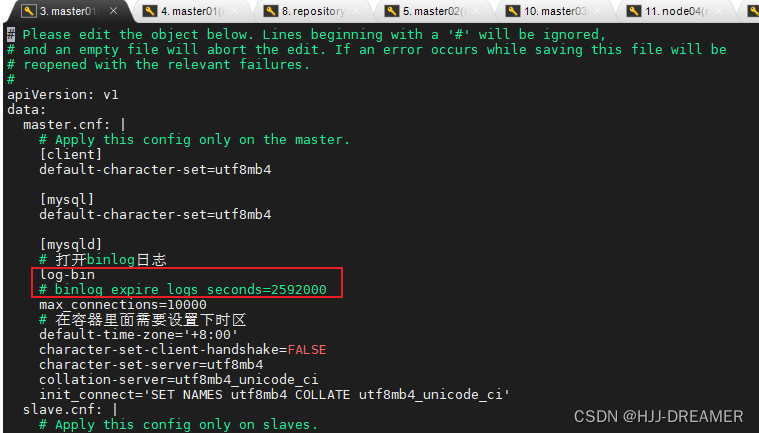
Error: unknown variable 'binlog_expire_logs_seconds=2592000'
非官方的参考文档用的是mysql:8的镜像,其中配置文件写binlog_expire_logs_seconds=2592000
目前,我自己使用的镜像是MySQL:5.7.43的镜像,这里可能存在配置参数不支持的问题
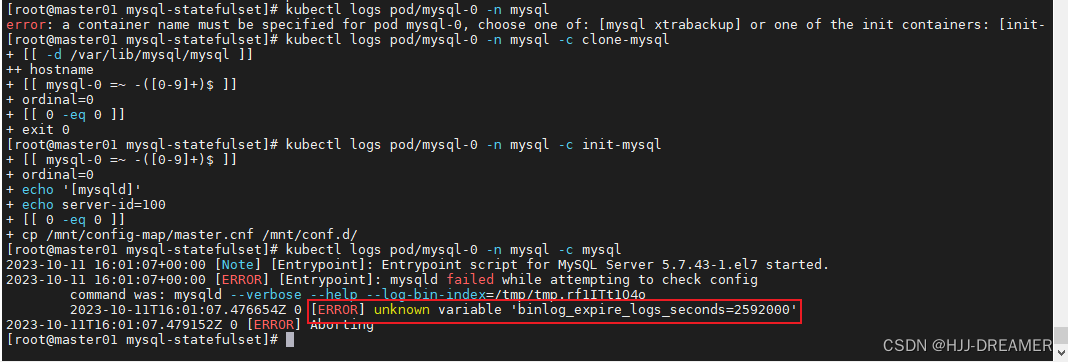
修改配置文件:kubectl edit configmap mysql -n mysql
Error: pvc 一直处于pending状态

相关nfs服务已经处于资源吃紧的边缘:

缩减资源的使用,statefulset的副本需要缩小,由原来的3个缩小为2个。
成功结果:
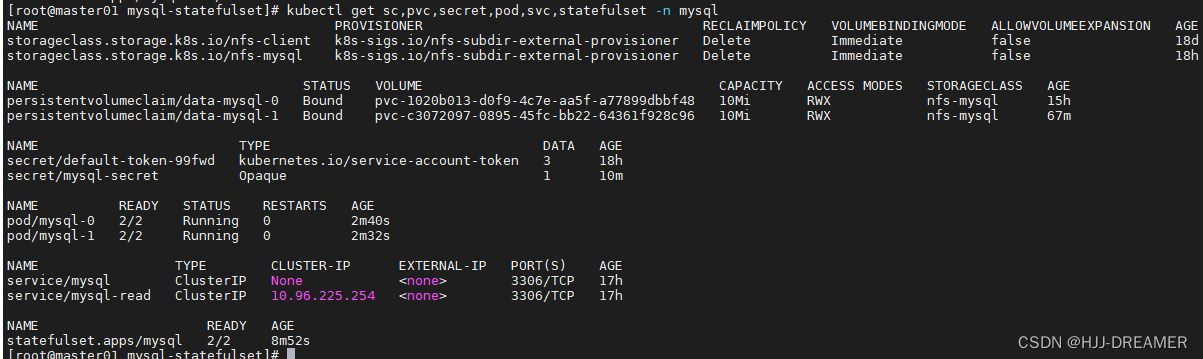
验证:


参考文档
深入剖析Kubernetes学习笔记:StatefulSet-MySQL集群(20) - 活的潇洒80 - 博客园 (cnblogs.com)
kubernetes【statefulset搭建MySQL集群】 - 掘金 (juejin.cn)
使用pv + nfs服务器的案例:k8s-使用statefulset部署mysql主从集群5.7 - gg888666 - 博客园 (cnblogs.com)
使用storageclass + PV的案例:K8S 部署 Statefulset mysql-腾讯云开发者社区-腾讯云 (tencent.com)
有状态的节点控制器 -- StatefulSet 及其网络状态 (qq.com)
有状态的节点控制器 StatefulSet 的存储状态 (qq.com)
实战 Kubernetes StatefulSet -- MySQL 主从集群搭建-腾讯云开发者社区-腾讯云 (tencent.com)
Kubernetes:使用StatefulSet搭建MySQL集群(一主多从) - Cooper_73 - 博客园 (cnblogs.com)
Kubernetes:使用StatefulSet搭建MySQL集群(一主多从) - Cooper_73 - 博客园 (cnblogs.com)
Mongodb-StatefulSet
文件来源
Install and Configure the Kubernetes Operator — MongoDB Kubernetes Operator upcoming
Install the MongoDB Enterprise Kubernetes Operator — MongoDB Kubernetes Operator upcoming
crd.yaml
来源于官网文件,使用kubectl apply -f 直接部署
mongodb-enterprise.yaml
参考的视频:statefulset 学亮-哔哩哔哩_Bilibili
将官方网站的deployment文件进行了修改,主要是:
- 增加了创建namespace的yaml部分
- 修改了Deployment为StatefulSet
- 增加了无头服务Service
- ---
- apiVersion: v1
- kind: Namespace
- metadata:
- labels:
- kubernetes.io/metadata.name: mongodb
- name: mongodb
- spec:
- finalizers:
- - kubernetes
- status:
- phase: Active
- ---
- # Source: enterprise-operator/templates/operator-roles.yaml
- apiVersion: v1
- kind: ServiceAccount
- metadata:
- name: mongodb-enterprise-operator
- namespace: mongodb
- ---
- # Source: enterprise-operator/templates/operator-roles.yaml
- kind: ClusterRole
- apiVersion: rbac.authorization.k8s.io/v1
- metadata:
- name: mongodb-enterprise-operator-mongodb-webhook
- rules:
- - apiGroups:
- - "admissionregistration.k8s.io"
- resources:
- - validatingwebhookconfigurations
- verbs:
- - get
- - create
- - update
- - delete
- - apiGroups:
- - ""
- resources:
- - services
- verbs:
- - get
- - list
- - watch
- - create
- - update
- - delete
- ---
- # Source: enterprise-operator/templates/operator-roles.yaml
- kind: ClusterRoleBinding
- apiVersion: rbac.authorization.k8s.io/v1
- metadata:
- name: mongodb-enterprise-operator-mongodb-webhook-binding
- roleRef:
- apiGroup: rbac.authorization.k8s.io
- kind: ClusterRole
- name: mongodb-enterprise-operator-mongodb-webhook
- subjects:
- - kind: ServiceAccount
- name: mongodb-enterprise-operator
- namespace: mongodb
- ---
- # Source: enterprise-operator/templates/operator-roles.yaml
- kind: Role
- apiVersion: rbac.authorization.k8s.io/v1
- metadata:
- name: mongodb-enterprise-operator
- namespace: mongodb
- rules:
- - apiGroups:
- - ""
- resources:
- - services
- verbs:
- - get
- - list
- - watch
- - create
- - update
- - delete
- - apiGroups:
- - ""
- resources:
- - secrets
- - configmaps
- verbs:
- - get
- - list
- - create
- - update
- - delete
- - watch
- - apiGroups:
- - apps
- resources:
- - statefulsets
- verbs:
- - create
- - get
- - list
- - watch
- - delete
- - update
- - apiGroups:
- - ""
- resources:
- - pods
- verbs:
- - get
- - list
- - watch
- - delete
- - deletecollection
- - apiGroups:
- - mongodb.com
- verbs:
- - "*"
- resources:
- - mongodb
- - mongodb/finalizers
- - mongodbusers
- - opsmanagers
- - opsmanagers/finalizers
- - mongodbmulticluster
- - mongodbmulticluster/finalizers
- - mongodb/status
- - mongodbusers/status
- - opsmanagers/status
- - mongodbmulticluster/status
- ---
- # Source: enterprise-operator/templates/operator-roles.yaml
- kind: RoleBinding
- apiVersion: rbac.authorization.k8s.io/v1
- metadata:
- name: mongodb-enterprise-operator
- namespace: mongodb
- roleRef:
- apiGroup: rbac.authorization.k8s.io
- kind: Role
- name: mongodb-enterprise-operator
- subjects:
- - kind: ServiceAccount
- name: mongodb-enterprise-operator
- namespace: mongodb
- # This ClusterRoleBinding is necessary in order to use validating
- # webhooks—these will prevent you from applying a variety of invalid resource
- # definitions. The validating webhooks are optional so this can be removed if
- # necessary.
- ---
- # Source: enterprise-operator/templates/database-roles.yaml
- apiVersion: v1
- kind: ServiceAccount
- metadata:
- name: mongodb-enterprise-appdb
- namespace: mongodb
- ---
- # Source: enterprise-operator/templates/database-roles.yaml
- apiVersion: v1
- kind: ServiceAccount
- metadata:
- name: mongodb-enterprise-database-pods
- namespace: mongodb
- ---
- # Source: enterprise-operator/templates/database-roles.yaml
- apiVersion: v1
- kind: ServiceAccount
- metadata:
- name: mongodb-enterprise-ops-manager
- namespace: mongodb
- ---
- # Source: enterprise-operator/templates/database-roles.yaml
- kind: Role
- apiVersion: rbac.authorization.k8s.io/v1
- metadata:
- name: mongodb-enterprise-appdb
- namespace: mongodb
- rules:
- - apiGroups:
- - ""
- resources:
- - secrets
- verbs:
- - get
- - apiGroups:
- - ""
- resources:
- - pods
- verbs:
- - patch
- - delete
- - get
- ---
- # Source: enterprise-operator/templates/database-roles.yaml
- kind: RoleBinding
- apiVersion: rbac.authorization.k8s.io/v1
- metadata:
- name: mongodb-enterprise-appdb
- namespace: mongodb
- roleRef:
- apiGroup: rbac.authorization.k8s.io
- kind: Role
- name: mongodb-enterprise-appdb
- subjects:
- - kind: ServiceAccount
- name: mongodb-enterprise-appdb
- namespace: mongodb
- ---
- # Source: enterprise-operator/templates/operator.yaml
- apiVersion: apps/v1
- kind: StatefulSet
- metadata:
- name: mongodb-enterprise-operator
- namespace: mongodb
- spec:
- serviceName: mongodb
- replicas: 3
- selector:
- matchLabels:
- app.kubernetes.io/component: controller
- app.kubernetes.io/name: mongodb-enterprise-operator
- app.kubernetes.io/instance: mongodb-enterprise-operator
- template:
- metadata:
- labels:
- app.kubernetes.io/component: controller
- app.kubernetes.io/name: mongodb-enterprise-operator
- app.kubernetes.io/instance: mongodb-enterprise-operator
- spec:
- serviceAccountName: mongodb-enterprise-operator
- securityContext:
- runAsNonRoot: true
- runAsUser: 2000
- containers:
- - name: mongodb-enterprise-operator
- image: "quay.io/mongodb/mongodb-enterprise-operator-ubi:1.22.0"
- imagePullPolicy: Always
- args:
- - -watch-resource=mongodb
- - -watch-resource=opsmanagers
- - -watch-resource=mongodbusers
- command:
- - /usr/local/bin/mongodb-enterprise-operator
- resources:
- limits:
- cpu: 1100m
- memory: 1Gi
- requests:
- cpu: 500m
- memory: 200Mi
- env:
- - name: OPERATOR_ENV
- value: prod
- - name: WATCH_NAMESPACE
- valueFrom:
- fieldRef:
- fieldPath: metadata.namespace
- - name: NAMESPACE
- valueFrom:
- fieldRef:
- fieldPath: metadata.namespace
- - name: CLUSTER_CLIENT_TIMEOUT
- value: "10"
- - name: IMAGE_PULL_POLICY
- value: Always
- # Database
- - name: MONGODB_ENTERPRISE_DATABASE_IMAGE
- value: quay.io/mongodb/mongodb-enterprise-database-ubi
- - name: INIT_DATABASE_IMAGE_REPOSITORY
- value: quay.io/mongodb/mongodb-enterprise-init-database-ubi
- - name: INIT_DATABASE_VERSION
- value: 1.0.19
- - name: DATABASE_VERSION
- value: 2.0.2
- # Ops Manager
- - name: OPS_MANAGER_IMAGE_REPOSITORY
- value: quay.io/mongodb/mongodb-enterprise-ops-manager-ubi
- - name: INIT_OPS_MANAGER_IMAGE_REPOSITORY
- value: quay.io/mongodb/mongodb-enterprise-init-ops-manager-ubi
- - name: INIT_OPS_MANAGER_VERSION
- value: 1.0.12
- # AppDB
- - name: INIT_APPDB_IMAGE_REPOSITORY
- value: quay.io/mongodb/mongodb-enterprise-init-appdb-ubi
- - name: INIT_APPDB_VERSION
- value: 1.0.18
- - name: OPS_MANAGER_IMAGE_PULL_POLICY
- value: Always
- - name: AGENT_IMAGE
- value: "quay.io/mongodb/mongodb-agent-ubi:12.0.25.7724-1"
- - name: MONGODB_IMAGE
- value: mongodb-enterprise-server
- - name: MONGODB_REPO_URL
- value: quay.io/mongodb
- - name: MDB_IMAGE_TYPE
- value: ubi8
- - name: PERFORM_FAILOVER
- value: "true"
- ---
- apiVersion: v1
- kind: Service
- metadata:
- name: mongodb
- namespace: mongodb
- spec:
- selector:
- app.kubernetes.io/name: mongodb-enterprise-operator
- type: ClusterIP
- clusterIP: None
- ports:
- - port: 27017
- targetPort: 27017
成功部署的结果:

部署 Ops Manager Resource
secret.yaml
- kubectl create secret generic ops-manager-admin-secret \
- --from-literal=Username="test" --from-literal=Password="test" \
- --from-literal=FirstName="test" --from-literal=LastName="test" \
- -n mongodb -o yaml --dry-run=client
storageclass.yaml
- apiVersion: storage.k8s.io/v1
- kind: StorageClass
- metadata:
- name: nfs-mongodb
- namespace: mongodb
- annotations:
- storageclass.kubernetes.io/is-default-class: "false" ## 是否设置为默认的storageclass
- provisioner: k8s-sigs.io/nfs-subdir-external-provisioner # or choose another name, must match deployment's env PROVISIONER_NAME'
- #provisioner: nfs-subdir-external-provisioner # or choose another name, must match deployment's env PROVISIONER_NAME'
- parameters:
- archiveOnDelete: "true"
- pathPattern: "${.PVC.namespace}/${.PVC.name}/${.PVC.annotations.nfs.io/storage-path}"
- # pathPattern: "${.PVC.namespace}/${.PVC.annotations.nfs.io/storage-path}"
- # pathPattern: "${.PVC.namespace}-${.PVC.name}"
ops-manager.yaml
依赖于crd.yaml的成功创建才能执行该步骤
Error: version + members 错误

Error: 修改旧版文件,部署不可行
部署的时候参考第三方旧版文件部署:Kubernetes部署MongoDB集群(一):安装MongoDB Ops Manager | Finisky Garden
最终没有成功
- apiVersion: mongodb.com/v1
- kind: MongoDBOpsManager
- metadata:
- name: ops-manager
- namespace: mongodb
- spec:
- # the version of Ops Manager distro to use
- # 4.2.4 已经不再支持
- version: 5.0.13
- # the name of the secret containing admin user credentials.
- adminCredentials: ops-manager-admin-secret
- externalConnectivity:
- type: NodePort
- # the Replica Set backing Ops Manager.
- # appDB has the SCRAM-SHA authentication mode always enabled
- applicationDatabase:
- members: 3
- version: "4.4.0-ubi8"
查看状态:一直pending
- kubectl api-resources | grep mongodb
- kubectl get opsmanagers -n mongodb
- kubectl describe opsmanagers.mongodb.com ops-manager -n mongodb
- kubectl get all -n mongodb


核心问题是没有持久卷可以被绑定:

根据官方文档,
第一种是PVC的模式部署
Configure File System Backup Store with Kubernetes Operator — MongoDB Kubernetes Operator upcoming
第二种是storageclass模式部署
mongodb-enterprise-kubernetes/samples/ops-manager/ops-manager-local-mode.yaml at master · mongodb/mongodb-enterprise-kubernetes · GitHub根据github仓库选合适的yaml文件部署:ops-manager-local-mode.yaml,修改后部署,该版本使用的镜像较大,最终也没部署下来
- apiVersion: mongodb.com/v1
- kind: MongoDBOpsManager
- metadata:
- name: ops-manager-local
- namespace: mongodb
- spec:
- replicas: 1
- version: 5.0.5
- adminCredentials: ops-manager-admin-secret
- configuration:
- # this enables local mode in Ops Manager
- automation.versions.source: local
- statefulSet:
- spec:
- # the Persistent Volume Claim will be created for each Ops Manager Pod
- volumeClaimTemplates:
- - metadata:
- name: mongodb-versions
- spec:
- # 定义storageClass
- storageClassName: nfs-mongodb
- # 修改模式为many
- accessModes: ["ReadWriteMany"]
- resources:
- requests:
- storage: 20G
- template:
- spec:
- containers:
- - name: mongodb-ops-manager
- volumeMounts:
- - name: mongodb-versions
- # this is the directory in each Pod where all MongoDB
- # archives must be put
- mountPath: /mongodb-ops-manager/mongodb-releases
- backup:
- enabled: false
- applicationDatabase:
- version: "4.4.11-ent"
- members: 3
修改PVC.yaml
一直处于pending状态,故手动对其进行修改:

手动修改,会提示失败,删除现有的PVC,重新部署/tmp/下的pvc
- apiVersion: v1
- kind: PersistentVolumeClaim
- metadata:
- labels:
- app: ops-manager-local-db-svc
- controller: mongodb-enterprise-operator
- pod-anti-affinity: ops-manager-local-db
- name: data-ops-manager-local-db-0
- namespace: mongodb
- spec:
- # 新增storageclass
- storageClassName: nfs-mongodb
- # 修改访问模式
- accessModes:
- - ReadWriteMany
- resources:
- requests:
- storage: 16G
- volumeMode: Filesystem

配置节点驱逐:
配置完成后,删除pod,重新调度部署


修改镜像配置:
因为电脑配置较低,需要在镜像服务器将相关镜像推送到个人docker镜像中
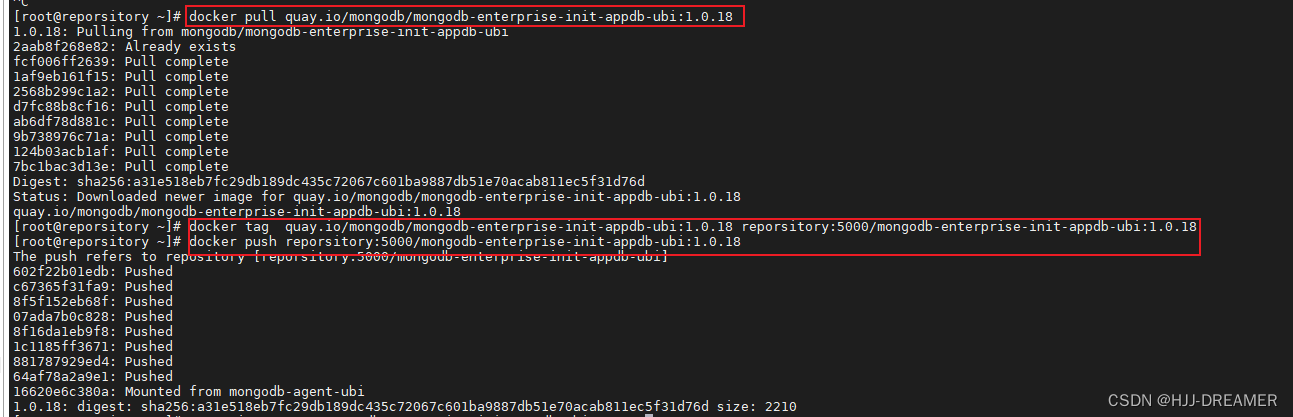
修改statefulset.yaml文件,方便镜像拉取部署。
修改containerd的启动配置
Failed to pull image "reporsitory:5000/mongodb-enterprise-init-appdb-ubi:1.0.18": rpc error: code = Unknown desc = f00/mongodb-enterprise-init-appdb-ubi:1.0.18": failed to resolve reference "reporsitory:5000/mongodb-enterprise-init-appdb-ubi:1.0.18": failed to do request: Head "https://reporsitoanifests/1.0.18": http: server gave HTTP response to HTTPS client

需要新增加为:vim /etc/containerd/config.toml

随后需要重启服务

参考文档
Install the MongoDB Enterprise Kubernetes Operator — MongoDB Kubernetes Operator upcoming
Deploy an Ops Manager Resource — MongoDB Kubernetes Operator upcoming
部署Ops Manager资源_MonogDB 中文网 (mongodb.net.cn)
Kubernetes部署MongoDB集群(一):安装MongoDB Ops Manager | Finisky Garden
-
相关阅读:
Kubernetes Node Not Ready Error
QT中使用QProcess执行命令,实时获取数据,例如进度条
(附源码)计算机毕业设计ssm《Java EE开发技术》课程学习网站
VR云游带你玩转智慧文旅,解决景区营销痛点
wininet,winhttp,xmlhttprequest,各版本区别 《转》
网络调试工具编程实现
Wow: 基于 DDD、EventSourcing 的现代响应式 CQRS 架构微服务开发框架
Allegro如何使用快捷键快速切换层面操作指导
channel 进阶
基于大模型做txt文档拆分的方法
- 原文地址:https://blog.csdn.net/m0_59267075/article/details/133255012
