-
Unity实现设计模式——适配器模式
Unity实现设计模式——适配器模式
适配器模式又称为变压器模式、包装模式(Wrapper) 将一个类的接口变换成客户端所期待的另一种接口,从而使原本因接口不匹配而无法在一起工作的两个类能够在一起工作。
在一个在役的项目期望在原有接口的基础上拓展,那么适配器模式是最适合的。 即需要使用一个已有或新建的类,但这个类又不符合系统的接口,则可以使用适配器模式。client:需要使用适配器的对象,不需要关心适配器内部的实现,只对接目标角色。
Target:目标角色,和client直接对接,定义了client需要用到的功能。
Adaptee:需要被进行适配的对象。
Adapter:适配器,负责将源对象转化,给client做适配。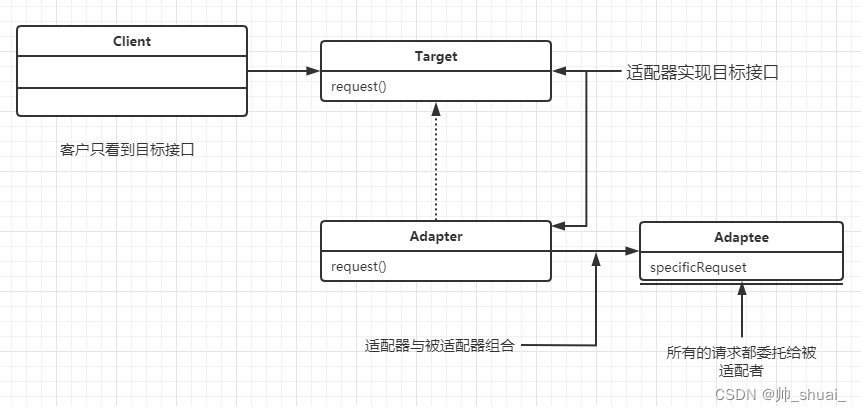
下面还是使用两个例子来说明适配器模式(一)使用比较抽象的例子来说明
1.Target
class Target { public virtual void Request() { Debug.Log("Called Target Request()"); } }- 1
- 2
- 3
- 4
- 5
- 6
- 7
2.Adaptee
class Adaptee { public void SpecificRequest() { Debug.Log("Called SpecificRequest()"); } }- 1
- 2
- 3
- 4
- 5
- 6
- 7
可以看到目标对象和待适配对象并不匹配
使用适配器来让二者联系起来3.Adapter
class Adapter : Target { private Adaptee _adaptee = new Adaptee(); public override void Request() { // Possibly do some other work // and then call SpecificRequest _adaptee.SpecificRequest(); } }- 1
- 2
- 3
- 4
- 5
- 6
- 7
- 8
- 9
- 10
- 11
4.测试
public class AdapterStructure : MonoBehaviour { void Start( ) { // Create adapter and place a request Target target = new Adapter(); target.Request(); } }- 1
- 2
- 3
- 4
- 5
- 6
- 7
- 8
- 9
可以发现两个无关的类很自然的就联系起来了!
(二)使用具体的例子来说明
现在有敌方攻击者的基类,派生出了敌方坦克,同时有敌方机器人但是机器人的接口和敌方攻击者的接口不同,我们需要进行适配
1. IEnemyAttacker
public interface IEnemyAttacker { void FireWeapon(); void DriveForward(); void AssignDriver(string driver); }- 1
- 2
- 3
- 4
- 5
- 6
2. EnemyTank
public class EnemyTank : IEnemyAttacker { public void FireWeapon() { int attackDamage = Random.Range(1, 10); Debug.Log("Enemy Tank does " + attackDamage + " damage"); } public void DriveForward() { int movement = Random.Range(1, 5); Debug.Log("Enemy Tank moves " + movement + " spaces"); } public void AssignDriver(string driver) { Debug.Log(driver + " is driving the tank"); } }- 1
- 2
- 3
- 4
- 5
- 6
- 7
- 8
- 9
- 10
- 11
- 12
- 13
- 14
- 15
- 16
- 17
- 18
- 19
3. EnemyRobot
public class EnemyRobot { public void SmashWithHands() { int attackDamage = Random.Range(1, 10); Debug.Log("Robot causes " + attackDamage + " damage with it hands"); } public void WalkForward() { int movement = Random.Range(1, 3); Debug.Log("Robot walks " + movement + " spaces"); } public void ReactToHuman(string driverName) { Debug.Log("Robot tramps on " + driverName); } }- 1
- 2
- 3
- 4
- 5
- 6
- 7
- 8
- 9
- 10
- 11
- 12
- 13
- 14
- 15
- 16
- 17
- 18
- 19
可以看出这里不同,当然可以对EnemyRobot派生自IEnemyAttacker接口,然后重新实现接口,但是在多人协作的场景,这样是不允许的。同时该类可能在别处引用,显然有很大的工作量要修改。
4. EnemyRobotAdaper
public class EnemyRobotAdaper : IEnemyAttacker { EnemyRobot robot; public EnemyRobotAdaper(EnemyRobot robot) { this.robot = robot; } public void FireWeapon() { robot.SmashWithHands(); } public void DriveForward() { robot.WalkForward(); } public void AssignDriver(string driver) { robot.ReactToHuman(driver); } }- 1
- 2
- 3
- 4
- 5
- 6
- 7
- 8
- 9
- 10
- 11
- 12
- 13
- 14
- 15
- 16
- 17
- 18
- 19
- 20
- 21
- 22
- 23
- 24
5.测试
public class AdapterPatternExample2 : MonoBehaviour { void Start() { IEnemyAttacker tank = new EnemyTank(); EnemyRobot fredTheRobot = new EnemyRobot(); IEnemyAttacker adapter = new EnemyRobotAdaper(fredTheRobot); fredTheRobot.ReactToHuman("Hans"); fredTheRobot.WalkForward(); tank.AssignDriver("Frank"); tank.DriveForward(); tank.FireWeapon(); adapter.AssignDriver("Mark"); adapter.DriveForward(); adapter.FireWeapon(); } }- 1
- 2
- 3
- 4
- 5
- 6
- 7
- 8
- 9
- 10
- 11
- 12
- 13
- 14
- 15
- 16
- 17
- 18
- 19
- 20
- 21
-
相关阅读:
【Linux安全之iptables的target】
两种解法搞定Swap Nodes in Pairs算法题
基本通信设备
Github自动构建及推送DockerHub
Antdv+Asp.net WebApi开发学生信息管理系统(一)
『现学现忘』Git基础 — 20、Git中忽略文件补充
Apifox很难不爱
Spring Security学习笔记(一)Spring Security架构原理
NATAPP内网穿透之接口测试
源码包部署
- 原文地址:https://blog.csdn.net/zzzsss123333/article/details/133694390
