-
canvas基础1
直线
- <!DOCTYPE html>
- <html lang="en">
- <head>
- <meta charset="UTF-8">
- <meta name="viewport" content="width=device-width, initial-scale=1.0">
- <title>Document</title>
- </head>
- <body>
- <canvas id="canvas" style="border:1px solid #ccc;margin:50px;"></canvas>
- <script>
- const canvas = document.getElementById('canvas')
- canvas.width = 1024
- canvas.height = 768
- const context = canvas.getContext('2d')
- // 绘制直线
- context.moveTo(100, 90) // 笔尖移动到 x:100 y:90 的位置
- context.lineTo(700, 600) // 画一条直线到 x: 700 y: 600 的位置
- context.lineWidth = 5 // 设置直线宽度为 5
- context.strokeStyle = '#005588' // 设置直线颜色
- // 以上只是设置直线状态,并未开始画
- context.stroke() // 将之前描述的线条状态画出来 stroke用于绘制线条
- </script>
- </body>
- </html>
图示:

线条的属性
lineCap
butt: 默认
round
square
设置线条 2端 的形态,2条线条相交处设置无效
- context.lineWidth = 50
- context.strokeStyle = '#058'
- context.beginPath()
- context.moveTo(100, 200)
- context.lineTo(700, 200)
- context.lineCap = 'butt'
- context.stroke()
- context.beginPath()
- context.moveTo(100, 400)
- context.lineTo(700, 400)
- context.lineCap = 'round'
- context.stroke()
- context.beginPath()
- context.moveTo(100, 600)
- context.lineTo(700, 600)
- context.lineCap = 'square'
- context.stroke()
- // 基线,用于对比lineCap的三种属性
- context.lineWidth = 1
- context.strokeStyle = '#27a'
- context.beginPath()
- context.moveTo(100, 100)
- context.lineTo(100, 700)
- context.moveTo(700, 100)
- context.lineTo(700, 700)
- context.stroke()
图示:

lineJoin
miter:默认 尖角形状
bevel:连接斜面
round:圆角
设置2条线条相交时的形态
miter:
- const canvas = document.getElementById('canvas')
- canvas.width = 800
- canvas.height = 800
- const context = canvas.getContext('2d')
- const posX = 400
- const posY = 0
- const bigRadius = 300
- const smallRadius = 150
- context.lineWidth = 10
- context.lineJoin = 'miter'
- drawStar(context, smallRadius, bigRadius, posX, posY, 0)
- function drawStar(cxt, r, R, x, y, rot=0) {
- cxt.beginPath()
- for (let i = 0; i < 5; i++) {
- cxt.lineTo(
- Math.cos((18 + i * 72 - rot) / 180 * Math.PI) * R + x,
- -Math.sin((18 + i * 72 - rot) / 180 * Math.PI) * R + x
- )
- cxt.lineTo(
- Math.cos((54 + i * 72 - rot) / 180 * Math.PI) * r + x,
- -Math.sin((54 + i * 72 - rot) / 180 * Math.PI) * r + x
- )
- }
- cxt.closePath()
- context.stroke()
- }
图示:

bevel:
context.lineJoin = 'bevel'
图示:

round:
context.lineJoin = 'round'
图示:

miter
当线条属性 lineJoin 为 miter 时有效,
内角和外角之间的距离
默认为 10

矩形
rect(x, y, width, height)
x: 矩形左上角的 x 坐标
y: 矩形左上角的 y 坐标
width: 矩形的宽度
height: 矩形的高度
fillRect(x, y, width, height) 绘制矩形并填充颜色
strokeRect(x, y, width, height) 绘制矩形并描边
后面绘制的图形会覆盖前面的图形
- context.lineWidth = 5
- context.strokeStyle = '#058'
- context.fillStyle = 'red'
- context.beginPath()
- context.rect(100, 100, 400, 300)
- context.closePath()
- context.fill()
- context.stroke()
- context.fillStyle = 'green'
- context.beginPath()
- context.fillRect(300, 300, 400, 300)
- context.strokeRect(300, 300, 400, 300)
- context.closePath()
图示:

多边形
多边形就是多个线条连接起来
- // 绘制多边形
- context.moveTo(100, 90) // 笔尖移动到 x:100 y:90 的位置
- context.lineTo(700, 600) // 画一条直线到 x: 700 y: 600 的位置
- context.lineTo(100, 600)
- context.lineTo(100, 90)
- context.fillStyle = 'rgb(2, 100, 30)' // 设置形状内的填充色
- context.fill() // 填充颜色
- context.lineWidth = 5 // 设置直线宽度为 5
- context.strokeStyle = '#005588' // 设置直线颜色
- // 以上只是设置直线状态,并未开始画
- context.stroke() // 将之前描述的线条状态画出来 stroke用于绘制线条
图示:

多条线段
灵活使用 moveTo 函数,调整笔尖位置开始绘制
- context.moveTo(100, 200)
- context.lineTo(300, 400)
- context.lineTo(100, 600)
- context.moveTo(300, 200)
- context.lineTo(500, 400)
- context.lineTo(300, 600)
- context.moveTo(500, 200)
- context.lineTo(700, 400)
- context.lineTo(500, 600)
- context.lineWidth = 5
- context.strokeStyle = '#058'
- context.stroke()
图示:

多个图形
stroke函数 会将所有内容重新绘制,因此后面设置的线段的宽度、颜色等会覆盖之前的设定
需要用 beginPath 声明重新绘制一个线段, 这样 stroke函数 将从 beiginPath 开始绘制
closePath 会将 未闭合 的图形 用直线 将图形闭合
- // 绘制多个图形
- context.beginPath()
- context.moveTo(100, 90) // 笔尖移动到 x:100 y:90 的位置
- context.lineTo(700, 600) // 画一条直线到 x: 700 y: 600 的位置
- context.lineTo(100, 600)
- context.lineTo(100, 90)
- context.closePath()
- context.fillStyle = 'rgb(2, 100, 30)' // 设置形状内的填充色
- context.fill() // 填充颜色
- context.lineWidth = 5 // 设置直线宽度为 5
- context.strokeStyle = '#005588' // 设置直线颜色
- // 以上只是设置直线状态,并未开始画
- context.stroke() // 将之前描述的线条状态画出来 stroke用于绘制线条
- context.beginPath()
- context.moveTo(200, 100)
- context.lineTo(800, 600)
- context.closePath()
- context.strokeStyle = 'black'
- context.stroke()
图示:

弧线
arc
context.arc(centerx, centery, radius, startingAngle, endingAngle, anticlockwise = false)
centerx: x坐标
centery: y坐标
radius: 半径
startingAngle: 从哪个弧度值开始
endingAngle: 结束于哪个弧度值
anticlockwise: 是否逆时针绘制,默认为 false,也就是顺时针绘制弧度值
无论是顺时针绘制还是逆时针绘制,弧度制是不变的

顺时针:
- // 绘制弧线
- /*
- context.arc(centerx, centery, radius, startingAngle, endingAngle, anticlockwise = false)
- centerx: x坐标
- centery: y坐标
- radius: 半径
- startingAngle: 从哪个弧度值开始
- endingAngle: 结束于哪个弧度值
- anticlockwise: 是否逆时针绘制,默认为 false,也就是顺时针绘制
- */
- context.lineWidth = 5
- context.strokeStyle = '#005588'
- context.arc(300, 300, 200, 0, 1.5*Math.PI)
- context.stroke()
图示:

逆时针:
- context.lineWidth = 5
- context.strokeStyle = '#005588'
- context.arc(300, 300, 200, 0, 1.5*Math.PI, true)
- context.stroke()
图示:

arcTo
将上文 moveTo 或 lineTo 的坐标作为 x0,y0

代码:
- <!DOCTYPE html>
- <html lang="en">
- <head>
- <meta charset="UTF-8">
- <meta name="viewport" content="width=device-width, initial-scale=1.0">
- <title>Document</title>
- </head>
- <body>
- <canvas id="canvas" style="border:1px solid #ccc;display:block;margin:50px auto;"></canvas>
- <script>
- const canvas = document.getElementById('canvas')
- canvas.width = 800
- canvas.height = 800
- const context = canvas.getContext('2d')
- arcToTest(context, 150, 100, 650, 100, 650, 600, 300)
- function arcToTest(cxt, x0, y0, x1, y1, x2, y2, R) {
- context.beginPath()
- context.moveTo(x0, y0)
- context.arcTo(x1, y1, x2, y2, R)
- context.lineWidth = 6
- context.strokeStyle = 'red'
- context.stroke()
- // baseline
- context.beginPath()
- context.moveTo(x0, y0)
- context.lineTo(x1, y1)
- context.lineTo(x2, y2)
- context.lineWidth = 2
- context.strokeStyle = 'gray'
- context.stroke()
- }
- </script>
- </body>
- </html>
图示:

贝塞尔二次曲线

参考网站
Canvas Quadratic Curve Example
贝塞尔三次曲线


椭圆
- <!DOCTYPE html>
- <html lang="en">
- <head>
- <meta charset="UTF-8">
- <meta name="viewport" content="width=device-width, initial-scale=1.0">
- <title>Document</title>
- </head>
- <body>
- <canvas id="canvas" style="border: 1px solid #aaa;display:block;margin: 20px auto;"></canvas>
- <script>
- const canvas = document.getElementById('canvas')
- canvas.width = 800
- canvas.height = 800
- const context = canvas.getContext('2d')
- context.beginPath()
- context.ellipse(400, 400, 300, 200, 0, 0, Math.PI*2)
- context.stroke()
- </script>
- </body>
- </html>
图示:

线性渐变
- const canvas = document.getElementById('canvas')
- canvas.width = 800
- canvas.height = 800
- const context = canvas.getContext('2d')
- const linearGrad = context.createLinearGradient(0, 0, 800, 800)
- linearGrad.addColorStop(0.0, '#fff')
- linearGrad.addColorStop(0.25, 'yellow')
- linearGrad.addColorStop(0.5, 'green')
- linearGrad.addColorStop(0.75, 'blue')
- linearGrad.addColorStop(1.0, '#000')
- context.fillStyle = linearGrad
- context.fillRect(0, 0, 800, 800)
图示:

水平渐变
const linearGrad = context.createLinearGradient(0, 0, 800, 0)

垂直渐变
const linearGrad = context.createLinearGradient(0, 0, 0, 800)

径向渐变
- const canvas = document.getElementById('canvas')
- canvas.width = 800
- canvas.height = 800
- const context = canvas.getContext('2d')
- const linearGrad = context.createRadialGradient(400, 400, 100, 400, 400, 500)
- linearGrad.addColorStop(0.0, '#fff')
- linearGrad.addColorStop(0.25, 'yellow')
- linearGrad.addColorStop(0.5, 'green')
- linearGrad.addColorStop(0.75, 'blue')
- linearGrad.addColorStop(1.0, '#000')
- context.fillStyle = linearGrad
- context.fillRect(0, 0, 800, 800)
图示:

图片填充
createPattern
- const canvas = document.getElementById('canvas')
- canvas.width = 800
- canvas.height = 800
- const context = canvas.getContext('2d')
- const backgroundImage = new Image()
- backgroundImage.src = 'a.jpg'
- backgroundImage.onload = function() {
- const pattern = context.createPattern(backgroundImage, 'repeat')
- context.fillStyle = pattern
- context.fillRect(0, 0, 800, 800)
- }
图示:

文字渲染
文字渲染
- <!DOCTYPE html>
- <html lang="en">
- <head>
- <meta charset="UTF-8">
- <meta name="viewport" content="width=device-width, initial-scale=1.0">
- <title>Document</title>
- </head>
- <body>
- <canvas id="canvas" style="border:1px solid #ccc;display:block;margin:50px auto;"></canvas>
- <script>
- const canvas = document.getElementById('canvas')
- canvas.width = 800
- canvas.height = 800
- const context = canvas.getContext('2d')
- context.font = 'bold 40px Arial'
- context.fillStyle = '#058'
- context.fillText('欢迎大家学习《Canvas绘图接口详解》!', 40, 100)
- </script>
- </body>
- </html>
图示:

文字描边
- <!DOCTYPE html>
- <html lang="en">
- <head>
- <meta charset="UTF-8">
- <meta name="viewport" content="width=device-width, initial-scale=1.0">
- <title>Document</title>
- </head>
- <body>
- <canvas id="canvas" style="border:1px solid #ccc;display:block;margin:50px auto;"></canvas>
- <script>
- const canvas = document.getElementById('canvas')
- canvas.width = 800
- canvas.height = 800
- const context = canvas.getContext('2d')
- context.font = 'bold 40px Arial'
- context.fillStyle = '#058'
- context.fillText('欢迎大家学习《Canvas绘图接口详解》!', 40, 100)
- context.lineWidth = 1
- context.strokeStyle = '#058'
- context.strokeText('欢迎大家学习《Canvas绘图接口详解》!', 40, 200)
- </script>
- </body>
- </html>
图示:

设置文字的宽度
- <!DOCTYPE html>
- <html lang="en">
- <head>
- <meta charset="UTF-8">
- <meta name="viewport" content="width=device-width, initial-scale=1.0">
- <title>Document</title>
- </head>
- <body>
- <canvas id="canvas" style="border:1px solid #ccc;display:block;margin:50px auto;"></canvas>
- <script>
- const canvas = document.getElementById('canvas')
- canvas.width = 800
- canvas.height = 800
- const context = canvas.getContext('2d')
- context.font = 'bold 40px Arial'
- context.fillStyle = '#058'
- context.fillText('欢迎大家学习《Canvas绘图接口详解》!', 40, 100)
- context.lineWidth = 1
- context.strokeStyle = '#058'
- context.strokeText('欢迎大家学习《Canvas绘图接口详解》!', 40, 200)
- context.fillText('欢迎大家学习《Canvas绘图接口详解》!', 40, 300, 400)
- context.strokeText('欢迎大家学习《Canvas绘图接口详解》!', 40, 400, 400)
- </script>
- </body>
- </html>
图示:

文字渐变样式
- <!DOCTYPE html>
- <html lang="en">
- <head>
- <meta charset="UTF-8">
- <meta name="viewport" content="width=device-width, initial-scale=1.0">
- <title>Document</title>
- </head>
- <body>
- <canvas id="canvas" style="border:1px solid #ccc;display:block;margin:50px auto;"></canvas>
- <script>
- const canvas = document.getElementById('canvas')
- canvas.width = 800
- canvas.height = 800
- const context = canvas.getContext('2d')
- context.font = 'bold 40px Arial'
- context.fillStyle = '#058'
- context.fillText('欢迎大家学习《Canvas绘图接口详解》!', 40, 100)
- context.lineWidth = 1
- context.strokeStyle = '#058'
- context.strokeText('欢迎大家学习《Canvas绘图接口详解》!', 40, 200)
- context.fillText('欢迎大家学习《Canvas绘图接口详解》!', 40, 300, 400)
- context.strokeText('欢迎大家学习《Canvas绘图接口详解》!', 40, 400, 400)
- const linearGrad = context.createLinearGradient(0, 0, 800, 0)
- linearGrad.addColorStop(0.0, 'red')
- linearGrad.addColorStop(0.25, 'orange')
- linearGrad.addColorStop(0.5, 'yellow')
- linearGrad.addColorStop(0.75, 'green')
- linearGrad.addColorStop(1.0, 'purple')
- context.fillStyle = linearGrad
- context.fillText('欢迎大家学习《Canvas绘图接口详解》!', 40, 500)
- </script>
- </body>
- </html>
图示:

设置文字背景
- <!DOCTYPE html>
- <html lang="en">
- <head>
- <meta charset="UTF-8">
- <meta name="viewport" content="width=device-width, initial-scale=1.0">
- <title>Document</title>
- </head>
- <body>
- <canvas id="canvas" style="border:1px solid #ccc;display:block;margin:50px auto;"></canvas>
- <script>
- const canvas = document.getElementById('canvas')
- canvas.width = 800
- canvas.height = 800
- const context = canvas.getContext('2d')
- context.font = 'bold 40px Arial'
- context.fillStyle = '#058'
- context.fillText('欢迎大家学习《Canvas绘图接口详解》!', 40, 100)
- context.lineWidth = 1
- context.strokeStyle = '#058'
- context.strokeText('欢迎大家学习《Canvas绘图接口详解》!', 40, 200)
- context.fillText('欢迎大家学习《Canvas绘图接口详解》!', 40, 300, 400)
- context.strokeText('欢迎大家学习《Canvas绘图接口详解》!', 40, 400, 400)
- const linearGrad = context.createLinearGradient(0, 0, 800, 0)
- linearGrad.addColorStop(0.0, 'red')
- linearGrad.addColorStop(0.25, 'orange')
- linearGrad.addColorStop(0.5, 'yellow')
- linearGrad.addColorStop(0.75, 'green')
- linearGrad.addColorStop(1.0, 'purple')
- context.fillStyle = linearGrad
- context.fillText('欢迎大家学习《Canvas绘图接口详解》!', 40, 500)
- const backgroundImage = new Image()
- backgroundImage.src = 'a.jpg'
- backgroundImage.onload = function () {
- const pattern = context.createPattern(backgroundImage, 'repeat')
- context.fillStyle = pattern
- context.font = 'bold 100px Arial'
- context.fillText('Canvas', 40, 650)
- context.strokeText('Canvas', 40, 650)
- }
- </script>
- </body>
- </html>
图示:

设置字体

font-style
normal (默认)
italic (斜体字)
oblique (倾斜字体)
font-variant
normal (默认)
small-caps (小型大写字母)
例:context.font = 'small-caps bold 40px sans-serif'

font-weight
lighter
normal (默认)
bold
bolder
font-size
20px (默认)
2em
150%
font-family
设置多种字体备选
支持 @font-face
Web安全字体
文本对齐
水平对齐
context.textAlign = left
center
right
- <!DOCTYPE html>
- <html lang="en">
- <head>
- <meta charset="UTF-8">
- <meta name="viewport" content="width=device-width, initial-scale=1.0">
- <title>Document</title>
- </head>
- <body>
- <canvas id="canvas" style="border:1px solid #ccc;display:block;margin:50px auto;"></canvas>
- <script>
- const canvas = document.getElementById('canvas')
- canvas.width = 800
- canvas.height = 800
- const context = canvas.getContext('2d')
- context.font = 'bold 40px Arial'
- context.fillStyle = '#058'
- context.textAlign = 'left'
- context.fillText('textAlign = left', 400, 100)
- context.textAlign = 'center'
- context.fillText('textAlign = center', 400, 200)
- context.textAlign = 'right'
- context.fillText('textAlign = right', 400, 300)
- // baseline
- context.strokeStyle = '#888'
- context.moveTo(400, 0)
- context.lineTo(400, 800)
- context.stroke()
- </script>
- </body>
- </html>
图示:

垂直对齐
context.textBaseline = top
middle
bottom
- <!DOCTYPE html>
- <html lang="en">
- <head>
- <meta charset="UTF-8">
- <meta name="viewport" content="width=device-width, initial-scale=1.0">
- <title>Document</title>
- </head>
- <body>
- <canvas id="canvas" style="border:1px solid #ccc;display:block;margin:50px auto;"></canvas>
- <script>
- const canvas = document.getElementById('canvas')
- canvas.width = 800
- canvas.height = 800
- const context = canvas.getContext('2d')
- context.font = 'bold 40px Arial'
- context.fillStyle = '#058'
- context.textBaseline = 'top'
- context.fillText('textBaseline = top', 40, 100)
- drawBaseline(context, 100)
- context.textBaseline = 'middle'
- context.fillText('textBaseline = middle', 40, 200)
- drawBaseline(context, 200)
- context.textBaseline = 'bottom'
- context.fillText('textBaseline = bottom', 40, 300)
- drawBaseline(context, 300)
- function drawBaseline(cxt, h) {
- const width = cxt.canvas.width
- cxt.save()
- cxt.strokeStyle = '#888'
- cxt.lineWidth = 2
- cxt.moveTo(0, h)
- cxt.lineTo(width, h)
- cxt.stroke()
- cxt.restore()
- }
- </script>
- </body>
- </html>
图示:

文本的度量
context.measureText(string).width 获取文本的宽度
- <!DOCTYPE html>
- <html lang="en">
- <head>
- <meta charset="UTF-8">
- <meta name="viewport" content="width=device-width, initial-scale=1.0">
- <title>Document</title>
- </head>
- <body>
- <canvas id="canvas" style="border:1px solid #ccc;display:block;margin:50px auto;"></canvas>
- <script>
- const canvas = document.getElementById('canvas')
- canvas.width = 800
- canvas.height = 800
- const context = canvas.getContext('2d')
- context.font = 'bold 40px Arial'
- context.fillStyle = '#058'
- context.fillText('欢迎大家学习《Canvas绘图接口详解》!', 40, 100)
- const textWidth = context.measureText('欢迎大家学习《Canvas绘图接口详解》!').width
- context.fillText('以上字符串的宽度为' + textWidth + 'px', 40, 200)
- </script>
- </body>
- </html>
图示:

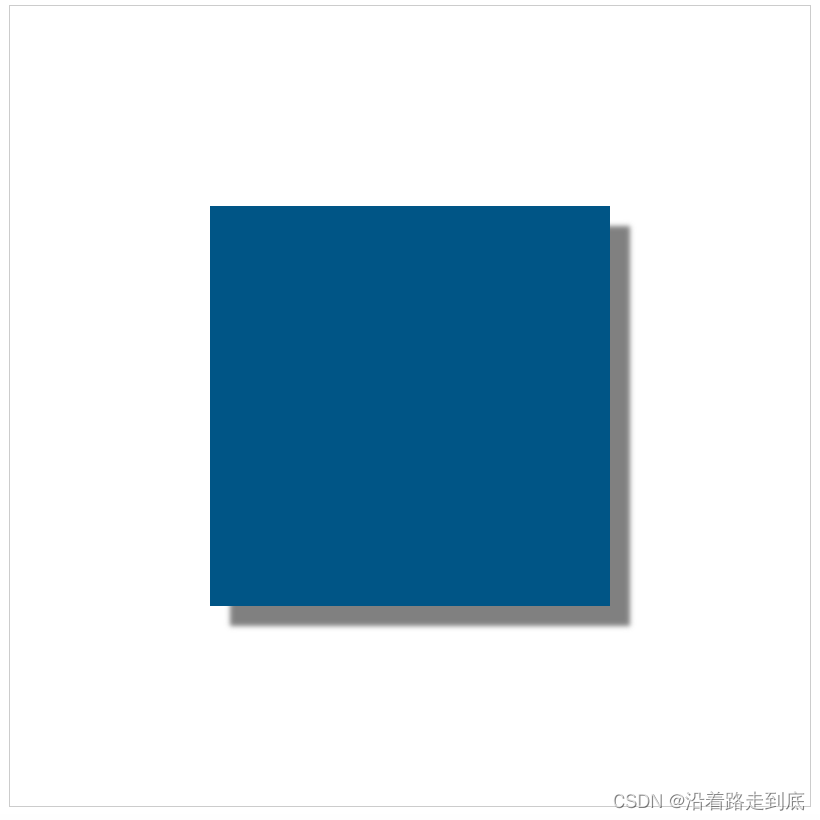
阴影
context.shadowColor 阴影的颜色
context.shadowOffsetX 阴影的位移值
context.shadowOffsetY 阴影的位移值
context.shadowBlur 阴影的模糊程度 如果为0不模糊 值越大,越模糊
- <!DOCTYPE html>
- <html lang="en">
- <head>
- <meta charset="UTF-8">
- <meta name="viewport" content="width=device-width, initial-scale=1.0">
- <title>Document</title>
- </head>
- <body>
- <canvas id="canvas" style="border:1px solid #ccc;display:block;margin:50px auto;"></canvas>
- <script>
- const canvas = document.getElementById('canvas')
- canvas.width = 800
- canvas.height = 800
- const context = canvas.getContext('2d')
- context.fillStyle = '#058'
- context.shadowColor = 'gray'
- context.shadowOffsetX = 20
- context.shadowOffsetY = 20
- context.shadowBlur = 5
- context.fillRect(200, 200, 400, 400)
- </script>
- </body>
- </html>
图示:
global
globalAlpha
让全局 绘制的图像 具有透明度
默认值: 1
- <!DOCTYPE html>
- <html lang="en">
- <head>
- <meta charset="UTF-8">
- <meta name="viewport" content="width=device-width, initial-scale=1.0">
- <title>Document</title>
- </head>
- <body>
- <canvas id="canvas" style="border:1px solid #ccc;display:block;margin:50px auto;"></canvas>
- <script>
- const canvas = document.getElementById('canvas')
- canvas.width = 1200
- canvas.height = 800
- const context = canvas.getContext('2d')
- context.globalAlpha = 0.7
- for(let i = 0; i < 100; i++) {
- const R = Math.floor(Math.random() * 255)
- const G = Math.floor(Math.random() * 255)
- const B = Math.floor(Math.random() * 255)
- context.fillStyle = `rgb(${R}, ${G}, ${B})`
- context.beginPath()
- context.arc(Math.random()*canvas.width, Math.random()*canvas.height, Math.random()*100, 0, Math.PI*2)
- context.fill()
- }
- </script>
- </body>
- </html>
图示:

globalCompositeOperation
绘制的图像所产生的效果
- <!DOCTYPE html>
- <html lang="en">
- <head>
- <meta charset="UTF-8">
- <meta name="viewport" content="width=device-width, initial-scale=1.0">
- <title>Document</title>
- <style>
- #buttons {
- width: 1200px;
- margin: 10px auto;
- display: flex;
- }
- #buttons a {
- font-size: 18px;
- margin-right: 14px;
- }
- </style>
- </head>
- <body>
- <canvas id="canvas" style="border:1px solid #ccc;display:block;margin:10px auto;"></canvas>
- <div id="buttons">
- <a href="#">source-over</a>
- <a href="#">source-atop</a>
- <a href="#">source-in</a>
- <a href="#">source-out</a>
- <a href="#">destination-over</a>
- <a href="#">destination-atop</a>
- <a href="#">destination-in</a>
- <a href="#">destination-out</a>
- <a href="#">lighter</a>
- <a href="#">copy</a>
- <a href="#">xor</a>
- </div>
- <script>
- const canvas = document.getElementById('canvas')
- canvas.width = 1200
- canvas.height = 800
- const context = canvas.getContext('2d')
- draw(context, 'source-over')
- const buttons = document.getElementsByTagName('a')
- for (let i = 0; i < buttons.length; i++) {
- buttons[i].onclick = function() {
- draw(context, this.text)
- return false
- }
- }
- function draw(ctx, compositeStyle) {
- ctx.clearRect(0, 0, ctx.canvas.width, ctx.canvas.height)
- // draw title
- ctx.font = 'bold 40px Arial'
- ctx.textAlign = 'center'
- ctx.textBaseline = 'middle'
- ctx.fillStyle = '#058'
- ctx.fillText('globalCompositeOperation = ' + compositeStyle, ctx.canvas.width/2, 60)
- // draw a rect
- ctx.fillStyle = 'blue'
- ctx.fillRect(300, 150, 500, 500)
- // draw a triangle
- ctx.globalCompositeOperation = compositeStyle
- ctx.fillStyle = 'red'
- ctx.beginPath()
- ctx.moveTo(700, 250)
- ctx.lineTo(1000, 750)
- ctx.lineTo(400, 750)
- ctx.closePath()
- ctx.fill()
- }
- </script>
- </body>
- </html>
source-over 后绘制的图像压盖在前面绘制的图像上 (默认)

source-atop

source-in

source-out

destination-over 前面绘制的图像压盖在后面绘制的图像上

destination-atop

destination-in
destination-out

lighter

copy (只绘制最后一个图形)

xor 图形之间进行 异或 操作

剪辑区域
context.clip()
- <!DOCTYPE html>
- <html lang="en">
- <head>
- <meta charset="UTF-8">
- <meta name="viewport" content="width=device-width, initial-scale=1.0">
- <title>Document</title>
- </head>
- <body>
- <canvas id="canvas" style="border:1px solid #ccc;display:block;margin:10px auto;"></canvas>
- </div>
- <script>
- const canvas = document.getElementById('canvas')
- canvas.width = 800
- canvas.height = 800
- const context = canvas.getContext('2d')
- context.beginPath()
- context.fillStyle = 'black'
- context.fillRect(0, 0, canvas.width, canvas.height)
- context.beginPath()
- context.arc(400, 400, 150, 0, Math.PI*2)
- context.fillStyle = '#fff'
- context.fill()
- context.clip()
- context.font = 'bold 150px Arial'
- context.textAlign = 'center'
- context.textBaseline = 'middle'
- context.fillStyle = '#058'
- context.fillText('CANVAS', canvas.width / 2, canvas.height / 2)
- </script>
- </body>
- </html>
图示:

isPointInPath
context.isPointInPath(x, y)
确定坐标是否在某个图形内
扩展 canvas 的 context
- <!DOCTYPE html>
- <html lang="en">
- <head>
- <meta charset="UTF-8">
- <meta name="viewport" content="width=device-width, initial-scale=1.0">
- <title>Document</title>
- </head>
- <body>
- <canvas id="canvas" style="border: 1px solid #aaa;display:block;margin: 20px auto;"></canvas>
- <script>
- CanvasRenderingContext2D.prototype.fillStar = function(r, R, x, y, rot) {
- this.beginPath()
- for (let i = 0; i < 5; i++) {
- this.lineTo(
- Math.cos((18 + i * 72 - rot) / 180 * Math.PI) * R + x,
- -Math.sin((18 + i * 72 - rot) / 180 * Math.PI) * R + y
- )
- this.lineTo(
- Math.cos((54 + i * 72 - rot) / 180 * Math.PI) * r + x,
- -Math.sin((54 + i * 72 - rot) / 180 * Math.PI) * r + y
- )
- }
- this.closePath()
- this.fill()
- }
- const canvas = document.getElementById('canvas')
- canvas.width = 800
- canvas.height = 800
- const context = canvas.getContext('2d')
- context.fillStyle = '#058'
- context.fillStar(150, 300, 400, 400, 0)
- </script>
- </body>
- </html>
图示:

1
-
相关阅读:
【广州华锐互动】三维全景3D消防科普展馆
xubuntu16.04系统中隐藏网络连接的弹窗提示
k3s 搭建高可用rancher
金融日 | 看金融机构数据安全建设典型案例
【@property的参数copy Objective-C语言】
【递归】树形结构、list转map
基于SSM的酒店客房管理系统设计与实现
CPU流水线与指令乱序执行
Facebook内容的类型
设计模式-迭代器模式(Iterator)
- 原文地址:https://blog.csdn.net/m0_38066007/article/details/133745657
