-
OpenMMLab【超级视客营】——支持InverseForm Loss(MMSegmentation的第三个PR)
文章目录
- 1. 任务目标
- 2. 理解原理
- 3. 代码实现
- 3.X checklist
- 3.0 Issue中的有效内容
- 3.1 MMSegmentation支持multiple loss
- 3.2 北京超级云计算中心-环境配置
- 3.3 创建分支
- 3.4 执行官方repo的推理
- 3.5 自己写代码
- 3.6 报错 ImportError: cannot import name 'InverseFormLoss' from 'mmseg.models.losses'
- 3.7 RuntimeError: Attempting to deserialize object on a CUDA device but torch.cuda.is_available() is False. If you are running on a CPU-only machine, please use torch.load with map_location=torch.device('cpu') to map your storages to the CPU.
- 3.8 pytest.raises Failed: DID NOT RAISE with try/except
- 3.9 构建文档报错
- 3.10 提交的PR conflict
1. 任务目标
时间:8.3~8.31
1.1 issue
- 提出需求的 issue: https://github.com/open-mmlab/mmsegmentation/issues/3159
- 参考 repo : https://github.com/Qualcomm-AI-research/InverseForm,用到的文件:
- 参考论文:https://arxiv.org/abs/2104.02745
- 论文Appendix:https://openaccess.thecvf.com/content/CVPR2021/supplemental/Borse_InverseForm_A_Loss_CVPR_2021_supplemental.pdf
- discussions:https://github.com/open-mmlab/OpenMMLabCamp/discussions/522
1.2 原理相关资料(论文讲解)
InverseForm
- 【论文笔记】InverseForm: A Loss Function for Structured Boundary-Aware Segmentation
- InverseForm:结构边缘感知的损失函数
- 【图像分割】InverseForm: A Loss Function for Structured Boundary-Aware Segmentation
- Transformer在3D语义分割中的应用
- 碎碎念:B站上好像也没有讲这个论文的教程,是因为很简单吗?
STN(Spatial Transformer Networks)
理论上来说,InverseForm所依赖的网络是STN的逆操作
- 李宏毅老师的视频:Spatial Transformer Networks
- STN(Spatial Transformer Networks)
- Spatial Transformer Networks(STN)详解
- pytorch的教程:https://pytorch.org/tutorials/intermediate/spatial_transformer_tutorial.html
- 这两个的代码实现是类似的
- github上也有相关的repo:https://github.com/fxia22/stn.pytorch
- Spatial Transformer Networks,这个人的专栏写的很好,可以参考学习
- 大学课件pdf:Spatial Transformer Networks
- Review: STN — Spatial Transformer Network (Image Classification)
1.3 实现相关资料(相关PR)
- https://github.com/open-mmlab/mmsegmentation/pull/3242
- https://github.com/open-mmlab/mmsegmentation/pull/3237/files
- https://github.com/open-mmlab/mmsegmentation/pull/3002/files#diff-6b13122fc8d4a0c49faf7c7052dbf6ff6e9287d96ecf84f1f7d3959c935b0348
- https://github.com/open-mmlab/mmsegmentation/pull/2791/files
根据以上PR,确定要改的文件是:
- mmsegmentation/mmseg/models/losses
- mmsegmentation/tests/test_models/test_losses/
- 关于单元测试,除了看现有脚本,也可以看看这个教程,单元测试贡献指南(建设中)
2. 理解原理
3. 代码实现
源码中最重要的几个文件:
- https://github.com/Qualcomm-AI-research/InverseForm/blob/main/models/InverseForm.py
- https://github.com/Qualcomm-AI-research/InverseForm/blob/main/models/loss/utils.py
- https://github.com/Qualcomm-AI-research/InverseForm/blob/main/utils/trnval_utils.py,训练时很多内容是参考了这两个项目,代码是直接搬过来的,没有修改。
3.X checklist
- 实现inverseformloss
- inverseformloss的单元测试
- 提供一个整合了inverseformloss架构的分割网络,初步定为orcnet
3.0 Issue中的有效内容
2021年论文刚发布的时候很多issue是回复了,后面的就没有什么回复了。。。还是有一些是有价值的信息。
- 问: 为什么
b_gt是通过对真实seg图像进行sobel处理得到,而b_pred不是通过类似方式,即对预测seg图像进行sobel处理得到? - 答:不好收敛,实验效果不好,所以采取了通过对预测seg添加约束,即将
y_pred送入一个boundary head来生成b_pred。
Questions about the test dataset #5
- 问:训练时的
edge_gts = inputs['edge']是怎么得到的 - 答:是从
y_gt中提取的,可以在gt map上使用sobel/laplacian,然后再threshold得到一个二值图。
Training the Inverseform Net on custom dataset #7
- 问:为什么要对每个数据集分别训练InverseForm Net,数据集的边界变换的差异有这么大吗?
- 答:一开始只是在Imagenet上训练了一个IF module,并将其用于所有的数据集,这个方式和现在论文里显示的对每个数据集都单独训练一个IF module效果是类似的。
坚持当前的策略(在同一数据集上进行训练):是为了说明改进并非来自辅助数据集(Imagenet)。
因此,实际使用的时候,可以用任意一个数据集训练的IF module - 问:Imagenet没有提供
b_gt(边界map),你是如何在ImageNet上训练IF module的呢 - 答:可以直接从seg mask提取,或者直接从原图提取也可以
- 问:如何得到 transformed GT masks,STN的pipeline是什么
- 答:直接用pytorch的STN: https://pytorch.org/tutorials/intermediate/spatial_transformer_tutorial.html
- 问:在单个数据集上训练的IF module,当插入分割网络后,可以适应不同数据集的边缘map的单应性变换?
- 答:我们的实验和观测结果是支持这个观点的
Two confusions about the code #1
- 问:按照论文,InverseFormNet应该会输出6个或者8个值,但是代码里实际只输出了4个值,这4个值代表什么?
- 答:上传的是最近开发的InverseFormNet的轻量化版本,输出的4个值是normalized后的shift和scale,提供的代码里使用的是Euclidian距离。你也可以按照论文里说的用欧氏距离的6个参数或者测地距离的8个参数随意进行实验,在使用测地距离的时候,确实会有搜索空间受到严重限制的问题。
Confuse about predict scales and shifts and the loss #9
- 问:上一个问题里提到InverseFormNet输出的四个参数分别是shift和scale,因此如果要优化InverseForm loss,应该是让scale接近1,让shift接近0,但是在
InverseTransform2D的代码中,有mean_square_inverse_loss = (((distance_coeffs*distance_coeffs).sum(dim=1))**0.5).mean(),这会让4个值都朝着向0的方向优化。 - 答:如果使用的损失函数是欧式距离,那么提前归一化,是为了减少对任意一个参数的偏差。
这个问题不对,shift和scale参数可以放在一个 3 × 3 3\times 3 3×3的矩阵里,如果InverseFormNet输出的矩阵越靠近单位矩阵(预测的边界越接近真实边界),则预测的转换矩阵与单位矩阵相减之后,shift和scale减法之后那个位置的值都是朝着0优化的
3.1 MMSegmentation支持multiple loss
3.2 北京超级云计算中心-环境配置
访问:https://cloud.blsc.cn,直接使用用户名密码无法成功登录,需要关注
北京超级云计算中心,微信扫码登录,在微信的页面里填写邮件里给的用户和密码。然后就可以看到控制台了,在
资源管理->SSH直连管理中配置密钥或者密码

配置好之后,复制下面给的ssh命令,

可以视情况选择接入网络,我用Hong Kong不行,但是用Zhongwei可以直接用vscode登录,打开文件夹,或者用MobaXTerm等你习惯的终端连接软件去ssh连接,输入密码就行(默认用户名已经@在了ssh命令中,你只需要输入你上面创建的密码的值即可)
配置python环境
# 查看可用软件 > module avail [scw6886@ln01 run]$ module avail ------------------------------------------------------------- /data/apps_4090/modulefiles ------------------------------------------------------------- alphafold/2.3.1 gdb/7.6.1 openblas/0.3.22 amber/22_ambertools23 go/1.18.2 opencv/3.4.16 anaconda/2020.11 gromacs/2022.5_nompi_cuda11.8 opencv/4.5.5 anaconda/2021.05 hdf5/1.12.1 OpenMMLab/MMDetection3.1.0_py38 anaconda/2022.10 hwloc/2.1.0 OpenMMLab/MMDetection_base_py38 arias/1.36.0 intel/parallelstudio/2017.1.5 openmpi/4.1.1 blas/3.10.0 intel/parallelstudio/2019.3.0 openmpi/4.1.5_gcc11.2_ucx1.14.1_cuda11.8 cmake/3.22.0 intel/parallelstudio/2021.1.1 openmpi/4.1.5_ucx1.14.1_nvhpc23.5_cuda12.1 complier/gcc/12.2.0 jupyter/lab p7zip/16.02 cuda/11.7 jupyter/notebook p7zip/21.02 cuda/11.8 lapack/3.10.1 plumed/2.7.2 cuda/12.1 libevent/2.1.12 pmix/3.2.2 cuda/12.2 namd/2.14-verbs-linux-x86_64-gcc-smp-CUDA pnetcdf/1.12.2/openmpi_gcc9.3 cudnn/8.2.1_cuda11.x namd/2.15_2022-07-21_multicore_CUDA qflow/1.0 cudnn/8.5.0_cuda11.x namd/3.0b3_multicore_CUDA rar/611 cudnn/8.6.0_cuda11.x nccl/2.11.4-1_RTX4090-cuda11.8 relion/3.0.8 cudnn/8.7.0_cuda11.x nccl/2.18.1-1_RTX4090-cuda11.8 relion/3.1.3 cudnn/8.9.3.28_cuda12.x netcdf-c/4.8.1/openmpi_gcc9.3 singularity/2.6.0 dos2unix/6.0.3 nvhpc/nvhpc/23.7 singularity/3.10.0 fftw/3.3.9 nvhpc/nvhpc-byo-compiler/22.11 singularity/3.9.9 fftw/3.3.9-ompi-float nvhpc/nvhpc-byo-compiler/23.5 tensorboard/2.3.0 gcc/11.2 nvhpc/nvhpc-byo-compiler/23.7 ucx/1.14.1_gcc11.2_cuda11.8 gcc/5.4 nvhpc/nvhpc-hpcx/23.7 ucx/1.14.1_nvhpc23.5_cuda12.1 gcc/6.3 nvhpc/nvhpc-hpcx-cuda12/23.7 ucx/1.8 gcc/7.3 nvhpc/nvhpc-nompi/22.11 ucx/1.9 gcc/8.3 nvhpc/nvhpc-nompi/23.5 xesces/3.2.0 gcc/9.3 nvhpc/nvhpc-nompi/23.7 zlib/1.2.11- 1
- 2
- 3
- 4
- 5
- 6
- 7
- 8
- 9
- 10
- 11
- 12
- 13
- 14
- 15
- 16
- 17
- 18
- 19
- 20
- 21
- 22
- 23
- 24
- 25
- 26
- 27
- 28
- 29
- 30
- 31
- 32
该有的基本都有,还算比较全,
- 安装anaconda,
module load anaconda/2021.05 # anaconda/2022.10 这个版本会报错 conda init source ~/.bashrc- 1
- 2
- 3
- 4
- 修改
~/.bashrc脚本- module加载的软件环境只在当前登录窗口有效,退出登录后软件环境就会失效。
- 用户如果需要经常使用一个软件,可以把load命令放在
~/.bashrc或者提交脚本中
vim ~/.bashrc module load anaconda/2021.05 module load jupyter/lab module load jupyter/notebook module load cuda/11.8 module load cudnn/8.7.0_cuda11.x module load gcc/8.3- 1
- 2
- 3
- 4
- 5
- 6
- 7
- 根据目的创建不同的虚拟环境,我默认base是py38,所以就不创建了,就直接在base上安装软件了。
# 根据自己的module avail中显示的cuda版本,找对应的pytorch版本 # https://pytorch.org/get-started/previous-versions/ conda create -n mmseg python=3.8 conda activate mmseg # 安装torch pip3 install torch==2.0.0+cu118 torchvision==0.15.1+cu118 torchaudio==2.0.1 --index-url https://download.pytorch.org/whl/cu118 >|█████▏ | 369.2 MB 607 kB/s eta 0:52:05 |████████████████▍ | 1160.7 MB 31.4 MB/s eta 0:00:36 # 下载速度很好! # 安装mmseg需要的包 pip3 install openmim pip3 install mmengine # mmcv需要编译,需要gcc 5.4+的版本 module load gcc/8.3 pip3 install mmcv # 安装之后确认下版本 pip show mmcv # Version: 2.0.1 pip show mmengine # Version: 0.8.4 # 还可以看见安装位置: Location: /data/run01/scw6886/.local/lib/python3.7/site-packages # 运行期间的,所以会话关闭之后就会消失。。- 1
- 2
- 3
- 4
- 5
- 6
- 7
- 8
- 9
- 10
- 11
- 12
- 13
- 14
- 15
- 16
- 17
- 18
- 19
- 20
- 21
- 22
- 23
- 由于每次ssh连接到bash会话,都要重新手动安装一遍,很麻烦,所以也可以把你想要在开机时就执行的命令全都写到
.bashrc文件中,可以启动时执行命令,关于这个文件的作用,可以自行搜索。- 但是也不一定每次都是要使用cuda,所以看自己选择吧,是每次连接时都要等差不多10分钟,但是不需要手动输入;还是每次都手动输入,可以根据任务是否需要使用cuda来选择不等待
pip3 install torch==2.0.0+cu118 torchvision==0.15.1+cu118 torchaudio==2.0.1 --index-url https://download.pytorch.org/whl/cu118 pip3 install openmim pip3 install mmengine pip3 install mmcv- 1
- 2
- 3
- 4
- 5
- 目录问题,
- 默认ssh登录后位于家目录,home,用于存放用户环境设置等文件,
不要在此目录下安装软件及存放文件,默认配额为1GB - 作业运行数据存放目录:
~/run用于存放计算所需或者访问频次较高的数据,读写性能较好,请将计算时需要使用的数据存储到该目录下并在此目录进行计算
- 默认ssh登录后位于家目录,home,用于存放用户环境设置等文件,
参考:
- 北京超算云计算平台深度学习环境配置
- Linux必备技能:轻松编辑bashrc配置文件!
- 配置开机自启命令文件~/.bashrc、/etc/profile、/etc/bash.bashrc的异同(bashrc:Bash Run Commands)环境变量、~/.bash_profile
3.3 创建分支
# fetch,把upstream上最新的所有内容都拉到本地 # 但是注意,需要保证本地没有什么冲突,当前处在任意分支都没问题 git fetch upstream- 1
- 2
- 3

然后就可以基于远程最新的
dev-1.x来创建自己的开发分支了git checkout -b SupportInverseFormLoss upstream/dev-1.x- 1
3.4 执行官方repo的推理
根据:https://github.com/Qualcomm-AI-research/InverseForm
参考:
3.5 自己写代码
主要参考的两个已有的loss是:
- https://github.com/open-mmlab/mmsegmentation/blob/main/mmseg/models/losses/tversky_loss.py
- https://github.com/open-mmlab/mmsegmentation/blob/main/mmseg/models/losses/cross_entropy_loss.py
1. 网络作为损失函数
- Pytorch-DCGAN TUTORIAL
- https://www.run.ai/guides/deep-learning-for-computer-vision/pytorch-gan
- 对抗神经网络(二)——DCGAN
2. XXX.cuda()
3. XX_loss类的参数与config文件的对应关系
如下例子所示,损失函数的参数就是config文件中部分的参数class CrossEntropyLoss(nn.Module): def __init__(self, use_sigmoid=False, use_mask=False, reduction='mean', class_weight=None, loss_weight=1.0, loss_name='loss_ce', avg_non_ignore=False): loss_decode=dict( # Config of loss function for the decode_head. type='CrossEntropyLoss', # Type of loss used for segmentation. use_sigmoid=False, # Whether use sigmoid activation for segmentation. loss_weight=1.0)), # Loss weight of decode_head.- 1
- 2
- 3
- 4
- 5
- 6
- 7
- 8
- 9
- 10
- 11
- 12
- 13
- 14
- mmsegmentation/mmseg/models/losses/cross_entropy_loss.py
- https://mmsegmentation.readthedocs.io/en/latest/user_guides/1_config.html
4. 函数的一些默认值设置
- 这里用的是
Cityscapes数据集,所以基本都是针对这个数据集进行的设置 - https://github.com/Qualcomm-AI-research/InverseForm/blob/main/utils/config.py#L223
5. upper_bound参数
- boundaryloss:Boundary loss for highly unbalanced segmentation

- PaddleSeg/paddleseg/models/losses/decoupledsegnet_relax_boundary_loss.py
- OHEM: Training Region-based Object Detectors with Online Hard Example Mining
- https://mmsegmentation.readthedocs.io/en/latest/advanced_guides/training_tricks.html#online-hard-example-mining-ohem
@manager.LOSSES.add_component class RelaxBoundaryLoss(nn.Layer): """ Implements the ohem cross entropy loss function. Args: border (int, optional): The value of border to relax. Default: 1. calculate_weights (bool, optional): Whether to calculate weights for every classes. Default: False. upper_bound (float, optional): The upper bound of weights if calculating weights for every classes. Default: 1.0. ignore_index (int64): Specifies a target value that is ignored and does not contribute to the input gradient. Default: 255. """ def __init__(self, border=1, calculate_weights=False, upper_bound=1.0, ignore_index=255): super(RelaxBoundaryLoss, self).__init__() self.border = border self.calculate_weights = calculate_weights self.upper_bound = upper_bound self.ignore_index = ignore_index self.EPS = 1e-5 def calculate_weights(self, label): hist = paddle.sum(label, axis=(1, 2)) * 1.0 / label.sum() hist = ((hist != 0) * self.upper_bound * (1 - hist)) + 1- 1
- 2
- 3
- 4
- 5
- 6
- 7
- 8
- 9
- 10
- 11
- 12
- 13
- 14
- 15
- 16
- 17
- 18
- 19
- 20
- 21
- 22
- 23
- 24
- 25
- 26
- 27
6. torch.where()
https://pytorch.org/docs/stable/generated/torch.where.htmltorch.where(edge.max(1)[0] > 0.8, target, filler) >>> x = torch.randn(3, 2) >>> y = torch.ones(3, 2) >>> x tensor([[-0.4620, 0.3139], [ 0.3898, -0.7197], [ 0.0478, -0.1657]]) >>> torch.where(x > 0, 1.0, 0.0) tensor([[0., 1.], [1., 0.], [1., 0.]]) >>> torch.where(x > 0, x, y) # 满足条件的就用x的值,不满足的就用y的值 tensor([[ 1.0000, 0.3139], [ 0.3898, 1.0000], [ 0.0478, 1.0000]])- 1
- 2
- 3
- 4
- 5
- 6
- 7
- 8
- 9
- 10
- 11
- 12
- 13
- 14
- 15
- 16
7. 预测的分割边界图来源- b p r e d b_{pred} bpred来源
论文中提到:

我们工作的主要不同点在于:推理时候不会引入额外开销,下面这个框架图已经很明显了说明问题了
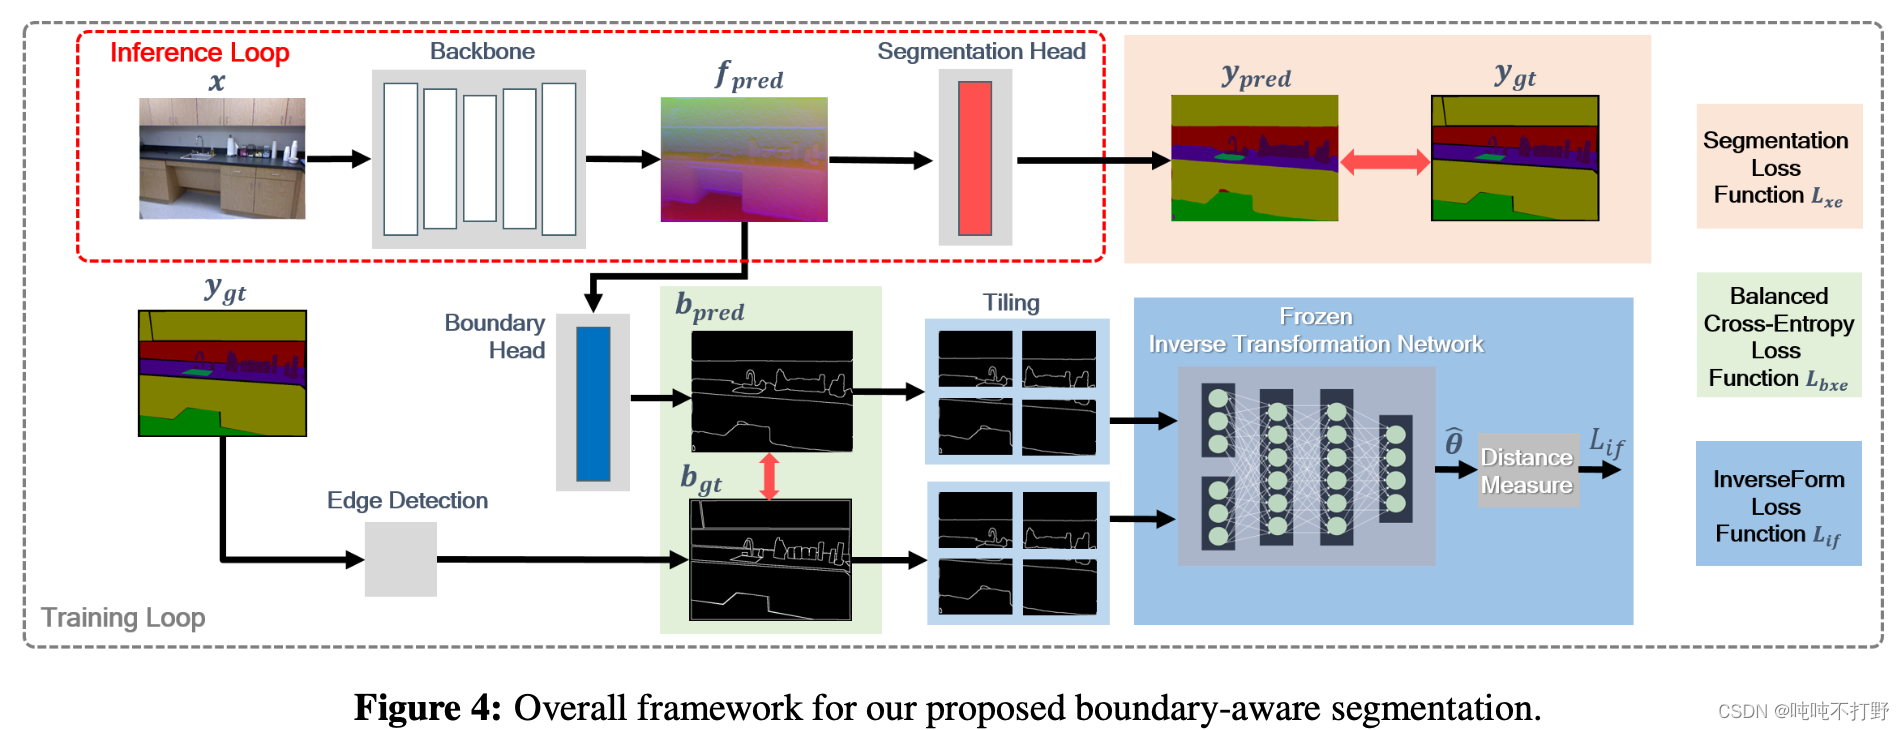
- 推理的时候关闭那个Boundary head,只使用上面的Segmentation head,只生成 y p r e d y_pred ypred就可以
- 训练的时候才会使用Boundary head来生成 b p r e d b_{pred} bpred

- 所以想要使用这个InverseFormLoss,是需要修改网络结构的

8. 如何把InverseForm插入现有网络
- https://github.com/Qualcomm-AI-research/InverseForm/blob/main/models/ocrnet.py
- https://github.com/NVIDIA/semantic-segmentation/blob/main/network/ocrnet.py
HRnet+OCR
- https://arxiv.org/abs/1904.04514
- https://github.com/HRNet/HRNet-Semantic-Segmentation/pulls
- https://github.com/open-mmlab/mmsegmentation/tree/main/configs/ocrnet
- https://github.com/open-mmlab/mmsegmentation/tree/main/configs/hrnet
9. 单元测试
10. 实现多头
- mmpretrain-issue: multi task 多任务训练[Feature] #481
- https://mmsegmentation.readthedocs.io/zh_CN/latest/advanced_guides/add_models.html#head
- https://github.com/open-mmlab/mmsegmentation/blob/main/mmseg/models/decode_heads/ocr_head.py
- https://github.com/Qualcomm-AI-research/InverseForm/blob/main/models/ocrnet.py
11. bce2d和boundary_loss
- https://github.com/Qualcomm-AI-research/InverseForm/blob/main/models/loss/utils.py#L123C11-L123C11
- 其实和这个是一样的:
有些写法上的区别:(重点关注,continuous的问题)
- PyTorch 两大转置函数 transpose() 和 permute(), 以及RuntimeError: invalid argument 2: view size is not compati
- Different between permute, transpose, view? Which should I use?
- TORCH.TENSOR.VIEW
12. ImageBasedCrossEntropyLoss2d
- semantic-segmentation/loss/utils.py,直接用的NVIDIA的这里的实现,也是页面搜索
ImageBasedCrossEntropyLoss2d - https://gitee.com/mindspore/mindspore/issues/I55C9U,页面内搜索
class ImageBasedCrossEntropyLoss2d,- 这个实现和这个github的repo是一样的:https://github.com/lxtGH/SFSegNets/blob/master/loss.py
3.6 报错 ImportError: cannot import name ‘InverseFormLoss’ from ‘mmseg.models.losses’
Traceback (most recent call last): File "../tests/test_models/test_losses/test_inverseform_loss.py", line 9, infrom mmseg.models.losses import InverseFormLoss ImportError: cannot import name 'InverseFormLoss' from 'mmseg.models.losses' (mmsegmentation/mmseg/models/losses/__init__.py) - 1
- 2
- 3
- 4
- 这是因为默认
from mmseg.models.losses import InverseFormLoss这句其实是引用的当前python环境中已经安装的mmsegmation其实是旧的,是之前安装的版本,不是你自己改动过的版本。 - 因此,可以卸载这个版本,
pip uninstall mmsegmentation。 - 然后把自己当前的这个
mmsegmentation的文件夹的路径添加到python的系统路径中,具体如下:import sys sys.path.append('yourDir/mmsegmentation') # 一定要确定是把这个目录添加到系统目录之后,再去import刚刚ImportError的内容 # 或者你可以直接把这个路径写到python的系统路径中,上面这种方式只是运行时生效 from mmseg.models.losses import InverseFormLoss- 1
- 2
- 3
- 4
- 5
我用的:
import sys sys.path.append('/Users/huangshan/Documents/DailyStudy/mmsegmentation') print(sys.path) if __name__ == "__main__": test_inverseform_loss()- 1
- 2
- 3
- 4
- 5
- 6
3.7 RuntimeError: Attempting to deserialize object on a CUDA device but torch.cuda.is_available() is False. If you are running on a CPU-only machine, please use torch.load with map_location=torch.device(‘cpu’) to map your storages to the CPU.
根据pytest.raises Failed: DID NOT RAISE with try/except,只需要在模型加载的时候
torch.load(path, map_location='cpu'),用map_location指明是cpu就行3.8 pytest.raises Failed: DID NOT RAISE with try/except
# Test loss forward with pred.shape!=target.shape pred_wrong = torch.zeros(2, 1, 4, 4) target_wrong = torch.zeros(3, 1, 4, 4) with pytest.raises(AssertionError): loss = loss_class(pred_wrong, target_wrong) print(loss)- 1
- 2
- 3
- 4
- 5
- 6
这个
pytest.raises(AssertionError)本身就是判断如果错了,会不会报错出来,所以with里面是可以抛出错误的代码3.9 构建文档报错


https://docs.readthedocs.io/en/stable/config-file/v2.html#build-os提交PR在测试的时候,第一次遇到构建文档报错。。。
这次写注释的时候,唯一的一个异常,就是某行超过72个字符的时候,把
and换成了&,然后就出现了上面这个错误。。改了之后,就没有了。
但是没有找到相关的资料,不确定真的是因为这个
&符号,还是说可能刚刚测试环境坏了3.10 提交的PR conflict
-
相关阅读:
Java Random类生成随机数示例分析
LCR 120.寻找文件副本
猿创征文| Dcoker实战:Linux环境安装Redis图文教程
翻译QT使用手册:将库添加到项目
数据结构学习系列之顺序表的两种删除方式
43、Flink之Hive 读写及详细验证示例
OpenCV项目开发实战--实现使用面部标志在脸上覆盖面具--附完整源码
猿创征文| Unity~DOTween相关使用
golang学习笔记——斐波纳契数列
腾讯一面:Mybatis中 Dao接口和XML文件的SQL如何建立关联?
- 原文地址:https://blog.csdn.net/Castlehe/article/details/132079748
