-
18scala笔记
Scala2.12
1 入门
1.1 发展历史
…
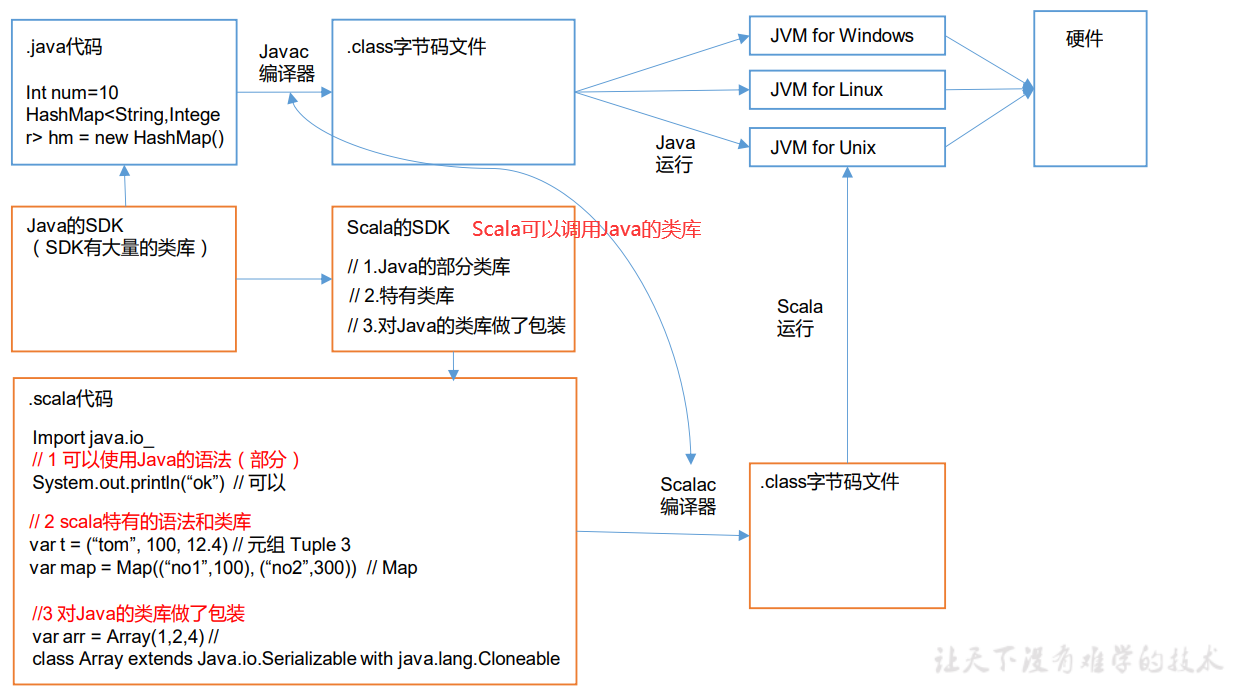
1.2 Scala 和 Java
Scala = Java++
- 编写代码
- 使用scalac编译成.class字节码文件
- scala + .class文件 执行代码
1.3 特点

1.4 安装
注意配置好
环境变量简单代码

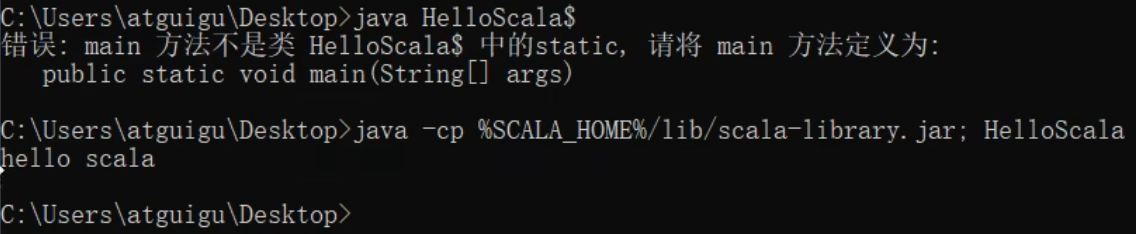
1.5 编译文件
编译scala文件会产生两个.class文件

使用java命令执行scala编译出的class文件,报错:

正确方法如下
1.6 IDEA使用

安装scala插件

创建java 和scala目录同时设置成源代码目录
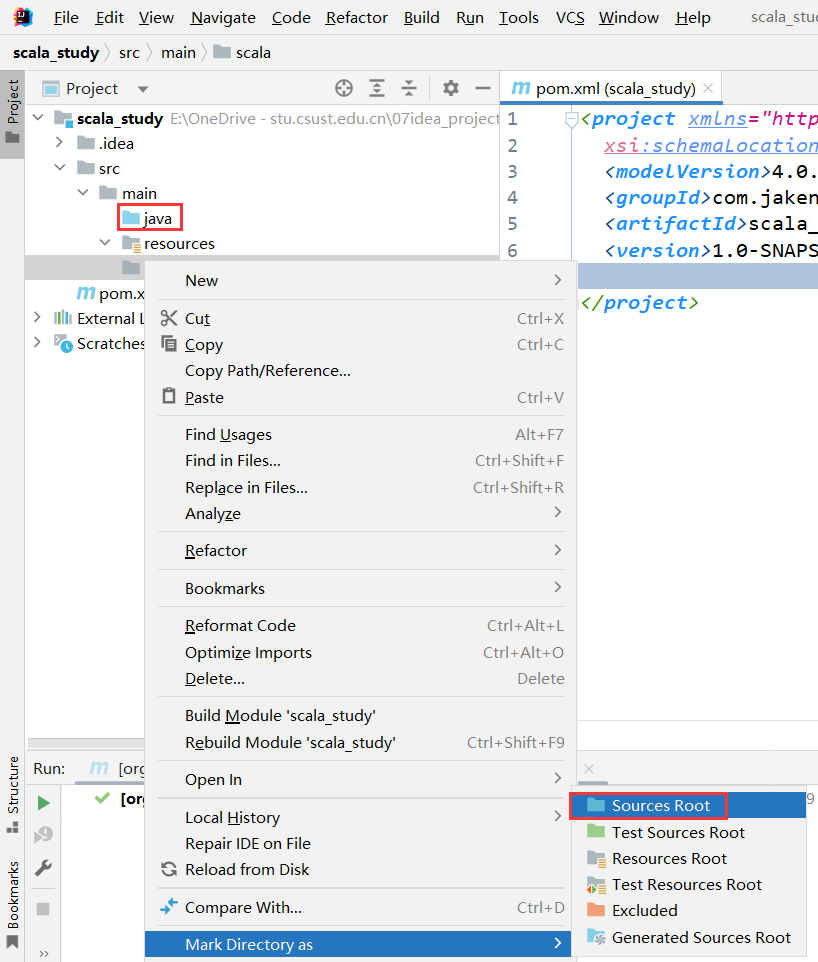
右击项目名 -> 添加框架支持

1.7 HelloWorld
创建包和类 输入main即可自动补全

基本格式

1.8 class 和 object
static关键字 调用方法:
类名.属性// 在java中 static修饰的字段是属于类的,也就是所有创建的对象都会有这个属性 public class Student { private String name; private Integer age; private static String school = "atguigu"; public Student(String name, Integer age) { this.name = name; this.age = age; } public void printInfo(){ System.out.println(this.name + " " + this.age + " " + Student.school); } public static void main(String[] args) { Student alice = new Student("alice", 20); Student bob = new Student("bob", 23); alice.printInfo(); bob.printInfo(); } }- 1
- 2
- 3
- 4
- 5
- 6
- 7
- 8
- 9
- 10
- 11
- 12
- 13
- 14
- 15
- 16
- 17
- 18
- 19
- 20
- 21
- 22
而在scala中,使用
伴生对象代替了static字段,也就是类存在,伴生对象就存在class Student(name: String, age: Int) { def printInfo(): Unit = { println(name + " " + age + " " + Student.school) } } // 引入伴生对象 object Student{ val school: String = "atguigu" def main(args: Array[String]): Unit = { val alice = new Student("alice", 20) val bob = new Student("bob", 23) alice.printInfo() bob.printInfo() } }- 1
- 2
- 3
- 4
- 5
- 6
- 7
- 8
- 9
- 10
- 11
- 12
- 13
- 14
- 15
- 16
- 17
- 18

1.9 反编译
2 变量和数据类型
2.1 注释
和java完全一样
2.2 变量和常量
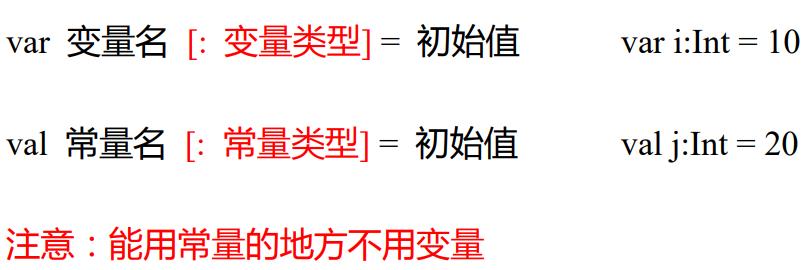
原则
- 声明变量时,类型可以省略,编译器自动推导,即类型推导,var a1 = 10
- 类型确定后,就不能修改,说明Scala是强数据类型语言
- 变量声明时,必须要有初始值
- 在声明/定义一个变量时,可以使用var或者val来修饰,var修饰的变量可改变,val修饰的变量不可改。
2.3 命名规范
基本与
Java一致- 以字母或者下划线开头,后接字母、数字、下划线
- 以操作符开头,且只包含操作符(+ - * / # !等)
- 用反引号`…`包括的任意字符串,即使是 Scala 关键字(39 个)也可以
关键字
2.4 字符串输出
基本用法
- 字符串通过+连接
- printf 用法:字符串,通过%传值。
- 字符串模板(插值字符串):通过$获取变量值
var name: String = "jinlian" var age: Int = 18 //(1)字符串,通过+号连接 println(name + " " + age) //(2)printf 用法字符串,通过%传值。 printf("name=%s age=%d\n", name, age) //(3)字符串,通过$引用 /*多行字符串,在 Scala中,利用三个双引号包围多行字符串就可以实现。输入的内容,带有空格、\t 之类,导致每一行的开始位置不能整洁对齐。应用 scala 的 stripMargin 方法,在 scala 中 stripMargin 默认是“|”作为连接符,在多行换行的行头前面加一个“|”符号即可。 */ val s = """ |select |name, |age |from user |where name="zhangsan" """.stripMargin println(s) //如果需要对变量进行运算,那么可以加${} val s1 = s""" |select | name, | age |from user |where name="$name" and age=${age+2} """.stripMargin println(s1) val s2 = s"name=$name" println(s2)- 1
- 2
- 3
- 4
- 5
- 6
- 7
- 8
- 9
- 10
- 11
- 12
- 13
- 14
- 15
- 16
- 17
- 18
- 19
- 20
- 21
- 22
- 23
- 24
- 25
- 26
- 27
- 28
- 29
- 30
- 31
- 32
- 33

2.5 键盘输入
基本用法
-
StdIn.readLine()
-
StdIn.readShort()
-
StdIn.readDouble()
// 1 输入姓名 println("input name:") var name = StdIn.readLine() // 2 输入年龄 println("input age:") var age = StdIn.readShort() // 3 输入薪水 println("input sal:") var sal = StdIn.readDouble() // 4 打印 println("name=" + name) println("age=" + age) println("sal=" + sal)- 1
- 2
- 3
- 4
- 5
- 6
- 7
- 8
- 9
- 10
- 11
- 12
- 13

2.6 数字类型
Java

scala
2.7 整数类型
Byte、Short、Int、Long
定义不要超过类型的范围
// 正确 var n1:Byte = 127 var n2:Byte = -128 // 错误 // var n3:Byte = 128 // var n4:Byte = -129- 1
- 2
- 3
- 4
- 5
- 6
Scala 的整型,默认为 Int 型,声明 Long 型,须后加‘l’或‘L’
var n5 = 10 println(n5) var n6 = 9223372036854775807L println(n6)- 1
- 2
- 3
- 4
Scala 程序中变量常声明为 Int 型,除非不足以表示大数,才使用 Long
2.8 浮点类型
Scala 的浮点类型可以表示一个小数,比如 123.4f,7.8,0.12 等等。

Scala 的浮点型常量默认为 Double 型,声明 Float 型常量,须后加‘f’或‘F’。
// 建议,在开发中需要高精度小数时,请选择 Double var n7 = 2.2345678912f var n8 = 2.2345678912- 1
- 2
- 3

2.9 字符类型
字符类型可以表示单个字符,字符类型是 Char。
- 字符常量是用单引号 ’ ’ 括起来的单个字符。
- \t :一个制表位,实现对齐的功能
- \n :换行符
- \\ :表示\
- \" :表示"
虽然IDEA会报错 但是默认会自动进行强制类型转换

这样写就会报错

2.10 Boolean类型
同Java

2.11 Unit 、Null 、 Nothing
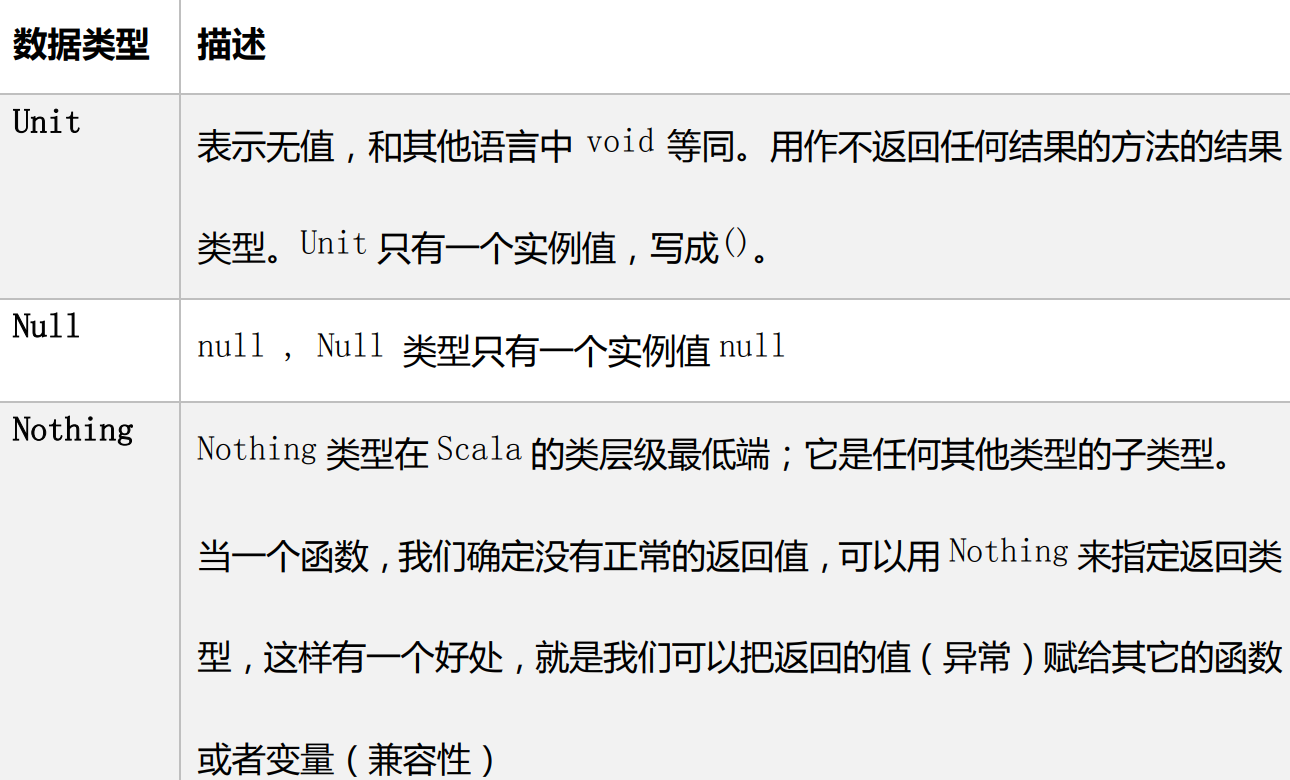
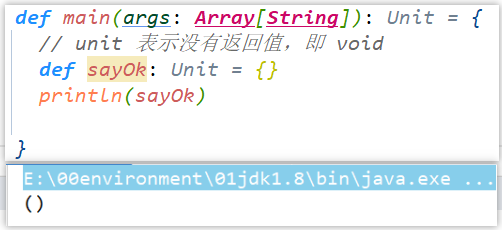
Unit
Null 类只有一个实例对象,Null 类似于 Java 中的
null引用。Null 可以赋值给任 意引用类型(AnyRef),但是不能赋值给值类型(AnyVal)object TestDataType { def main(args: Array[String]): Unit = { //null 可以赋值给任意引用类型(AnyRef),但是不能赋值给值类型(AnyVal) var cat = new Cat(); cat = null // 正确 var n1: Int = null // 错误 println("n1:" + n1) } } class Cat { }- 1
- 2
- 3
- 4
- 5
- 6
- 7
- 8
- 9
- 10
- 11
- 12
Nothing,可以作为没有正常返回值的方法的返回类型,非常直观的告诉你这个方 法不会正常返回,而且由于 Nothing 是其他任意类型的子类,他还能跟要求返回值的方法兼容。
def main(args: Array[String]): Unit = { def test() : Nothing={ throw new Exception() } test() }- 1
- 2
- 3
- 4
- 5
- 6

2.12 类型转换
基本同Java
object TestValueTransfer { def main(args: Array[String]): Unit = { //(1)自动提升原则:有多种类型的数据混合运算时,系统首先自动将所有 数据转换成精度大的那种数值类型,然后再进行计算。 var n = 1 + 2.0 println(n) // n 就是 Double //(2)把精度大的数值类型赋值给精度小的数值类型时,就会报错,反之就 会进行自动类型转换。 var n2 : Double= 1.0 //var n3 : Int = n2 //错误,原因不能把高精度的数据直接赋值和低 精度。 //(3)(byte,short)和 char 之间不会相互自动转换。 var n4 : Byte = 1 //var c1 : Char = n4 //错误 var n5:Int = n4 //(4)byte,short,char 他们三者可以计算,在计算时首先转换为 int 类型。 var n6 : Byte = 1 var c2 : Char = 1 // var n : Short = n6 + c2 //当 n6 + c2 结果类型就是 int // var n7 : Short = 10 + 90 //错误 } }- 1
- 2
- 3
- 4
- 5
- 6
- 7
- 8
- 9
- 10
- 11
- 12
- 13
- 14
- 15
- 16
- 17
- 18
- 19
- 20
- 21
- 22
- 23
强制类型转换
Java : int num = (int)2.5 Scala : var num : Int = 2.7.toInt var r1: Int = 10 * 3.5.toInt + 6 * 1.5.toInt // 10 *3 + 6*1 = 36 var r2: Int = (10 * 3.5 + 6 * 1.5).toInt // 44.0.toInt = 44- 1
- 2
- 3
- 4
- 5
数值类型与String类型转换
- 基本类型转 String 类型(语法:将基本类型的值+“” 即可)
- String 类型转基本数值类型(语法:s1.toInt、s1.toFloat、s1.toDouble、s1.toByte、s1.toLong、s1.toShort)
例
def main(args: Array[String]): Unit = { var n: Int = 130 var b: Byte = n.toByte println(b) //-126 原因:Byte最大值为127,-128 -127 -126 }- 1
- 2
- 3
- 4
- 5
3 运算符
大体同Java
3.1 注意事项
Scala:
==更加类似于 Java 中的equalsdef main(args: Array[String]): Unit = { val s1 = "abc" val s2 = new String("abc") println(s1 == s2) println(s1.eq(s2)) } 输出结果: true false- 1
- 2
- 3
- 4
- 5
- 6
- 7
- 8
- 9
Scala 中没有
++、--操作符,可以通过+=、-=来实现同样的效果3.2 运算符本质
在 Scala 中其实是没有运算符的,所有运算符都是方法。
- 当调用对象的方法时,
点.可以省略 - 如果函数参数只有一个,或者没有参数,()可以省略
object TestOpt { def main(args: Array[String]): Unit = { // 标准的加法运算 val i:Int = 1.+(1) // (1)当调用对象的方法时,.可以省略 val j:Int = 1 + (1) // (2)如果函数参数只有一个,或者没有参数,()可以省略 val k:Int = 1 + 1 println(1.toString()) println(1 toString()) println(1 toString) } }- 1
- 2
- 3
- 4
- 5
- 6
- 7
- 8
- 9
- 10
- 11
- 12
- 13
- 14
4 流程控制
Scala 中 if else 表达式其实是有返回值的,具体返回值取决于满足条件的 代码体的最后一行内容。
object TestIfElse { def main(args: Array[String]): Unit = { println("input age") var age = StdIn.readInt() val res :String = if (age < 18){ "童年" }else if(age>=18 && age<30){ "中年" }else{ "老年" } println(res) } }- 1
- 2
- 3
- 4
- 5
- 6
- 7
- 8
- 9
- 10
- 11
- 12
- 13
- 14
Java 中的三元运算符可以用 if else 实现
如果大括号{}内的逻辑代码只有一行,大括号可以省略。如果省略大括号,if 只对最近 的一行逻辑代码起作用。
object TestIfElse { def main(args: Array[String]): Unit = { // Java // int result = flag?1:0 // Scala println("input age") var age = StdIn.readInt() val res:Any = if (age < 18) "童年" else "成年" println(res) } }- 1
- 2
- 3
- 4
- 5
- 6
- 7
- 8
- 9
- 10
- 11
- 12
4.1 Switch 分支结构
在 Scala 中没有
Switch,而是使用模式匹配来处理。4.2 For循环控制
基本用法 to
// i 将会从 1-3 循环,前后闭合 for(i <- 1 to 3){ print(i + " ") } i 1 2 3- 1
- 2
- 3
- 4
- 5
Until
// 前闭合后开 for(i <- 1 until 3) { print(i + " ") } i 1 2- 1
- 2
- 3
- 4
- 5
4.3 循环守卫
for(i <- 1 to 3 if i != 2) { print(i + " ") } println() // 等价于 ============= for (i <- 1 to 3){ if (i != 2) { print(i + " ") } }- 1
- 2
- 3
- 4
- 5
- 6
- 7
- 8
- 9
- 10
- 11
4.4 循环步长
// by 表示步长 for (i <- 1 to 10 by 2) { println("i=" + i) } i 1 3 5 7 9- 1
- 2
- 3
- 4
- 5
4.5 嵌套循环
// 没有关键字,所以范围后一定要加;来隔断逻辑 for(i <- 1 to 3; j <- 1 to 3) { println(" i =" + i + " j = " + j) } // 等价于=============================== for (i <- 1 to 3) { for (j <- 1 to 3) { println("i =" + i + " j=" + j) } }- 1
- 2
- 3
- 4
- 5
- 6
- 7
- 8
- 9
- 10
4.6 引入变量
for(i <- 1 to 3; j = 4 - i) { println("i=" + i + " j=" + j) } ================================== for { i <- 1 to 3 j = 4 - i } { println("i=" + i + " j=" + j) } ================================== for (i <- 1 to 3) { var j = 4 - i println("i=" + i + " j=" + j) } // 三者等价- 1
- 2
- 3
- 4
- 5
- 6
- 7
- 8
- 9
- 10
- 11
- 12
- 13
- 14
- 15
- 16
4.7 循环返回值 yield
类似于js中的map
// 将遍历过程中处理的结果返回到一个新 Vector 集合中 val res = for(i <- 1 to 10) yield i println(res) // 结果:res = Vector(1, 2, 3, 4, 5, 6, 7, 8, 9, 10) // 将原数据中所有值乘以 2,并把数据返回到一个新的集合中 var res = for(i <-1 to 10) yield { i * 2 } // 结果:res = Vector(2, 4, 6, 8, 10, 12, 14, 16, 18, 20)- 1
- 2
- 3
- 4
- 5
- 6
- 7
- 8
- 9
- 10
4.8 倒序打印 reverse
for(i <- 1 to 10 reverse){ println(i) }- 1
- 2
- 3
4.9 While循环控制
- 与 for 语句不同,while 语句没有返回值,即整个 while 语句的结果是
Unit类型() - 因为 while 中没有返回值,所以当要用该语句来计算并返回结果时,就不可避免的使用变量,而
变量需要声明在 while 循环的外部,那么就等同于循环的内部对外部的变量 造成了影响,所以不推荐使用,而是推荐使用for循环。
显然,while循环不能满足大数据并行处理的要求,因为他们公用的都是外部的变量,比如控制循环的i
def main(args: Array[String]): Unit = { var i = 0 //变量必须在while外面声明 while (i < 10) { println("宋宋,喜欢海狗人参丸" + i) i += 1 } }- 1
- 2
- 3
- 4
- 5
- 6
- 7
- 8
4.10 循环中断
Scala 内置控制结构特地去掉了 break 和 continue,是为了更好的适应函数式编程,推荐使用函数式的风格解决break和continue的功能,而不是一个关键字。Scala中使用
breakable控制结构来实现break和continue功能。采用异常的方式退出循环
def main(args: Array[String]): Unit = { try { for (elem <- 1 to 10) { println(elem) if (elem == 5) throw new RuntimeException } } catch { case e => } println("正常结束循环") }- 1
- 2
- 3
- 4
- 5
- 6
- 7
- 8
- 9
- 10
- 11
采用 Scala 自带的函数,退出循环
import scala.util.control.Breaks def main(args: Array[String]): Unit = { Breaks.breakable( for (elem <- 1 to 10) { println(elem) if (elem == 5) Breaks.break() } ) println("正常结束循环") }- 1
- 2
- 3
- 4
- 5
- 6
- 7
- 8
- 9
- 10
对 break 进行省略
import scala.util.control.Breaks._ object TestBreak { def main(args: Array[String]): Unit = { breakable { for (elem <- 1 to 10) { println(elem) if (elem == 5) break } } println("正常结束循环") } }- 1
- 2
- 3
- 4
- 5
- 6
- 7
- 8
- 9
- 10
- 11
- 12
5 函数式编程
面向对象编程
解决问题,分解对象,行为,属性,然后通过对象的关系以及行为的调用来解决问题。
-
对象:用户
-
行为:登录、连接 JDBC、读取数据库
-
属性:用户名、密码
Scala 语言是一个完全面向对象编程语言。
万物皆对象
对象的本质:对
数据和行为的一个封装函数式编程
解决问题时,将问题分解成一个一个的步骤,将每个步骤进行封装(函数),通过调用这些封装好的步骤,解决问题。
例如:请求->用户名、密码->连接 JDBC->读取数据库
Scala 语言是一个
完全函数式编程语言。万物皆函数。函数的本质:
函数可以当做一个值进行传递5.1 函数基础
5.1.1 函数基本语法

// 定义一个函数,实现将传入的名称打印出来。 object TestFunction { def main(args: Array[String]): Unit = { // (1)函数定义 def f(arg: String): Unit = { println(arg) } // (2)函数调用 // 函数名(参数) f("hello world") } }- 1
- 2
- 3
- 4
- 5
- 6
- 7
- 8
- 9
- 10
- 11
- 12
- 13
5.1.2 函数和方法的区别
概念
- 为完成某一功能的程序语句的集合,称为函数。
- 类中的函数称之方法。
案例实操
- Scala 语言可以在任何的语法结构中声明任何的语法
- 函数没有重载和重写的概念;
方法可以进行重载和重写 - Scala 中函数可以
嵌套定义
// (2)方法可以进行重载和重写,程序可以执行 def main(): Unit = { } def main(args: Array[String]): Unit = { // (1)Scala 语言可以在任何的语法结构中声明任何的语法 import java.util.Date new Date() // (2)函数没有重载和重写的概念,程序报错 def test(): Unit = { println("无参,无返回值") } test() def test(name: String): Unit = { println() } //(3)Scala 中函数可以嵌套定义 def test2(): Unit = { def test3(name: String): Unit = { println("函数可以嵌套定义") } } }- 1
- 2
- 3
- 4
- 5
- 6
- 7
- 8
- 9
- 10
- 11
- 12
- 13
- 14
- 15
- 16
- 17
- 18
- 19
- 20
- 21
- 22
- 23
- 24
- 25
5.1.3 函数定义
def main(args: Array[String]): Unit = { // 函数 1:无参,无返回值 def test1(): Unit ={ println("无参,无返回值") } test1() // 函数 2:无参,有返回值 def test2():String={ return "无参,有返回值" } println(test2()) // 函数 3:有参,无返回值 def test3(s:String):Unit={ println(s) } test3("jinlian") // 函数 4:有参,有返回值 def test4(s:String):String={ return s+"有参,有返回值" } println(test4("hello ")) // 函数 5:多参,无返回值 def test5(name:String, age:Int):Unit={ println(s"$name, $age") } test5("dalang",40) } }- 1
- 2
- 3
- 4
- 5
- 6
- 7
- 8
- 9
- 10
- 11
- 12
- 13
- 14
- 15
- 16
- 17
- 18
- 19
- 20
- 21
- 22
- 23
- 24
- 25
- 26
- 27
- 28
5.1.4 参数函数
- 可变参数
- 如果参数列表中存在多个参数,那么可变参数一般放置在最后
- 参数默认值,一般将有默认值的参数放置在参数列表的后面
- 带名参数
object TestFunction { def main(args: Array[String]): Unit = { // (1)可变参数 def test( s : String* ): Unit = { println(s) } // 有输入参数:输出 Array test("Hello", "Scala") // 无输入参数:输出 List() test() ======================================================= // (2)如果参数列表中存在多个参数,那么可变参数一般放置在最后 def test2( name : String, s: String* ): Unit = { println(name + "," + s) } test2("jinlian", "dalang") ======================================================= // (3)参数默认值 def test3( name : String, age : Int = 30 ): Unit = { println(s"$name, $age") } // 如果参数传递了值,那么会覆盖默认值 test3("jinlian", 20) // 如果参数有默认值,在调用的时候,可以省略这个参数 test3("dalang") // 一般情况下,将有默认值的参数放置在参数列表的后面 def test4( sex : String = "男", name : String ): Unit = { println(s"$name, $sex") } // Scala 函数中参数传递是,从左到右 //test4("wusong") ======================================================= //(4)带名参数 test4(name="ximenqing") } }- 1
- 2
- 3
- 4
- 5
- 6
- 7
- 8
- 9
- 10
- 11
- 12
- 13
- 14
- 15
- 16
- 17
- 18
- 19
- 20
- 21
- 22
- 23
- 24
- 25
- 26
- 27
- 28
- 29
- 30
- 31
- 32
- 33
- 34
- 35
- 36
- 37
5.1.5 函数至简原则
能省就省- return 可以省略,Scala 会使用函数体的最后一行代码作为返回值
- 如果函数体只有一行代码,可以省略花括号
- 返回值类型如果能够推断出来,那么可以省略(:和返回值类型一起省略)
- 如果有 return,则不能省略返回值类型,必须指定
- 如果函数明确声明 unit,那么即使函数体中使用 return 关键字也不起作用
- Scala 如果期望是无返回值类型,可以省略等号
- 如果函数无参,但是声明了参数列表,那么调用时,小括号,可加可不加
- 如果函数没有参数列表,那么小括号可以省略,调用时小括号必须省略
- 如果不关心名称,只关心逻辑处理,那么函数名(def)可以省略
object TestFunction { def main(args: Array[String]): Unit = { // (0)函数标准写法 def f( s : String ): String = { return s + " jinlian" } println(f("Hello")) // 至简原则:能省则省 //(1) return 可以省略,Scala 会使用函数体的最后一行代码作为返回值 def f1( s : String ): String = { s + " jinlian" } println(f1("Hello")) //(2)如果函数体只有一行代码,可以省略花括号 def f2(s:String):String = s + " jinlian" //(3)返回值类型如果能够推断出来,那么可以省略(:和返回值类型一起省略) def f3( s : String ) = s + " jinlian" println(f3("Hello3")) //(4)如果有 return,则不能省略返回值类型,必须指定。 def f4() :String = { return "ximenqing4" } println(f4()) //(5)如果函数明确声明 unit,那么即使函数体中使用 return 关键字也不起作用 def f5(): Unit = { return "dalang5" } println(f5()) //(6)一般不使用 Scala 如果期望是无返回值类型,可以省略等号 // 将无返回值的函数称之为过程 def f6() { "dalang6" } println(f6()) //输出值为(),因为没有等号 是无返回值类型 //(7)如果函数无参,但是声明了参数列表,那么调用时,小括号,可加可不加 def f7() = "dalang7" println(f7()) println(f7) //(8)如果函数没有参数列表,那么小括号可以省略,调用时小括号必须省略 def f8 = "dalang" //println(f8()) println(f8) //(9)如果不关心名称,只关心逻辑处理,那么函数名(def)可以省略 //这就是匿名函数 lambda表达式 (x:String)=>{println("wusong")} }- 1
- 2
- 3
- 4
- 5
- 6
- 7
- 8
- 9
- 10
- 11
- 12
- 13
- 14
- 15
- 16
- 17
- 18
- 19
- 20
- 21
- 22
- 23
- 24
- 25
- 26
- 27
- 28
- 29
- 30
- 31
- 32
- 33
- 34
- 35
- 36
- 37
- 38
- 39
- 40
- 41
- 42
- 43
- 44
- 45
- 46
- 47
5.2 函数高级
5.2.1 高阶函数
函数作为参数输入

_的用法(3) f中传入一个函数,函数的参数为name,方法体为输出name
(4) 可以知道f中传入的函数就是将一个参数输出,无论参数的名字叫什么,所以可以用_代替参数名

// 2. 函数作为参数进行传递 // 定义二元计算函数 def dualEval(op: (Int, Int)=>Int, a: Int, b: Int): Int = { op(a, b) } def add(a: Int, b: Int): Int = { a + b } println(dualEval(add, 12, 35)) println(dualEval((a, b) => a + b, 12, 35)) println(dualEval(_ + _, 12, 35))- 1
- 2
- 3
- 4
- 5
- 6
- 7
- 8
- 9
- 10
- 11
- 12
- 13
函数作为值进行传递,即一个函数等于另外一个函数,
f2 = f _表示f2这个函数赋值为f

函数作为函数的返回值返回
// 函数f5的参数为空,它的返回值为一个输入参数为Int,返回值为空的函数 def f5(): Int=>Unit = { def f6(a: Int): Unit = { println("f6调用 " + a) } f6 // 将函数直接返回 } // 调用函数,相当于f5()返回的是一个函数名,后面的(25)是参数 f5()(25)- 1
- 2
- 3
- 4
- 5
- 6
- 7
- 8
- 9
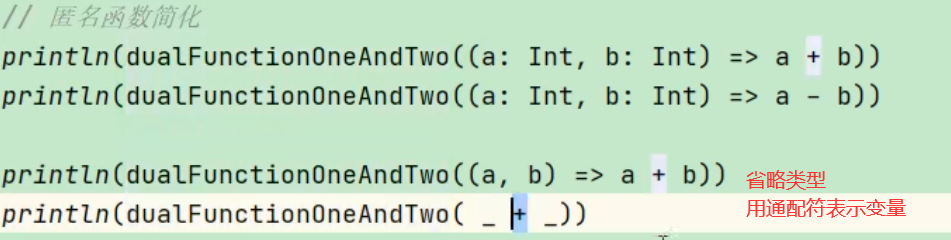
5.2.2 匿名函数
(x:Int)=>{函数体}- 1
至简原则
- 参数的类型可以省略,会根据形参进行自动的推导

- 类型省略之后,发现只有一个参数,则圆括号可以省略;其他情况:没有参数和参数超过 1 的永远不能省略圆括号。

- 匿名函数如果只有一行,则大括号也可以省略

- 如果参数只出现一次,则参数省略且后面参数可以用_代替

- 如果执行的是一步操作,那么可以直接省略_

例

简化:
5.2.3 实战
对数组进行操作,定义运算函数
def main(args: Array[String]): Unit = { val arr: Array[Int] = Array(12, 45, 75, 98) // 对数组进行处理,将操作抽象出来,处理完毕之后的结果返回一个新的数组 def arrayOperation(array: Array[Int], op: Int=>Int): Array[Int] = { for (elem <- array) yield op(elem) } // 定义一个加一操作 def addOne(elem: Int): Int = { elem + 1 } // 调用函数 val newArray: Array[Int] = arrayOperation(arr, addOne) // 将数组中的元素取出来 并用,分隔 println(newArray.mkString(",")) // 传入匿名函数,实现元素翻倍 val newArray2 = arrayOperation(arr, _ * 2) // 将数组中的元素取出来 并用,分隔 println(newArray2.mkString(", ")) }- 1
- 2
- 3
- 4
- 5
- 6
- 7
- 8
- 9
- 10
- 11
- 12
- 13
- 14
- 15
- 16
- 17
- 18
- 19
- 20
- 21

定义一个匿名函数,并将它作为值赋给变量 fun。函数有三个参数,类型分别为 Int,String,Char,返回值类型为 Boolean。要求调用函数 fun(0, “”, ‘0’)得到返回值为 false,其它情况均返回 true。
val fun = (i: Int, s: String, c: Char) => { if (i == 0 && s == "" && c == '0') false else true } println(fun(0, "", '0')) println(fun(0, "", '1')) println(fun(23, "", '0')) println(fun(0, "hello", '0')) println("===========================")- 1
- 2
- 3
- 4
- 5
- 6
- 7
- 8
- 9
- 10
定义一个函数 func,它接收一个 Int 类型的参数,返回一个函数(记作 f1)。 它返回的函数 f1,接收一个 String 类型的参数,同样返回一个函数(记作 f2)。函数 f2 接 收一个 Char 类型的参数,返回一个 Boolean 的值。 要求调用函数 func(0) (“”) (‘0’)得到返回值为 false,其它情况均返回 true。
def func(i: Int): String=>(Char=>Boolean) = { def f1(s: String): Char=>Boolean = { def f2(c: Char): Boolean = { if (i == 0 && s == "" && c == '0') false else true } f2 } f1 } println(func(0)("")('0')) println(func(0)("")('1')) println(func(23)("")('0')) println(func(0)("hello")('0')) // 匿名函数简写 // 匿名函数接收String类型的参数s,返回值为一个函数 // 匿名函数接收Char类型的参数c,返回值为Boolean def func1(i: Int): String => (Char => Boolean) = { s => { c => { if (i == 0 && s == "" && c == '0') false else true } } } // =======================省去括号就变成下面的样子 def func1(i: Int): String=>(Char=>Boolean) = { s => c => if (i == 0 && s == "" && c == '0') false else true } println(func1(0)("")('0')) println(func1(0)("")('1')) println(func1(23)("")('0')) println(func1(0)("hello")('0')) // 柯里化 def func2(i: Int)(s: String)(c: Char): Boolean = { if (i == 0 && s == "" && c == '0') false else true } println(func2(0)("")('0')) println(func2(0)("")('1')) println(func2(23)("")('0')) println(func2(0)("hello")('0')) }- 1
- 2
- 3
- 4
- 5
- 6
- 7
- 8
- 9
- 10
- 11
- 12
- 13
- 14
- 15
- 16
- 17
- 18
- 19
- 20
- 21
- 22
- 23
- 24
- 25
- 26
- 27
- 28
- 29
- 30
- 31
- 32
- 33
- 34
- 35
- 36
- 37
- 38
- 39
- 40
- 41
- 42
- 43
- 44
5.2.4 函数柯里化和闭包
闭包:如果一个函数,访问到了它的外部(局部)变量的值,那么这个函数和他所处的环境,称为闭包原理: scala是面向对象的,所有的方法都有一个地址,即:在堆中保存了下来,所以即使先执行的方法出栈了,但其数据任然保存在堆中,后面执行的方法可以访问到数据
object TestFunction { def main(args: Array[String]): Unit = { def f1()={ var a:Int = 10 def f2(b:Int)={ a + b } f2 _ } // 在调用时,f1 函数执行完毕后,局部变量 a 应该随着栈空间释放掉 val f = f1() // 但是在此处,变量 a 其实并没有释放,而是包含在了 f2 函数的内部,形成了闭合的效果 println(f(3)) println(f1()(3))- 1
- 2
- 3
- 4
- 5
- 6
- 7
- 8
- 9
- 10
- 11
- 12
- 13
- 14
- 15
- 16
函数柯里化:把一个参数列表的多个参数,变成多个参数列表。// 函数柯里化,其实就是将复杂的参数逻辑变得简单化,函数柯里化一定存在闭包 def f3()(b:Int)={ a + b } println(f3()(3))- 1
- 2
- 3
- 4
- 5
5.2.5 递归
同Java
5.2.6 控制抽象
值调用:参数传值,平常的传值方法
def foo(a: Int):Unit = { println(a) }- 1
- 2
- 3
名调用:传名参数,把代码块传递过去,有
返回值def f1(): Int = { println("f1调用") 12 } // 2. 传名参数,传递的不再是具体的值,而是代码块 def f2(a: =>Int): Unit = { println("a: " + a) println("a: " + a) } // 传递的是f1这个代码块,相当于f2中的参数a=f1() f2(f1()) f2({ println("这是一个代码块") 29 })- 1
- 2
- 3
- 4
- 5
- 6
- 7
- 8
- 9
- 10
- 11
- 12
- 13
- 14
- 15
- 16
案例:自定义while循环
使用柯里化最容易理解,while(代码块)(代码块)
package chapter05 object Test12_MyWhile { def main(args: Array[String]): Unit = { var n = 10 // 1. 常规的while循环 while (n >= 1){ println(n) n -= 1 } // 2. 用闭包实现一个函数,将代码块作为参数传入,递归调用 def myWhile(condition: =>Boolean): (=>Unit)=>Unit = { // 内层函数需要递归调用,参数就是循环体 def doLoop(op: =>Unit): Unit = { if (condition){ op myWhile(condition)(op) } } doLoop _ } println("=================") n = 10 myWhile(n >= 1){ println(n) n -= 1 } // 3. 用匿名函数实现 def myWhile2(condition: =>Boolean): (=>Unit)=>Unit = { // 内层函数需要递归调用,参数就是循环体 op => { if (condition){ op myWhile2(condition)(op) } } } println("=================") n = 10 myWhile2(n >= 1){ println(n) n -= 1 } // 3. 用柯里化实现====最容易理解 def myWhile3(condition: =>Boolean)(op: =>Unit): Unit = { if (condition){ op myWhile3(condition)(op) } } println("=================") n = 10 myWhile3(n >= 1){ println(n) n -= 1 } } }- 1
- 2
- 3
- 4
- 5
- 6
- 7
- 8
- 9
- 10
- 11
- 12
- 13
- 14
- 15
- 16
- 17
- 18
- 19
- 20
- 21
- 22
- 23
- 24
- 25
- 26
- 27
- 28
- 29
- 30
- 31
- 32
- 33
- 34
- 35
- 36
- 37
- 38
- 39
- 40
- 41
- 42
- 43
- 44
- 45
- 46
- 47
- 48
- 49
- 50
- 51
- 52
- 53
- 54
- 55
- 56
- 57
- 58
- 59
- 60
5.2.7 惰性加载
当函数返回值被声明为 lazy 时,函数的执行将被推迟,直到我们首次对此取值,该函 数才会执行。这种函数我们称之为惰性函数。
def main(args: Array[String]): Unit = { lazy val res = sum(10, 30) println("----------------") println("res=" + res) } def sum(n1: Int, n2: Int): Int = { println("sum 被执行。。。") return n1 + n2 }- 1
- 2
- 3
- 4
- 5
- 6
- 7
- 8
- 9

6 面向对象
Scala 的面向对象思想和 Java 的面向对象思想和概念是一致的。
Scala 中语法和 Java 不同,补充了更多的功能。
6.1 Scala包
6.1.1 包的命名
同java
6.1.2 包语句
有两种风格
- com.jaken.scala
- 嵌套风格
package com{ package jaken{ package scala{ } } }- 1
- 2
- 3
- 4
- 5
- 6
优点:
- 一个源文件中可以声明多个 package
- 子包中的类可以直接访问父包中的内容,而无需导包
package com { import com.atguigu.Inner //父包访问子包需要导包 object Outer { val out: String = "out" def main(args: Array[String]): Unit = { println(Inner.in) } } package atguigu { object Inner { val in: String = "in" def main(args: Array[String]): Unit = { println(Outer.out) //子包访问父包无需导包 } } } } package other { }- 1
- 2
- 3
- 4
- 5
- 6
- 7
- 8
- 9
- 10
- 11
- 12
- 13
- 14
- 15
- 16
- 17
- 18
- 19
6.1.3 包对象
在 Scala 中可以为每个包定义
一个同名的包对象(package object),定义在包对象中的成员,作为其对应包下所有 class 和 object 的共享变量,可以被直接访问。package object com{ val shareValue="share" def shareMethod()={} } package com { object Outer { val out: String = "out" def main(args: Array[String]): Unit = { // 可以直接拿到包对象 println(shareValue) } } }- 1
- 2
- 3
- 4
- 5
- 6
- 7
- 8
- 9
- 10
- 11
- 12
- 13
- 14
- 15
6.1.4 导包说明
同java
6.2 类和对象
类:可以看成一个模板对象:表示具体的事物6.2.1 定义类和属性
Scala 中没有 public,
一个.scala 中可以写多个类。- Scala 语法中,类并不声明为
public,所有这些类都具有公有可见性(即默认就是 public) - 一个 Scala 源文件可以包含多个类
class Person { var name: String = "bobo" //定义属性 var age: Int = _ // _表示给属性一个默认值,Int默认为0,String为null //Bean 属性(@BeanProperty),修饰的属性有getter/setter @BeanProperty var sex: String = "男" } object Person { def main(args: Array[String]): Unit = { var person = new Person() println(person.name) person.setSex("女") println(person.getSex) } }- 1
- 2
- 3
- 4
- 5
- 6
- 7
- 8
- 9
- 10
- 11
- 12
- 13
- 14
- 15
- 16
6.3 封装
Scala 中的
public属性,底层实际为private,并通过 get 方法(obj.field())和 set 方法 (obj.field_=(value))对其进行操作。所以 Scala 并
不推荐将属性设为private,再为其设置 public 的 get 和 set 方法的做法。但由于很多 Java 框架都利用反射调用 getXXX 和 setXXX 方 法,有时候为了和这些框架兼容,也会为 Scala 的属性设置 getXXX 和 setXXX 方法(通过@BeanProperty注解实现)。6.3.1 访问权限
- Scala 中属性和方法的默认访问权限为 public,但 Scala 中无 public 关键字。
- private 为私有权限,只在
类的内部和伴生对象中可用。 - protected 为受保护权限,Scala 中受保护权限比 Java 中
更严格,同类、子类可以访问,同包无法访问。 private[包名]增加包访问权限,包名下的其他类也可以使用
例
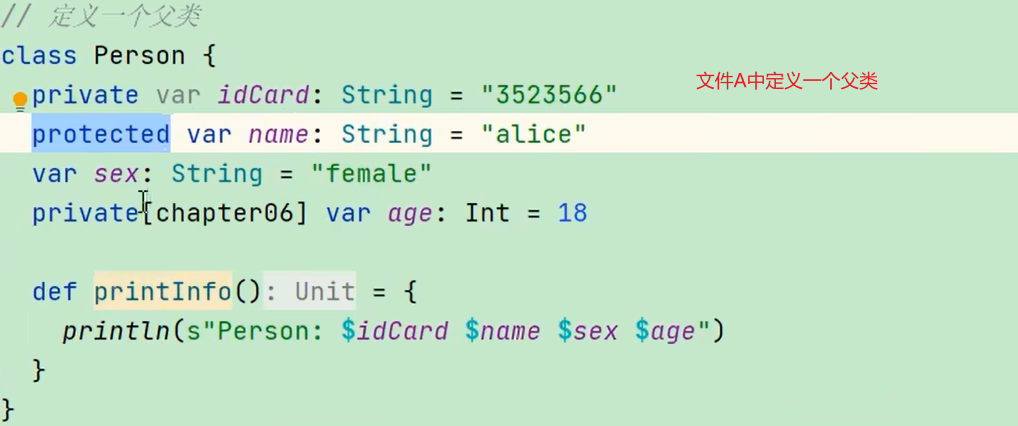
在子类中idCard由于是私有属性 所以不能访问

在实例对象中,
protect对象不能访问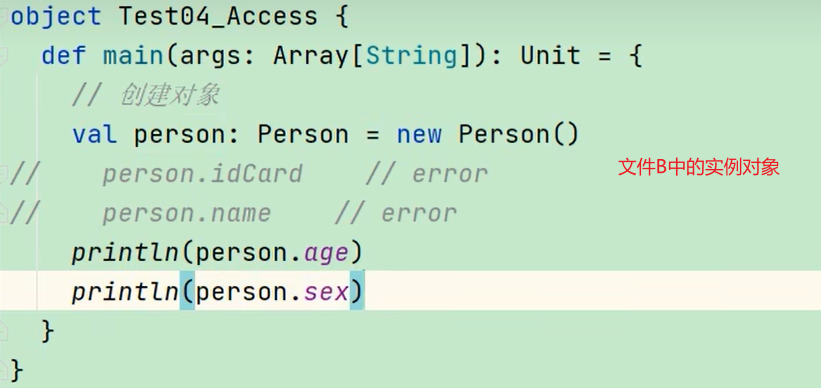
6.3.2 构造方法
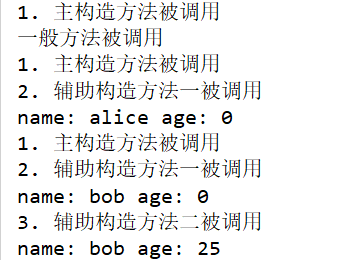
object Test05_Constructor { def main(args: Array[String]): Unit = { // 调用的主构造方法 val student1 = new Student1 //调用的一般方法 student1.Student1() //调用的辅助构造方法1 val student2 = new Student1("alice") //调用的辅助构造方法2 val student3 = new Student1("bob", 25) } } // 定义一个类,其实也是主构造方法 class Student1() { // 定义属性 var name: String = _ var age: Int = _ println("1. 主构造方法被调用") // 声明辅助构造方法1 def this(name: String) { // 首先必须调用主构造器 this() println("2. 辅助构造方法一被调用") this.name = name println(s"name: $name age: $age") } // 声明辅助构造方法2 def this(name: String, age: Int){ //调用构造方法1 this(name) println("3. 辅助构造方法二被调用") this.age = age println(s"name: $name age: $age") } // 不同于JAVA,这并不是一个构造方法,而是一个普通的方法 def Student1(): Unit = { println("一般方法被调用") } }- 1
- 2
- 3
- 4
- 5
- 6
- 7
- 8
- 9
- 10
- 11
- 12
- 13
- 14
- 15
- 16
- 17
- 18
- 19
- 20
- 21
- 22
- 23
- 24
- 25
- 26
- 27
- 28
- 29
- 30
- 31
- 32
- 33
- 34
- 35
- 36
- 37
- 38
- 39
- 40
- 41
- 42
运行结果
6.3.3构造方法参数

实操
object Test06_ConstructorParams { def main(args: Array[String]): Unit = { val student2 = new Student2 student2.name = "alice" student2.age = 18 println(s"student2: name = ${student2.name}, age = ${student2.age}") val student3 = new Student3("bob", 20) println(s"student3: name = ${student3.name}, age = ${student3.age}") val student4 = new Student4("cary", 25) //由于Student4的参数未修饰,所以参数是局部变量而不是成员属性 // println(s"student4: name = ${student4.name}, age = ${student4.age}") student4.printInfo() val student5 = new Student5("bob", 20) println(s"student3: name = ${student5.name}, age = ${student5.age}") student3.age = 21 val student6 = new Student6("cary", 25, "atguigu") println(s"student6: name = ${student6.name}, age = ${student6.age}") student6.printInfo() } } // 定义类 // 无参构造器 class Student2 { // 单独定义属性 var name: String = _ var age: Int = _ } // 上面定义等价于 class Student3(var name: String, var age: Int) // 主构造器参数无修饰,name和age属性就相当于局部变量,而不是成员属性 class Student4(name: String, age: Int){ def printInfo(){ println(s"student4: name = ${name}, age = $age") } } //class Student4(_name: String, _age: Int){ // var name: String = _name // var age: Int = _age //} //用常量修饰 class Student5(val name: String, val age: Int) //用变量修饰 class Student6(var name: String, var age: Int){ var school: String = _ def this(name: String, age: Int, school: String){ this(name, age) this.school = school } def printInfo(){ println(s"student6: name = ${name}, age = $age, school = $school") } }- 1
- 2
- 3
- 4
- 5
- 6
- 7
- 8
- 9
- 10
- 11
- 12
- 13
- 14
- 15
- 16
- 17
- 18
- 19
- 20
- 21
- 22
- 23
- 24
- 25
- 26
- 27
- 28
- 29
- 30
- 31
- 32
- 33
- 34
- 35
- 36
- 37
- 38
- 39
- 40
- 41
- 42
- 43
- 44
- 45
- 46
- 47
- 48
- 49
- 50
- 51
- 52
- 53
- 54
- 55
- 56
- 57
- 58
- 59
- 60
- 61
- 62
- 63
运行结果

6.4 继承
object Test07_Inherit { def main(args: Array[String]): Unit = { val student1: Student7 = new Student7("alice", 18) val student2 = new Student7("bob", 20, "std001") student1.printInfo() student2.printInfo() val teacher = new Teacher teacher.printInfo() def personInfo(person: Person7): Unit = { person.printInfo() } println("=========================") val person = new Person7 personInfo(student1) personInfo(teacher) personInfo(person) } } // 定义一个父类 class Person7() { var name: String = _ var age: Int = _ println("1. 父类的主构造器调用") def this(name: String, age: Int){ this() println("2. 父类的辅助构造器调用") this.name = name this.age = age } def printInfo(): Unit = { println(s"Person: $name $age") } } // 定义子类 class Student7(name: String, age: Int) extends Person7(name, age) { var stdNo: String = _ println("3. 子类的主构造器调用") def this(name: String, age: Int, stdNo: String){ this(name, age) println("4. 子类的辅助构造器调用") this.stdNo = stdNo } override def printInfo(): Unit = { println(s"Student: $name $age $stdNo") } } class Teacher extends Person7 { override def printInfo(): Unit = { println(s"Teacher") } }- 1
- 2
- 3
- 4
- 5
- 6
- 7
- 8
- 9
- 10
- 11
- 12
- 13
- 14
- 15
- 16
- 17
- 18
- 19
- 20
- 21
- 22
- 23
- 24
- 25
- 26
- 27
- 28
- 29
- 30
- 31
- 32
- 33
- 34
- 35
- 36
- 37
- 38
- 39
- 40
- 41
- 42
- 43
- 44
- 45
- 46
- 47
- 48
- 49
- 50
- 51
- 52
- 53
- 54
- 55
- 56
- 57
- 58
- 59
- 60
- 61
- 62
- 63
- 64
- 65

6.5 多态(动态绑定)
与java的区别
scala中的
属性和方法都是动态绑定,也就是说,new的是什么,就调用什么的属性和方法java中的
属性是静态绑定,方法是动态绑定,也就是说,定义为父类,而new子类,调用的属性是父类的属性值,调用的方法是子类的方法java多态
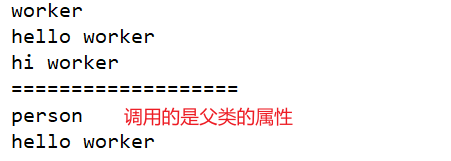
public class TestDynamicBind { public static void main(String[] args) { Worker worker = new Worker(); System.out.println(worker.name); worker.hello(); worker.hi(); System.out.println("==================="); // 多态:定义的是Person父类,但new的是Worder子类 Person person = new Worker(); // 静态绑定属性,所以打印的是person的属性 System.out.println(person.name); // 动态绑定方法,所以打印的是worker的方法 person.hello(); // 由于父类中没有hi方法,所以报错 // person.hi(); // error } } class Person { String name = "person"; public void hello() { System.out.println("hello person"); } } class Worker extends Person { String name = "worker"; public void hello() { System.out.println("hello worker"); } public void hi() { System.out.println("hi worker"); } }- 1
- 2
- 3
- 4
- 5
- 6
- 7
- 8
- 9
- 10
- 11
- 12
- 13
- 14
- 15
- 16
- 17
- 18
- 19
- 20
- 21
- 22
- 23
- 24
- 25
- 26
- 27
- 28
- 29
- 30
- 31
- 32
- 33
- 34
- 35
- 36
scala多态
object Test08_DynamicBind { def main(args: Array[String]): Unit = { //同样定义的是父类,实例化的是子类 val student: Person8 = new Student8 //与JAVA不同,SCALA的属性也是动态绑定,所以是Student8的属性 println(student.name) //调用的是是Student8的方法 student.hello() } } class Person8 { val name: String = "person" def hello(): Unit = { println("hello person") } } class Student8 extends Person8 { override val name: String = "student" override def hello(): Unit = { println("hello student") } }- 1
- 2
- 3
- 4
- 5
- 6
- 7
- 8
- 9
- 10
- 11
- 12
- 13
- 14
- 15
- 16
- 17
- 18
- 19
- 20
- 21
- 22
- 23
- 24

6.6 抽象类
基本语法
- 定义抽象类:abstract class Person{} //通过 abstract 关键字标记抽象类
- 定义抽象属性:val|var name:String //一个属性没有初始化,就是抽象属性
- 定义抽象方法:def hello():String //只声明而没有实现的方法,就是抽象方法
package chapter06 object Test09_AbstractClass { def main(args: Array[String]): Unit = { val student = new Student9 student.eat() student.sleep() } } // 定义抽象类 abstract class Person9{ // 非抽象属性 var name: String = "person" // 抽象属性 var age: Int // 非抽象方法 def eat(): Unit = { println("person eat") } // 抽象方法 def sleep(): Unit } // 定义具体的实现子类 class Student9 extends Person9 { // 实现抽象属性,必须var,override可有可无 var age: Int = 18 // 实现抽象方法,直接定义就行,override可有可无 def sleep(): Unit = { println("student sleep") } // 重写非抽象属性,因为父类name是var修饰的,直接写就可以 // 如果父类是val,则子类都不可以修改,直接继承父类的 // override val name: String = "student" name = "student" //重写非抽象方法 override def eat(): Unit = { super.eat() println("student eat") } }- 1
- 2
- 3
- 4
- 5
- 6
- 7
- 8
- 9
- 10
- 11
- 12
- 13
- 14
- 15
- 16
- 17
- 18
- 19
- 20
- 21
- 22
- 23
- 24
- 25
- 26
- 27
- 28
- 29
- 30
- 31
- 32
- 33
- 34
- 35
- 36
- 37
- 38
- 39
- 40
- 41
- 42
- 43
- 44
- 45
- 46

6.6.1 匿名抽象类
object Test10_AnnoymousClass { def main(args: Array[String]): Unit = { val person: Person10 = new Person10 { //有无override都可 override var name: String = "alice" override def eat(): Unit = println("person eat") } println(person.name) person.eat() } } // 定义抽象类 abstract class Person10 { var name: String def eat(): Unit }- 1
- 2
- 3
- 4
- 5
- 6
- 7
- 8
- 9
- 10
- 11
- 12
- 13
- 14
- 15
- 16
- 17
6.7 单例对象(伴生对象)
Scala语言是
完全面向对象的语言,所以并没有静态的操作(即在Scala中没有静态的概念)。但是为了能够和Java语言交互(因为Java中有静态概念),就产生了一种特殊的对象来模拟类对象,该对象为单例对象。若单例对象名与类名一致,则称该单例对象这个类的伴生对象,这个类的所有“静态”内容都可以放置在它的伴生对象中声明。基本语法
object Test11_Object { def main(args: Array[String]): Unit = { // val student = new Student11("alice", 18) // student.printInfo() // 实现构造方法私有化,也就是类.“静态”方法 val student1 = Student11.newStudent("alice", 18) student1.printInfo() val student2 = Student11.apply("bob", 19) student2.printInfo() val student3 = Student11("bob", 19) student3.printInfo() } } // 定义类,private表明主构造器私有化了 class Student11 private(val name: String, val age: Int){ def printInfo(): Unit = { // 注意这里的Student11.school,也就是类名.属性 println(s"student: name = ${name}, age = $age, school = ${Student11.school}") } } // 伴生对象,可以访问伴生类的私有成员和方法 object Student11{ //这个变量 就相当于java中的static修饰的静态变量 val school: String = "atguigu" // 定义一个类的对象实例的创建方法,该方法也是静态方法 def newStudent(name: String, age: Int): Student11 = new Student11(name, age) //如果参数名称是apply,则调用的时候可以省略类.apply(),直接写Student11("bob", 19) def apply(name: String, age: Int): Student11 = new Student11(name, age) }- 1
- 2
- 3
- 4
- 5
- 6
- 7
- 8
- 9
- 10
- 11
- 12
- 13
- 14
- 15
- 16
- 17
- 18
- 19
- 20
- 21
- 22
- 23
- 24
- 25
- 26
- 27
- 28
- 29
- 30
- 31
- 32
- 33
- 34
- 35
6.7.1 单例设计模式
也就是类只有一个,类中的属性先前就定义好了,写死了
object Test12_Singleton { def main(args: Array[String]): Unit = { val student1 = Student12.getInstance() student1.printInfo() val student2 = Student12.getInstance() student2.printInfo() // student1和student2的地址是相同的 println(student1) println(student2) } } class Student12 private(val name: String, val age: Int){ def printInfo(): Unit = { println(s"student: name = ${name}, age = $age, school = ${Student11.school}") } } // 饿汉式,无论Student12类是否存在,都会重新new //object Student12 { // private val student: Student12 = new Student12("alice", 18) // def getInstance(): Student12 = student //} // 懒汉式,如果单例类不存在,才会new object Student12 { // 相当于定义了静态变量student,它是Student12类型的,只有一份 private var student: Student12 = _ def getInstance(): Student12 = { if (student == null){ // 如果没有对象实例的话,就创建一个 student = new Student12("alice", 18) } student } }- 1
- 2
- 3
- 4
- 5
- 6
- 7
- 8
- 9
- 10
- 11
- 12
- 13
- 14
- 15
- 16
- 17
- 18
- 19
- 20
- 21
- 22
- 23
- 24
- 25
- 26
- 27
- 28
- 29
- 30
- 31
- 32
- 33
- 34
- 35
- 36
6.8 特质(trait)
某个类,它的
本质,就用它的父类来体现,是继承关系。比如student类的本质就用它的父类person来体现。motivation
然而,像student类,他会有young person或是old person,这两个类的特性是不一样的,在java中就定义了
接口,使类能够保持它的特性scala中没有
接口的概念,采用特质trait(特征)来代替。Scala 中的 trait 中即可以有抽象属性和方法,也可以有具体的属性和方法,一个类可以混入(mixin)多个特质。这种感觉类似于Java 中的抽象类。 Scala 引入 trait 特征,第一可以替代 Java 的接口,第二个也是对单继承机制的一种补充(有点类似于多继承的味道,但实际上还是为单继承)。基本语法
没有父类:class 类名 extends 特质 1 with 特质 2 with 特质 3有父类:class 类名 extends父类with 特质 1 with 特质 2 with 特质 3package chapter06 object Test13_Trait { def main(args: Array[String]): Unit = { val student: Student13 = new Student13 student.sayHello() student.study() student.dating() student.play() } } // 定义一个父类 class Person13 { val name: String = "person" var age: Int = 18 def sayHello(): Unit = { println("hello from: " + name) } def increase(): Unit = { println("person increase") } } // 定义一个特质 trait Young { // 声明抽象和非抽象属性 var age: Int val name: String = "young" // 声明抽象和非抽象的方法 def play(): Unit = { println(s"young people $name is playing") } def dating(): Unit } class Student13 extends Person13 with Young { // Person13中有name=person,Yong中有name=young,需要重写冲突的属性 override val name: String = "student" // 实现抽象方法 def dating(): Unit = println(s"student $name is dating") def study(): Unit = println(s"student $name is studying") // 重写父类方法 override def sayHello(): Unit = { super.sayHello() println(s"hello from: student $name") } }- 1
- 2
- 3
- 4
- 5
- 6
- 7
- 8
- 9
- 10
- 11
- 12
- 13
- 14
- 15
- 16
- 17
- 18
- 19
- 20
- 21
- 22
- 23
- 24
- 25
- 26
- 27
- 28
- 29
- 30
- 31
- 32
- 33
- 34
- 35
- 36
- 37
- 38
- 39
- 40
- 41
- 42
- 43
- 44
- 45
- 46
- 47
- 48

6.8.1 多特质(mixin)动态混入
package chapter06 object Test14_TraitMixin { def main(args: Array[String]): Unit = { val student = new Student14 student.study() student.increase() student.play() student.increase() student.dating() student.increase() println("===========================") // 动态混入,也就是要什么特性就给什么特质 val studentWithTalent = new Student14 with Talent { override def dancing(): Unit = println("student is good at dancing") override def singing(): Unit = println("student is good at singing") } studentWithTalent.sayHello() studentWithTalent.play() studentWithTalent.study() studentWithTalent.dating() studentWithTalent.dancing() studentWithTalent.singing() } } // 再定义一个特质 trait Knowledge { var amount: Int = 0 def increase(): Unit } trait Talent { def singing(): Unit def dancing(): Unit } class Student14 extends Person13 with Young with Knowledge { // 重写冲突的属性 override val name: String = "student" // 实现抽象方法 def dating(): Unit = println(s"student $name is dating") def study(): Unit = println(s"student $name is studying") // 重写父类方法 override def sayHello(): Unit = { super.sayHello() println(s"hello from: student $name") } // 实现特质中的抽象方法 override def increase(): Unit = { amount += 1 println(s"student $name knowledge increased: $amount") } }- 1
- 2
- 3
- 4
- 5
- 6
- 7
- 8
- 9
- 10
- 11
- 12
- 13
- 14
- 15
- 16
- 17
- 18
- 19
- 20
- 21
- 22
- 23
- 24
- 25
- 26
- 27
- 28
- 29
- 30
- 31
- 32
- 33
- 34
- 35
- 36
- 37
- 38
- 39
- 40
- 41
- 42
- 43
- 44
- 45
- 46
- 47
- 48
- 49
- 50
- 51
- 52
- 53
- 54
- 55
- 56
- 57
- 58
- 59
- 60
6.8.2 特质的叠加

由于一个类可以混入(mixin)多个 trait,且 trait 中可以有具体的属性和方法,若混入的特质中具有
相同的方法(方法名,参数列表,返回值均相同),必然会出现继承冲突问题。 冲突分为以下两种:解决这类冲突问题,直接在类(Sub)中重写冲突方法。

所谓的“钻石问题”,解决这类冲突问题,Scala 采用了
特质叠加的策略。package chapter06 object Test15_TraitOverlying { def main(args: Array[String]): Unit = { // 钻石问题特征叠加 val myFootBall = new MyFootBall println(myFootBall.describe()) } } // 定义球类特征 trait Ball { def describe(): String = "ball" } // 定义颜色特征 trait ColorBall extends Ball { var color: String = "red" override def describe(): String = color + "-" + super.describe() } // 定义种类特征 trait CategoryBall extends Ball { var category: String = "foot" override def describe(): String = category + "-" + super.describe() } // 定义一个自定义球的类 class MyFootBall extends CategoryBall with ColorBall { override def describe(): String = "my ball is a " + super[CategoryBall].describe() }- 1
- 2
- 3
- 4
- 5
- 6
- 7
- 8
- 9
- 10
- 11
- 12
- 13
- 14
- 15
- 16
- 17
- 18
- 19
- 20
- 21
- 22
- 23
- 24
- 25
- 26
- 27
- 28
- 29
- 30

案例中的 super,不是表示其父特质对象,而是表示上述叠加顺序中的下一个特质, 即,MyClass 中的 super 指代
Color,Color 中的 super 指代Category,Category 中的 super 指代Ball。6.8.3 指定super
除了上面的推断外,也可以
指定使用哪个父类的方法
6.8.4 特质和抽象类的区别
- 优先使用特质。一个类扩展
多个特质是很方便的,但却只能扩展一个抽象类。 - 如果你需要
构造函数参数,使用抽象类。因为抽象类可以定义带参数的构造函数, 而特质不行(有无参构造)。
6.8.5 特质自身类型
自身类型可实现
依赖注入的功能。object Test16_TraitSelfType { def main(args: Array[String]): Unit = { val user = new RegisterUser("alice", "123456") user.insert() } } // 用户类 class User(val name: String, val password: String) trait UserDao { // 相当于依赖注入的效果 _只是一个通配符 表示UserDao会用到User,但它们没有继承关系 _: User => // 向数据库插入数据 def insert(): Unit = { // 使用this来调用User println(s"insert into db: ${this.name}") } } // 定义注册用户类 class RegisterUser(name: String, password: String) extends User(name, password) with UserDao- 1
- 2
- 3
- 4
- 5
- 6
- 7
- 8
- 9
- 10
- 11
- 12
- 13
- 14
- 15
- 16
- 17
- 18
- 19
- 20
- 21
- 22
- 23
6.9 扩展
6.9.1 类型检查和转换
-
obj.isInstanceOf[T]:判断 obj 是不是 T 类型。
-
obj.asInstanceOf[T]:将 obj 强转成 T 类型。
-
classOf 获取对象的类名。
6.9.2 枚举类和应用类
// 定义枚举类对象 object WorkDay extends Enumeration { // 1,2表示键,也就是底层的存储 val MONDAY = Value(1, "Monday") val TUESDAY = Value(2, "TuesDay") } // 定义应用类对象 object TestApp extends App { println("app start") // type 起别名 type MyString = String val a: MyString = "abc" println(a) } // 2. 测试枚举类,直接引用就行 println(WorkDay.MONDAY)- 1
- 2
- 3
- 4
- 5
- 6
- 7
- 8
- 9
- 10
- 11
- 12
- 13
- 14
- 15
- 16
- 17
- 18
7 集合
- Scala 的集合有三大类:
序列 Seq、集 Set、映射 Map,所有的集合都扩展自Iterable特质。 - 对于几乎所有的
集合类,Scala 都同时提供了可变和不可变的版本,分别位于以下两 个包(scala.collection.immutable、scala.collection.mutable) - Scala
不可变集合,就是指该集合对象不可修改,每次修改就会返回一个新对象,而 不会对原对象进行修改。类似于 java 中的 String 对象 - 可变集合,就是这个集合可以
直接对原对象进行修改,而不会返回新的对象。类似 于 java 中 StringBuilder 对象
建议
在操作集合的时候,
不可变用符号,可变用方法7.1 不可变集合继承图

7.2 可变集合继承图
7.3 数组 相当于JAVA中的List
7.3.1 不可变数组
并不是说数组的值不可以修改,而是指向该数组的
地址是不变的创建数组
val arr1 = new Array[Int](10) // 这里调用的是Array.apply()方法 val arr2 = Array(1,54,46,15,45)- 1
- 2
- 3
数组遍历和访问
// 数组访问 println(arr(0)) // 3. 数组的遍历 // 1) 普通for循环 until前闭后开 for (i <- 0 until arr.length){ println(arr(i)) } for (i <- arr.indices) println(arr(i)) println("---------------------") // 2) 直接遍历所有元素,增强for循环 for (elem <- arr2) println(elem) println("---------------------") // 3) 迭代器 val iter = arr2.iterator while (iter.hasNext) println(iter.next()) println("---------------------") // 4) 调用foreach方法 arr2.foreach( (elem: Int) => println(elem) ) arr.foreach( println ) println(arr2.mkString("--")) //打印结果为12--37--42--58--97- 1
- 2
- 3
- 4
- 5
- 6
- 7
- 8
- 9
- 10
- 11
- 12
- 13
- 14
- 15
- 16
- 17
- 18
- 19
- 20
- 21
数组添加
// 4. 添加元素,在数组后面加用:+ val newArr = arr2.:+(73) // arr2是不变的 println(arr2.mkString("--")) println(newArr.mkString("--")) // 在数组前面添加元素用+: val newArr2 = newArr.+:(30) println(newArr2.mkString("--")) //所有的运算符也是函数,可以省略() val newArr3 = newArr2 :+ 15 // +一定在数字那边 val newArr4 = 19 +: 29 +: newArr3 :+ 26 :+ 73 println(newArr4.mkString(", "))- 1
- 2
- 3
- 4
- 5
- 6
- 7
- 8
- 9
- 10
- 11
- 12
- 13
7.3.2 可变数组
创建数组
val arr1: ArrayBuffer[Int] = new ArrayBuffer[Int]() val arr2 = ArrayBuffer(23, 57, 92) //直接使用println可以输出 println(arr2)- 1
- 2
- 3
- 4
数组遍历和访问
// 遍历和访问同不可变数组 println(arr2(1))- 1
- 2
添加元素
// 3. 添加元素 val newArr1 = arr1 :+ 15 // arr1依旧是不变的 println(arr1) println(newArr1) println(arr1 == newArr1) // 对于可变数组而言,非常不推荐将返回的值再赋给另外一个变量============= val newArr2 = arr1 += 19 // arr1 改变了 println(arr1) println(newArr2) // 是一个东西 结果为true println(arr1 == newArr2) // 如果newArr2改变了 newArr2 += 13 // arr1 也会改变 println(arr1) // 在数组前面添加元素 77 +=: arr1 println(arr1) println(newArr2) // 在后面添加=======================可变数组推荐使用方法=============== arr1.append(36) // 在前面添加 arr1.prepend(11, 76) // 在索引为1的位置添加13和39 arr1.insert(1, 13, 59) println(arr1) // 在索引为2的位置,添加一个数组 arr1.insertAll(2, newArr1) // 在前面添加一个数组 arr1.prependAll(newArr2) // 在后面添加一个数组 arr1.appendAll(newArr2)- 1
- 2
- 3
- 4
- 5
- 6
- 7
- 8
- 9
- 10
- 11
- 12
- 13
- 14
- 15
- 16
- 17
- 18
- 19
- 20
- 21
- 22
- 23
- 24
- 25
- 26
- 27
- 28
- 29
- 30
- 31
- 32
- 33
- 34
删除元素
// 4. 删除索引3的元素 arr1.remove(3) println(arr1) // 从索引0开始删除10个数 arr1.remove(0, 10) println(arr1) // 删除第一个值为13的数,如果13不在数组内,啥也不做 arr1 -= 13- 1
- 2
- 3
- 4
- 5
- 6
- 7
- 8
7.3.3 可变数组和不可变数组的转换
// 5. 可变数组转换为不可变数组toArray val arr: ArrayBuffer[Int] = ArrayBuffer(23, 56, 98) val newArr: Array[Int] = arr.toArray println(newArr.mkString(", ")) println(arr)- 1
- 2
- 3
- 4
- 5
// 6. 不可变数组转换为可变数组toBuffer val buffer: mutable.Buffer[Int] = newArr.toBuffer println(buffer) println(newArr)- 1
- 2
- 3
- 4
7.3.4 多维数组
// 1. 创建二维数组 val array: Array[Array[Int]] = Array.ofDim[Int](2, 3) // 2. 访问元素 array(0)(2) = 19 array(1)(0) = 25 // 3.遍历二维数组 println(array.mkString(", ")) for (i <- 0 until array.length; j <- 0 until array(i).length){ println(array(i)(j)) } for (i <- array.indices; j <- array(i).indices){ print(array(i)(j) + "\t") if (j == array(i).length - 1) println() } array.foreach(line => line.foreach(println)) // 简化写法 array.foreach(_.foreach(println))- 1
- 2
- 3
- 4
- 5
- 6
- 7
- 8
- 9
- 10
- 11
- 12
- 13
- 14
- 15
- 16
- 17
- 18
7.4 列表 相当于JAVA中的LinkedList
7.4.1 不可变列表
创建list
// 1. 创建一个List,不能new,只能使用伴生对象的.apply方法 val list1 = List(23, 65, 87) println(list1) // List(73,32) val list6 = 73 :: 32 :: Nil // List(17,28,59,6 ) val list7 = 17 :: 28 :: 59 :: 16 :: Nil- 1
- 2
- 3
- 4
- 5
- 6
- 7
访问和遍历list
// 2. 访问和遍历元素 println(list1(1)) // 无法修改元素的值 list1(1) = 12 list1.foreach(println)- 1
- 2
- 3
- 4
添加元素
val list2 = 10 +: list1 val list3 = list1 :+ 23 println(list1) println(list2) println(list3) println("==================") // 调用特殊的方法::将51放在list的前面 val list4 = list2.::(51) println(list4) // 一般用Nil.::(元素)在创建新list val list5 = Nil.::(13) println(list5) // List(73,32) val list6 = 73 :: 32 :: Nil // List(17,28,59,16) val list7 = 17 :: 28 :: 59 :: 16 :: Nil println(list7)- 1
- 2
- 3
- 4
- 5
- 6
- 7
- 8
- 9
- 10
- 11
- 12
- 13
- 14
- 15
- 16
- 17
合并列表
// 4. 合并列表 // List(73,32) val list6 = 73 :: 32 :: Nil // List(17,28,59,16) val list7 = 17 :: 28 :: 59 :: 16 :: Nil val list8 = list6 :: list7 // list8=List(List(73,32),17,28,59,16) println(list8) // list9=List(73,32,17,28,59,16) val list9 = list6 ::: list7 println(list9) // 结果同上 val list10 = list6 ++ list7 println(list10)- 1
- 2
- 3
- 4
- 5
- 6
- 7
- 8
- 9
- 10
- 11
- 12
- 13
- 14
7.4.2可变列表
// 1. 创建可变列表 val list1: ListBuffer[Int] = new ListBuffer[Int]() val list2 = ListBuffer(12, 53, 75) println(list1) println(list2) println("==============") // 2. 添加元素 list1.append(15, 62) list2.prepend(20) // 在索引为1的位置加19,22 list1.insert(1, 19, 22) println(list1) println(list2) println("==============") 31 +=: 96 +=: list1 += 25 += 11 println(list1) println("==============") // 3. 合并list val list3 = list1 ++ list2 // list1 list2并不更改 println(list1) println(list2) println("==============") // list2改变,因为有:是从右到左改变 list1 ++=: list2 println(list1) println(list2) println("==============") // 4. 修改索引为3的元素 list2(3) = 30 // 修改索引为0的元素为89 list2.update(0, 89) println(list2) // 5. 删除元素 list2.remove(2) // 指定删除值为25的值 list2 -= 25 println(list2)- 1
- 2
- 3
- 4
- 5
- 6
- 7
- 8
- 9
- 10
- 11
- 12
- 13
- 14
- 15
- 16
- 17
- 18
- 19
- 20
- 21
- 22
- 23
- 24
- 25
- 26
- 27
- 28
- 29
- 30
- 31
- 32
- 33
- 34
- 35
- 36
- 37
- 38
- 39
- 40
- 41
- 42
- 43
- 44
7.5 集合Set
7.5.1 不可变集合
// 1. 创建set,重复的数据会自动删除,且是乱序的 val set1 = Set(13, 23, 53, 12, 13, 23, 78) println(set1) println("==================") // 2. 添加元素 val set2 = set1 + 129 println(set1) println(set2) println("==================") // 3. 合并set val set3 = Set(19, 13, 23, 53, 67, 99) val set4 = set2 ++ set3 println(set2) println(set3) println(set4) // 4. 删除元素 val set5 = set3 - 13 println(set3) println(set5)- 1
- 2
- 3
- 4
- 5
- 6
- 7
- 8
- 9
- 10
- 11
- 12
- 13
- 14
- 15
- 16
- 17
- 18
- 19
- 20
- 21
- 22
- 23
7.5.2 可变集合
// 1. 创建set,使用mutable.Set val set1: mutable.Set[Int] = mutable.Set(13, 23, 53, 12, 13, 23, 78) println(set1) println("==================") // 2. 添加元素 val set2 = set1 + 11 // set1并没有改变 println(set1) println(set2) // set1改变了 set1 += 11 println(set1) // 修改了set就返回true val flag1 = set1.add(10) println(flag1) println(set1) val flag2 = set1.add(10) println(flag2) println(set1) println("==================") // 3. 删除元素 set1 -= 11 println(set1) val flag3 = set1.remove(10) println(flag3) println(set1) val flag4 = set1.remove(10) println(flag4) println(set1) println("==================") // 4. 合并两个Set,set1改变set2不变 set1 ++= set2- 1
- 2
- 3
- 4
- 5
- 6
- 7
- 8
- 9
- 10
- 11
- 12
- 13
- 14
- 15
- 16
- 17
- 18
- 19
- 20
- 21
- 22
- 23
- 24
- 25
- 26
- 27
- 28
- 29
- 30
- 31
- 32
- 33
- 34
- 35
7.6 Map
7.6.1 不可变Map
// 1. 创建map val map1: Map[String, Int] = Map("a" -> 13, "b" -> 25, "hello" -> 3) println(map1) println(map1.getClass) //class scala.collection.immutable.Map$Map3 println("==========================") // 2. 遍历元素 map1.foreach(println) map1.foreach( (kv: (String, Int)) => println(kv) ) println("============================") // 3. 取map中所有的key 或者 value for (key <- map1.keys){ println(s"$key ---> ${map1.get(key)}") //输出为a ---> Some(13) } // 4. 访问某一个key的value println("a: " + map1.get("a").get) //获得具体的值map1.get("a").get) // 获得key为a的值 println(map1("a")) println("c: " + map1.get("c")) // 如果c不存在,返回0 println("c: " + map1.getOrElse("c", 0))- 1
- 2
- 3
- 4
- 5
- 6
- 7
- 8
- 9
- 10
- 11
- 12
- 13
- 14
- 15
- 16
- 17
- 18
- 19
- 20
7.6.2 可变Map
// 1. 创建map val map1: mutable.Map[String, Int] = mutable.Map("a" -> 13, "b" -> 25, "hello" -> 3) println(map1) println(map1.getClass) // class scala.collection.mutable.HashMap println("==========================") // 2. 添加元素 map1.put("c", 5) map1.put("d", 9) println(map1) // 注意是使用(()),原因是若只加一个(),编译器会以为省略了一个(),中间的内容又是另外一个函数,也就是两个函数 map1 += (("e", 7)) println(map1) println("====================") // 3. 删除元素 println(map1("c")) map1.remove("c") println(map1.getOrElse("c", 0)) map1 -= "d" println(map1) println("====================") // 4. 修改元素 map1.update("c", 5) map1.update("e", 10) println(map1) println("====================") // 5. 合并两个Map,map2是不可变的 val map2: Map[String, Int] = Map("aaa" -> 11, "b" -> 29, "hello" -> 5) // map1修改 map1 ++= map2 println(map1) println(map2) println("---------------------------") val map3: Map[String, Int] = map2 ++ map1 println(map1) println(map2) println(map3)- 1
- 2
- 3
- 4
- 5
- 6
- 7
- 8
- 9
- 10
- 11
- 12
- 13
- 14
- 15
- 16
- 17
- 18
- 19
- 20
- 21
- 22
- 23
- 24
- 25
- 26
- 27
- 28
- 29
- 30
- 31
- 32
- 33
- 34
- 35
- 36
- 37
- 38
- 39
- 40
7.7 元组
元组也是可以理解为一个容器,可以存放各种相同或不同类型的数据。元组中最大只能有
22个元素。// 1. 创建元组 val tuple: (String, Int, Char, Boolean) = ("hello", 100, 'a', true) println(tuple) // 2. 访问数据,从下标1开始 println(tuple._1) println(tuple._2) println(tuple._3) println(tuple._4) println(tuple.productElement(1)) println("====================") // 3. 遍历元组数据 for (elem <- tuple.productIterator) println(elem) // 4. 嵌套元组 val mulTuple = (12, 0.3, "hello", (23, "scala"), 29) println(mulTuple._4._2)- 1
- 2
- 3
- 4
- 5
- 6
- 7
- 8
- 9
- 10
- 11
- 12
- 13
- 14
- 15
- 16
- 17
- 18
- 19
- 20
7.8 集合函数
7.8.1 常用函数
val list = List(1,3,5,7,2,89) val set = Set(23,34,423,75) // (1)获取集合长度,只有线性序列才有的属性 println(list.length) // (2)获取集合大小 set不能获取长度 println(set.size) // (3)循环遍历 for (elem <- list) println(elem) set.foreach(println) // (4)迭代器 for (elem <- list.iterator) println(elem) println("====================") // (5)生成字符串 println(list) println(set) println(list.mkString("--")) // (6)是否包含 println(list.contains(23)) println(set.contains(23))- 1
- 2
- 3
- 4
- 5
- 6
- 7
- 8
- 9
- 10
- 11
- 12
- 13
- 14
- 15
- 16
- 17
- 18
- 19
- 20
- 21
- 22
- 23
- 24
- 25
- 26
- 27
7.8.2 衍生操作
val list1 = List(1,3,5,7,2,89) val list2 = List(3,7,2,45,4,8,19) // (1)获取集合的头1 println(list1.head) // (2)获取集合的尾(不是头的就是尾)List(3, 5, 7, 2, 89) println(list1.tail) // (3)集合最后一个数据19 println(list2.last) // (4)集合初始数据(不包含最后一个)List(3, 7, 2, 45, 4, 8) println(list2.init) // (5)反转List(89, 2, 7, 5, 3, 1) println(list1.reverse) // (6)取前(后)n个元素 println(list1.take(3)) println(list1.takeRight(4)) // (7)去掉前(后)n个元素 println(list1.drop(3)) println(list1.dropRight(4)) println("=========================") // (8)并集 val union = list1.union(list2) println("union: " + union) println(list1 ::: list2) // 如果是set做并集,会去重 val set1 = Set(1,3,5,7,2,89) val set2 = Set(3,7,2,45,4,8,19) val union2 = set1.union(set2) println("union2: " + union2) println(set1 ++ set2) println("-----------------------") // (9)交集 val intersection = list1.intersect(list2) println("intersection: " + intersection) println("-----------------------") // (10)差集,存在一个集合中(list1),但不存在另外一个集合中(list2) val diff1 = list1.diff(list2) val diff2 = list2.diff(list1) println("diff1: " + diff1) println("diff2: " + diff2) println("-----------------------") // (11)拉链(a,b,c) (d,e,f,g) => ((a,d),(b,e),(c,f)) println("zip: " + list1.zip(list2))//List((1,3), (3,7), (5,2), (7,45), (2,4), (89,8)) println("zip: " + list2.zip(list1))//List((3,1), (7,3), (2,5), (45,7), (4,2), (8,89)) println("-----------------------") // (12)滑窗,一定划过整个数组 // list1(1,3,5,7,2,89) => (1, 3, 5) (3, 5, 7) (5, 7, 2) (7, 2, 89) for (elem <- list1.sliding(3)) println(elem) println("-----------------------") // 窗口大小为4,每次滑动2个 for (elem <- list2.sliding(4, 2)) println(elem) println("-----------------------") for (elem <- list2.sliding(3, 3)) println(elem)- 1
- 2
- 3
- 4
- 5
- 6
- 7
- 8
- 9
- 10
- 11
- 12
- 13
- 14
- 15
- 16
- 17
- 18
- 19
- 20
- 21
- 22
- 23
- 24
- 25
- 26
- 27
- 28
- 29
- 30
- 31
- 32
- 33
- 34
- 35
- 36
- 37
- 38
- 39
- 40
- 41
- 42
- 43
- 44
- 45
- 46
- 47
- 48
- 49
- 50
- 51
- 52
- 53
- 54
- 55
- 56
- 57
- 58
- 59
- 60
- 61
- 62
- 63
- 64
- 65
- 66
- 67
- 68
- 69
- 70
7.8.3 数学操作
val list = List(5,1,8,2,-3,4) val list2 = List(("a", 5), ("b", 1), ("c", 8), ("d", 2), ("e", -3), ("f", 4)) // (1)求和 var sum = 0 for (elem <- list){ sum += elem } println(sum) println(list.sum) // (2)求乘积 println(list.product) // (3)最大值 println(list.max) // 指定怎样找到最大值,比如看第二个字段 println(list2.maxBy( (tuple: (String, Int)) => tuple._2 )) println(list2.maxBy( _._2 )) // (4)最小值 println(list.min) println(list2.minBy(_._2)) println("========================") // (5)排序 // 5.1 sorted val sortedList = list.sorted println(sortedList) // 从大到小逆序排序 println(list.sorted.reverse) // 传入隐式参数 println(list.sorted(Ordering[Int].reverse)) println(list2.sorted) // 5.2 sortBy设置排序的方式 println(list2.sortBy(_._2)) println(list2.sortBy(_._2)(Ordering[Int].reverse)) // 5.3 sortWith println(list.sortWith( (a: Int, b: Int) => {a < b} )) // 从小到大 println(list.sortWith( _ < _ )) println(list.sortWith( _ > _))- 1
- 2
- 3
- 4
- 5
- 6
- 7
- 8
- 9
- 10
- 11
- 12
- 13
- 14
- 15
- 16
- 17
- 18
- 19
- 20
- 21
- 22
- 23
- 24
- 25
- 26
- 27
- 28
- 29
- 30
- 31
- 32
- 33
- 34
- 35
- 36
- 37
- 38
- 39
- 40
- 41
- 42
- 43
- 44
- 45
7.8.4 map操作
val list = List(0,1,2,3,4,5,6,7,8,9) // 1. 过滤filter // 选取偶数 val evenList = list.filter( (elem: Int) => {elem % 2 == 0} ) println(evenList) // 选取奇数 println(list.filter( _ % 2 == 1 )) println("=======================") // 2. 映射map // 把集合中每个数乘2 println(list.map(_ * 2)) println(list.map( x => x * x)) println("=======================") // 3. 扁平化flatten val nestedList: List[List[Int]] = List(List(1,2,3),List(4,5),List(6,7,8,9)) val flatList = nestedList(0) ::: nestedList(1) ::: nestedList(2) println(flatList) val flatList2 = nestedList.flatten println(flatList2) println("=======================") // 4. 扁平映射flatMap // 将一组字符串进行分词,并保存成单词的列表 val strings: List[String] = List("hello world", "hello scala", "hello java", "we study") val splitList: List[Array[String]] = strings.map( _.split(" ") ) // 分词 val flattenList = splitList.flatten // 打散扁平化 println(flattenList) val flatmapList = strings.flatMap(_.split(" ")) println(flatmapList) println("========================") // 5. 分组groupBy // 分成奇偶两组Map(1 -> List(1, 3, 5, 7, 9), 0 -> List(0, 2, 4, 6, 8)) val groupMap: Map[Int, List[Int]] = list.groupBy( _ % 2) // Map(奇数 -> List(1, 3, 5, 7, 9), 偶数 -> List(0, 2, 4, 6, 8)) val groupMap2: Map[String, List[Int]] = list.groupBy( data => if (data % 2 == 0) "偶数" else "奇数") println(groupMap) println(groupMap2) // 给定一组词汇,按照单词的首字母进行分组groupBy // Map(b -> List(bob), j -> List(japan), a -> List(america, alice), c -> List(china, canada, cary)) val wordList = List("china", "america", "alice", "canada", "cary", "bob", "japan") println( wordList.groupBy( _.charAt(0) ) )- 1
- 2
- 3
- 4
- 5
- 6
- 7
- 8
- 9
- 10
- 11
- 12
- 13
- 14
- 15
- 16
- 17
- 18
- 19
- 20
- 21
- 22
- 23
- 24
- 25
- 26
- 27
- 28
- 29
- 30
- 31
- 32
- 33
- 34
- 35
- 36
- 37
- 38
- 39
- 40
- 41
- 42
- 43
- 44
- 45
- 46
- 47
- 48
- 49
7.8.5 reduce操作
fold和reduce的区别就是fold是具有初始值的,是以初始值为主的计算// 1. reduce 示例为求和 println(list.reduce( _ + _ )) // 从左往右算 println(list.reduceLeft(_ + _)) // 从右往左算 println(list.reduceRight(_ + _)) println("===========================") val list2 = List(3,4,5,8,10) // 从左往右减 println(list2.reduce(_ - _)) // -24 println(list2.reduceLeft(_ - _)) // 底层代码是递归调用 println(list2.reduceRight(_ - _)) // 3 - (4 - (5 - (8 - 10))), 6 println("===========================") // 2. fold有初始值 println(list.fold(10)(_ + _)) // 10 + 1 + 2 + 3 + 4 println(list.foldLeft(10)(_ - _)) // 10 - 1 - 2 - 3 - 4 println(list2.foldRight(11)(_ - _)) // 3 - (4 - (5 - (8 - (10 - 11)))), -5- 1
- 2
- 3
- 4
- 5
- 6
- 7
- 8
- 9
- 10
- 11
- 12
- 13
- 14
- 15
- 16
- 17
- 18
- 19
- 20
7.8.6 map合并
val map1 = Map("a" -> 1, "b" -> 3, "c" -> 6) val map2 = mutable.Map("a" -> 6, "b" -> 2, "c" -> 9, "d" -> 3) //println(map1 ++ map2) 值就是map2 // 以map2作为初始值,底层是递归调用的,所以map2应当为可变Map // 因为fold中两个类型必须一样,所以使用foldLeft val map3 = map1.foldLeft(map2)( // mergedMap表示结果,初始值为map2,kv表示的是map1中的元素 (mergedMap, kv) => { val key = kv._1 val value = kv._2 println(kv._1+' '+kv._2) mergedMap(key) = mergedMap.getOrElse(key, 0) + value mergedMap }- 1
- 2
- 3
- 4
- 5
- 6
- 7
- 8
- 9
- 10
- 11
- 12
- 13
- 14
- 15
7.8.7 单词统计
val stringList: List[String] = List( "hello", "hello world", "hello scala", "hello spark from scala", "hello flink from scala" ) // 1. 对字符串进行切分,得到一个打散所有单词的列表 // val wordList1: List[Array[String]] = stringList.map(_.split(" ")) // val wordList2: List[String] = wordList1.flatten // println(wordList2) val wordList:List[String] = stringList.flatMap(_.split(" ")) println(wordList) // 2. 相同的单词进行分组,groupBy传入的函数就是(word返回值为它自己) val groupMap: Map[String, List[String]] = wordList.groupBy(word => word) println(groupMap) // 3. 对分组之后的list取长度,得到每个单词的个数 val countMap: Map[String, Int] = groupMap.map(kv => (kv._1, kv._2.length)) println(countMap) // 4. 将map转换为list,并排序取前3 val sortList: List[(String, Int)] = countMap.toList .sortWith( _._2 > _._2 ) .take(3) println(sortList)- 1
- 2
- 3
- 4
- 5
- 6
- 7
- 8
- 9
- 10
- 11
- 12
- 13
- 14
- 15
- 16
- 17
- 18
- 19
- 20
- 21
- 22
- 23
- 24
- 25
- 26
- 27
- 28
结果
List(hello, hello, world, hello, scala, hello, spark, from, scala, hello, flink, from, scala)
Map(world -> List(world), flink -> List(flink), spark -> List(spark), scala -> List(scala, scala, scala), from -> List(from, from), hello -> List(hello, hello, hello, hello, hello))
Map(world -> 1, flink -> 1, spark -> 1, scala -> 3, from -> 2, hello -> 5)
List((hello,5), (scala,3), (from,2))7.8.8 复杂单词统计
// 1. 将字符串打散为单词,并结合对应的个数包装成二元组 val preCountList: List[(String, Int)] = tupleList.flatMap( tuple => { val strings: Array[String] = tuple._1.split(" ") strings.map( word => (word, tuple._2) ) } ) println(preCountList) // 2. 对二元组按照单词进行分组 val preCountMap: Map[String, List[(String, Int)]] = preCountList.groupBy( _._1 ) println(preCountMap) // 3. 叠加每个单词预统计的个数值 val countMap: Map[String, Int] = preCountMap.mapValues( tupleList => tupleList.map(_._2).sum ) println(countMap) // 4. 转换成list,排序取前3 val countList = countMap.toList .sortWith(_._2 > _._2) .take(3) println(countList)- 1
- 2
- 3
- 4
- 5
- 6
- 7
- 8
- 9
- 10
- 11
- 12
- 13
- 14
- 15
- 16
- 17
- 18
- 19
- 20
- 21
- 22
- 23
7.9 队列
// 创建一个可变队列 val queue: mutable.Queue[String] = new mutable.Queue[String]() queue.enqueue("a", "b", "c") println(queue) println(queue.dequeue()) println(queue) println(queue.dequeue()) println(queue) queue.enqueue("d", "e") println(queue) println(queue.dequeue()) println(queue) println("==========================") // 不可变队列 val queue2: Queue[String] = Queue("a", "b", "c") val queue3 = queue2.enqueue("d") println(queue2) println(queue3)- 1
- 2
- 3
- 4
- 5
- 6
- 7
- 8
- 9
- 10
- 11
- 12
- 13
- 14
- 15
- 16
- 17
- 18
- 19
- 20
- 21
- 22
- 23
- 24
7.10 并行集合
// 串行执行Vector(1, 1, 1, 1, 1, 1, 1, 1, 1, 1, 1...) val result: immutable.IndexedSeq[Long] = (1 to 100).map( x => Thread.currentThread.getId ) println(result) // 并行执行ParVector(12, 12, 12, 12, 12, 12, 18, 18, 16, 16, 16, 19, 19...) val result2: ParSeq[Long] = (1 to 100).par.map( x => Thread.currentThread.getId ) println(result2)- 1
- 2
- 3
- 4
- 5
- 6
- 7
- 8
- 9
- 10
8 模式匹配
代替了JAVA中的switch case
- 如果所有 case 都不匹配,那么会执行 case _ 分支,类似于 Java 中 default 语句, 若此时没有 case _ 分支,那么会抛出 MatchError。
- 每个 case 中,不需要使用 break 语句,
自动中断 case。 - match case 语句可以
匹配任何类型,而不只是字面量。 - => 后面的代码块,直到下一个 case 语句之前的代码是作为一个整体执行,可以 使用{}括起来,也可以不括。
8.1 基本语法
// 1. 基本定义语法 val x: Int = 5 val y: String = x match { case 1 => "one" case 2 => "two" case 3 => "three" case _ => "other" } println(y) // 2. 示例:用模式匹配实现简单二元运算 val a = 25 val b = 13 def matchDualOp(op: Char): Int = op match { case '+' => a + b case '-' => a - b case '*' => a * b case '/' => a / b case '%' => a % b case _ => -1 } println(matchDualOp('+')) println(matchDualOp('/')) println(matchDualOp('\\')) println("=========================")- 1
- 2
- 3
- 4
- 5
- 6
- 7
- 8
- 9
- 10
- 11
- 12
- 13
- 14
- 15
- 16
- 17
- 18
- 19
- 20
- 21
- 22
- 23
- 24
- 25
- 26
- 27
- 28
8.2 模式守卫
// 3. 模式守卫 也就是加了个判断 // 求一个整数的绝对值 def abs(num: Int): Int = { num match { case i if i >= 0 => i case i if i < 0 => -i } } println(abs(67)) println(abs(0)) println(abs(-24))- 1
- 2
- 3
- 4
- 5
- 6
- 7
- 8
- 9
- 10
- 11
- 12
8.3 匹配类型
package chapter08 object Test02_MatchTypes { def main(args: Array[String]): Unit = { // 1. 匹配常量 def describeConst(x: Any): String = x match { case 1 => "Int one" case "hello" => "String hello" case true => "Boolean true" case '+' => "Char +" case _ => "" } println(describeConst("hello")) println(describeConst('+')) println(describeConst(0.3)) println("==================================") // 2. 匹配类型 def describeType(x: Any): String = x match { case i: Int => "Int " + i case s: String => "String " + s // JVM中存在泛型擦除,也就是只能识别List,而不能识别其中的类型 case list: List[String] => "List " + list // 可以识别Array及其内的元素类型 case array: Array[Int] => "Array[Int] " + array.mkString(",") case a => "Something else: " + a } println(describeType(35)) println(describeType("hello")) println(describeType(List("hi", "hello"))) println(describeType(List(2, 23))) println(describeType(Array("hi", "hello"))) println(describeType(Array(2, 23))) // 3. 匹配数组 for (arr <- List( Array(0), Array(1, 0), Array(0, 1, 0), Array(1, 1, 0), Array(2, 3, 7, 15), Array("hello", 1, 30), )) { val result = arr match { case Array(0) => "0" case Array(1, 0) => "Array(1, 0)" case Array(x, y) => "Array: " + x + ", " + y // 匹配两元素数组 case Array(0, _*) => "以0开头的数组" case Array(x, 1, z) => "中间为1的三元素数组" case _ => "something else" } println(result) } println("=========================") // 4. 匹配列表 // 方式一 for (list <- List( List(0), List(1, 0), List(0, 0, 0), List(1, 1, 0), List(88), List("hello") )) { val result = list match { case List(0) => "0" case List(x, y) => "List(x, y): " + x + ", " + y case List(0, _*) => "List(0, ...)" // list中有一个元素 case List(a) => "List(a): " + a case _ => "something else" } println(result) } // 方式二 val list1 = List(1, 2, 5, 7, 24) val list = List(24) list1 match { //first: 1, second: 2, rest: List(5, 7, 24) case first :: second :: rest => println(s"first: $first, second: $second, rest: $rest") case _ => println("something else") } println("===========================") // 5. 匹配元组 for (tuple <- List( (0, 1), (0, 0), (0, 1, 0), (0, 1, 1), (1, 23, 56), ("hello", true, 0.5) )){ val result = tuple match { case (a, b) => "" + a + ", " + b case (0, _) => "(0, _)" case (a, 1, _) => "(a, 1, _) " + a case (x, y, z) => "(x, y, z) " + x + " " + y + " " + z case _ => "something else" } println(result) } } }- 1
- 2
- 3
- 4
- 5
- 6
- 7
- 8
- 9
- 10
- 11
- 12
- 13
- 14
- 15
- 16
- 17
- 18
- 19
- 20
- 21
- 22
- 23
- 24
- 25
- 26
- 27
- 28
- 29
- 30
- 31
- 32
- 33
- 34
- 35
- 36
- 37
- 38
- 39
- 40
- 41
- 42
- 43
- 44
- 45
- 46
- 47
- 48
- 49
- 50
- 51
- 52
- 53
- 54
- 55
- 56
- 57
- 58
- 59
- 60
- 61
- 62
- 63
- 64
- 65
- 66
- 67
- 68
- 69
- 70
- 71
- 72
- 73
- 74
- 75
- 76
- 77
- 78
- 79
- 80
- 81
- 82
- 83
- 84
- 85
- 86
- 87
- 88
- 89
- 90
- 91
- 92
- 93
- 94
- 95
- 96
- 97
- 98
- 99
- 100
- 101
- 102
- 103
- 104
- 105
- 106
- 107
- 108
- 109
- 110
- 111
- 112
- 113
8.4 应用时匹配
package chapter08 object Test03_MatchTupleExtend { def main(args: Array[String]): Unit = { // 1. 在变量声明时匹配 val (x, y) = (10, "hello") println(s"x: $x, y: $y") val List(first, second, _*) = List(23, 15, 9, 78) println(s"first: $first, second: $second") val fir :: sec :: rest = List(23, 15 , 9, 78) println(s"first: $fir, second: $sec, rest: $rest") println("=====================") // 2. for推导式中进行模式匹配 val list: List[(String, Int)] = List(("a", 12), ("b", 35), ("c", 27), ("a", 13)) // 2.1 原本的遍历方式 for (elem <- list){ println(elem._1 + " " + elem._2) } // 2.2 将List的元素直接定义为元组,对变量赋值 for ((word, count) <- list ){ println(word + ": " + count) } println("-----------------------") // 2.3 可以不考虑某个位置的变量,只遍历key或者value for ((word, _) <- list) println(word) println("-----------------------") // 2.4 可以指定某个位置的值必须是多少 for (("a", count) <- list){ println(count) } } }- 1
- 2
- 3
- 4
- 5
- 6
- 7
- 8
- 9
- 10
- 11
- 12
- 13
- 14
- 15
- 16
- 17
- 18
- 19
- 20
- 21
- 22
- 23
- 24
- 25
- 26
- 27
- 28
- 29
- 30
- 31
- 32
- 33
- 34
- 35
- 36
- 37
- 38
- 39
- 40
- 41
- 42
8.5 匹配对象
package chapter08 object Test04_MatchObject { def main(args: Array[String]): Unit = { val student = new Student("alice", 19) // 使用伴生对象针对对象实例的内容进行匹配 val result = student match { case Student("alice", 18) => "Alice, 18" case _ => "Else" } println(result) } } // 定义类 class Student(val name: String, val age: Int) // 定义伴生对象 object Student { def apply(name: String, age: Int): Student = new Student(name, age) // 必须实现一个unapply方法,用来对对象属性进行拆解 Option[(String, Int)] def unapply(student: Student): Option[(String, Int)] = { if (student == null){ None } else { Some((student.name, student.age)) } } }- 1
- 2
- 3
- 4
- 5
- 6
- 7
- 8
- 9
- 10
- 11
- 12
- 13
- 14
- 15
- 16
- 17
- 18
- 19
- 20
- 21
- 22
- 23
- 24
- 25
- 26
- 27
- 28
- 29
- 30
- 31
8.6 样例类
object Test05_MatchCaseClass { def main(args: Array[String]): Unit = { val student = Student1("alice", 18) // 针对对象实例的内容进行匹配 val result = student match { case Student1("alice", 18) => "Alice, 18" case _ => "Else" } println(result) } } // 定义样例类 case class Student1(name: String, age: Int)- 1
- 2
- 3
- 4
- 5
- 6
- 7
- 8
- 9
- 10
- 11
- 12
- 13
- 14
- 15
- 16
8.7 偏函数
偏函数也是函数的一种,通过偏函数我们可以方便的对输入参数做更精确的检查。例如 该偏函数的输入类型为 List[Int],而我们需要的是第一个元素是 0 的集合,这就是通过模式 匹配实现的。

package chapter08 object Test06_PartialFunction { def main(args: Array[String]): Unit = { val list: List[(String, Int)] = List(("a", 12), ("b", 35), ("c", 27), ("a", 13)) // 1. map转换,实现key不变,value2倍 val newList = list.map( tuple => (tuple._1, tuple._2 * 2) ) // 2. 用模式匹配对元组元素赋值,实现功能 val newList2 = list.map( tuple => { tuple match { case (word, count) => (word, count * 2) } } ) // 3. 省略lambda表达式的写法,进行简化 val newList3 = list.map { case (word, count) => (word, count * 2) } println(newList) println(newList2) println(newList3) // 偏函数的应用,求绝对值 // 对输入数据分为不同的情形:正、负、0 val positiveAbs: PartialFunction[Int, Int] = { case x if x > 0 => x } val negativeAbs: PartialFunction[Int, Int] = { case x if x < 0 => -x } val zeroAbs: PartialFunction[Int, Int] = { case 0 => 0 } def abs(x: Int): Int = (positiveAbs orElse negativeAbs orElse zeroAbs) (x) println(abs(-67)) println(abs(35)) println(abs(0)) } }- 1
- 2
- 3
- 4
- 5
- 6
- 7
- 8
- 9
- 10
- 11
- 12
- 13
- 14
- 15
- 16
- 17
- 18
- 19
- 20
- 21
- 22
- 23
- 24
- 25
- 26
- 27
- 28
- 29
- 30
- 31
- 32
- 33
- 34
- 35
- 36
- 37
- 38
- 39
- 40
- 41
- 42
- 43
- 44
- 45
- 46
9 异常
需要注意以下几点:
- Scala 没有“checked(编译期)”异常,即 Scala 没有编译异常这个概念,异常都是在运行的时候捕获处理。
- 所有异常都是
Throwable的子类型。throw 表达式是有类型的,就是Nothing
def main(args: Array[String]): Unit = { try{ val n = 10 / 0 } catch { case e: ArithmeticException => { println("发生算术异常") } case e: Exception => { println("发生一般异常") } } finally { println("处理结束") } }- 1
- 2
- 3
- 4
- 5
- 6
- 7
- 8
- 9
- 10
- 11
- 12
- 13
- 14
def test():Nothing = { throw new Exception("不对") }- 1
- 2
- 3
10 隐式转换
当编译器第一次编译失败的时候,会在当前的环境中查找能让代码编译通过的方法,用于将类型进行转换,实现
二次编译10.1 隐式函数和隐式类
def main(args: Array[String]): Unit = { val new12 = new MyRichInt(12) println(new12.myMax(15)) // 1. 隐式函数,将int转换成MyRichInt,需要写在调用代码的前面 implicit def convert(num: Int): MyRichInt = new MyRichInt(num) println(12.myMax(15)) println("============================") // 2. 隐式类,必须放在object或者其他类的内部 implicit class MyRichInt2(val self: Int) { // 自定义比较大小的方法 def myMax2(n: Int): Int = if ( n < self ) self else n def myMin2(n: Int): Int = if ( n < self ) n else self } println(12.myMin2(15)) println("============================") } // 自定义类 class MyRichInt(val self: Int) { // 自定义比较大小的方法 def myMax(n: Int): Int = if ( n < self ) self else n def myMin(n: Int): Int = if ( n < self ) n else self }- 1
- 2
- 3
- 4
- 5
- 6
- 7
- 8
- 9
- 10
- 11
- 12
- 13
- 14
- 15
- 16
- 17
- 18
- 19
- 20
- 21
- 22
- 23
- 24
- 25
10.2 隐式参数
就是可以将参数的默认值定义在函数外部
// 3. 隐式参数,在同一作用范围内,相同类型的隐式参数只能有一个 implicit val str: String = "alice" // implicit val str2: String = "alice2" implicit val num: Int = 18 // 隐式参数底层使用了柯里化,调用的时候可以不用传参数,使用上面定义的隐式参数 def sayHello()(implicit name: String): Unit = { println("hello, " + name) } def sayHi(implicit name: String = "atguigu"): Unit = { println("hi, " + name) } // 调用可以加(),也可以不加 sayHello() // 隐式参数会覆盖参数的默认值,所以输出的是hi atguigu sayHi // 简便写法implicitly def hiAge(): Unit = { // 指明调用Int的隐式参数 println("hi, " + implicitly[Int]) } hiAge()- 1
- 2
- 3
- 4
- 5
- 6
- 7
- 8
- 9
- 10
- 11
- 12
- 13
- 14
- 15
- 16
- 17
- 18
- 19
- 20
- 21
- 22
- 23
11 泛型
11.1 协变和逆变
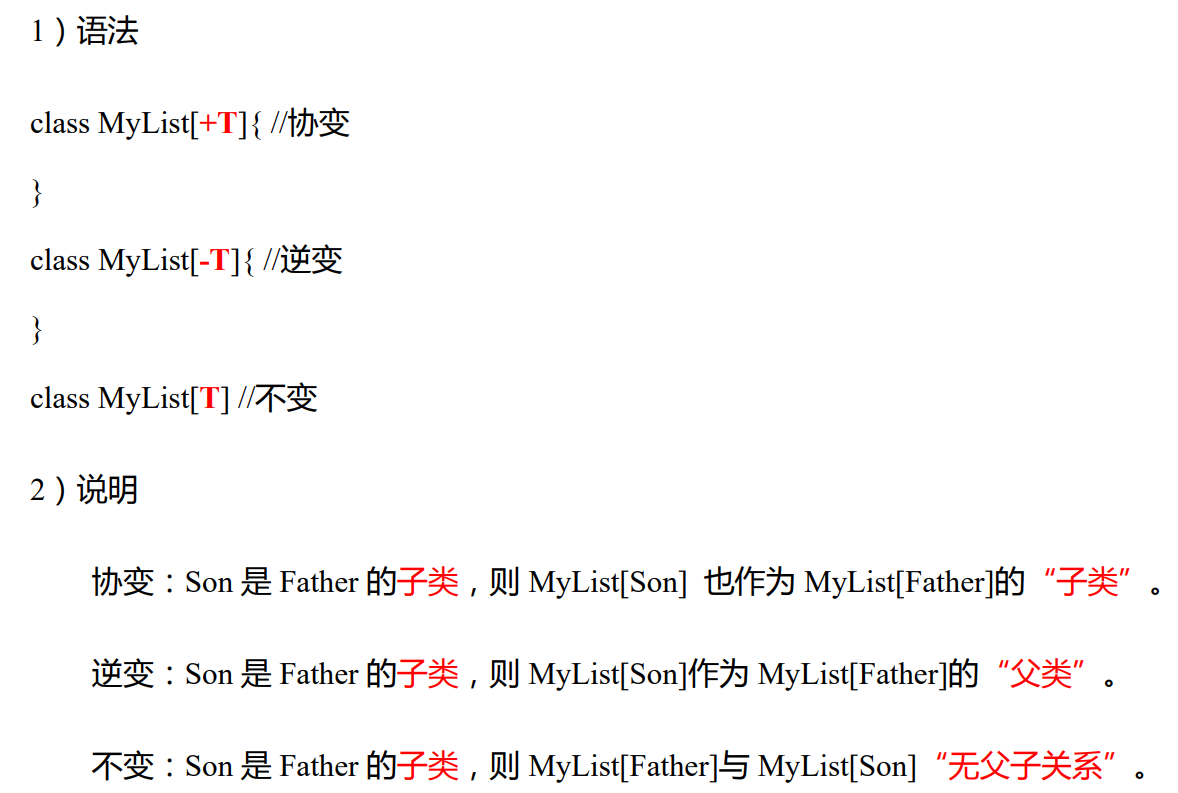
object Test03_Generics { def main(args: Array[String]): Unit = { // 1. 协变和逆变 val child: Parent = new Child // 协变,Child是Parent的子类,如果不使用协变,就无法定义 //val childList: MyCollection[Parent] = new MyCollection[Child] // 逆变,Child是SubChild的子类,如果不使用逆变,就无法定义 val childList: MyCollection[SubChild] = new MyCollection[Child] } } // 定义继承关系 class Parent {} class Child extends Parent {} class SubChild extends Child {} // 定义带泛型的集合类型,使用逆变 class MyCollection[-E] {}- 1
- 2
- 3
- 4
- 5
- 6
- 7
- 8
- 9
- 10
- 11
- 12
- 13
- 14
- 15
- 16
- 17
- 18
11.2 泛型上下限
// 2. 上下限,传入的泛型A只能是Child及其子类 def test[A <: Child](a: A): Unit = { println(a.getClass.getName) } // 下面会报错,因为Parent不是Child及其子类 // test[Parent](new Child) test[SubChild](new SubChild) test[Child](new SubChild) // 下面会报错,因为不能把父类(Child)的对象赋给子类(SubChild) // test[SubChild](new Child) // 定义继承关系 class Parent {} class Child extends Parent {} class SubChild extends Child {}- 1
- 2
- 3
- 4
- 5
- 6
- 7
- 8
- 9
- 10
- 11
- 12
- 13
- 14
- 15
11.3 上下文限定
相当于内部包含一个隐式参数B[A]
def f[A : B](a: A) = println(a) //等同于 def f[A](a:A)(implicit arg:B[A])=println(a)- 1
- 2
说明
上下文限定是将泛型和隐式转换的结合产物,以下两者功能相同,使用上下文限定[A : Ordering]之后,方法内无法使用隐式参数名调用隐式参数,需要通过 implicitly[Ordering[A]] 获取隐式变量,如果此时无法查找到对应类型的隐式变量,会发生出错误。
def main(args: Array[String]): Unit = { implicit val x = 1 val y = implicitly[Int] // 下面会报错, 因为没有隐式的Double参数 // val z = implicitly[Double] println(y) // 使用上下文限定,也就等同于下面的代码,相当于有一个隐式的参数,参数类型为Ordering[A] def f[A: Ordering](a: A, b: A) = implicitly[Ordering[A]].compare(a, b) // def f[A](a: A, b: A)(implicit ord: Ordering[A]) = ord.compare(a, b) // 3<4 结果为-1 println(f[Int](3,4)) }- 1
- 2
- 3
- 4
- 5
- 6
- 7
- 8
- 9
- 10
- 11
- 12
- 13
9 异常
需要注意以下几点:
- Scala 没有“checked(编译期)”异常,即 Scala 没有编译异常这个概念,异常都是在运行的时候捕获处理。
- 所有异常都是
Throwable的子类型。throw 表达式是有类型的,就是Nothing
def main(args: Array[String]): Unit = { try{ val n = 10 / 0 } catch { case e: ArithmeticException => { println("发生算术异常") } case e: Exception => { println("发生一般异常") } } finally { println("处理结束") } }- 1
- 2
- 3
- 4
- 5
- 6
- 7
- 8
- 9
- 10
- 11
- 12
- 13
- 14
def test():Nothing = { throw new Exception("不对") }- 1
- 2
- 3
10 隐式转换
当编译器第一次编译失败的时候,会在当前的环境中查找能让代码编译通过的方法,用于将类型进行转换,实现
二次编译10.1 隐式函数和隐式类
def main(args: Array[String]): Unit = { val new12 = new MyRichInt(12) println(new12.myMax(15)) // 1. 隐式函数,将int转换成MyRichInt,需要写在调用代码的前面 implicit def convert(num: Int): MyRichInt = new MyRichInt(num) println(12.myMax(15)) println("============================") // 2. 隐式类,必须放在object或者其他类的内部 implicit class MyRichInt2(val self: Int) { // 自定义比较大小的方法 def myMax2(n: Int): Int = if ( n < self ) self else n def myMin2(n: Int): Int = if ( n < self ) n else self } println(12.myMin2(15)) println("============================") } // 自定义类 class MyRichInt(val self: Int) { // 自定义比较大小的方法 def myMax(n: Int): Int = if ( n < self ) self else n def myMin(n: Int): Int = if ( n < self ) n else self }- 1
- 2
- 3
- 4
- 5
- 6
- 7
- 8
- 9
- 10
- 11
- 12
- 13
- 14
- 15
- 16
- 17
- 18
- 19
- 20
- 21
- 22
- 23
- 24
- 25
10.2 隐式参数
就是可以将参数的默认值定义在函数外部
// 3. 隐式参数,在同一作用范围内,相同类型的隐式参数只能有一个 implicit val str: String = "alice" // implicit val str2: String = "alice2" implicit val num: Int = 18 // 隐式参数底层使用了柯里化,调用的时候可以不用传参数,使用上面定义的隐式参数 def sayHello()(implicit name: String): Unit = { println("hello, " + name) } def sayHi(implicit name: String = "atguigu"): Unit = { println("hi, " + name) } // 调用可以加(),也可以不加 sayHello() // 隐式参数会覆盖参数的默认值,所以输出的是hi atguigu sayHi // 简便写法implicitly def hiAge(): Unit = { // 指明调用Int的隐式参数 println("hi, " + implicitly[Int]) } hiAge()- 1
- 2
- 3
- 4
- 5
- 6
- 7
- 8
- 9
- 10
- 11
- 12
- 13
- 14
- 15
- 16
- 17
- 18
- 19
- 20
- 21
- 22
- 23
11 泛型
11.1 协变和逆变
[外链图片转存中…(img-9RgQjphE-1696143222645)]
object Test03_Generics { def main(args: Array[String]): Unit = { // 1. 协变和逆变 val child: Parent = new Child // 协变,Child是Parent的子类,如果不使用协变,就无法定义 //val childList: MyCollection[Parent] = new MyCollection[Child] // 逆变,Child是SubChild的子类,如果不使用逆变,就无法定义 val childList: MyCollection[SubChild] = new MyCollection[Child] } } // 定义继承关系 class Parent {} class Child extends Parent {} class SubChild extends Child {} // 定义带泛型的集合类型,使用逆变 class MyCollection[-E] {}- 1
- 2
- 3
- 4
- 5
- 6
- 7
- 8
- 9
- 10
- 11
- 12
- 13
- 14
- 15
- 16
- 17
- 18
11.2 泛型上下限
// 2. 上下限,传入的泛型A只能是Child及其子类 def test[A <: Child](a: A): Unit = { println(a.getClass.getName) } // 下面会报错,因为Parent不是Child及其子类 // test[Parent](new Child) test[SubChild](new SubChild) test[Child](new SubChild) // 下面会报错,因为不能把父类(Child)的对象赋给子类(SubChild) // test[SubChild](new Child) // 定义继承关系 class Parent {} class Child extends Parent {} class SubChild extends Child {}- 1
- 2
- 3
- 4
- 5
- 6
- 7
- 8
- 9
- 10
- 11
- 12
- 13
- 14
- 15
11.3 上下文限定
相当于内部包含一个隐式参数B[A]
def f[A : B](a: A) = println(a) //等同于 def f[A](a:A)(implicit arg:B[A])=println(a)- 1
- 2
说明
上下文限定是将泛型和隐式转换的结合产物,以下两者功能相同,使用上下文限定[A : Ordering]之后,方法内无法使用隐式参数名调用隐式参数,需要通过 implicitly[Ordering[A]] 获取隐式变量,如果此时无法查找到对应类型的隐式变量,会发生出错误。
def main(args: Array[String]): Unit = { implicit val x = 1 val y = implicitly[Int] // 下面会报错, 因为没有隐式的Double参数 // val z = implicitly[Double] println(y) // 使用上下文限定,也就等同于下面的代码,相当于有一个隐式的参数,参数类型为Ordering[A] def f[A: Ordering](a: A, b: A) = implicitly[Ordering[A]].compare(a, b) // def f[A](a: A, b: A)(implicit ord: Ordering[A]) = ord.compare(a, b) // 3<4 结果为-1 println(f[Int](3,4)) }- 1
- 2
- 3
- 4
- 5
- 6
- 7
- 8
- 9
- 10
- 11
- 12
- 13
-
相关阅读:
【解密】记一次辽宁省某综合实践教学管理平台加解密算法分析
【微服务】Day01
git密码提交切换SSH提交
Quartz.NET简单使用
创建者模式(Builder Pattern):构造复杂对象的通用解决方案
Ubuntu下Qt creator不能输入中文解决方法
基于DBC Signal Group生成Autosar SR接口(2)
【uniapp】点击多选的一种写法
基于整体学习的大幅面超高分遥感影像桥梁目标检测(含数据集下载地址)
基于单目的光流法测速
- 原文地址:https://blog.csdn.net/jaken_xie/article/details/133465214