-
【OpenCV-Torch-dlib-ubuntu】Vm虚拟机linux环境摄像头调用方法与dilb模型探究
前言
随着金秋时节的来临,国庆和中秋的双重喜庆汇聚成一片温暖的节日氛围。在这个美好的时刻,我们有幸共同迎来一次长达8天的假期,为心灵充电,为身体放松,为未来充实自己。今年的国庆不仅仅是家国团聚的时刻,更是展现自我的舞台。我在这个特殊的假期里,决定探究dlib模型用法,并将在这篇文章中分享我的学习过程和心得体会。
在上一篇文章中,我们成功跨平台成功配置了dlib库
全面横扫:dlib Python API在Linux和Windows的配置方案
本文基于人脸识别系统项目继续拓展,尝试添加dlib库相关功能进行二合一
Retinaface+FaceNet人脸识别系统-Gradio界面设计文章目录
- 前言
- VMware摄像头调用方法
- 运行环境配置
- 13个模型逐个分析
- 模型下载
- 13个模型的示例程序
- 1.dlib_face_recognition_resnet_model_v1.dat
- 2. **mmod_dog_hipsterizer.dat.bz2**
- 3. **mmod_human_face_detector.dat.bz2:**
- 4. **resnet34_1000_imagenet_classifier.dnn.bz2:**
- 5. **shape_predictor_5_face_landmarks.dat.bz2:**
- 6. **shape_predictor_68_face_landmarks.dat.bz2:**
- 7. **shape_predictor_68_face_landmarks_GTX.dat.bz2:**
- 8. **mmod_rear_end_vehicle_detector.dat.bz2:**
- 9. **mmod_front_and_rear_end_vehicle_detector.dat.bz2:**
- 10. **dnn_gender_classifier_v1.dat.bz2:**
- 11. **dnn_age_predictor_v1.dat.bz2:**
- 12. **resnet50_1000_imagenet_classifier.dnn.bz2:**
- 13. **dcgan_162x162_synth_faces.dnn.bz2:**
- 实用技巧
- 下一步尝试
- 写给自己(关闭gpu加速仅在cpu上加载模型)
- 总结
VMware摄像头调用方法
- VMware怎么调中文
网上的教程大多都说右键快捷方式打开属性,然后再vmware.exe后加一个空格再加上–locale zh_CN,我开始测试时不管用,后来换成两个空格,即
快捷方式末尾添加两个空格然后加--locale zh_CN- 1

-
调整虚拟机USB设置:
- 进入虚拟机设置。
- 转至硬件选项,选择USB控制器。
- 在USB兼容性选项中,设置为USB3.1。

-
在VMware Workstation中配置虚拟机摄像头:
- 打开虚拟机,找到虚拟机(M)。
- 移动鼠标到可移动设置,找到图像设备。
- 在图像设备中,确保摄像头选项已启用。

-
进行虚拟机设置:
- 打开终端并输入以下命令:
sudo apt-get install cheese cheese- 1
- 2
- 测试摄像头是否连接成功,在终端输入命令,如果看到video0,表示连接成功:
ls /dev/video0- 1
- 安装ffmpeg:
sudo apt-get install ffmpeg- 1
- 使用以下命令测试摄像头:
ffplay -i /dev/video0- 1
- 打开终端并输入以下命令:
以上步骤确保了你的虚拟机摄像头能够成功连接,并且通过ffmpeg进行测试。

运行环境配置
打包方式基于
半自动化使用.bat手动打包迁移python项目
- Python 3.8
- OpenCV
- Pytorch
- dlib
- gradio
rem 创建虚拟环境 python -m venv venv call venv\Scripts\activate.bat python -m pip install -i https://mirrors.aliyun.com/pypi/simple/ --upgrade pip setuptools pip install dlib-19.19.0-cp38-cp38-win_amd64.whl pip install -i https://mirrors.aliyun.com/pypi/simple/ opencv-python==4.5.3.56 pip install torch-1.7.1+cu110-cp38-cp38-win_amd64.whl pip install torch==1.7.1+cu110 torchvision==0.8.2+cu110 torchaudio==0.7.2 -f https://download.pytorch.org/whl/torch_stable.html pip install -i https://mirrors.aliyun.com/pypi/simple/ gradio pip install -i https://mirrors.aliyun.com/pypi/simple/ scikit-learn pip install -i https://mirrors.aliyun.com/pypi/simple/ -r requirements.txt- 1
- 2
- 3
- 4
- 5
- 6
- 7
- 8
- 9
- 10
- 11
requirements.txt
scipy==1.7.1 numpy==1.21.2 matplotlib==3.4.3 opencv_python==4.5.3.56 torch==1.7.1 torchvision==0.8.2 tqdm==4.62.2 Pillow==8.3.2 h5py==2.10.0- 1
- 2
- 3
- 4
- 5
- 6
- 7
- 8
- 9
我搜集了python3.7-3.9各种版本的dlib安装包你可以关注我然后回复我dlib获取
dlib- 1
我搜集了python3.7-3.9各种版本的dlib安装包
dlib-19.17.99-cp37-cp37m-win_amd64.whl dlib-19.24.2-cp37-cp37m-win_amd64.whl dlib-19.19.0-cp38-cp38-win_amd64.whl dlib-19.21.99-cp38-cp38-win_amd64.whl dlib-19.22.99-cp39-cp39-win_amd64.whl- 1
- 2
- 3
- 4
- 5
这里我们使用dlib-19.19.0-cp38-cp38-win_amd64.whl测试
rem 创建虚拟环境 python -m venv venv call venv\Scripts\activate.bat python -m pip install -i https://mirrors.aliyun.com/pypi/simple/ --upgrade pip setuptools pip install dlib-19.19.0-cp38-cp38-win_amd64.whl- 1
- 2
- 3
- 4
- 5
13个模型逐个分析
官方GitHub连接
dlib
dlib-models
"dlib-models"仓库中的训练模型由Davis King创建,主要用于计算机视觉和人脸识别等各种任务。以下是每个模型及其特点的简要总结:-
dlib_face_recognition_resnet_model_v1.dat.bz2:
- 描述:一个具有29个卷积层的ResNet网络,改编自ResNet-34架构。从头开始训练,使用了约300万张脸部图像,数据来自多个来源,包括face scrub、VGG数据集和从互联网上抓取的图像。
- 用途:人脸识别。
- 性能:在LFW基准测试中,平均误差为0.993833,标准差为0.00272732。
-
mmod_dog_hipsterizer.dat.bz2:
- 描述:基于Columbia Dogs数据集训练,用于狗的品种分类和部位定位。
- 用途:狗的品种分类以及可能与狗图像相关的其他任务。
-
mmod_human_face_detector.dat.bz2:
- 描述:在包括ImageNet、AFLW、Pascal VOC、VGG数据集、WIDER和face scrub在内的多个公开可用图像数据集中找到的人脸图像创建的数据集。标注是使用dlib的imglab工具创建的。
- 用途:人脸检测。
-
resnet34_1000_imagenet_classifier.dnn.bz2:
- 描述:在ImageNet数据集上训练。
- 用途:通用图像分类。
-
shape_predictor_5_face_landmarks.dat.bz2:
- 描述:一个5点面部标记模型,用于识别眼睛角和鼻子底部。使用从互联网下载的图像并使用dlib的imglab工具进行标注创建的数据集进行训练。
- 用途:面部特征定位,与dlib的HOG人脸检测器和CNN人脸检测器兼容。
-
shape_predictor_68_face_landmarks.dat.bz2:
- 描述:在ibug 300-W数据集上训练,用于精确的面部特征定位,最适合与dlib的HOG人脸检测器一起使用。
-
shape_predictor_68_face_landmarks_GTX.dat.bz2:
- 描述:具有增强的面部检测器鲁棒性的68点面部标记模型。
- 用途:精确的面部特征定位,优化用于方形边界框。
-
mmod_rear_end_vehicle_detector.dat.bz2:
- 描述:在包括车辆仪表板摄像头图像的后端车辆图像上手动注释的数据集上进行训练。
- 用途:后端车辆检测。
-
mmod_front_and_rear_end_vehicle_detector.dat.bz2:
- 描述:在包括车辆仪表板摄像头图像的前端和后端车辆图像上手动注释的数据集上进行训练。
- 用途:前端和后端车辆检测。
-
dnn_gender_classifier_v1.dat.bz2:
- 描述:使用约20万张不同脸部图像的私有数据集训练的性别分类器。
- 用途:从面部图像进行性别预测。
-
dnn_age_predictor_v1.dat.bz2:
- 描述:基于ResNet-10架构训练的年龄预测器,使用约11万张不同标记图像进行训练,性能超越了最新的结果。
- 用途:从面部图像进行年龄估计。
-
resnet50_1000_imagenet_classifier.dnn.bz2:
- 描述:使用ResNet50模型定义在resnet.h中,在ImageNet数据集上进行训练。
- 用途:通用图像分类。
-
dcgan_162x162_synth_faces.dnn.bz2:
- 描述:使用深度卷积生成对抗网络(DCGAN)架构训练的DCGAN面部合成模型,用于生成逼真的合成彩色面部图像。
请注意,这些模型的使用和许可可能会有所不同,因此务必仔细阅读提供的信息,并确保遵守任何提到的限制。这些模型可以用于各种计算机视觉任务,是宝贵的资源。
模型下载
我们直接使用git
git clone https://github.com/davisking/dlib-models.git- 1
当使用dlib的
dlib_face_recognition_resnet_model_v1.dat模型进行人脸识别时,你需要安装dlib库并加载该模型。以下是一个Python示例代码,演示如何使用该模型进行简单的人脸识别:首先,确保你已经安装了dlib库。你可以使用以下命令安装:
pip install dlib- 1
然后,你可以使用以下Python代码进行人脸识别:
import dlib from skimage import io # 加载dlib_face_recognition_resnet_model_v1.dat模型 detector = dlib.get_frontal_face_detector() sp = dlib.shape_predictor("shape_predictor_68_face_landmarks.dat") # 这里你也可以使用其他人脸关键点模型 facerec = dlib.face_recognition_model_v1("dlib_face_recognition_resnet_model_v1.dat") # 加载测试图像 img = io.imread("test_image.jpg") # 在图像中检测人脸 dets = detector(img, 1) # 如果检测到多个人脸,可以迭代处理每一个人脸 for i, d in enumerate(dets): shape = sp(img, d) # 获取关键点 face_descriptor = facerec.compute_face_descriptor(img, shape) # 获取人脸描述符 # 在这里,你可以与数据库中的人脸描述符进行比对,实现人脸识别 # 例如,计算当前人脸描述符与数据库中存储的描述符的欧氏距离,找到最接近的匹配 # 打印人脸描述符 print(f"Face Descriptor for Face {i + 1}:") print(face_descriptor) # 在这里,你可以根据你的需求进行人脸识别匹配- 1
- 2
- 3
- 4
- 5
- 6
- 7
- 8
- 9
- 10
- 11
- 12
- 13
- 14
- 15
- 16
- 17
- 18
- 19
- 20
- 21
- 22
- 23
- 24
- 25
- 26
- 27
请注意,上述示例中使用的是
shape_predictor_68_face_landmarks.dat模型来获取人脸关键点,然后使用dlib_face_recognition_resnet_model_v1.dat模型来计算人脸描述符。你可以根据需要使用不同的关键点模型和匹配算法来进行人脸识别。还需要将test_image.jpg替换为你要测试的图像文件的路径。13个模型的示例程序
1.dlib_face_recognition_resnet_model_v1.dat
当使用dlib的
dlib_face_recognition_resnet_model_v1.dat模型进行人脸识别时,你需要安装dlib库并加载该模型。以下是一个Python示例代码,演示如何使用该模型进行简单的人脸识别:首先,确保你已经安装了scikit-image库。你可以使用以下命令安装:
pip install scikit-image- 1
文件夹结构: 将用户图像存储在以用户名称命名的文件夹中,这样可以更轻松地组织用户数据。例如,用户1的图像存储在名为 user1 的文件夹中,用户2的图像存储在名为 user2 的文件夹中。
1. 注册用户的人脸描述符生成代码:import dlib import numpy as np import os from skimage import io import pickle # 加载dlib_face_recognition_resnet_model_v1.dat模型 detector = dlib.get_frontal_face_detector() sp = dlib.shape_predictor("shape_predictor_68_face_landmarks.dat") # 这里你也可以使用其他人脸关键点模型 facerec = dlib.face_recognition_model_v1("dlib_face_recognition_resnet_model_v1.dat") # 初始化一个字典来存储已注册用户的人脸描述符 registered_faces = {} # 指定用户图像所在的文件夹 user_images_folder = "user_images" # 遍历用户图像文件夹 for user_folder in os.listdir(user_images_folder): if os.path.isdir(os.path.join(user_images_folder, user_folder)): user_name = user_folder # 使用文件夹名称作为用户名称 # 初始化一个列表来存储当前用户的人脸描述符 user_face_descriptors = [] # 遍历用户文件夹中的图像文件 for user_image_file in os.listdir(os.path.join(user_images_folder, user_folder)): if user_image_file.endswith(".jpg"): user_image_path = os.path.join(user_images_folder, user_folder, user_image_file) # 从用户图像中读取图像 user_img = io.imread(user_image_path) # 在图像中检测人脸 dets = detector(user_img, 1) # 如果检测到一个人脸,假设只有一个人脸 if len(dets) == 1: shape = sp(user_img, dets[0]) # 获取关键点 face_descriptor = facerec.compute_face_descriptor(user_img, shape) # 获取人脸描述符 user_face_descriptors.append(np.array(face_descriptor)) # 存储用户的人脸描述符到已注册用户的字典 registered_faces[user_name] = user_face_descriptors # 将已注册用户的人脸描述符保存到本地文件 with open("registered_faces.pkl", "wb") as f: pickle.dump(registered_faces, f) print("Registration completed.")- 1
- 2
- 3
- 4
- 5
- 6
- 7
- 8
- 9
- 10
- 11
- 12
- 13
- 14
- 15
- 16
- 17
- 18
- 19
- 20
- 21
- 22
- 23
- 24
- 25
- 26
- 27
- 28
- 29
- 30
- 31
- 32
- 33
- 34
- 35
- 36
- 37
- 38
- 39
- 40
- 41
- 42
- 43
- 44
- 45
- 46
- 47
- 48
- 49
- 50
- 51
2. 人脸识别代码:
import dlib import numpy as np from skimage import io import pickle import cv2 # 加载dlib_face_recognition_resnet_model_v1.dat模型 detector = dlib.get_frontal_face_detector() sp = dlib.shape_predictor("shape_predictor_68_face_landmarks.dat") # 这里你也可以使用其他人脸关键点模型 facerec = dlib.face_recognition_model_v1("dlib_face_recognition_resnet_model_v1.dat") # 加载已注册用户的人脸描述符 with open("registered_faces.pkl", "rb") as f: registered_faces = pickle.load(f) # 设定一个阈值,用于确定匹配是否成功,阈值越小,匹配越严格 threshold = 0.6 # 加载测试图像 test_image_path = "test.jpg" img = io.imread(test_image_path) # 在图像中检测人脸 dets = detector(img, 1) # 初始化一个列表来存储匹配结果 matches = [] # 遍历检测到的人脸描述符 for i, d in enumerate(dets): shape = sp(img, d) # 获取关键点 face_descriptor = facerec.compute_face_descriptor(img, shape) # 获取人脸描述符 # 初始化最佳匹配信息 best_match_name = "Unknown" best_match_distance = float("inf") # 遍历已注册用户的数据库 for name, registered_descriptors in registered_faces.items(): for registered_descriptor in registered_descriptors: # 计算当前人脸描述符与已注册用户的欧氏距离 distance = np.linalg.norm(np.array(face_descriptor) - np.array(registered_descriptor)) # 如果距离小于阈值,并且比当前最佳匹配距离更近 if distance < threshold and distance < best_match_distance: best_match_name = name best_match_distance = distance # 将匹配结果添加到列表 matches.append({"face_id": i + 1, "user_name": best_match_name, "distance": best_match_distance}) # 在图像上绘制匹配结果 for match in matches: face_id = match["face_id"] user_name = match["user_name"] distance = match["distance"] # 绘制人脸框 x, y, w, h = d.left(), d.top(), d.width(), d.height() cv2.rectangle(img, (x, y), (x + w, y + h), (0, 255, 0), 2) # 在人脸框上方显示匹配结果 text = f"Face {face_id}: {user_name} ({distance:.2f})" cv2.putText(img, text, (x, y - 10), cv2.FONT_HERSHEY_SIMPLEX, 0.5, (0, 255, 0), 2) # 显示带有匹配结果的图像 cv2.imshow("Face Recognition", img) cv2.waitKey(0) cv2.destroyAllWindows()- 1
- 2
- 3
- 4
- 5
- 6
- 7
- 8
- 9
- 10
- 11
- 12
- 13
- 14
- 15
- 16
- 17
- 18
- 19
- 20
- 21
- 22
- 23
- 24
- 25
- 26
- 27
- 28
- 29
- 30
- 31
- 32
- 33
- 34
- 35
- 36
- 37
- 38
- 39
- 40
- 41
- 42
- 43
- 44
- 45
- 46
- 47
- 48
- 49
- 50
- 51
- 52
- 53
- 54
- 55
- 56
- 57
- 58
- 59
- 60
- 61
- 62
- 63
- 64
- 65
- 66
- 67
- 68
- 69
- 70
- 71
确保根据你的需求将这些代码片段中的变量和文件路径进行适当的替换。这两段代码现在应该能够正常运行并进行人脸识别。如果你有其他问题或需要进一步的帮助,请随时提问。
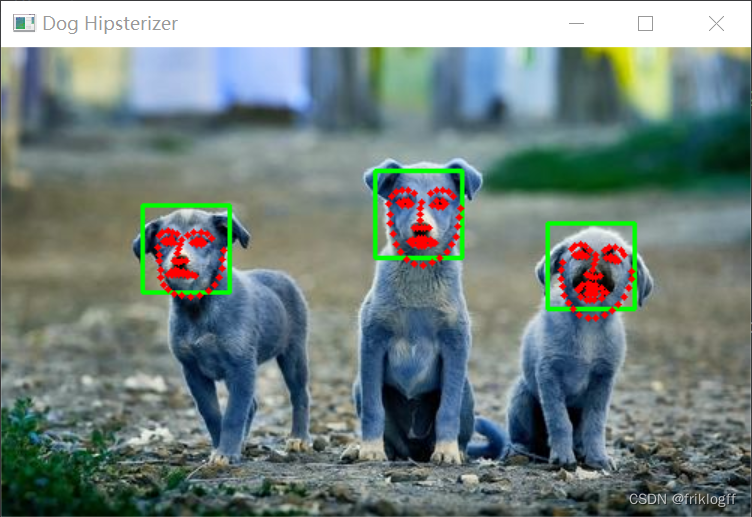
2. mmod_dog_hipsterizer.dat.bz2
import dlib import cv2 from skimage import io # 加载 dlib_face_recognition_resnet_model_v1.dat 模型用于关键点检测 shape_predictor = dlib.shape_predictor("shape_predictor_68_face_landmarks.dat") # 加载测试图像 img = io.imread("test.jpg") # 加载 mmod_dog_hipsterizer.dat 模型 detector = dlib.get_frontal_face_detector() hip_detector = dlib.cnn_face_detection_model_v1("mmod_dog_hipsterizer.dat") # 使用检测器检测狗的品种和部位 detections = hip_detector(img, 1) # 遍历检测结果并绘制矩形框 for detection in detections: x, y, w, h = detection.rect.left(), detection.rect.top(), detection.rect.width(), detection.rect.height() # 绘制矩形框 cv2.rectangle(img, (x, y), (x + w, y + h), (0, 255, 0), 2) # 使用关键点检测器获取部位关键点 landmarks = shape_predictor(img, detection.rect) # 遍历关键点并绘制 for point in landmarks.parts(): cv2.circle(img, (point.x, point.y), 2, (0, 0, 255), -1) # 显示带有检测结果和关键点的图像 cv2.imshow("Dog Hipsterizer", img) cv2.waitKey(0) cv2.destroyAllWindows()- 1
- 2
- 3
- 4
- 5
- 6
- 7
- 8
- 9
- 10
- 11
- 12
- 13
- 14
- 15
- 16
- 17
- 18
- 19
- 20
- 21
- 22
- 23
- 24
- 25
- 26
- 27
- 28
- 29
- 30
- 31
- 32
- 33
- 34
- 35
- 36
import dlib from skimage import io # 加载模型 detector = dlib.cnn_face_detection_model_v1("mmod_dog_hipsterizer.dat") # 加载要分类的狗的图像 dog_image = io.imread("dog2.jpg") # 运行分类器来检测品种 detections = detector(dog_image) # 打印每个检测到的品种 for detection in detections: # 检测到的品种的置信度可以通过矩形的面积来估计 confidence = detection.rect.area() print(f"品种:{detection.rect}, 置信度:{confidence}") # 如果需要,可以进一步解析品种的标签以获得可读的结果- 1
- 2
- 3
- 4
- 5
- 6
- 7
- 8
- 9
- 10
- 11
- 12
- 13
- 14
- 15
- 16
- 17
- 18
- 19
- 20
- 21
- 22
3. mmod_human_face_detector.dat.bz2:
import dlib import cv2 # 加载模型 detector = dlib.cnn_face_detection_model_v1("mmod_human_face_detector.dat") # 加载要进行人脸检测的图像 image = cv2.imread("test.jpg") # 将图像转换为灰度图像(dlib要求输入为灰度图像) gray = cv2.cvtColor(image, cv2.COLOR_BGR2GRAY) # 使用模型进行人脸检测 detections = detector(gray) # 在原图上绘制检测到的人脸矩形框 for detection in detections: x, y, w, h = (detection.rect.left(), detection.rect.top(), detection.rect.width(), detection.rect.height()) cv2.rectangle(image, (x, y), (x + w, y + h), (0, 255, 0), 2) # 显示带有人脸检测结果的图像 cv2.imshow("Face Detection", image) cv2.waitKey(0) cv2.destroyAllWindows()- 1
- 2
- 3
- 4
- 5
- 6
- 7
- 8
- 9
- 10
- 11
- 12
- 13
- 14
- 15
- 16
- 17
- 18
- 19
- 20
- 21
- 22
- 23
- 24
- 25

4. resnet34_1000_imagenet_classifier.dnn.bz2:
暂未找到python调用方法
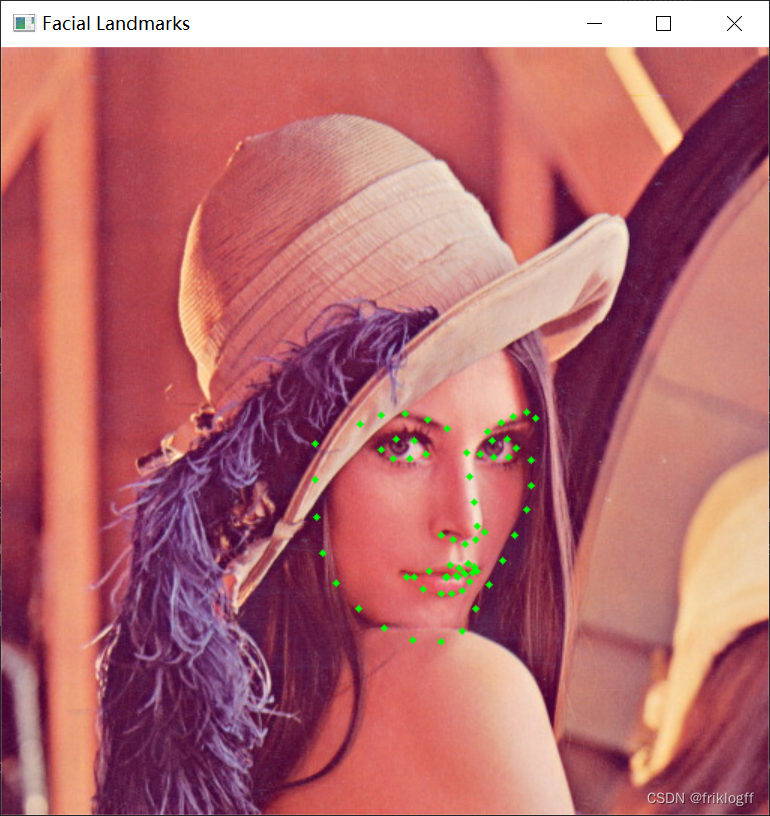
5. shape_predictor_5_face_landmarks.dat.bz2:
import dlib import cv2 # 加载面部特征定位模型 predictor = dlib.shape_predictor("shape_predictor_5_face_landmarks.dat") # 加载图像 image = cv2.imread("test.jpg") # 将图像转换为灰度 gray = cv2.cvtColor(image, cv2.COLOR_BGR2GRAY) # 使用dlib的HOG人脸检测器检测人脸 detector = dlib.get_frontal_face_detector() faces = detector(gray) # 对每个检测到的人脸进行面部特征定位 for face in faces: landmarks = predictor(gray, face) # 获取并绘制每个关键点 for n in range(5): # 此模型仅包含5个关键点 x = landmarks.part(n).x y = landmarks.part(n).y cv2.circle(image, (x, y), 2, (0, 255, 0), -1) # 显示带有关键点的图像 cv2.imshow("Facial Landmarks", image) cv2.waitKey(0) cv2.destroyAllWindows()- 1
- 2
- 3
- 4
- 5
- 6
- 7
- 8
- 9
- 10
- 11
- 12
- 13
- 14
- 15
- 16
- 17
- 18
- 19
- 20
- 21
- 22
- 23
- 24
- 25
- 26
- 27
- 28
- 29
- 30
- 31
- 32

6. shape_predictor_68_face_landmarks.dat.bz2:
import dlib import cv2 # 加载面部特征定位模型 predictor = dlib.shape_predictor("shape_predictor_68_face_landmarks.dat") # 加载图像 image = cv2.imread("test.jpg") # 将图像转换为灰度 gray = cv2.cvtColor(image, cv2.COLOR_BGR2GRAY) # 使用dlib的HOG人脸检测器检测人脸 detector = dlib.get_frontal_face_detector() faces = detector(gray) # 对每个检测到的人脸进行面部特征定位 for face in faces: landmarks = predictor(gray, face) # 获取并绘制每个关键点 for n in range(68): # 此模型包含68个关键点 x = landmarks.part(n).x y = landmarks.part(n).y cv2.circle(image, (x, y), 2, (0, 255, 0), -1) # 显示带有关键点的图像 cv2.imshow("Facial Landmarks", image) cv2.waitKey(0) cv2.destroyAllWindows()- 1
- 2
- 3
- 4
- 5
- 6
- 7
- 8
- 9
- 10
- 11
- 12
- 13
- 14
- 15
- 16
- 17
- 18
- 19
- 20
- 21
- 22
- 23
- 24
- 25
- 26
- 27
- 28
- 29
- 30
- 31

7. shape_predictor_68_face_landmarks_GTX.dat.bz2:
import dlib import cv2 # 加载面部特征定位模型 predictor = dlib.shape_predictor("shape_predictor_68_face_landmarks_GTX.dat") # 加载图像 image = cv2.imread("test.jpg") # 将图像转换为灰度 gray = cv2.cvtColor(image, cv2.COLOR_BGR2GRAY) # 使用dlib的HOG人脸检测器检测人脸 detector = dlib.get_frontal_face_detector() faces = detector(gray) # 对每个检测到的人脸进行面部特征定位 for face in faces: landmarks = predictor(gray, face) # 获取并绘制每个关键点 for n in range(68): # 此模型包含68个关键点 x = landmarks.part(n).x y = landmarks.part(n).y cv2.circle(image, (x, y), 2, (0, 255, 0), -1) # 显示带有关键点的图像 cv2.imshow("Facial Landmarks", image) cv2.waitKey(0) cv2.destroyAllWindows()- 1
- 2
- 3
- 4
- 5
- 6
- 7
- 8
- 9
- 10
- 11
- 12
- 13
- 14
- 15
- 16
- 17
- 18
- 19
- 20
- 21
- 22
- 23
- 24
- 25
- 26
- 27
- 28
- 29
- 30
- 31
- 32
8. mmod_rear_end_vehicle_detector.dat.bz2:
暂未找到python调用方法
9. mmod_front_and_rear_end_vehicle_detector.dat.bz2:
暂未找到python调用方法
10. dnn_gender_classifier_v1.dat.bz2:
暂未找到python调用方法
11. dnn_age_predictor_v1.dat.bz2:
暂未找到python调用方法
12. resnet50_1000_imagenet_classifier.dnn.bz2:
暂未找到python调用方法
13. dcgan_162x162_synth_faces.dnn.bz2:
暂未找到python调用方法
实用技巧
眨眼次数记录
import dlib import cv2 import numpy as np # 计算眼睛长宽比 def eye_aspect_ratio(eye): A = np.linalg.norm(eye[1] - eye[5]) B = np.linalg.norm(eye[2] - eye[4]) C = np.linalg.norm(eye[0] - eye[3]) ear = (A + B) / (2.0 * C) return ear # 获取最大的人脸 def largest_face(dets): if len(dets) == 1: return 0 face_areas = [(det.right() - det.left()) * (det.bottom() - det.top()) for det in dets] largest_area = face_areas[0] largest_index = 0 for index in range(1, len(dets)): if face_areas[index] > largest_area: largest_index = index largest_area = face_areas[index] return largest_index # 初始化探测器和预测器 detector = dlib.get_frontal_face_detector() predictor = dlib.shape_predictor("shape_predictor_68_face_landmarks.dat") # 获取视频流 cap = cv2.VideoCapture(0) # 初始化帧计数器和眨眼计数器 frame_counter = 0 blink_counter = 0 while True: # 获取当前帧 ret, frame = cap.read() if not ret: break # 转换为灰度图 gray = cv2.cvtColor(frame, cv2.COLOR_BGR2GRAY) # 检测人脸 faces = detector(gray, 0) # 检测到人脸 if len(faces) > 0: # 获取最大的人脸 index = largest_face(faces) face = faces[index] # 获取特征点 landmarks = np.matrix([[p.x, p.y] for p in predictor(frame, face).parts()]) # 提取左右眼点 left_eye = landmarks[42:48] right_eye = landmarks[36:42] # 计算EAR left_ear = eye_aspect_ratio(left_eye) right_ear = eye_aspect_ratio(right_eye) ear = (left_ear + right_ear) / 2.0 # 判断是否眨眼 if ear < 0.21: frame_counter += 1 status = "Blinking" else: # 眨眼次数判断 if frame_counter >= 3: blink_counter += 1 frame_counter = 0 status = "Open" # 显示眨眼结果 cv2.putText(frame, "Blinks: {}".format(blink_counter), (10, 30), cv2.FONT_HERSHEY_SIMPLEX, 0.7, (0, 0, 255), 2) cv2.putText(frame, "EAR: {:.2f}".format(ear), (300, 30), cv2.FONT_HERSHEY_SIMPLEX, 0.7, (0, 0, 255), 2) cv2.putText(frame, "Status: {}".format(status), (10, 60), cv2.FONT_HERSHEY_SIMPLEX, 0.7, (255, 0, 0), 2) # 显示画面 cv2.imshow("Frame", frame) # 按Q退出 key = cv2.waitKey(1) & 0xFF if key == ord('q'): break # 释放资源并关闭窗口 cap.release() cv2.destroyAllWindows()- 1
- 2
- 3
- 4
- 5
- 6
- 7
- 8
- 9
- 10
- 11
- 12
- 13
- 14
- 15
- 16
- 17
- 18
- 19
- 20
- 21
- 22
- 23
- 24
- 25
- 26
- 27
- 28
- 29
- 30
- 31
- 32
- 33
- 34
- 35
- 36
- 37
- 38
- 39
- 40
- 41
- 42
- 43
- 44
- 45
- 46
- 47
- 48
- 49
- 50
- 51
- 52
- 53
- 54
- 55
- 56
- 57
- 58
- 59
- 60
- 61
- 62
- 63
- 64
- 65
- 66
- 67
- 68
- 69
- 70
- 71
- 72
- 73
- 74
- 75
- 76
- 77
- 78
- 79
- 80
- 81
- 82
- 83
- 84
- 85
- 86
- 87
- 88
- 89
- 90
- 91
- 92
- 93
- 94
- 95
- 96
- 97
- 98
- 99
- 100
- 101
- 102
- 103
下一步尝试
dlib库在人脸检测和面部landmark定位方面非常强大,主要支持的功能包括:
- 人脸检测 - 使用CNN模型进行快速且准确的人脸检测。
- 人脸关键点定位 - 基于68点或5点模型,定位人脸的关键结构点,如眉毛、眼睛、鼻子、嘴巴等。
- 人脸识别 - 通过提取人脸特征,实现面部比对识别不同人脸。
- 人脸校准 - 对人脸图像进行校准,实现平移、旋转和缩放调整。
- 头部姿态估计 - 通过面部关键点分析头部的3D方向和姿态。
- 微笑检测 - 通过观察嘴巴形状变化判断是否微笑。
- 眨眼检测 - 通过眼睛形状分析判断是否眨眼。
- 情绪识别 - 利用面部表情判断人脸情绪,如生气、高兴、悲伤等。
- 年龄/性别预测 - 基于人脸图像判断年龄阶段和性别。
- 3D人脸重建 - 通过2D图片生成3D人脸模型。
dlib提供了非常方便的人脸分析API,包括数据训练和预训练模型,是人脸相关任务不可多得的强大工具库。
shape_predictor_68_face_landmarks.dat 这个人脸68点标志模型不仅可以实现眨眼检测,结合计算机视觉和机器学习算法,还可以扩展实现更多的面部分析任务:
- 微笑检测:通过观察嘴角上扬的关键点坐标变化来判断是否微笑。
- 情绪识别:观察眉毛、眼睛、嘴巴等关键点形变来判断面部表达的情绪。
- 年龄/性别预测:建立回归/分类模型,以关键点坐标和相对位置关系作为特征,预测年龄和性别。
- 头部姿态分析:根据关键点构成的人脸轮廓变化推断头部的三维旋转和平移信息。
- 面部交换:结合图片变形,可以在不同人脸之间交换表情。
基于该模型提取的特征非常丰富,可以支持构建各种面部理解和分析的机器学习模型。需要注意商业授权限制,但对研究用途非常有价值。掌握了计算机视觉和机器学习技巧,可以开发出很多有趣的人脸应用。
写给自己(关闭gpu加速仅在cpu上加载模型)
根据的错误日志,问题出在加载RetinaFace模型的时候:
File "/home/topeet/rknn/RetinaFace-FaceNet/retinaface.py", line 124, in __init__ self.generate() File "/home/topeet/rknn/RetinaFace-FaceNet/retinaface.py", line 146, in generate state_dict = torch.load(self.retinaface_model_path)- 1
- 2
- 3
- 4
所以需要在retinaface.py里面加载模型的时候添加map_location参数:
# retinaface.py import torch class RetinaFace(): def __init__(self): ... def generate(self): ... # 原代码 # state_dict = torch.load(self.retinaface_model_path) # 修改为 state_dict = torch.load(self.retinaface_model_path, map_location=torch.device('cpu'))- 1
- 2
- 3
- 4
- 5
- 6
- 7
- 8
- 9
- 10
- 11
- 12
- 13
- 14
- 15
- 16
用map_location='cpu’告诉torch将模型加载到CPU上。
这样应该就可以避免CUDA不可用的问题了。
另外,为了保证结果的一致性,在加载模型之前可以加上:torch.cuda.empty_cache()- 1
清空GPU缓存,torch就会把 computation 默认放在CPU上做。
所以完整的修改代码是:import torch class RetinaFace(): def __init__(self): ... def generate(self): ... torch.cuda.empty_cache() state_dict = torch.load(self.retinaface_model_path, map_location=torch.device('cpu'))- 1
- 2
- 3
- 4
- 5
- 6
- 7
- 8
- 9
- 10
- 11
总结
在国庆和中秋双节的欢庆氛围中,我深入研究了dlib,并在实践中遭遇了种种问题。通过不懈的努力和探索,我成功地克服了挑战,取得了技术上的突破。这个过程不仅让我更深入地理解了活体检测技术的原理,也锻炼了我的问题解决能力。希望通过我的分享,能够为大家提供一些有价值的经验,也希望在未来的技术道路上,我们能够不断探索,共同进步,这篇文章并未完结,我还会继续坚持更新。
-
相关阅读:
MySql学习笔记:索引和索引创建策略
【面试经典150 | 位运算】二进制求和
linux: 切换并配置root
如何学习?今天聊聊关于学习
MySQL——基础知识
基于架构软件设计-架构真题(五十八)
【echarts】06、echarts+vue2 - 雷达图
net6 项目搭建及引用框架记录(log4net,autofac,exception,api result,jwt,efcore)二、配置log4net
百度SEO优化策略与经验分享(提升百度排名的8大步骤)
暑期第一周总结
- 原文地址:https://blog.csdn.net/qq_42531954/article/details/133441505