-
boost序列化单例3
源码见文章底部。
class singleton 声明了一个静态引用 static T & m_instance;
这个静态引用是用来干嘛的呢?注意到该文件末尾有如下代码:template<class T> T & singleton< T >::m_instance = singleton< T >::get_instance();- 1
- 2
读到这里应该大概能理解了,该引用只是为了使用
static的特性,该全局对象在程序初始化之前就进行了实例化了对象。单例函数
get_instance()方位属性为private。内部有如下定义class singleton_wrapper : public T {};将T的构造函数保护了起来。先将静态成员赋值然后在堆中构造对象,静态成员指向他。is_destroyed()主要作用是对生命周期做控制管理。而
template只是为了消除未初始化的警告,可参考另一工具类static void use(T const *) boost::template的使用。最后调用构造生成实例对象并返回其引用。void ignore_unused() // refer to instance, causing it to be instantiated (and // initialized at startup on working compilers) BOOST_ASSERT(! is_destroyed()); // note that the following is absolutely essential. // commenting out this statement will cause compilers to fail to // construct the instance at pre-execution time. This would prevent // our usage/implementation of "locking" and introduce uncertainty into // the sequence of object initializaition. use(& m_instance); if (!t) t = new singleton_wrapper; return static_cast<T &>(*t);- 1
- 2
- 3
- 4
- 5
- 6
- 7
- 8
- 9
- 10
- 11
- 12
- 13
- 14
class singleton的析构函数负责清理资源。
下面的代码为测试简单的简单的静态对象单例模式与boost::serialization::singleton的区别#include#include template<typename T> class singleton_test { private: T tt; public: T& get_instance() { return tt; } }; class TEST_CLASS1 { public: TEST_CLASS1() { std::cout << __FUNCTION__ << std::endl; } ~TEST_CLASS1(){ std::cout << __FUNCTION__ << std::endl; } void print() { std::cout << "hello, im TEST_CLASS1" << std::endl; } }; class TEST_CLASS2 { public: TEST_CLASS2() { std::cout << __FUNCTION__ << std::endl; } ~TEST_CLASS2() { std::cout << __FUNCTION__ << std::endl; } void print() { std::cout << "hello, im TEST_CLASS2" << std::endl; } }; int main() { std::cout << "begin main:" << std::endl; boost::serialization::singleton<TEST_CLASS2> t2; singleton_test<TEST_CLASS1> t1; t1.get_instance().print(); t2.get_mutable_instance().print(); std::cout << "end main:" << std::endl; } - 1
- 2
- 3
- 4
- 5
- 6
- 7
- 8
- 9
- 10
- 11
- 12
- 13
- 14
- 15
- 16
- 17
- 18
- 19
- 20
- 21
- 22
- 23
- 24
- 25
- 26
- 27
- 28
- 29
- 30
- 31
- 32
- 33
- 34
- 35
- 36
- 37
- 38
- 39
- 40
- 41
测试结果如图:
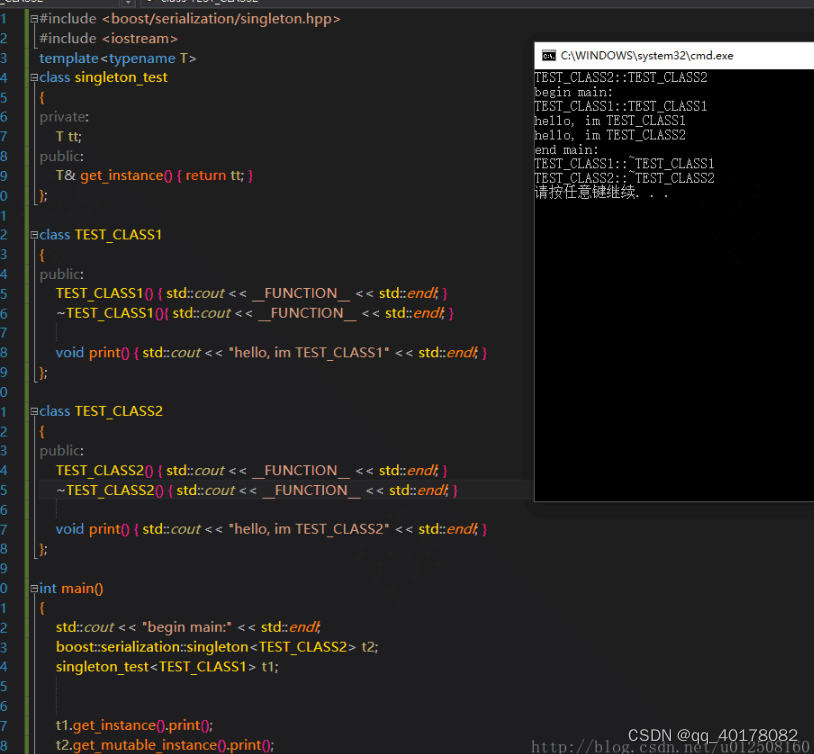

可知boost库的单件在程序入口点(main)之前已经完成构造。而两者析构顺序与声明顺序相关(逆序)。boost库的单件源码(版本boost_1_66_0)
template <class T> class singleton : public singleton_module { private: static T & m_instance; // include this to provoke instantiation at pre-execution time static void use(T const *) {} static T & get_instance() { // use a wrapper so that types T with protected constructors // can be used class singleton_wrapper : public T {}; // Use a heap-allocated instance to work around static variable // destruction order issues: this inner singleton_wrapper<> // instance may be destructed before the singleton<> instance. // Using a 'dumb' static variable lets us precisely choose the // time destructor is invoked. static singleton_wrapper *t = 0; // refer to instance, causing it to be instantiated (and // initialized at startup on working compilers) BOOST_ASSERT(! is_destroyed()); // note that the following is absolutely essential. // commenting out this statement will cause compilers to fail to // construct the instance at pre-execution time. This would prevent // our usage/implementation of "locking" and introduce uncertainty into // the sequence of object initializaition. use(& m_instance); if (!t) t = new singleton_wrapper; return static_cast<T &>(*t); } static bool & get_is_destroyed(){ static bool is_destroyed; return is_destroyed; } public: BOOST_DLLEXPORT static T & get_mutable_instance(){ BOOST_ASSERT(! is_locked()); return get_instance(); } BOOST_DLLEXPORT static const T & get_const_instance(){ return get_instance(); } BOOST_DLLEXPORT static bool is_destroyed(){ return get_is_destroyed(); } BOOST_DLLEXPORT singleton(){ get_is_destroyed() = false; } BOOST_DLLEXPORT ~singleton() { if (!get_is_destroyed()) { delete &(get_instance()); } get_is_destroyed() = true; } }; template<class T> T & singleton< T >::m_instance = singleton< T >::get_instance(); } // namespace serialization } /- 1
- 2
- 3
- 4
- 5
- 6
- 7
- 8
- 9
- 10
- 11
- 12
- 13
- 14
- 15
- 16
- 17
- 18
- 19
- 20
- 21
- 22
- 23
- 24
- 25
- 26
- 27
- 28
- 29
- 30
- 31
- 32
- 33
- 34
- 35
- 36
- 37
- 38
- 39
- 40
- 41
- 42
- 43
- 44
- 45
- 46
- 47
- 48
- 49
- 50
- 51
- 52
- 53
- 54
- 55
- 56
- 57
- 58
- 59
- 60
- 61
- 62
- 63
- 64
- 65
- 66
https://blog.csdn.net/u012508160/article/details/79127729
-
相关阅读:
HTML小游戏8 —— 小霸王游戏机网页版(附完整源码)
Linux安装tomcat(附带安装包)
redis的基础底层篇 zset的详解
鸿蒙实战项目开发:【短信服务】
Node.js | MongoDB 入门讲解 & Mongoose 模块的初步应用
100ms的延迟让亚马逊损失1%销量,如何快速降低网站延迟?
一百八十七、大数据离线数仓完整流程——步骤六、在ClickHouse的ADS层建表并用Kettle同步Hive中DWS层的结果数据
软件设计师2017上午题基础知识(易错整理)
安装nvm 和node 的那些事
COBOL语言总结(三)--JCL扩展
- 原文地址:https://blog.csdn.net/qq_40178082/article/details/133319649
