-
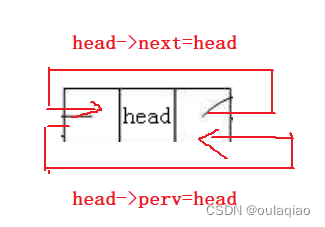
带头双向循环链表
带头双向循环链表是这样子的:

下面我们用代码来实现它,并且对他进行增删改查
1、首先定义一个节点的结构体

2、用结构体指针开辟节点SLTNode* BUYSLTNode(SLTDatatype x)//开辟节点 { SLTNode* newnode = (SLTNode*)malloc(sizeof(SLTNode)); if (newnode == NULL) { perror("malloc fail"); exit(-1); } newnode->data = x; newnode->next = NULL; newnode->prev = NULL; return newnode;//函数外面用一个结构体指针接收返回的指针 }- 1
- 2
- 3
- 4
- 5
- 6
- 7
- 8
- 9
- 10
- 11
- 12
- 13
- 14
3、因为是带哨兵的链表,所以不能只定义一个头指针指向空为链表的头结点,因该给头结点开辟以节点空间(利用上面的开辟函数实现),然后有应为是双向循环的所以还要让他的双指针都指向他自己
SLTNode* LTInit()//初始化链表 { SLTNode* phead = BUYSLTNode(-1); phead->next = phead; phead->prev = phead; return phead; }- 1
- 2
- 3
- 4
- 5
- 6
- 7
4、尾插
因为是带头的所以在尾插的时候函数传参传形参就行
及时链表为空,但是还是用一个哨兵位,所以链表为空的插入也是和不为空一样的
尾节点的查找不需要遍历结构体,因为是双向的,所以phead->perv就是链表的尾节点

void LTPushBack(SLTNode* phead, SLTDatatype x)//尾插 { assert(phead); SLTNode* tail = phead->prev; SLTNode* newnode = BUYSLTNode(x); newnode->prev = tail;//找到尾节点 tail->next = newnode; phead->prev = newnode; newnode->next = phead; }- 1
- 2
- 3
- 4
- 5
- 6
- 7
- 8
- 9
- 10
- 11
- 12
5、打印链表
从head->next开始打印,当打印到比遍历指针next后=head时停止
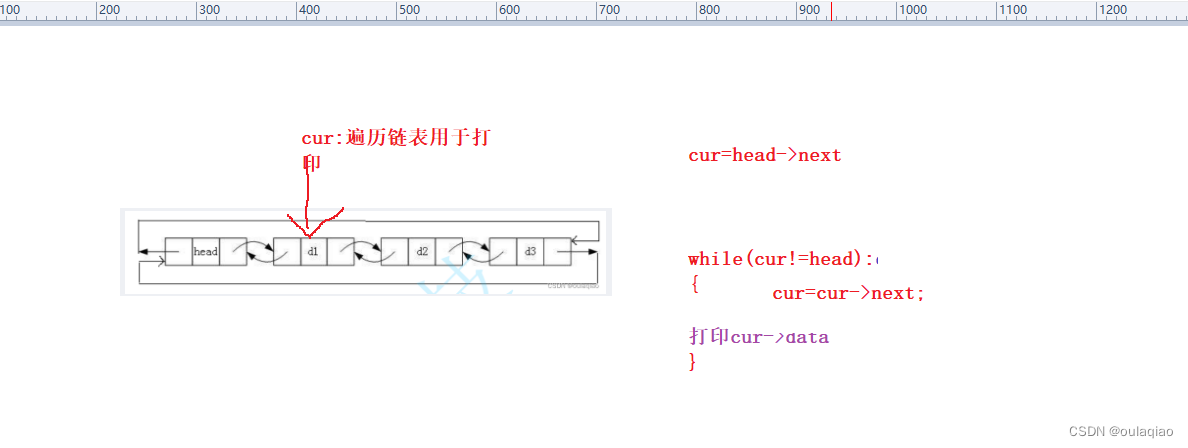
代码:void SLTPrint(SLTNode* phead)//打印 { assert(phead); printf("phead"); SLTNode* cur = phead->next; while (cur!= phead) { printf("<->%d", cur->data); cur = cur->next; } printf("\n"); }- 1
- 2
- 3
- 4
- 5
- 6
- 7
- 8
- 9
- 10
- 11
- 12
- 13
尾删
通过head->prev找到尾,然后通过尾指针的->perv找到前一个节点
释放尾节点,然后把前一个节点个头循环起来

代码:void SLTopBack(SLTNode* phead)//尾删 { assert(phead!=NULL); assert(phead->next != phead);//当只用一个哨兵位,说明链表是空的,那么就没有可以删的就报错 SLTNode* tail = phead->prev; SLTNode* per = tail->prev; free(tail); per->next = phead; phead->prev = per; }- 1
- 2
- 3
- 4
- 5
- 6
- 7
- 8
- 9
- 10
- 11
- 12
- 13
- 14
头插

代码:void SLTushFront(SLTNode* phead, SLTDatatype x)//头插 { assert(phead);//只用判断phead是否是一个空指针,不需要判断是不是只有哨兵位,及时只用哨兵位也一样可以插入 SLTNode* newnode= BUYSLTNode(x);//为要头插的数据开辟节点空间 //先链接后面 newnode->next = phead->next; phead->prev = newnode; //再链接前面 phead->next = newnode; newnode->prev = phead; }- 1
- 2
- 3
- 4
- 5
- 6
- 7
- 8
- 9
- 10
- 11
- 12
头删

代码:void SLTPopFront(SLTNode* phead)//头删 { assert(phead); assert(phead->next != phead);//需要判断是不是只有哨兵位 SLTNode* first = phead->next; SLTNode* second = first->next; free(first); phead->next = second; second->prev = phead; }- 1
- 2
- 3
- 4
- 5
- 6
- 7
- 8
- 9
- 10
求链表的长(是不包含哨兵位的)
和打印函数差不多,就是遍历一遍链表void SLTSize(SLTNode* phead)//求长 { assert(phead); int size = 0; SLTNode* cur = phead->next; while (cur != phead) { size++; cur = cur->next; } printf("%d", size); }- 1
- 2
- 3
- 4
- 5
- 6
- 7
- 8
- 9
- 10
- 11
- 12
在pos位置之前插入一个节点

代码:void SLTInsert(SLTNode* pos, SLTDatatype x)//在pos位置之前插入一个节点 { assert(pos); SLTNode* posPerv = pos->prev; SLTNode* newnode = BUYSLTNode(x); posPerv->next = newnode; newnode->prev = posPerv; newnode->next = pos; pos->prev = newnode; }- 1
- 2
- 3
- 4
- 5
- 6
- 7
- 8
- 9
- 10
- 11
- 12
有了再pos位置之前插入数据代码,那之前的头插和尾插就可以简写为:

void LTPushBack(SLTNode* phead, SLTDatatype x)//尾插 { assert(phead); //SLTNode* tail = phead->prev; //SLTNode* newnode = BUYSLTNode(x); //newnode->prev = tail;//找到尾节点 //tail->next = newnode; //phead->prev = newnode; //newnode->next = phead; SLTInsert(phead, x); } void SLTushFront(SLTNode* phead, SLTDatatype x)//头插 { assert(phead);//只用判断phead是否是一个空指针,不需要判断是不是只有哨兵位,及时只用哨兵位也一样可以插入 //SLTNode* newnode= BUYSLTNode(x);//为要头插的数据开辟节点空间 先链接后面 //newnode->next = phead->next; //phead->prev = newnode; 再链接前面 //phead->next = newnode; //newnode->prev = phead; SLTInsert(phead->next,x); }- 1
- 2
- 3
- 4
- 5
- 6
- 7
- 8
- 9
- 10
- 11
- 12
- 13
- 14
- 15
- 16
- 17
- 18
- 19
- 20
- 21
- 22
- 23
- 24
- 25
- 26
删除pos位置的节点
定义两个指针分别接收pos的前后位置节点,然后free(pos),然后把前后位置节点连接起来

void SLTErase(SLTNode* pos)//删除Pos位置 { assert(pos); SLTNode* posperv = pos->prev; SLTNode* postsil = pos->next; free(pos); posperv->next = postsil; postsil->prev = posperv; }- 1
- 2
- 3
- 4
- 5
- 6
- 7
- 8
- 9
- 10
- 11
- 12
- 13
有了这个代码,之前的头删尾删就也可以调用这个代码完成,
头删的pos=phead->next
尾删的pos=phead->perv在链表中查找一个数的位置pos
从phead->next开始遍历链表,SLTNode* SLTFind(SLTNode* phead, SLTDatatype x)//查找链表 { assert(phead); SLTNode* cur = phead->next; while (cur != phead) { if (cur->data == x) { return cur; } cur = cur->next; } return NULL; }- 1
- 2
- 3
- 4
- 5
- 6
- 7
- 8
- 9
- 10
- 11
- 12
- 13
- 14
- 15
释放链表
void SLTDestroy(SLTNode* phead)//释放链表 { asser(phead); SLTNode* cur = phead->next; while (cur != phead) { SLTNode* next = cur->next;//首先保存cur->next;等之后cur释放后任然能找到之后的节点置空 free(cur); cur = next; } free(phead); }- 1
- 2
- 3
- 4
- 5
- 6
- 7
- 8
- 9
- 10
- 11
- 12
- 13
-
相关阅读:
华为云云耀云服务器L实例评测|Elasticsearch的可视化Kibana工具安装 & IK分词器的安装和使用
VR建筑仿真场景编辑软件有助于激发创作者的灵感和创造力
健身用什么耳机,几款比较适合健身场景的耳机推荐
喜讯!持安科技入选2023年北京市知识产权试点单位!
JavaEE进阶 - Spring Boot 日志文件 - 细节狂魔
什么?console.log打印出的数据不对?
2022深圳杯D题思路:复杂水平井三维轨道设计
scrapy爬取图片
大数据ClickHouse(七):Special系列表引擎
C语言——冒泡排序
- 原文地址:https://blog.csdn.net/qq2127189274/article/details/133246403
