-
Java中swing的5种布局方式浅析
在一个传统的java项目中,遇到一个需要调整布局的需求,下面将学习网上大佬的文章,并将过程记录下来。
1、Java swing5种布局方式
- 1、 边界布局(BorderLayout)
- 2、流式布局(FlowLayout)
- 3、网格布局(GridLayout)
- 4、盒子布局(BoxLaYout)
- 5、空布局(null)
还有其他两种布局,分别是GridBagLayout(网格包布局)、CardLayout(卡片布局)。
注意:JFrame和JDialog默认布局为BorderLayout,JPanel和Applet默认布局为FlowLayout。
2、边界布局BorderLayout
实例如下
public class BorderLayoutExample extends JFrame { JButton btn1=new JButton("东"); JButton btn2=new JButton("南"); JButton btn3=new JButton("西"); JButton btn4=new JButton("北"); JButton btn5=new JButton("中"); BorderLayoutExample(){ init(); this.setTitle("边界布局"); this.setResizable(true); this.setSize(300, 300); this.setLocationRelativeTo(null); this.setDefaultCloseOperation(EXIT_ON_CLOSE); this.setVisible(true); } void init(){ this.setLayout(new BorderLayout(10,5)); //默认为0,0;水平间距10,垂直间距5 this.add(btn1,BorderLayout.EAST); this.add(btn2,BorderLayout.SOUTH); this.add(btn3,BorderLayout.WEST); this.add(btn4,BorderLayout.NORTH); this.add(btn5,BorderLayout.CENTER); } public static void main(String args[]){ new BorderLayoutExample(); } }- 1
- 2
- 3
- 4
- 5
- 6
- 7
- 8
- 9
- 10
- 11
- 12
- 13
- 14
- 15
- 16
- 17
- 18
- 19
- 20
- 21
- 22
- 23
- 24
- 25
- 26
- 27
运行结果如下
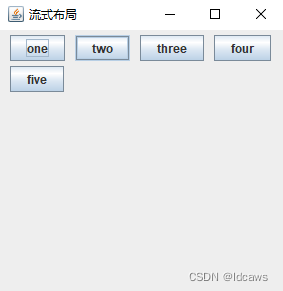
3、流式布局FlowLayout
实例如下
public class FlowLayoutExample extends JFrame { JButton btn1=new JButton("one"); JButton btn2=new JButton("two"); JButton btn3=new JButton("three"); JButton btn4=new JButton("four"); JButton btn5=new JButton("five"); FlowLayoutExample(){ init(); this.setTitle("流式布局"); this.setResizable(true); this.setSize(300, 300); this.setLocationRelativeTo(null); this.setDefaultCloseOperation(EXIT_ON_CLOSE); this.setVisible(true); } void init(){ this.setLayout(new FlowLayout(FlowLayout.LEFT,10,5)); //默认为居中;水平间距10,垂直间距5 this.add(btn1); this.add(btn2); this.add(btn3); this.add(btn4); this.add(btn5); } public static void main(String args[]){ new FlowLayoutExample(); } }- 1
- 2
- 3
- 4
- 5
- 6
- 7
- 8
- 9
- 10
- 11
- 12
- 13
- 14
- 15
- 16
- 17
- 18
- 19
- 20
- 21
- 22
- 23
- 24
- 25
- 26
- 27
运行结果如下
4、网格布局GridLayout
实例如下
public class GridLayoutExample extends JFrame { JButton btn1=new JButton("one"); JButton btn2=new JButton("two"); JButton btn3=new JButton("three"); JButton btn4=new JButton("four"); JButton btn5=new JButton("five"); GridLayoutExample(){ init(); this.setTitle("表格布局"); this.setResizable(true); this.setSize(300, 300); this.setLocationRelativeTo(null); this.setDefaultCloseOperation(EXIT_ON_CLOSE); this.setVisible(true); } void init(){ this.setLayout(new GridLayout(2,3,10,5)); //默认为1行,n列;2行3列,水平间距10,垂直间距5 this.add(btn1); this.add(btn2); this.add(btn3); this.add(btn4); this.add(btn5); } public static void main(String args[]){ new GridLayoutExample(); } }- 1
- 2
- 3
- 4
- 5
- 6
- 7
- 8
- 9
- 10
- 11
- 12
- 13
- 14
- 15
- 16
- 17
- 18
- 19
- 20
- 21
- 22
- 23
- 24
- 25
- 26
- 27
运行结果如下

5、盒子布局BoxLaYout
实例如下
public class BoxLayoutExample extends JFrame { JButton btn1=new JButton("one"); JButton btn2=new JButton("two"); JButton btn3=new JButton("three"); JButton btn4=new JButton("four"); JButton btn5=new JButton("five"); BoxLayoutExample(){ init(); this.setTitle("表格布局"); this.setResizable(true); this.setSize(300, 300); this.setLocationRelativeTo(null); this.setDefaultCloseOperation(EXIT_ON_CLOSE); this.setVisible(true); } void init(){ this.setLayout(new BoxLayout(this.getContentPane(),BoxLayout.X_AXIS)); //可以使用Box容器代替 //Box box = new Box(BoxLayout.Y_AXIS);box.add(btn...);box.add(creat..); this.add(btn1); this.add(btn2); this.getContentPane().add(Box.createHorizontalStrut(10)); //采用x布局时,添加固定宽度组件隔开 //this.getContentPane().add(Box.createVerticalStrut(5)); //采用y布局时,添加固定高度组件隔开 this.add(btn3); this.add(btn4); this.add(btn5); } public static void main(String args[]){ new BoxLayoutExample(); } }- 1
- 2
- 3
- 4
- 5
- 6
- 7
- 8
- 9
- 10
- 11
- 12
- 13
- 14
- 15
- 16
- 17
- 18
- 19
- 20
- 21
- 22
- 23
- 24
- 25
- 26
- 27
- 28
- 29
- 30
- 31
运行结果如下
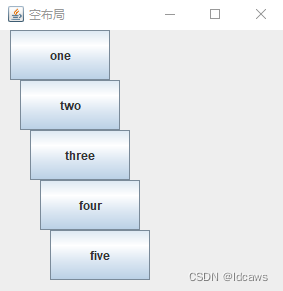
6、空布局null
实例如下
public class NullLayoutExample extends JFrame { JButton btn1=new JButton("one"); JButton btn2=new JButton("two"); JButton btn3=new JButton("three"); JButton btn4=new JButton("four"); JButton btn5=new JButton("five"); NullLayoutExample(){ init(); this.setTitle("空布局"); this.setResizable(true); this.setSize(300, 300); this.setLocationRelativeTo(null); this.setDefaultCloseOperation(EXIT_ON_CLOSE); this.setVisible(true); } void init(){ this.setLayout(null); btn1.setBounds(10, 0, 100, 50); //x坐标10,y坐标0,组件宽100,高50 btn2.setBounds(20, 50, 100, 50); btn3.setBounds(30, 100, 100, 50); btn4.setBounds(40, 150, 100, 50); btn5.setBounds(50, 200, 100, 50); this.add(btn1); this.add(btn2); this.add(btn3); this.add(btn4); this.add(btn5); } public static void main(String args[]){ new NullLayoutExample(); } }- 1
- 2
- 3
- 4
- 5
- 6
- 7
- 8
- 9
- 10
- 11
- 12
- 13
- 14
- 15
- 16
- 17
- 18
- 19
- 20
- 21
- 22
- 23
- 24
- 25
- 26
- 27
- 28
- 29
- 30
- 31
- 32
运行结果如下
注:感兴趣的小伙伴可以试试可以直接运行 -
相关阅读:
Instant Neural Graphics Primitives with a Multiresolution Hash Encoding以及源码浅析
浅谈C++|多态篇
JVM 对象的访问方式
woocommerce 数据库删除图片路径
机器学习【聚类算法2】
Mathcad的数组使用
从数学老师转行到银行做开发,我都经历了什么……
基于Java+SpringBoot+vue+elementui图书商城系统设计实现
运算符,switch
[NOIP2015 提高组] 跳石头—二分答案
- 原文地址:https://blog.csdn.net/leijie0322/article/details/133169818
