-
spring security教程(一)--认证
零.简介
【1】简介
【2】登录校验流程

【3】原理(入门的时候先了解一下就好)


一.思路分析
二.建表
确保你已经建立好一张用户表,并且引入springboot,mybatis,mp,slf4j等基础依赖。
即使你有多个角色你也可以将他们的相同信息(如用户名密码登都提取到一张表中)。并根据表编写对应实体类和mapper。
上面是我建立的我的user表,我把学生,督导,老师,辅导员的相同信息提取到一张表中。
- @Data
- @NoArgsConstructor
- @AllArgsConstructor
- @TableName("user")
- public class User {
- @TableId(type = IdType.AUTO)
- private Integer id;
- private String no;
- private String password;
- private String name;
- private String gender;
- private String college;
- private String userType;
- }
- @Mapper
- public interface UserMapper extends BaseMapper
{ - }
三.引入依赖
- <dependency>
- <groupId>com.alibabagroupId>
- <artifactId>fastjsonartifactId>
- <version>1.2.62version>
- dependency>
- <dependency>
- <groupId>junitgroupId>
- <artifactId>junitartifactId>
- <scope>testscope>
- dependency>
- 下面这个依赖不用写版本是因为这个依赖继承spring boot,而springboot中已经有版本管理了
- <dependency>
- <groupId>org.springframework.bootgroupId>
- <artifactId>spring-boot-starter-data-redisartifactId>
- dependency>
- <dependency>
- <groupId>org.springframework.bootgroupId>
- <artifactId>spring-boot-starter-securityartifactId>
- dependency>
- <dependency>
- <groupId>io.jsonwebtokengroupId>
- <artifactId>jjwtartifactId>
- <version>0.9.1version>
- dependency>
四.工具类
【1】redis
(1)redis使用FastJson序列化配置
- package com.flyingpig.util;
- import com.alibaba.fastjson.JSON;
- import com.alibaba.fastjson.serializer.SerializerFeature;
- import com.fasterxml.jackson.databind.JavaType;
- import com.fasterxml.jackson.databind.ObjectMapper;
- import com.fasterxml.jackson.databind.type.TypeFactory;
- import org.springframework.data.redis.serializer.RedisSerializer;
- import org.springframework.data.redis.serializer.SerializationException;
- import com.alibaba.fastjson.parser.ParserConfig;
- import org.springframework.util.Assert;
- import java.nio.charset.Charset;
- /**
- * Redis使用FastJson序列化
- *
- */
- public class FastJsonRedisSerializer
implements RedisSerializer - {
- public static final Charset DEFAULT_CHARSET = Charset.forName("UTF-8");
- private Class
clazz; - static
- {
- ParserConfig.getGlobalInstance().setAutoTypeSupport(true);
- }
- public FastJsonRedisSerializer(Class
clazz) - {
- super();
- this.clazz = clazz;
- }
- @Override
- public byte[] serialize(T t) throws SerializationException
- {
- if (t == null)
- {
- return new byte[0];
- }
- return JSON.toJSONString(t, SerializerFeature.WriteClassName).getBytes(DEFAULT_CHARSET);
- }
- @Override
- public T deserialize(byte[] bytes) throws SerializationException
- {
- if (bytes == null || bytes.length <= 0)
- {
- return null;
- }
- String str = new String(bytes, DEFAULT_CHARSET);
- return JSON.parseObject(str, clazz);
- }
- protected JavaType getJavaType(Class clazz)
- {
- return TypeFactory.defaultInstance().constructType(clazz);
- }
- }
(2)redis配置类--如果没有redis配置类,不同方法中的redis数据还是不能共用
- package com.flyingpig.config;
- import com.flyingpig.util.FastJsonRedisSerializer;
- import org.springframework.context.annotation.Bean;
- import org.springframework.context.annotation.Configuration;
- import org.springframework.data.redis.connection.RedisConnectionFactory;
- import org.springframework.data.redis.core.RedisTemplate;
- import org.springframework.data.redis.serializer.StringRedisSerializer;
- @Configuration
- public class RedisConfig {
- @Bean
- @SuppressWarnings(value = { "unchecked", "rawtypes" })
- public RedisTemplate
- {
- RedisTemplate
- template.setConnectionFactory(connectionFactory);
- FastJsonRedisSerializer serializer = new FastJsonRedisSerializer(Object.class);
- // 使用StringRedisSerializer来序列化和反序列化redis的key值
- template.setKeySerializer(new StringRedisSerializer());
- template.setValueSerializer(serializer);
- // Hash的key也采用StringRedisSerializer的序列化方式
- template.setHashKeySerializer(new StringRedisSerializer());
- template.setHashValueSerializer(serializer);
- template.afterPropertiesSet();
- return template;
- }
- }
(3)redis工具类
- package com.flyingpig.util;
- import org.springframework.beans.factory.annotation.Autowired;
- import org.springframework.data.redis.core.BoundSetOperations;
- import org.springframework.data.redis.core.HashOperations;
- import org.springframework.data.redis.core.RedisTemplate;
- import org.springframework.data.redis.core.ValueOperations;
- import org.springframework.stereotype.Component;
- import java.util.*;
- import java.util.concurrent.TimeUnit;
- @SuppressWarnings(value = { "unchecked", "rawtypes" })
- @Component
- public class RedisCache
- {
- @Autowired
- public RedisTemplate redisTemplate;
- /**
- * 缓存基本的对象,Integer、String、实体类等
- *
- * @param key 缓存的键值
- * @param value 缓存的值
- */
- public
void setCacheObject(final String key, final T value) - {
- redisTemplate.opsForValue().set(key, value);
- }
- /**
- * 缓存基本的对象,Integer、String、实体类等
- *
- * @param key 缓存的键值
- * @param value 缓存的值
- * @param timeout 时间
- * @param timeUnit 时间颗粒度
- */
- public
void setCacheObject(final String key, final T value, final Integer timeout, final TimeUnit timeUnit) - {
- redisTemplate.opsForValue().set(key, value, timeout, timeUnit);
- }
- /**
- * 设置有效时间
- *
- * @param key Redis键
- * @param timeout 超时时间
- * @return true=设置成功;false=设置失败
- */
- public boolean expire(final String key, final long timeout)
- {
- return expire(key, timeout, TimeUnit.SECONDS);
- }
- /**
- * 设置有效时间
- *
- * @param key Redis键
- * @param timeout 超时时间
- * @param unit 时间单位
- * @return true=设置成功;false=设置失败
- */
- public boolean expire(final String key, final long timeout, final TimeUnit unit)
- {
- return redisTemplate.expire(key, timeout, unit);
- }
- /**
- * 获得缓存的基本对象。
- *
- * @param key 缓存键值
- * @return 缓存键值对应的数据
- */
- public
T getCacheObject(final String key) - {
- ValueOperations
- return operation.get(key);
- }
- /**
- * 删除单个对象
- *
- * @param key
- */
- public boolean deleteObject(final String key)
- {
- return redisTemplate.delete(key);
- }
- /**
- * 删除集合对象
- *
- * @param collection 多个对象
- * @return
- */
- public long deleteObject(final Collection collection)
- {
- return redisTemplate.delete(collection);
- }
- /**
- * 缓存List数据
- *
- * @param key 缓存的键值
- * @param dataList 待缓存的List数据
- * @return 缓存的对象
- */
- public
long setCacheList(final String key, final List dataList) - {
- Long count = redisTemplate.opsForList().rightPushAll(key, dataList);
- return count == null ? 0 : count;
- }
- /**
- * 获得缓存的list对象
- *
- * @param key 缓存的键值
- * @return 缓存键值对应的数据
- */
- public
List getCacheList(final String key) - {
- return redisTemplate.opsForList().range(key, 0, -1);
- }
- /**
- * 缓存Set
- *
- * @param key 缓存键值
- * @param dataSet 缓存的数据
- * @return 缓存数据的对象
- */
- public
BoundSetOperations dataSet) - {
- BoundSetOperations
- Iterator
it = dataSet.iterator(); - while (it.hasNext())
- {
- setOperation.add(it.next());
- }
- return setOperation;
- }
- /**
- * 获得缓存的set
- *
- * @param key
- * @return
- */
- public
Set getCacheSet(final String key) - {
- return redisTemplate.opsForSet().members(key);
- }
- /**
- * 缓存Map
- *
- * @param key
- * @param dataMap
- */
- public
void setCacheMap(final String key, final Map - {
- if (dataMap != null) {
- redisTemplate.opsForHash().putAll(key, dataMap);
- }
- }
- /**
- * 获得缓存的Map
- *
- * @param key
- * @return
- */
- public
Map - {
- return redisTemplate.opsForHash().entries(key);
- }
- /**
- * 往Hash中存入数据
- *
- * @param key Redis键
- * @param hKey Hash键
- * @param value 值
- */
- public
void setCacheMapValue(final String key, final String hKey, final T value) - {
- redisTemplate.opsForHash().put(key, hKey, value);
- }
- /**
- * 获取Hash中的数据
- *
- * @param key Redis键
- * @param hKey Hash键
- * @return Hash中的对象
- */
- public
T getCacheMapValue(final String key, final String hKey) - {
- HashOperations
- return opsForHash.get(key, hKey);
- }
- /**
- * 删除Hash中的数据
- *
- * @param key
- * @param hkey
- */
- public void delCacheMapValue(final String key, final String hkey)
- {
- HashOperations hashOperations = redisTemplate.opsForHash();
- hashOperations.delete(key, hkey);
- }
- /**
- * 获取多个Hash中的数据
- *
- * @param key Redis键
- * @param hKeys Hash键集合
- * @return Hash对象集合
- */
- public
List getMultiCacheMapValue(final String key, final Collection - {
- return redisTemplate.opsForHash().multiGet(key, hKeys);
- }
- /**
- * 获得缓存的基本对象列表
- *
- * @param pattern 字符串前缀
- * @return 对象列表
- */
- public Collection
keys(final String pattern) - {
- return redisTemplate.keys(pattern);
- }
- }
【2】JWT
- package com.flyingpig.util;
- import io.jsonwebtoken.Claims;
- import io.jsonwebtoken.JwtBuilder;
- import io.jsonwebtoken.Jwts;
- import io.jsonwebtoken.SignatureAlgorithm;
- import javax.crypto.SecretKey;
- import javax.crypto.spec.SecretKeySpec;
- import java.util.Base64;
- import java.util.Date;
- import java.util.Map;
- import java.util.UUID;
- public class JwtUtil {
- //有效期为
- public static final Long JWT_TTL = 60 * 60 *1000L;// 60 * 60 *1000 一个小时
- //设置秘钥明文
- public static final String JWT_KEY = "Zmx5aW5ncGln";//flyingpig
- public static String getUUID(){
- String token = UUID.randomUUID().toString().replaceAll("-", "");
- return token;
- }
- /**
- * 生成jtw
- * @param subject token中要存放的数据(json格式)
- * @return
- */
- public static String createJWT(String subject) {
- JwtBuilder builder = getJwtBuilder(subject, null, getUUID());// 设置过期时间
- return builder.compact();
- }
- /**
- * 生成jtw
- * @param subject token中要存放的数据(json格式)
- * @param ttlMillis token超时时间
- * @return
- */
- public static String createJWT(String subject, Long ttlMillis) {
- JwtBuilder builder = getJwtBuilder(subject, ttlMillis, getUUID());// 设置过期时间
- return builder.compact();
- }
- private static JwtBuilder getJwtBuilder(String subject, Long ttlMillis, String uuid) {
- SignatureAlgorithm signatureAlgorithm = SignatureAlgorithm.HS256;
- SecretKey secretKey = generalKey();
- long nowMillis = System.currentTimeMillis();
- Date now = new Date(nowMillis);
- if(ttlMillis==null){
- ttlMillis=JwtUtil.JWT_TTL;
- }
- long expMillis = nowMillis + ttlMillis;
- Date expDate = new Date(expMillis);
- return Jwts.builder()
- .setId(uuid) //唯一的ID
- .setSubject(subject) // 主题 可以是JSON数据
- .setIssuer("flyingpig") // 签发者
- .setIssuedAt(now) // 签发时间
- .signWith(signatureAlgorithm, secretKey) //使用HS256对称加密算法签名, 第二个参数为秘钥
- .setExpiration(expDate);
- }
- /**
- * 创建token
- * @param id
- * @param subject
- * @param ttlMillis
- * @return
- */
- public static String createJWT(String id, String subject, Long ttlMillis) {
- JwtBuilder builder = getJwtBuilder(subject, ttlMillis, id);// 设置过期时间
- return builder.compact();
- }
- public static void main(String[] args) throws Exception {
- String jwtKey = "flyingpig";
- String encodedKey = Base64.getEncoder().encodeToString(jwtKey.getBytes());
- System.out.println(encodedKey);
- }
- /**
- * 生成加密后的秘钥 secretKey
- * @return
- */
- public static SecretKey generalKey() {
- byte[] encodedKey = Base64.getDecoder().decode(JwtUtil.JWT_KEY);
- SecretKey key = new SecretKeySpec(encodedKey, 0, encodedKey.length, "AES");
- return key;
- }
- //解析JWT令牌
- public static Claims parseJwt(String jwt) {
- SecretKey secretKey = generalKey();
- return Jwts.parser()
- .setSigningKey(secretKey)
- .parseClaimsJws(jwt)
- .getBody();
- }
- }
【3】WebUtils
- package com.flyingpig.util;
- import javax.servlet.http.HttpServletResponse;
- import java.io.IOException;
- public class WebUtils
- {
- /**
- * 将字符串渲染到客户端,往响应当中去写入数据
- *
- * @param response 渲染对象
- * @param string 待渲染的字符串
- * @return null
- */
- public static String renderString(HttpServletResponse response, String string) {
- try
- {
- response.setStatus(200);
- response.setContentType("application/json");
- response.setCharacterEncoding("utf-8");
- response.getWriter().print(string);
- }
- catch (IOException e)
- {
- e.printStackTrace();
- }
- return null;
- }
- }
五.核心代码实现
1.编写UserDetailsServiceImpl实现UserDetailsService接口--通过用户名从数据库查询信息
- package com.flyingpig.service.serviceImpl;
- import com.baomidou.mybatisplus.core.conditions.query.QueryWrapper;
- import com.flyingpig.dto.LoginUser;
- import com.flyingpig.mapper.UserMapper;
- import com.flyingpig.untity.User;
- import org.springframework.beans.factory.annotation.Autowired;
- import org.springframework.security.core.userdetails.UserDetails;
- import org.springframework.security.core.userdetails.UserDetailsService;
- import org.springframework.security.core.userdetails.UsernameNotFoundException;
- import org.springframework.stereotype.Service;
- import java.util.List;
- import java.util.Objects;
- @Service
- public class UserDetailsServiceImpl implements UserDetailsService {
- @Autowired
- private UserMapper userMapper;
- @Override
- public UserDetails loadUserByUsername(String username) throws UsernameNotFoundException{
- //查询用户信息
- QueryWrapper
queryWrapper = new QueryWrapper<>(); - queryWrapper.eq("no",username);
- User user = userMapper.selectOne(queryWrapper);
- //如果没有查询到用户就抛出异常
- if(Objects.isNull(user)){
- throw new RuntimeException("用户名或者密码错误");
- }
- //TODO 根据用户查询权限信息,添加到LoginUser中
- //把数据封装成UserDetails返回
- return new LoginUser(user);
- }
- }
2.编写LoginUser实现UserDetails接口--封装用户信息
- @Data
- @NoArgsConstructor
- @AllArgsConstructor
- public class LoginUser implements UserDetails {
- private User user;
- //获取用户权限
- @Override
- public Collectionextends GrantedAuthority> getAuthorities() {
- return null;
- }
- //判断用户名和密码是否没过期
- @Override
- public boolean isAccountNonExpired() {
- return true;
- }
- //返回用户名
- @Override
- public String getUsername(){
- return user.getNo();
- }
- //返回密码
- @Override
- public String getPassword(){
- return user.getPassword();
- }
- @Override
- public boolean isAccountNonLocked() {
- return true;
- }
- @Override
- public boolean isCredentialsNonExpired() {
- return true;
- }
- @Override
- public boolean isEnabled() {
- return true;
- }
- }
3.编写登录和登出接口LoginController
- @RestController
- @CrossOrigin(origins = "*", allowedHeaders = "*")
- @RequestMapping("/user")
- public class LoginController {
- @Autowired
- private LoginServcie loginServcie;
- @PostMapping("/login")
- public Result login(@RequestBody User user) {
- return loginServcie.login(user);
- }
- @RequestMapping("/logout")
- public Result logout(){
- return loginServcie.logout();
- }
- }
4.编写SecurityConfig继承WebSecurityConfigurerAdapter接口--确定密码加密方式并让spring security对登录接口允许匿名访问
里面有各段代码的详细解释
- @Configuration
- public class SecurityConfig extends WebSecurityConfigurerAdapter {
- @Bean
- public PasswordEncoder passwordEncoder(){
- return new BCryptPasswordEncoder();
- }
- @Override
- protected void configure(HttpSecurity http) throws Exception {
- http
- //关闭csrf
- .csrf().disable()
- //不会创建HttpSession并且不通过Session获取SecurityContext对象,因为前后端分离基本session就已经灭有用了
- .sessionManagement().sessionCreationPolicy(SessionCreationPolicy.STATELESS)
- .and()
- .authorizeRequests()//对请求认证规则进行相应配置
- //1.对于登录,修改密码和注册接口放行(antMatchers)
- // 并且在后面加上anonymous方法允许匿名访问而不允许在已登录状态访问
- //简单说加上anonymous在没有token的情况下可以访问,携带token反而不能访问,一般用于登录注册接口之类的
- //与之相对应的是加上permiAll(),加上后这个接口有无token(有无身份)都可以访问,一般用于静态资源的放行
- .antMatchers("/user/login").anonymous()
- //2.除上面外的所有请求任意的用户认证之后可以访问
- //后面会进行精细化授权
- .anyRequest().authenticated();
- }
- @Bean
- @Override
- public AuthenticationManager authenticationManagerBean() throws Exception {
- return super.authenticationManagerBean();
- }
- }
5.编写LoginService及其impl
- public interface LoginService {
- Result login(User user);
- Result logout();
- }
- @Service
- public class LoginServiceImpl implements LoginService {
- @Autowired
- private AuthenticationManager authenticationManager;
- @Autowired
- private RedisCache redisCache;
- @Override
- public Result login(User user) {
- //AuthenticationManager authenticate进行用户认证
- UsernamePasswordAuthenticationToken authenticationToken = new UsernamePasswordAuthenticationToken(user.getNo(),user.getPassword());
- Authentication authenticate = authenticationManager.authenticate(authenticationToken);
- //如果认证没通过,给出对应的提示
- if(Objects.isNull(authenticate)){
- throw new RuntimeException("登录失败");
- }
- //如果认证通过了,使用userid生成一个jwt jwt存入ResponseResult返回
- LoginUser loginUser = (LoginUser) authenticate.getPrincipal();
- String userid = loginUser.getUser().getId().toString();
- String jwt = JwtUtil.createJWT(userid);
- Map
- map.put("token",jwt);
- //把完整的用户信息存入redis userid作为key
- redisCache.setCacheObject("login:"+userid,loginUser);
- return Result.success(map);
- }
- @Override
- public Result logout() {
- Authentication authentication = SecurityContextHolder.getContext().getAuthentication();
- LoginUser loginUser = (LoginUser) authentication.getPrincipal();
- Integer userid = loginUser.getUser().getId();
- redisCache.deleteObject("login:"+userid);
- return new Result(200,"退出成功",null);
- }
- }
6.测试接口
下载redis,并启动redis-server,用postman发送请求,返回token
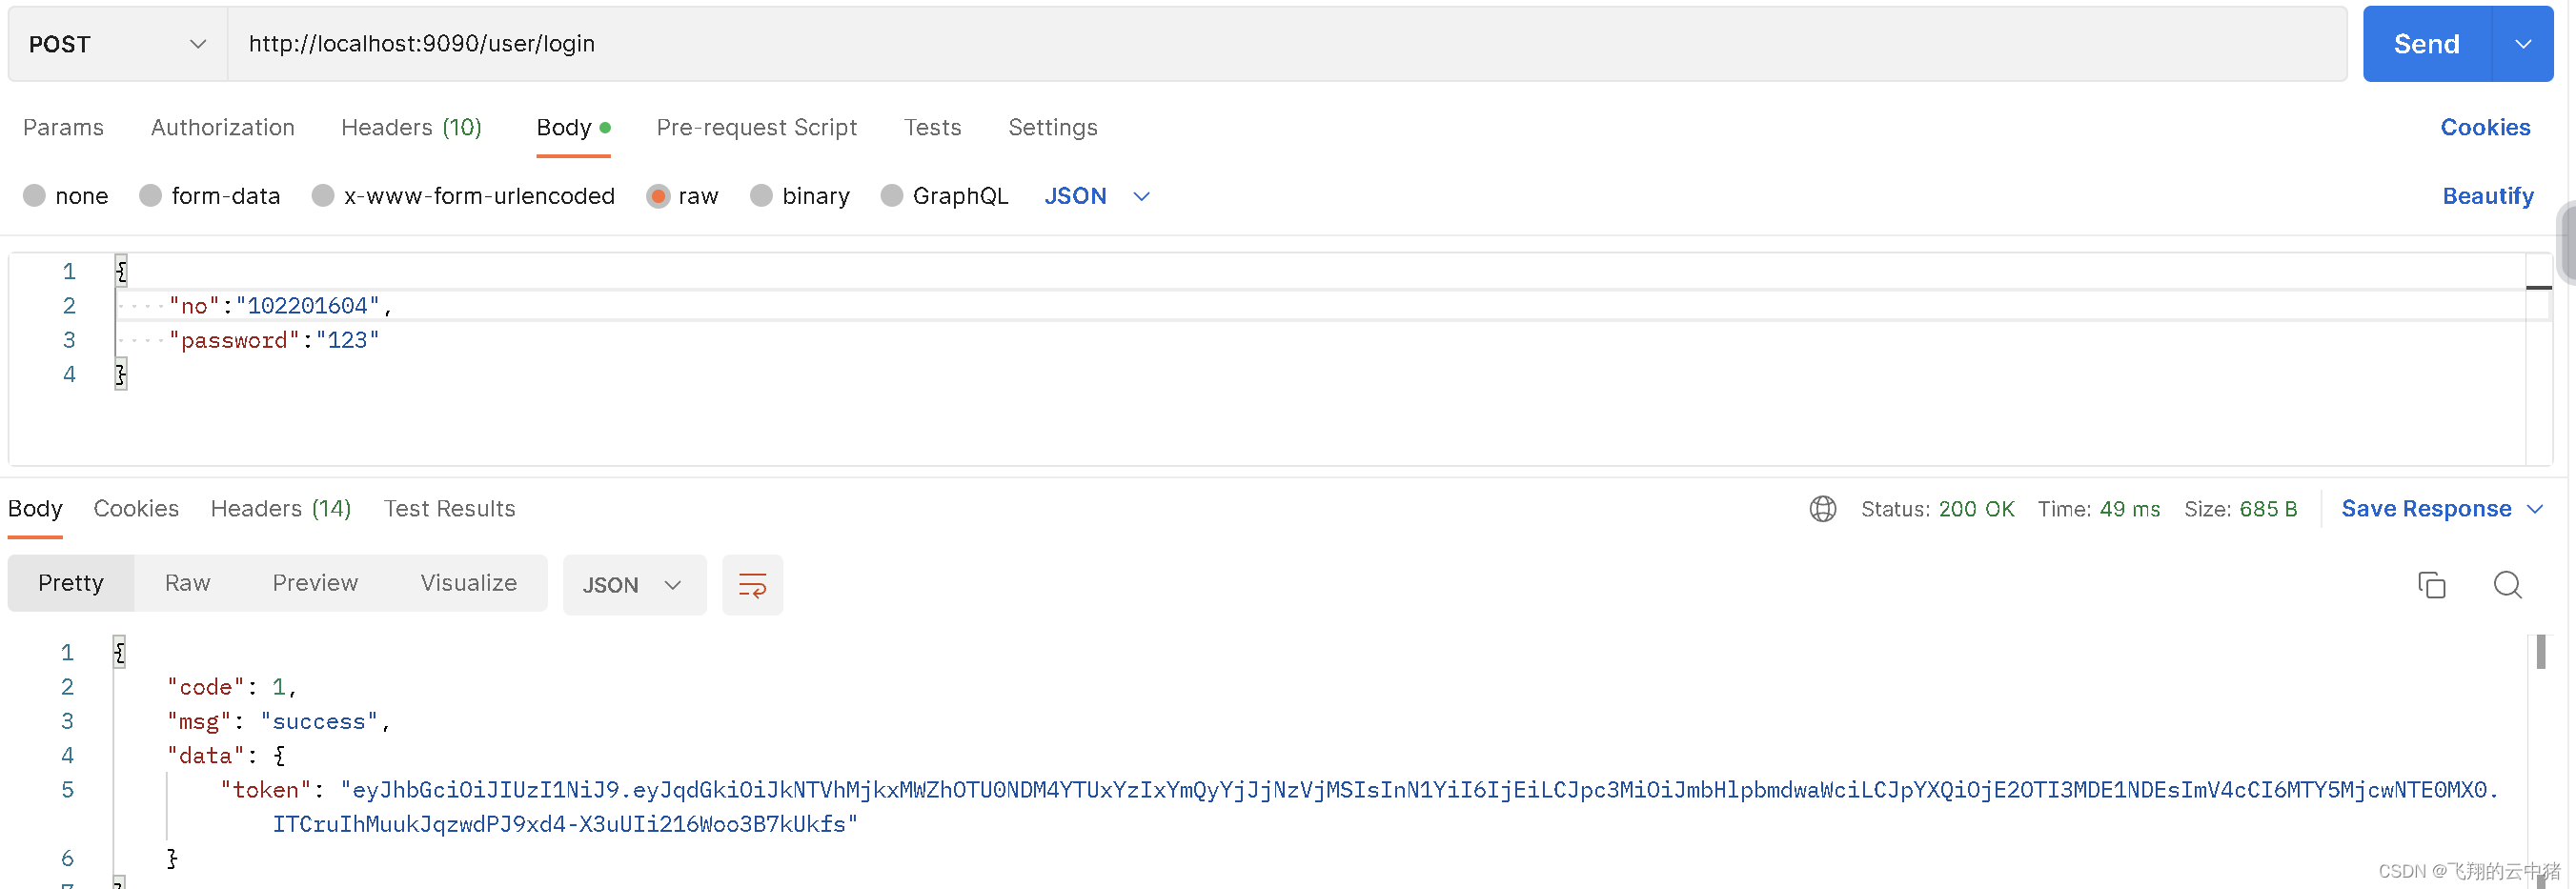
注意请求体要写对,不然接口会403报错
7.认证JwtAuthenticationTokenFilter继承OncePerRequestFilter--自定义认证过滤器
这个过滤器会去获取请求头中的token,对token进行解析取出其中的userid。使用userid去redis获取对应的LoginUser对象,然后封装Authentication对象存入SecurityContextHolder。
- @Component
- public class JwtAuthenticationTokenFilter extends OncePerRequestFilter {
- @Autowired
- private RedisCache redisCache;
- @Override
- protected void doFilterInternal(HttpServletRequest request, HttpServletResponse response, FilterChain filterChain) throws ServletException, IOException {
- //获取请求路径
- String requestPath = request.getRequestURI();
- //判断请求路径是否为"/user/login"
- if (requestPath.equals("/user/login")) {
- //放行"/user/login"请求
- filterChain.doFilter(request, response);
- return;
- }
- //获取token
- String authorization = request.getHeader("Authorization");
- String token = authorization.replace("Bearer ", "");
- if (!StringUtils.hasText(token)) {
- //放行
- filterChain.doFilter(request, response);
- return;
- }
- //解析token
- String userid;
- try {
- Claims claims = JwtUtil.parseJwt(token);
- userid = claims.getSubject();
- } catch (Exception e) {
- e.printStackTrace();
- throw new RuntimeException("token非法");
- }
- //从redis中获取用户信息
- String redisKey = "login:" + userid;
- LoginUser loginUser = redisCache.getCacheObject(redisKey);
- if(Objects.isNull(loginUser)){
- throw new RuntimeException("用户未登录");
- }
- //存入SecurityContextHolder
- //TODO 获取权限信息封装到Authentication中
- UsernamePasswordAuthenticationToken authenticationToken =
- new UsernamePasswordAuthenticationToken(loginUser,null,loginUser.getAuthorities());
- SecurityContextHolder.getContext().setAuthentication(authenticationToken);
- //放行
- filterChain.doFilter(request, response);
- }
- }
这个token校验过滤器会自动添加到过滤器链中
注意:我这里token传过来使用的格式是:Authorization: Bearer

当然你也可以简单的使用:token:
,只要改一下过滤器中获取token的那一两句代码就可以了。 六.补充
1.从Redis中获取到loginUser的信息
在其他接口中,你可以通过以下步骤来从缓存中获取 `loginUser`:
1. 首先,确保已经注入了RedisCache对象。可以使用@Autowired注解将RedisCache注入到其他接口的类中。
- @Autowired
- private RedisCache redisCache;
2. 在需要实现loginSeriveImpl接口中,通过用户的userid构建缓存的 key 值,前面已经写好了
- //把完整的用户信息存入redis userid作为key
- redisCache.setCacheObject("login:"+userid,loginUser);
即里面的这行代码。
3. 在需要用到loginUser的地方使用redisCache对象从缓存中获取loginUser
LoginUser loginUser = redisCache.getCacheObject(cacheKey);4. 确认获取到了 `loginUser`
- if (Objects.isNull(loginUser)) {
- // 缓存中没有对应的登录信息
- // 处理缓存中没有登录信息的情况
- } else {
- // 缓存中有对应的登录信息
- // 处理缓存中的登录信息
- }
在处理缓存中没有登录信息的情况下,你可以根据实际需求进行错误处理或者重新进行用户认证。
2.解决跨域问题
资料--什么是跨域问题?
【1】在只有springboot的时候只需要在springboot中处理跨域问题即可。
- @Configuration
- public class CorsConfig {
- /**
- * 允许跨域调用的过滤器
- */
- @Bean
- public CorsFilter corsFilter() {
- CorsConfiguration config = new CorsConfiguration();
- //允许白名单域名进行跨域调用
- config.addAllowedOriginPattern("*");
- //允许跨越发送cookie
- config.setAllowCredentials(true);
- //放行全部原始头信息
- config.addAllowedHeader("*");
- //允许所有请求方法跨域调用
- config.addAllowedMethod("*");
- UrlBasedCorsConfigurationSource source = new UrlBasedCorsConfigurationSource();
- source.registerCorsConfiguration("/**", config);
- return new CorsFilter(source);
- }
- }
【2】加入springsecurity之后,除了要上面的类,还需要在前面的SecurityConfig的config方法中允许跨域:
- //允许跨域
- http.cors();
配置类中的完整代码如下:
- @Configuration
- public class SecurityConfig extends WebSecurityConfigurerAdapter {
- @Bean
- public PasswordEncoder passwordEncoder(){
- return new BCryptPasswordEncoder();
- }
- @Autowired
- JwtAuthenticationTokenFilter jwtAuthenticationTokenFilter;
- @Override
- protected void configure(HttpSecurity http) throws Exception {
- http
- //关闭csrf
- .csrf().disable()
- //不通过Session获取SecurityContext
- .sessionManagement().sessionCreationPolicy(SessionCreationPolicy.STATELESS)
- .and()
- .authorizeRequests()
- // 对于登录接口 允许匿名访问
- .antMatchers("/user/login").anonymous()
- // 除上面外的所有请求全部需要鉴权认证
- .anyRequest().authenticated();
- //把token校验过滤器添加到过滤器链中
- http.addFilterBefore(jwtAuthenticationTokenFilter, UsernamePasswordAuthenticationFilter.class);
- //允许跨域
- http.cors();
- }
- @Bean
- @Override
- public AuthenticationManager authenticationManagerBean() throws Exception {
- return super.authenticationManagerBean();
- }
- }
-
相关阅读:
科大讯飞发布讯飞星火 3.0;开源AI的现状
使用Generator处理二叉树的中序遍历
深度学习 Transformer架构解析
Spring整合MyBatis导致一级缓存失效问题
笔记_HTML+CSS精选
Python数据分析
深度自编码网络的集成学习ICPS入侵检测模型
cmake简洁教程 - 第五篇
机车整备场数字孪生 | 图扑智慧铁路
Linux常用命令之top监测
- 原文地址:https://blog.csdn.net/bjjx123456/article/details/132414814
