-
【Jenkins】pipeline流水线
【Jenkins】pipeline
【一】什么是pipeline?
流水线既能作为任务的本身,也能作为jenkinsfile,使用流水线可以让我们的任务从ui手动操作,转换为代码化,像docker的dockerfile一样,从shell命令到配置文件,更适合大型项目,可以让团队其他开发者同事参与进来,同时也可以编辑开发jenkinswebui不能完成的复杂的构建逻辑,作为开发者可读性也更好
pipeline就是一套运行于jenkins上的工作流程框架,将原本独立运行于单个或者多个节点的任务连接起来,实现单个任务难以完成的复杂流程编排与可视化;
Pipeline 是Jenkins 2.X 的最核心的特性,帮助Jenkins 实现从CI 到 CD 与 DevOps的转变。
Pipeline 是一组插件,让jenkins 可以实现持续交付管道的落地和实施。持续交付管道是将软件从版本控制阶段到交付给用户/客户的完整过程的自动化表现。【二】pipeline任务
【1】安装pipeline插件
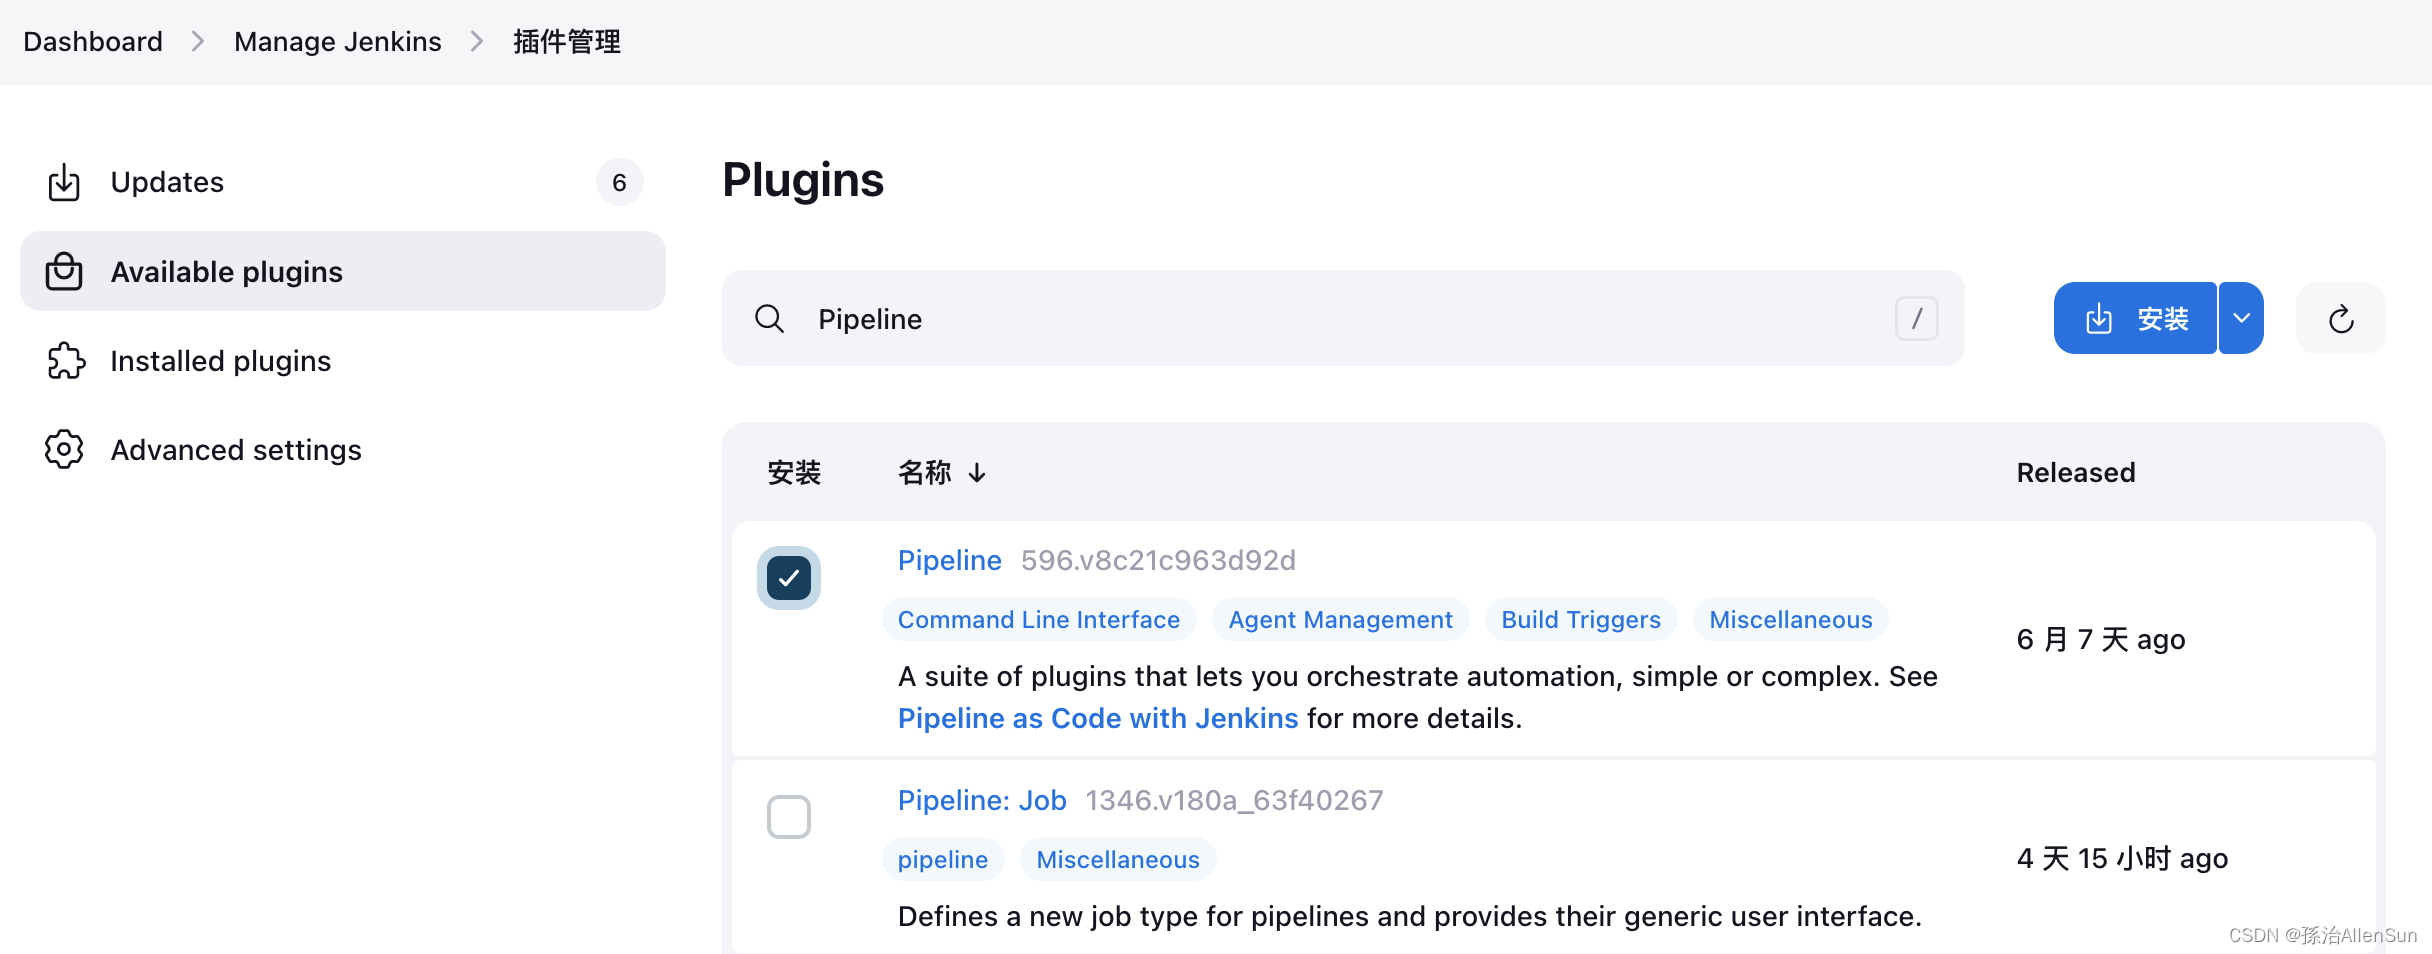

【2】创建pipeline任务
(1)新增任务,选择流水线

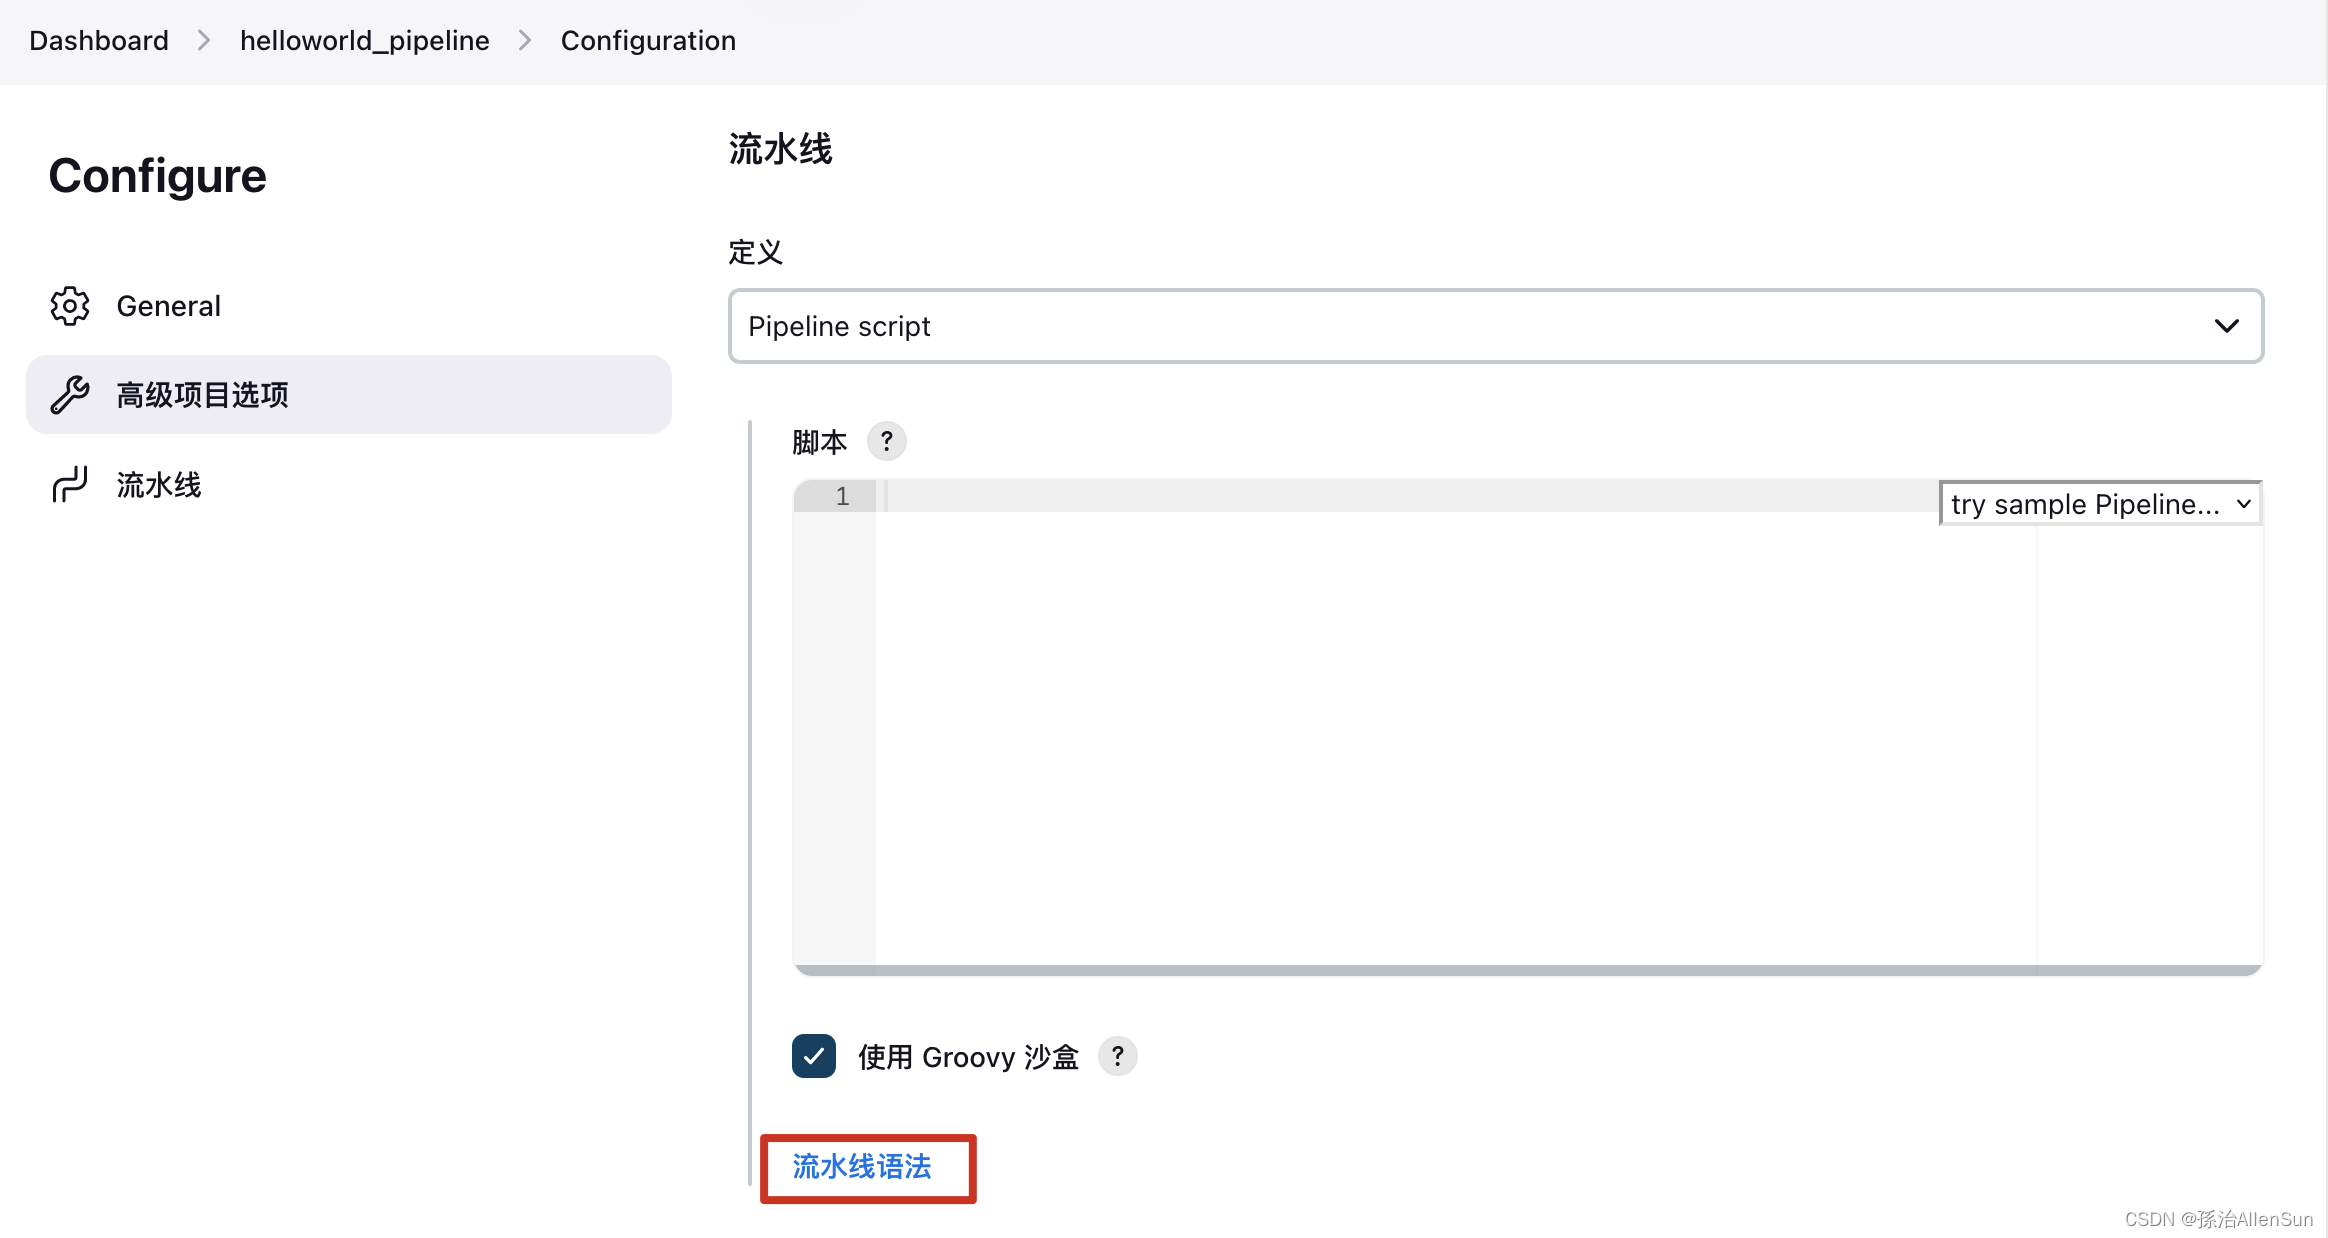
(2)Pipeline定义有两种方式:
一种是Pipeline Script ,是直接把脚本内容写到脚本对话框中;
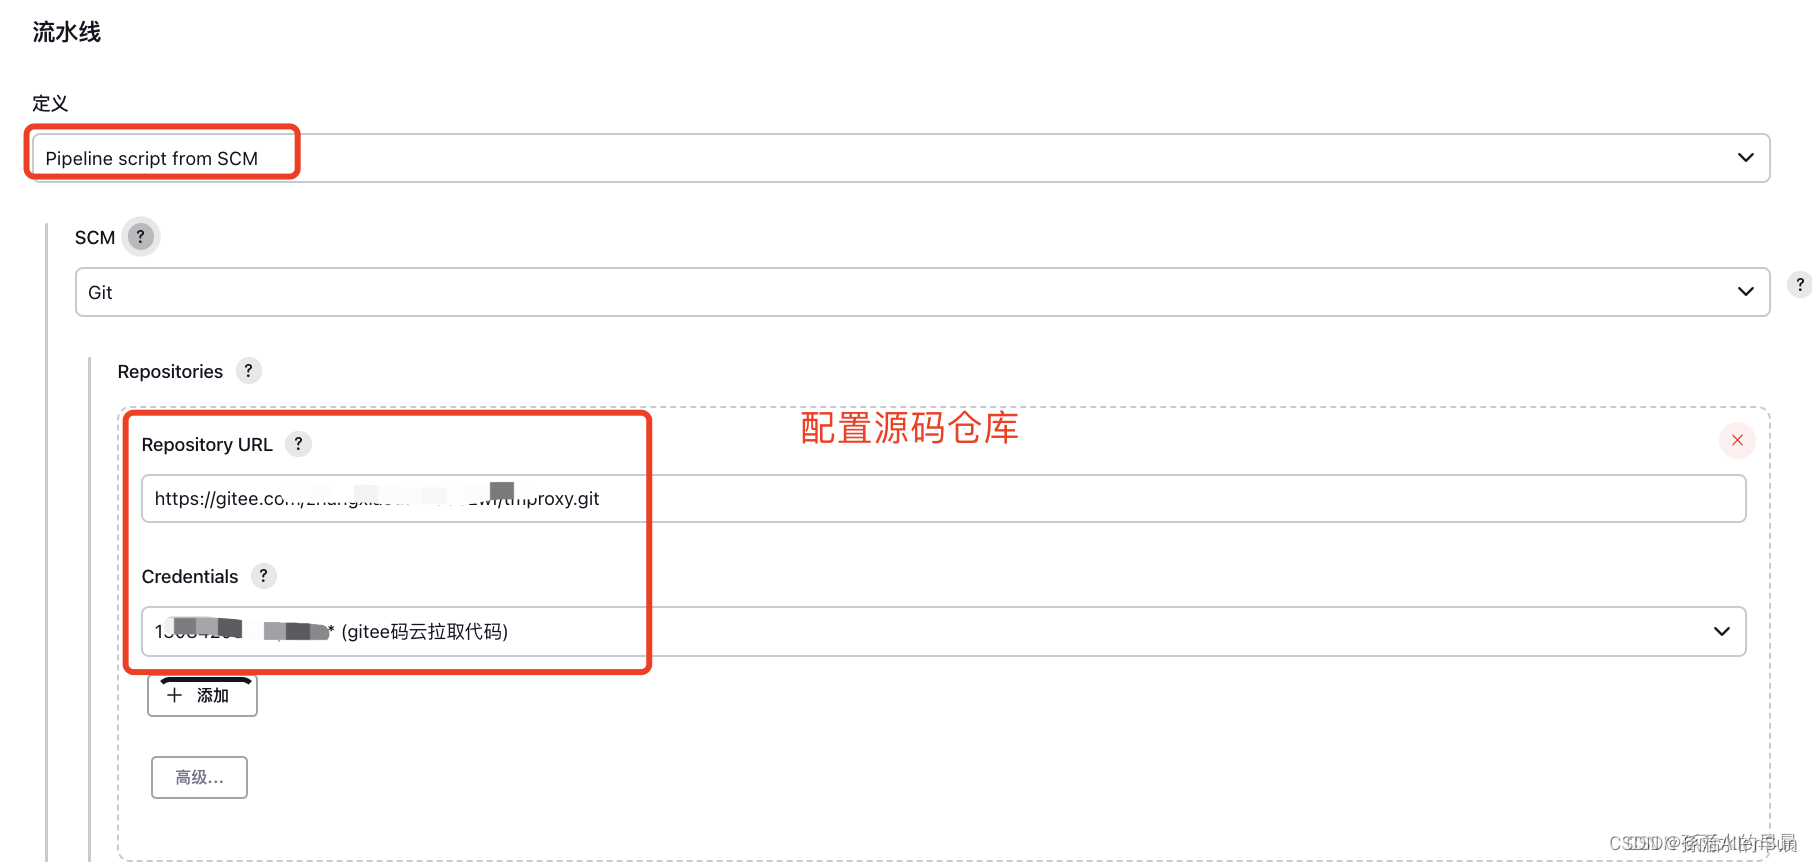
另一种是 Pipeline script from SCM (Source Control Management–源代码控制管理,即从gitlab/github/git上获得pipeline脚本–JenkisFile)
【3】Pipeline Script 运行任务
一步一步来完善这个脚本
(1)版本一:初始脚本结构如下
pipeline{ agent any stages{ stage("拉取代码"){ steps { echo '拉取成功' } } stage("执行构建"){ steps { echo '构建完成' } } stage("发送jar包到测试服务器"){ steps { echo '发送完成' } } } post{ always{ echo 'always say goodbay' } } }- 1
- 2
- 3
- 4
- 5
- 6
- 7
- 8
- 9
- 10
- 11
- 12
- 13
- 14
- 15
- 16
- 17
- 18
- 19
- 20
- 21
- 22
- 23
- 24
- 25
脚本中定义了2个阶段(stage):first和run test;post是jenkins完成构建动作之后需要做的事情。
运行任务,可以看到分为3个部分,如下图所示:

(2)版本二:使用流水线语法自动生成拉取git的代码


pipeline{ agent any stages{ stage("拉取代码"){ steps { git branch: 'pipeline', credentialsId: 'helloworld', url: 'http://192.168.19.8/root/hello-world.git' echo '拉取成功' } } stage("执行构建"){ steps { echo '构建完成' } } stage("发送jar包到测试服务器"){ steps { echo '发送完成' } } } post{ always{ echo 'always say goodbay' } } }- 1
- 2
- 3
- 4
- 5
- 6
- 7
- 8
- 9
- 10
- 11
- 12
- 13
- 14
- 15
- 16
- 17
- 18
- 19
- 20
- 21
- 22
- 23
- 24
- 25
- 26
(3)版本三:测试执行maven命令的代码
首先找到jenkins里配置的maven的名称

pipeline{ agent any tools{ maven "maven" } stages{ stage("拉取代码"){ steps { git branch: 'pipeline', credentialsId: 'helloworld', url: 'http://192.168.19.8/root/hello-world.git' echo '拉取成功' } } stage("执行构建"){ steps { sh "mvn --version" echo '构建完成' } } stage("发送jar包到测试服务器"){ steps { echo '发送完成' } } } post{ always{ echo 'always say goodbay' } } }- 1
- 2
- 3
- 4
- 5
- 6
- 7
- 8
- 9
- 10
- 11
- 12
- 13
- 14
- 15
- 16
- 17
- 18
- 19
- 20
- 21
- 22
- 23
- 24
- 25
- 26
- 27
- 28
- 29
- 30
报错了

解决方案
 点击Approve(批准)即可
再点击构建,然后查看日志,可以看到git代码拉取成功了,执行的maven命令也成功了
(4)版本四:配置maven构建项目的代码
pipeline{ agent any tools{ maven "maven" } stages{ stage("拉取代码"){ steps { git branch: 'pipeline', credentialsId: 'helloworld', url: 'http://192.168.19.8/root/hello-world.git' echo '拉取成功' } } stage("执行构建"){ steps { //sh "mvn --version" sh """ cd /var/jenkins_home/workspace/helloworld_pipeline mvn clean package -Dmaven.test.skip=true """ echo '构建完成' } } stage("发送jar包到测试服务器"){ steps { echo '发送完成' } } } post{ always{ echo 'always say goodbay' } } }- 1
- 2
- 3
- 4
- 5
- 6
- 7
- 8
- 9
- 10
- 11
- 12
- 13
- 14
- 15
- 16
- 17
- 18
- 19
- 20
- 21
- 22
- 23
- 24
- 25
- 26
- 27
- 28
- 29
- 30
- 31
- 32
- 33
- 34
保存,然后开始构建,成功
(5)版本五:把jar包和Dockerfile发送到测试服务器上,并执行命令
(1)在项目准备好Dockerfile文件

FROM java:8 ENV APP_PATH=/docker/helloworld_pipeline WORKDIR $APP_PATH ADD ./helloworld_pipeline-0.0.1-SNAPSHOT.jar $APP_PATH/helloworld_pipeline.jar EXPOSE 8093 ENTRYPOINT ["java","-jar"] CMD ["helloworld_pipeline.jar","-Dfile.encoding=GBK", "--server.port=8093"]- 1
- 2
- 3
- 4
- 5
- 6
- 7
(2)这里要用到ssh,继续使用片段代码生成器

(3)配置的内容可以直接从之前maven项目的配置里复制过来
一共分为三步
1-删除旧的jar包和Dockerfile文件
2-发送新的jar包
3-发送新的Dockerfile,并且执行构建命令
最后点一下【生成流水线脚本】就可以得到自动生成的命令了,直接复制来用完整的pipeline命令如下
pipeline{ agent any tools{ maven "maven" } stages{ stage("拉取代码"){ steps { git branch: 'pipeline', credentialsId: 'helloworld', url: 'http://192.168.19.8/root/hello-world.git' echo '拉取成功' } } stage("执行构建"){ steps { //sh "mvn --version" sh """ cd /var/jenkins_home/workspace/helloworld_pipeline mvn clean package -Dmaven.test.skip=true """ echo '构建完成' } } stage("发送jar包到测试服务器"){ steps { sshPublisher(publishers: [sshPublisherDesc(configName: 'testserver', transfers: [sshTransfer(cleanRemote: false, excludes: '', execCommand: '''rm -rf helloworld_pipeline.* docker stop helloworld_pipeline docker rm helloworld_pipeline docker rmi helloworld_pipeline:1.0''', execTimeout: 120000, flatten: false, makeEmptyDirs: false, noDefaultExcludes: false, patternSeparator: '[, ]+', remoteDirectory: '/docker/helloworld_pipeline', remoteDirectorySDF: false, removePrefix: '', sourceFiles: ''), sshTransfer(cleanRemote: false, excludes: '', execCommand: '', execTimeout: 120000, flatten: false, makeEmptyDirs: false, noDefaultExcludes: false, patternSeparator: '[, ]+', remoteDirectory: '/docker/helloworld_pipeline', remoteDirectorySDF: false, removePrefix: 'target', sourceFiles: '**/helloworld_pipeline*.jar'), sshTransfer(cleanRemote: false, excludes: '', execCommand: '''cd /root/docker/helloworld_pipeline docker build -t helloworld_pipeline:1.0 . docker run -d -p 8093:8093 --name helloworld_pipeline helloworld_pipeline:1.0''', execTimeout: 120000, flatten: false, makeEmptyDirs: false, noDefaultExcludes: false, patternSeparator: '[, ]+', remoteDirectory: '/docker/helloworld_pipeline', remoteDirectorySDF: false, removePrefix: 'docker', sourceFiles: 'docker/Dockerfile')], usePromotionTimestamp: false, useWorkspaceInPromotion: false, verbose: false)]) echo 'jar包发送完成' } } } post{ always{ echo 'always say goodbay' } } }- 1
- 2
- 3
- 4
- 5
- 6
- 7
- 8
- 9
- 10
- 11
- 12
- 13
- 14
- 15
- 16
- 17
- 18
- 19
- 20
- 21
- 22
- 23
- 24
- 25
- 26
- 27
- 28
- 29
- 30
- 31
- 32
- 33
- 34
- 35
- 36
- 37
- 38
- 39
- 40
点击构建,访问链接:http://192.168.19.11:8093/hello,测试成功
【4】Pipeline script from SCM 通过代码库运行任务
将pipeline代码(Jenkinsfile)保存到代码库中,然后通过指定代码位置(脚本位置)的方式来运行pipeline任务。
(1)创建Jenkinsfile,由Groovy语言实现。一般是存放在项目根目录,随项目一起受源代码管理软件控制。

Jenkinsfile :创建在根目录
脚本的第二stage 是执行pytestzwf文件下的test_json.py脚本
将项目提交到代码库。(2)在 job(任务)中配置Pipeline script from SCM

运行任务,查看结果:

【三】Jenkinsfile 语法学习
5个必备的组成部分
(1)pipeline:整条流水线
(2)agent:指定执行器
(3)stages:所有阶段
(4)stage:某一阶段,可有多个
(5)steps:阶段内的每一步,可执行命令【1】Jenkinsfile 支持两种语法形式:
(1)Declarative pipeline – 在pipeline v2.5 之后引入,结构化方式,比较简单,容易上手。这种类似于我们在做自动化测试时所接触的关键字驱动模式,只要理解其定义好的关键词,按要求填充数据即可。入门容易,但是灵活性欠缺。
(2)Scripted pipeline – 基于grjoovy的语法,相较于Declarative,扩展性比较高,好封装,但是有些难度,需要一定的编程工具。
【2】Declarative pipeline 语法详解
(1)必须包含在固定格式Pipeline{} 块内,每个声明语句必须独立一行,行尾无需使用分号。
(2)块 blocks{} 只能包含章节(Sections),指令(Directves),步骤(Steps) 或 赋值语句。【3】agent:节点
(1)必须存在,agent必须在pipeline块内的顶层定义
(2)any :可以在任意agent 上执行pipeline
(3)none :pipeline 将不分配全局agent,每个stage分配自己的agent
(4)label :指定运行节点的label
(5)node:自定义运行节点配置,指定label ,指定customWorkspace(工作空间)
(6)docker:控制目标节点上的docker运行相关内容agent any agent { label 'my-master'} agent{ node{ label "myslave" customWorkspace "myworkspace" } }- 1
- 2
- 3
- 4
- 5
- 6
- 7
- 8
- 9
【4】stages :阶段集
(1)必须存在,包含顺序执行的一个或者多个stage命令
(2)在pipeline内仅能使用一次
(3)需要定义stage的名字【5】steps :步骤
(1)必须存在
(2)steps位于stage指令块内部,包含一个或者多个stepstages{ stage("stage name"){ steps{ echo "this is a step" } } }- 1
- 2
- 3
- 4
- 5
- 6
- 7
【6】post :构建后的操作
(1)非必须
(2)always:无论pipeline运行的完成的状态如何都会运行
(3)success:仅当当前pipeline具有 成功 状态时才运行
(4)failure: 仅当当前pipeline 具有 失败 状态时才运行当然还有其他选项,这里不再做扩展介绍;
【7】parameters :参数
(1)非必须
(2)参数化构建的参数设置,参数类型有booleanParam、choice(选择)、file、text、string 等parameters{ string( name :'name',defaultValue:'beauty',description:'姓名是') }- 1
- 2
- 3
等同于如下设置:

构建时效果如下:
【8】triggers :触发器
(1)非必须
(2)定义了pipeline自动化触发的方式
(3)cron:接受一个cron风格的字符串来定义pipeline触发的常规间隔
(4)pollSCM:接受一个cron风格的字符串来定义jenkins检查SCM源更改的常规间隔;如果存在新的更改,则pipeline将被重新触发triggers{ cron('*/1 * * * *') }- 1
- 2
- 3
每隔一分钟执行一次
triggers{ pollSCM('*/1 * * * *') }- 1
- 2
- 3
每隔一分钟监控SCM源,更改即触发

-
相关阅读:
蓝桥杯物联网_STM32L071_2_继电器控制
【数据结构】串(二)—— 朴素模式匹配算法
Util应用框架快速入门(5) - 权限入门
极光笔记 | 大语言模型插件
43、SpringMvc创建拦截器(拦截器的配置)
Idea中查看SpringSecurity各Filter信息
Prometheus+Grafana 监控平台实践-搭建&常用服务监控&告警
Jenkins部署springboot项目
mmc命令(do_mmcops函数的源码分析)
又一重磅利好来袭!Zebec Payroll 集成至 Nautilus Chain 主网
- 原文地址:https://blog.csdn.net/weixin_44823875/article/details/132805271
