-
树莓派入门
目录
前言
最近发生了很多事情,很懈怠,由于时间不够用,没有继续研究树莓派,把前段时间研究树莓派的入门资料整理了一下,大多数是抄袭网上的.本来打算研究完树莓派,然后研究ARM64体系结构和汇编语言,然后再研究一下linux内核0.11版本.把内核0.11版本移植到树莓派上,然后在0.11版本的基础上直接升级到最新版本内核,保持功能和0.11版本基本相同,
这样能让后来学习linux内核的朋友少走弯路,理想很宏大,现实很残酷,时间不够用,希望以后有时间能实现这样的理想.
现在时间是2023年9月9日,其实树莓派看官网的资料是最好的学习资料.我主要参考B站和官网.
正式开始吧.兴趣是最好的老师,热爱是最好的动力,不要为了金钱和利益而损耗兴趣和热爱.系统烧录
使用官方烧录工具
下载Raspberry Pi Imager工具.
选择操作系统

选择存储卡
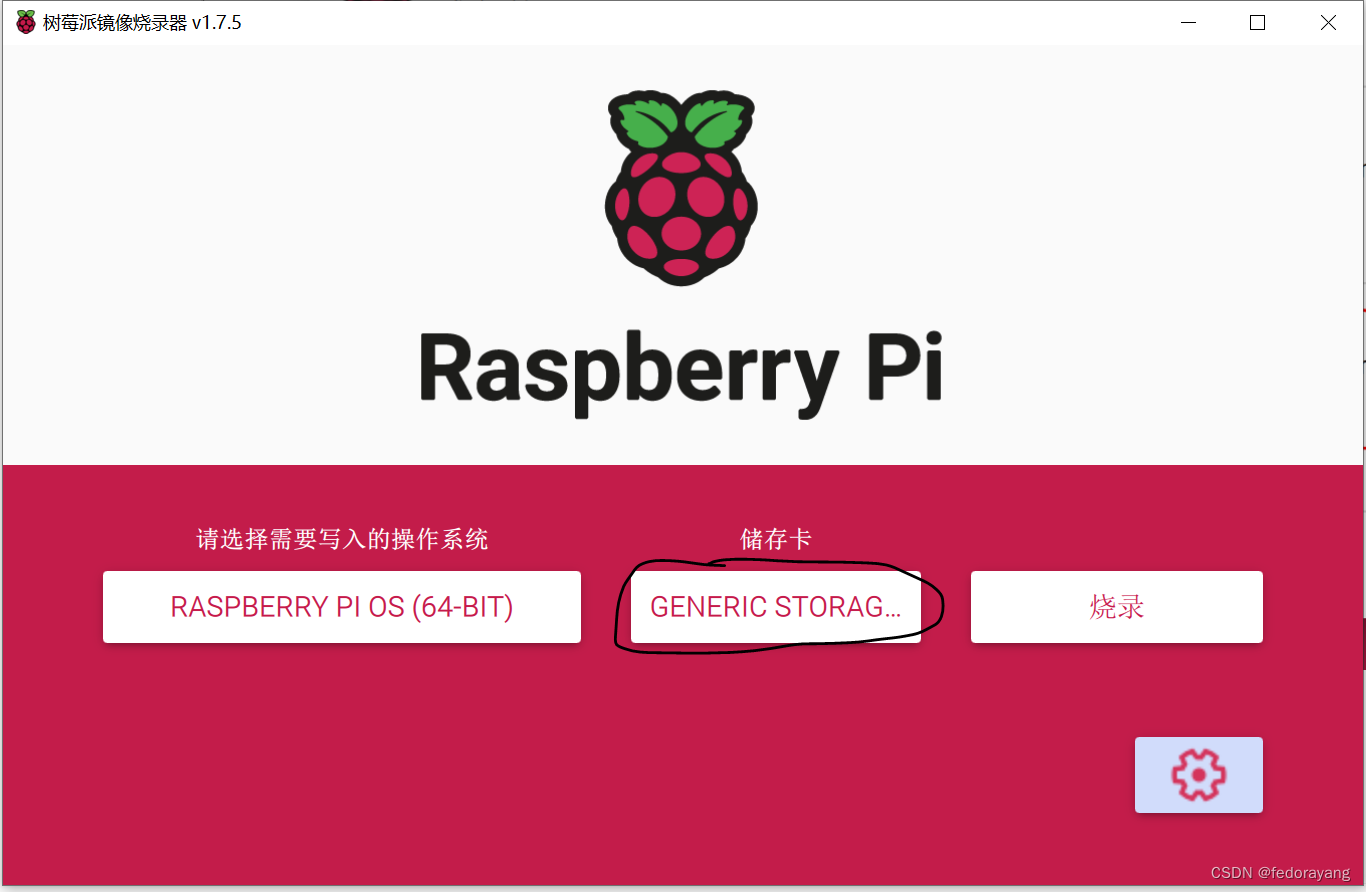
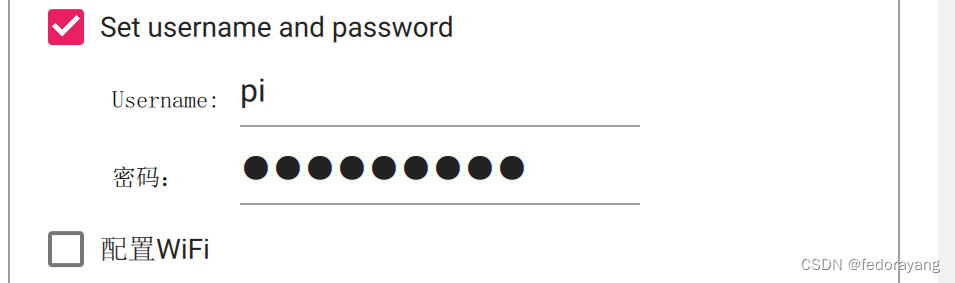
配置
开启SSH,设置SSH登录方式

Win32DiskImager
有屏幕树莓派开机
先连接HDMI显示器,再打开树莓派电源.
树莓派关机
#关闭电源 sudo poweroff #立刻关机 sudo shutdown -h now #立刻重启 sudo shutdown -r now #2分钟之后关机 sudo shutdown -h +2- 1
- 2
- 3
- 4
- 5
- 6
- 7
- 8
- 9
无屏幕树莓派开机
获取树莓派IP地址
通过路由器获取
把树莓派连接到路由器上,登录路由器可以获得树莓派的IP地址.
共享网络方式获取
-
1.用网线连接笔记本和树莓派
-
2.共享笔记本的wifi给树莓派

- 3.查找树莓派IP地址
arp -a ping 192.168.137.115- 1
- 2
给树莓派配置静态IP地址
查找默认网关
ipconfig #无线网络- 1
- 2
分盘给树莓派的IP地址
hostname -I- 1
两个条件:
- 静态IP地址与路由器网段保持一致
- 与路由器自动分配的IP地址不能冲突
当前给树莓派分配的IP地址就是满足条件的IP地址.
修改树莓派DHCP配置文件
#sudo nano /etc/dhcpcd.conf interface eth0 static ip_address=192.168.0.10 static routers=192.168.0.1 static domain_name_servers=192.168.1.1 192.168.0.1- 1
- 2
- 3
- 4
- 5
- 6
ssh登录
ssh pi@192.168.137.115- 1
让树莓派连接指定的网络
windows10共享热点
在sd卡根目录下,新建wifi配置文件wpa_supplicant.conf。如果用windows系统编辑这个文件,需要选择采用Linux/Unix style格式的行结尾,例如用Notepad++,需要选择 “Edit” > “EOL Conversion” > “UNIX/OSX Format”。然后写入:
ctrl_interface=DIR=/var/run/wpa_supplicant GROUP=netdev update_config=1 country=CN network={ ssid="USER-20230430HW" psk="12345678" priority=1 id_str="notebook1" }- 1
- 2
- 3
- 4
- 5
- 6
- 7
- 8
- 9
在共享热点界面可以查看IP地址

windows远程桌面连接
sudo apt install xrdp- 1

sudo raspi-config #修改分辨率- 1
- 2
树莓派新操作系统xrdp远程桌面黑屏的问题
这个问题我今天自己解决了,因为树莓派的新操作系统基于Debian bullseye. 对于bullseye默认的root用户(也就是pi)不能同时登录本地和远程桌面,这个和原来的操作系统是不一样的,所以用用户pi登录就会导致黑屏。解决方法是为远程桌面增加一个新的用户,用这个新的用户登录xrdp远程桌面就没有问题了。
先远程桌面登录,然后再使用SSH登录.
VNC远程连接树莓派
VNC服务器
树莓派默认自带VNC服务器,默认关闭
图形界面打开


命令行打开
sudo raspi-config #Interface Options -> VNC -> Yes- 1
- 2
运行VNC服务器
vncserver-virtual- 1
VNC服务器开机自启
sudo nano /etc/init.d/vncserver#!/bin/sh export USER='pi' eval cd ~$USER case "$1" in start) #启动命令行.此处自定义分辨率,控制台号码或其它参数. su $USER -c 'vncserver-virtual -geometry 1920x1080 :1' echo "Starting VNCServer-virtual for $USER" ;; stop) su $USER -c 'vncserver-virtual -kill :1' echo "VNCServer-virtual stopped" ;; esac exit 0- 1
- 2
- 3
- 4
- 5
- 6
- 7
- 8
- 9
- 10
- 11
- 12
- 13
- 14
- 15
- 16
sudo chmod 755 /etc/init.d/vncserver #脚本正常,但是这样开机不会自动运行 sudo update-rc.d vncserver defaults- 1
- 2
- 3
VNC查看器
VNC-Viewer-7.5.1-Windows.exe
更改vnc分辨率
#!/bin/sh vncserver-virtual -geometry 1920x1080 :1- 1
- 2
/etc/rc.localsu pi -c "exec /home/pi/Scripts/vncserver.sh"- 1
文件传输
使用U盘
VNC传输
vnc viewer 传输到 vnc server
最上面图标tansfer files- 1
vnc server传输到vnc viewer
python配置开发环境
默认安装python3
print("hello world") exit()- 1
- 2
pip install pandas- 1
thonny
option修改中午界面
C++配置编译环境
WiringPi库
安装
WiringPi 官网上说明,只提供deb安装包,但是这个安装包只支持32位系统,使用动态库编程时,会有问题.
建议源码安装
#deb安装 cd /tmp wget https://project-downloads.drogon.net/wiringpi-latest.deb sudo dpkg -i wiringpi-latest.deb #源码安装 git clone https://github.com/WiringPi/WiringPi.git cd WiringPi ./build- 1
- 2
- 3
- 4
- 5
- 6
- 7
- 8
- 9
deb安装在64系统上有错误
gcc -o led led.c /usr/lib/libwiringPi.so /usr/bin/ld: /usr/lib/libwiringPi.so: error adding symbols: file in wrong format file /usr/lib/libwiringPi.so.2.52 /usr/lib/libwiringPi.so.2.52: ELF 32-bit LSB shared object, ARM, EABI5 version 1 (SYSV)- 1
- 2
- 3
- 4
- 5
命令使用
gpio -v gpio readall- 1
- 2
geany
在树莓派上使用geany集成开发环境
参考资料
树莓派4B-WiringPi库的安装和使用 (C和Python版)
linux操作系统命令和编辑器的使用
#切换为超级用户身份 sudo su #切换为普通用户pi su pi- 1
- 2
- 3
- 4
nano 编辑器
nano 编辑器常用快捷键
ctrl + o #保存当前文档(也可用ctrl+s) esc+u #撤销上次操作 ctrl+u #粘贴 ctrl+g #打开nano帮助文档- 1
- 2
- 3
- 4
系统备份和还原
树莓派官方系统raspberry Pi OS有两个分区boot分区和root分区.
全卡备份
Win32DiskImager
1.在电脑中新建一个文件,后缀名为"*.img" 2.打开文件 3.设备选择root分区 4.读取- 1
- 2
- 3
- 4
- 5

树莓派自带SD Card Copier
查看块设备
lsblk #或者 fdisk -l- 1
- 2
- 3
终端命令
# if 表示要复制的内容 # of 表示要复制到哪里去 sudo dd if=/dev/mmcblk0 of=dev/sda #新终端窗口中查看dd命令的进程号 sudo ps -ef | grep dd #注意pid需要换成查到的进程号 #发送USR1(用户自定义信号),查看copy进度 #结合watch就可以实时刷新 sudo watch -n 3 kill -USR1 pid- 1
- 2
- 3
- 4
- 5
- 6
- 7
- 8
- 9
- 10
- 11
或者
sudo dd if=/dev/mmcblk0 of=dev/sda status=progress- 1
备份到文件
压缩备份
df -h git clone https://github.com/nanhantianyi/rpi-backup.git && cd rpi-backupsudo ./back.sh 备份镜像名字.img- 1
- 2
- 3
- 4
- 5
系统还原
直接使用
全卡备份方式二:树莓派桌面系统自带SD Card Copier
全卡备份方式三:终端命令复制全卡烧录使用
全卡备份方式一:第三方软件Win32DiskImager
压缩备份: rpi-backup脚本GPIO
树莓派引脚编码
树莓派的引脚共有三种编码:
1.板载编码
2.BCM编码
3.WiringPi编码板载编码
板载编码:这种编码方式是按照树莓派主板上引脚排针编号。分别对应1~40号排针。能够直接看见
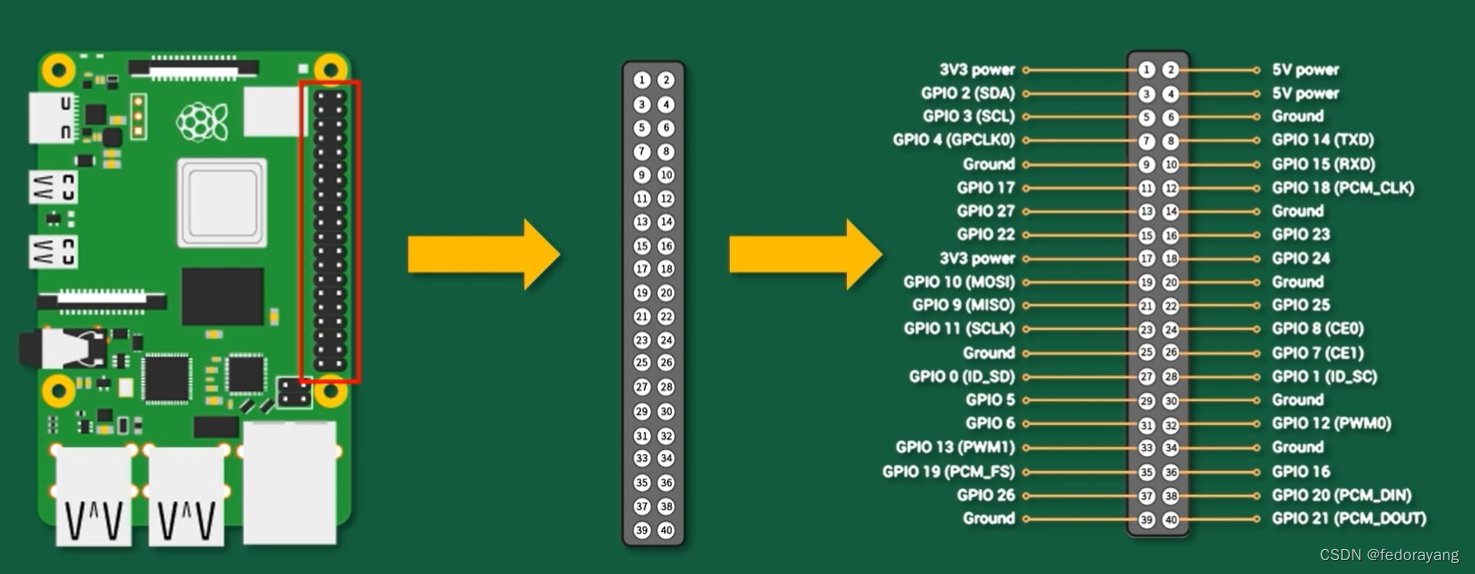
BCM编码
- 这种方式是参考 Broadcom SOC 的通道编号侧重CPU寄存器。
- 使用 Python 控制树莓派引脚时,使用的是BCM编码。

WiringPi编码
- WiringPi编码,把扩展GPIO端口从0开始编码。
- 使用 C语言 控制树莓派引脚时,使用的是WiringPi编码。

查看引脚编码
#板载编码 pinout #查看全部编码 gpio readall- 1
- 2
- 3
- 4
控制GPIO
我们可以直接使用gpio命令操作树莓派GPIO 引脚来控制LED
#设置管脚为输出模式,-g表示是以BCM编码 #如果去掉这个参数表示以wiringPi编码方式 gpio -g mode 4 out # 读取管脚当前状态 gpio -g read 4 # 设置管脚为高电平 gpio -g write 4 1 # 设置管脚为低电平 gpio -g write 4 0- 1
- 2
- 3
- 4
- 5
- 6
- 7
- 8
- 9
- 10
GPIO多种控制方式
1 使用GPIO命令
gpio -g write 4 1 gpio -g write 4 0- 1
- 2
2 直接通过终端命令进行控制
从内核空间找到引脚直接控制GPIO引脚
步骤1:选定GPIO引脚
cd /sys/class/gpio/ ls export gpiochip0 gpiochip504 unexport #BCM编码 echo 引脚编码 > export gpio readall echo 26 > export ls export gpio26 gpiochip0 gpiochip504 unexport cd gpio26- 1
- 2
- 3
- 4
- 5
- 6
- 7
- 8
- 9
- 10
- 11
- 12
- 13
步骤2: 使用GPIO开始控制
echo out >direction echo 1 > value echo 0 > value- 1
- 2
- 3
步骤3: 注销GPIO引脚
cd .. echo 26 > unexport- 1
- 2
3 使用 Python 来控制LED灯
使用
RPi.GPIO库,编辑文件 led.pyimport RPi.GPIO as GPIO from time import sleep GPIO.setmode(GPIO.BCM) # 采用bcm编号方式 GPIO.setup(26,GPIO.OUT)# 指定使用26号端口 for i in range(1,10): GPIO.output(26,GPIO.HIGH) sleep(1) GPIO.output(26,GPIO.LOW) sleep(1) GPIO.cleanup()- 1
- 2
- 3
- 4
- 5
- 6
- 7
- 8
- 9
- 10
运行程序
python3 led.py- 1
4 使用C语言控制LED灯
使用 WiringPi.h 库
#include#define Pin 25 int main() { if (wiringPiSetup() < 0) return 1; pinMode(Pin, OUTPUT); for (int i = 0; i < 10; i++) { digitalWrite(Pin, 1); delay(200); digitalWrite(Pin, 0); delay(200); } return 0; } - 1
- 2
- 3
- 4
- 5
- 6
- 7
- 8
- 9
- 10
- 11
- 12
- 13
- 14
- 15
- 16
gcc -o led lec.c -lwiringPi sudo ./led- 1
- 2
串口
硬件上分类
树莓派4B包括两个串口:
硬件串口
/dev/ttyAMA0mini串口
/dev/ttyS0硬件串口,引脚8 TXD,引脚10 RXD
软件上分类
主串口-------->可以通过引脚实现通讯
辅助串口 --------> 不能使用GPIO引脚通信默认被分配给蓝牙端
注意:默认情况下,mini串口是禁用的,无论将它指定为主 UART 还是辅助 UART。
硬件和软件对应关系

串口通信步骤
- 准备待调试的硬件串口
- 安装minicom串口助手
- 电脑安装串口调试工具
- 使用USB转TTL工具连接电脑和树莓派, 开始通讯
准备待调试的硬件串口
1、使用命令 Is/dev -al 查看串口打开情况
ls /dev -al #主串口没有打开 serial1 -> ttyAMA0- 1
- 2
- 3
2、打开 mini URAT

ls /dev -al lrwxrwxrwx 1 root root 5 Aug 9 00:27 serial0 -> ttyS0 lrwxrwxrwx 1 root root 7 Aug 9 00:27 serial1 -> ttyAMA0- 1
- 2
- 3
3、将硬件串口设置为主串口
sudo nano /boot/config.txt dtoverlay=pi3-miniuart-bt force_turbo=1 #重启树莓派 sudo reboot ls /dev -al #硬件串口变成了主串口 lrwxrwxrwx 1 root root 7 Aug 9 00:33 serial0 -> ttyAMA0 lrwxrwxrwx 1 root root 5 Aug 9 00:33 serial1 -> ttyS0- 1
- 2
- 3
- 4
- 5
- 6
- 7
- 8
- 9
- 10
安装minicom串口助手
在树莓派上安装 minicom
sudo apt install minicom- 1
电脑安装串口调试工具

使用USB转TTL工具连接电脑和树莓派, 开始通讯
minicom -D /dev/ttyAMA0 -b 115200 #在PC端串口调试助手发送数据 #在minicom发送数据到PC端串口调试助手 #退出minicom ctrl+a z x yes- 1
- 2
- 3
- 4
- 5
- 6
- 7
- 8
- 9
- 10
串口登录
串口登录特别重要,可能忘记IP地址和联网方式.使用串口登录可以设置IP地址和联网方式.
配置
#/boot/config.txt [all] enable_uart=1 dtoverlay=pi3-miniuart-bt force_turbo=1 uart_2ndstage=1- 1
- 2
- 3
- 4
- 5
- 6

串口默认参数
115200,8,1,N- 1
登录log
输入用户名和密码登录到系统
Read start4.elf bytes 2251392 hnd 0x0000167f Read fixup4.dat bytes 5399 hnd 0x00000108 Firmware: 82f3750a65fadae9a38077e3c2e217ad158c8d54 Mar 17 2023 10:50:39 0x00c03112 0x00000000 0x00001fff MEM GPU: 76 ARM: 948 TOTAL: 1024 Starting start4.elf @ 0xfec00200 partition 0 PCI reset + MESS:00:00:04.673007:0: arasan: arasan_emmc_open MESS:00:00:04.674667:0: arasan: arasan_emmc_set_clock C0: 0x00800000 C1: 0x000e0047 emmc: 200000000 actual: 390625 div: 0x00000100 target: 400000 min: 400000 max: 400000 delay: 5 MESS:00:00:04.794894:0: arasan: arasan_emmc_set_clock C0: 0x00800000 C1: 0x000e0047 emmc: 200000000 actual: 390625 div: 0x00000100 target: 400000 min: 400000 max: 400000 delay: 5 MESS:00:00:04.807765:0: arasan: arasan_emmc_set_clock C0: 0x00800f00 C1: 0x000e0047 emmc: 200000000 actual: 390625 div: 0x00000100 target: 400000 min: 390000 max: 400000 delay: 5 MESS:00:00:04.841659:0: arasan: arasan_emmc_set_clock C0: 0x00800f06 C1: 0x000e0207 emmc: 200000000 actual: 50000000 div: 0x00000002 target: 50000000 min: 0 max: 50000000 delay: 1 MESS:00:00:04.861470:0: brfs: File read: /mfs/sd/config.txt MESS:00:00:04.864976:0: brfs: File read: 2180 bytes MESS:00:00:04.890168:0: HDMI0:EDID error reading EDID block 0 attempt 0 MESS:00:00:04.894676:0: HDMI0:EDID giving up on reading EDID block 0 MESS:00:00:04.911424:0: HDMI1:EDID error reading EDID block 0 attempt 0 MESS:00:00:04.915927:0: HDMI1:EDID giving up on reading EDID block 0 MESS:00:00:04.923076:0: brfs: File read: /mfs/sd/config.txt MESS:00:00:05.687574:0: gpioman: gpioman_get_pin_num: pin DISPLAY_DSI_PORT not defined MESS:00:00:05.694884:0: *** Restart logging MESS:00:00:05.696289:0: brfs: File read: 2180 bytes MESS:00:00:05.706323:0: hdmi: HDMI0:EDID error reading EDID block 0 attempt 0 MESS:00:00:05.711346:0: hdmi: HDMI0:EDID giving up on reading EDID block 0 MESS:00:00:05.721969:0: hdmi: HDMI0:EDID error reading EDID block 0 attempt 0 MESS:00:00:05.726999:0: hdmi: HDMI0:EDID giving up on reading EDID block 0 MESS:00:00:05.732597:0: hdmi: HDMI:hdmi_get_state is deprecated, use hdmi_get_display_state instead MESS:00:00:05.746386:0: hdmi: HDMI1:EDID error reading EDID block 0 attempt 0 MESS:00:00:05.751416:0: hdmi: HDMI1:EDID giving up on reading EDID block 0 MESS:00:00:05.762037:0: hdmi: HDMI1:EDID error reading EDID block 0 attempt 0 MESS:00:00:05.767057:0: hdmi: HDMI1:EDID giving up on reading EDID block 0 MESS:00:00:05.772656:0: hdmi: HDMI:hdmi_get_state is deprecated, use hdmi_get_display_state instead MESS:00:00:05.781420:0: HDMI0: hdmi_pixel_encoding: 300000000 MESS:00:00:05.786888:0: HDMI1: hdmi_pixel_encoding: 300000000 MESS:00:00:05.792687:0: kernel= MESS:00:00:05.800156:0: dtb_file 'bcm2711-rpi-4-b.dtb' MESS:00:00:05.808788:0: brfs: File read: /mfs/sd/bcm2711-rpi-4-b.dtb MESS:00:00:05.812036:0: Loaded 'bcm2711-rpi-4-b.dtb' to 0x100 size 0xcd71 MESS:00:00:05.831619:0: brfs: File read: 52593 bytes MESS:00:00:05.850660:0: brfs: File read: /mfs/sd/overlays/overlay_map.dtb MESS:00:00:05.928256:0: brfs: File read: 2347 bytes MESS:00:00:05.932930:0: brfs: File read: /mfs/sd/config.txt MESS:00:00:05.935871:0: dtparam: audio=on MESS:00:00:05.943709:0: brfs: File read: 2180 bytes MESS:00:00:05.969638:0: brfs: File read: /mfs/sd/overlays/vc4-kms-v3d-pi4.dtbo MESS:00:00:06.034773:0: Loaded overlay 'vc4-kms-v3d' MESS:00:00:06.185696:0: dtwarn: overlay 'pi3-miniuart-bt' has been renamed 'miniuart-bt' MESS:00:00:06.191173:0: brfs: File read: 3913 bytes MESS:00:00:06.210444:0: brfs: File read: /mfs/sd/overlays/miniuart-bt.dtbo MESS:00:00:06.235223:0: Loaded overlay 'pi3-miniuart-bt' MESS:00:00:06.292653:0: brfs: File read: 1819 bytes MESS:00:00:06.296699:0: brfs: File read: /mfs/sd/cmdline.txt MESS:00:00:06.299831:0: Read command line from file 'cmdline.txt': MESS:00:00:06.305700:0: 'console=tty1 console=serial0,115200 root=PARTUUID=e413b287-02 rootfstype=ext4 fsck.repair=yes rootwait quiet splash plymouth.ignore-serial-consoles' MESS:00:00:06.433770:0: brfs: File read: 147 bytes MESS:00:00:07.161984:0: brfs: File read: /mfs/sd/kernel8.img MESS:00:00:07.164537:0: Loaded 'kernel8.img' to 0x80000 size 0x7d6bd0 MESS:00:00:08.344064:0: Kernel relocated to 0x200000 MESS:00:00:08.345920:0: Device tree loaded to 0x2eff2c00 (size 0xd3e4) MESS:00:00:08.353794:0: uart: Set PL011 baud rate to 103448.300000 Hz MESS:00:00:08.361242:0: uart: Baud rate change done... MESS:00:00:08.363264:0: uart: Baud rate change done... MESS:00:00:08.369681:0: gpioman: gpioman_get_pin_num: pin SDCARD_CONTROL_POWER not defined RealVNC(R) Server 7.5.1 (r50075) ARMv8-A (May 30 2023 13:27:57) Copyright (C) RealVNC Ltd. RealVNC and VNC are trademarks of RealVNC Ltd and are protected by trademark registrations and/or pending trademark applications in the European Union, United States of America and other jurisdictions. Protected by UK patent 2481870; US patent 8760366; EU patent 2652951. See https://www.realvnc.com for information on VNC. For third party acknowledgements see: https://www.realvnc.com/docs/7/foss.html OS: Debian GNU/Linux 11, Linux 6.1.21, aarch64 On some distributions (in particular Red Hat), you may get a better experience by running vncserver-virtual in conjunction with the system Xorg server, rather than the old version built-in to Xvnc. More desktop environments and applications will likely be compatible. For more information on this alternative implementation, please see: https://www.realvnc.com/doclink/kb-546 Running applications in /etc/vnc/xstartup VNC Server catchphrase: "Observe street private. Polaris Italian magnum." signature: ef-88-9e-5e-6a-a7-b1-42 Log file is /home/pi/.vnc/raspberrypi:1.log New desktop is raspberrypi:1 Debian GNU/Linux 11 raspberrypi ttyAMA0 raspberrypi login: pi Password: Linux raspberrypi 6.1.21-v8+ #1642 SMP PREEMPT Mon Apr 3 17:24:16 BST 2023 aarch64 The programs included with the Debian GNU/Linux system are free software; the exact distribution terms for each program are described in the individual files in /usr/share/doc/*/copyright. Debian GNU/Linux comes with ABSOLUTELY NO WARRANTY, to the extent permitted by applicable law. Last login: Wed Aug 9 03:04:44 BST 2023 on ttyAMA0 SSH is enabled and the default password for the 'pi' user has not been changed. This is a security risk - please login as the 'pi' user and type 'passwd' to set a new password. pi@raspberrypi:~$- 1
- 2
- 3
- 4
- 5
- 6
- 7
- 8
- 9
- 10
- 11
- 12
- 13
- 14
- 15
- 16
- 17
- 18
- 19
- 20
- 21
- 22
- 23
- 24
- 25
- 26
- 27
- 28
- 29
- 30
- 31
- 32
- 33
- 34
- 35
- 36
- 37
- 38
- 39
- 40
- 41
- 42
- 43
- 44
- 45
- 46
- 47
- 48
- 49
- 50
- 51
- 52
- 53
- 54
- 55
- 56
- 57
- 58
- 59
- 60
- 61
- 62
- 63
- 64
- 65
- 66
- 67
- 68
- 69
- 70
- 71
- 72
- 73
- 74
- 75
- 76
- 77
- 78
- 79
- 80
- 81
- 82
- 83
- 84
- 85
- 86
- 87
- 88
- 89
- 90
- 91
- 92
- 93
- 94
- 95
- 96
- 97
- 98
- 99
- 100
- 101
- 102
- 103
- 104
- 105
- 106
- 107
- 108
- 109
-
相关阅读:
如何判断多用户商城系统是否靠谱?
【计算机毕业设计】331基于微信小程序的家庭财务管理系统
mssql调用外部接口
算法刷题day47
系统集成|第十章(笔记)
NPS:使用 Windows NPS Server 部署 802.1X 无线认证(2)
Cosmopolitan:一次构建,多平台原生运行的C语言库行!
企业快速构建可落地的IT服务管理体系的五大关键点
使用CFimagehost源码搭建免费的PHP图片托管私人图床,无需数据库支持
网络协议二
- 原文地址:https://blog.csdn.net/fedorayang/article/details/132782994
