-
freemarker模板引擎详解以及使用方法
哈喽!大家好,我是旷世奇才李先生
文章持续更新,可以微信搜索【小奇JAVA面试】第一时间阅读,回复【资料】更有我为大家准备的福利哟,回复【项目】获取我为大家准备的项目相关阅读
一、freemarker 介绍
1、简介
FreeMarker 是一款 模板引擎: 即一种基于模板和要改变的数据, 并用来生成输出文本(HTML网页,电子邮件,配置文件,源代码等)的通用工具。 它不是面向最终用户的,而是一个Java类库,是一款程序员可以嵌入他们所开发产品的组件。
模板编写为FreeMarker Template Language (FTL)。它是简单的,专用的语言, 不是 像PHP那样成熟的编程语言。 那就意味着要准备数据在真实编程语言中来显示,比如数据库查询和业务运算, 之后模板显示已经准备好的数据。在模板中,你可以专注于如何展现数据, 而在模板之外可以专注于要展示什么数据。

二、freemarker 使用
1、导入MAVEN依赖
我们首先需要导入maven依赖
org.springframework.boot spring-boot-starter-web org.springframework.boot spring-boot-starter-freemarker org.springframework.boot spring-boot-starter-test org.projectlombok lombok org.apache.commons commons-io 1.3.2 - 1
- 2
- 3
- 4
- 5
- 6
- 7
- 8
- 9
- 10
- 11
- 12
- 13
- 14
- 15
- 16
- 17
- 18
- 19
- 20
- 21
- 22
- 23
- 24
- 25
- 26
- 27
2、配置application.yml
server: port: 8881 #服务端口 spring: application: name: freemarker-demo #指定服务名 freemarker: cache: false #关闭模板缓存,方便测试 settings: template_update_delay: 0 #检查模板更新延迟时间,设置为0表示立即检查,如果时间大于0会有缓存不方便进行模板测试 suffix: .ftl #指定Freemarker模板文件的后缀名- 1
- 2
- 3
- 4
- 5
- 6
- 7
- 8
- 9
- 10
3、创建模板
在resources下创建templates,此目录为freemarker的默认模板存放目录。
在templates下创建模板文件 01-basic.ftl ,模板中的插值表达式最终会被freemarker替换成具体的数据。

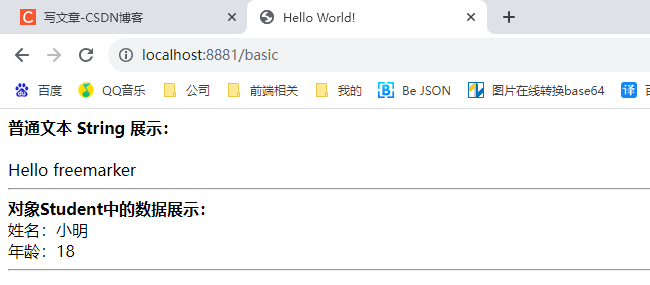
    Hello World!


普通文本 String 展示:


Hello ${name}


对象Student中的数据展示:

姓名:${stu.name}

年龄:${stu.age}
- 1
- 2
- 3
- 4
- 5
- 6
- 7
- 8
- 9
- 10
- 11
- 12
- 13
- 14
- 15
- 16
4、创建学生实体类
import lombok.Data; import java.util.Date; @Data public class Student { private String name;//姓名 private int age;//年龄 private Date birthday;//生日 private Float money;//钱包 }- 1
- 2
- 3
- 4
- 5
- 6
- 7
- 8
- 9
- 10
- 11
5、创建Controller类
import com.heima.freemarker.entity.Student; import org.springframework.stereotype.Controller; import org.springframework.ui.Model; import org.springframework.web.bind.annotation.GetMapping; @Controller public class HelloController { @GetMapping("/basic") public String hello(Model model){ //name model.addAttribute("name","freemarker"); //stu Student student = new Student(); student.setName("小明"); student.setAge(18); model.addAttribute("stu",student); return "01-basic"; } }- 1
- 2
- 3
- 4
- 5
- 6
- 7
- 8
- 9
- 10
- 11
- 12
- 13
- 14
- 15
- 16
- 17
- 18
- 19
- 20
6、访问页面
三、freemarker 静态文件生成
1、新建模板02-list.ftl
Hello World! <#-- list 数据的展示 --> 展示list中的stu数据:
序号 姓名 年龄 钱包 ${stu_index+1} ${stu.name} ${stu.age} ${stu.money}
<#-- Map 数据的展示 --> map数据的展示:
方式一:通过map['keyname'].property
输出stu1的学生信息:
姓名:${stuMap['stu1'].name}
年龄:${stuMap['stu1'].age}
方式二:通过map.keyname.property
输出stu2的学生信息:
姓名:${stuMap.stu2.name}
年龄:${stuMap.stu2.age}
遍历map中两个学生信息:
序号 姓名 年龄 钱包 ${key_index} ${stuMap[key].name} ${stuMap[key].age} ${stuMap[key].money}
- 1
- 2
- 3
- 4
- 5
- 6
- 7
- 8
- 9
- 10
- 11
- 12
- 13
- 14
- 15
- 16
- 17
- 18
- 19
- 20
- 21
- 22
- 23
- 24
- 25
- 26
- 27
- 28
- 29
- 30
- 31
- 32
- 33
- 34
- 35
- 36
- 37
- 38
- 39
- 40
- 41
- 42
- 43
- 44
- 45
- 46
- 47
- 48
- 49
- 50
- 51
- 52
- 53
- 54
- 55
- 56
- 57
- 58
- 59
- 60
- 61
- 62
- 63
- 64
- 65
- 66
2、生成代码
import com.heima.freemarker.FreemarkerDemoApplication; import com.heima.freemarker.entity.Student; import freemarker.template.Configuration; import freemarker.template.Template; import freemarker.template.TemplateException; import org.junit.Test; import org.junit.runner.RunWith; import org.springframework.beans.factory.annotation.Autowired; import org.springframework.boot.test.context.SpringBootTest; import org.springframework.test.context.junit4.SpringRunner; import java.io.FileWriter; import java.io.IOException; import java.util.*; /** * @Author: KSQC * @Description: ${description} * @Date: 2023/9/9 16:59 */ @SpringBootTest(classes = FreemarkerDemoApplication.class) @RunWith(SpringRunner.class) public class FreemarkerTest { @Autowired private Configuration configuration; @Test public void test() throws IOException, TemplateException { Template template = configuration.getTemplate("02-list.ftl"); /** * 合成方法 * * 两个参数 * 第一个参数: 模型数据 * 第二个参数:输出流 */ template.process(getData(),new FileWriter("d:/list.html")); } private Map getData(){ Mapstus = new ArrayList<>(); stus.add(stu1); stus.add(stu2); //向map中存放List集合数据 map.put("stus", stus); //创建Map数据 HashMap - 1
- 2
- 3
- 4
- 5
- 6
- 7
- 8
- 9
- 10
- 11
- 12
- 13
- 14
- 15
- 16
- 17
- 18
- 19
- 20
- 21
- 22
- 23
- 24
- 25
- 26
- 27
- 28
- 29
- 30
- 31
- 32
- 33
- 34
- 35
- 36
- 37
- 38
- 39
- 40
- 41
- 42
- 43
- 44
- 45
- 46
- 47
- 48
- 49
- 50
- 51
- 52
- 53
- 54
- 55
- 56
- 57
- 58
- 59
- 60
- 61
- 62
- 63
- 64
- 65
- 66
- 67
- 68
- 69
- 70
- 71
- 72
- 73
- 74
- 75
- 76
- 77
- 78
3、生成本地静态文件

打开可以看到数据都正常赋值显示

四、总结
项目涉及的功能还是比较全面的,建议大家跟着视频做一遍。可以关注公众号回复【项目】领取项目,如果有用就点赞支持一下吧。
文章持续更新,可以微信搜索【小奇JAVA面试】第一时间阅读,回复【项目】获取我为大家准备的项目
-
相关阅读:
Windows11+Ubuntu 3系统如何安全地删掉最后一个Ubuntu系统?
C语言——分支语句和循环语句
ConcurrentHashMap源码解析 5.get() & remove() 方法
文档图片阴影去除
设计模式第一课-单例模式(懒汉模式和饿汉模式)
java的健身房管理系统计算机毕业设计MyBatis+系统+LW文档+源码+调试部署
Java---Stream进阶
黑豹程序员-CSS四种样式的定义方式及冲突后的就近原则
关于vue混入(mixin)的解读
前端代码规范神器之f2elint的使用教程
- 原文地址:https://blog.csdn.net/weixin_44096133/article/details/132774438
