-
vscode配置conda环境
写在最前面
之前一直是jupyter notebook+pycharm
帮朋友配置环境的时候发现:vscode结合了cell+自动补齐,狠狠心动了
于是安装+配置vscode参考:
https://blog.csdn.net/fan18317517352/article/details/123035625
https://zhuanlan.zhihu.com/p/263036716
https://zhuanlan.zhihu.com/p/378378346
https://blog.csdn.net/qq_51831335/article/details/126757014安装
vscode
直接百度,然后在官网下载windows版本即可

一路同意即可
尽量不要安装在系统C盘,我的安装路径为:D:\program\Microsoft VS Codeanaconda3
在清华源直接下载
https://mirrors.tuna.tsinghua.edu.cn/anaconda/archive/?C=M&O=A
选择win64版本

一路同意即可
尽量不要安装在系统C盘,我的安装路径为:D:\program\anaconda3然后进行环境配置


python的环境变量也一起配置了,我的是
C:\Users\Yu\AppData\Roaming\Python\Python311\Scripts测试:
进入cmdconda --version- 1

conda info -e- 1

ok了配置conda国内镜像
参考:https://mirrors.tuna.tsinghua.edu.cn/help/anaconda/
Windows 用户无法直接创建名为 .condarc 的文件,可先执行conda config --set show_channel_urls yes- 1
在C:\Users\你的用户名目录下会生成.condarc文件,生成该文件之后再修改。、

将配置文件复制到复制到.condarc 文件channels: - defaults show_channel_urls: true default_channels: - https://mirrors.tuna.tsinghua.edu.cn/anaconda/pkgs/main - https://mirrors.tuna.tsinghua.edu.cn/anaconda/pkgs/r - https://mirrors.tuna.tsinghua.edu.cn/anaconda/pkgs/msys2 custom_channels: conda-forge: https://mirrors.tuna.tsinghua.edu.cn/anaconda/cloud msys2: https://mirrors.tuna.tsinghua.edu.cn/anaconda/cloud bioconda: https://mirrors.tuna.tsinghua.edu.cn/anaconda/cloud menpo: https://mirrors.tuna.tsinghua.edu.cn/anaconda/cloud pytorch: https://mirrors.tuna.tsinghua.edu.cn/anaconda/cloud pytorch-lts: https://mirrors.tuna.tsinghua.edu.cn/anaconda/cloud simpleitk: https://mirrors.tuna.tsinghua.edu.cn/anaconda/cloud deepmodeling: https://mirrors.tuna.tsinghua.edu.cn/anaconda/cloud/- 1
- 2
- 3
- 4
- 5
- 6
- 7
- 8
- 9
- 10
- 11
- 12
- 13
- 14
- 15
- 16

测试# 清除索引缓存 conda clean -i conda create -n name- 1
- 2
- 3
- 4

安装ipykernel
conda install ipykernel- 1
vscode中文
点击“应用”按钮
输入“Chinese (Simplified) Language Pack for Visual Studio Code
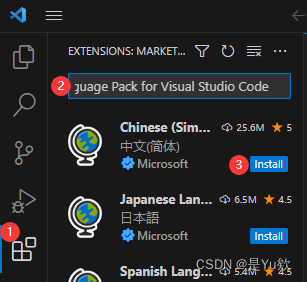

ok了

vscode配置anaconda环境步骤
安装Python软件和jupyter扩展(没有图,记得自己安装)

打开项目文件
选择anconda中的环境
注意:只有安装了python插件才会有这个界面在Vscode中使用
CTRL+P,另外部分系统是:CTRL+Shift+P的快捷键打开搜索,然后输入:select interpreter- 1

点击小齿轮

OK啦新建.ipynb项目


完美撒花✿✿ヽ(°▽°)ノ✿
-
相关阅读:
【QT教程】QT6物联网应用
C站专家圈分享-低代码构建WebAPI的原理与体验
前端开发中的try...catch
栈 之 如何实现一个栈
Go入门教程
Vulnhub_Noob
爬取某音乐榜单歌曲
SpringMVC枚举类型字段处理
Day 87
小谈设计模式(25)—职责链模式
- 原文地址:https://blog.csdn.net/wtyuong/article/details/132775180