-
Nginx 学习(十)高可用中间件的配置与实现
一 Keepalived热备
1 概述
- 调度器出现单点故障,如何解决?
- Keepalived实现了高可用集群
- Keepalived最初是为LVS设计的,专门监控各服务器节点的状态
- Keepalived后来加入了VRRP功能,防止单点故障
2 运行原理
Keepalived检测每个服务器节点状态,当服务器节点异常或工作出现故障, Keepalived将故障节点从集群系统中剔除,故障节点恢复后,Keepalived再将其加入到集群系统中所有工作自动完成,无需人工千预
3 配高可用的web拓扑
使用keepalived为主从设备提供VIP地址漂移

二 案列1:使用Keepalived实现web服务器的高可用
- Web服务器IP地址分别为192.168.88.100和192.168.88.200
- Web服务器的VIP地址为192.168.88.80
- 客户端通过访问VIP地址访问Web页面
1 环境说明
- web1:eth0->192.168.88.100/24
- web2:eth0->192.168.88.200/24
2 配置keepalived
- # 在两台web服务器上安装keepalived
- [root@pubserver cluster]# vim 07-install-keepalived.yml
- ---
- - name: install keepalived
- hosts: webservers
- tasks:
- - name: install keepalived # 安装keepalived
- yum:
- name: keepalived
- state: present
- [root@pubserver cluster]# ansible-playbook 07-install-keepalived.yml
- # 修改配置文件
- [root@web1 ~]# vim /etc/keepalived/keepalived.conf
- 12 router_id web1 # 设置本机在集群中的唯一识别符
- 13 vrrp_iptables # 自动配置iptables放行规则
- ... ...
- 20 vrrp_instance VI_1 {
- 21 state MASTER # 状态,主为MASTER,备为BACKUP
- 22 interface eth0 # 网卡
- 23 virtual_router_id 51 # 虚拟路由器地址
- 24 priority 100 # 优先级
- 25 advert_int 1 # 发送心跳消息的间隔
- 26 authentication {
- 27 auth_type PASS # 认证类型为共享密码
- 28 auth_pass 1111 # 集群中的机器密码相同,才能成为集群
- 29 }
- 30 virtual_ipaddress {
- 31 192.168.88.80/24 # VIP地址
- 32 }
- 33 }
- # 删除下面所有行
- [root@web1 ~]# systemctl start keepalived
- # 等几秒服务完全启动后,可以查看到vip
- [root@web1 ~]# ip a s eth0 | grep '88'
- inet 192.168.88.100/24 brd 192.168.88.255 scope global noprefixroute eth0
- inet 192.168.88.80/24 scope global secondary eth0
- # 配置web2
- [root@web1 ~]# scp /etc/keepalived/keepalived.conf 192.168.88.200:/etc/keepalived/
- [root@web2 ~]# vim /etc/keepalived/keepalived.conf
- 12 router_id web2 # 改id
- 13 vrrp_iptables
- ... ...
- 20 vrrp_instance VI_1 {
- 21 state BACKUP # 改状态
- 22 interface eth0
- 23 virtual_router_id 51
- 24 priority 80 # 改优先级
- 25 advert_int 1
- 26 authentication {
- 27 auth_type PASS
- 28 auth_pass 1111
- 29 }
- 30 virtual_ipaddress {
- 31 192.168.88.80/24
- 32 }
- 33 }
- # 启动服务
- [root@web2 ~]# systemctl start keepalived
- # 查看地址,eth0不会出现vip
- [root@web2 ~]# ip a s | grep '88'
- inet 192.168.88.200/24 brd 192.168.88.255 scope global noprefixroute eth0
- # 测试,现在访问88.80,看到是web1上的内容
- [root@client1 ~]# curl http://192.168.88.80
- Welcome from web1
- # 模拟web1出现故障
- [root@web1 ~]# systemctl stop keepalived.service
- # 测试,现在访问88.80,看到是web2上的内容
- [root@client1 ~]# curl http://192.168.88.80
- Welcome from web2
- # 在web2上查看vip,可以查看到vip 192.168.88.80
- [root@web2 ~]# ip a s | grep '88'
- inet 192.168.88.200/24 brd 192.168.88.255 scope global noprefixroute eth0
- inet 192.168.88.80/24 scope global secondary eth0
三 案例2:配置track_script脚本
通过track script脚本控制监视MASTER服务器的80端口,实现主备切换
- 创建/etc/keepalived/check_http.sh脚本
- 该脚本检查本机是否监听在80端口
- 如果正在监听端口,退出码设置为0,否则为1
- 修改KeepAlived配置,利用创建的脚本决定是否要切换VIP到BACKUP节点
1 跟踪脚本
- KeepAlived默认只提供一个VIP,对运行的服务无感知
- track_script用于检查一个脚本的返回值,如果返回值为0,则认为当前主机处于正常状态,如果返回值为1,则认为当前主机处于异常状态,需要将VIP地址切换到另一台备用机器上
- track_script来检测应用程序或服务是否正常,可以增加VIP地址更准确、可靠的自动切换功能,提高系统的可用性和可靠性
2 实现原理
- 配置高可用的web集群时,Keepalived只为服务器提供了VIP
- Keepalived不知道服务器上运行了哪些服务
- MASTER服务器可以通过跟踪脚本监视本机的80端口,一旦本机80端口失效,则将VIP切换至BACKUP服务器
- Keepalived对脚本的要求是,退出码为0表示访问成功;退出码为1表示失败。
3 实施
- # 1. 在MASTER上创建监视脚本
- [root@web1 ~]# vim /etc/keepalived/check_http.sh
- #!/bin/bash
- ss -tlnp | grep :80 &> /dev/null && exit 0 || exit 1
- [root@web1 ~]# chmod +x /etc/keepalived/check_http.sh
- # 2. 修改MASTER配置文件,使用脚本
- [root@web1 ~]# vim /etc/keepalived/keepalived.conf
- 1 ! Configuration File for keepalived
- 2
- 3 global_defs {
- ...略...
- 18 }
- 19
- 20 vrrp_script chk_http_port { # 定义监视脚本
- 21 script "/etc/keepalived/check_http.sh"
- 22 interval 2 # 脚本每隔2秒运行一次
- 23 }
- 24
- 25 vrrp_instance VI_1 {
- 26 state MASTER
- 27 interface eth0
- 28 virtual_router_id 51
- 29 priority 100
- 30 advert_int 1
- 31 authentication {
- 32 auth_type PASS
- 33 auth_pass 1111
- 34 }
- 35 virtual_ipaddress {
- 36 192.168.88.80/24
- 37 }
- 38 track_script { # 引用脚本
- 39 chk_http_port
- 40 }
- 41 }
- # 3. 重起服务
- [root@web1 ~]# systemctl restart keepalived.service
- # 4. 测试,关闭web1的nginx后,VIP将会切换至web2
- [root@web1 ~]# systemctl stop nginx.service
- [root@web1 ~]# ip a s | grep 88
- inet 192.168.88.100/24 brd 192.168.88.255 scope global noprefixroute eth0
- [root@web2 ~]# ip a s | grep 88
- inet 192.168.88.200/24 brd 192.168.88.255 scope global noprefixroute eth0
- inet 192.168.88.80/24 scope global secondary eth0
- # 5. 当MASTER的nginx修复后,VIP将会切换回至web1
- [root@web1 ~]# systemctl start nginx.service
- [root@web1 ~]# ip a s | grep 88
- inet 192.168.88.100/24 brd 192.168.88.255 scope global noprefixroute eth0
- inet 192.168.88.80/24 scope global secondary eth0
- [root@web2 ~]# ip a s | grep 88
- inet 192.168.88.200/24 brd 192.168.88.255 scope global noprefixroute eth0
四 案列3:Keepalived + LVS服务器
- 准备5台服务器,两台用于Real ServerI,两台用于搭建高可用、负载平衡集群,一台作为路由器
- 在RealServer上配置VIP并调整内核参数
- 两台调度器节点均安装Keepalived和LVS
- 通过Keepalived配置DR模式的LVS
1 项目拓扑图
- 使用Keepalived高可用解决调度器单点失败问题
- 主、备调度器上配置LVS
- 主调度器异常时,Keepalived启用备用调度器调度器
-
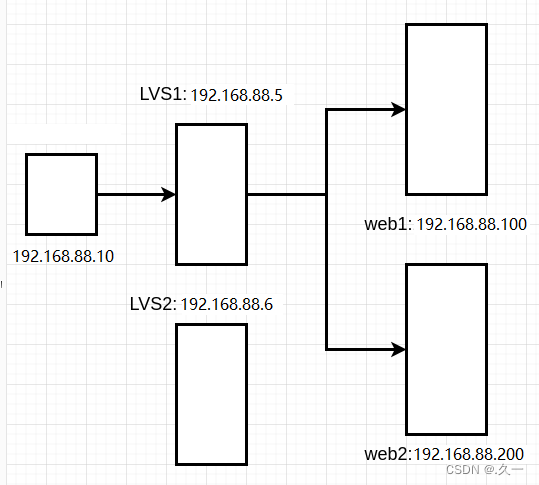
2 环境准备
环境说明:LVS-DR模式
client1 eth0->192.168.88.10 lvs1 eth0->192.168.88.5 lvs2 eth0->192.168.88.6 web1 eth0->192.168.88.100 web2 eth0->192.168.88.200 - # 关闭2台web服务器上的keepalived,并卸载
- [root@pubserver cluster]# vim 08-rm-keepalived.yml
- ---
- - name: remove keepalived
- hosts: webservers
- tasks:
- - name: stop keepalived # 停服务
- service:
- name: keepalived
- state: stopped
- - name: uninstall keepalived # 卸载
- yum:
- name: keepalived
- state: absent
- [root@pubserver cluster]# ansible-playbook 08-rm-keepalived.yml
- # 创建新虚拟机lvs2
- [root@myhost ~]# vm clone lvs2
- # 为lvs2设置ip地址
- [root@myhost ~]# vm setip lvs2 192.168.88.6
- # 连接
- [root@myhost ~]# ssh 192.168.88.6
-
配置高可用、负载均衡
- 在2台web服务器的lo上配置vip
- 在2台web服务器上配置内核参数
- 删除lvs1上的
eth0上的VIP地址。因为vip将由keepalived接管
- [root@pubserver cluster]# vim 09-del-lvs1-vip.yml
- ---
- - name: del lvs1 vip
- hosts: lvs1
- tasks:
- - name: rm vip
- lineinfile: # 在指定文件中删除行
- path: /etc/sysconfig/network-scripts/ifcfg-eth0
- regexp: 'IPADDR2=' # 正则匹配
- state: absent
- notify: restart system
- handlers:
- - name: restart system
- shell: reboot
- [root@pubserver cluster]# ansible-playbook 09-del-lvs1-vip.yml
- # 查看结果
- [root@lvs1 ~]# ip a s eth0 | grep 88
- inet 192.168.88.5/24 brd 192.168.88.255 scope global noprefixroute eth0
- 删除lvs1上的lvs规则。因为lvs规则将由keepalived创建
- [root@lvs1 ~]# ipvsadm -Ln # 查看规则
- [root@lvs1 ~]# ipvsadm -D -t 192.168.88.15:80
- 在lvs上配置keepalived
- # 在主机清单文件中加入lvs2的说明
- [root@pubserver cluster]# vim inventory
- ...略...
- [lb]
- lvs1 ansible_host=192.168.88.5
- lvs2 ansible_host=192.168.88.6
- ...略...
- # 安装软件包
- [root@pubserver cluster]# cp 01-upload-repo.yml 10-upload-repo.yml
- ---
- - name: config repos.d
- hosts: lb
- tasks:
- - name: delete repos.d
- file:
- path: /etc/yum.repos.d
- state: absent
- - name: create repos.d
- file:
- path: /etc/yum.repos.d
- state: directory
- mode: '0755'
- - name: upload local88
- copy:
- src: files/local88.repo
- dest: /etc/yum.repos.d/
- [root@pubserver cluster]# ansible-playbook 10-upload-repo.yml
- [root@pubserver cluster]# vim 11-install-lvs2.yml
- ---
- - name: install lvs keepalived
- hosts: lb
- tasks:
- - name: install pkgs # 安装软件包
- yum:
- name: ipvsadm,keepalived
- state: present
- [root@pubserver cluster]# ansible-playbook 11-install-lvs2.yml
- [root@lvs1 ~]# vim /etc/keepalived/keepalived.conf
- 12 router_id lvs1 # 为本机取一个唯一的id
- 13 vrrp_iptables # 自动开启iptables放行规则
- ... ...
- 20 vrrp_instance VI_1 {
- 21 state MASTER
- 22 interface eth0
- 23 virtual_router_id 51
- 24 priority 100
- 25 advert_int 1
- 26 authentication {
- 27 auth_type PASS
- 28 auth_pass 1111
- 29 }
- 30 virtual_ipaddress {
- 31 192.168.88.15 # vip地址,与web服务器的vip一致
- 32 }
- 33 }
- # 以下为keepalived配置lvs的规则
- 35 virtual_server 192.168.88.15 80 { # 声明虚拟服务器地址
- 36 delay_loop 6 # 健康检查延迟6秒开始
- 37 lb_algo wrr # 调度算法为wrr
- 38 lb_kind DR # 工作模式为DR
- 39 persistence_timeout 50 # 50秒内相同客户端调度到相同服务器
- 40 protocol TCP # 协议是TCP
- 41
- 42 real_server 192.168.88.100 80 { # 声明真实服务器
- 43 weight 1 # 权重
- 44 TCP_CHECK { # 通过TCP协议对真实服务器做健康检查
- 45 connect_timeout 3 # 连接超时时间为3秒
- 46 nb_get_retry 3 # 3次访问失败则认为真实服务器故障
- 47 delay_before_retry 3 # 两次检查时间的间隔3秒
- 48 }
- 49 }
- 50 real_server 192.168.88.200 80 {
- 51 weight 2
- 52 TCP_CHECK {
- 53 connect_timeout 3
- 54 nb_get_retry 3
- 55 delay_before_retry 3
- 56 }
- 57 }
- 58 }
- # 以下部分删除
- # 启动keepalived服务
- [root@lvs1 ~]# systemctl start keepalived
- # 验证
- [root@lvs1 ~]# ip a s eth0 | grep 88
- inet 192.168.88.5/24 brd 192.168.88.255 scope global noprefixroute eth0
- inet 192.168.88.15/32 scope global eth0
- [root@lvs1 ~]# ipvsadm -Ln # 出现规则
- IP Virtual Server version 1.2.1 (size=4096)
- Prot LocalAddress:Port Scheduler Flags
- -> RemoteAddress:Port Forward Weight ActiveConn InActConn
- TCP 192.168.88.15:80 wrr persistent 50
- -> 192.168.88.100:80 Route 1 0 0
- -> 192.168.88.200:80 Route 2 0 0
- # 客户端连接测试
- [root@client1 ~]# for i in {1..6}; do curl http://192.168.88.15/; done
- Welcome from web2
- Welcome from web2
- Welcome from web2
- Welcome from web2
- Welcome from web2
- Welcome from web2
- # 为了效率相同的客户端在50秒内分发给同一台服务器。为了使用同一个客户端可以看到轮询效果,可以注释配置文件中相应的行后,重启keepavlied。
- [root@lvs1 ~]# vim +39 /etc/keepalived/keepalived.conf
- ...略...
- # persistence_timeout 50
- ...略...
- [root@lvs1 ~]# systemctl restart keepalived.service
- # 在客户端验证
- [root@client1 ~]# for i in {1..6}; do curl http://192.168.88.15/; done
- Welcome from web2
- Welcome from web1
- Welcome from web2
- Welcome from web2
- Welcome from web1
- Welcome from web2
- # 配置LVS2
- [root@lvs1 ~]# scp /etc/keepalived/keepalived.conf 192.168.88.6:/etc/keepalived/
- [root@lvs2 ~]# vim /etc/keepalived/keepalived.conf
- 12 router_id lvs2
- 21 state BACKUP
- 24 priority 80
- [root@lvs2 ~]# systemctl start keepalived
- [root@lvs2 ~]# ipvsadm -Ln # 出现规则
- IP Virtual Server version 1.2.1 (size=4096)
- Prot LocalAddress:Port Scheduler Flags
- -> RemoteAddress:Port Forward Weight ActiveConn InActConn
- TCP 192.168.88.15:80 wrr
- -> 192.168.88.100:80 Route 1 0 0
- -> 192.168.88.200:80 Route 2 0 0
- 验证
- # 1. 验证真实服务器健康检查
- [root@web1 ~]# systemctl stop nginx
- [root@lvs1 ~]# ipvsadm -Ln # web1在规则中消失
- [root@lvs2 ~]# ipvsadm -Ln
- [root@web1 ~]# systemctl start nginx
- [root@lvs1 ~]# ipvsadm -Ln # web1重新出现在规则中
- [root@lvs2 ~]# ipvsadm -Ln
- # 2. 验证lvs的高可用性
- [root@lvs1 ~]# shutdown -h now # 关机
- [root@lvs2 ~]# ip a s | grep 88 # 可以查看到vip
- inet 192.168.88.6/24 brd 192.168.88.255 scope global noprefixroute eth0
- inet 192.168.88.15/32 scope global eth0
- # 客户端访问vip依然可用
- [root@client1 ~]# for i in {1..6}; do curl http://192.168.88.15/; done
- Welcome from web1
- Welcome from web2
- Welcome from web2
- Welcome from web1
- Welcome from web2
- Welcome from web2
五 HAProxy
1 简介
它是免费、快速并且可靠的一种解决方案,适用于那些负载特大的web站点,这些站点通常又需要会话保持或七层处理,可以提供高可用性、负载均衡以及基于TCP和HTTP应用的代理
2 衡量负责均衡器性能的因素
- Session rate 会话率,每秒钟产生的会话数
- Session concurrency 并发会话数,服务器处理会话的时间越长,并发会话数越多
- Data rate数据速率,以MB/s或Mbps衡量
3 工作模式
mode http
- 客户端请求被深度分析后再发往服务器,只适用于web服务
mode tcp
- 4层调度,不检查第七层信息,适用于各种服务
mode health
- 仅做健康状态检查,已经不建议使用六 案列4 配置HAProxy负载平衡集群
- 准备三台虚拟机两台做Web服务器,一台安装HAProxy
- 安装并配置HAProxy,发往HAProxy的连接请求,分发到真正的Web服务器-把HAProxy设置为开机自动启动
- 设置HAProxy以实现监控,并查看监控信息
1 项目拓扑图

2 环境准备
client1 eth0 -> 192.168.88.10 HAProxy eth0 -> 192.168.88.5 web1 eth0 -> 192.168.88.100 web2 eth0 -> 192.168.88.200 3 初始化配置
- # 关闭192.168.88.6
- [root@lvs2 ~]# shutdown -h now
- # 配置192.168.88.5为haproxy服务器
- [root@pubserver cluster]# vim 12-config-haproxy.yml
- ---
- - name: config haproxy
- hosts: lvs1
- tasks:
- - name: rm lvs keepalived # 删除软件包
- yum:
- name: ipvsadm,keepalived
- state: absent
- - name: rename hostname # 修改主机名
- shell: hostnamectl set-hostname haproxy1
- - name: install haproxy # 安装软件包
- yum:
- name: haproxy
- state: present
- [root@pubserver cluster]# ansible-playbook 12-config-haproxy.yml
- # web服务器,不需要配置vip,不需要改内核参数。但是存在对haproxy也没有影响。
- 配置haproxy
- # 修改配置文件
- [root@haproxy1 ~]# vim /etc/haproxy/haproxy.cfg
- # 配置文件中,global是全局配置;default是缺省配置,如果后续有和default相同的配置,default配置将会被覆盖。
- # 配置文件中,frontend描述haproxy怎么和用户交互;backend描述haproxy怎么和后台应用服务器交互。这两个选项,一般不单独使用,而是合并到一起,名为listen。
- # 将64行之后全部删除,写入以下内容
- 64 #---------------------------------------------------------------------
- 65 listen myweb # 定义虚拟服务器
- 66 bind 0.0.0.0:80 # 监听在所有可用地址的80端口
- 67 balance roundrobin # 定义轮询调度算法
- # 对web服务器做健康检查,2秒检查一次,如果连续2次检查成功,认为服务器是健康的,如果连续5次检查失败,认为服务器坏了
- 68 server web1 192.168.88.100:80 check inter 2000 rise 2 fall 5
- 69 server web2 192.168.88.200:80 check inter 2000 rise 2 fall 5
- 70
- 71 listen stats # 定义虚拟服务器
- 72 bind 0.0.0.0:1080 # 监听在所有可用地址的1080端口
- 73 stats refresh 30s # 设置监控页面自动刷新时间为30秒
- 74 stats uri /stats # 定义监控地址是/stats
- 75 stats auth admin:admin # 监控页面的用户名和密码都是admin
- # 启服务
- [root@haproxy1 ~]# systemctl start haproxy.service
- # 使用firefox访问监控地址 http://192.168.88.5:1080/stats
- # 客户端访问测试
- [root@client1 ~]# for i in {1..6}; do curl http://192.168.88.5/; done
- Welcome from web2
- Welcome from web1
- Welcome from web2
- Welcome from web1
- Welcome from web2
- Welcome from web1
- # client1上使用ab访问
- [root@client1 ~]# yum install -y httpd-tools
- [root@client1 ~]# ab -n1000 -c200 http://192.168.88.5/
监控地址 http://192.168.88.5:1080/stats如下:

- Queue:队列长度。Cur当前队列长度,Max最大队列长度,Limit限制长度
- Session rate:会话率,每秒钟的会话数
- Sessions:会话数
- Bytes:字节数。In收到的字节数,Out发出的字节数
- Denied:拒绝。Req请求,Resp响应
- Errors:错误
- Warning:警告
- Status:状态
- LastChk:上一次检查。L4OK,第四层tcp检查通过
- Wght:权重
七 负载均衡调度器比较
LVS适用于需要高并发性和稳定性的场景,Nginx适用于静态文件服务和反向代理等应用层负载均衡场景,HAProxy则具备较为丰富的功能和灵活性,适用于多种负载均衡场景。
1 LVS(Linux Virtual Server)
优点:
- 高性能:LVS使用Linux内核中的IP负载均衡技术,能够实现非常高的并发处理能力。
- 稳定性:LVS经过长时间的实践应用,成熟稳定,被广泛使用。
- 可用性:支持高可用性的配置,可以实现故障自动切换,提供无中断的服务。
- 灵活性:可根据需要采用多种负载均衡算法,如轮询、加权轮询、哈希等。
缺点:
- 配置复杂:相对于其他两个技术,LVS的配置相对较为复杂,需要更深入的了解和配置。
- 功能相对局限:LVS主要是一种传输层负载均衡技术,无法像Nginx和HAProxy那样对应用层协议进行处理。
2 Nginx
优点:
- 高性能:Nginx采用了基于事件驱动的异步非阻塞架构,能够处理大量并发连接。
- 负载均衡:Nginx具备内置的负载均衡功能,可以根据配置进行请求的转发。
- 丰富的功能:Nginx支持反向代理、静态文件服务、缓存、SSL等,在Web服务器领域有很广泛的应用。
缺点:
- 功能相对较少:相对于LVS和HAProxy,Nginx在负载均衡算法和健康检查等方面的功能相对较少。
- 限制于应用层协议:Nginx只能对HTTP和HTTPS等应用层协议进行处理,无法处理其他协议。
3 HAProxy
优点:
- 灵活性:HAProxy支持丰富的负载均衡算法和会话保持方式,可以根据需求进行灵活配置。
- 完整的功能:HAProxy支持高可用性配置、健康检查、故障恢复、SSL等功能,在负载均衡领域应用广泛。
- 高性能:HAProxy性能优良,能够处理大量并发连接,并且支持异步IO模型。
缺点:
- 内存占用:相对于Nginx和LVS,HAProxy在处理大量连接时消耗的内存稍高一些。
- 高可用性:HAProxy需要借助额外的工具来实现高可用性,例如Keepalived。
-
相关阅读:
springboot幼儿园幼儿基本信息管理系统毕业设计源码201126
用起 Arduino IDE 2.0版本
机器学习(一)
STM32 基础知识
只会postman单接口测试?这些高级功能你必须掌握
【Java基础】方法重写、修饰符、权限修饰符及final、static关键字
数据驭王: PostgreSQL教程指南解密
windows10下同时安装两个mysql服务的解决办法
js 对象深拷贝递归实现
理解单点登录
- 原文地址:https://blog.csdn.net/2301_79227925/article/details/132631532