-
深度学习(十一)---zed 调用yolov5 进行识别目标并实时测距
1. 前言
zed 相机测距有2种方式:一种是根据点云数据进行测试,二是根据zed获取深度值进行测距。上篇文章 调用yolov5模型进行实时图像推理及网页端部署 我们讲述了zed调用yolov5进行目标识别,我们在此基础上进一步实现目标测距功能。
2.深度图和点云图的区别:
(1)深度图像也叫距离影像,是指将从图像采集器到场景中各点的距离(深度)值作为像素值的图像。深度D等于像素在该视图相机坐标系下Z坐标。获取方法有:激光雷达深度成像法、计算机立体视觉成像、坐标测量机法、莫尔条纹法、结构光法。
(2)点云:当一束激光照射到物体表面时,所反射的激光会携带方位、距离等信息。通过深度相机得到的物体外观表面的点数据集合是点云。使用深度相机得到的点云信息为三维坐标(X,Y,Z)。点云格式有*.las ;*.pcd; *.txt等。
(3)深度数据流所提供的图像帧中,每一个像素点代表的是在深度感应器的视野中,该特定的(x, y)坐标处物体到离摄像头平面最近的物体到该平面的距离(以毫米为单位)。
(4)深度图像经过坐标转换可以计算为点云数据;有规则及必要信息的点云数据可以反算为深度图像。
(5)视差图是立体匹配算法的产出,而深度图则是立体匹配到点云生成的中间桥梁。
简而言之,点云可以看作是三维的深度图。深度图只包含每个像素的距离或Z信息,而点云包含物体表面的3D点(X,Y, Z)的集合,可以包含颜色信息。
3.测距原理
(1)基于点云三维测距
基于点云的三维测距,首先获取目标物体(x,y)的点云值,然后利用欧几里得公式进行求解
point_cloud = sl.Mat() zed.retrieve_measure(point_cloud, sl.MEASURE.XYZRGBA, sl.MEM.CPU) s, point_cloud_value = point_cloud.get_value((x2+x1)/2, (y2+y1)/2) 或者: point_cloud_value = point_cloud.get_value((x2+x1)/2, (y2+y1)/2)[1] # print("point_cloud_value",point_cloud_value) -->输出:-->(SUCCESS, array([....])) distance = math.sqrt(point_cloud_value[0] * point_cloud_value[0] + point_cloud_value[1] * point_cloud_value[1] + point_cloud_value[2] * point_cloud_value[2])- 1
- 2
- 3
- 4
- 5
- 6
- 7
(2)基于深度值测距
使用深度值进行测距,可以直接得出距离值
depth = sl.Mat() zed.retrieve_measure(depth, sl.MEASURE.DEPTH, sl.MEM.CPU) s,depth_value = depth.get_value((x2+x1)/2, (y2+y1)/2) -->输出:(SUCCESS, ...) 或者: depth_value = depth.get_value((x2+x1)/2, (y2+y1)/2)[1]- 1
- 2
- 3
- 4
- 5
4.完整代码实现
import time import cv2 import numpy as np import torch from models.experimental import attempt_load from utils.datasets import letterbox from utils.general import check_img_size, non_max_suppression,scale_coords, xyxy2xywh,set_logging,plot_one_box # from utils.plots import colors, plot_one_box from utils.torch_utils import select_device,time_synchronized from numpy import random import pyzed.sl as sl @torch.no_grad() def detect( weights='weights/yolov5s.pt', imgsz=512, cap = 0, conf_thres=0.25, iou_thres=0.45, max_det=1000, device='', crop=True, classes=None, agnostic_nms=False, #class-agnostic NMS augment=False, half=False, hide_labels=False, hide_conf=False, line_thickness=3 ): ######## zed 初始化 ######### zed = sl.Camera() # 设置相机的分辨率1080和采集帧率30fps init_params = sl.InitParameters() init_params.camera_resolution = sl.RESOLUTION.HD1080 # Use HD1080 video mode init_params.camera_fps = 30 # fps可选:15、30、60、100 err = zed.open(init_params) # 根据自定义参数打开相机 if err != sl.ERROR_CODE.SUCCESS: exit(1) runtime_parameters = sl.RuntimeParameters() # 设置相机获取参数 runtime_parameters.sensing_mode = sl.SENSING_MODE.STANDARD # 创建sl.Mat对象来存储图像(容器),Mat类可以处理1到4个通道的多种矩阵格式(定义储存图象的类型) image = sl.Mat() # 图像 point_cloud = sl.Mat() #点云 depth = sl.Mat() #深度 # # 获取分辨率 # resolution = zed.get_camera_information().camera_resolution # w, h = resolution.width , resolution.height # x,y = int(w/2),int(h/2) # 中心点 ########### 图像预处理 ########## device = select_device(device) print("device", device) half &= device.type != 'cpu' model = attempt_load(weights, map_location=device) stride = int(model.stride.max()) imgsz = check_img_size(imgsz, s=stride) names = model.module.names if hasattr(model, 'module') else model.names colors = [[random.randint(0, 255) for _ in range(3)] for _ in range(len(names))] #toFP16 if half: model.half() if device.type != 'cpu': model(torch.zeros(1, 3, imgsz, imgsz).to(device).type_as(next(model.parameters()))) while True: ### zed捕获图像 ##### if zed.grab(runtime_parameters) == sl.ERROR_CODE.SUCCESS: #相机成功获取图象 # 获取图像 timestamp = zed.get_timestamp(sl.TIME_REFERENCE.CURRENT) #获取图像被捕获时的时间戳(ms) zed.retrieve_image(image, sl.VIEW.LEFT) # image:容器,sl.VIEW.LEFT:内容 ,左镜头 view = image.get_data() # 转换成图像数组,便于后续的显示或者储存 # 显示彩色图 # img0 = cv2.resize(view,(384,384)) im = view[:, :, 0:3] #### 图像推理,目标识别 ############ labels = [] t0 = time.time() img = letterbox(im, imgsz)[0] #channel=3 img = img[:, :, ::-1].transpose(2, 0, 1) #BGR to RGB, to 3x416x416 img = np.ascontiguousarray(img) #channel = imgsz img = torch.from_numpy(img).to(device) #uint8 to fp16/32 img = img.half() if half else img.float() #0 - 255 to 0.0 - 1.0 img /= 255.0 #512 if img.ndimension() == 3: img = img.unsqueeze(0) # print("shape2",img.shape[2]) #320 t1 = time_synchronized() pred = model(img, augment=False)[0] pred = non_max_suppression(pred, conf_thres, iou_thres, classes, agnostic_nms) t2 = time_synchronized() for i, det in enumerate(pred): # s, im0 = '', im.copy() s += '%gx%g ' % img.shape[2:] gn = torch.tensor(im0.shape)[[1, 0, 1, 0]] if det is not None and len(det): det[:, :4] = scale_coords(img.shape[2:], det[:, :4], im0.shape).round() for c in det[:, -1].unique(): n = (det[:, -1] == c).sum() s += f"{n} {names[int(c)]}{'s' * (n > 1)}, " for *xyxy, conf, cls in reversed(det): #检测框坐标,置信度,类别id xywh = (xyxy2xywh(torch.tensor(xyxy).view(1, 4)) / gn).view(-1).tolist() line = (cls, *xywh, conf) c = int(cls) #names[c] 获取类别名称 label = None if hide_labels else (names[c] if hide_conf else f'{names[c]} {conf:.2f}') if crop: plot_one_box(xyxy, im0, label=label, color=colors[int(c)], line_thickness=line_thickness) labels.append([names[c],conf,xyxy]) ###### 点云测距 ######### import math x1, y1 = int(xyxy[0]), int(xyxy[1]) x2, y2 = int(xyxy[2]), int(xyxy[3]) zed.retrieve_measure(point_cloud, sl.MEASURE.XYZRGBA, sl.MEM.CPU) s, point_cloud_value = point_cloud.get_value((x2+x1)/2, (y2+y1)/2) # print("point_cloud_value",point_cloud_value) distance = math.sqrt(point_cloud_value[0] * point_cloud_value[0] + point_cloud_value[1] * point_cloud_value[1] + point_cloud_value[2] * point_cloud_value[2]) cv2.circle(im0, (int((x2+x1)/2), int((y2+y1)/2)), 5, [0, 0, 255], 5) #画出目标中心点 cv2.putText(im0, "Distance: " + str(round(distance / 1000, 2)) + 'm', (int(xyxy[0]), int(xyxy[3] + 25)),cv2.FONT_HERSHEY_COMPLEX, 1, colors[int(c)], 2) #标出点云距离mm-->m ##### 求解深度距离 ########## zed.retrieve_measure(depth, sl.MEASURE.DEPTH, sl.MEM.CPU) s1,depth_value = depth.get_value((x2+x1)/2, (y2+y1)/2) cv2.putText(im0, "depth_value: " + str(round(depth_value /1000, 2)) + 'm', (int(xyxy[0]), int(xyxy[3] + 75)),cv2.FONT_HERSHEY_COMPLEX, 1, colors[int(c)], 2) #标出深度值 # print("depth_value",depth_value) print(f'time: ({time.time() - t0:.3f}s)') cv2.namedWindow('666',cv2.WINDOW_NORMAL) cv2.resizeWindow('666',800,600) cv2.imshow("666",im0) key = cv2.waitKey(20) if key == 27: break cv2.destroyAllWindows() if __name__ == "__main__": detect()- 1
- 2
- 3
- 4
- 5
- 6
- 7
- 8
- 9
- 10
- 11
- 12
- 13
- 14
- 15
- 16
- 17
- 18
- 19
- 20
- 21
- 22
- 23
- 24
- 25
- 26
- 27
- 28
- 29
- 30
- 31
- 32
- 33
- 34
- 35
- 36
- 37
- 38
- 39
- 40
- 41
- 42
- 43
- 44
- 45
- 46
- 47
- 48
- 49
- 50
- 51
- 52
- 53
- 54
- 55
- 56
- 57
- 58
- 59
- 60
- 61
- 62
- 63
- 64
- 65
- 66
- 67
- 68
- 69
- 70
- 71
- 72
- 73
- 74
- 75
- 76
- 77
- 78
- 79
- 80
- 81
- 82
- 83
- 84
- 85
- 86
- 87
- 88
- 89
- 90
- 91
- 92
- 93
- 94
- 95
- 96
- 97
- 98
- 99
- 100
- 101
- 102
- 103
- 104
- 105
- 106
- 107
- 108
- 109
- 110
- 111
- 112
- 113
- 114
- 115
- 116
- 117
- 118
- 119
- 120
- 121
- 122
- 123
- 124
- 125
- 126
- 127
- 128
- 129
- 130
- 131
- 132
- 133
- 134
- 135
- 136
- 137
- 138
- 139
- 140
- 141
- 142
- 143
- 144
- 145
- 146
- 147
- 148
- 149
- 150
- 151
- 152
- 153
- 154
- 155
- 156
- 157
- 158
- 159
- 160
- 161
- 162
5.可视化展示
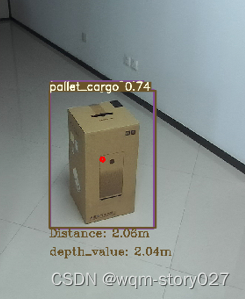
由此可以看出深度测距和点云测距存在一定误差,一般使用点云测距会更精准些。
-
相关阅读:
架构实战关键知识点
2023年电工杯B题问题二三思路讲解+创新点
文字验证码:简单有效的账号安全守卫!
学习C语言的好处:
对象转换之modelmapper
openssl在window下的编译方法
算法训练营第四十三天(9.5)| 动态规划Part16:距离
如何编辑扫描的PDF文件?
【机器学习】02. 使用sklearn库牛顿化、正则化的逻辑回归(代码简洁,思路推导)
华为:数据治理方法论
- 原文地址:https://blog.csdn.net/weixin_51157015/article/details/132717349