-
SpringBoot简单入门
创建Spring Boot项目
自学笔记,如有理解不正确之处欢迎指出
安装插件
先去下载插件:
Spring Boot Extension Pack创建Spring Boot项目
使用快捷键:
Ctrl+Shift+P调出命令窗口- 创建Java 项目

- Spring Boot
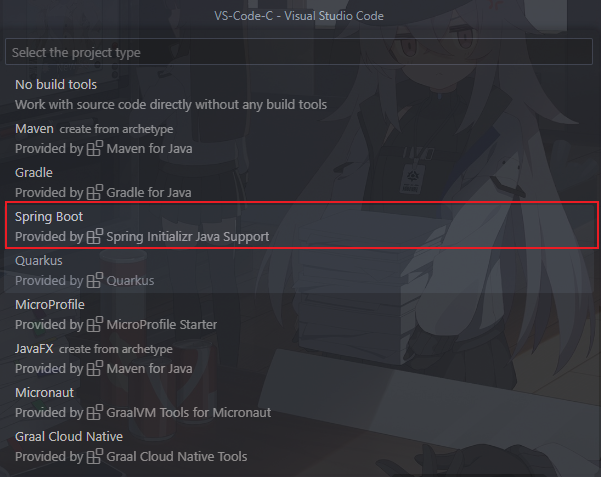
- Maven Project

- 选择Spring Boot版,这里选择
3.1.2

- 选择语言 Java

- Group Id、项目名称等


- 选择打包类型、Java版本等

- 选择需要引入的包,引入如下几个包即可满足web开发:
- DevTools(代码修改热更新,无需重启)
- Web(集成tomcat、SpringMVC)
- Lombok(智能生成setter、getter、toString等接口,无需手动生成,代码更简介)
- Thymeleaf (模板引擎)
- MySQL (链接数据库)

点击
Selected 6 dependencies进入下一步- 选择目录路径

- Add to Workspace

- 重启vscode

- 删除我当前用不到的文件

==>

添加pom.xml依赖
- mybatis-plus:MyBatis的增强工具,在 MyBatis 的基础上只做增强不做改变
- Commons Lang:扩展Java的能力
- druid:分布式的、支持实时多维OLAP 分析、列式存储的数据处理系统
- fastjson:Java 对象与 JSON 格式之间相互转换
com.baomidou mybatis-plus-boot-starter 3.5.3 commons-lang commons-lang 2.6 com.alibaba druid 1.1.16 com.alibaba fastjson 2.0.39 - 1
- 2
- 3
- 4
- 5
- 6
- 7
- 8
- 9
- 10
- 11
- 12
- 13
- 14
- 15
- 16
- 17
- 18
- 19
- 20
设置配置文件
springboot_mybatisplus_quickstart\src\main\resources\application.ymlspring: datasource: type: com.alibaba.druid.pool.DruidDataSource driver-class-name: com.mysql.cj.jdbc.Driver url: jdbc:mysql://localhost:3306/jdbc username: root password: 5508769123- 1
- 2
- 3
- 4
- 5
- 6
- 7
注意:
启动引导文件
SpringbootReggieApplication.java默认是放在springboot_reggie\src\main\java\com\mercurows\springboot_reggie\文件下的。而SpringBoot项目的Bean装配默认规则是根据DemoApplication类所在的包位置从上往下扫描。当执行测试文件:
springboot_reggie\src\test\java\com\mercurows\springboot_reggie\SpringbootReggieApplicationTests.java时:package com.mercurows.springboot_reggie; import org.junit.jupiter.api.Test; import org.springframework.beans.factory.annotation.Autowired; import org.springframework.boot.test.context.SpringBootTest; import com.mercurows.dao.StudentDao; import com.mercurows.domain.Student; @SpringBootTest() class SpringbootReggieApplicationTests { @Autowired private StudentDao studentDao; @Test void testSave() { Student student = new Student(); student.setNameCh("小米米"); student.setNameEn("xiaomimi"); student.setSex("男"); student.setAge(16); studentDao.insert(student); System.out.println("testSave"); } }- 1
- 2
- 3
- 4
- 5
- 6
- 7
- 8
- 9
- 10
- 11
- 12
- 13
- 14
- 15
- 16
- 17
- 18
- 19
- 20
- 21
- 22
- 23
- 24
- 25
会弹出创建Bean错误:
org.springframework.beans.factory.UnsatisfiedDependencyException: Error creating bean with name ‘com.mercurows.springboot_reggie.SpringbootReggieApplicationTests’: Unsatisfied dependency expressed through field ‘studentDao’: No qualifying bean of type ‘com.mercurows.dao.StudentDao’ available: expected at least 1 bean which qualifies as autowire candidate.
这时需要我们将文件
SpringbootReggieApplication.java移动到:springboot_reggie\src\main\java\com\mercurows\下即可 -
相关阅读:
如何使用vs code调试python程序
直播系统源码平台内容安全与版权维护技术:DRM
数字孪生与GIS的完美融合
Multism介绍——简单电路为例,介绍基本仿真流程
基于ArcGIS、ENVI、InVEST、FRAGSTATS等多技术融合提升环境、生态、水文、土地、土壤、农业、大气等领域的数据分析能力与项目科研水平教程
cmake简单使用
JDK1.5 新特性【泛型】
谷粒商城1.项目简介和项目环境预搭建(项目概述和环境搭建代码)
为什么键盘上F和J这两个键有两个凸起的横线呢?
docker部署文档dockercompose
- 原文地址:https://blog.csdn.net/weixin_45609535/article/details/132640257
