-
【网络通信 -- WebRTC】Open WebRTC Toolkit 环境搭建指南
【网络通信 -- WebRTC】Open WebRTC Toolkit -- OWT-Server 编译安装指南
【1】OWT Server 与 Web Demo 视频会议环境搭建
【1.1】编译 OWT Server
- 安装依赖
- ./scripts/installDepsUnattended.sh
- 编译
- scripts/build.js -t all --check
- 注意若不支持硬件加速则采用如下命令
- scripts/build.js -t mcu --check
【1.2】编译 owt-client-javascript
- npm install -g grunt-cli
- 进入 scripts 目录
- npm install
- grunt
【1.3】打包 OWT Server
scripts/pack.js -t all --install-module --app-path ${webrtc-javascript-sdk-sample-conference-dist}【1.4】配置 OWT Server
- ------------------------- 对于存在公网 IP 的场景 -------------------------
- 修改 webrtc_agent/agent.toml 文件中如下配置,添加公网IP配置
- {name = "eth0", replaced_ip_address = "公网IP"}
- 修改 portal/portal.toml 文件中如下配置,添加公网IP配置
- ip_address = "公网IP"
- ------------------------- 本地部署测试场景 -------------------------
- 修改 app 模块的 samplertcservice.js 文件 如下代码段
- icsREST.API.init('_service_ID_', '_service_KEY_', 'https://localhost:3000/', false);
- 替换其中的 _service_ID_、_service_KEY_、HTTP-API 的 Url
- _service_ID_、_service_KEY_ 在执行 ./bin/init-all.sh 初始化脚本时会输出如下
- superServiceId: {}
- superServiceKey: {}
- sampleServiceId: {}
- sampleServiceKey: {}
- 使用其中的 sampleServiceId、sampleServiceKey
【1.5】启动 OWT Server 与测试
- 进入 dist 目录执行如下命令启动 OWT Server
- ./bin/init-all.sh
- 初始化时会提示是否更新 mangodb、rabbitmq 的账号信息,注意选择 no
- ./bin/start-all.sh
- 注意请单独启动 app 模块,示例中的 app 模块初始化时会查询 HTTP-API 接口,初始化房间
- 需要确保 HTTP-API 模块启动完毕才能启动 app 模块,否则 app 模块将无法访问 HTTP-API 接口
- 启动完毕后
- 访问 https://{服务器 IP}:3300/console/ 可以进入 OWT 控制台,其中可以新增房间并配置房间能力
- 访问 https://{服务器 IP}:3004 即可进入默认房间进行测试,该模式是 MCU
- 访问 https://{服务器 IP}:3004?forward=true 即可进入默认房间进行测试,该模式是 SFU
问题与解决方案
【1】depot_tools / fetch:第8行:exec:python:未找到
- 解决方案
- ln -s /usr/bin/python2.7 /usr/bin/python
【2】编译 usrsctp 失败
- 解决方案
- 修改 installCommonDeps.sh 脚本如下
- ./configure --prefix=$PREFIX_DIR enable_warnings_as_errors=set
【3】boost库相关问题
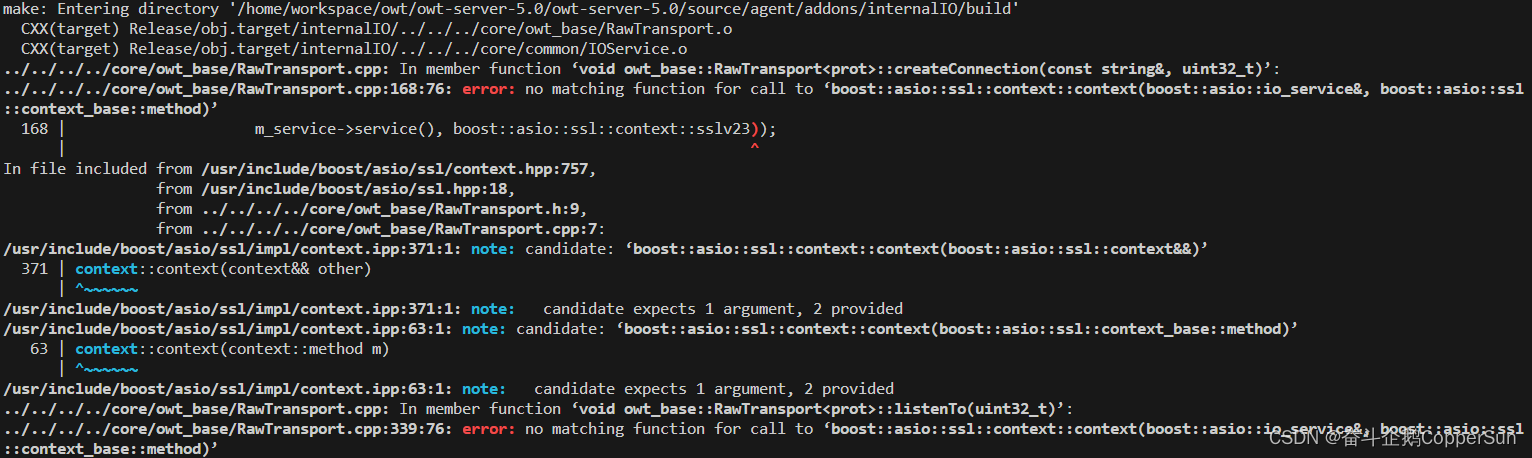
- 解决方案
- sudo apt-get install python-dev
- 修改 installUbuntuDeps.sh
- 添加如下函数
- install_boost(){
- if [ -d $LIB_DIR ]; then
- cd $LIB_DIR
- wget -c https://boostorg.jfrog.io/artifactory/main/release/1.65.0/source/boost_1_65_0.tar.bz2
- tar xvf boost_1_65_0.tar.bz2
- cd boost_1_65_0
- chmod +x bootstrap.sh
- ./bootstrap.sh
- ./b2 && ./b2 install --prefix=$PREFIX_DIR
- else
- mkdir -p $LIB_DIR
- install_boost
- fi
- }
- 修改 installDepUnattended.sh 如下
- if [[ "$OS" =~ .*centos.* ]]
- then
- . installCentOSDeps.sh
- if [ "$NIGHTLY" != "true" ]; then
- installRepo
- installYumDeps
- install_boost
- fi
- elif [[ "$OS" =~ .*ubuntu.* ]]
- then
- . installUbuntuDeps.sh
- if [ "$NIGHTLY" != "true" ]; then
- install_apt_deps
- install_boost
- fi
- fi
【2】OWT Client Native 编译生成 SDK -- Android 平台
【2.1】OWT Client Native SDK -- Android 平台编译
- 1. 获取 owt-client-native 代码
- git clone https://github.com/open-webrtc-toolkit/owt-client-native.git
- 将获取到的目录名改为 src
- 2. 在 src 同级目录中创建 .gclient 文件,内容如下
- solutions = [
- {
- "managed": False,
- "name": "src",
- "url": "https://github.com/open-webrtc-toolkit/owt-client-native.git@8cf4e56ff990e5d698b9b13aeb02fb7d3219233a",
- "custom_deps": {},
- "deps_file": "DEPS",
- "safesync_url": "",
- },
- ]
- target_os = ["android"]
- 注意,owt-client-native 在 4.2 以上版本方才支持 android,因此项目 git url 中需指明具体的提交
- 3. 执行 gclient sync 同步代码
- 4. 执行 python2 scripts/build_android.py 编译对应的 sdk 库
- 5. 编译完毕将得到 libwebrtc.jar 以及 arm64-v8a、armeabi-v7a、x86 平台的 libjingle_peerconnection_so.so
【2.2】运行 owt-client-android
- 获取代码 git clone https://github.com/open-webrtc-toolkit/owt-client-android@9965201e05c1ac0c42d56285b0717ec5c5b69d21
- 将 android 平台编译得到的 owt-client-native 库拷贝到对应的 dependencies/libwebrtc 目录下
- 编译 owt-client-android 工程即可获得对应的 APK
参考致谢
本博客为博主的学习实践总结,并参考了众多博主的博文,在此表示感谢,博主若有不足之处,请批评指正。
-
相关阅读:
来!PyFlink 作业的多种部署模式
glibc 2.23 源码分析 | malloc & free
非零基础自学Java (老师:韩顺平) 第8章 面向对象编程(中级部分) 8.6 面向对象编程三大特征 && 8.7 快速入门案例
【高效开发工具系列】PlantUML入门使用
jvm 三 之堆与栈
matlab中narginchk函数用法及其举例
三、RabbitMQ消息的可靠投递
2022年哪款超短焦投影仪性价比最高?当贝超短焦激光投影仪U1测评值得买
Redis 要被替代了?
《opencv学习笔记》-- 亚像素角点检测
- 原文地址:https://blog.csdn.net/qq_27788177/article/details/132635335
