-
SpringBoot_第六章(知识点总结)
目录
目录
2:过滤器(Filter)、自定义(Servlet)、监听器(Listener)
1:拦截器(Interceptor)
1.1:拦截器代码实现
拦截器是Spring容器进行管理的,对请求路径进行动态的拦截,可以进行各种权限日志等等骚操作。
代码实现第一步:自己实现HandlerInterceptor接口
- /**
- * 登录检查 拦截器
- *
- * 1:写拦截器代码逻辑
- * 2 配置拦截器拦截 那些请求
- */
- @Slf4j
- public class LoginInterceptor implements HandlerInterceptor {
- /**
- * controller方法 执行之前
- * @return
- * @throws Exception
- */
- public boolean preHandle(HttpServletRequest request, HttpServletResponse response, Object handler)
- throws Exception {
- log.info("拦截请求{}"+request.getRequestURI());
- User user = (User) request.getSession().getAttribute("loginUser");
- if (user == null) {
- System.out.println("拦截器重定向");
- //如果session不存在登录信息,重定向到登录页面
- request.setAttribute("msg","拦截器拦截未登录");
- request.getRequestDispatcher("/").forward(request,response);
- return false;
- }
- return true;//返回true 程序接着执行
- }
- /**
- * controller方法执行之后,在页面渲染之前
- */
- public void postHandle(HttpServletRequest request, HttpServletResponse response, Object handler,
- @Nullable ModelAndView modelAndView) throws Exception {
- log.info("controller方法执行之后{}",modelAndView);
- }
- /**
- * 页面渲染之后
- */
- public void afterCompletion(HttpServletRequest request, HttpServletResponse response, Object handler,
- @Nullable Exception ex) throws Exception {
- log.info("页面渲染之后{}",ex);
- }
- }
代码实现第二步:自定义拦截器拦截路径和放行路径
- /**
- * 实现WebMvcConfigurer接口 改变MVC行为
- * 使用addInterceptors 接口添加拦截器
- */
- @Configuration
- public class MyMvcConfig implements WebMvcConfigurer {
- @Override
- public void addInterceptors(InterceptorRegistry registry) {
- registry.addInterceptor(new LoginInterceptor())
- .addPathPatterns("/*") // /**拦截所有请求,包含静态页面 /*:只拦截后面一级 /**:拦截内容包含多个层级
- .excludePathPatterns("/","/login","/css/**","/fonts/**","/images/*","/js/**");//过滤掉登录请求和静态资源
- }
- }
1.2:拦截器源码分析和流程总结

所以真正的执行步骤如下:

2:过滤器(Filter)、自定义(Servlet)、监听器(Listener)
Filter、servlet是Servlet规范,拦截的是自定义的请求。因为DispatcherServlet拦截的是/
但是Filter、servlet可以自定义拦截请求,根据匹配规则,他们会自己处理请求。
Filter代码实现:
- /**
- * 继承Filter
- * 不会经过拦截器
- * 拦截/*所有请求 不管get post
- *
- * 使用次注解生效
- * @ServletComponentScan(basePackages = "com.example.springboot2_web03")
- */
- @WebFilter(urlPatterns = "/*",filterName = "MyFilter")
- public class MyFilter implements Filter {
- @Override
- public void doFilter(ServletRequest request, ServletResponse response, FilterChain chain) throws IOException, ServletException {
- String name = request.getParameter("name");
- System.out.println("执行MyFilter无论什么get、post方法:"+name);
- chain.doFilter(request,response);//调用链
- }
- }
Servlet代码实现:
- /**
- * 继承HttpServlet类,可以重写各种get post put 等等方法
- *
- * 使用次注解生效
- * @ServletComponentScan(basePackages = "com.example.springboot2_web03")
- *
- * servlet 拦截/s1(精度高 优先匹配) 就不会进入DispatcherServlet拦截/
- */
- @WebServlet(urlPatterns = "/s1",name = "MyServlet")
- public class MyServlet extends HttpServlet {
- @Override
- protected void doGet(HttpServletRequest req, HttpServletResponse resp) throws ServletException, IOException {
- String name = req.getParameter("name");
- System.out.println("执行MyServlet请求get:"+name);
- resp.getWriter().write("get请求MyServlet拦截/s1请求:"+name);
- }
- @Override
- protected void doPost(HttpServletRequest req, HttpServletResponse resp) throws ServletException, IOException {
- String name = req.getParameter("name");
- System.out.println("执行MyServlet请求post:"+name);
- resp.getWriter().write("post请求MyServlet拦截/s1请求:"+name);
- }
- }
监听器代码实现:
- /**
- * 继承ServletContextListener
- * 容器启动的时候生效
- *
- * 使用次注解生效
- * @ServletComponentScan(basePackages = "com.example.springboot2_web03")
- */
- @WebListener(value = "MyListener")
- public class MyListener implements ServletContextListener {
- @Override
- public void contextInitialized(ServletContextEvent sce) {
- System.out.println("MyListener监听ServletContext初始化,容器启动的时候输出");
- }
- @Override
- public void contextDestroyed(ServletContextEvent sce) {
- System.out.println("MyListener监听ServletContext销毁");
- }
- }
3:文件上传
3.1:文件上传代码实现
第一步:html文件
- <form role="form" th:action="@{/fileUpload}" method="post" enctype="multipart/form-data">
- <div class="form-group">
- <label for="exampleInputEmail1">邮箱label>
- <input type="email" name="email" class="form-control" id="exampleInputEmail1" placeholder="Enter email">
- div>
- <div class="form-group">
- <label for="exampleInputPassword1">名字label>
- <input type="text" name="username" class="form-control" id="exampleInputPassword1" placeholder="Password">
- div>
- <div class="form-group">
- <label for="exampleInputFile">头像label>
- <input type="file" name="headerImg" id="exampleInputFile">
- div>
- <div class="form-group">
- <label for="exampleInputFile">生活照label>
- <input type="file" name="photos" multiple>
- div>
- <button type="submit" class="btn btn-primary">提交button>
- form>
第二步Java代码实现:
- /**
- * 文件上传
- * @param files
- * @return
- */
- @PostMapping(value = "/fileUpload")
- public String fileUpload(@RequestParam(value = "username") String username,
- @RequestParam(value = "email")String email,
- @RequestParam(value = "headerImg") MultipartFile headerImg,
- @RequestParam(value = "photos") MultipartFile[] photos,
- Files files) throws IOException {
- if (!headerImg.isEmpty()){
- System.out.println("username:"+username);
- System.out.println("email:"+email);
- System.out.println("files:"+files);
- //headerImg 单文件
- System.out.println("headerImg名字:"+ headerImg.getOriginalFilename());
- System.out.println("headerImg大小:"+ headerImg.getSize());
- System.out.println("headerImg文件类型:"+ headerImg.getContentType());
- String newFileHeaderImg="A"+headerImg.getOriginalFilename();
- headerImg.transferTo(new File("/Users/huyiju/Desktop/upload/"+newFileHeaderImg));
- }
- if (photos.length>0){
- //photos多文件用MultipartFile[]数组
- for (MultipartFile photo : photos) {
- File file=new File("","");
- String newFilePhotos="B"+photo.getOriginalFilename();
- photo.transferTo(new File("/Users/huyiju/Desktop/upload/"+newFilePhotos));
- }
- }
- return "/form/form_layouts";
- }
第三步配置文件设置文件上传大小
- #单个文件上限
- spring.servlet.multipart.max-file-size=10MB
- #多个文件请求上限
- spring.servlet.multipart.max-request-size=100MB
3.2:文件上传源码分析
首先查看源码MultipartAutoConfiguration的自动装配

有了文件上传解析器,我们在配置文件中设置上传文件大小配置,默认是1MB(单个文件)和10MB(最大请求)
然后查看源码
- //for循环将controller的参数逐个绑定
- args[i] = this.resolvers.resolveArgument(parameter, mavContainer, request, this.dataBinderFactory);
- //根据请求multipartRequest获取MultipartFile 并将返回值
- //赋值给 controller中的MultipartFile 类型的参数
- //
- List
files = multipartRequest.getFiles(name); - return (!files.isEmpty() ? files.toArray(new MultipartFile[0]) : null);
4:整合druid数据源
4.1:整合德鲁伊
1:导入依赖
- <dependency>
- <groupId>mysqlgroupId>
- <artifactId>mysql-connector-javaartifactId>
- dependency>
- <dependency>
- <groupId>com.alibabagroupId>
- <artifactId>druid-spring-boot-starterartifactId>
- <version>1.2.16version>
- dependency>
2:配置数据库信息和连接池
- #德鲁伊数据库连接
- spring.datasource.url=jdbc:mysql://localhost:3306/W1?useUnicode=true&characterEncoding=utf-8&useSSL=false
- spring.datasource.username=root
- spring.datasource.password=123456
- #连接池信息
- spring.datasource.type= com.alibaba.druid.pool.DruidDataSource
- spring.datasource.druid.max-active=20
- spring.datasource.druid.min-idle=5
- spring.datasource.druid.initial-size=5
- spring.datasource.druid.max-wait=60000
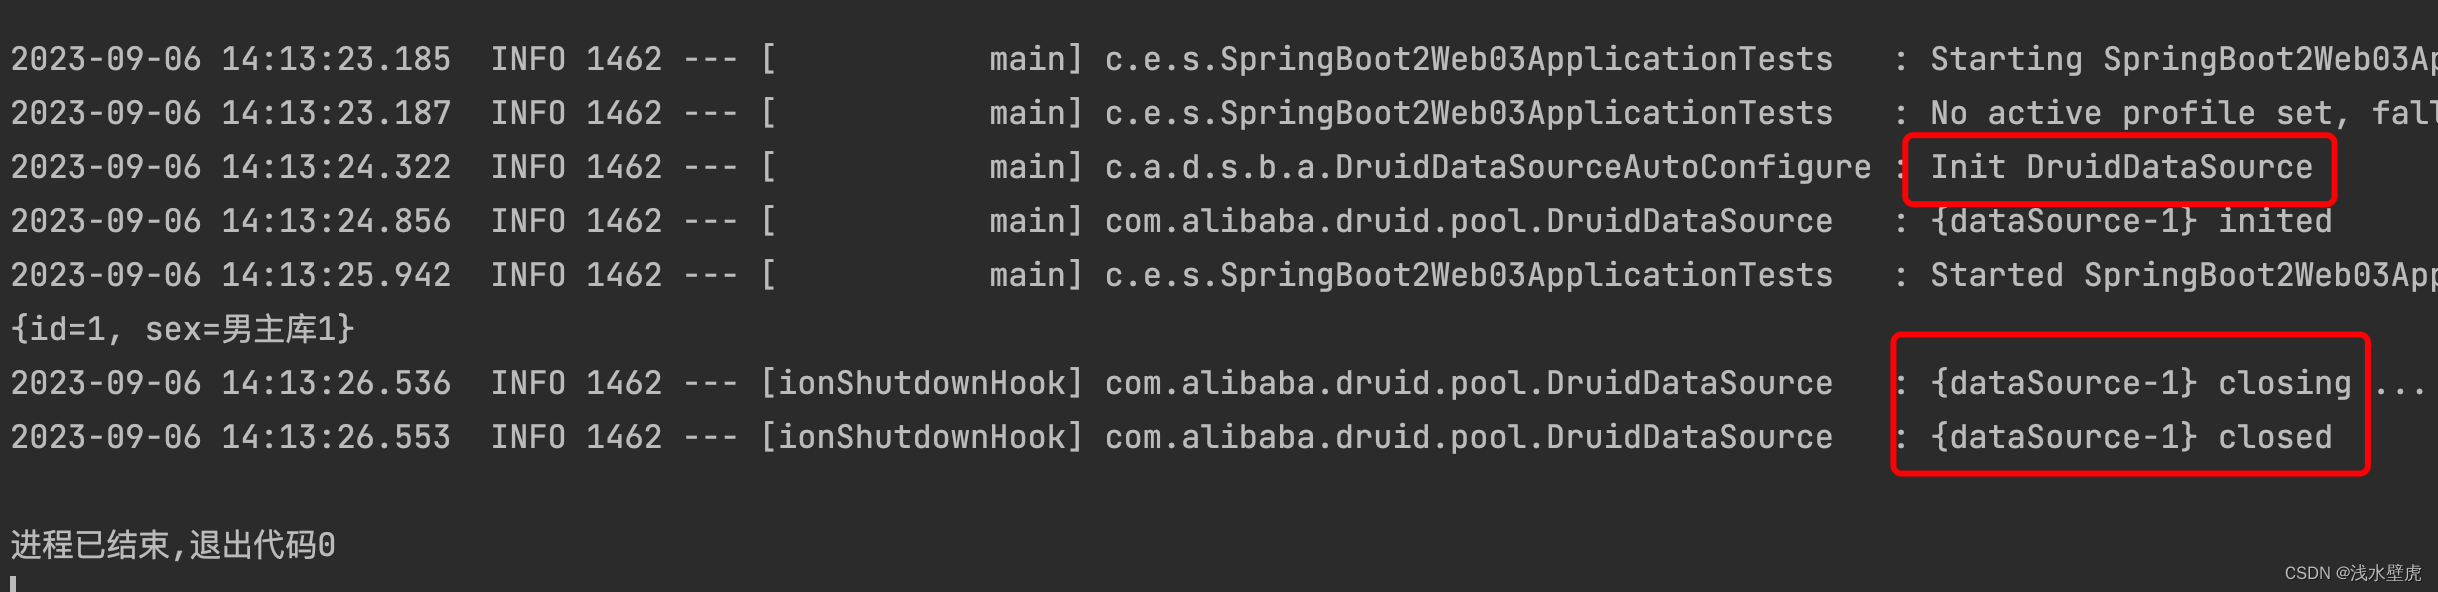
3:代码测试(未使用mybatis,所以这里使用了jdbcTemplate)
- @Autowired
- JdbcTemplate jdbcTemplate;
- /**
- * druid测试
- */
- @Test
- void starter_jdbc() {
- String sql="select * from t1";
- List
- maps.forEach(map -> System.out.println(map));
- }
4:结果查看(图片里边初始化的德鲁伊连接池)
4.2:德鲁伊监控页面
德鲁伊的依赖包含监控页面功能,只是没有开启我们只需要配置文件开启监控页面就可以
1:配置监控页面信息
- # StatViewServlet配置,说明请参考Druid Wiki,配置_StatViewServlet配置
- #是否启用StatViewServlet(监控页面)默认值为false(考虑到安全问题默认并未启动,如需启用建议设置密码或白名单以保障安全)
- spring.datasource.druid.stat-view-servlet.enabled=true
- spring.datasource.druid.stat-view-servlet.reset-enable=false
- spring.datasource.druid.stat-view-servlet.login-username=root
- spring.datasource.druid.stat-view-servlet.login-password=123456
- ### WebStatFilter配置,说明请参考Druid Wiki,配置_配置WebStatFilter
- spring.datasource.druid.web-stat-filter.enabled=true
- spring.datasource.druid.web-stat-filter.url-pattern=/*
- spring.datasource.druid.web-stat-filter.session-stat-enable=true
- spring.datasource.druid.web-stat-filter.session-stat-max-count=1000
- spring.datasource.druid.filters=stat,wall
- spring.datasource.druid.filter.stat.slow-sql-millis=1000
- spring.datasource.druid.filter.stat.log-slow-sql=true
- spring.datasource.druid.filter.stat.enabled=true
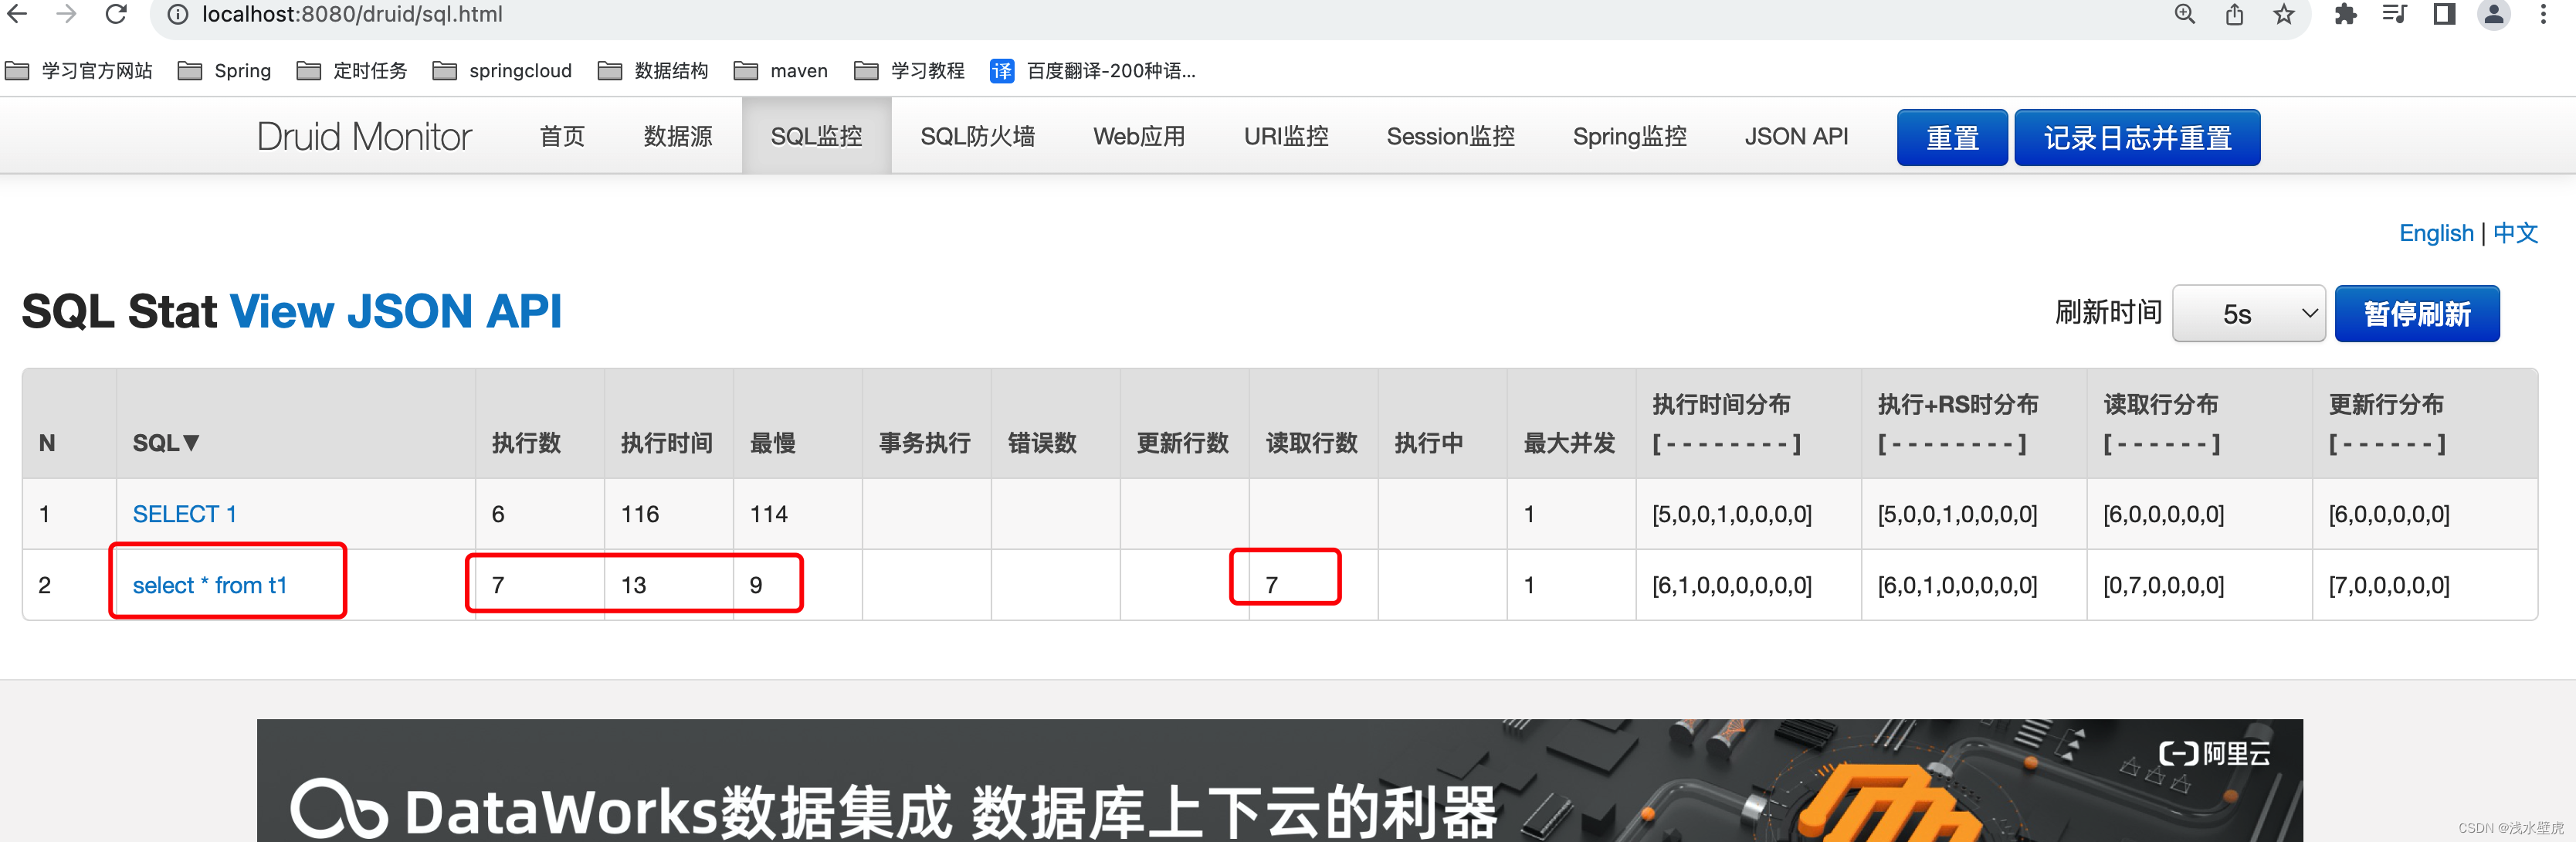
2:页面验证
登录页面,输入账户密码root、123456
http://localhost:8080/druid/login.html
5:Spingboot指标监控
5.1:为什么能实现指标监控
当我们导入actuator的jar包,打开指标监控的配置文件,访问不同的请求地址,被拦截返回json,就能看到截图中的这些项目信息,不同的指标监控请求能得到项目信息。
1:导入jar
- <dependency>
- <groupId>org.springframework.bootgroupId>
- <artifactId>spring-boot-starter-actuatorartifactId>
- dependency>
2:打开指标监控
- #开启指标监控 暴露所有 http://localhost:8081/actuator/
- management.endpoints.enabled-by-default=true
- management.endpoints.web.exposure.include=*
- #显示health的详细信息
- management.endpoint.health.show-details=ALWAYS
- management.info.env.enabled=true
- #自定义info信息 http://localhost:8081/actuator/info @project.artifactId@导入maven的pom信息
- info.appName=SpringBootWeb04
- info.appNameVersion=阿斯顿发生
- info.mavenName=@project.artifactId@
3:访问页面http://localhost:8082/actuator

5.2:怎么能实现指标监控
上边的指标监控很详细,但是没有可视化页面。需要我们访问不同的请求得到不同的信息。这个时候就需要一个中控台来同一管理,可视化页面来操作。我们启动一个控制台服务,导入jar,这控制台当我们查询的时候 就会每一秒向两个81和82发送http://localhost:8082/actuator/不同路径
来发送不同的信息,这个就是原理

1:控制台服务器8888导入jar,启动服务
- <dependency>
- <groupId>de.codecentricgroupId>
- <artifactId>spring-boot-admin-starter-serverartifactId>
- <version>2.7.9version>
- dependency>
启动服务:
- @SpringBootApplication
- @EnableAdminServer //启动服务管理服务器
- public class SpringBoot04AdminServiceApplication {
- public static void main(String[] args) {
- System.out.println("进入adminUI的管理页面");
- SpringApplication.run(SpringBoot04AdminServiceApplication.class, args);
- }
- }
2:控制台客户端8081、8082导入jar,启动服务
- <dependency>
- <groupId>de.codecentricgroupId>
- <artifactId>spring-boot-admin-starter-clientartifactId>
- <version>2.7.9version>
- dependency>
配置服务暴露和注册控制台
- #这里分别是8081和8082
- server.port=8082
- #监控服务 将服务注册到8888
- spring.boot.admin.client.url=http://localhost:8888
- spring.boot.admin.client.instance.prefer-ip=true
- #这里是控制台服务名字
- spring.application.name=springBoot_client2
- #开启指标监控 暴露所有 http://localhost:8081/actuator/
- management.endpoints.enabled-by-default=true
- management.endpoints.web.exposure.include=*
启动项目
- @SpringBootApplication
- @MapperScan(value = {"com.example.springboot04_web_mvc1.mapper"})
- public class SpringBoot04WebMvc1Application {
- public static void main(String[] args) {
- SpringApplication.run(SpringBoot04WebMvc1Application.class, args);
- }
- }
查看控制台

更多详细点击查看
6:整合mybatis、mybatis-plus
6.1:整合mybatis
1:导入依赖
- <dependency>
- <groupId>org.mybatis.spring.bootgroupId>
- <artifactId>mybatis-spring-boot-starterartifactId>
- <version>2.1.3version>
- dependency>
2:配置mapper映射位置
- #mybatis配置 config-location配置mybatis文件地址 mapper-locations mapper地址
- mybatis.config-location=classpath:mybatis-config.xml
- mybatis.mapper-locations=classpath:mapper/*.xml
3:接口
- package com.example.springboot2_web03.mapper;
- import com.example.springboot2_web03.entity.T1;
- @Mapper
- public interface T1Mapper {
- List
selectAll(); - T1 selectById(@Param(value = "id") int id);
- @Select("select * from t1 where id=#{id}")
- T1 selectById1(@Param(value = "id") int id);
- }
4:mapper配置文件
- 1.0" encoding="UTF-8" ?>
- PUBLIC "-//mybatis.org//DTD Mapper 3.0//EN""http://mybatis.org/dtd/mybatis-3-mapper.dtd">
"> com.example.springboot2_web03.entity.T1">select * from t1com.example.springboot2_web03.entity.T1">select * from t1 where id=#{id}代码测试:
- @Autowired
- T1Mapper t1Mapper;
- /**
- * mybatis测试
- */
- @Test
- void mybatis_test() {
- List
t1s = t1Mapper.selectAll(); - for (T1 t1 : t1s) {
- System.out.println("查询数据:"+t1);
- }
- T1 t1 = t1Mapper.selectById1(1);
- System.out.println("根据id查询:"+t1);
- }
6.2:整合mybatis-plus
1:导入依赖
- <dependency>
- <groupId>mysqlgroupId>
- <artifactId>mysql-connector-javaartifactId>
- dependency>
- <dependency>
- <groupId>com.alibabagroupId>
- <artifactId>druid-spring-boot-starterartifactId>
- <version>1.2.16version>
- dependency>
- <dependency>
- <groupId>com.baomidougroupId>
- <artifactId>mybatis-plus-boot-starterartifactId>
- <version>3.5.3.1version>
- dependency>
- <dependency>
- <groupId>com.baomidougroupId>
- <artifactId>mybatis-plus-extensionartifactId>
- <version>3.5.3.1version>
- <scope>compilescope>
- dependency>
2:配置文件
- #mybatisPlus配置 config-location配置mybatis文件地址 mapper-locations mapper地址
- #mybatis-plus.config-location=classpath:mybatis-config.xml
- mybatis-plus.mapper-locations=classpath*:mapper/*.xml
- mybatis-plus.configuration.log-impl=org.apache.ibatis.logging.stdout.StdOutImpl
3:添加分页拦截器
- @Configuration
- public class MybatisPlusConfig {
- /**
- * 添加分页插件
- */
- @Bean
- public MybatisPlusInterceptor mybatisPlusInterceptor() {
- MybatisPlusInterceptor interceptor = new MybatisPlusInterceptor();
- PaginationInnerInterceptor paginationInnerInterceptor = new PaginationInnerInterceptor(DbType.MYSQL);
- paginationInnerInterceptor.setOverflow(true);//最后一页的下一页调回首页
- paginationInnerInterceptor.setMaxLimit(500L);//-1不受限制 这里限制500条
- interceptor.addInnerInterceptor(paginationInnerInterceptor);//如果配置多个插件,切记分页最后添加
- //interceptor.addInnerInterceptor(new PaginationInnerInterceptor()); 如果有多数据源可以不配具体类型 否则都建议配上具体的DbType
- return interceptor;
- }
4:代码测试
- //mapper代码
- @Mapper
- public interface TestMapper extends BaseMapper
{ - //自定义分页查询
- Page
selectOrderByAgePage(@Param(value = "page") Page page); - }
- //接口和实现类代码
- public interface TestService extends IService
{ - Page
selectOrderByAgePage(Page page); - }
- @Service
- public class TestServiceImpl extends ServiceImpl
- @Autowired
- TestMapper testMapper;
- /**
- * 查询数据 分页显示
- * @return
- */
- public Page
selectOrderByAgePage(Page page){ - return testMapper.selectOrderByAgePage(page);
- }
- }
- //controller 代码
- @GetMapping(value = "/dynamic_table")
- public String dynamic_table(@RequestParam(name = "pageIndex",defaultValue = "1",required = false)Integer pageIndex,
- Model model){
- System.out.println("执行dynamic_table方法:默认值是第一页");
- //开始页和条数
- Page
page=new Page<>(pageIndex,3); - Page
pages = testService.selectOrderByAgePage(page); - System.out.println("当前页:"+pages.getCurrent());
- System.out.println("总页数:"+pages.getPages());
- System.out.println("总行数:"+pages.getTotal());
- System.out.println("当前页数据:"+pages.getRecords());
- model.addAttribute("pages",pages);
- return "/table/dynamic_table";
- }
7:整合redis集群
集群搭建过程见其他文章
1:导入依赖
org.springframework.boot spring-boot-starter-data-redis
2:配置集群信息
- #配置redis 集群
- #集群密码
- spring.redis.password=123456
- #集群节点81 - 86
- spring.redis.cluster.nodes=127.0.0.1:6381,127.0.0.1:6382,127.0.0.1:6383,127.0.0.1:6384,127.0.0.1:6385,127.0.0.1:6386
- #最大重定向次数
- spring.redis.cluster.max-redirects=5
- #连接池最大连接量
- spring.redis.lettuce.pool.max-active=8
- #连接最大阻塞时间 毫秒
- spring.redis.lettuce.pool.max-wait=1s
- #空闲的最大数量
- spring.redis.lettuce.pool.max-idle=8
- #空闲的最小数量
- spring.redis.lettuce.pool.min-idle=0
3:测试代码
- //redistemplate配置
- @Configuration
- public class RedisConfig集群 {
- @Bean("redisTemplate")
- public RedisTemplate
- @SuppressWarnings("SpringJavaInjectionPointsAutowiringInspection")
- RedisConnectionFactory factory) {
- RedisTemplate<Object, Object> redisTemplate = new RedisTemplate<>();
- redisTemplate.setConnectionFactory(factory);
- Jackson2JsonRedisSerializer serializer = new Jackson2JsonRedisSerializer(Object.class);
- ObjectMapper mapper = new ObjectMapper();
- mapper.setVisibility(PropertyAccessor.ALL, JsonAutoDetect.Visibility.ANY);
- mapper.activateDefaultTyping(LaissezFaireSubTypeValidator.instance, ObjectMapper.DefaultTyping.NON_FINAL, JsonTypeInfo.As.PROPERTY);
- serializer.setObjectMapper(mapper);
- // 使用StringRedisSerializer来序列化和反序列化redis的key值
- redisTemplate.setKeySerializer(new StringRedisSerializer());
- redisTemplate.setValueSerializer(serializer);
- // Hash的key也采用StringRedisSerializer的序列化方式
- redisTemplate.setHashKeySerializer(new StringRedisSerializer());
- redisTemplate.setHashValueSerializer(serializer);
- redisTemplate.afterPropertiesSet();
- return redisTemplate;
- }
- }
- //测试代码
- @Autowired
- RedisTemplate redisTemplate;
- //StringRedisTemplate redisTemplate;
- @Test
- void t1() {
- redisTemplate.opsForValue().set("代", "测试", 10, TimeUnit.MINUTES);
- Set
keys = redisTemplate.keys("*"); - for (String key : keys) {
- System.out.println("key:"+key);
- }
- System.out.println(keys);
- System.out.println("返回值a:" + redisTemplate.opsForValue().get("代"));
- }
8:错误处理
8.1:请求不存在的controller
1:浏览器请求没有服务的controller,返回html

2:postMan请求没有服务的controller,返回json

源码分析:
当请求不存在的时候,找不到处理方法报错
服务器转发了一个http://localhost:8080/error 请求,该请求会被自动装配的basicErrorController拦截
1:在ErrorMvcAutoConfiguration声明了一个bean是basicErrorController这个controller会拦截/error请求的错误。

2:这个controller拦截/error请求,在源码中可以看到这连个拦截错误请求


3:根据不同的请求方式浏览器和postMan程序来决定返回html和json

8.2:请求存在但是代码错误的controller
controller代码
- @GetMapping(value = "/basic_table")
- public String basic_table(){
- //自定义错误 抛出 java.lang.ArithmeticException: / by zero
- int a=10/0;
- return "/table/basic_table";
- }
源码分析:
1:执行controller代码报错,DispatcherServlet拦截到异常。
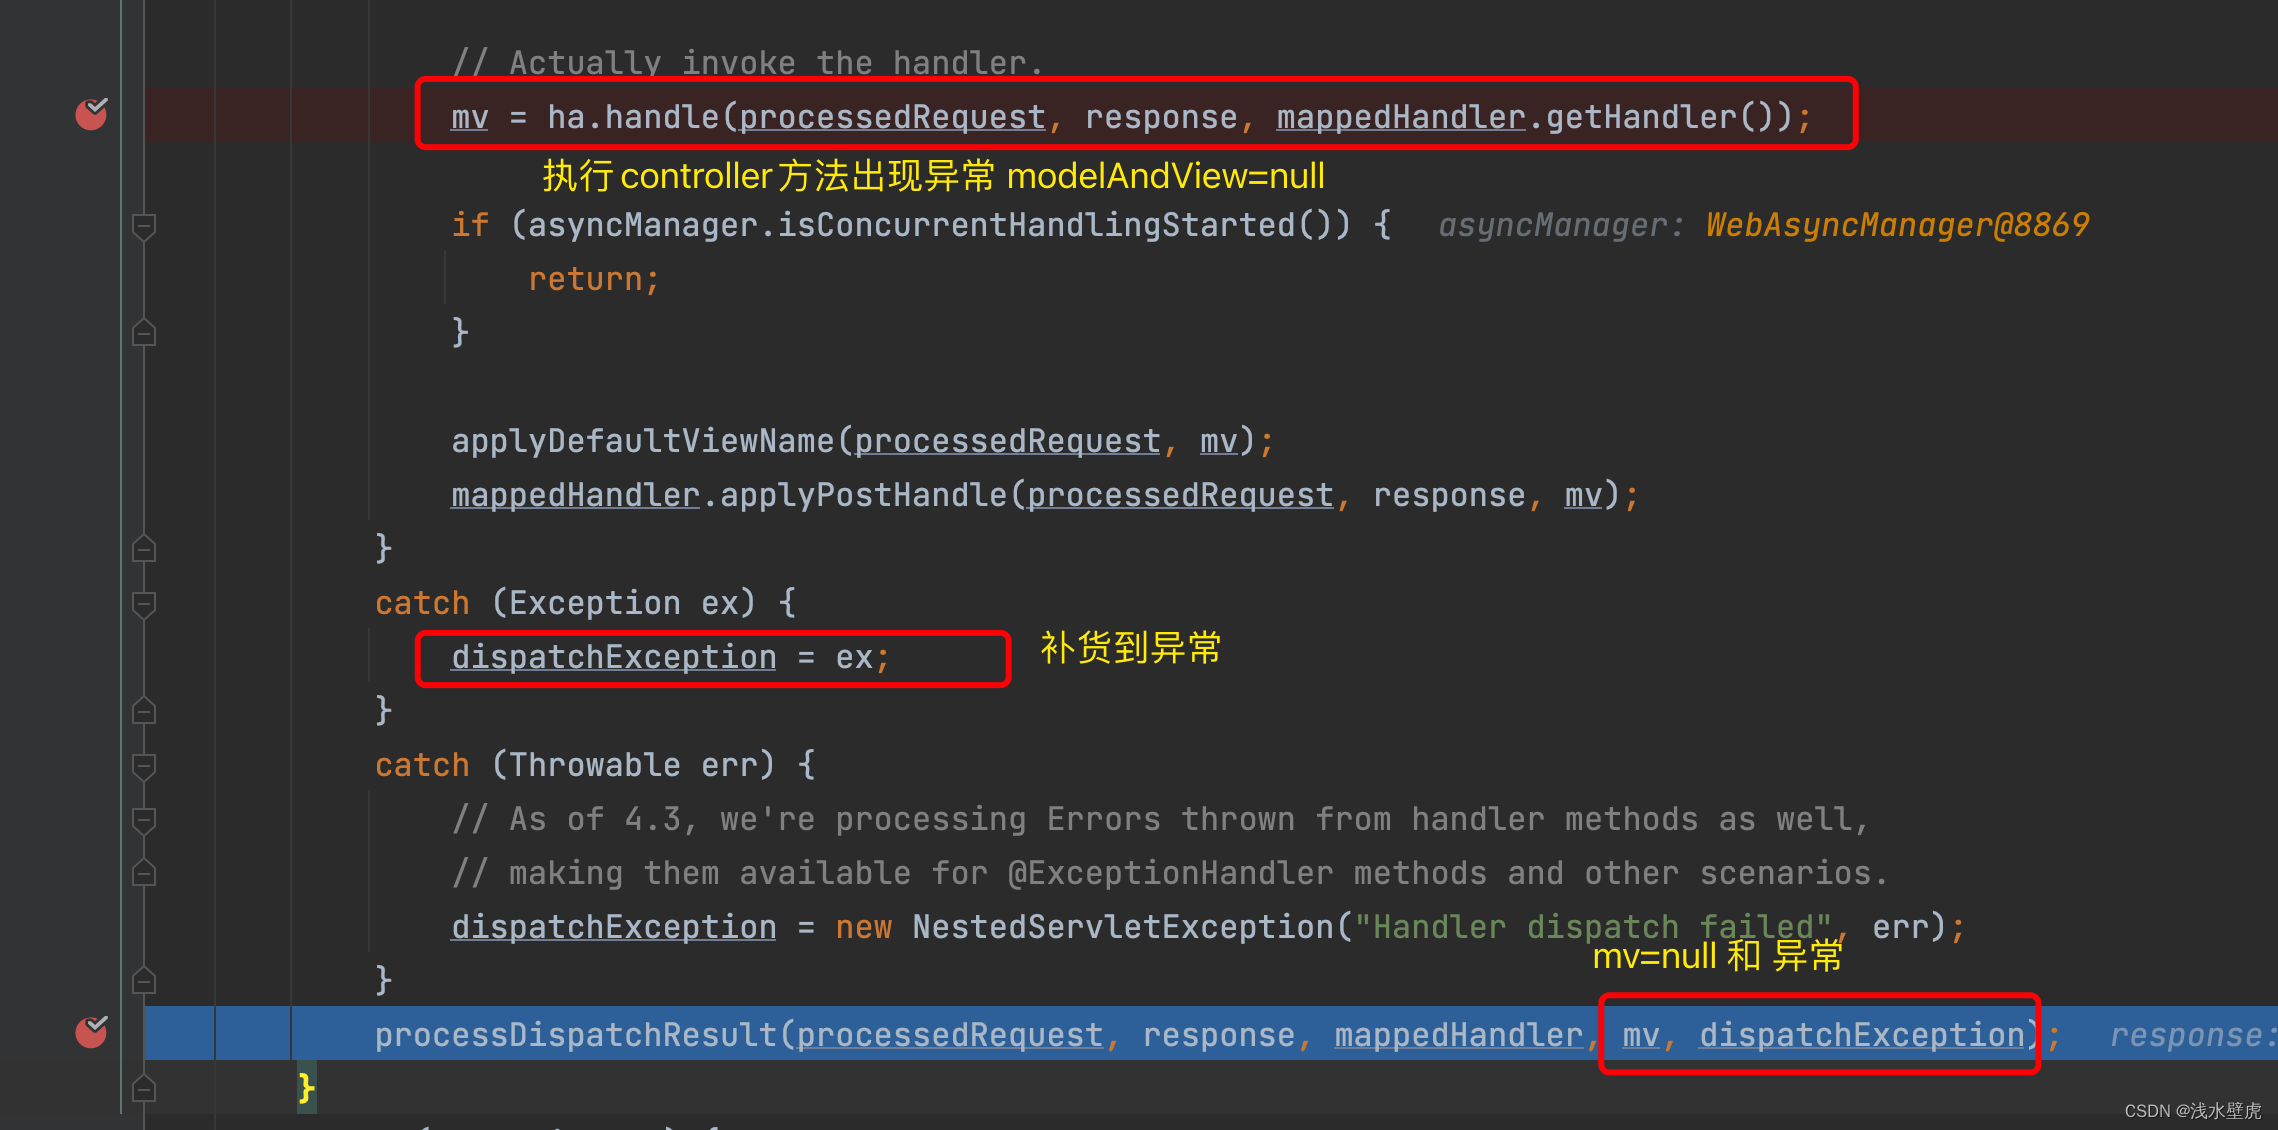
2:异常处理

3:系统默认的异常解析器处理异常,结果都处理不了,回到上边用baseErrorController来处理

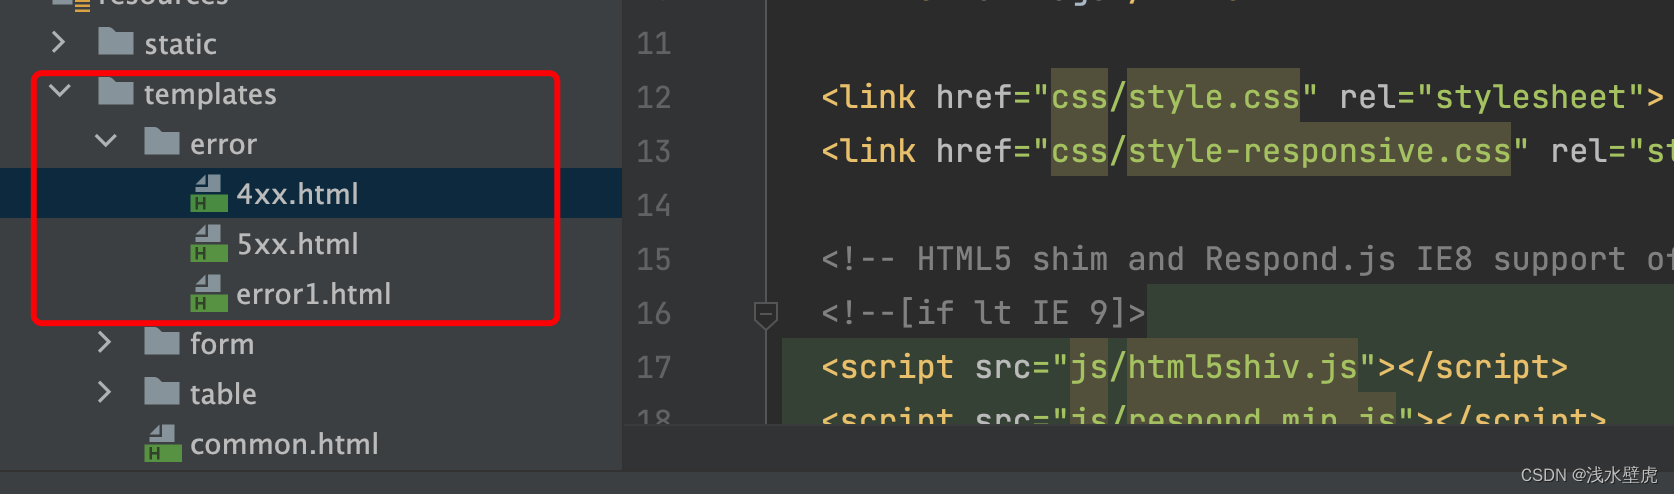
8.3:前后端未分离
当我们配置了4XX和5XX错误的html页面的时候
我们配置在项目中配置错误页,baseErrorController就会在浏览器请求错误的情况下,跳转到这些错误页面。我们在错误页面中取出异常信息
html页面
- <h3 th:text="${path}">请求路径h3>
- <h3 th:text="${status}">状态h3>
- <h3 th:text="${message}">错误消息h3>
- <h3 th:text="${timestamp}">时间h3>
浏览器页面显示

8.4: 前后端分析,全局异常
首先我们定义两个Controller
- @Controller
- public class 异常Controller {
- /**
- * 前后端分离Controller 直接返回json
- */
- @GetMapping(value = "/basic_table1")
- @ResponseBody
- public CommonReturnType basic_table1(@RequestParam(value = "a",required = false) int b ){
- //1:重点:没有自定义全局异常,默认的异常解析器解析
- //这里出现异常没有返回值 会被DispatcherServlet拦截,捕获异常 发送/error
- // 会进入baseErrorController 返回html
- //2:重点:自定义全局异常,拦截指定异常
- // 会根据自定异常返回值 是走ModelAndView 还是直接返回json
- // 会进入baseErrorController 返回html
- int a=10/0; //报错 后边执行
- List
users = Arrays.asList(new User("张三1","000"), - new User("张三1","111"),
- new User("张三2","222"),
- new User("张三3","333"));
- return CommonReturnType.crateCommonReturnType(users);
- }
- /**
- * 前后端不分离Controller 返回视图
- */
- @GetMapping(value = "/basic_table")
- public String basic_table(@RequestParam(value = "a") int b ){
- //1:重点:没有自定义全局异常,默认的异常解析器解析
- //这里出现异常没有返回值 会被DispatcherServlet拦截,捕获异常 发送/error
- // 会进入baseErrorController 返回html
- //2:重点:自定义全局异常,拦截指定异常
- // 会根据自定异常返回值 是走ModelAndView 还是直接返回json
- // 会进入baseErrorController 返回html
- //自定义错误 抛出 java.lang.ArithmeticException: / by zero
- int a=10/0; //报错 后边不执行
- // 这个异常ExceptionHandler 直接返回视图 return "login";//返回视图
- return "/table/basic_table";
- }
- }
自定义全局异常
- @Slf4j
- @ControllerAdvice //底层Component
- public class GlobalExceptionHandler {
- //自定义异常CommonReturnType {
- // "status": "fail",
- // "data": {
- // "errCode": "300",
- // "errMsg": "参数绑定错误"
- // }
- //}
- //第一个自定义异常
- @ExceptionHandler(value = Exception.class)
- @ResponseBody
- public CommonReturnType GlobalControllerExceptions1(Exception exception){
- log.info("异常是{}:",exception);
- Map
- if (exception instanceof ServletRequestBindingException) {
- map.put("errCode", "300");
- map.put("errMsg", "参数绑定错误");
- } else if (exception instanceof NoHandlerFoundException) {
- map.put("errCode", "404");
- map.put("errMsg", "404错误");
- } else {
- map.put("errCode", "8888");
- map.put("errMsg",exception.getMessage());
- }
- return CommonReturnType.crateCommonReturnType("fail", map);//返回指定异常
- }
- //前提:没有配置全局异常解析器 出现异常会被抛出,没有异常解析器处理
- //然后发送/error请求 被baseErrorController拦截 返回标准页面
- //拦截指定异常,会返回ModelAndView 不加@ResponseBody java.lang.ArithmeticException: / by zero
- @ExceptionHandler(value ={NullPointerException.class,ArithmeticException.class})
- //@ResponseBody 异常直接返回页面
- public String GlobalControllerExceptions(Exception exception) {
- log.info("异常是{}:",exception);
- return "login";//返回视图
- }
- }
9:springBoot的run()方法
在主方法中启动run
- @SpringBootApplication
- public class SpringBoot04WebMvc2Application {
- public static void main(String[] args) {
- String[] strArray={"springboot启动参数"};
- ConfigurableApplicationContext run = SpringApplication.run(SpringBoot04WebMvc2Application.class, strArray);
- }
- }

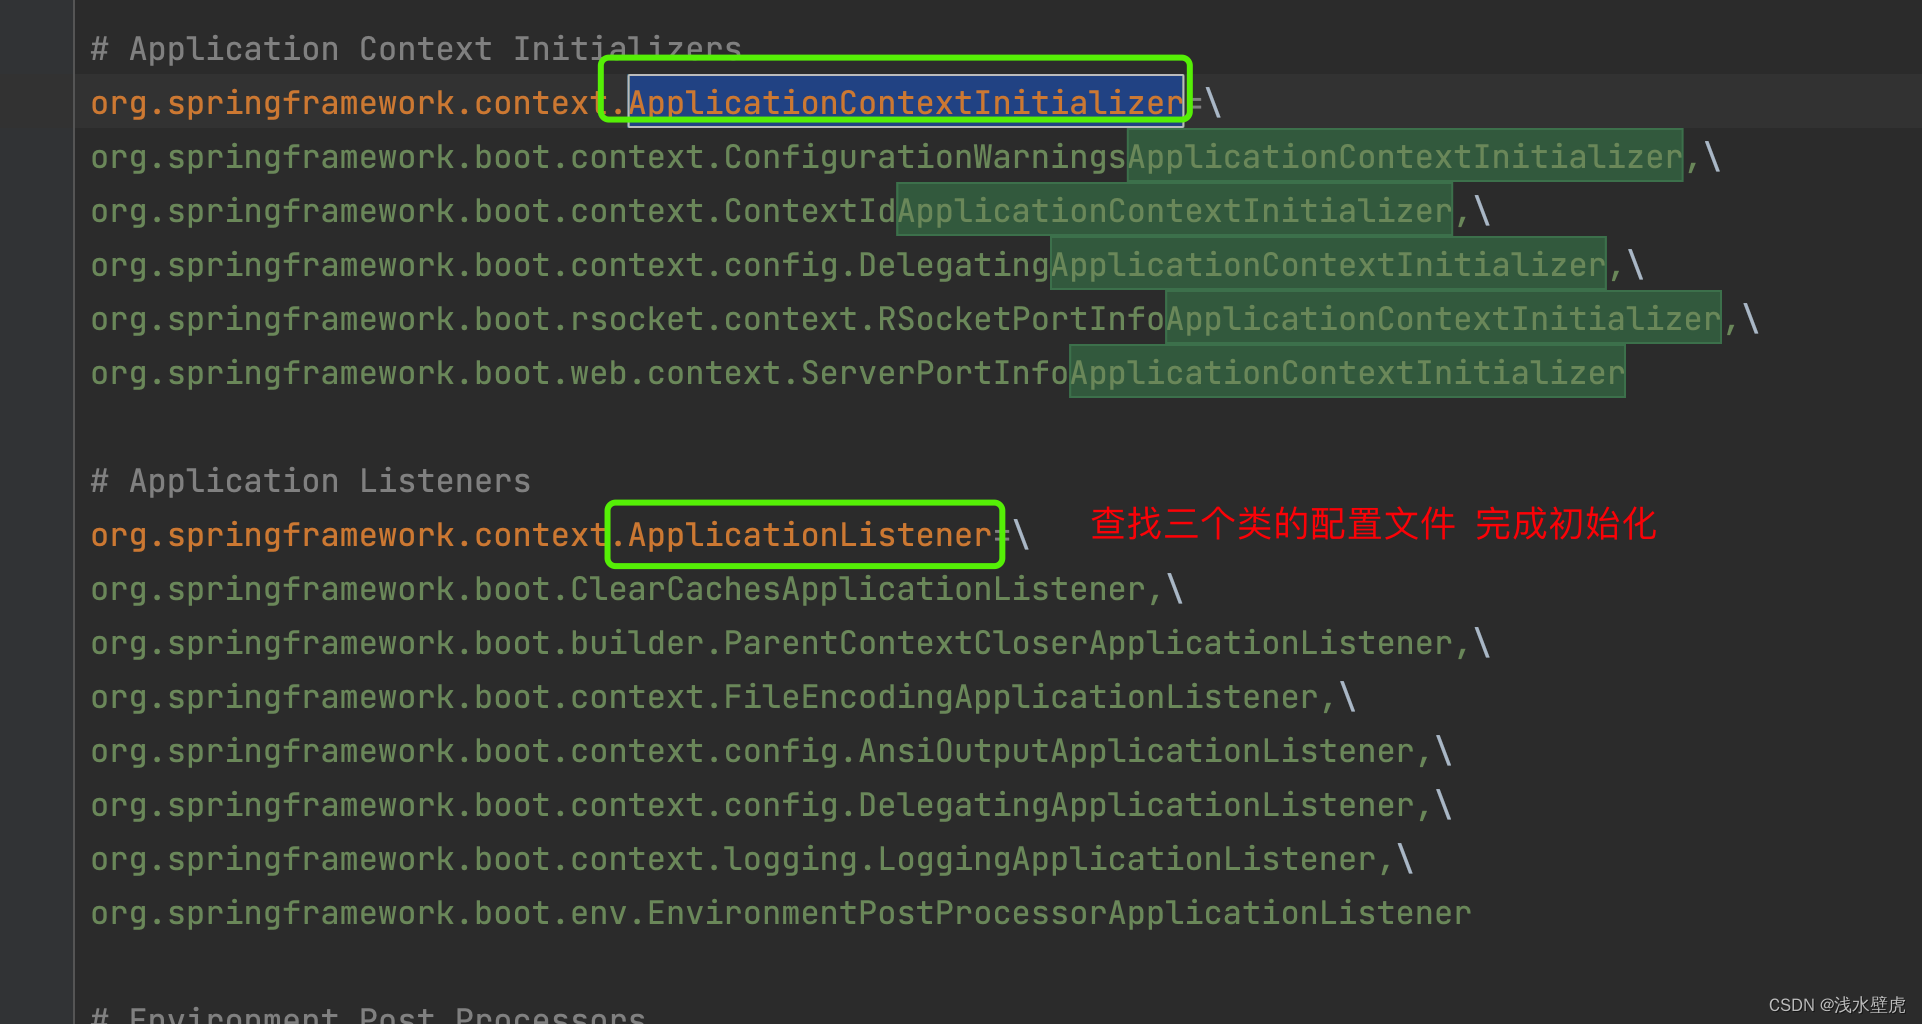
9.1:创建application对象
new SpringBootApplication(主类) 完成初始化,去spring.factories中查找。
将BootstrapRegistryInitializer(引导启动器 0个)
ApplicationContextInitializer(应用程序上下文初始化器 9个)
和ApplicationListener(应用程序监听器 11个)
放到SpringBootAlpplication中完成初始化。

9.2:执行run()方法
主要就是
1:准备引用程序的环境参数
2:创建applicationContext(里边的refresh是spring的核心源码 里边会执行tomcat)
3:穿插执行runListenner的各个方法

- 相关阅读:
Tensorflow简单CNN实现
【Javascript】对象中的常规操作(增删改查)
vue目录树的封装
国内免费好用 Chat GPT推荐
11月3日 OpenCV 实战基础学习笔记——图像基本处理
骰子游戏-第11届蓝桥杯Scratch选拔赛真题精选
基于php的汇业家具商城
Pikachu靶场——PHP反序列化漏洞
嵌入式学习笔记(46) NandFlash的结构
Luma AI如何注册:文生视频领域的新星
- 原文地址:https://blog.csdn.net/huyiju/article/details/132630616
