-
Redis从基础到进阶篇(三)----架构原理与集群演变
目录
一、缓存淘汰策略
1.1 LRU原理
LRU ( Least recently used ,最近最少使⽤)算法根据数据的历史访问记录来进⾏淘汰数据,其核⼼思 想是“ 如果数据最近被访问过,那么将来被访问的⼏率也更⾼ ” 。最常⻅的实现是使⽤⼀个链表保存缓存数据,详细算法实现如下:
 1. 新数据插⼊到链表头部;2. 每当缓存命中(即缓存数据被访问),则将数据移到链表头部;3. 当链表满的时候,将链表尾部的数据丢弃。在Java中可以使⽤LinkHashMap去实现LRU利⽤哈希链表实现
1.2 案例分析
让我们以⽤户信息的需求为例,来演示⼀下LRU算法的基本思路:(1) 假设我们使⽤哈希链表来缓存⽤户信息,⽬前缓存了4个⽤户,这4个⽤户是按照时间顺序依次从链表右端插⼊的。

(2) 此时,业务⽅访问⽤户5,由于哈希链表中没有⽤户5的数据,我们从数据库中读取出来,插⼊到缓存当中。这时候,链表中最右端是最新访问到的⽤户5,最左端是最近最少访问的⽤户1。

(3) 接下来,业务⽅访问⽤户2,哈希链表中存在⽤户2的数据,我们怎么做呢?我们把⽤户2从它的前驱节 点和后继节点之间移除,重新插⼊到链表最右端。这时候,链表中最右端变成了最新访问到的⽤户2,最左端仍然是最近最少访问的⽤户1

(4) 接下来,业务⽅请求修改⽤户4的信息。同样道理,我们把⽤户4从原来的位置移动到链表最右侧,并把⽤户信息的值更新。这时候,链表中最右端是最新访问到的⽤户4,最左端仍然是最近最少访问的⽤户1

(5) 后来业务⽅换⼝味了,访问⽤户6,⽤户6在缓存⾥没有,需要插⼊到哈希链表。假设这时候缓存容量已经达到上限,必须先删除最近最少访问的数据,那么位于哈希链表最左端的⽤户1就会被删除掉,然后再把⽤户6插⼊到最右端。
 以上,就是 LRU 算法的基本思路。
1.3 Redis缓存淘汰策略
1.3.1 设置最⼤缓存
在 redis 中,允许⽤户设置最⼤使⽤内存⼤⼩ maxmemory ,默认为 0 ,没有指定最⼤缓存,如果 有新的数据添加,超过最⼤内存,则会使redis 崩溃,所以⼀定要设置。redis 内存数据集⼤⼩上升到⼀定⼤⼩的时候,就会实⾏数据淘汰策略。1.3.2 淘汰策略
redis 淘汰策略配置: maxmemory-policy voltile-lru ,⽀持热配置redis 提供 6 种数据淘汰策略:1. volatile-lru :从已设置过期时间的数据集( server.db[i].expires )中挑选最近最少使⽤的数据淘汰2. volatile-ttl :从已设置过期时间的数据集( server.db[i].expires )中挑选将要过期的数据淘汰3. volatile-random :从已设置过期时间的数据集( server.db[i].expires )中任意选择数据淘汰4. allkeys-lru :从数据集( server.db[i].dict )中挑选最近最少使⽤的数据淘汰5. allkeys-random :从数据集( server.db[i].dict )中任意选择数据淘汰6. no-enviction (驱逐):禁⽌驱逐数据二、Redis事务
2.1 Redis事务典型应⽤—Redis乐观锁
在⽣产环境⾥,经常会利⽤ redis 乐观锁来实现秒杀, Redis 乐观锁是 Redis 事务的经典应⽤。秒杀场景描述 :秒杀活动对稀缺或者特价的商品进⾏定时,定量售卖,吸引成⼤量的消费者进⾏抢购,但⼜只有少部分 消费者可以下单成功。因此,秒杀活动将在较短时间内产⽣⽐平时⼤数⼗倍,上百倍的⻚⾯访问流量和 下单请求流量。由于秒杀只有少部分请求能够成功,⽽⼤量的请求是并发产⽣的,所以如何确定哪个请求成功了,就是 由redis 乐观锁来实现。具体思路如下:监控 锁定量,如果该值被修改成功则表示该请求被通过,反之表示该请求未通过。从监控到修改到执⾏都需要在 redis ⾥操作,这样就需要⽤到 Redis 事务。2.2 Redis事务介绍
Redis 的事务是通过 MULTI 、 EXEC 、 DISCARD 和 WATCH 这四个命令来完成的。Redis 的单个命令都是原⼦性的,所以这⾥需要确保事务性的对象是 命令集合 。Redis 将命令集合序列化并确保处于同⼀事务的 命令集合连续且不被打断 的执⾏Redis 不⽀持回滚操作。
2.3 事务命令
2.3.1 MULTI
⽤于标记事务块的开始。Redis 会将后续的命令逐个放⼊队列中,然后使⽤ EXEC 命令原⼦化地执⾏这个命令序列。语法:multi2.3.2 EXEC
在⼀个事务中执⾏所有先前放⼊队列的命令,然后恢复正常的连接状态语法:exec2.3.3 DISCARD
清除所有先前在⼀个事务中放⼊队列的命令,然后恢复正常的连接状态。语法:discard2.3.4 WATCH
当某个 [ 事务需要按条件执⾏ ] 时,就要使⽤这个命令将给定的 [ 键设置为受监控 ] 的状态。语法:watch key [key…]注意事项: 使⽤该命令可以实现 Redis 的 乐观锁 。(后⾯实现)2.3.5 UNWATCH
清除所有先前为⼀个事务监控的键。语法:unwatch2.4 事务演示
- 127.0.0.1:6379> multi
- OK
- 127.0.0.1:6379> set s1 111
- QUEUED
- 127.0.0.1:6379> hset set1 name zhangsan
- QUEUED
- 127.0.0.1:6379> exec
- 1) OK
- 2) (integer) 1
- 127.0.0.1:6379> multi
- OK
- 127.0.0.1:6379> set s2 222
- QUEUED
- 127.0.0.1:6379> hset set2 age 20
- QUEUED
- 127.0.0.1:6379> discard
- OK
- 127.0.0.1:6379> exec
- (error) ERR EXEC without MULTI
- 127.0.0.1:6379> watch s1
- OK
- 127.0.0.1:6379> multi
- OK
- 127.0.0.1:6379> set s1 555
- QUEUED
- 127.0.0.1:6379> exec # 此时在没有exec之前,通过另⼀个命令窗⼝对监控的s1字段进⾏修改
- (nil)
- 127.0.0.1:6379> get s1
- 111

2.5 事务失败处理
(1 )Redis 语法错误
整个事务的命令在队列⾥都清除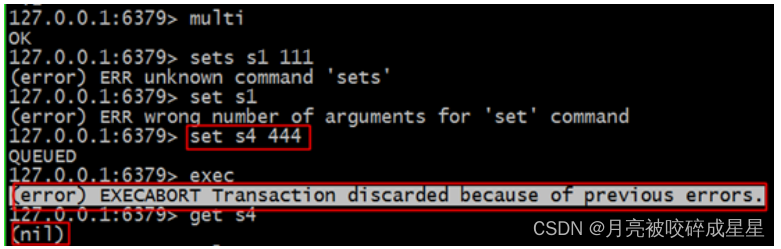
(2)Redis 运⾏错误
在队列⾥正确的命令可以执⾏ (弱事务性)弱事务性 :1 、在队列⾥正确的命令可以执⾏ (⾮原⼦操作)2 、不⽀持回滚
(3) Redis 不⽀持事务回滚(为什么呢)
1 、⼤多数事务失败是因为 语法错误或者类型错误 ,这两种错误,在开发阶段都是可以预⻅的2 、 Redis 为了 性能⽅⾯ 就忽略了事务回滚。 (回滚记录历史版本)2.6 Redis乐观锁
乐观锁基于 CAS ( Compare And Swap )思想(⽐较并替换),是不具有互斥性,不会产⽣锁等待⽽消 耗资源,但是需要反复的重试,但也是因为重试的机制,能⽐较快的响应。因此我们可以利⽤redis 来实 现乐观锁。具体思路如下:1 、利⽤ redis 的 watch 功能,监控这个 redisKey 的状态值2 、获取 redisKey 的值3 、创建 redis 事务4 、给这个 key 的值 +15 、然后去执⾏这个事务,如果 key 的值被修改过则回滚, key 不加 1- public void watch() {
- try {
- String watchKeys = "watchKeys";
- //初始值 value=1
- jedis.set(watchKeys, 1);
- //监听key为watchKeys的值
- jedis.watch(watchkeys);
- //开启事务
- Transaction tx = jedis.multi();
- //watchKeys⾃增加⼀
- tx.incr(watchKeys);
- //执⾏事务,如果其他线程对watchKeys中的value进⾏修改,则该事务将不会执⾏
- //通过redis事务以及watch命令实现乐观锁
- List
- if (exec == null) {
- System.out.println("事务未执⾏");
- } else {
- System.out.println("事务成功执⾏,watchKeys的value成功修改");
- }
- } catch (Exception e) {
- e.printStackTrace();
- } finally {
- jedis.close();
- }
- }
2.7 Redis乐观锁实现秒杀
- import redis.clients.jedis.Jedis;
- import redis.clients.jedis.Transaction;
- import java.util.List;
- import java.util.UUID;
- import java.util.concurrent.ExecutorService;
- import java.util.concurrent.Executors;
- public class SecKill {
- public static void main(String[] arg) {
- // 库存key
- String redisKey = "stock";
- ExecutorService executorService = Executors.newFixedThreadPool(20);
- try {
- Jedis jedis = new Jedis("127.0.0.1", 6378);
- // 可以被秒杀的库存的初始值,库存总共20个
- jedis.set(redisKey, "0");
- jedis.close();
- } catch (Exception e) {
- e.printStackTrace();
- }
- for (int i = 0; i < 1000; i++) {
- executorService.execute(() -> {
- Jedis jedis1 = new Jedis("127.0.0.1", 6378);
- try {
- jedis1.watch(redisKey);
- String redisValue = jedis1.get(redisKey);
- int valInteger = Integer.valueOf(redisValue);
- String userInfo = UUID.randomUUID().toString();
- // 没有秒完
- if (valInteger < 20) {
- Transaction tx = jedis1.multi();
- tx.incr(redisKey);
- List
- // 秒成功 失败返回空list⽽不是空
- if (list != null && list.size() > 0) {
- System.out.println("⽤户:" + userInfo + ",秒杀成功!当前成功⼈数:" + (valInteger + 1));
- }
- // 版本变化,被别⼈抢了。
- else {
- System.out.println("⽤户:" + userInfo + ",秒杀失败");
- }
- }
- // 秒完了
- else {
- System.out.println("已经有20⼈秒杀成功,秒杀结束");
- }
- } catch (Exception e) {
- e.printStackTrace();
- } finally {
- jedis1.close();
- }
- });
- }
- executorService.shutdown();
- }
- }
三、Redis持久化
Redis 是⼀个 内存 数据库,为了保证数据的持久性,它提供了两种持久化⽅案:3.1 RDB⽅式(默认)
RDB ⽅式是通过 快照 ( snapshotting )完成的,当 符合⼀定条件 时 Redis 会⾃动将内存中的数据进⾏快 照并持久化到硬盘3.1.1 触发快照的时机
1. 符合⾃定义配置的快照规则 redis.conf2. 执⾏ save 或者 bgsave 命令3. 执⾏ flushall 命令4. 执⾏主从复制操作 ( 第⼀次 )3.1.2 设置快照规则
save 多少秒内 数据变了多少save "" : 不使⽤ RDB 存储save 900 1 : 表示 15 分钟( 900 秒钟)内⾄少 1 个键被更改则进⾏快照。save 300 10 : 表示 5 分钟( 300 秒)内⾄少 10 个键被更改则进⾏快照。save 60 10000 :表示 1 分钟内⾄少 10000 个键被更改则进⾏快照。过滤条件是或的关系,⽽且是漏⽃型的过滤顺序。3.1.3 原理图
 注意事项!!!1. Redis 在进⾏快照的过程中不会修改 RDB ⽂件,只有快照操作结束后才会将旧的⽂件替换成新的, 也就是说任何时候 RDB ⽂件都是完整的。2. 这就使得我们可以通过定时备份 RDB ⽂件来实现 Redis 数据库的备份, RDB ⽂件是 经过压缩的⼆ 进制⽂件 ,占⽤的空间会⼩于内存中的数据,更加利于传输。RDB优缺点:缺点: 使⽤ RDB ⽅式实现持久化,⼀旦 Redis 异常退出 ,就会 丢失最后⼀次快照以后更改的所有数 据 。这个时候我们就需要根据具体的应⽤场景,通过组合设置⾃动快照条件的⽅式来将可能发⽣的 数据损失控制在能够接受范围。如果数据相对来说⽐较重要,希望将损失降到最⼩,则可以使 ⽤ AOF ⽅式进⾏持久化优点: RDB 可以最⼤化 Redis 的性能:⽗进程在保存 RDB ⽂件时唯⼀要做的就是 fork 出⼀个⼦ 进程,然后这个⼦进程就会处理接下来的所有保存⼯作,⽗进程⽆需执⾏任何磁盘 I/O 操作。同时 这个也是⼀个缺点,如果数据集⽐较⼤的时候, fork 可以能⽐较耗时,造成服务器在⼀段时间内 停⽌处理客户端的请求;
3.2 AOF⽅式
3.2.1 AOF介绍
默认情况下 Redis 没有开启 AOF ( append only file )⽅式的持久化。开启 AOF 持久化后,每执⾏⼀条会 更改 Redis 中的数据的命令 , Redis 就会将该命令写⼊硬盘中的 AOF ⽂件,这⼀过程显然 会降低 Redis 的性能 ,但⼤部分情况下这个影响是能够接受的,另外使 ⽤较快 的硬盘可以提⾼ AOF 的性能 。redis.conf :- # 可以通过修改redis.conf配置⽂件中的appendonly参数开启
- appendonly yes
- # AOF⽂件的保存位置和RDB⽂件的位置相同,都是通过dir参数设置的。
- dir ./
- # 默认的⽂件名是appendonly.aof,可以通过appendfilename参数修改
- appendfilename appendonly.aof
⽤ SET 命令来举例说明 RESP 协议的格式。- redis> SET mykey "Hello"
- "OK"
实际发送的请求数据:- *3\r\n$3\r\nSET\r\n$5\r\nmykey\r\n$5\r\nHello\r\n
- *3
- $3
- SET
- $5
- mykey
- $5
- Hello
3.2.2 同步磁盘数据
Redis 每次更改数据的时候, aof 机制都会将命令记录到 aof ⽂件,但是实际上由于操作系统的 缓存 机制 ,数据并没有实时写⼊到硬盘,⽽是进⼊ 硬盘缓存 。再通过 硬盘缓存机制 去刷新到保存到⽂件。filesync 命令:参数说明:- # 每次执⾏写⼊都会进⾏同步, 这个是最安全但是是效率⽐较低的⽅式
- appendfsync always
- # 每⼀秒执⾏(默认)
- appendfsync everysec
- # 不主动进⾏同步操作,由操作系统去执⾏,这个是最快但是最不安全的⽅式
- appendfsync no
3.2.3 AOF重写原理(优化AOF⽂件)
- set s1 111
- set s1 222
- set s1 333
- set s1 444
- set s1 444
Redis 可以在 AOF ⽂件体积变得过⼤时,⾃动地在后台对 AOF 进⾏重写。重写后的新 AOF ⽂ 件包含了恢复当前数据集所需的最⼩命令集合。AOF ⽂件有序地保存了对数据库执⾏的所有写⼊操作, 这些写⼊操作以 Redis 协( RESP )的格式 保存, 因此 AOF ⽂件的内容⾮常容易被⼈读懂, 对⽂件进⾏分析( parse )也很轻松。AOF重写过程分析(整个重写操作是绝对安全的):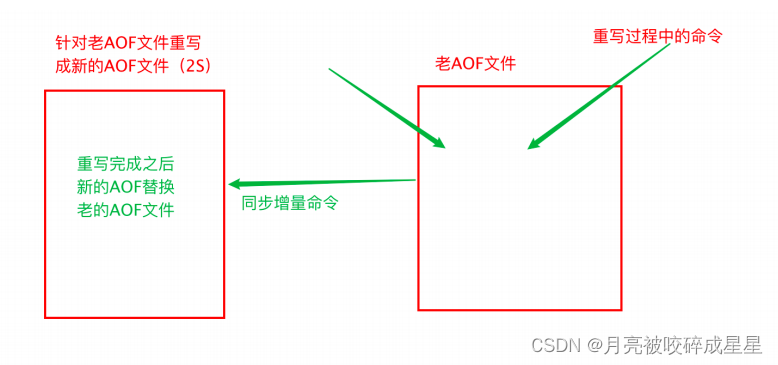 Redis 在创建新 AOF ⽂件的过程中,会继续将命令追加到现有的 AOF ⽂件⾥⾯,即使重写过程中发 ⽣停机,现有的 AOF ⽂件也不会丢失。 ⽽⼀旦新 AOF ⽂件创建完毕, Redis 就会从旧 AOF ⽂件切换 到新 AOF ⽂件,并开始对新 AOF ⽂件进⾏追加操作。参数说明:
- # 表示当前aof⽂件⼤⼩超过上⼀次aof⽂件⼤⼩的百分之多少的时候会进⾏重写。如果之前没有重写过,以启动时aof⽂件⼤⼩为准
- auto-aof-rewrite-percentage 100
- # 限制允许重写最⼩aof⽂件⼤⼩,也就是⽂件⼤⼩⼩于64mb的时候,不需要进⾏优化
- auto-aof-rewrite-min-size 64mb
3.2.4 AOF⽂件损坏以后如何修复
问题描述:服务器可能在程序正在对 AOF ⽂件进⾏写⼊时停机, 如果停机造成了 AOF ⽂件出错( corrupt ), 那么 Redis 在重启时会拒绝载⼊这个 AOF ⽂件, 从⽽确保数据的⼀致性不会 被破坏。当发⽣这种情况时, 可以⽤以下⽅法来修复出错的 AOF ⽂件:1.为现有的 AOF ⽂件创建⼀个备份。2.使⽤ Redis 附带的 redis-check-aof 程序,对原来的 AOF ⽂件进⾏修复。redis-check-aof --fix readonly.aof3.重启 Redis 服务器,等待服务器载⼊修复后的 AOF ⽂件,并进⾏数据恢复。
3.3 如何选择RDB和AOF
⼀般来说 , 如果对数据的安全性要求⾮常⾼的话,应该同时使⽤两种持久化功能。如果可以承受数分钟以内的数据丢失,那么可以只使⽤ RDB 持久化。有很多⽤户都只使⽤ AOF 持久化, 但并不推荐这种⽅式: 因为定时⽣成 RDB 快照( snapshot )⾮常便于进⾏数据库备份, 并且 RDB 恢复数据集的速度也要⽐ AOF 恢复的速度要快 。# 禁⽌ RDB ⽅式save ""两种持久化策略可以同时使⽤,也可以使⽤其中⼀种。如果同时使⽤的话, 那么 Redis 重启时,会优先使⽤ AOF ⽂件来还原数据。3.4 如何选择RDB和AOF(4.0之前的还需要考虑)
内存数据库 rdb ( redis database ) +aof 数据不能丢缓存服务器 rdb不建议 只使⽤ aof ( 性能差 )恢复时: 先 aof 再 rdb3.5 混合持久化⽅式
Redis 4.0 之后新增的⽅式,混合持久化是结合了 RDB 和 AOF 的优点,在写⼊的时候,先把当前 的数据以 RDB 的形式写⼊⽂件的开头,再将后续的操作命令以 AOF 的格式存⼊⽂件,这样既能保证 Redis 重启时的速度,⼜能减低数据丢失的⻛险。RDB 和 AOF 持久化各有利弊, RDB 可能会导致⼀定时间内的数据丢失,⽽ AOF 由于⽂件较⼤则会影响 Redis 的启动速度,为了能同时拥有 RDB 和 AOF 的优点, Redis 4.0 之后新增了混合持久化的⽅式,因 此我们在必须要进⾏持久化操作时,应该选择混合持久化的⽅式。查询是否开启混合持久化可以使⽤ config get aof-use-rdb-preamble 命令,执⾏结果- 127.0.0.1:6379> config get aof-use-rdb-preamble
- 1) "aof-use-rdb-preamble"
- 2) "yes"
其中 yes 表示已经开启混合持久化, no 表示关闭, Redis 5.0 默认值为 yes 。如果是其他版本的 Redis ⾸先需要检查⼀下,是否已经开启了混合持久化,如果关闭的情况下,可以通过以下两种⽅式开启:通过命令⾏开启通过修改 Redis 配置⽂件开启(1) 通过命令⾏开启
使⽤命令 config set aof-use-rdb-preamble yes命令⾏设置配置的缺点是重启 Redis 服务之后,设置的配置就会失效。(2) 通过修改 Redis 配置⽂件开启
在 Redis 的根路径下找到 redis.conf ⽂件,把配置⽂件中的 aof-use-rdb-preamble no 改为 aof-use-rdb-preamble yes配置完成之后,需要重启 Redis 服务器,配置才能⽣效,但修改配置⽂件的⽅式,在每次重启 Redis 服务之后,配置信息不会丢失。需要注意的是,在⾮必须进⾏持久化的业务中,可以关闭持久化,这样可以有效的提升 Redis 的运⾏速度,不会出现间歇性卡顿的困扰。混合持久化 是 RDB+ 指令如果 AOF ⽂件过⼤时候,会重写:把当前数据已 RDB 格式保存,后续指令⽤ aof四、Redis主从复制
4.1 什么是主从复制
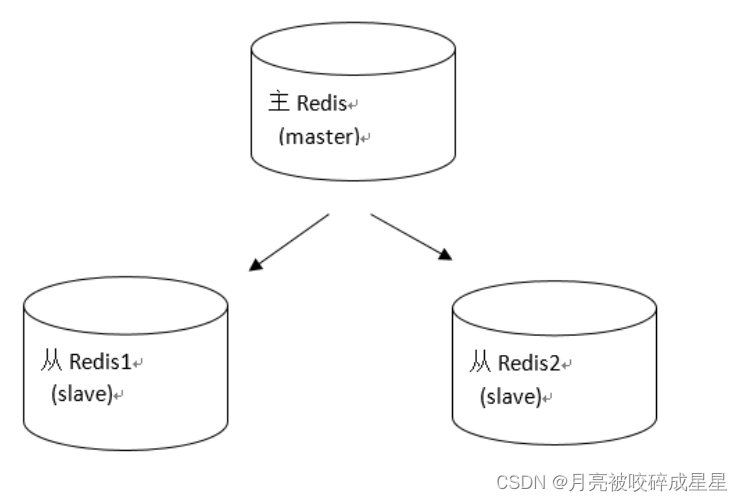
 主对外从对内,主可写从不可写主挂了,从不可为主
4.2 主从配置
4.2.1 主Redis配置
⽆需特殊配置4.2.2 从Redis配置
修改从服务器上的 redis.conf ⽂件:- # slaveof
- # 表示当前【从服务器】对应的【主服务器】的IP是192.168.10.135,端⼝是6379。
- slaveof 127.0.0.1 6379
- replicaof
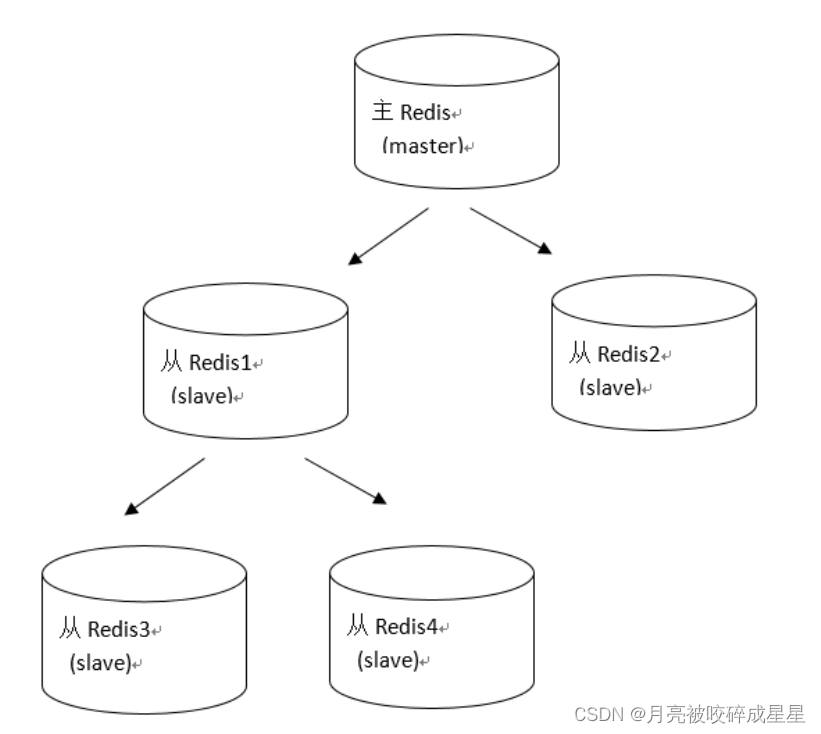
4.2.3 实现原理
Redis 的主从同步,分为 全量同步 和 增量同步 。只有从机第⼀次连接上主机是 全量同步 。断线重连有可能触发 全量同步 也有可能是 增量同步( master 判断 runid 是否⼀致)。 除此之外的情况都是 增量同步 。
4.2.4 全量同步
Redis 的全量同步过程主要分三个阶段:同步快照阶段: Master 创建并发送 快照 RDB 给 Slave , Slave 载⼊并解析快照。 Master 同时将此阶段所产⽣的新的写命令存储到缓冲区。同步写缓冲阶段: Master 向 Slave 同步存储在缓冲区的写操作命令。同步增量阶段: Master 向 Slave 同步写操作命令。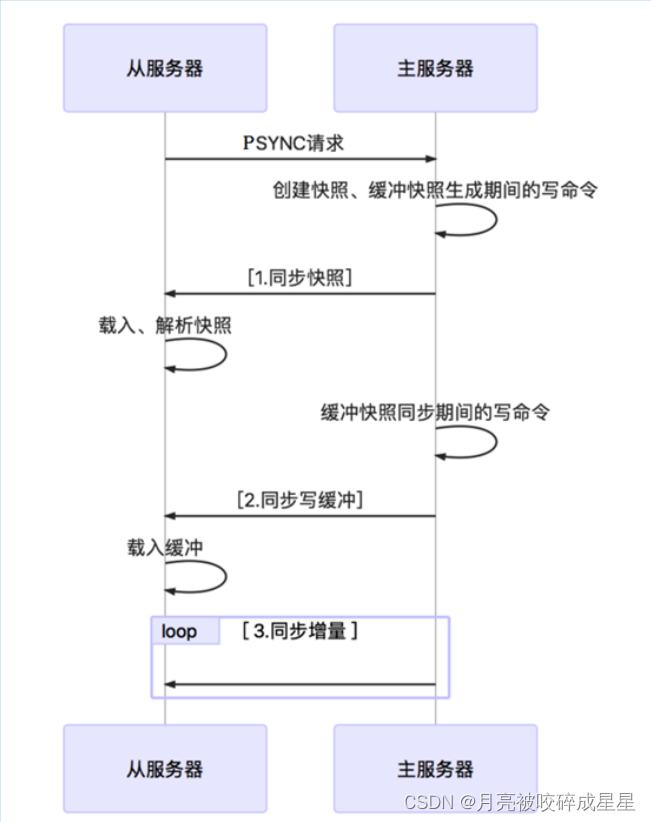
4.2.5 增量同步
Redis 增量同步主要指 ** Slave 完成初始化后开始正常⼯作时, Master 发⽣的写操作同步到 Slave` 的过 程** 。通常情况下, Master 每执⾏⼀个写命令就会向 Slave 发送相同的 写命令 ,然后 Slave 接收并执⾏。五、Redis哨兵机制
Redis 主从复制的缺点:没有办法对 master 进⾏动态选举( master 宕机后,需要重新选举 master ),需要使⽤ Sentinel 机制完成动态选举。5.1 简介
Redis 的哨兵模式到了 2.8 版本之后Sentinel ( 哨兵 ) 进程是⽤于监控 Redis 集群中 Master 主服务器⼯作的状态在 Master 主服务器发⽣故障的时候,可以实现 Master 和 Slave 服务器的切换,保证系统的⾼可⽤( HA )5.2 哨兵进程的作用
监控 ( Monitoring ) :哨兵 ( sentinel ) 会不断地检查你的 Master 和 Slave 是否运作正常。提醒 ( Notification ) : 当被监控的某个 Redis 节点出现问题时 , 哨兵 ( sentinel ) 可以通过 API 向管理员或者其他应⽤程序发送通知。⾃动故障迁移 ( Automatic failover ) :当⼀个 Master 不能正常⼯作时,哨兵 ( sentinel ) 会开始⼀次⾃动故障迁移操作5.3 故障判定原理分析
 1. 每个 Sentinel (哨兵)进程以 每秒钟⼀次 的频率向整个集群中的 Master 主服务器, Slave 从服务器以及其他 Sentinel (哨兵)进程发送⼀个 PING 命令。2. 如果⼀个实例( instance )距离最后⼀次有效回复 PING 命令的时间超过 down-aftermilliseconds 选项所指定的值, 则这个实例会被 Sentinel (哨兵)进程标记为 主观下线 ( SDOWN )。3. 如果⼀个 Master 主服务器被标记为主观下线( SDOWN ),则正在监视这个 Master 主服务器的 所 有 Sentinel (哨兵) 进程要以每秒⼀次的频率 确认 Master 主服务器 的确 进⼊了主观下线状态 。4. 当有⾜够数量的 Sentinel (哨兵) 进程(⼤于等于配置⽂件指定的值)在指定的时间范围内确认Master 主服务器进⼊了主观下线状态( SDOWN ), 则 Master 主服务器会被标记为 客观下线 ( ODOWN ) 。5. 在⼀般情况下, 每个 Sentinel (哨兵)进程会以每 10 秒⼀次的频率向集群中的所有 Master 主服务器、 Slave 从服务器发送 INFO 命令。6. 当 Master 主服务器被 Sentinel (哨兵)进程标记为 客观下线( ODOWN ) 时, Sentinel (哨兵)进程向下线的 Master 主服务器的所有 Slave 从服务器发送 INFO 命令的频率会从 10 秒⼀次改为每秒⼀次。7. 若没有⾜够数量的 Sentinel (哨兵)进程同意 Master 主服务器下线, Master 主服务器的客观下线状态就会被移除。若 Master 主服务器重新向 Sentinel (哨兵)进程发送 PING 命令返回有效回复, Master 主服务器的主观下线状态就会被移除。
5.4 ⾃动故障迁移
1.它会将失效 Master 的其中⼀个 Slave 升级为新的 Master , 并让失效 Master 的其他 Slave 改为复制新的 Master ;2.当客户端试图连接失效的 Master 时,集群也会向客户端返回新 Master 的地址,使得集群可以使⽤现在的 Master 替换失效 Master 。3.Master 和 Slave 服务器切换后, Master 的 redis.conf 、 Slave 的 redis.conf 和sentinel.conf 的配置⽂件的内容都会发⽣相应的改变,即, Master 主服务器的 redis.conf配置⽂件中会多⼀⾏ slaveof 的配置, sentinel.conf 的监控⽬标会随之调换。5.5 案例演示
(1) 修改从机的 sentinel.conf
- # 哨兵sentinel监控的redis主节点的 ip port
- # master-name 可以⾃⼰命名的主节点名字 只能由字⺟A-z、数字0-9 、这三个字符".-_"组成。
- # quorum 当这些quorum个数sentinel哨兵认为master主节点失联 那么这时 客观上认为主节点失联了
- # sentinel monitor
- sentinel monitor mymaster 192.168.10.133 6379 1
(2) 其他配置项说明
sentinel.conf- # 哨兵sentinel实例运⾏的端⼝ 默认26379
- port 26379
- # 哨兵sentinel的⼯作⽬录
- dir /tmp
- # 哨兵sentinel监控的redis主节点的 ip port
- # master-name 可以⾃⼰命名的主节点名字 只能由字⺟A-z、数字0-9 、这三个字符".-_"组成。
- # quorum 当这些quorum个数sentinel哨兵认为master主节点失联 那么这时 客观上认为主节点失联了
- # sentinel monitor
- sentinel monitor mymaster 127.0.0.1 6379 1
- # 当在Redis实例中开启了requirepass foobared 授权密码 这样所有连接Redis实例的客户端都要提供密码
- # 设置哨兵sentinel 连接主从的密码 注意必须为主从设置⼀样的验证密码
- # sentinel auth-pass
- sentinel auth-pass mymaster MySUPER--secret-0123passw0rd
- # 指定多少毫秒之后 主节点没有应答哨兵sentinel 此时 哨兵主观上认为主节点下线 默认30秒
- # sentinel down-after-milliseconds
- sentinel down-after-milliseconds mymaster 30000
- # 这个配置项指定了在发⽣failover主备切换时最多可以有多少个slave同时对新的master进⾏ 同步,这个数字越⼩,完成failover所需的时间就越⻓,但是如果这个数字越⼤,就意味着越 多的slave因为replication⽽不可⽤。可以通过将这个值设为 1 来保证每次只有⼀个slave 处于不能处理命令请求的状态。
- # sentinel parallel-syncs
- sentinel parallel-syncs mymaster 1
- # 故障转移的超时时间 failover-timeout 可以⽤在以下这些⽅⾯:
- #1. 同⼀个sentinel对同⼀个master两次failover之间的间隔时间。
- #2. 当⼀个slave从⼀个错误的master那⾥同步数据开始计算时间。直到slave被纠正为向正确的master那⾥同步数据时。
- #3.当想要取消⼀个正在进⾏的failover所需要的时间。
- #4.当进⾏failover时,配置所有slaves指向新的master所需的最⼤时间。不过,即使过了这个超时,
- slaves依然会被正确配置为指向master,但是就不按parallel-syncs所配置的规则来了
- # 默认三分钟
- # sentinel failover-timeout
- sentinel failover-timeout mymaster 180000
- # SCRIPTS EXECUTION
- #配置当某⼀事件发⽣时所需要执⾏的脚本,可以通过脚本来通知管理员,例如当系统运⾏不正常时发邮件通知相关⼈员。
- #对于脚本的运⾏结果有以下规则:
- #若脚本执⾏后返回1,那么该脚本稍后将会被再次执⾏,重复次数⽬前默认为10
- #若脚本执⾏后返回2,或者⽐2更⾼的⼀个返回值,脚本将不会重复执⾏。
- #如果脚本在执⾏过程中由于收到系统中断信号被终⽌了,则同返回值为1时的⾏为相同。
- #⼀个脚本的最⼤执⾏时间为60s,如果超过这个时间,脚本将会被⼀个SIGKILL信号终⽌,之后重新执⾏。
- #通知型脚本:当sentinel有任何警告级别的事件发⽣时(⽐如说redis实例的主观失效和客观失效等等),将会去调⽤这个脚本,这时这个脚本应该通过邮件,SMS等⽅式去通知系统管理员关于系统不正常运⾏的信息。调⽤该脚本时,将传给脚本两个参数,⼀个是事件的类型,⼀个是事件的描述。
- #如果sentinel.conf配置⽂件中配置了这个脚本路径,那么必须保证这个脚本存在于这个路径,并且是可执⾏的,否则sentinel⽆法正常启动成功。
- #通知脚本
- # sentinel notification-script
- sentinel notification-script mymaster /var/redis/notify.sh
- # 客户端重新配置主节点参数脚本
- # 当⼀个master由于failover⽽发⽣改变时,这个脚本将会被调⽤,通知相关的客户端关于master地址已经发⽣改变的信息。
- # 以下参数将会在调⽤脚本时传给脚本:
- #
- # ⽬前
总是“failover”, - #
是“leader”或者“observer”中的⼀个。 - # 参数 from-ip, from-port, to-ip, to-port是⽤来和旧的master和新的master(即旧的slave)通信的
- # 这个脚本应该是通⽤的,能被多次调⽤,不是针对性的。
- # sentinel client-reconfig-script
- sentinel client-reconfig-script mymaster /var/redis/reconfig.sh
(3) 通过 redis-sentinel 启动哨兵服务
./redis-sentinel sentinel.conf六、Redis集群
6.1 Redis的集群策略
twproxycodis (豌⾖荚)代理⽅案
6.2 Redis-cluster架构图
Redis3 以后,官⽅的集群⽅案 Redis-ClusterRedis3 使⽤ lua 脚本实现Redis5 直接实现
 架构细节 :(1) 所有的 redis 主节点彼此互联 ( PING-PONG 机制 ), 内部使⽤⼆进制协议优化传输速度和带宽 .(2) 节点的 fail 是通过集群中超过半数的节点检测失效时才⽣效 .(3) 客户端与 redis 节点直连 , 不需要中间 proxy 层 . 客户端不需要连接集群所有节点 , 连接集群中任何⼀个可⽤节点即可(4)redis-cluster 把所有的物理节点映射到 [0-16383] slot 上 ,cluster 负责维护 node<->slot<->valueRedis 集群中内置了 16384 个哈希槽,当需要在 Redis 集群中放置⼀个 key-value 时, redis 先对key 使⽤ crc16 算法算出⼀个结果,然后把结果对 16384 求余数,这样每个 key 都会对应⼀个编号在 0-16383 之间的哈希槽, redis 会根据节点数量⼤致均等的将哈希槽映射到不同的节点示例如下:
6.3 Redis-cluster投票:容错
 1 、主节点投票,如果超过半数的主都认为某主 down 了,则该主就 down 了(主选择单数)2 、主节点投票,选出挂了的主的从升级为主注:集群挂了的情况:1 、半数的主挂了,不能投票⽣效,则集群挂了2 、挂了的主机的从也挂了,造成 slot 槽分配不连续( 16384 不能完全分配),集群就挂了
6.4 安装RedisCluster
Redis 集群最少需要三台主服务器,三台从服务器。端⼝号分别为: 7001~7006(1) 第⼀步:创建7001实例,并编辑redis.conf⽂件,修改port为7001。
注意:创建实例,即拷⻉单机版安装时,⽣成的 bin ⽬录,为 7001 ⽬录。
(2) 第⼆步:修改redis.conf配置⽂件,打开cluster-enable yes

(3) 第三步:复制7001,创建7002~7006实例,注意端⼝修改。
(4) 第四步:创建start.sh,启动所有的实例
- cd 7001
- ./redis-server redis.conf
- cd ..
- cd 7002
- ./redis-server redis.conf
- cd ..
- cd 7003
- ./redis-server redis.conf
- cd ..
- cd 7004
- ./redis-server redis.conf
- cd ..
- cd 7005
- ./redis-server redis.conf
- cd ..
- cd 7006
- ./redis-server redis.conf
- cd ..
chomd u+x start.sh(5) 第五步:创建Redis集群
- [root@localhost 7001]# ./redis-cli --cluster create 127.0.0.1:7001
- 127.0.0.1:7002 127.0.0.1:7003 127.0.0.1:7004 127.0.0.1:7005 127.0.0.1:7006
- --cluster-replicas 1
- >>> Performing hash slots allocation on 6 nodes...
- Master[0] -> Slots 0 - 5460
- Master[1] -> Slots 5461 - 10922
- Master[2] -> Slots 10923 - 16383
- Adding replica 127.0.0.1:7005 to 127.0.0.1:7001
- Adding replica 127.0.0.1:7006 to 127.0.0.1:7002
- Adding replica 127.0.0.1:7004 to 127.0.0.1:7003
- >>> Trying to optimize slaves allocation for anti-affinity
- [WARNING] Some slaves are in the same host as their master
- M: af559fc6c82c83dc39d07e2dfe59046d16b6a429 127.0.0.1:7001
- slots:[0-5460] (5461 slots) master
- M: 068b678923ad0858002e906040b0fef6fff8dda4 127.0.0.1:7002
- slots:[5461-10922] (5462 slots) master
- M: d277cd2984639747a17ca79428602480b28ef070 127.0.0.1:7003
- slots:[10923-16383] (5461 slots) master
- S: 51c3ebdd0911dd6564040c7e20b9ae69cabb0425 127.0.0.1:7004
- replicates af559fc6c82c83dc39d07e2dfe59046d16b6a429
- S: e7b1f1962de2a1ffef2bf1ac5d94574b2e4d67d8 127.0.0.1:7005
- replicates 068b678923ad0858002e906040b0fef6fff8dda4
- S: 78dfe773eaa817fb69a405a3863f5b8fcf3e172f 127.0.0.1:7006
- replicates d277cd2984639747a17ca79428602480b28ef070
- Can I set the above configuration? (type 'yes' to accept): yes
- >>> Nodes configuration updated
- >>> Assign a different config epoch to each node
- >>> Sending CLUSTER MEET messages to join the cluster
- Waiting for the cluster to join
- ....
- >>> Performing Cluster Check (using node 127.0.0.1:7001)
- M: af559fc6c82c83dc39d07e2dfe59046d16b6a429 127.0.0.1:7001
- slots:[0-5460] (5461 slots) master
- 1 additional replica(s)
- M: d277cd2984639747a17ca79428602480b28ef070 127.0.0.1:7003
- slots:[10923-16383] (5461 slots) master
- 1 additional replica(s)
- S: e7b1f1962de2a1ffef2bf1ac5d94574b2e4d67d8 127.0.0.1:7005
- slots: (0 slots) slave
- replicates 068b678923ad0858002e906040b0fef6fff8dda4
- M: 068b678923ad0858002e906040b0fef6fff8dda4 127.0.0.1:7002
- slots:[5461-10922] (5462 slots) master
- 1 additional replica(s)
- S: 51c3ebdd0911dd6564040c7e20b9ae69cabb0425 127.0.0.1:7004
- slots: (0 slots) slave
- replicates af559fc6c82c83dc39d07e2dfe59046d16b6a429
- S: 78dfe773eaa817fb69a405a3863f5b8fcf3e172f 127.0.0.1:7006
- slots: (0 slots) slave
- replicates d277cd2984639747a17ca79428602480b28ef070
- [OK] All nodes agree about slots configuration.
- >>> Check for open slots...
- >>> Check slots coverage...
- [OK] All 16384 slots covered.
- [root@localhost-0723 redis]#
6.5 命令客户端连接集群
命令:./redis-cli -h 127.0.0.1 -p 7001 -c注意: -c 表示是以 redis 集群⽅式进⾏连接- [root@localhost redis-cluster]# cd 7001
- [root@localhost 7001]# ./redis-cli -h 127.0.0.1 -p 7001 -c
- 127.0.0.1:7001> set name1 aaa
- -> Redirected to slot [12933] located at 127.0.0.1:7003
- OK
- 127.0.0.1:7003>
6.6 查看集群的命令
(1) 查看集群状态
- 127.0.0.1:7003> cluster info
- cluster_state:ok
- cluster_slots_assigned:16384
- cluster_slots_ok:16384
- cluster_slots_pfail:0
- cluster_slots_fail:0
- cluster_known_nodes:6
- cluster_size:3
- cluster_current_epoch:6
- cluster_my_epoch:3
- cluster_stats_messages_sent:926
- cluster_stats_messages_received:926
(2) 查看集群中的节点:
- 127.0.0.1:7003> cluster nodes
- d277cd2984639747a17ca79428602480b28ef070 127.0.0.1:7003@17003 myself,master - 0
- 1570457306000 3 connected 10923-16383
- af559fc6c82c83dc39d07e2dfe59046d16b6a429 127.0.0.1:7001@17001 master - 0
- 1570457307597 1 connected 0-5460
- e7b1f1962de2a1ffef2bf1ac5d94574b2e4d67d8 127.0.0.1:7005@17005 slave
- 068b678923ad0858002e906040b0fef6fff8dda4 0 1570457308605 5 connected
- 068b678923ad0858002e906040b0fef6fff8dda4 127.0.0.1:7002@17002 master - 0
- 1570457309614 2 connected 5461-10922
- 51c3ebdd0911dd6564040c7e20b9ae69cabb0425 127.0.0.1:7004@17004 slave
- af559fc6c82c83dc39d07e2dfe59046d16b6a429 0 1570457307000 4 connected
- 78dfe773eaa817fb69a405a3863f5b8fcf3e172f 127.0.0.1:7006@17006 slave
- d277cd2984639747a17ca79428602480b28ef070 0 1570457309000 6 connected
- 127.0.0.1:7003>
6.7 维护节点
集群创建成功后可以继续向集群中添加节点6.7.1 添加主节点
先创建 7007 节点添加 7007 结点作为新节点 , 并启动执⾏命令:- [root@localhost 7007]# ./redis-cli --cluster add-node 127.0.0.1:7007
- 127.0.0.1:7001
- >>> Adding node 127.0.0.1:7007 to cluster 127.0.0.1:7001
- >>> Performing Cluster Check (using node 127.0.0.1:7001)
- M: af559fc6c82c83dc39d07e2dfe59046d16b6a429 127.0.0.1:7001
- slots:[0-5460] (5461 slots) master
- 1 additional replica(s)
- M: d277cd2984639747a17ca79428602480b28ef070 127.0.0.1:7003
- slots:[10923-16383] (5461 slots) master
- 1 additional replica(s)
- S: e7b1f1962de2a1ffef2bf1ac5d94574b2e4d67d8 127.0.0.1:7005
- slots: (0 slots) slave
- replicates 068b678923ad0858002e906040b0fef6fff8dda4
- M: 068b678923ad0858002e906040b0fef6fff8dda4 127.0.0.1:7002
- slots:[5461-10922] (5462 slots) master
- 1 additional replica(s)
- S: 51c3ebdd0911dd6564040c7e20b9ae69cabb0425 127.0.0.1:7004
- slots: (0 slots) slave
- replicates af559fc6c82c83dc39d07e2dfe59046d16b6a429
- S: 78dfe773eaa817fb69a405a3863f5b8fcf3e172f 127.0.0.1:7006
- slots: (0 slots) slave
- replicates d277cd2984639747a17ca79428602480b28ef070
- [OK] All nodes agree about slots configuration.
- >>> Check for open slots...
- >>> Check slots coverage...
- [OK] All 16384 slots covered.
- >>> Send CLUSTER MEET to node 127.0.0.1:7007 to make it join the cluster.
- [OK] New node added correctly.
查看集群结点发现 7007 已添加到集群中- 127.0.0.1:7001> cluster nodes
- d277cd2984639747a17ca79428602480b28ef070 127.0.0.1:7003@17003 master - 0
- 1570457568602 3 connected 10923-16383
- 50b073163bc4058e89d285dc5dfc42a0d1a222f2 127.0.0.1:7007@17007 master - 0
- 1570457567000 0 connected
- e7b1f1962de2a1ffef2bf1ac5d94574b2e4d67d8 127.0.0.1:7005@17005 slave
- 068b678923ad0858002e906040b0fef6fff8dda4 0 1570457569609 5 connected
- 068b678923ad0858002e906040b0fef6fff8dda4 127.0.0.1:7002@17002 master - 0
- 1570457566000 2 connected 5461-10922
- 51c3ebdd0911dd6564040c7e20b9ae69cabb0425 127.0.0.1:7004@17004 slave
- af559fc6c82c83dc39d07e2dfe59046d16b6a429 0 1570457567000 4 connected
- af559fc6c82c83dc39d07e2dfe59046d16b6a429 127.0.0.1:7001@17001 myself,master - 0
- 1570457567000 1 connected 0-5460
- 78dfe773eaa817fb69a405a3863f5b8fcf3e172f 127.0.0.1:7006@17006 slave
- d277cd2984639747a17ca79428602480b28ef070 0 1570457567593 6 connected
6.7.2 hash槽重新分配(数据迁移)
添加完主节点需要对主节点进⾏ hash 槽分配,这样该主节才可以存储数据。查看集群中槽占⽤情况cluster nodesredis 集群有 16384 个槽,集群中的每个结点分配⾃已槽,通过查看集群结点可以看到槽占⽤情况。- 127.0.0.1:7001> cluster nodes
- d277cd2984639747a17ca79428602480b28ef070 127.0.0.1:7003@17003 master - 0
- 1570457568602 3 connected 10923-16383
- 50b073163bc4058e89d285dc5dfc42a0d1a222f2 127.0.0.1:7007@17007 master - 0
- 1570457567000 0 connected
- e7b1f1962de2a1ffef2bf1ac5d94574b2e4d67d8 127.0.0.1:7005@17005 slave
- 068b678923ad0858002e906040b0fef6fff8dda4 0 1570457569609 5 connected
- 068b678923ad0858002e906040b0fef6fff8dda4 127.0.0.1:7002@17002 master - 0
- 1570457566000 2 connected 5461-10922
- 51c3ebdd0911dd6564040c7e20b9ae69cabb0425 127.0.0.1:7004@17004 slave
- af559fc6c82c83dc39d07e2dfe59046d16b6a429 0 1570457567000 4 connected
- af559fc6c82c83dc39d07e2dfe59046d16b6a429 127.0.0.1:7001@17001 myself,master - 0
- 1570457567000 1 connected 0-5460
- 78dfe773eaa817fb69a405a3863f5b8fcf3e172f 127.0.0.1:7006@17006 slave
- d277cd2984639747a17ca79428602480b28ef070 0 1570457567593 6 connected
给刚添加的 7007 结点分配槽(1)第⼀步:连接上集群(连接集群中任意⼀个可⽤结点都⾏)- [root@localhost 7007]# ./redis-cli --cluster reshard 127.0.0.1:7007
- >>> Performing Cluster Check (using node 127.0.0.1:7007)
- M: 50b073163bc4058e89d285dc5dfc42a0d1a222f2 127.0.0.1:7007
- slots: (0 slots) master
- S: 51c3ebdd0911dd6564040c7e20b9ae69cabb0425 127.0.0.1:7004
- slots: (0 slots) slave
- replicates af559fc6c82c83dc39d07e2dfe59046d16b6a429
- S: 78dfe773eaa817fb69a405a3863f5b8fcf3e172f 127.0.0.1:7006
- slots: (0 slots) slave
- replicates d277cd2984639747a17ca79428602480b28ef070
- S: e7b1f1962de2a1ffef2bf1ac5d94574b2e4d67d8 127.0.0.1:7005
- slots: (0 slots) slave
- replicates 068b678923ad0858002e906040b0fef6fff8dda4
- M: af559fc6c82c83dc39d07e2dfe59046d16b6a429 127.0.0.1:7001
- slots:[0-5460] (5461 slots) master
- 1 additional replica(s)
- M: 068b678923ad0858002e906040b0fef6fff8dda4 127.0.0.1:7002
- slots:[5461-10922] (5462 slots) master
- 1 additional replica(s)
- M: d277cd2984639747a17ca79428602480b28ef070 127.0.0.1:7003
- slots:[10923-16383] (5461 slots) master
- 1 additional replica(s)
- [OK] All nodes agree about slots configuration.
- >>> Check for open slots...
- >>> Check slots coverage...
- [OK] All 16384 slots covered.
(2) 第⼆步:输⼊要分配的槽数量
How many slots do you want to move (from 1 to 16384)? 3000输⼊: 3000 ,表示要给⽬标节点分配 3000 个槽(3) 第三步:输⼊接收槽的结点id
What is the receiving node ID?输⼊: 50b073163bc4058e89d285dc5dfc42a0d1a222f2- PS:这⾥准备给7007分配槽,通过cluster nodes查看7007结点id为:
- 50b073163bc4058e89d285dc5dfc42a0d1a222f2
(4) 第四步:输⼊源结点id
- Please enter all the source node IDs.
- Type 'all' to use all the nodes as source nodes for the hash slots.
- Type 'done' once you entered all the source nodes IDs.
输⼊: all(5) 第五步:输⼊yes开始移动槽到⽬标结点id
 输⼊: yes
- Moving slot 11899 from 127.0.0.1:7003 to 127.0.0.1:7007:
- Moving slot 11900 from 127.0.0.1:7003 to 127.0.0.1:7007:
- Moving slot 11901 from 127.0.0.1:7003 to 127.0.0.1:7007:
- Moving slot 11902 from 127.0.0.1:7003 to 127.0.0.1:7007:
- Moving slot 11903 from 127.0.0.1:7003 to 127.0.0.1:7007:
- Moving slot 11904 from 127.0.0.1:7003 to 127.0.0.1:7007:
- Moving slot 11905 from 127.0.0.1:7003 to 127.0.0.1:7007:
- Moving slot 11906 from 127.0.0.1:7003 to 127.0.0.1:7007:
- Moving slot 11907 from 127.0.0.1:7003 to 127.0.0.1:7007:
- Moving slot 11908 from 127.0.0.1:7003 to 127.0.0.1:7007:
- Moving slot 11909 from 127.0.0.1:7003 to 127.0.0.1:7007:
- Moving slot 11910 from 127.0.0.1:7003 to 127.0.0.1:7007:
- Moving slot 11911 from 127.0.0.1:7003 to 127.0.0.1:7007:
- Moving slot 11912 from 127.0.0.1:7003 to 127.0.0.1:7007:
- Moving slot 11913 from 127.0.0.1:7003 to 127.0.0.1:7007:
- Moving slot 11914 from 127.0.0.1:7003 to 127.0.0.1:7007:
- Moving slot 11915 from 127.0.0.1:7003 to 127.0.0.1:7007:
- Moving slot 11916 from 127.0.0.1:7003 to 127.0.0.1:7007:
- Moving slot 11917 from 127.0.0.1:7003 to 127.0.0.1:7007:
- Moving slot 11918 from 127.0.0.1:7003 to 127.0.0.1:7007:
- Moving slot 11919 from 127.0.0.1:7003 to 127.0.0.1:7007:
- Moving slot 11920 from 127.0.0.1:7003 to 127.0.0.1:7007:
- Moving slot 11921 from 127.0.0.1:7003 to 127.0.0.1:7007:
(6) 查看结果
- 127.0.0.1:7001> cluster nodes
- d277cd2984639747a17ca79428602480b28ef070 127.0.0.1:7003@17003 master - 0
- 1570458285557 3 connected 11922-16383
- 50b073163bc4058e89d285dc5dfc42a0d1a222f2 127.0.0.1:7007@17007 master - 0
- 1570458284000 7 connected 0-998 5461-6461 10923-11921
- e7b1f1962de2a1ffef2bf1ac5d94574b2e4d67d8 127.0.0.1:7005@17005 slave
- 068b678923ad0858002e906040b0fef6fff8dda4 0 1570458283000 5 connected
- 068b678923ad0858002e906040b0fef6fff8dda4 127.0.0.1:7002@17002 master - 0
- 1570458284546 2 connected 6462-10922
- 51c3ebdd0911dd6564040c7e20b9ae69cabb0425 127.0.0.1:7004@17004 slave
- af559fc6c82c83dc39d07e2dfe59046d16b6a429 0 1570458283538 4 connected
- af559fc6c82c83dc39d07e2dfe59046d16b6a429 127.0.0.1:7001@17001 myself,master - 0
- 1570458283000 1 connected 999-5460
- 78dfe773eaa817fb69a405a3863f5b8fcf3e172f 127.0.0.1:7006@17006 slave
- d277cd2984639747a17ca79428602480b28ef070 0 1570458284000 6 connected
6.7.3 添加从节点
添加 7008 从结点,将 7008 作为 7007 的从结点命令:./redis-cli --cluster add-node 新节点的ip和端⼝ 旧节点ip和端⼝ --cluster-slave --cluster-master-id 主节点id例如:./redis-cli --cluster add-node 127.0.0.1:7008 127.0.0.1:7007 --cluster-slave --cluster-master-id 50b073163bc4058e89d285dc5dfc42a0d1a222f250b073163bc4058e89d285dc5dfc42a0d1a222f2 是 7007 结点的 id ,可通过 cluster nodes 查看。- [root@localhost 7008]# ./redis-cli --cluster add-node 127.0.0.1:7008
- 127.0.0.1:7007 --cluster-slave --cluster-master-id
- 50b073163bc4058e89d285dc5dfc42a0d1a222f2
- >>> Adding node 127.0.0.1:7008 to cluster 127.0.0.1:7007
- >>> Performing Cluster Check (using node 127.0.0.1:7007)
- M: 50b073163bc4058e89d285dc5dfc42a0d1a222f2 127.0.0.1:7007
- slots:[0-998],[5461-6461],[10923-11921] (2999 slots) master
- S: 51c3ebdd0911dd6564040c7e20b9ae69cabb0425 127.0.0.1:7004
- slots: (0 slots) slave
- replicates af559fc6c82c83dc39d07e2dfe59046d16b6a429
- S: 78dfe773eaa817fb69a405a3863f5b8fcf3e172f 127.0.0.1:7006
- slots: (0 slots) slave
- replicates d277cd2984639747a17ca79428602480b28ef070
- S: e7b1f1962de2a1ffef2bf1ac5d94574b2e4d67d8 127.0.0.1:7005
- slots: (0 slots) slave
- replicates 068b678923ad0858002e906040b0fef6fff8dda4
- M: af559fc6c82c83dc39d07e2dfe59046d16b6a429 127.0.0.1:7001
- slots:[999-5460] (4462 slots) master
- 1 additional replica(s)
- M: 068b678923ad0858002e906040b0fef6fff8dda4 127.0.0.1:7002
- slots:[6462-10922] (4461 slots) master
- 1 additional replica(s)
- M: d277cd2984639747a17ca79428602480b28ef070 127.0.0.1:7003
- slots:[11922-16383] (4462 slots) master
- 1 additional replica(s)
- [OK] All nodes agree about slots configuration.
- >>> Check for open slots...
- >>> Check slots coverage...
- [OK] All 16384 slots covered.
- >>> Send CLUSTER MEET to node 127.0.0.1:7008 to make it join the cluster.
- Waiting for the cluster to join
- .....
- >>> Configure node as replica of 127.0.0.1:7007.
- [OK] New node added correctly.
注意:如果原来该结点在集群中的配置信息已经⽣成到 cluster-config-file 指定的配置⽂件中(如果cluster-config-file 没有指定则默认为 nodes.conf ),这时可能会报错:- [ERR] Node XXXXXX is not empty. Either the node already knows other nodes
- (check with CLUSTER NODES) or contains some key in database 0
解决⽅法是删除⽣成的配置⽂件 nodes.conf ,删除后再执⾏ ./redis-cli --cluster add-node 指令查看集群中的结点,刚添加的 7008 为 7007 的从节点:- [root@localhost 7008]# ./redis-cli -h 127.0.0.1 -p 7001 -c
- 127.0.0.1:7001> cluster nodes
- d277cd2984639747a17ca79428602480b28ef070 127.0.0.1:7003@17003 master - 0
- 1570458650720 3 connected 11922-16383
- c3272565847bf9be8ae0194f7fb833db40b98ac4 127.0.0.1:7008@17008 slave
- 50b073163bc4058e89d285dc5dfc42a0d1a222f2 0 1570458648710 7 connected
- 50b073163bc4058e89d285dc5dfc42a0d1a222f2 127.0.0.1:7007@17007 master - 0
- 1570458649000 7 connected 0-998 5461-6461 10923-11921
- e7b1f1962de2a1ffef2bf1ac5d94574b2e4d67d8 127.0.0.1:7005@17005 slave
- 068b678923ad0858002e906040b0fef6fff8dda4 0 1570458650000 5 connected
- 068b678923ad0858002e906040b0fef6fff8dda4 127.0.0.1:7002@17002 master - 0
- 1570458649715 2 connected 6462-10922
- 51c3ebdd0911dd6564040c7e20b9ae69cabb0425 127.0.0.1:7004@17004 slave
- af559fc6c82c83dc39d07e2dfe59046d16b6a429 0 1570458648000 4 connected
- af559fc6c82c83dc39d07e2dfe59046d16b6a429 127.0.0.1:7001@17001 myself,master - 0
- 1570458650000 1 connected 999-5460
- 78dfe773eaa817fb69a405a3863f5b8fcf3e172f 127.0.0.1:7006@17006 slave
- d277cd2984639747a17ca79428602480b28ef070 0 1570458651725 6 connected
- 127.0.0.1:7001>
6.7.4 删除结点
命令:- ./redis-cli --cluster del-node 127.0.0.1:7008
- 41592e62b83a8455f07f7797f1d5c071cffedb50
删除已经占有 hash 槽的结点会失败,报错如下:[ERR] Node 127.0.0.1:7008 is not empty! Reshard data away and try again.需要将该结点占⽤的 hash 槽分配出去(参考 hash 槽重新分配章节)。6.8 Jedis连接集群
需要开启防⽕墙,或者直接关闭防⽕墙。service iptables stop6.8.1 代码实现
创建 JedisCluster 类连接 redis 集群- @Test
- public void testJedisCluster() throws Exception {
- //创建⼀连接,JedisCluster对象,在系统中是单例存在
- Set
nodes = new HashSet<>(); - nodes.add(new HostAndPort("192.168.10.133", 7001));
- nodes.add(new HostAndPort("192.168.10.133", 7002));
- nodes.add(new HostAndPort("192.168.10.133", 7003));
- nodes.add(new HostAndPort("192.168.10.133", 7004));
- nodes.add(new HostAndPort("192.168.10.133", 7005));
- nodes.add(new HostAndPort("192.168.10.133", 7006));
- JedisCluster cluster = new JedisCluster(nodes);
- //执⾏JedisCluster对象中的⽅法,⽅法和redis⼀⼀对应。
- cluster.set("cluster-test", "my jedis cluster test");
- String result = cluster.get("cluster-test");
- System.out.println(result);
- //程序结束时需要关闭JedisCluster对象
- cluster.close();
- }
6.8.2 使⽤spring
配置 applicationContext.xml- <bean id="jedisPoolConfig" class="redis.clients.jedis.JedisPoolConfig">
- <property name="maxTotal" value="30" />
- <property name="maxIdle" value="10" />
- <property name="numTestsPerEvictionRun" value="1024" />
- <property name="timeBetweenEvictionRunsMillis" value="30000" />
- <property name="minEvictableIdleTimeMillis" value="1800000" />
- <property name="softMinEvictableIdleTimeMillis" value="10000" />
- <property name="maxWaitMillis" value="1500" />
- <property name="testOnBorrow" value="true" />
- <property name="testWhileIdle" value="true" />
- <property name="blockWhenExhausted" value="false" />
- bean>
- <bean id="jedisCluster" class="redis.clients.jedis.JedisCluster">
- <constructor-arg index="0">
- <set>
- <bean class="redis.clients.jedis.HostAndPort">
- <constructor-arg index="0" value="192.168.101.3">constructor-arg>
- <constructor-arg index="1" value="7001">constructor-arg>
- bean>
- <bean class="redis.clients.jedis.HostAndPort">
- <constructor-arg index="0" value="192.168.101.3">constructor-arg>
- <constructor-arg index="1" value="7002">constructor-arg>
- bean>
- <bean class="redis.clients.jedis.HostAndPort">
- <constructor-arg index="0" value="192.168.101.3">constructor-arg>
- <constructor-arg index="1" value="7003">constructor-arg>
- bean>
- <bean class="redis.clients.jedis.HostAndPort">
- <constructor-arg index="0" value="192.168.101.3">constructor-arg>
- <constructor-arg index="1" value="7004">constructor-arg>
- bean>
- <bean class="redis.clients.jedis.HostAndPort">
- <constructor-arg index="0" value="192.168.101.3">constructor-arg>
- <constructor-arg index="1" value="7005">constructor-arg>
- bean>
- <bean class="redis.clients.jedis.HostAndPort">
- <constructor-arg index="0" value="192.168.101.3">constructor-arg>
- <constructor-arg index="1" value="7006">constructor-arg>
- bean>
- set>
- constructor-arg>
- <constructor-arg index="1" ref="jedisPoolConfig">constructor-arg>
- bean>
Ø 测试代码- private ApplicationContext applicationContext;
- @Before
- public void init() {
- applicationContext = new ClassPathXmlApplicationContext(
- "classpath:applicationContext.xml");
- }
- // redis集群
- @Test
- public void testJedisCluster() {
- JedisCluster jedisCluster = (JedisCluster) applicationContext
- .getBean("jedisCluster");
- jedisCluster.set("name", "zhangsan");
- String value = jedisCluster.get("name");
- System.out.println(value);
- }
-
相关阅读:
开启婚恋新市场!!!
项目执行过程中有几个关键注意事项?
Elasticsearch:验证 Elasticsearch Docker 镜像并安装 Elasticsearch
JavaScript 数组手册 – 通过示例和备忘单了解 JS 数组方法如何工作
Kafka-go各部分详细分析、案例
learning to rank 学习排名系统综述
vim以16进制打开和编辑文件
世微 降压恒流 12V 5A 一切一双灯 LED汽车大灯驱动方案 AP5191
【一起学Java-第八篇】Java语言类的特性详解
entos7主网卡ip不通
- 原文地址:https://blog.csdn.net/m0_57209427/article/details/132646108
