-
ThreeJs学习
1 基本使用
//1、创建场景 const scene = new THREE.Scene() //2、创建网格模型 const geometry = new THREE.BoxGeometry(100,100,100) const matrial = new THREE.MeshLambertMaterial({ color: #0000ff }) const mesh = new THREE.Mesh(geometry,matrial) scene.add(mesh) //3、添加光照 const point = new THREE.PointLight(0xffffff) point.position.set(10,20,30) scene.add(point) const ambient = new THREE.ambient(0x444444) scene.add(ambient) //设置相机 const width = window.innerWidth const height = window.innerHeight const aspect = width/height const s = 20 //参数为左右上下近远 const camera = new THREE.OrthographicCamera(-s*aspect,s*aspect,s,-s,1,1000) camera.position.set(10,10,10) camerta.lookAt(camera.position) //设置渲染器对象 const renderer = new THREE.WebGLRenderer() renderer.setSize(width.height) renderer.setClearcolor(0x,fffffff,1) document.body.appendChild(renderer.domElement) renderer.renderer(scene,camera)- 1
- 2
- 3
- 4
- 5
- 6
- 7
- 8
- 9
- 10
- 11
- 12
- 13
- 14
- 15
- 16
- 17
- 18
- 19
- 20
- 21
- 22
- 23
- 24
- 25
- 26
- 27
- 28
- 29
- 30
- 31
- 32
- 33
- 34
- 35
2 相机轨道控制旋转缩放
const controls = new THREE.OrbitControls(camera,renderer.domElement) controls.addEventListener('change',render) //自动监听鼠标键盘事件,更新相机参数 //如果使用requestAnimationFrame调用render函数,则不需要添加监听事件- 1
- 2
- 3
- 4
3 设置材质效果
- color:材质颜色
- wireframe:将几何图形渲染为线框
- opacity:设置透明度
- transparent:是否开启透明
new THREE.MeshlambertMatrial({ color: 0xff0000, opacity: 0.7, transparent: true }) //也可以以对象方式设置 material.opacity = 0.7- 1
- 2
- 3
- 4
- 5
- 6
- 7
- 8
4 添加高光效果
ambient:环境色,于与AmbientLight光源一起使用颜色会相乘emissive:材质发射的亚瑟,不受其他光照影响的颜色specular:光亮程度及高光部分颜色shininess:指定高光部分的亮度
new THREE.MeshPhongMaterial({ color: #ffffff, specular: 0x4488ee, shininess: 12 })- 1
- 2
- 3
- 4
- 5
5 材质类型
MeshLambertMaterial:lambert网格材质,与光照有反应,漫反射MeshBasicMaterial:基础网格材质,不受光照影响MeshPhongMaterial:高光phong材质,与光照有反应MeshStandradMaterial:PBR物理材质,可以更好模拟玻璃、金属等效果
6 光照效果
光源类型:
AmbientLight:环境光PointLight:点光源DirectionlLight:平行光SpotLight:聚光源
注:如果只使用环境光,整个立方体没有任何棱角感,必须设置具有方向性的点光源和平行光源
7 顶点位置数据解析渲染
//创建顶点数据缓冲区 const geometry= new THREE.BufferGeometry() //创建顶点坐标 const vertices = new Float32Array([ 0, 0, 0, //顶点1坐标 50, 0, 0, //顶点2坐标 0, 100, 0, //顶点3坐标 ]) const attribute = new THREE.BufferAttribute(vertices,3) geometry.attributes.position = attribute const material = new THREE.MeshBasicMaterial({ color: 0x0000ff, side: ThREE.DoubleSide, }) const mesh = new THREE.Mesh(geometry,material)- 1
- 2
- 3
- 4
- 5
- 6
- 7
- 8
- 9
- 10
- 11
- 12
- 13
- 14
- 15
- 16
- 17
- 18
8 点模型
const material = new THREE.PointsMaterial({ color: 0x0000ff, size: 10.0, }) const points = new THREE.Points(geometry,material)- 1
- 2
- 3
- 4
- 5
9 线模型
const material = new THREE.LineBasicMaterial({ color: 0x0000ff, }) const line = new THREE.Line(geometry,material)- 1
- 2
- 3
- 4
10 顶点颜色数据插值计算
const colors = new Float32Array([ 1, 0, 0, //顶点1颜色 0, 1, 0, //顶点2颜色 0, 0, 1, //顶点3颜色 1, 1, 0, //顶点4颜色 0, 1, 1, //顶点5颜色 1, 0, 1, //顶点6颜色 ]); geometry.attributes.color = new THREE.BufferAttribute(colors,3) const material = new THREE.PointsMaterial({ vertexColor: THREE.VertexColor, size: 10.0 }) const points = new THREE.Points(geometry,material) scene.add(points)- 1
- 2
- 3
- 4
- 5
- 6
- 7
- 8
- 9
- 10
- 11
- 12
- 13
- 14
- 15
- 16
- 17
- 18
11 定义顶点法向量
定义顶点法向量后点光源和平行光源会起作用
var normals = new Float32Array([ 0, 0, 1, //顶点1法向量 0, 0, 1, //顶点2法向量 0, 0, 1, //顶点3法向量 0, 1, 0, //顶点4法向量 0, 1, 0, //顶点5法向量 0, 1, 0, //顶点6法向量 ]); geometry.attributes.normal = new THREE.BufferAttribute(normals,3)- 1
- 2
- 3
- 4
- 5
- 6
- 7
- 8
- 9
- 10
- 11
12 通过顶点索引复用顶点数据
当我们画一个长方形时,需要6个顶点数据,然而其中两个顶点可以复用,因此通过索引来实现复用
const index = new Uint16Array([ 0,1,2, 0,2,3, ]) geometry.index = new THREE.BufferAttribute(index,1)- 1
- 2
- 3
- 4
- 5
13 设置Geometry顶点位置、顶点颜色数据
const geometry = new THREE.Geometry() const p1 = new THREE.Vector3(50,0,0) const color1 = new THREE.Color(0x00ff00) //将顶点数据添加到geometry对象中 geometry.vertices.push(p1) geometry.colors.push(color1) //设置顶点颜色属性对Mesh无效 //设置顶点颜色数据时,需要将vertexColor变为THREE.VertexColors const material = new THREE.MeshLambertMaterial({ vertexColor: THREE.VertexColors, side: DoubleSide, })- 1
- 2
- 3
- 4
- 5
- 6
- 7
- 8
- 9
- 10
- 11
- 12
14 Face3定义Geometry的三角形面
设置三角形Face3的颜色对于Mesh模型有效,对于Points、Line无效
var p1 = new THREE.Vector3(0, 0, 0); //顶点1坐标 var p2 = new THREE.Vector3(0, 100, 0); //顶点2坐标 var p3 = new THREE.Vector3(50, 0, 0); //顶点3坐标 var p4 = new THREE.Vector3(0, 0, 100); //顶点4坐标 geometry.vertices.push(p1,p2,p3,p4) //构建一个三角面 const face1 = new THREE.Face3(0,1,2) //每个顶点的法向量 var n1 = new THREE.Vector3(0, 0, -1); var n2 = new THREE.Vector3(0, 0, -1); var n3 = new THREE.Vector3(0, 0, -1); face1.vertexNormals.push(n1,n2,n3) const face2 = new THREE.Face3(0,2,3) face2.normal = new ThREE.Vector3(0,-1,0) //设置颜色 face1.color = new THREE.Color(0x00f0f0f) face1.vertexColors = [ new THREE.Color(0x00f0f0f), new THREE.Color(0x00f0f0f), new THREE.Color(0x00f0f0f), ] geometry.faces.push(face1,face2)- 1
- 2
- 3
- 4
- 5
- 6
- 7
- 8
- 9
- 10
- 11
- 12
- 13
- 14
- 15
- 16
- 17
- 18
- 19
- 20
- 21
- 22
- 23
- 24
- 25
- 26
- 27
- 28
15 访问几何体的数据
BoxGeometry、PlaneGeometry、SphereGeometry的基类为Geometry//获取几何体的顶点位置数据 const vertex_position = geometry.vertices //获取几何体的面数据 const face_data = geometry.faces //获取几何体的颜色数据 const colors = geometry.colors- 1
- 2
- 3
- 4
- 5
- 6
- 7
BoxBufferGeometry、PlaneBufferGeometry、SphereBufferGeometry的基类为BufferGeometry//获取顶点位置 const vertex = geometry.attributes.position //顶点颜色 const colors = geometry.attributes.color //顶点法向量 const normal = geometry.attributes.normal //纹理贴图UV坐标 const uv = geometry.attributes.ub //顶点索引数据 const index = geometry.index- 1
- 2
- 3
- 4
- 5
- 6
- 7
- 8
- 9
- 10
16 几何体旋转、缩放、平移
网格模型进行变换不会影响几何体的顶点位置坐标,网格模型旋转缩放平移改变的是模型的
本地矩阵、世界矩阵geometry.scale(2,2,2) geometry.translate(50,0,0) geometry.rotateX(Math.PI/4) geometry.center()- 1
- 2
- 3
- 4
17 常用材质
- PointsMaterial:点材质
- LineBasicMaterial:线材质
- LineDashedMaterial:虚线材质
- MeshBasicMaterial:基础网格材质,不受带有方向光源影响,没有棱角感
- MeshLambertMaterial:可以实现网格表面与光源的漫反射光照计算,有棱角感
- MeshPhongMaterial:高光效果
- SpriteMaterial:精灵材质
18 材质对应模型对象
- 点模型:Points
- 线模型:Line、LineLoop、LineSegments
- 网格模型:Mesh、SkinnedMesh
- 精灵模型:Sprite
19 材质共有属性、私有属性
(1)side属性
定义面的渲染方式,可以是前面(THREE.FrontSide)、后面(THREE.BackSide)、双面(THREE.DoubleSide)
(2)材质透明度:opacity、transparent20 对象克隆和复制
对网格模型的几何体进行缩放时,克隆的网格也会同时改变大小;几何体的克隆或复制为深拷贝
21 光源对象

- 环境光源AmbientLight:均匀改变整体物体表面的明暗效果
- 点光源PointLight:同一平面不同区域呈现出不同的明暗效果
- 平行光DirectionalLight:需要position和target确定光的方向,无论position在哪,平行光的强度一样
- 聚光源SpotLight:angle设置发散角度,照射方向通过设置position和target实现
漫反射光的颜色=网格模型材质颜色x光线颜色x光线入射角余弦值22 光照阴影计算
- 模型.castShadow属性:设置一个模型对象是否在光照下产生投影效果
- receiveShadow:设置一个模型对象是否在光照下接收其他模型的投影效果
- 光源.castShadow属性:光源是否投射动态阴影
- 光源.shadow:光源阴影对象
- LightShadow属性.camera:观察光源的相机对象,设置投影的边界属性
- LightShadow属性.mapSize:较高的值将提供更好的阴影质量,宽高的值必须为2的幂
23 层级模型
scene作为group的父级,group作为mesh1和mesh2的父级,这样对group做的任何操作都会同样作用在mesh1和mesh2上
const group = new THREE.Group() group.add(mesh1) group.add(mesh2) scene.add(group) //访问子对象 const child = scene.children || group.children //移除子对象 group.remove(mesh1.mesh2)- 1
- 2
- 3
- 4
- 5
- 6
- 7
- 8
- 9
- 10
- 命名:group.name = ‘11’
- 遍历:group.traverse((obj)=>{})
- 查找:scene.getObjectById()、scene.getObjecctByName()
24 本地位置坐标、世界位置坐标
- getWorldPosition:获得世界位置坐标
- getWorldScale:获得世界缩放系数
- matrix:本地矩阵
- matrixWorld:世界矩阵
25 常见几何体和曲线
(1)几何体
- BoxGeometry:长方体
- CylinderGeometry:圆柱体
- SphereGeometry:球体
- ConeGeometry:圆锥、棱锥
(2)曲线
- LineCurve:直线
- ArcCurve:圆弧
- EllipseCurve:椭圆
- SplineCurve:样条曲线
26 圆弧线
(1)圆弧线
//参数分别为圆心坐标、圆弧半径、起始角度、是否顺时针绘制 const arc = new THREE.ArcCurve(aX,aY,aRadius,aStartAngle,aEndAngle,aClockwise) const points = arc.getPoints(50) //返回51个顶点- 1
- 2
- 3
- 4
(2)setFromPoints方法
Geometry使用该方法可以把数组points中顶点数据提取出来赋值给几何体的顶点位置属性geometry.vertices,BufferGeometry和Geometry一样具有该方法,不过提取顶点后的数据赋值给geometry.attributes.position属性const geometry = new THREE.Geometry() const curve = new THREE.- 1
- 2
- 3
27 轮廓填充
const points = [ new THREE.Vector2(-50, -50), new THREE.Vector2(-60, 0), new THREE.Vector2(0, 50), new THREE.Vector2(60, 0), new THREE.Vector2(50, -50), new THREE.Vector2(-50, -50), ] const shape = new THREE.Shape(points) const geometry = new THREE.ShapeGeometry(shape,20) //生成外接圆 const shape = new THREE.Shape() shape.absarc(0,0,100,0,2*Math.PI) const geometry = new THREE.ShapeGeometry(shape,20) //- 1
- 2
- 3
- 4
- 5
- 6
- 7
- 8
- 9
- 10
- 11
- 12
- 13
- 14
- 15
- 16
- 17
- 18
- 19
28 二维路径的共有方法
//依靠点生成二维路径 const shape = new THREE.Shape() const path = new THREE.Path(points) //移动基点 path.moveTo() //从currentPosition连线到改点 path.lineTo() //绘制圆弧 path.arc(x,y,r,startAngle,endAngle,closewise) //添加到形状的内轮廓中 shape.holes.push(path)- 1
- 2
- 3
- 4
- 5
- 6
- 7
- 8
- 9
- 10
- 11
- 12
29 拉伸成型
const geometry = new THREE.ExtrudeGeometry(shape,{ amount: 120, //拉伸长度 bevelEnabled: false //无倒角 }) const material = new THREE.PointsMaterial({ color: 0x0000ff, size: 5.0 }) const mesh = new THREE.Points(geometry,material)- 1
- 2
- 3
- 4
- 5
- 6
- 7
- 8
- 9
- 10
30 扫描成型
扫描效果与拉伸一致,不过不需要设置拉伸距离,设置扫描路径即可
const curve = new THREE.SplineCurve3([ new THREE.Vector3( -10, -50, -50 ), new THREE.Vector3( 10, 0, 0 ), new THREE.Vector3( 8, 50, 50 ), new THREE.Vector3( -5, 0, 100) ]) const geometry = new THREE.ExtrudeGeometry(shape,{ bevelEnabled: false, extrudePath: curve, //扫描轨迹 steps:55//扫描方向细分数 })- 1
- 2
- 3
- 4
- 5
- 6
- 7
- 8
- 9
- 10
- 11
- 12
- 13
31 纹理贴图
将图片作为geometry的贴图,需要设置material的map属性为相应的geometry
const geometry = new THREE.PlaneGeometry(204,102) //设置纹理对象 const textureLoader = new THREE.TextureLoader() textureLoader.load('./1.png',(texture)=>{ const material = new THREE.MeshLambertMaterial({ map: texture }) const mesh = new THREE.Mesh(geometry,material) })- 1
- 2
- 3
- 4
- 5
- 6
- 7
- 8
- 9
- 10
- 11
也可以使用ImgLoader,内部使用FileLoader来加载文件,并被CubeTextureLoader、ObjectLoader、TextureLoader所使用
const loader = new THREE.ImageLoader() loader.load('./1.png',(image)=>{ const texture = new THREE.Texture(image) //下次使用纹理时触发更新 texture.needsUpdate = true })- 1
- 2
- 3
- 4
- 5
- 6
- 7
32 几何体顶点纹理坐标UV
const geometry = new THREE.BufferGeometry() const vertices = new Float32Array([ 0, 0, 0, //顶点1坐标 80, 0, 0, //顶点2坐标 80, 80, 0, //顶点3坐标 0, 80, 0, //顶点4坐标 ]) //创建缓冲区对象 const attribute = new THREE.BufferAttribute(vertices,3) geometry.attributes.position = attribute const normals = new Float32Array([ 0, 0, 1, //顶点1法向量 0, 0, 1, //顶点2法向量 0, 0, 1, //顶点3法向量 0, 0, 1, //顶点4法向量 ]) geometry.attributes.normal = new THREE.BufferAttribute(normals,3) const index = new Uint16Array([0,1,2,0,2,3]) geometry.index = new THREE.BufferAttribute(index,1) const uvs = new Float32Array([ 0,0, //图片左下角 1,0, //图片右下角 1,1, //图片右上角 0,1, //图片左上角 ]) geometry.attributes,uv = new THREE.BufferAttribute(uvs,2)- 1
- 2
- 3
- 4
- 5
- 6
- 7
- 8
- 9
- 10
- 11
- 12
- 13
- 14
- 15
- 16
- 17
- 18
- 19
- 20
- 21
- 22
- 23
- 24
- 25
- 26
- 27
- 28
- 29
- 30
- 31
- 32
- 33
- 34
- 35
33 数组材质、材质索引
(1)数组材质
const material_1 = new THREE.MeshPhongMaterial({ color: 0xff0000 }) const textureLoader = new THREE.TextureLoader() const texture = textureLoader.loader('./1.png') const material_2 = new THREE.MeshLambertMaterial({ map: texture }) const materialArr = [material_2,material_1,material_1,material_1,material_1,material_2] const mesh = new THREE.Mesh(geometry,materialArr) scene.add(mesh)- 1
- 2
- 3
- 4
- 5
- 6
- 7
- 8
- 9
- 10
- 11
- 12
- 13
(2)材质索引属性
geometry.faces[1].materialIndex = 1- 1
34 纹理对象Texture阵列、偏移、旋转
(1)阵列
- 默认:ClampToEdgeWrapping
- 阵列:RepeatWrapping
- 镜像阵列:MirrorRepeatWrapping
wrapS:纹理贴图在水平方向上将如何包裹
wrapT:纹理贴图在垂直方向上将如何包裹texture.wrapS = THREE.RepeatWrapping texture.wrapT = THREE.RepeatWrapping texture.repeat.set(4,2)- 1
- 2
- 3
(2)偏移
相对于原来位置进行偏移texture.offset = new THREE.Vector2(0.5,0.5)- 1
(3)旋转
texture.rotation = Math.PI/4 texture.center.set(0.5,0.5)- 1
- 2
35 法线贴图
const textureLoader = new THREE.TextureLoader() const textureNormal = textureLoader.load('./1.png') const material = new THREE.MeshPhongMaterial({ color: 0x0000ff, normalMap: textureNormal, normalScale: new THREE.Vector2(3,3) })- 1
- 2
- 3
- 4
- 5
- 6
- 7
36 凹凸贴图
设置material的bumpMap属性为纹理贴图,bumpScale为凹凸的高度
37 高光贴图
const material = new THREE.MeshPhongMaterial({ shininess: 30 map: texture, specular: textureSpecular, //高光贴图 })- 1
- 2
- 3
- 4
- 5
38 环境贴图
类似于租房的VR效果
const geometry = new THREE.BoxGrometry(100,100,100) const loader = new THREE.CubeTextureLoader() loader.setPath('./') const cubeTexture = loader.load(['1.jpg','1.jpg','1.jpg','1.jpg','1.jpg','1.jpg']) const material = new THREE.MeshPhongMaterial({ envMap: cubeTexture })- 1
- 2
- 3
- 4
- 5
- 6
- 7
- 8
- 9
- 10
- 11
39 正射投影和透视投影

(1)正射投影相机对象OrthographicCamera
- left:左边界
- right:右边界
- top
- bottom
- near
- far
注意:左右边界的距离与上下边界距离的比值要和画布渲染窗口比例一直,否则三维模型显示效果会被单方向不等比例拉伸
(2)透视投影相机对象
PerspectiveCamera

- fov:视角角度
- aspect:宽高比
- near:近裁剪面
- far:远裁剪面
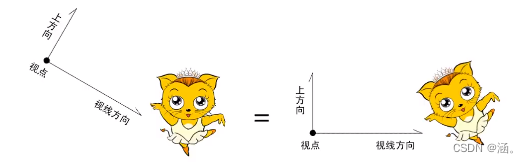
(3)相机位置和拍摄方向
camera.position.set() camera.lookAt(scene.position)- 1
- 2
40 浏览器窗口尺寸变化(自适应渲染)
如果浏览器窗口尺寸发生变化,会出现局部空白区域
//相当于设置视图矩阵的matrixWorldInverse属性 camera.position.set() camera.lookAt() //相当于设置投影矩阵的projectionMatrix属性 var camera = new THREE.OrthographicCamera(-s * k, s * k, s, -s, 1, 1000); var camera = new THREE.PerspectiveCamera(60, width / height, 1, 1000);- 1
- 2
- 3
- 4
- 5
- 6
- 7
(1)正射投影相机自适应渲染
需要重新设置相机对象和渲染对象参数window.onresize = ()=>{ renderer.setSize(window.innerWidth,window.innerHeight) k = window.innerWidth/window.innerHeight camera.left = -s*k camera.right = s*k camera.top = s camera.bottom = -s //需要手动更新,这是用为每次执行渲染器方法render的时候不会读取相机相关参数重新计算一次投影矩阵 //如果相机的一些属性发生了变化,需要执行updateProjectMatrix方法更新相机的投影矩阵 camera.updateProjectionMatrix() }- 1
- 2
- 3
- 4
- 5
- 6
- 7
- 8
- 9
- 10
- 11
(2)透视相机自适应渲染
window.onresize = ()=>{ renderer.setSize(window.innerWidth,window.innerHeight) camera.aspect = window.innerWidth/window.innerHeight camera.updateProjectionMatrix() }- 1
- 2
- 3
- 4
- 5
41 雾化效果
场景中越远的位置看起来越模糊
(1)Fog
雾的密度随距离线性增大- color:雾的颜色
- near:雾化效果的最小距离,距离camera小于near的物体不会受雾化效果的影响
- far:雾化效果的最远距离
(2)FogExp
雾的密度随距离指数增大- color
- density:密度增长指数
42 CSS渲染器
将自己写的DOM元素添加到场景中
43 ShaderMaterial(创建自定义着色)
着色器直接在GPU上运行,提高渲染效率
- vertexShader: 顶点着色器,用于计算顶点的最终位置,将3d坐标转变为2d坐标
- fragmentShader:片元着色器,计算每个像素的最终颜色
const shaderMaterial = new ShaderMaterial({ vertexShader: ` void main() { gl_Position = projectionMatrix * viewMatrix * modelMatrix * vec4( position, 1.0 ) ; } `, fragmentShader: ` void main(){ gl_FragColor = vec4(1.0,0.0,0.0,1.0); } ` })- 1
- 2
- 3
- 4
- 5
- 6
- 7
- 8
- 9
- 10
- 11
- 12
顶点着色器中的默认变量:
-
modelMatrix:模型矩阵,控制模型的旋转、平移
-
modelViewMatrix:
-
projectionMatrix:投影矩阵,控制三维物体观看效果
-
viewMatrix:视图矩阵,当改变相机的视点、视线和上方向时,其实改变物体即可,这个改变物体的矩阵就是视图矩阵
-
normalMatrix:法向量矩阵
-
cameraPosition:摄像机在世界空间的位置
默认属性:
- position:位置
- normal:法线向量
- uv:二维向量
顶点位置计算如下:
gl_Position = projectionMatrix * modelViewMatrix * vec4(position, 1.0)- 1
或者
gl_Position = projectionMatrix * viewMatrix * modelMatrix * vec4(position, 1.0)其中vec4(position, 1.0)表示顶点在本地坐标系中的坐标(四维齐次坐标系),左乘模型矩阵得到该顶点在世界坐标系中的坐标,这个矩阵包含旋转、平移,然后世界坐标系坐标左乘视图矩阵,就将坐标变换到相机坐标系下,最后左乘投影矩阵
44 全局变量uniforms
uniforms是GLSL着色器中的全局变量,必须包含一个属性value
-
相关阅读:
Python subprocess模块学习笔记
计数器(JS闭包)
jQuery 效果- 动画
抱怨身处黑暗,不如提灯前行
Service详解「2」
java计算机毕业设计水库洪水预报调度系统源码+系统+数据库+lw文档+mybatis+运行部署
unity3d客户端框架 基于类对象池的可回收变量 代码实现
Markdown类图之继承、实现、关联、依赖、组合、聚合总结(十五)
计算机毕业设计Java卓越导师双选系统(源码+系统+mysql数据库+Lw文档)
Nginx加载Lua脚本lrucache缓存
- 原文地址:https://blog.csdn.net/weixin_44208404/article/details/128105220
