-
SpringSecurity(二十)---OAuth2:实现资源服务器(上)资源服务器搭建以及直接调用授权服务器模式
一、 前言
本章将讨论如何使用Spring Security实现一个资源服务器,资源服务器是管理用户资源的组件。另外,学习本章有个前提,需要先把前面搭建授权服务器的相关文章先给阅读,否则可能后面出现的授权服务器相关代码不知道个所以然。就OAuth2而言,它代表了我们要保护的后端(端点),就像前几章保护的其他应用程序是一样的。为了允许客户端访问资源,资源服务器需要一个有效的访问令牌。客户端会从授权服务器获得访问令牌,并通过将该令牌添加到HTTP请求头信息来使用该令牌调用资源服务器上的资源。
还记得前两章讨论客户端和授权服务器的实现时,我们曾经提起过资源服务器更为重要的是选择资源服务器验证令牌的方式。对于在资源服务器级别实现令牌验证,我们主要有三种方式:- 远程检查令牌,即通过网络调用授权服务器检查token
- 黑板模式,我们使用一个公共数据库,这个可以是Mysql也可以是redis,这个我们都会讲。redis我会专门提起一章来说。授权服务器会在其中存储令牌,然后资源服务器可以在其中访问和验证令牌。这种方法也称为黑板模式。
- 最后第三个选项是使用加密签名。授权服务器在颁发令牌时会对其进行签名,资源服务器则要验证签名。这里是我们通常使用的JWT的地方。这个也会专门提一章后面讲。
二、实现资源服务器
首先要实现我们的第一个资源服务器应用程序,这是OAuth2拼图的最后一块。
使用可以颁发令牌的授权服务器的原因是为了允许客户端访问用户的资源。资源服务器将管理和保护用户的资源。由于这个原因,我们需要知道如何实现资源服务器。

当资源服务器需要验证令牌时,它会直接调用授权服务器。如果授权服务器确认它颁发了该令牌,则资源服务器认为该令牌有效。要实现资源服务器,需要在和之前搭建授权服务器的同一个父项目下创建一个新项目spring_security_resource_server并添加依赖项,完整pom文件如下,关于mysql,redis,fastjson等后面会用到,大家可以提前加上。
<project xmlns="http://maven.apache.org/POM/4.0.0" xmlns:xsi="http://www.w3.org/2001/XMLSchema-instance" xsi:schemaLocation="http://maven.apache.org/POM/4.0.0 http://maven.apache.org/xsd/maven-4.0.0.xsd"> <parent> <artifactId>spring_security_oauth2_demoartifactId> <groupId>org.examplegroupId> <version>1.0-SNAPSHOTversion> parent> <modelVersion>4.0.0modelVersion> <artifactId>spring_security_resource_serverartifactId> <properties> <maven.compiler.source>8maven.compiler.source> <maven.compiler.target>8maven.compiler.target> properties> <dependencies> <dependency> <groupId>org.springframework.bootgroupId> <artifactId>spring-boot-starter-webartifactId> dependency> <dependency> <groupId>org.springframework.bootgroupId> <artifactId>spring-boot-starter-testartifactId> dependency> <dependency> <groupId>com.alibabagroupId> <artifactId>fastjsonartifactId> <version>1.2.56version> dependency> <dependency> <groupId>org.springframework.cloudgroupId> <artifactId>spring-cloud-starter-oauth2artifactId> dependency> <dependency> <groupId>org.springframework.bootgroupId> <artifactId>spring-boot-starter-oauth2-resource-serverartifactId> dependency> <dependency> <groupId>com.baomidougroupId> <artifactId>mybatis-plus-boot-starterartifactId> dependency> <dependency> <groupId>mysqlgroupId> <artifactId>mysql-connector-javaartifactId> dependency> <dependency> <groupId>org.springframework.bootgroupId> <artifactId>spring-boot-starter-data-redisartifactId> dependency> dependencies> project>- 1
- 2
- 3
- 4
- 5
- 6
- 7
- 8
- 9
- 10
- 11
- 12
- 13
- 14
- 15
- 16
- 17
- 18
- 19
- 20
- 21
- 22
- 23
- 24
- 25
- 26
- 27
- 28
- 29
- 30
- 31
- 32
- 33
- 34
- 35
- 36
- 37
- 38
- 39
- 40
- 41
- 42
- 43
- 44
- 45
- 46
- 47
- 48
- 49
- 50
- 51
- 52
- 53
资源服务器的目的是管理和保护用户的资源。因此为了证明它是如何工作的,这里需要一个我们希望访问的资源。我们写一个控制器类代表我们需要保护的资源:
TestController.javapackage com.mbw.controller; import org.springframework.security.core.Authentication; import org.springframework.security.core.context.SecurityContextHolder; import org.springframework.web.bind.annotation.GetMapping; import org.springframework.web.bind.annotation.PathVariable; import org.springframework.web.bind.annotation.RequestMapping; import org.springframework.web.bind.annotation.RestController; @RestController @RequestMapping("/test") public class TestController { @GetMapping("/xiao") public String xiao(){return "纳西妲我抽爆!";} @GetMapping("/giao") public String giao(){ Authentication authentication = SecurityContextHolder.getContext().getAuthentication(); String name = authentication.getName(); return "giao,"+name; } @GetMapping("/a") public String getEndpointA(){ return "a"; } @GetMapping("/a/b") public String getEndpointAB(){ return "ab"; } @GetMapping("/product/{code}") public String productCode(@PathVariable String code){ return code; } }- 1
- 2
- 3
- 4
- 5
- 6
- 7
- 8
- 9
- 10
- 11
- 12
- 13
- 14
- 15
- 16
- 17
- 18
- 19
- 20
- 21
- 22
- 23
- 24
- 25
- 26
- 27
- 28
- 29
- 30
- 31
- 32
- 33
- 34
- 35
- 36
这里还需要一个配置类,在这个类中将使用@EnableResourceServer注解来允许Spring Boot为应用程序配置成为资源服务器所需的内容。而你也可以通过扩展ResourceServerConfigurerAdapter去重写资源服务器相关组件和方法,代码如下:
ResourceServerConfig.javapackage com.mbw.config; import org.springframework.context.annotation.Configuration; import org.springframework.security.config.annotation.web.builders.HttpSecurity; import org.springframework.security.oauth2.config.annotation.web.configuration.EnableResourceServer; import org.springframework.security.oauth2.config.annotation.web.configuration.ResourceServerConfigurerAdapter; import javax.servlet.http.HttpServletResponse; @Configuration @EnableResourceServer public class ResourceServerConfig extends ResourceServerConfigurerAdapter { @Override public void configure(HttpSecurity http) throws Exception { http .csrf().disable() .exceptionHandling() .authenticationEntryPoint((request, response, authException) -> response.sendError(HttpServletResponse.SC_UNAUTHORIZED)) .and() .authorizeRequests() .antMatchers("/test/**").authenticated() .and() .httpBasic(); } }- 1
- 2
- 3
- 4
- 5
- 6
- 7
- 8
- 9
- 10
- 11
- 12
- 13
- 14
- 15
- 16
- 17
- 18
- 19
- 20
- 21
- 22
- 23
- 24
- 25
- 26
- 27
上面的代码如果大家对spring Security熟悉的小伙伴应该很快能反应过来,几乎一模一样,其中/test/**就是我们刚才写的Controller的所有端点。
那么我们现在就有了一个资源服务器。但是,如果不能访问端点,它就没有任何用处,就像目前这个示例一样,因为还没有配置资源服务器检查令牌的任何方式。我们知道,对资源的请求也需要提供有效的访问令牌。但即使它提供了有效的访问令牌,请求仍然不能工作,这里的资源服务器还无法验证这些是否是有效的令牌,也无法验证授权服务器确实颁发了它们。这是因为还没有实现资源服务器验证访问令牌所需的任何选项,接下来我们将讨论这些方式。三、远程检查令牌
本节将通过允许资源服务器直接调用授权服务器来实现令牌验证。此方法是使用有效访问令牌启用对资源服务器的访问的最简单实现,如果系统中的令牌是简单形式(例如,在Spring Security的授权服务器的默认实现中使用的简单UUID),则可以选择此方法。这种验证令牌的机制很简单:
- 授权服务器暴露一个端点。对于有效的令牌,它会返回先前向其颁发该令牌的用户所被授予的权限。此处把这个端点称为check_token端点。
- 资源服务器为每个请求调用check_token端点。这样,它就会验证从客户端接收的令牌,并获得授予客户端的权限。

这种方法的优点是简单。可以将其应用于任何类型的令牌实现。这种方法的缺点是,对于资源服务器上具有新的未知令牌的每个请求,资源服务器将调用授权服务器来验证该令牌。这些调用会给授权服务器带来不必要的负荷。此外,请记住:网络并不是100%可靠的。每次在架构中设计新的远程调用时,都需要记住这一点。如果由于网络不稳定导致调用失败,则可能还需要应用一些替代解决方案。并且如果重启资源服务器,就算之前产生了令牌并且还没过期,资源服务器也验证不了这个令牌。因为这个令牌已经失效了,所以也就有了后面将令牌持久化的方案。
那么接下来讨论如何实现。此处的预期是:如果/hello端点提供了授权服务器颁发的访问令牌,则允许客户端访问该端点。
默认情况下,授权服务器会实现端点/oauth/check_token,资源服务器可以使用该端点验证令牌。但是,目前授权服务器将隐式拒绝对该端点的所有请求。在使用/oauth/check_token端点之前,需要确保资源服务器可以调用它。
为了允许经过身份验证的请求调用/oauth/check_token端点,需要重写授权服务器的AuthServerConfig类中的configure(AuthorizationServerSecurityConfigurer c)方法。重写configure()方法就可以设置允许调用/oauth/check_token端点的条件。代码如下:
import com.mbw.security.service.ClientDetailsServiceImpl; import com.mbw.security.service.UserDetailsServiceImpl; import org.springframework.beans.factory.annotation.Autowired; import org.springframework.context.annotation.Configuration; import org.springframework.security.authentication.AuthenticationManager; import org.springframework.security.oauth2.config.annotation.configurers.ClientDetailsServiceConfigurer; import org.springframework.security.oauth2.config.annotation.web.configuration.AuthorizationServerConfigurerAdapter; import org.springframework.security.oauth2.config.annotation.web.configuration.EnableAuthorizationServer; import org.springframework.security.oauth2.config.annotation.web.configurers.AuthorizationServerEndpointsConfigurer; import org.springframework.security.oauth2.config.annotation.web.configurers.AuthorizationServerSecurityConfigurer; @Configuration @EnableAuthorizationServer public class AuthServerConfig extends AuthorizationServerConfigurerAdapter { @Autowired private AuthenticationManager authenticationManager; @Autowired private ClientDetailsServiceImpl clientDetailsServiceImpl; @Autowired private UserDetailsServiceImpl userDetailsServiceImpl; @Override public void configure(AuthorizationServerEndpointsConfigurer endpoints) throws Exception { endpoints.authenticationManager(authenticationManager) .userDetailsService(userDetailsServiceImpl) .tokenStore(jsonRedisTokenStore); DefaultTokenServices tokenService = getTokenStore(endpoints); endpoints.tokenServices(tokenService); } @Override public void configure(ClientDetailsServiceConfigurer clients) throws Exception { clients.withClientDetails(clientDetailsServiceImpl); } /** * 解决访问/oauth/check_token 403的问题 */ @Override public void configure(AuthorizationServerSecurityConfigurer security) throws Exception { // 允许表单认证 security .tokenKeyAccess("permitAll()") .checkTokenAccess("permitAll()") //指定可以调用check_token端点的条件 .allowFormAuthenticationForClients(); } }- 1
- 2
- 3
- 4
- 5
- 6
- 7
- 8
- 9
- 10
- 11
- 12
- 13
- 14
- 15
- 16
- 17
- 18
- 19
- 20
- 21
- 22
- 23
- 24
- 25
- 26
- 27
- 28
- 29
- 30
- 31
- 32
- 33
- 34
- 35
- 36
- 37
- 38
- 39
- 40
- 41
- 42
- 43
- 44
- 45
- 46
- 47
- 48
- 49
你也可以使用isAuthenticated(),只是我这儿用permitAll在没有身份验证的情况下也可以访问,便于我测试,但是不建议像我这样做让端点不受保护,在真实场景下,最好对这个端点使用身份验证。
除了使这个端点可访问之外,如果还决定只允许经过身份验证的访问,就需要为资源服务器本身注册一个客户端。对于授权服务器而言,资源服务器也是客户端,并且也需要它自己的凭据。需要像添加到其他客户端那样添加它,对于资源服务器,则不需要任何授权类型或作用域,只需要资源服务器用于调用check_token端点的一组凭据即可。
所以我修改了下上次注册客户端的接口,让他们也可以自行输入clientId和clientSecret:public OAuth2Client createOAuth2Client(OAuth2Client oAuth2Client){ String clientId = oAuth2Client.getClientId(); if(CharSequenceUtil.isBlank(clientId)){ clientId = getClientIdUnique(oAuth2Client); } String clientSecret = oAuth2Client.getClientSecret(); if(CharSequenceUtil.isBlank(clientSecret)) { clientSecret = RandomUtil.randomString(16); } String clientSecretEncoded = passwordEncoder.encode(clientSecret); oAuth2Client.setClientId(clientId); oAuth2Client.setClientSecret(clientSecretEncoded); oAuth2ClientMapper.insert(oAuth2Client); oAuth2Client.setClientSecret(clientSecret); return oAuth2Client; }- 1
- 2
- 3
- 4
- 5
- 6
- 7
- 8
- 9
- 10
- 11
- 12
- 13
- 14
- 15
- 16
然后到postman调用注册客户端的接口,cleintId就取名为resourceServer,clientSecret就为resourceServerSecret
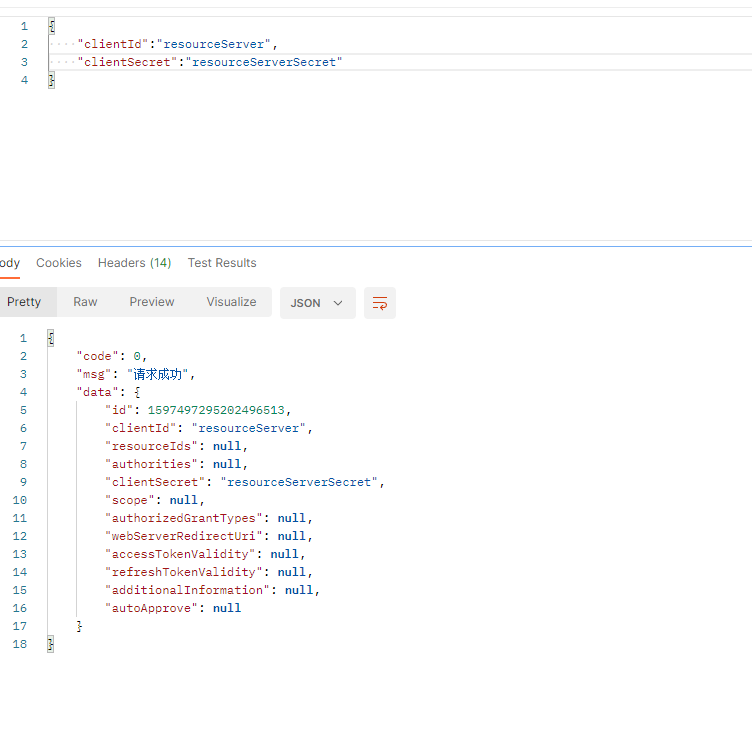
并且入库,且对clientecret加密。
现在启动授权服务器并获得一个令牌,就想之前授权服务器那样,直接通过postman调用,随便你使用某一种方式都行,这里我为了方便就选择密码授权模式

接下来要调用check_token端点查找前面的代码片段中所获得的访问令牌的详细信息。这一调用是这样的:
观察从check_token端点返回的响应。其中包含关于访问令牌所需的所有详细信息:- 该令牌是否仍然有效并且何时过期
- 该令牌是为哪个用户颁发的
- 表示权利的权限
- 该令牌是为哪个客户颁发的
现在,如果使用postman调用端点,则资源服务器应该能够用它验证令牌了。还需要配置授权服务器的端点和资源服务器用于访问端点的凭据。可以在application.yaml文件中完成所有这些配置。以下就是配置文件的代码:
server: port: 9091 security: oauth2: resource: token-info-uri: http://localhost:9090/oauth/check_token client: client-id: resourceServer client-secret: resourceServerSecret- 1
- 2
- 3
- 4
- 5
- 6
- 7
- 8
- 9
ps:在对/oauth/check_token(令牌自省)端点使用身份验证时,资源服务器将充当授权服务器的客户端。由于这个原因,它就需要注册一些凭据,在调用自省端点时,它将是=使用这些凭据利用HTTP Basic身份验证进行身份验证。
现在可以通过调用/hello端点运行该应用程序和测试整个设置。需要在请求的Authorization头信息中设置访问令牌,并且需要在其值前面加上带有单次bearer的前缀。对于这个单词来说,其大小写是不区分的。这就意味着也可以写作“bearer”或者“BEARER”。

如果在没有令牌或使用错误令牌的情况下调用了端点,那么其结果将是HTTP响应上出现401 Unauthorized状态。例如我现在不传Authorization这个请求头,下面的代码片段给出了该响应:

又或者我传了一个错误的令牌:

-
相关阅读:
链表:C++实现
Ruby 注释
计算机网络---TCP流量控制和拥塞控制
网络安全(黑客)自学
低代码选型应该注重哪些方面的能力?
设计原则之【接口隔离原则】
字节秋招高频算法汇总(基础篇)
基于 I2C 协议的 AD实验(附代码)
7月 致 -.-- -..- -
mysql 基础知识
- 原文地址:https://blog.csdn.net/qq_44754515/article/details/128132263