-
Sentinel原理分析
1.概述
Sentinel(分布式系统的流量防卫兵)是阿里开源的一套用于服务容错的综合性解决方案;Sentinel是面向分布式服务架构的轻量级流量控制组件,主要以流量为切入点,从限流、流量整形、熔断降级、系统负载保护等多个维度来帮助您保障微服务的稳定性;本质要做的就是两件事:
①.
统计数据:统计某个资源的访问数据(QPS, RT等信息);②.
规则判断:判断限流规则, 隔离规则, 降级规则, 熔断规则是否满足;这里的
资源就是希望被Sentinel保护的业务,例如项目中定义的controller方法就是默认被Sentinel保护的资源;2.ProcessorSlotChain
实现上述功能的核心骨架是一个叫做ProcessorSlotChain的类.这个类基于
责任链模式来设计,将不同的功能(限流,降级,系统保护)封装为一个个的Slot,请求进入后逐个执行即可;工作流程如图:
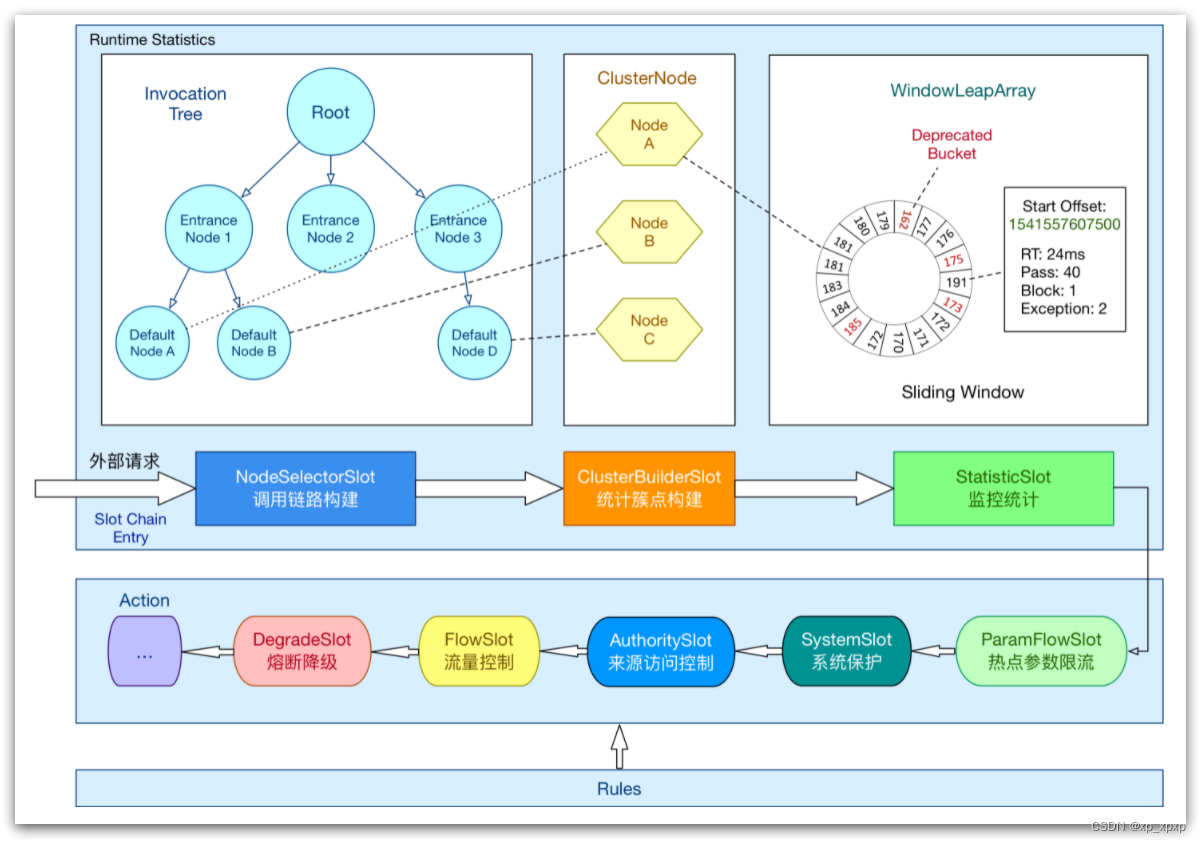
责任链中的Slot也分为两大类:
①.统计数据构建部分(statistic)
- NodeSelectorSlot: 负责构建簇点链路中的节点(DefaultNode),将这些节点形成链路树;
- ClusterBuilderSlot: 负责构建某个资源的ClusterNode,ClusterNode可以保存资源的运行信息(响应时间, QPS, block 数目, 线程数, 异常数等)以及来源信息(origin名称);
- StatisticSlot: 负责统计实时调用数据,包括运行信息, 来源信息等;
②.规则判断部分(rule checking)
- AuthoritySlot: 负责授权规则(来源控制);
- SystemSlot: 负责系统保护规则;
- ParamFlowSlot: 负责热点参数限流规则;
- FlowSlot: 负责限流规则;
- DegradeSlot: 负责降级规则;
3.Node
Sentinel中的
簇点链路是由一个个的Node组成的,Node是一个接口,包括下面的实现:

所有的节点都可以记录对资源的访问统计数据,所以
都是StatisticNode的子类;按照作用分为两类Node:
- DefaultNode: 代表链路树中的每一个资源,一个资源出现在不同链路中时,会创建不同的DefaultNode节点.而链路树的入口节点叫EntranceNode,是一种特殊的DefaultNode;
- ClusterNode: 代表资源,一个资源不管出现在多少链路中,只会有一个ClusterNode.记录的是当前资源被访问的所有统计数据之和;
DefaultNode记录的是资源在当前链路中的访问数据,用来实现基于链路模式的限流规则;ClusterNode记录的是资源在所有链路中的访问数据,实现默认模式,关联模式的限流规则;例如: 我们在一个SpringMVC项目中,有两个业务:
业务1: controller中的资源
/order/query访问了service中的资源/goods;业务2: controller中的资源
/order/save访问了service中的资源/goods;创建的链路如下:

4.Entry
默认情况下,Sentinel会将controller中的方法作为被保护资源,那么问题来了,我们该如何将自己的一段代码标记为一个Sentinel的资源呢?
Sentinel中的资源用Entry来表示,声明Entry的API示例:// 资源名可使用任意有业务语义的字符串,比如方法名、接口名或其它可唯一标识的字符串 try (Entry entry = SphU.entry("resourceName")) { // 被保护的业务逻辑 // do something here... } catch (BlockException ex) { // 资源访问阻止,被限流或被降级 // 在此处进行相应的处理操作 }- 1
- 2
- 3
- 4
- 5
- 6
- 7
- 8
- 9
- 10
4.1.自定义资源
例如,我们在order-service服务中,将
OrderService的queryOrderById()方法标记为一个资源;①.首先在order-service中引入sentinel依赖
<dependency> <groupId>com.alibaba.cloudgroupId> <artifactId>spring-cloud-starter-alibaba-sentinelartifactId> dependency>- 1
- 2
- 3
- 4
- 5
②.然后配置Sentinel地址
spring: cloud: sentinel: transport: dashboard: localhost:8089 # 这里我的sentinel用了8089的端口- 1
- 2
- 3
- 4
- 5
③.修改OrderService类的queryOrderById方法
public Order queryOrderById(Long orderId) { // 创建Entry,标记资源,资源名为resource1 try (Entry entry = SphU.entry("resource1")) { // 1.查询订单,这里是假数据 Order order = Order.build(101L, 4999L, "小米 MIX4", 1, 1L, null); // 2.查询用户,基于Feign的远程调用 User user = userClient.findById(order.getUserId()); // 3.设置 order.setUser(user); // 4.返回 return order; }catch (BlockException e){ log.error("被限流或降级", e); return null; } }- 1
- 2
- 3
- 4
- 5
- 6
- 7
- 8
- 9
- 10
- 11
- 12
- 13
- 14
- 15
- 16
- 17
- 18
- 19
④.在浏览器上访问接口,然后打开Sentinel控制台,查看簇点链路

4.2.基于注解标记资源
通过给方法添加@SentinelResource注解的形式来标记资源

这个是怎么实现的呢?
来看下我们引入的Sentinel依赖包:

其中的spring.factories文件中就是自动装配的配置类,内容如下:

我们来看下
SentinelAutoConfiguration这个类:
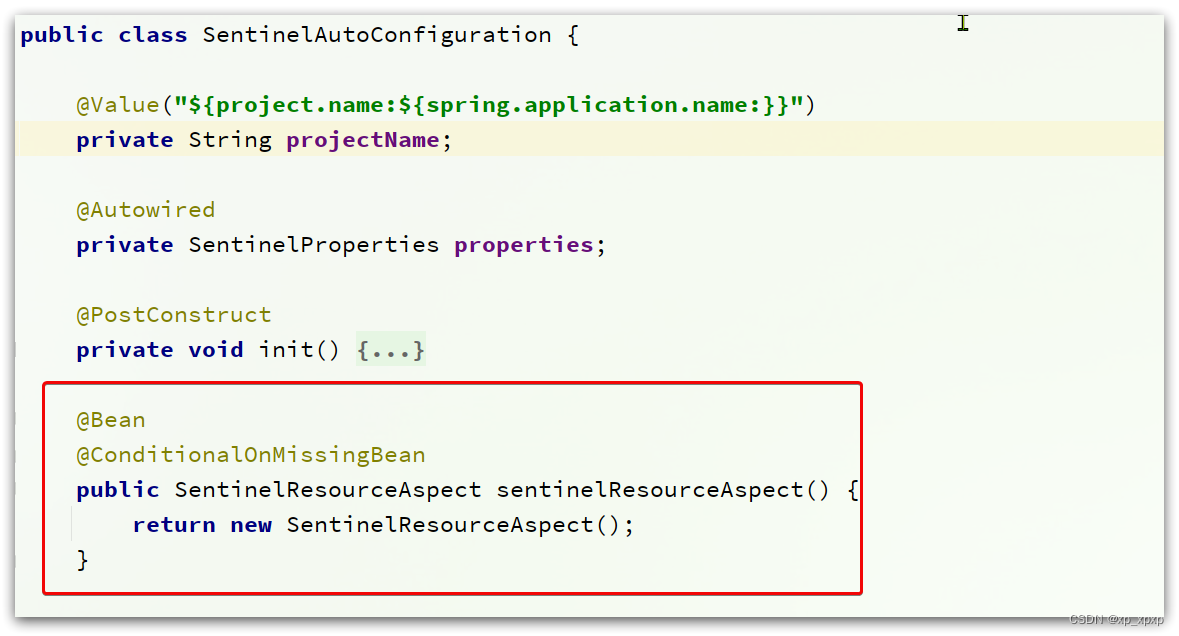
可以看到,在这里声明了一个Bean-
SentinelResourceAspect:@Aspect public class SentinelResourceAspect extends AbstractSentinelAspectSupport { // 切点是添加了 @SentinelResource注解的类 @Pointcut("@annotation(com.alibaba.csp.sentinel.annotation.SentinelResource)") public void sentinelResourceAnnotationPointcut() { } // 环绕增强 @Around("sentinelResourceAnnotationPointcut()") public Object invokeResourceWithSentinel(ProceedingJoinPoint pjp) throws Throwable { // 获取受保护的方法 Method originMethod = resolveMethod(pjp); // 获取 @SentinelResource注解 SentinelResource annotation = originMethod.getAnnotation(SentinelResource.class); if (annotation == null) { // Should not go through here. throw new IllegalStateException("Wrong state for SentinelResource annotation"); } // 获取注解上的资源名称 String resourceName = getResourceName(annotation.value(), originMethod); EntryType entryType = annotation.entryType(); int resourceType = annotation.resourceType(); Entry entry = null; try { // 创建资源 Entry entry = SphU.entry(resourceName, resourceType, entryType, pjp.getArgs()); // 执行受保护的方法 Object result = pjp.proceed(); return result; } catch (BlockException ex) { return handleBlockException(pjp, annotation, ex); } catch (Throwable ex) { Class<? extends Throwable>[] exceptionsToIgnore = annotation.exceptionsToIgnore(); // The ignore list will be checked first. if (exceptionsToIgnore.length > 0 && exceptionBelongsTo(ex, exceptionsToIgnore)) { throw ex; } if (exceptionBelongsTo(ex, annotation.exceptionsToTrace())) { traceException(ex); return handleFallback(pjp, annotation, ex); } // No fallback function can handle the exception, so throw it out. throw ex; } finally { if (entry != null) { entry.exit(1, pjp.getArgs()); } } } }- 1
- 2
- 3
- 4
- 5
- 6
- 7
- 8
- 9
- 10
- 11
- 12
- 13
- 14
- 15
- 16
- 17
- 18
- 19
- 20
- 21
- 22
- 23
- 24
- 25
- 26
- 27
- 28
- 29
- 30
- 31
- 32
- 33
- 34
- 35
- 36
- 37
- 38
- 39
- 40
- 41
- 42
- 43
- 44
- 45
- 46
- 47
- 48
- 49
- 50
- 51
- 52
- 53
- 54
- 55
- 56
- 57
- 58
- 59
- 60
- 61
- 62
简单来说,@SentinelResource注解就是一个标记,而
Sentinel基于AOP思想,对被标记的方法做环绕增强,完成资源(Entry)的创建;5.Context
①.在上面Sentinel控制台中我们发现簇点链路中除了controller方法, service方法两个资源外,还多了一个
默认的入口节点sentinel_spring_web_context,这是一个EntranceNode类型的节点,而且是在初始化Context的时候由Sentinel帮我们创建的;5.1.什么是Context
①.
Context 代表调用链路上下文,贯穿一次调用链路中的所有资源(Entry),基于ThreadLocal;②.Context 维持着入口节点(
entranceNode), 本次调用链路的 curNode(当前资源节点), 调用来源(origin)等信息;③.后续的Slot都可以通过Context拿到DefaultNode或者ClusterNode,从而获取统计数据,完成规则判断;
④.Context初始化的过程中,会创建EntranceNode,contextName就是EntranceNode的名称;
对应的API如下:
// 创建context,包含两个参数:context名称,来源名称 ContextUtil.enter("contextName", "originName");- 1
- 2
5.2.Context的初始化
那么这个Context又是在何时完成初始化的呢?
5.2.1.自动装配
打开Sentinel依赖中的
spring.factories文件,里面是自动装配的类:

先看SentinelWebAutoConfiguration这个类:

这个类
实现了WebMvcConfigurer接口,我们知道这个是SpringMVC自定义配置用到的类,可以配置HandlerInterceptor:
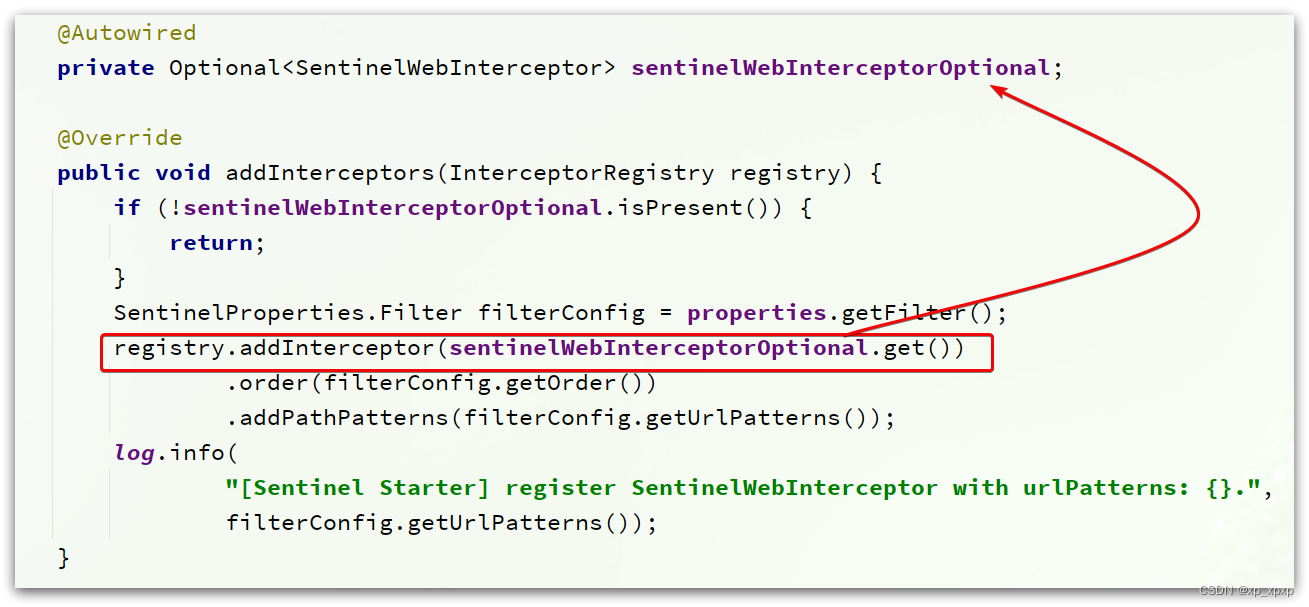
可以看到这里配置了一个
SentinelWebInterceptor的拦截器.SentinelWebInterceptor的声明如下:

它继承了
AbstractSentinelInterceptor这个类

HandlerInterceptor拦截器会拦截一切进入controller的方法,执行preHandle前置拦截方法,而Context的初始化就是在这里完成的;5.2.2.AbstractSentinelInterceptor
看看这个类的
preHandle实现:@Override public boolean preHandle(HttpServletRequest request, HttpServletResponse response, Object handler) throws Exception { try { // 获取资源名称,一般是controller方法的@RequestMapping路径,例如/order/{orderId} String resourceName = getResourceName(request); if (StringUtil.isEmpty(resourceName)) { return true; } // 从request中获取请求来源,将来做授权规则判断时会用 String origin = parseOrigin(request); // 获取 contextName,默认是sentinel_spring_web_context String contextName = getContextName(request); // 创建 Context ContextUtil.enter(contextName, origin); // 创建资源,名称就是当前请求的controller方法的映射路径 Entry entry = SphU.entry(resourceName, ResourceTypeConstants.COMMON_WEB, EntryType.IN); request.setAttribute(baseWebMvcConfig.getRequestAttributeName(), entry); return true; } catch (BlockException e) { try { handleBlockException(request, response, e); } finally { ContextUtil.exit(); } return false; } }- 1
- 2
- 3
- 4
- 5
- 6
- 7
- 8
- 9
- 10
- 11
- 12
- 13
- 14
- 15
- 16
- 17
- 18
- 19
- 20
- 21
- 22
- 23
- 24
- 25
- 26
- 27
- 28
- 29
- 30
- 31
- 32
- 33
- 34
- 35
5.2.3.ContextUtil
创建Context的方法就是
ContextUtil.enter(contextName, origin);进入该方法:
public static Context enter(String name, String origin) { if (Constants.CONTEXT_DEFAULT_NAME.equals(name)) { throw new ContextNameDefineException( "The " + Constants.CONTEXT_DEFAULT_NAME + " can't be permit to defined!"); } return trueEnter(name, origin); }- 1
- 2
- 3
- 4
- 5
- 6
- 7
- 8
- 9
进入
trueEnter方法:protected static Context trueEnter(String name, String origin) { // 尝试获取context Context context = contextHolder.get(); // 判空 if (context == null) { // 如果为空,开始初始化 Map<String, DefaultNode> localCacheNameMap = contextNameNodeMap; // 尝试获取入口节点 DefaultNode node = localCacheNameMap.get(name); if (node == null) { LOCK.lock(); try { node = contextNameNodeMap.get(name); if (node == null) { // 入口节点为空,初始化入口节点EntranceNode node = new EntranceNode(new StringResourceWrapper(name, EntryType.IN), null); // 添加入口节点到ROOT Constants.ROOT.addChild(node); // 将入口节点放入缓存 Map<String, DefaultNode> newMap = new HashMap<>(contextNameNodeMap.size() + 1); newMap.putAll(contextNameNodeMap); newMap.put(name, node); contextNameNodeMap = newMap; } } finally { LOCK.unlock()- 1
- 2
- 3
- 4
- 5
- 6
- 7
- 8
- 9
- 10
- 11
- 12
- 13
- 14
- 15
- 16
- 17
- 18
- 19
- 20
- 21
- 22
- 23
- 24
- 25
- 26
- 27
- 28
- 29
- 30
- 31
-
相关阅读:
springcloud 知识总结
idea compile项目正常,启动项目的时候build失败,报“找不到符号”等问题
对产品实现汇率换算服务(将两个CompletableFuture对象整合起来,无论它们是否存在依赖)
2022 年坑过我的 JAVA 面试题
Git推送和拉取Github
进入docker容器命令行
路由组件构建方案(分库分表)V1
Python入门教程 | Python3 网络编程
携手同行,共赴未来......
华为OD机考算法题:字符串解密
- 原文地址:https://blog.csdn.net/xp_xpxp/article/details/128122737
