-
Vue脚手架Ⅲ(浏览器本地存储,Vue中的自定义事件,全局事件总线,消息订阅与发布(pubsub),nextTick,Vue封装的过度与动画)
脚手架
3.10 浏览器本地存储
js 就有这个功能,没必要在.vue里面分析,不用脚手架,直接在htnl文件。
webStorage
sessionStorage 和 localStorage 统称为 webStorage
-
存储内容大小一般支持5MB左右(不同浏览器可能还不一样)
-
浏览器端通过 Window.sessionStorage 和 Window.localStorage 属性来实现本地存储机制。(可以对比游戏存档,如果想关闭后第二天接着之前的玩就是localStorage)
-
相关API:
-
xxxxxStorage.setItem('key', 'value');
该方法接受一个键和值作为参数,会把键值对添加到存储中,如果键名存在,则更新其对应的值。(设置) -
xxxxxStorage.getItem('person'); 该方法接受一个键名作为参数,返回键名对应的值。(读取)
-
xxxxxStorage.removeItem('key'); 该方法接受一个键名作为参数,并把该键名从存储中删除。
-
xxxxxStorage.clear() 该方法会清空存储中的所有数据。
-
-
备注:
- SessionStorage存储的内容会随着浏览器窗口关闭而消失。(Session 会话控制 这里就是 会话结束了就关闭消失了)
- LocalStorage存储的内容,需要手动清除才会消失。(浏览器关闭了数据也不会消失)
xxxxxStorage.getItem(xxx)如果xxx对应的value获取不到,那么getItem的返回值是null。JSON.parse(null)的结果依然是null。
例:搜索里面搜东西时,下面就会出现之前搜索过的

案例:
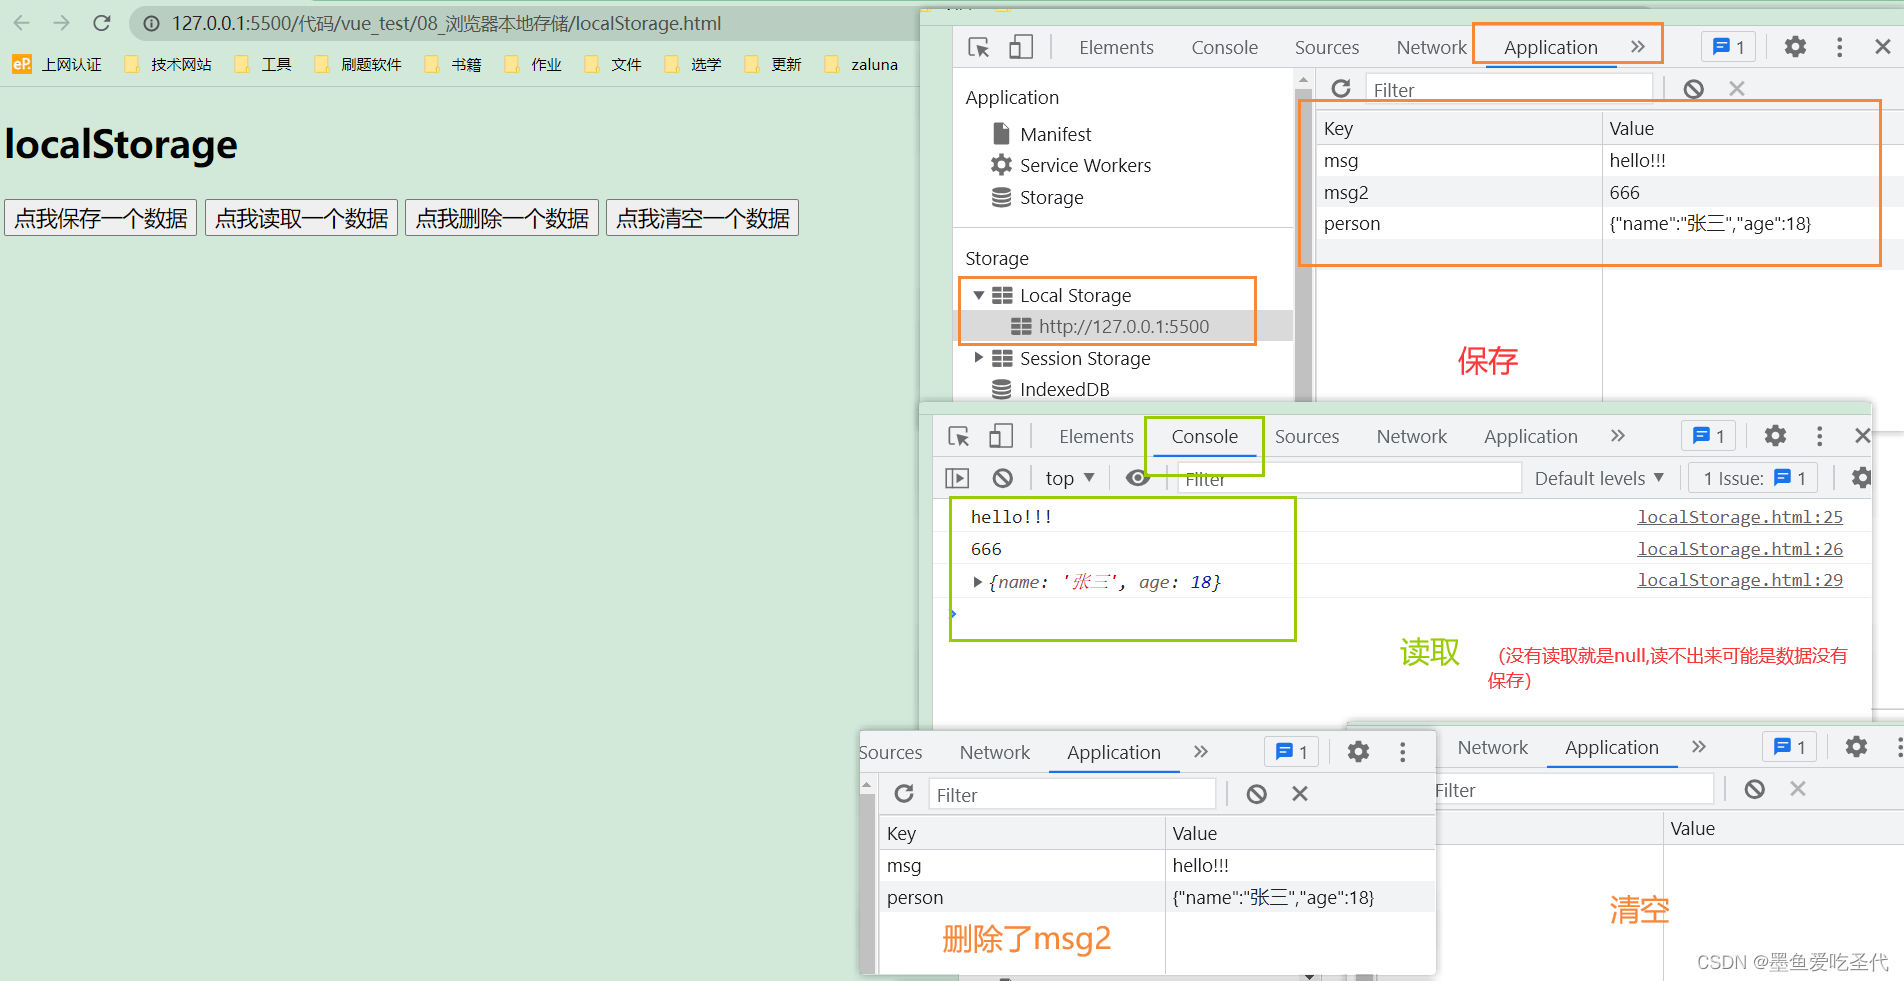
localStorage.htmlDOCTYPE html> <html> <head> <meta charset="UTF-8" /> <title>localStoragetitle> head> <body> <h2>localStorageh2> <button onclick="saveData()">点我保存一个数据button> <button onclick="readData()">点我读取一个数据button> <button onclick="deleteData()">点我删除一个数据button> <button onclick="deleteAllData()">点我清空一个数据button> <script type="text/javascript" > let p = {name:'张三',age:18} function saveData(){ localStorage.setItem('msg','hello!!!') // 这个666显示的是黑色的,是字符(数字型转换成了字符型)(蓝色的显示是字符) localStorage.setItem('msg2',666) // 把对象变成字符串 localStorage.setItem('person',JSON.stringify(p)) } function readData(){ console.log(localStorage.getItem('msg')) console.log(localStorage.getItem('msg2')) const result = localStorage.getItem('person') console.log(JSON.parse(result)) // console.log(localStorage.getItem('msg3')) } function deleteData(){ localStorage.removeItem('msg2') } function deleteAllData(){ localStorage.clear() } script> body> html>- 1
- 2
- 3
- 4
- 5
- 6
- 7
- 8
- 9
- 10
- 11
- 12
- 13
- 14
- 15
- 16
- 17
- 18
- 19
- 20
- 21
- 22
- 23
- 24
- 25
- 26
- 27
- 28
- 29
- 30
- 31
- 32
- 33
- 34
- 35
- 36
- 37
- 38
- 39
- 40
- 41
操作显示:
SessionStorage.html
把上面的代码中,搜索localStorage全部换成SessionStorage
DOCTYPE html> <html> <head> <meta charset="UTF-8" /> <title>sessionStoragetitle> head> <body> <h2>sessionStorageh2> <button onclick="saveData()">点我保存一个数据button> <button onclick="readData()">点我读取一个数据button> <button onclick="deleteData()">点我删除一个数据button> <button onclick="deleteAllData()">点我清空一个数据button> <script type="text/javascript" > let p = {name:'张三',age:18} function saveData(){ sessionStorage.setItem('msg','hello!!!') sessionStorage.setItem('msg2',666) sessionStorage.setItem('person',JSON.stringify(p)) } function readData(){ console.log(sessionStorage.getItem('msg')) console.log(sessionStorage.getItem('msg2')) const result = sessionStorage.getItem('person') console.log(JSON.parse(result)) // console.log(sessionStorage.getItem('msg3')) } function deleteData(){ sessionStorage.removeItem('msg2') } function deleteAllData(){ sessionStorage.clear() } script> body> html>- 1
- 2
- 3
- 4
- 5
- 6
- 7
- 8
- 9
- 10
- 11
- 12
- 13
- 14
- 15
- 16
- 17
- 18
- 19
- 20
- 21
- 22
- 23
- 24
- 25
- 26
- 27
- 28
- 29
- 30
- 31
- 32
- 33
- 34
- 35
- 36
- 37
- 38
- 39
显示:

3.11 Vue中的自定义事件
-
一种组件间通信的方式,适用于:子组件 ===> 父组件
-
使用场景:A是父组件,B是子组件,B想给A传数据,那么就要在A中给B绑定自定义事件(事件的回调在A中)。
-
绑定自定义事件:
-
第一种方式,在父组件中:
-
第二种方式,在父组件中:
<Demo ref="demo"/> ...... mounted(){ this.$refs.xxx.$on('atguigu',this.test) }- 1
- 2
- 3
- 4
- 5
-
若想让自定义事件只能触发一次,可以使用
once修饰符,或$once方法。
-
-
触发自定义事件:
this.$emit('atguigu',数据) -
解绑自定义事件
this.$off('atguigu') -
组件上也可以绑定原生DOM事件,需要使用
native修饰符。 -
注意:通过
this.$refs.xxx.$on('atguigu',回调)绑定自定义事件时,回调要么配置在methods中,要么用箭头函数,否则this指向会出问题!
案例:
(思路书写顺序在代码中)App.vue
{{msg}},学生姓名是:{{studentName}}
- 1
- 2
- 3
- 4
- 5
- 6
- 7
- 8
- 9
- 10
- 11
- 12
- 13
- 14
- 15
- 16
- 17
- 18
- 19
- 20
- 21
- 22
- 23
- 24
- 25
- 26
- 27
- 28
- 29
- 30
- 31
- 32
- 33
- 34
- 35
- 36
- 37
- 38
- 39
- 40
- 41
- 42
- 43
- 44
- 45
- 46
- 47
- 48
- 49
- 50
- 51
- 52
- 53
- 54
- 55
- 56
- 57
- 58
- 59
- 60
Student.vue
学生姓名:{{name}}
学生性别:{{sex}}
当前求和为:{{number}}
- 1
- 2
- 3
- 4
- 5
- 6
- 7
- 8
- 9
- 10
- 11
- 12
- 13
- 14
- 15
- 16
- 17
- 18
- 19
- 20
- 21
- 22
- 23
- 24
- 25
- 26
- 27
- 28
- 29
- 30
- 31
- 32
- 33
- 34
- 35
- 36
- 37
- 38
- 39
- 40
- 41
- 42
- 43
- 44
- 45
- 46
- 47
- 48
- 49
School.vue
学校名称:{{name}}
学校地址:{{address}}
- 1
- 2
- 3
- 4
- 5
- 6
- 7
- 8
- 9
- 10
- 11
- 12
- 13
- 14
- 15
- 16
- 17
- 18
- 19
- 20
- 21
- 22
- 23
- 24
- 25
- 26
- 27
- 28
- 29
- 30
- 31
- 32
- 33
- 34
- 35
- 36
效果

3.12 全局事件总线
任意组件间通信
-
一种组件间通信的方式,适用于任意组件间通信。
-
安装全局事件总线:
bus 有总线的意思
new Vue({ ...... beforeCreate() { Vue.prototype.$bus = this //安装全局事件总线,$bus就是当前应用的vm 全局都能看到这个$bus }, ...... })- 1
- 2
- 3
- 4
- 5
- 6
- 7
-
使用事件总线:
-
接收数据:A组件想接收数据,则在A组件中给$bus绑定自定义事件,事件的回调留在A组件自身。
methods(){ demo(data){......} } ...... mounted() { this.$bus.$on('xxxx',this.demo) }- 1
- 2
- 3
- 4
- 5
- 6
- 7
-
提供数据:
this.$bus.$emit('xxxx',数据)
-
-
最好在beforeDestroy钩子中,用$off去解绑当前组件所用到的事件。

如上图,我们通过一个x作为中间商,我们需要的是:
-
要让其他的人都能看到x (在js里面定义,我们用$bus)
-
能调用到
$on$off$emit
案例:(Student组件 提供数据给 School组件)
思路分析
- 先安装全局事件总线在main.js
- 弄清楚谁收数据谁发数据
- 收数据的人去绑定事件总线(mount一挂载就绑定最合适)
this.$bus找到全局事件总线this.$bus.$on给他绑定一个hello事件,如果有一天这个hello事件触发,就会调用后面的回调函数mounted() { this.$bus.$on('hello',(data)=>{ console.log('我是School组件,收到了数据',data) }) },- 1
- 2
- 3
- 4
- 5
- 在组件即将销毁的时候解绑,在当前的组件使用beforeDestroy
- 收数据的写完之后,就去发数据的组件写。在发数据的人那里去触发这个事件,
this.$bus找到这个人,this.$bus.$emit去触发这个hello事件,然后把后面的this.name带过去methods: { sendStudentName(){ this.$bus.$emit('hello',this.name) } },- 1
- 2
- 3
- 4
- 5
main.js
//引入Vue import Vue from 'vue' //引入App import App from './App.vue' //关闭Vue的生产提示 Vue.config.productionTip = false //创建vm new Vue({ el:'#app', render: h => h(App), beforeCreate() { Vue.prototype.$bus = this //安装全局事件总线 }, })- 1
- 2
- 3
- 4
- 5
- 6
- 7
- 8
- 9
- 10
- 11
- 12
- 13
- 14
- 15
School.vue
学校名称:{{name}}
学校地址:{{address}}
- 1
- 2
- 3
- 4
- 5
- 6
- 7
- 8
- 9
- 10
- 11
- 12
- 13
- 14
- 15
- 16
- 17
- 18
- 19
- 20
- 21
- 22
- 23
- 24
- 25
- 26
- 27
- 28
- 29
- 30
- 31
- 32
- 33
- 34
Student.vue
学生姓名:{{name}}
学生性别:{{sex}}
- 1
- 2
- 3
- 4
- 5
- 6
- 7
- 8
- 9
- 10
- 11
- 12
- 13
- 14
- 15
- 16
- 17
- 18
- 19
- 20
- 21
- 22
- 23
- 24
- 25
- 26
- 27
- 28
- 29
- 30
- 31
- 32
- 33
- 34
- 35
- 36
beforeCreate生命周期钩子 最开头的 这个时候模板还没有解析,借助这个,把要做的做好了,原型放好了,模板就开始解析。其实等子组件School执行的时候,该放的东西也放好了
所有人都在用$bus 以后要是不用了,占用着不好,所以需要销毁 使用beforeDestroy
有$bus 想得数据得数据,想发数据发数据
父传子的时候我们还是用props比较方便
3.13 消息订阅与发布(pubsub)
需要数据的订阅消息,提供数据的发布消息。一般在vue里面用的很少,因为可以使用全局事件总线
pubsub — publish subscribe
-
一种组件间通信的方式,适用于任意组件间通信。
-
使用步骤:
-
安装pubsub:
npm i pubsub-js -
引入:
import pubsub from 'pubsub-js' -
接收数据:A组件想接收数据,则在A组件中订阅消息,订阅的回调留在A组件自身。
methods(){ demo(data){......} } ...... mounted() { this.pid = pubsub.subscribe('xxx',this.demo) //订阅消息 }- 1
- 2
- 3
- 4
- 5
- 6
- 7
-
提供数据:
pubsub.publish('xxx',数据) -
最好在beforeDestroy钩子中,用
PubSub.unsubscribe(pid)去取消订阅。
-
3.14 nextTick
- 语法:
this.$nextTick(回调函数) - 作用:在下一次 DOM 更新结束后执行其指定的回调。
- 什么时候用:当改变数据后,要基于更新后的新DOM进行某些操作时,要在nextTick所指定的回调函数中执行。
3.15 Vue封装的过度与动画
案例:(左右隐藏显示效果)

3.15.1 动画效果
- 先写出普通结构效果
Test.vue

App.vue

目前实现的效果是简单的隐藏和显示,没有移动效果
- 写出动画效果
不用写两个动画,进入离开,写一个就行,写来,另外一个反着就行
Test.vue
你好啊!
- 1
- 2
- 3
- 4
- 5
- 6
- 7
- 8
- 9
- 10
- 11
- 12
- 13
- 14
- 15
- 16
- 17
- 18
- 19
- 20
- 21
- 22
- 23
- 24
- 25
- 26
- 27
- 28
- 29
- 30
- 31
- 32
- 33
- 34
- 35
- 36
- 37
- 38
- 39
- 40
- 41
- 42
3.15.2 过度效果
Test2.vue
你好啊!
尚硅谷!
- 1
- 2
- 3
- 4
- 5
- 6
- 7
- 8
- 9
- 10
- 11
- 12
- 13
- 14
- 15
- 16
- 17
- 18
- 19
- 20
- 21
- 22
- 23
- 24
- 25
- 26
- 27
- 28
- 29
- 30
- 31
- 32
- 33
- 34
- 35
- 36
- 37
- 38
3.15.3 多个元素过度
使用
transition-group和 key值3.15.4 集成第三方动画
使用npm里面的库,搜索animate.css,这是一个成型库,开箱即用


往下翻之后,按照流程

使用
Test3.vue
你好啊!
尚硅谷!
- 1
- 2
- 3
- 4
- 5
- 6
- 7
- 8
- 9
- 10
- 11
- 12
- 13
- 14
- 15
- 16
- 17
- 18
- 19
- 20
- 21
- 22
- 23
- 24
- 25
- 26
- 27
- 28
- 29
- 30
- 31
- 32
- 33
- 34
效果

3.15.5 总结过度和动画
-
作用:在插入、更新或移除 DOM元素时,在合适的时候给元素添加样式类名。
-
图示:

-
写法:
-
准备好样式:(自己写或者使用第三方库)
- 元素进入的样式:
- v-enter:进入的起点
- v-enter-active:进入过程中
- v-enter-to:进入的终点
- 元素离开的样式:
4. v-leave:离开的起点
5. v-leave-active:离开过程中
6. v-leave-to:离开的终点
- 元素进入的样式:
-
使用
你好啊!
- 1
- 2
- 3
-
备注:若有多个元素需要过度,则需要使用:
key值。
-
-
-
相关阅读:
多进程间通信学习之无名管道
如何将项目部署到服务器上(全套教程)
【unity】Timeline自定义轨道
Application of Intelligent Motor Protector in Yeme
大学生简单个人静态HTML网页设计作品 DIV布局个人介绍网页模板代码 DW学生个人网站制作成品下载
minio对象存储
从0到1搭建推荐系统
leetcode第145题python版二叉树后序遍历迭代法
利用python连接linux虚机并执行命令
STM32CubeMX 学习(5)输入捕获实验
- 原文地址:https://blog.csdn.net/weixin_51249285/article/details/128040878
