-
【Linux】文件描述符
🌈前言
本篇文章进行操作系统中文件描述符的学习!!!
🌷1、文件的概念
概念:
-
文件 = 文件内容 + 文件属性,文件属性也是数据,即使我们创建一个空文件,也要占据磁盘空间
-
文件操作 = 文件内容的操作 + 文件属性的操作 – 在操作文件的过程中,有可能既改变了文件的内容,又改变了文件属性。比如:改变内容到一定次数,文件的时间属性也会被修正
-
所谓的“打开”文件,就是将文件的内容和属性加载到内存当中!!! – 冯诺依曼体系结构
-
是不是所有的文件,都会处于被打开状态?绝对不是!没有被打开的文件,在磁盘上静静的存储着
打开的文件(“内存文件”)和“磁盘文件”的区别是什么???
- 内存文件:磁盘文件中的内容和属性大部分被加载到进程当中,就叫做“内存文件”
- 磁盘文件:存储在磁盘中的文件
- 区别:一个是虚拟内存文件,一个是磁盘文件
- 通常我们使用C语言打开文件、访问文件和关闭文件,都是通过fopen、fclose、fread、fwrite…函数来进行操作的!!!
是谁在进行文件相关操作的呢??? 答案是:进程
-
一个程序编译链接好后,会生成一个可执行程序,这时程序还没有被执行,在磁盘中还是一个普通的文件!!!
-
该程序运行时,会被加载到内存当中,然后程序的代码和数据被进程读取,进程会被加入到运行队列
-
当被调度器调度时,会执行进程中程序的代码,这时就会执行相应的文件操作和其他代码
🌹2、文件操作(C语言)
🍡2.1、概念+基本打开关闭操作
文件在读写之前应该先打开文件,在使用结束之后应该关闭文件
//打开文件 FILE * fopen ( const char * filename, const char * mode ); //关闭文件 int fclose ( FILE * stream );- 1
- 2
- 3
- 4
-
函数 fopen 打开文件名为 “filename” 指向的字符串的文件,将一个流与它关联
-
当文件被打开时,会默认打开三个流,分别是:stdin & stdout & stderr(后面理解)
-
仔细观察发现,这三个流的类型都是FILE*, fopen返回值类型,文件指针
-
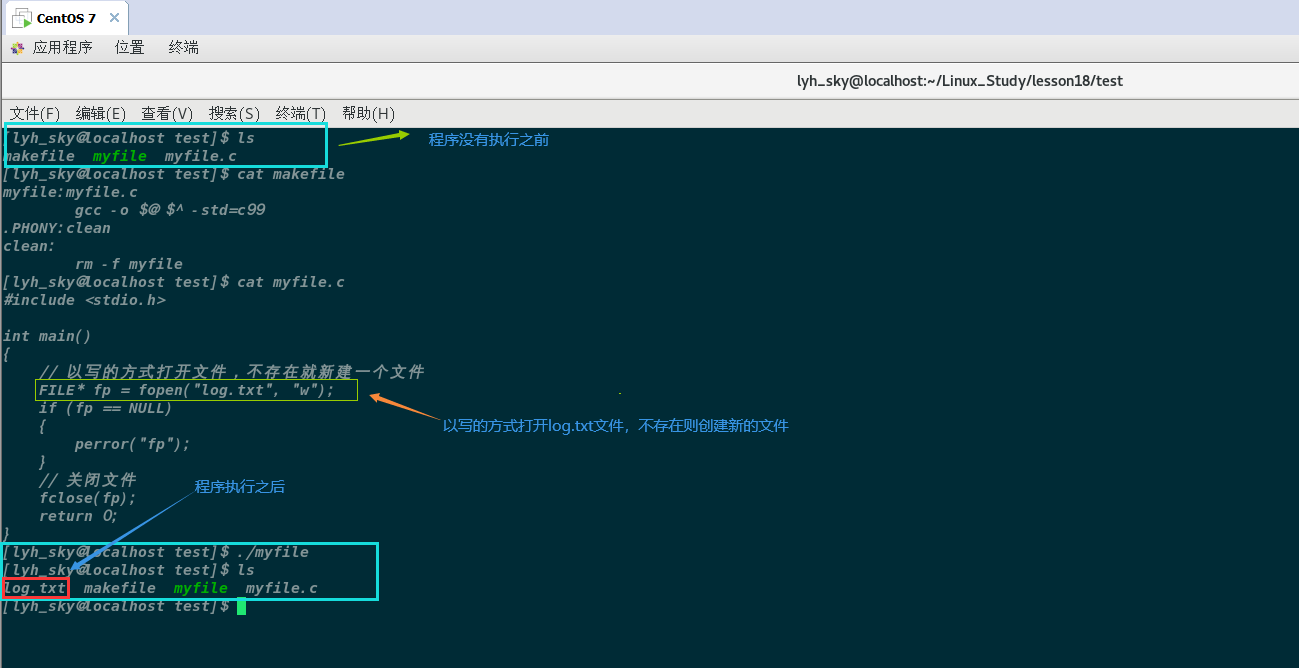
如果filename不存在,则会在”当前路径下“创建新的文件!!!
如何理解”当前路径“???
- 我们都知道程序执行后,会被加载到内存,然后被进程读取
- 当CPU执行到打开文件时,发现文件不存在
- 那么CPU就会在”进程所处的工作路径下创建新的文件“!!!
查看进程中的cwd属性,ls /proc/进程pid
[lyh_sky@localhost test]$ cat myfile.c #include#include #include #include int main() { // 以写的方式打开文件,不存在就新建一个文件 FILE* fp = fopen("log.txt", "w"); if (fp == NULL) { perror("fp"); } // 让该进程一直在运行,方便查看cwd printf("我是一个进程,我的pid: %d\n", getpid()); while (1) {} // 关闭文件 fclose(fp); return 0; } [lyh_sky@localhost test]$ ls log.txt makefile myfile myfile.c // 在当前工作目录创建了新的文件 - 1
- 2
- 3
- 4
- 5
- 6
- 7
- 8
- 9
- 10
- 11
- 12
- 13
- 14
- 15
- 16
- 17
- 18
- 19
- 20
- 21
- 22
- 23
- 24
- 25
- 26

用chdir系统函数修改进程当前所处工作路径,并且在新路径创建文件
[lyh_sky@localhost test]$ cat myfile.c #include#include #include #include int main() { chdir("/home/lyh_sky"); // 以写的方式打开文件,不存在就新建一个文件 FILE* fp = fopen("log.txt", "w"); if (fp == NULL) { perror("fp"); } // 让该进程一直在运行,方便查看cwd printf("我是一个进程,我的pid: %d\n", getpid()); while (1) {} // 关闭文件 fclose(fp); return 0; } // 运行后,然后ctrl + c退出进程,就能看到文本文件存在了 [lyh_sky@localhost test]$ ls /home/lyh_sky -al | grep log.txt -rw-rw-r--. 1 lyh_sky lyh_sky 0 11月 20 23:58 log.txt - 1
- 2
- 3
- 4
- 5
- 6
- 7
- 8
- 9
- 10
- 11
- 12
- 13
- 14
- 15
- 16
- 17
- 18
- 19
- 20
- 21
- 22
- 23
- 24
- 25
- 26
- 27
- 28

🍢2.2、文件的打开方式
- 参数 “mode” 指向一个字符串,以下列序列之一开始 (序列之后可以有附加的字符):
打开方式 作用 指定文件不存在 “r” 打开文本文件,用于读。流被定位于文件的开始 出错 “r+” 打开文本文件,用于读写。流被定位于文件的开始 出错 “w” 将文件长度截断为零,或者创建文本文件,用于写。流被定位于文件的开始 建立新的文件 “w+” 打开文件,用于读写。如果文件不存在就创建它,否则将截断它。流被定位于文件的开始 建立新的文件 “a” 打开文件,用于追加 (在文件尾写)。如果文件不存在就创建它。流被定位于文件的末尾 建立新的文件 “a+” 打开文件,用于追加 (在文件尾写)。如果文件不存在就创建它。读文件的初始位置是文件的开始,但是输出总是被追加到文件的末尾 建立新的文件 实例:以写的方式打开文件,并且关闭文件
#includeint main() { // 以写的方式打开文件,不存在就新建一个文件 FILE* fp = fopen("log.txt", "w"); // 判断是否打开成功 if (fp == NULL) { perror("fp"); } // 关闭文件 fclose(fp); return 0; } - 1
- 2
- 3
- 4
- 5
- 6
- 7
- 8
- 9
- 10
- 11
- 12
- 13
- 14
- 15
注意:当以w的方式打开文件时,如果文件有数据,会被截断清空,并且流被定位到文件的开始!
🍣2.3、文件的读写操作
文件的顺序读写
功能 函数名 适用于 字符输入函数 fgetc 所有输入流 字符输出函数 fputc 所有输出流 文本行输入函数 fgets 所有输入流 文本行输出函数 fputs 所有输出流 格式化输入函数 fscanf 所有输入流 格式化输出函数 fprintf 所有输出流 二进制输入 fread 文件 二进制输出 fwriter 文件 例子一:对文件进行写入数据 – 使用”fprintf“
int fprintf(FILE *stream, const char *format, …);
#include#include #include int main() { // 以写的方式打开文件,不存在就新建一个文件 FILE* fp = fopen("log.txt", "w"); if (fp == NULL) { perror("fp"); } int cnt = 1; while (cnt <= 5) { fprintf(fp, "%d: hello world!!!\n", cnt); ++cnt; } // 关闭文件 fclose(fp); return 0; } - 1
- 2
- 3
- 4
- 5
- 6
- 7
- 8
- 9
- 10
- 11
- 12
- 13
- 14
- 15
- 16
- 17
- 18
- 19
- 20
- 21
- 22
- 23
- 24
例子二:对文件进行读取数据 – 使用”fgets“
#include#include #include #include int main() { // 以读的方式打开文件,不存在会报错 FILE* fp = fopen("log.txt", "r"); if (fp == NULL) { perror("fp"); } // 读取文件数据 char buffer[64]; while(fgets(buffer, sizeof(buffer), fp) != NULL) { printf("%s", buffer); } // 关闭文件 fclose(fp); return 0; } - 1
- 2
- 3
- 4
- 5
- 6
- 7
- 8
- 9
- 10
- 11
- 12
- 13
- 14
- 15
- 16
- 17
- 18
- 19
- 20
- 21
- 22
- 23

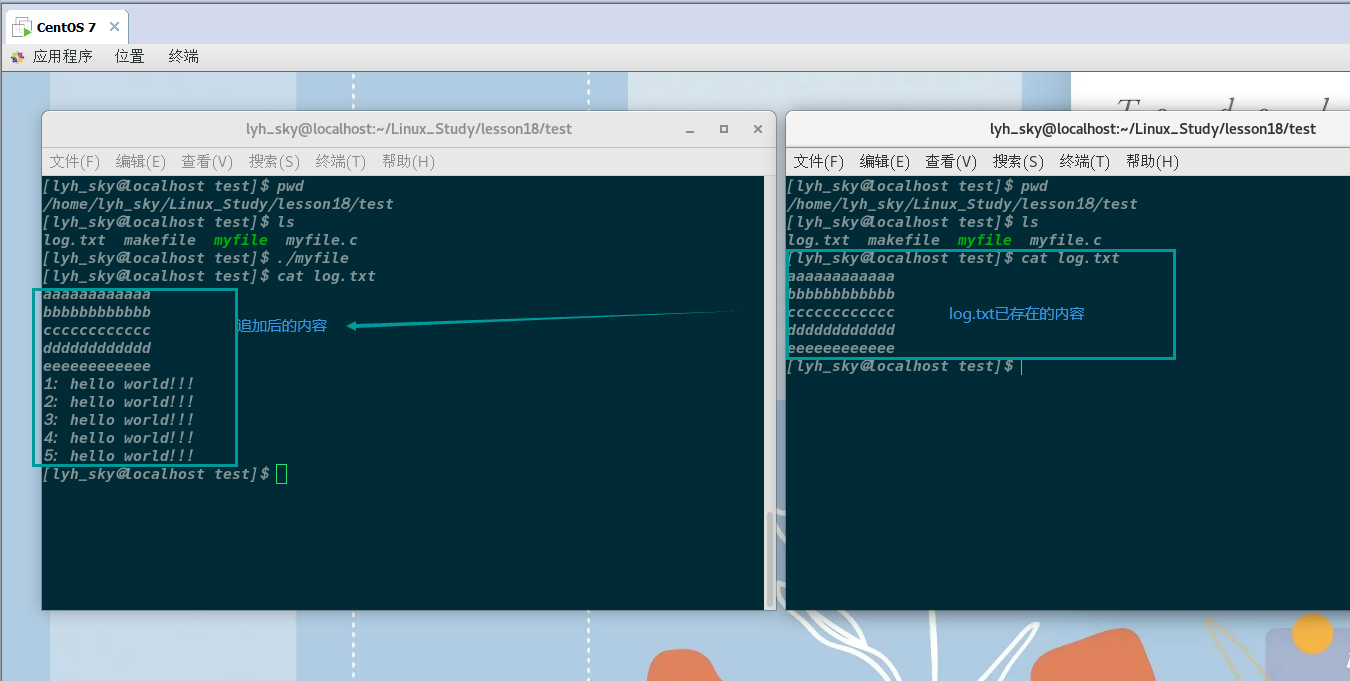
例子三:对文件进行追加数据 – 使用“fprintf”进行写入
#include#include #include #include int main() { // 以追加的方式打开文件,不存在会创建新的文件 FILE* fp = fopen("log.txt", "a"); if (fp == NULL) { perror("fp"); } int cnt = 1; // 向文件写入五次hello world while (cnt <= 5) { fprintf(fp, "%d: hello world!!!\n", cnt); ++cnt; } // 关闭文件 fclose(fp); return 0; } - 1
- 2
- 3
- 4
- 5
- 6
- 7
- 8
- 9
- 10
- 11
- 12
- 13
- 14
- 15
- 16
- 17
- 18
- 19
- 20
- 21
- 22
- 23
- 24
- 25
🍤2.4、对系统调用的封装
理论:
-
当我们打开文件后,向文件写入数据,是向磁盘写入数据的,而不是向内存文件写入
-
磁盘是一个硬件,只有OS有资格向硬件写入数据
-
我们不能绕开OS对硬件进行相关的操作,因为所有上层访问文件的操作,都必须贯穿OS
-
用户(上层)是通过操作系统提供的相关系统调用来访问底层硬件的
-
C/C++的部分库函数都提供了系统调用的封装!!!
-
C语言中printf就是封装了OS提供的相关系统调用来对硬件(显示器)进行写入数据
-
所有的语言都会系统接口做了封装
为什么要封装呢???
-
原生系统接口,使用成本比较高,我们要了解不同OS中不同的系统调用的参数问题!!!
-
语言不具备跨平台性!!!
-
比如:封装了LInux系统调用的fork(),如果在Windows上跑,是跑不了的!!!
封装是如何解决跨平台性的呢???
-
使用多态的思想,上层调用相同功能的接口,但是底层却完全不同
-
C语言是通过穷举所有的底层接口,通过条件编译控制不同的OS版本接口
-
C++是通过xoskit解决跨平台开发问题的
-
其他不同的语言或脚本,都有自己不同的跨平台解决方案!!!
🌸3、系统文件调用接口
🍥3.1、open(打开文件)
#include#include #include int open(const char *pathname, int flags); int open(const char *pathname, int flags, mode_t mode) - 1
- 2
- 3
- 4
- 5
- 6
参数解析:
- 返回值:打开成功,返回新打开的文件描述符,打开失败,返回-1
- pathname:要打开或创建的目标文件
前面三个常量/宏,必须指定一个且只能指定一个
- flags标记位:打开文件时,可以传入多个参数选项,用下面的一个或者多个宏进行“或”运算:
- O_RDONLY:只读打开
- O_WRONLY:只写打开
- O_RDWR :读,写打开
- O_APPEND:追加写数据
- O_CREAT: 若文件不存在,则创建它,需要使用mode选项,来指明新文件的访问权限
- O_TRUNC:文件已存在,且是一个普通文件,打开文件是可写(即文件是用 O_RDWR 或O_WRONLY 模式 打开 ),就把文件的长度设置为零 , 丢弃其中的现有内容
flags底层是通过位图来标识不同的状态的!!! – 下面代码助于理解
-
系统传递标记位,是通过位图的结构来传递的
-
每一个宏标记,一般只要有一个比特位是1,并且与其他宏对应的值,不能重叠,这样就能通过按位与传递多个不同参数!!!
#include// flags标记位,通过不同的标示码来执行不同的代码 #define PRINT_A 0x1 // 0001 #define PRINT_B 0X2 // 0010 #define PRINT_C 0x4 // 0100 #define PRINT_D 0x8 // 1000 #define PRINT_DEF 0x0 void Show(int flags) { if (flags & PRINT_A) printf("PRINT_A: hello A!!!\n"); if (flags & PRINT_B) printf("PRINT_B: hello B!!!\n"); if (flags & PRINT_C) printf("PRINT_C: hello C!!!\n"); if (flags & PRINT_D) printf("PRINT_D: hello D!!!\n"); if (flags == PRINT_DEF) printf("PRINT_DEF: hello default!!!\n"); } int main() { // 通过按位与传递多个标示码 Show(PRINT_DEF); Show(PRINT_A); Show(PRINT_B); Show(PRINT_A | PRINT_C); Show(PRINT_A | PRINT_B | PRINT_C | PRINT_D); return 0; } - 1
- 2
- 3
- 4
- 5
- 6
- 7
- 8
- 9
- 10
- 11
- 12
- 13
- 14
- 15
- 16
- 17
- 18
- 19
- 20
- 21
- 22
- 23
- 24
- 25
- 26
- 27
- 28
- mode_t:若文件不存在,创建新的文件时,需要指定文件拥有者、所属组和other的权限
模拟以只写的方式打开文件 – 标记位:O_WRONLY、O_CREAT、O_TRUNC
- 只读方式打开
- 只写涉及:文件不存在则创建新文件
- 文件已经存在,重新打开会将文件长度设置0
[lyh_sky@localhost test]$ cat my_files.c #include#include #include #include #include int main() { int fp = open("log.txt", O_WRONLY | O_CREAT | O_TRUNC); if (fp < 0) { perror("fp"); } close(fp); return 0; } - 1
- 2
- 3
- 4
- 5
- 6
- 7
- 8
- 9
- 10
- 11
- 12
- 13
- 14
- 15
- 16
- 17
注意看log.txt的读写可执行权限!!!

使用mode_t参数调整新建文件的权限问题!!!
[lyh_sky@localhost test]$ cat my_files.c #include#include #include #include #include int main() { int fp = open("log.txt", O_WRONLY | O_CREAT | O_TRUNC, 0666); if (fp < 0) { perror("fp"); } close(fp); return 0; } - 1
- 2
- 3
- 4
- 5
- 6
- 7
- 8
- 9
- 10
- 11
- 12
- 13
- 14
- 15
- 16
- 17
注意,调整后的权限会受bash进程默认的文件权限掩码的影响!!!

可以使用umask函数在程序内改变该进程的权限掩码
#include#include mode_t umask(mode_t mask); - 1
- 2
- 3
- 4
[lyh_sky@localhost test]$ cat my_files.c #include#include #include #include #include int main() { // 将该进程的文件全线掩码修改成0 umask(0); int fp = open("log.txt", O_WRONLY | O_CREAT | O_TRUNC, 0666); if (fp < 0) { perror("fp"); } close(fp); return 0; } - 1
- 2
- 3
- 4
- 5
- 6
- 7
- 8
- 9
- 10
- 11
- 12
- 13
- 14
- 15
- 16
- 17
- 18
- 19
- 20

🍦3.2、close(关闭文件)
close - 关闭一个文件描述符,使它不在指向任何文件,并且可以在新的文操作中被再次使用
#includeint close(int fd); - 1
- 2
-
返回值:返回0表示关闭成功,返回-1表示关闭时出错
-
fd:文件描述符,open函数的返回值
🍧3.3、read(读文件)
read - 在文件描述符上执行读操作
#includessize_t read(int fd, void *buf, size_t count); - 1
- 2
-
read() 从文件描述符fd中读取count字节的数据并放入从buf开始的缓冲区中
-
如果count为零,read()返回0,不执行其他任何操作
-
如果 count 大于SSIZE_MAX,那么结果将不可预料
-
返回值:成功时返回读取到的字节数,发生错误时返回-1,并置errno为相应值
[lyh_sky@localhost test]$ cat my_files.c #include#include #include #include #include int main() { // 将该进程的文件全线掩码修改成0 umask(0); // 以读的方式打开文件 int fd = open("log.txt", O_RDONLY, 0666); if (fd < 0) { perror("fp"); } char buffer[128]; ssize_t ret = read(fd, buffer, sizeof(buffer)); if (ret == -1) { perror("ret"); } printf("%s", buffer); printf("ret: %d\n", ret); close(fd); return 0; } - 1
- 2
- 3
- 4
- 5
- 6
- 7
- 8
- 9
- 10
- 11
- 12
- 13
- 14
- 15
- 16
- 17
- 18
- 19
- 20
- 21
- 22
- 23
- 24
- 25
- 26
- 27
- 28
- 29

🍨3.4、write(写文件)
write -在一个文件描述符上执行写操作
#includessize_t write(int fd, const void *buf, size_t count); - 1
- 2
-
write向文件描述符fd所引用的文件中写入,从buf开始的缓冲区中count字节的数据
-
返回值:成功时返回所写入的字节数(若为零则表示没有写入数据),错误时返回-1
[lyh_sky@localhost test]$ cat my_files.c #include#include #include #include #include int main() { // 将该进程的文件全线掩码修改成0 umask(0); // 以写的方式打开 int fd = open("log.txt", O_WRONLY | O_TRUNC | O_CREAT, 0666); if (fd < 0) { perror("fp"); } char buffer[] = "hello world!!!\n"; int cnt = 1; while (cnt <= 5) { int ret = write(fd, buffer, sizeof(buffer)); if (ret == -1) { perror("ret"); } ++cnt; } close(fd); return 0; } - 1
- 2
- 3
- 4
- 5
- 6
- 7
- 8
- 9
- 10
- 11
- 12
- 13
- 14
- 15
- 16
- 17
- 18
- 19
- 20
- 21
- 22
- 23
- 24
- 25
- 26
- 27
- 28
- 29
- 30
- 31

🌹4、文件描述符
🍩4.1、为什么文件描述符从3开始???
如何理解文件描述符,前面遇到的各种文件系统接口都要使用它
[lyh_sky@localhost test]$ cat my_files.c #include#include #include #include #include int main() { // 将该进程的文件全线掩码修改成0 umask(0); int fd1 = open("log.txt", O_WRONLY | O_TRUNC | O_CREAT, 0666); int fd2 = open("log.txt", O_WRONLY | O_TRUNC | O_CREAT, 0666); int fd3 = open("log.txt", O_WRONLY | O_TRUNC | O_CREAT, 0666); if (fd1 < 0) printf("fd1"); if (fd2 < 0) printf("fd2"); if (fd3 < 0) printf("fd3"); printf("fd1: %d\n", fd1); printf("fd2: %d\n", fd2); printf("fd3: %d\n", fd3); return 0; } - 1
- 2
- 3
- 4
- 5
- 6
- 7
- 8
- 9
- 10
- 11
- 12
- 13
- 14
- 15
- 16
- 17
- 18
- 19
- 20
- 21
- 22
- 23
- 24

为什么文件描述符是从3开始呢?0、1、2去哪里了呢???
- 因为程序运行时,会默认打开三个流:stdin & stdout & stderr
- 0号描述符:标准输入流,键盘
- 1号描述符:标准输出流,显示器
- 2号描述符:标准错误流,显示器
- 0、1、2就是标准输入输出错误流!!!
#includeextern FILE* stdin; extern FILE* stdout; extern FILE* stderr; - 1
- 2
- 3
- 4
-
FILE*是一个文件指针
-
FILE是C库提供的结构体,它封装了很多成员,其中也必定包含了“fd描述符”
-
C库函数调用文件相关系统接口,必须通过fd描述符来实现
验证标准I/O的存在
// 验证stdin的存在 -- 将键盘输入的数据保存到buf数组中,并且回显到显示器 [lyh_sky@localhost test]$ cat my_files.c #includeint main() { char buf[1024]; ssize_t ret = read(0, buf, sizeof(buf)); if (ret < 0) { printf("ret"); } else { buf[ret - 1] = '\0'; printf("%s\n", buf); } return 0; } [lyh_sky@localhost test]$ ./myfile abcdef abcdef [lyh_sky@localhost test]$ - 1
- 2
- 3
- 4
- 5
- 6
- 7
- 8
- 9
- 10
- 11
- 12
- 13
- 14
- 15
- 16
- 17
- 18
- 19
- 20
- 21
- 22
- 23
[lyh_sky@localhost test]$ cat my_files.c #include#include int main() { // 验证标准输出流,将buf数据回显到显示器上 char buf[] = "hello world!!!\n"; ssize_t ret = write(1, buf, sizeof(buf)); if (ret < 0) { printf("ret"); } return 0; } [lyh_sky@localhost test]$ ./myfile hello world!!! - 1
- 2
- 3
- 4
- 5
- 6
- 7
- 8
- 9
- 10
- 11
- 12
- 13
- 14
- 15
- 16
- 17
标准输出和错误打印的一样,这里不演示了!!!
// 打印标准输入输出错误流的文件描述符 [lyh_sky@localhost test]$ cat my_files.c #includeint main() { // 验证012和stdin,stdout,stderr的对应关系 printf("stdin: %d\n", stdin->_fleno); printf("stdout: %d\n", stdout->_fileno); printf("stderr: %d\n", stderr->_fileno); return 0; } [lyh_sky@localhost test]$ ./myfile stdin: 0 stdout: 1 stderr: 2 - 1
- 2
- 3
- 4
- 5
- 6
- 7
- 8
- 9
- 10
- 11
- 12
- 13
- 14
- 15
- 16
🍪4.2、fd描述符底层原理
0, 1, 2, 3, 4, 5…,你见过什么样的数据,是这样子的???
-
我们常见的数组下标,就是从0开始的!!!
-
打开文件时,是通过调用相关文件系统函数,fd描述符是OS提供的返回值!!!
一个进程可以打开多个文件吗???
-
可以的,所以在内核中,进程 :打开的文件比例是1 :n
-
所以在系统运行中,有可能会存在大量的文件被打开!
-
那么操作系统如何管理这些被打开的文件呢?先描述,再组织!!!
一个文件被打开,在内核中,要创建被打开文件的内核数据结构 – 先描述
struct file { // 文件大部分内容和属性 // .... struct file* next; struct file* prev; };- 1
- 2
- 3
- 4
- 5
- 6
- 7
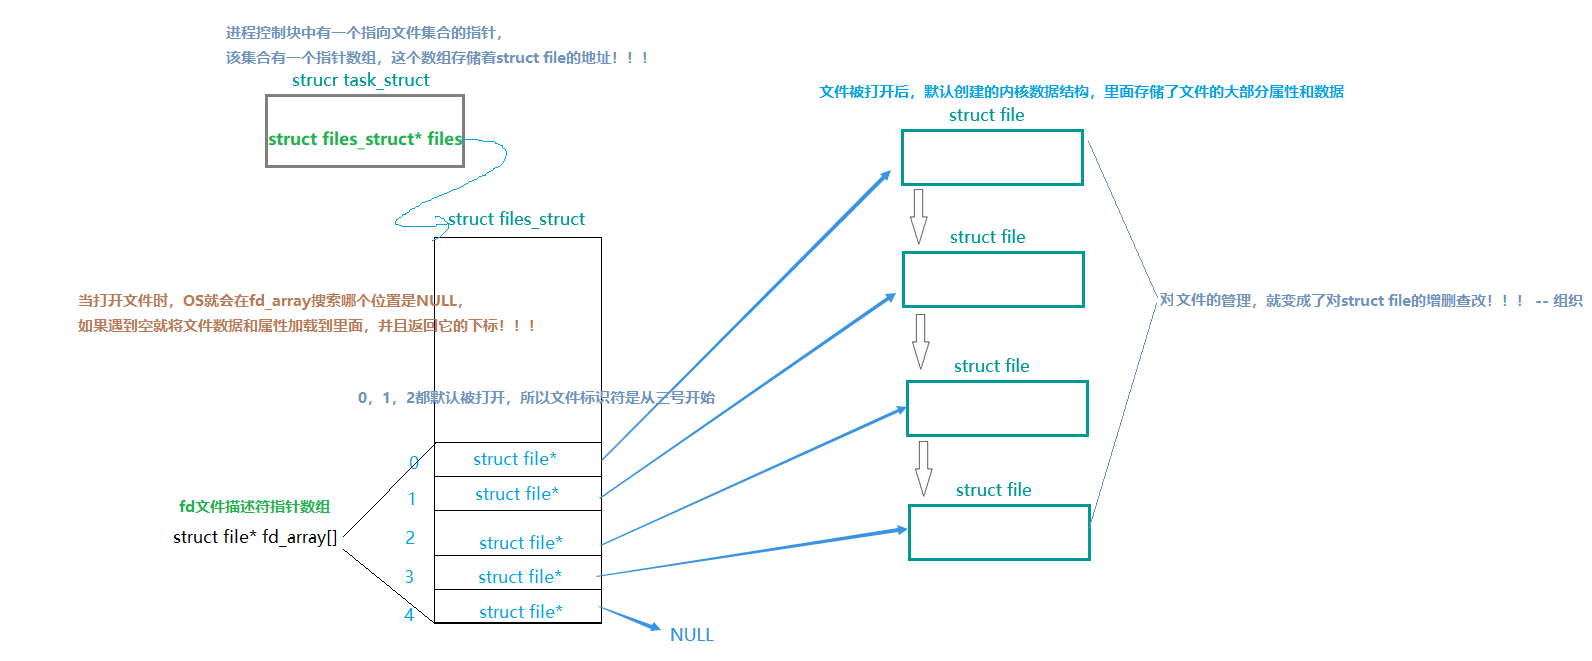
进程如何与被打开的文件建立映射关系呢???
-
文件被打开后,它的数据和属性会被加载到struct file中
-
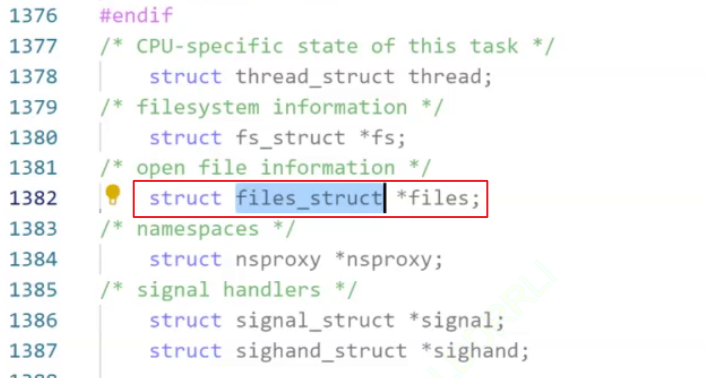
进程中包含一个struct files_struct*的结构体指针,该指针指向多文件的结构体(struct files_struct )
-
files_struct里面包含了一个数组,该数组是一个结构体指针数组(struct file* fd[])
-
该数组里面存储着struct file的地址,该数组的下标就是文件描述符!!!
文件被打开后,struct file会被分配到指针数组中为空的位置,然后OS会通过open返回该位置的下标给用户
- 拿到文件描述符后,用户可以通过文件描述符来进行文件的读写操作!!!
🍬4.3、Linux下一切皆文件
文件描述符0,1,2对应的是键盘,显示器,显示器,它们都是硬件,被打开时,都是用struct file来标识的!
如何使用C语言,实现面向对象(类)呢?
// 我们可以使用函数指针来实现!!! -- 实现一个文件类 #includestruct file { // 文件的数据和属性 ..... // 文件的基本读写操作 -- 函数指针实现 void (*readp)(struct file* filep, int fd...); void (*writep)(struct file* filep, int fd...); }; // C++的类中有一个隐藏的this指针,相当于这里的struct file* void read(struct file* filep, int fd...) {} void write(struct file* filep, int fd...) {} int main() { struct file f = {/*文件的数据和属性...*/, read, write}; f.readp(&f, ...); f.writep(&f, ...); return 0; } - 1
- 2
- 3
- 4
- 5
- 6
- 7
- 8
- 9
- 10
- 11
- 12
- 13
- 14
- 15
- 16
- 17
- 18
- 19
- 20
- 21
- 22
- 23
- 24
- 25
- 26
-
硬件包含:磁盘、键盘、显示器、网卡等等其他硬件
-
驱动可以提供不同设备的读写操作
-
当要对硬件进行读写时,OS会创建一个struct file来标识对应的硬件
-
对硬件进行读写操作,只需要调用struct file里面封装的读写方法即可
-
struct file是存储在文件描述符指针数组里面的
图解:


🍫4.4、文件描述符的分配规则
分配规则:
-
从头变量fd_array结构体指针数组,找到一个最小的,没有被使用的下标
-
分配给新打开的文件(struct file)
验证分配规则
[lyh_sky@localhost test]$ ls log.txt makefile myfile my_files.c [lyh_sky@localhost test]$ cat my_files.c #include#include #include #include #include #include int main() { // 关闭0号文件描述符 close(0); // 以读的方式打开文件,设置权限为0666 int fd = open("log.txt", O_WRONLY | O_CREAT | O_TRUNC, 0666); if (fd < 0) { perror("fd"); return 1; } printf("fd: %d\n", fd); // 关闭文件 close(fd); return 0; } [lyh_sky@localhost test]$ ./myfile fd: 0 - 1
- 2
- 3
- 4
- 5
- 6
- 7
- 8
- 9
- 10
- 11
- 12
- 13
- 14
- 15
- 16
- 17
- 18
- 19
- 20
- 21
- 22
- 23
- 24
- 25
- 26
- 27
- 28
- 29
[lyh_sky@localhost test]$ ls log.txt makefile myfile my_files.c [lyh_sky@localhost test]$ cat my_files.c #include#include #include #include #include #include int main() { // 关闭2号文件描述符 close(0); // 以读的方式打开文件,设置权限为0666 int fd = open("log.txt", O_WRONLY | O_CREAT | O_TRUNC, 0666); if (fd < 0) { perror("fd"); return 1; } printf("fd: %d\n", fd); // 关闭文件 close(fd); return 0; } [lyh_sky@localhost test]$ ./myfile fd: 2 - 1
- 2
- 3
- 4
- 5
- 6
- 7
- 8
- 9
- 10
- 11
- 12
- 13
- 14
- 15
- 16
- 17
- 18
- 19
- 20
- 21
- 22
- 23
- 24
- 25
- 26
- 27
- 28
- 29
🍀5、重定向
🍬5.1、重定向的本质
如果关闭1号文件描述符的文件呢???
[lyh_sky@localhost test]$ ls log.txt makefile myfile my_files.c [lyh_sky@localhost test]$ cat my_files.c #include#include #include #include #include #include int main() { // 关闭1号文件描述符 close(1); // 以读的方式打开文件,设置权限为0666 int fd = open("log.txt", O_WRONLY | O_CREAT | O_TRUNC, 0666); if (fd < 0) { perror("fd"); return 1; } printf("fd: %d\n", fd); // 关闭文件 close(fd); // 后面讲为什么要刷新缓冲区才会打印 fflsh(stdout); return 0; } [lyh_sky@localhost test]$ ./myfile [lyh_sky@localhost test]$ cat log.txt fd: 1 - 1
- 2
- 3
- 4
- 5
- 6
- 7
- 8
- 9
- 10
- 11
- 12
- 13
- 14
- 15
- 16
- 17
- 18
- 19
- 20
- 21
- 22
- 23
- 24
- 25
- 26
- 27
- 28
- 29
- 30
- 31
- 32
- 33
-
数据本来显示到显示器中,却写入到文件当中,这种现象叫做:输出重定向
-
常见的重定向有:>(输出重定向)、<(输入重定向)、>>(追加重定向)
比如:在命令行中输入 ls > 文件名,ls < 文件名,ls >> 文件名
重定向的本质:
-
将指定的文件关闭(close),然后打开(open)一个新的文件
-
根据文件描述符的分配规则,会分配给最小下标且已经为NULL的下标
-
如果关闭了下标为1的fd,打开新的文件,·打印(printf)数据时,会将数据写入到该文件中

🍫5.2、dup2系统调用
#includeint dup2(int oldfd, int newfd); - 1
- 2
dup2() 使newfd成为oldfd的副本,如果需要,首先关闭newfd
-
如果oldfd不是有效的文件描述符,则调用失败,并且newfd未关闭
-
如果oldfd是有效的文件描述符,而newfd的值与oldfd相同,则dup2()不执行任何操作,并且返回newfd
-
这里面的拷贝,不是拷贝下标的值,而是下标中存储的指针变量
-
拷贝完成后,关闭原oldfd也没事,底层使用引用计数的方式实现
如何传参呢?
-
oldfd是新打开的文件,newfd是旧打开的文件(默认打开的三个流就是旧文件)
-
因为是将新打开的文件拷贝到旧打开的文件中,所以oldfd是新文件,newfd是旧文件
-
参数设计的很反感,因为新打开的文件是newfd才对,而oldfd应该是三个流中的一个
模拟输出重定向
[lyh_sky@localhost lesson20]$ cat cache.c #include#include #include #include #include #include int main() { // 模拟输出重定向 int fd = open("log.txt", O_WRONLY | O_CREAT | O_TRUNC, 0666); if (fd < 0) { perror("open"); return 1; } // 将fd拷贝到1号文件描述符 -- 这里的拷贝是拷贝文件描述符指向的file地址 int ret = dup2(fd, 1); if (ret < 0) { perror("dup2"); return 1; } // 关闭fd,dup2底层使用的是引用计数的方式,关了只是计数减一 close(fd); printf("hello world!!!\n"); return 0; } [lyh_sky@localhost lesson20]$ ls cache cache.c makefile [lyh_sky@localhost lesson20]$ make gcc -o cache cache.c [lyh_sky@localhost lesson20]$ ./cache [lyh_sky@localhost lesson20]$ ls cache cache.c log.txt makefile [lyh_sky@localhost lesson20]$ cat log.txt hello world!!! - 1
- 2
- 3
- 4
- 5
- 6
- 7
- 8
- 9
- 10
- 11
- 12
- 13
- 14
- 15
- 16
- 17
- 18
- 19
- 20
- 21
- 22
- 23
- 24
- 25
- 26
- 27
- 28
- 29
- 30
- 31
- 32
- 33
- 34
- 35
- 36
- 37
- 38
模拟追加重定向:修改一个打开文件标记位即可!!! – O_WRONLY |O_APPEND | O_CREAT
int main() { // 模拟追加重定向 int fd = open("log.txt", O_WRONLY |O_APPEND | O_CREAT, 0666); if (fd < 0) { perror("open"); return 1; } // 将fd拷贝到1号文件描述符 -- 这里的拷贝是拷贝文件描述符指向的file地址 int ret = dup2(fd, 1); if (ret < 0) { perror("dup2"); return 1; } // 关闭fd,dup2底层使用的是引用计数的方式,关了只是计数减一 close(fd); printf("hello world!!!\n"); return 0; } [lyh_sky@localhost lesson20]$ ls cache cache.c makefile // 该程序运行了五次 [lyh_sky@localhost lesson20]$ ./cache [lyh_sky@localhost lesson20]$ ./cache [lyh_sky@localhost lesson20]$ ./cache [lyh_sky@localhost lesson20]$ ./cache [lyh_sky@localhost lesson20]$ ./cache [lyh_sky@localhost lesson20]$ ls cache cache.c log.txt makefile [lyh_sky@localhost lesson20]$ cat log.txt hello world!!! hello world!!! hello world!!! hello world!!! hello world!!!- 1
- 2
- 3
- 4
- 5
- 6
- 7
- 8
- 9
- 10
- 11
- 12
- 13
- 14
- 15
- 16
- 17
- 18
- 19
- 20
- 21
- 22
- 23
- 24
- 25
- 26
- 27
- 28
- 29
- 30
- 31
- 32
- 33
- 34
- 35
- 36
- 37
模拟输入重定向
[lyh_sky@localhost lesson20]$ cat cache.c #include#include #include #include #include #include int main() { // 输入重定向 int fd = open("log.txt", O_RDONLY, 0666); if (fd < 0) { perror("open"); return 1; } // 将fd拷贝到1号文件描述符 -- 这里的拷贝是拷贝文件描述符指向的file地址 int ret = dup2(fd, 0); // 0 -- stdin if (ret < 0) { perror("dup2"); return 1; } // 关闭fd,dup2底层使用的是引用计数的方式,关了只是计数减一 close(fd); char buffer[128]; read(ret, buffer, sizeof(buffer)); printf("%s", buffer); return 0; } [lyh_sky@localhost lesson20]$ ls cache cache.c log.txt makefile [lyh_sky@localhost lesson20]$ cat log.txt aaaaaaaaaaaa bbbbbbbbbbbb cccccccccccc [lyh_sky@localhost lesson20]$ ./cache aaaaaaaaaaaa bbbbbbbbbbbb cccccccccccc - 1
- 2
- 3
- 4
- 5
- 6
- 7
- 8
- 9
- 10
- 11
- 12
- 13
- 14
- 15
- 16
- 17
- 18
- 19
- 20
- 21
- 22
- 23
- 24
- 25
- 26
- 27
- 28
- 29
- 30
- 31
- 32
- 33
- 34
- 35
- 36
- 37
- 38
- 39
- 40
- 41
- 42
- 43
-
-
相关阅读:
ld.lld的undefined symbol错误
羊了个羊爆火,背后有什么样的营销套路?
CMD端口占用和进程终止
《HelloGitHub》第 78 期
搭建开发环境
Spring Boot集成JWT快速入门demo
linux ethtool 命令详解
TCPIP网络编程(一)
node框架之express
大数据面试技术复习hadoop,hdfs,yarn
- 原文地址:https://blog.csdn.net/weixin_59400943/article/details/127954717
