-
【快速上手系列】使用idea调百度AI接口实现人脸识别功能
【快速上手系列】使用idea调百度AI接口实现人脸识别和人脸对比功能并实现登录
一、人脸检测
步骤
1、百度AI开放平台
登录后点击控制台

点击公有云服务——应用列表——点击创建应用

填写一下信息然后创建

然后回到概览——领取免费资源(如果账号没领取过的话)

可以自选,不过嫌麻烦直接全选了也一样

然后回到概览——点击调用服务下的API文档

获取api
到API文档下滑,可以看到获取Access Token的工具类

再往下滑可以看到demo的示例代码(懒的搞下面有代码)

获取sdk
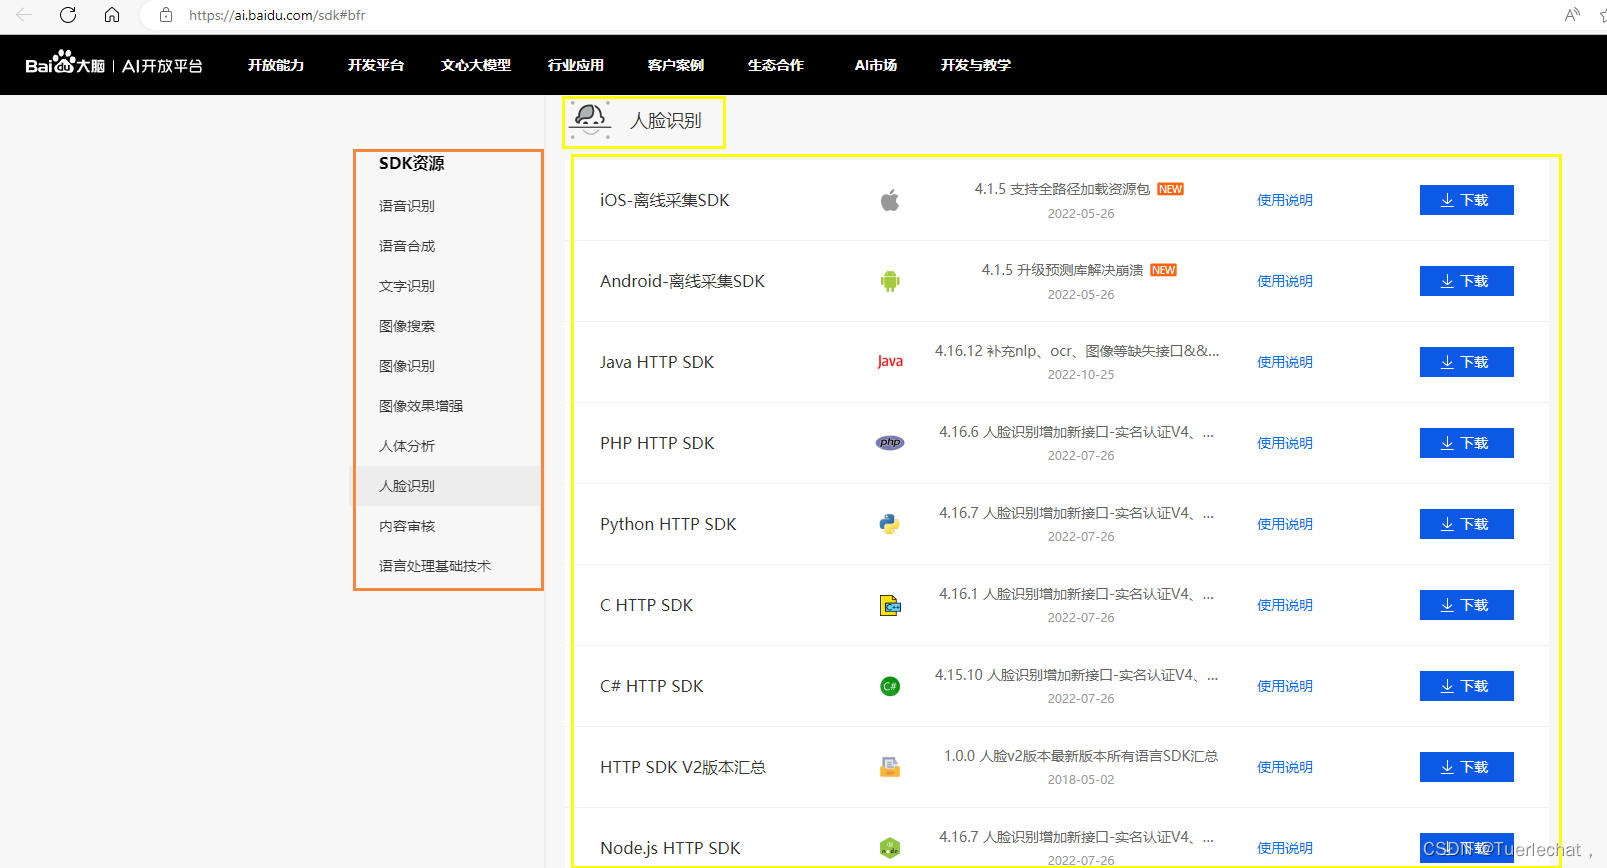
点击概览下HTTP SDK
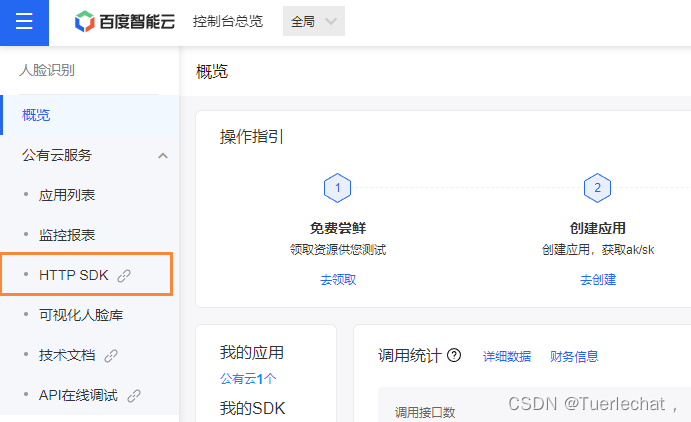
调转后可以看到所有的接口需要的各平台sdk,是离线的jar包
2、idea创建demo
idea新建一个maven项目
maven依赖
pom.xml
<dependency> <groupId>com.baidu.aipgroupId> <artifactId>java-sdkartifactId> <version>4.6.0version> dependency> <dependency> <groupId>org.jsongroupId> <artifactId>jsonartifactId> <version>20160810version> dependency> <dependency> <groupId>com.google.code.gsongroupId> <artifactId>gsonartifactId> <version>2.9.0version> dependency>- 1
- 2
- 3
- 4
- 5
- 6
- 7
- 8
- 9
- 10
- 11
- 12
- 13
- 14
- 15
项目结构

Base64Util:Base64 工具类FileUtil:文件读取工具类GetAccessToken:获取token类GsonUtils:Json工具类.HttpUtil:http 工具类tips:不是哪个项目都会用到,看情况,懒的话全扔里就行
五个工具类代码
Base64Util.java
package utils; /** * Base64 工具类 */ public class Base64Util { private static final char last2byte = (char) Integer.parseInt("00000011", 2); private static final char last4byte = (char) Integer.parseInt("00001111", 2); private static final char last6byte = (char) Integer.parseInt("00111111", 2); private static final char lead6byte = (char) Integer.parseInt("11111100", 2); private static final char lead4byte = (char) Integer.parseInt("11110000", 2); private static final char lead2byte = (char) Integer.parseInt("11000000", 2); private static final char[] encodeTable = new char[]{'A', 'B', 'C', 'D', 'E', 'F', 'G', 'H', 'I', 'J', 'K', 'L', 'M', 'N', 'O', 'P', 'Q', 'R', 'S', 'T', 'U', 'V', 'W', 'X', 'Y', 'Z', 'a', 'b', 'c', 'd', 'e', 'f', 'g', 'h', 'i', 'j', 'k', 'l', 'm', 'n', 'o', 'p', 'q', 'r', 's', 't', 'u', 'v', 'w', 'x', 'y', 'z', '0', '1', '2', '3', '4', '5', '6', '7', '8', '9', '+', '/'}; public Base64Util() { } public static String encode(byte[] from) { StringBuilder to = new StringBuilder((int) ((double) from.length * 1.34D) + 3); int num = 0; char currentByte = 0; int i; for (i = 0; i < from.length; ++i) { for (num %= 8; num < 8; num += 6) { switch (num) { case 0: currentByte = (char) (from[i] & lead6byte); currentByte = (char) (currentByte >>> 2); case 1: case 3: case 5: default: break; case 2: currentByte = (char) (from[i] & last6byte); break; case 4: currentByte = (char) (from[i] & last4byte); currentByte = (char) (currentByte << 2); if (i + 1 < from.length) { currentByte = (char) (currentByte | (from[i + 1] & lead2byte) >>> 6); } break; case 6: currentByte = (char) (from[i] & last2byte); currentByte = (char) (currentByte << 4); if (i + 1 < from.length) { currentByte = (char) (currentByte | (from[i + 1] & lead4byte) >>> 4); } } to.append(encodeTable[currentByte]); } } if (to.length() % 4 != 0) { for (i = 4 - to.length() % 4; i > 0; --i) { to.append("="); } } return to.toString(); } }- 1
- 2
- 3
- 4
- 5
- 6
- 7
- 8
- 9
- 10
- 11
- 12
- 13
- 14
- 15
- 16
- 17
- 18
- 19
- 20
- 21
- 22
- 23
- 24
- 25
- 26
- 27
- 28
- 29
- 30
- 31
- 32
- 33
- 34
- 35
- 36
- 37
- 38
- 39
- 40
- 41
- 42
- 43
- 44
- 45
- 46
- 47
- 48
- 49
- 50
- 51
- 52
- 53
- 54
- 55
- 56
- 57
- 58
- 59
- 60
- 61
- 62
- 63
- 64
- 65
FileUtil.java
package utils; import java.io.*; /** * 文件读取工具类 */ public class FileUtil { /** * 读取文件内容,作为字符串返回 */ public static String readFileAsString(String filePath) throws IOException { File file = new File(filePath); if (!file.exists()) { throw new FileNotFoundException(filePath); } if (file.length() > 1024 * 1024 * 1024) { throw new IOException("File is too large"); } StringBuilder sb = new StringBuilder((int) (file.length())); // 创建字节输入流 FileInputStream fis = new FileInputStream(filePath); // 创建一个长度为10240的Buffer byte[] bbuf = new byte[10240]; // 用于保存实际读取的字节数 int hasRead = 0; while ( (hasRead = fis.read(bbuf)) > 0 ) { sb.append(new String(bbuf, 0, hasRead)); } fis.close(); return sb.toString(); } /** * 根据文件路径读取byte[] 数组 */ public static byte[] readFileByBytes(String filePath) throws IOException { File file = new File(filePath); if (!file.exists()) { throw new FileNotFoundException(filePath); } else { ByteArrayOutputStream bos = new ByteArrayOutputStream((int) file.length()); BufferedInputStream in = null; try { in = new BufferedInputStream(new FileInputStream(file)); short bufSize = 1024; byte[] buffer = new byte[bufSize]; int len1; while (-1 != (len1 = in.read(buffer, 0, bufSize))) { bos.write(buffer, 0, len1); } byte[] var7 = bos.toByteArray(); return var7; } finally { try { if (in != null) { in.close(); } } catch (IOException var14) { var14.printStackTrace(); } bos.close(); } } } }- 1
- 2
- 3
- 4
- 5
- 6
- 7
- 8
- 9
- 10
- 11
- 12
- 13
- 14
- 15
- 16
- 17
- 18
- 19
- 20
- 21
- 22
- 23
- 24
- 25
- 26
- 27
- 28
- 29
- 30
- 31
- 32
- 33
- 34
- 35
- 36
- 37
- 38
- 39
- 40
- 41
- 42
- 43
- 44
- 45
- 46
- 47
- 48
- 49
- 50
- 51
- 52
- 53
- 54
- 55
- 56
- 57
- 58
- 59
- 60
- 61
- 62
- 63
- 64
- 65
- 66
- 67
- 68
- 69
- 70
- 71
- 72
- 73
GetAccessToken.java(需要输入自己应用的API Key和Secret Key哦)
package utils; import org.json.JSONObject; import java.io.BufferedReader; import java.io.InputStreamReader; import java.net.HttpURLConnection; import java.net.URL; import java.util.List; import java.util.Map; /** * 获取token类 */ public class GetAccessToken { /** * 获取权限token * @return 返回示例: * { * "access_token": "24.460da4889caad24cccdb1fea17221975.2592000.1491995545.282335-1234567", * "expires_in": 2592000 * } */ public static String getAuth() { // 官网获取的 API Key 更新为你注册的 String clientId = "XXXXXXXXXXXXXXXXXXXXXXX"; // 官网获取的 Secret Key 更新为你注册的 String clientSecret = "XXXXXXXXXXXXXXXXXXXXXXXXXXXXXXXXXXXXXXXX"; return getAuth(clientId, clientSecret); } /** * 获取API访问token * 该token有一定的有效期,需要自行管理,当失效时需重新获取. * @param ak - 百度云官网获取的 API Key * @param sk - 百度云官网获取的 Secret Key * @return assess_token 示例: * "24.460da4889caad24cccdb1fea17221975.2592000.1491995545.282335-1234567" */ public static String getAuth(String ak, String sk) { // 获取token地址 String authHost = "https://aip.baidubce.com/oauth/2.0/token?"; String getAccessTokenUrl = authHost // 1. grant_type为固定参数 + "grant_type=client_credentials" // 2. 官网获取的 API Key + "&client_id=" + ak // 3. 官网获取的 Secret Key + "&client_secret=" + sk; try { URL realUrl = new URL(getAccessTokenUrl); // 打开和URL之间的连接 HttpURLConnection connection = (HttpURLConnection) realUrl.openConnection(); connection.setRequestMethod("GET"); connection.connect(); // 获取所有响应头字段 Map<String, List<String>> map = connection.getHeaderFields(); // 遍历所有的响应头字段 for (String key : map.keySet()) { System.err.println(key + "--->" + map.get(key)); } // 定义 BufferedReader输入流来读取URL的响应 BufferedReader in = new BufferedReader(new InputStreamReader(connection.getInputStream())); String result = ""; String line; while ((line = in.readLine()) != null) { result += line; } /** * 返回结果示例 */ System.err.println("result:" + result); JSONObject jsonObject = new JSONObject(result); String access_token = jsonObject.getString("access_token"); return access_token; } catch (Exception e) { System.err.printf("获取token失败!"); e.printStackTrace(System.err); } return null; } }- 1
- 2
- 3
- 4
- 5
- 6
- 7
- 8
- 9
- 10
- 11
- 12
- 13
- 14
- 15
- 16
- 17
- 18
- 19
- 20
- 21
- 22
- 23
- 24
- 25
- 26
- 27
- 28
- 29
- 30
- 31
- 32
- 33
- 34
- 35
- 36
- 37
- 38
- 39
- 40
- 41
- 42
- 43
- 44
- 45
- 46
- 47
- 48
- 49
- 50
- 51
- 52
- 53
- 54
- 55
- 56
- 57
- 58
- 59
- 60
- 61
- 62
- 63
- 64
- 65
- 66
- 67
- 68
- 69
- 70
- 71
- 72
- 73
- 74
- 75
- 76
- 77
- 78
- 79
- 80
- 81
- 82
- 83
- 84
GsonUtils.java
/* * Copyright (C) 2017 Baidu, Inc. All Rights Reserved. */ package utils; import com.google.gson.Gson; import com.google.gson.GsonBuilder; import com.google.gson.JsonParseException; import java.lang.reflect.Type; /** * Json工具类. */ public class GsonUtils { private static Gson gson = new GsonBuilder().create(); public static String toJson(Object value) { return gson.toJson(value); } public static <T> T fromJson(String json, Class<T> classOfT) throws JsonParseException { return gson.fromJson(json, classOfT); } public static <T> T fromJson(String json, Type typeOfT) throws JsonParseException { return (T) gson.fromJson(json, typeOfT); } }- 1
- 2
- 3
- 4
- 5
- 6
- 7
- 8
- 9
- 10
- 11
- 12
- 13
- 14
- 15
- 16
- 17
- 18
- 19
- 20
- 21
- 22
- 23
- 24
- 25
- 26
- 27
- 28
- 29
HttpUtil.java
package utils; import java.io.BufferedReader; import java.io.DataOutputStream; import java.io.InputStreamReader; import java.net.HttpURLConnection; import java.net.URL; import java.util.List; import java.util.Map; /** * http 工具类 */ public class HttpUtil { public static String post(String requestUrl, String accessToken, String params) throws Exception { String contentType = "application/x-www-form-urlencoded"; return HttpUtil.post(requestUrl, accessToken, contentType, params); } public static String post(String requestUrl, String accessToken, String contentType, String params) throws Exception { String encoding = "UTF-8"; if (requestUrl.contains("nlp")) { encoding = "GBK"; } return HttpUtil.post(requestUrl, accessToken, contentType, params, encoding); } public static String post(String requestUrl, String accessToken, String contentType, String params, String encoding) throws Exception { String url = requestUrl + "?access_token=" + accessToken; return HttpUtil.postGeneralUrl(url, contentType, params, encoding); } public static String postGeneralUrl(String generalUrl, String contentType, String params, String encoding) throws Exception { URL url = new URL(generalUrl); // 打开和URL之间的连接 HttpURLConnection connection = (HttpURLConnection) url.openConnection(); connection.setRequestMethod("POST"); // 设置通用的请求属性 connection.setRequestProperty("Content-Type", contentType); connection.setRequestProperty("Connection", "Keep-Alive"); connection.setUseCaches(false); connection.setDoOutput(true); connection.setDoInput(true); // 得到请求的输出流对象 DataOutputStream out = new DataOutputStream(connection.getOutputStream()); out.write(params.getBytes(encoding)); out.flush(); out.close(); // 建立实际的连接 connection.connect(); // 获取所有响应头字段 Map<String, List<String>> headers = connection.getHeaderFields(); // 遍历所有的响应头字段 for (String key : headers.keySet()) { System.err.println(key + "--->" + headers.get(key)); } // 定义 BufferedReader输入流来读取URL的响应 BufferedReader in = null; in = new BufferedReader( new InputStreamReader(connection.getInputStream(), encoding)); String result = ""; String getLine; while ((getLine = in.readLine()) != null) { result += getLine; } in.close(); System.err.println("result:" + result); return result; } }- 1
- 2
- 3
- 4
- 5
- 6
- 7
- 8
- 9
- 10
- 11
- 12
- 13
- 14
- 15
- 16
- 17
- 18
- 19
- 20
- 21
- 22
- 23
- 24
- 25
- 26
- 27
- 28
- 29
- 30
- 31
- 32
- 33
- 34
- 35
- 36
- 37
- 38
- 39
- 40
- 41
- 42
- 43
- 44
- 45
- 46
- 47
- 48
- 49
- 50
- 51
- 52
- 53
- 54
- 55
- 56
- 57
- 58
- 59
- 60
- 61
- 62
- 63
- 64
- 65
- 66
- 67
- 68
- 69
- 70
- 71
- 72
- 73
- 74
- 75
- 76
- 77
测试类
FaceDetect.java(写入路径然后运行就行)
import com.baidu.aip.util.Base64Util; import utils.FileUtil; import utils.GetAccessToken; import utils.HttpUtil; import utils.GsonUtils; import java.util.*; /** * 人脸检测与属性分析 */ public class FaceDetect { /** * 重要提示代码中所需工具类 * FileUtil,Base64Util,HttpUtil,GsonUtils请从 * https://ai.baidu.com/file/658A35ABAB2D404FBF903F64D47C1F72 * https://ai.baidu.com/file/C8D81F3301E24D2892968F09AE1AD6E2 * https://ai.baidu.com/file/544D677F5D4E4F17B4122FBD60DB82B3 * https://ai.baidu.com/file/470B3ACCA3FE43788B5A963BF0B625F3 * 下载 */ public static String faceDetect() { // 请求url String url = "https://aip.baidubce.com/rest/2.0/face/v3/detect"; try { Map<String, Object> map = new HashMap<>(); //这里需要将本地图片进行Base64编码 byte[] bytes = FileUtil.readFileByBytes("e:\\11.jpg"); String img = Base64Util.encode(bytes); map.put("image", img); map.put("face_field", "faceshape,facetype"); //这里也要改成BASE64 map.put("image_type", "BASE64"); String param = GsonUtils.toJson(map); // 注意这里仅为了简化编码每一次请求都去获取access_token,线上环境access_token有过期时间, 客户端可自行缓存,过期后重新获取。 String accessToken = GetAccessToken.getAuth();; String result = HttpUtil.post(url, accessToken, "application/json", param); System.out.println(result); return result; } catch (Exception e) { e.printStackTrace(); } return null; } public static void main(String[] args) { FaceDetect.faceDetect(); } }- 1
- 2
- 3
- 4
- 5
- 6
- 7
- 8
- 9
- 10
- 11
- 12
- 13
- 14
- 15
- 16
- 17
- 18
- 19
- 20
- 21
- 22
- 23
- 24
- 25
- 26
- 27
- 28
- 29
- 30
- 31
- 32
- 33
- 34
- 35
- 36
- 37
- 38
- 39
- 40
- 41
- 42
- 43
- 44
- 45
- 46
- 47
- 48
- 49
- 50
- 51
- 52
测试结果:

Test.java(这个要输入AppID、 API Key 、Secret Key 和图片路径)
import com.baidu.aip.face.AipFace; import org.apache.commons.codec.binary.Base64; import org.json.JSONArray; import org.json.JSONObject; import java.io.FileInputStream; import java.io.IOException; import java.io.InputStream; import java.util.HashMap; public class Test { //设置AppID、API Key和Secret Key public static final String APP_ID = "XXXXXXXXXXXXXX"; public static final String API_KEY = "XXXXXXXXXXXXXXXXXXXXXXXXXX"; public static final String SECRET_KEY = "XXXXXXXXXXXXXXXXXXXXXXXXXXXXXXXXXXX"; public static void main(String[] args) { String image = base64(); String imageType = "BASE64"; // 初始化一个AipFace AipFace client = new AipFace(APP_ID, API_KEY, SECRET_KEY); // 可选:设置网络连接参数 client.setConnectionTimeoutInMillis(2000); client.setSocketTimeoutInMillis(60000); // 可选:设置代理服务器地址, http和socket二选一,或者均不设置 // client.setHttpProxy("proxy_host", proxy_port); // 设置http代理 // client.setSocketProxy("proxy_host", proxy_port); // 设置socket代理 // 传入可选参数调用接口,根据需求自行设置 HashMap<String, String> options = new HashMap<String, String>(); options.put("face_field", "age,beauty,expression,face_shape,gender,glasses,race,eye_status,emotion,face_type"); // options.put("max_face_num", "2"); // options.put("face_type", "LIVE"); // options.put("liveness_control", "LOW"); JSONObject res = client.detect(image, imageType, options); if (res.getString("error_msg") != null && res.getString("error_msg").equals("SUCCESS")) { JSONArray faceList = res.getJSONObject("result").getJSONArray("face_list"); JSONObject jsonObject = faceList.getJSONObject(0); System.out.println("年龄:" + jsonObject.getInt("age")); // 美丑打分,范围0-100,越大表示越美。 System.out.println("美丑打分:" + jsonObject.getDouble("beauty")); // none:不笑;smile:微笑;laugh:大笑 System.out.println("表情:" + jsonObject.getJSONObject("expression").getString("type")); // square: 正方形 triangle:三角形 oval: 椭圆 heart: 心形 round: 圆形 System.out.println("脸型:" + jsonObject.getJSONObject("face_shape").getString("type")); // male:男性 female:女性 System.out.println("性别:" + jsonObject.getJSONObject("gender").getString("type")); // yellow: 黄种人 white: 白种人 black:黑种人 arabs: 阿拉伯人 System.out.println("人种:" + jsonObject.getJSONObject("race").getString("type")); // [0,1]取值,越接近0闭合的可能性越大 System.out.println("右眼状态(睁开/闭合):" + jsonObject.getJSONObject("eye_status").getInt("right_eye")); System.out.println("左眼状态(睁开/闭合):" + jsonObject.getJSONObject("eye_status").getInt("left_eye")); System.out.println("人脸置信度,范围【0~1】:" + jsonObject.getInt("face_probability")); // none:无眼镜,common:普通眼镜,sun:墨镜 System.out.println("是否带眼镜:" + jsonObject.getJSONObject("glasses").getString("type")); // angry:愤怒 disgust:厌恶 fear:恐惧 happy:高兴 sad:伤心 surprise:惊讶 neutral:无情绪 System.out.println("情绪:" + jsonObject.getJSONObject("emotion").getString("type")); // human: 真实人脸 cartoon: 卡通人脸 System.out.println("真实人脸/卡通人脸:" + jsonObject.getJSONObject("face_type").getString("type")); System.out.println("face_token:" + jsonObject.getString("face_token")); } else { System.out.println(res.toString()); } } public static String base64() { //将图片文件转化为字节数组字符串,并对其进行Base64编码处理 InputStream in = null; byte[] data = null; //读取图片字节数组 try { in = new FileInputStream("e:\\11.jpg"); data = new byte[in.available()]; in.read(data); in.close(); } catch (IOException e) { e.printStackTrace(); } return new String(Base64.encodeBase64(data)); } }- 1
- 2
- 3
- 4
- 5
- 6
- 7
- 8
- 9
- 10
- 11
- 12
- 13
- 14
- 15
- 16
- 17
- 18
- 19
- 20
- 21
- 22
- 23
- 24
- 25
- 26
- 27
- 28
- 29
- 30
- 31
- 32
- 33
- 34
- 35
- 36
- 37
- 38
- 39
- 40
- 41
- 42
- 43
- 44
- 45
- 46
- 47
- 48
- 49
- 50
- 51
- 52
- 53
- 54
- 55
- 56
- 57
- 58
- 59
- 60
- 61
- 62
- 63
- 64
- 65
- 66
- 67
- 68
- 69
- 70
- 71
- 72
- 73
- 74
- 75
- 76
- 77
- 78
- 79
- 80
- 81
- 82
- 83
- 84
- 85
- 86
- 87
- 88
- 89
- 90
测试结果:

二、人脸对比
步骤
1、百度开放平台
获取Java-SDK文档
在百度开放平台中选择技术文档

然后在技术文档选择SDK文档—Java-SDK—然后如图

下载Java-SDK的demo源码:
JAVA SDK下载地址:https://github.com/Baidu-AIP/java-sdk
demo的目录结构

需要添加的maven依赖

pom.xml(本例子好像并没有用到)
<dependency> <groupId>com.baidu.aipgroupId> <artifactId>java-sdkartifactId> <version>${version}version> dependency>- 1
- 2
- 3
- 4
- 5
2、idea创建demo
首先创建一个springboot项目(maven啥的应该也可以,但是结构要自己搞😬)
然后文件我是粘过来的
项目结构如图

其中face包中的AipFace类是百度提供给我们的人脸识别相关接口的工具类,这是主要要用到的

然后可以准备两张图片来先测试一下
测试
新建一个测试类Test.java
分别将自己应用的 AppID 、 API Key 、 Secret Key和准备的两张图片路径放进去改一下运行即可
package com.r.demo3; import com.r.demo3.face.AipFace; import com.r.demo3.face.MatchRequest; import org.json.JSONObject; import sun.misc.BASE64Encoder; import java.io.FileInputStream; import java.io.IOException; import java.io.InputStream; import java.util.ArrayList; import java.util.List; /** * @Author Tuerlechat, * @Date 2022/11/9 */ public class Test { public static final String APP_ID = "---你的APPID---"; public static final String API_KEY = "---你的APIKEY---"; public static final String SECRET_KEY = "---你的SECRETKEY---"; public static void main(String[] args) { AipFace aipFace = new AipFace(APP_ID, API_KEY, SECRET_KEY); //准备的两张图片 String img1="e:\\测试\\1.jpg"; String img2="e:\\测试\\2.jpg"; //两张不一样的图片 String getImageStr1 = GetImageStr(img1); String getImageStr2 = GetImageStr(img2); // String getImageStr3 = GetImageStr(img1); List<MatchRequest> input = new ArrayList<>(); MatchRequest mr1 = new MatchRequest(getImageStr1, "BASE64"); MatchRequest mr2 = new MatchRequest(getImageStr2, "BASE64"); // MatchRequest mr2 = new MatchRequest(getImageStr3, "BASE64"); input.add(mr1); input.add(mr2); JSONObject match = aipFace.match(input); System.out.println(match); } public static String GetImageStr(String imgFile) {//将图片文件转化为字节数组字符串,并对其进行Base64编码处理 InputStream in = null; byte[] data = null; //读取图片字节数组 try { in = new FileInputStream(imgFile); data = new byte[in.available()]; in.read(data); in.close(); } catch (IOException e) { e.printStackTrace(); } //对字节数组Base64编码 BASE64Encoder encoder = new BASE64Encoder(); return encoder.encode(data);//返回Base64编码过的字节数组字符串 } }- 1
- 2
- 3
- 4
- 5
- 6
- 7
- 8
- 9
- 10
- 11
- 12
- 13
- 14
- 15
- 16
- 17
- 18
- 19
- 20
- 21
- 22
- 23
- 24
- 25
- 26
- 27
- 28
- 29
- 30
- 31
- 32
- 33
- 34
- 35
- 36
- 37
- 38
- 39
- 40
- 41
- 42
- 43
- 44
- 45
- 46
- 47
- 48
- 49
- 50
- 51
- 52
- 53
- 54
- 55
- 56
- 57
- 58
- 59
- 60
- 61
- 62
我用了两张自己的照片,运行可以看到结果显示

请求成功然后相似度99点多😂
然后可以建一个controller来访问前端页面验证登录测试
人脸登录测试
controller层
这里还是需要你的自己应用的 AppID 、 API Key 、 Secret Key,这里还有一张图片路径是一会用于验证登录
FaceController.java
package com.r.demo3.controller; import com.r.demo3.face.AipFace; import com.r.demo3.face.MatchRequest; import org.json.JSONObject; import org.springframework.web.bind.annotation.PostMapping; import org.springframework.web.bind.annotation.RequestMapping; import org.springframework.web.bind.annotation.RequestParam; import org.springframework.web.bind.annotation.RestController; import sun.misc.BASE64Encoder; import java.io.FileInputStream; import java.io.IOException; import java.io.InputStream; import java.util.ArrayList; import java.util.List; /** * @Author Tuerlechat, * @Date 2022/11/9 */ @RestController @RequestMapping("/Face") public class FaceController { public static final String APP_ID = "---你的APPID---"; public static final String API_KEY = "---你的APIKEY---"; public static final String SECRET_KEY = "---你的SECRETKEY---"; @PostMapping( "/test") public String Test(@RequestParam("image") String image) { String substring = image.substring("data:image/jpeg;base64,".length()); AipFace aipFace = new AipFace(APP_ID, API_KEY, SECRET_KEY); String img1="e:\\Shardddnshot.jpg"; //两张不一样的图片 String getImageStr1 = GetImageStr(img1); List<MatchRequest> input = new ArrayList<>(); MatchRequest mr1 = new MatchRequest(getImageStr1, "BASE64"); MatchRequest mr2 = new MatchRequest(substring, "BASE64"); input.add(mr1); input.add(mr2); JSONObject match = aipFace.match(input); System.out.println(match); return match.toString(); } public static String GetImageStr(String imgFile) {//将图片文件转化为字节数组字符串,并对其进行Base64编码处理 InputStream in = null; byte[] data = null; //读取图片字节数组 try { in = new FileInputStream(imgFile); data = new byte[in.available()]; in.read(data); in.close(); } catch (IOException e) { e.printStackTrace(); } //对字节数组Base64编码 BASE64Encoder encoder = new BASE64Encoder(); return encoder.encode(data);//返回Base64编码过的字节数组字符串 } }- 1
- 2
- 3
- 4
- 5
- 6
- 7
- 8
- 9
- 10
- 11
- 12
- 13
- 14
- 15
- 16
- 17
- 18
- 19
- 20
- 21
- 22
- 23
- 24
- 25
- 26
- 27
- 28
- 29
- 30
- 31
- 32
- 33
- 34
- 35
- 36
- 37
- 38
- 39
- 40
- 41
- 42
- 43
- 44
- 45
- 46
- 47
- 48
- 49
- 50
- 51
- 52
- 53
- 54
- 55
- 56
- 57
- 58
- 59
- 60
- 61
- 62
- 63
- 64
前端页面
photo.html(记得改一下页面中的jquery路径)
DOCTYPE html> <html lang="en"> <head> <meta charset="utf-8"/> <title>人脸验证登录title> <style> * { padding: 0; margin: 0; } div { width: 100vw; height: 100vh; display: flex; justify-content: center; align-items: center; } .btn { width: 100px; height: 50px; border-radius: 10px; background: #ff9900; line-height: 50px; text-align: center; color: #fff; box-shadow: 0 0 10px #999; } #video { width: 300px; height: 300px; border: 5px solid #000; border-radius: 10px; margin-left: 5px; } #canvas { width: 300px; height: 300px; border: 5px solid #000; border-radius: 10px; margin-left: 5px; } style> head> <script src="js/jquery-3.6.0.js" type="text/javascript" charset="utf-8">script> <body> <div> <div id="play" class="btn">开始摄像div> <div id="take" class="btn">拍照div> <div id="sub_btn" class="btn">登录div> <video id="video">video> <canvas id="canvas" width="300px" height="300px">canvas> div> <script> $(function () { // 开启摄像 document.getElementById('play').onclick = () => { let constraints = { // video属性设置 video: { width: 300, height: 300 }, // audio属性设置 audio: false } navigator.mediaDevices.getUserMedia(constraints) .then(mediaStream => { // 成功返回promise对象,接收一个mediaStream参数与video标签进行对接 document.getElementById('video').srcObject = mediaStream document.getElementById('video').play() }) // 失败就失败了 } // 拍照、canvas绘制 document.getElementById('take').onclick = () => { let ctx = document.getElementById("canvas").getContext('2d') ctx.drawImage(document.getElementById("video"), 0, 0, 300, 300) } $("body").on("click", "#sub_btn", function () { var imgdata = document.getElementById("canvas").toDataURL("image/jpeg"); console.log(imgdata) $.ajax({ url:"/Face/test", type:"post", async: true, dataType:"json", contentType : "application/x-www-form-urlencoded; charset=utf-8", data:{ image:imgdata }, success:function (res) { if (res.result.score>70) alert("登录成功") else alert("登录失败") } }) }); }) script> body> html>- 1
- 2
- 3
- 4
- 5
- 6
- 7
- 8
- 9
- 10
- 11
- 12
- 13
- 14
- 15
- 16
- 17
- 18
- 19
- 20
- 21
- 22
- 23
- 24
- 25
- 26
- 27
- 28
- 29
- 30
- 31
- 32
- 33
- 34
- 35
- 36
- 37
- 38
- 39
- 40
- 41
- 42
- 43
- 44
- 45
- 46
- 47
- 48
- 49
- 50
- 51
- 52
- 53
- 54
- 55
- 56
- 57
- 58
- 59
- 60
- 61
- 62
- 63
- 64
- 65
- 66
- 67
- 68
- 69
- 70
- 71
- 72
- 73
- 74
- 75
- 76
- 77
- 78
- 79
- 80
- 81
- 82
- 83
- 84
- 85
- 86
- 87
- 88
- 89
- 90
- 91
- 92
- 93
- 94
- 95
- 96
- 97
- 98
- 99
- 100
- 101
- 102
- 103
- 104
- 105
- 106
- 107
- 108
- 109
- 110
- 111
- 112
- 113
- 114
- 115
然后启动springboot,访问photo.html
进来之后是这样的:

tips:如果没输错东西但是点击开始摄像却没摄像头的话,在url地址栏右侧那个小摄像机打开开启电脑相机的权限,像这样

不方便露脸,所以用了两张jisoo和rose的照片来测试一下🤓

可以看到是能够成功登录的,说明人脸验证成功
换一张试试

可以看到登录失败,说明人脸验证是生效的
这样就搞好啦😁
-
相关阅读:
优化Mysql数据库的8个方法
07.抽象类
excel-gen.js 导出excel 功能
Django: 2. 创建菜单界面
分类预测 | MATLAB实现NGO-CNN北方苍鹰算法优化卷积神经网络数据分类预测
痞子衡嵌入式:MCUXpresso IDE下高度灵活的FreeMarker链接文件模板机制
Unity丨调色板丨颜色调色
Ubuntu20配置Mysql常用操作
VoLTE基础自学系列 | IMS(VoLTE)注册流程(不含eSRVCC)
【CFD小工坊】模型网格(三角形网格)
- 原文地址:https://blog.csdn.net/weixin_55452293/article/details/127922657