-
Java项目实战【超级详细】
软件开发流程

角色分工

开发环境搭建
创建普通Maven项目编写pom.xml导入依赖
<project xmlns="http://maven.apache.org/POM/4.0.0" xmlns:xsi="http://www.w3.org/2001/XMLSchema-instance" xsi:schemaLocation="http://maven.apache.org/POM/4.0.0 http://maven.apache.org/xsd/maven-4.0.0.xsd"> <modelVersion>4.0.0modelVersion> <parent> <groupId>org.springframework.bootgroupId> <artifactId>spring-boot-starter-parentartifactId> <version>2.4.5version> <relativePath/> parent> <groupId>com.yjqgroupId> <artifactId>reggie_take_outartifactId> <version>1.0-SNAPSHOTversion> <properties> <maven.compiler.source>8maven.compiler.source> <maven.compiler.target>8maven.compiler.target> <java.version>1.8java.version> properties> <dependencies> <dependency> <groupId>org.springframework.bootgroupId> <artifactId>spring-boot-starter-thymeleafartifactId> dependency> <dependency> <groupId>org.springframework.bootgroupId> <artifactId>spring-boot-starter-data-redisartifactId> dependency> <dependency> <groupId>org.springframework.bootgroupId> <artifactId>spring-boot-starter-cacheartifactId> dependency> <dependency> <groupId>org.springframework.bootgroupId> <artifactId>spring-boot-starter-mailartifactId> <version>2.2.6.RELEASEversion> dependency> <dependency> <groupId>org.springframework.bootgroupId> <artifactId>spring-boot-starterartifactId> dependency> <dependency> <groupId>org.springframework.bootgroupId> <artifactId>spring-boot-starter-testartifactId> <scope>testscope> dependency> <dependency> <groupId>org.springframework.bootgroupId> <artifactId>spring-boot-starter-webartifactId> <scope>compilescope> dependency> <dependency> <groupId>com.baomidougroupId> <artifactId>mybatis-plus-boot-starterartifactId> <version>3.4.2version> dependency> <dependency> <groupId>org.projectlombokgroupId> <artifactId>lombokartifactId> <version>1.18.20version> dependency> <dependency> <groupId>com.alibabagroupId> <artifactId>fastjsonartifactId> <version>1.2.76version> dependency> <dependency> <groupId>commons-langgroupId> <artifactId>commons-langartifactId> <version>2.6version> dependency> <dependency> <groupId>mysqlgroupId> <artifactId>mysql-connector-javaartifactId> <scope>runtimescope> dependency> <dependency> <groupId>com.alibabagroupId> <artifactId>druid-spring-boot-starterartifactId> <version>1.1.23version> dependency> dependencies> <build> <plugins> <plugin> <groupId>org.springframework.bootgroupId> <artifactId>spring-boot-maven-pluginartifactId> <version>2.4.5version> plugin> plugins> build> project>- 1
- 2
- 3
- 4
- 5
- 6
- 7
- 8
- 9
- 10
- 11
- 12
- 13
- 14
- 15
- 16
- 17
- 18
- 19
- 20
- 21
- 22
- 23
- 24
- 25
- 26
- 27
- 28
- 29
- 30
- 31
- 32
- 33
- 34
- 35
- 36
- 37
- 38
- 39
- 40
- 41
- 42
- 43
- 44
- 45
- 46
- 47
- 48
- 49
- 50
- 51
- 52
- 53
- 54
- 55
- 56
- 57
- 58
- 59
- 60
- 61
- 62
- 63
- 64
- 65
- 66
- 67
- 68
- 69
- 70
- 71
- 72
- 73
- 74
- 75
- 76
- 77
- 78
- 79
- 80
- 81
- 82
- 83
- 84
- 85
- 86
- 87
- 88
- 89
- 90
- 91
- 92
- 93
- 94
- 95
- 96
- 97
- 98
- 99
- 100
- 101
- 102
- 103
- 104
- 105
- 106
- 107
- 108
- 109
- 110
- 111
- 112
- 113
- 114
- 115
- 116
配置文件application.yml
server: port: 8080 spring: application: #应用的名称,可选 name: reggie_take_out datasource: druid: driver-class-name: com.mysql.cj.jdbc.Driver url: jdbc:mysql://localhost:3306/db_reggie?serverTimezone=Asia/Ningbo&useUnicode=true&characterEncoding=utf-8&zeroDateTimeBehavior=convertToNull&useSSL=false&allowPublicKeyRetrieval=true username: root password: 123456 mybatis-plus: configuration: #在映射实体或者属性时,将数据库中表名和字段名中的下划线去掉,按照驼峰命名法映射 map-underscore-to-camel-case: true log-impl: org.apache.ibatis.logging.stdout.StdOutImpl global-config: db-config: id-type: ASSIGN_ID- 1
- 2
- 3
- 4
- 5
- 6
- 7
- 8
- 9
- 10
- 11
- 12
- 13
- 14
- 15
- 16
- 17
- 18
- 19
- 20
- 21
- 22
启动类编写
src/main/java/com/XXX/reggie/ReggieApplication.java
package com.yjq.reggie; import lombok.extern.slf4j.Slf4j; import org.springframework.boot.SpringApplication; import org.springframework.boot.autoconfigure.SpringBootApplication; @Slf4j //直接可使用log日志 @SpringBootApplication public class ReggieApplication { public static void main(String[] args) { SpringApplication.run(ReggieApplication.class,args); log.info("项目启动成功..."); //测试项目启动 } }- 1
- 2
- 3
- 4
- 5
- 6
- 7
- 8
- 9
- 10
- 11
- 12
- 13
- 14
- 15
配置类编写 完成MVC框架静态资源映射
config/WebMvcConfig
package com.yjq.reggie; import lombok.extern.slf4j.Slf4j; import org.springframework.boot.SpringApplication; import org.springframework.boot.autoconfigure.SpringBootApplication; @Slf4j //直接可使用loge @SpringBootApplication public class ReggieApplication { public static void main(String[] args) { SpringApplication.run(ReggieApplication.class,args); log.info("项目启动成功..."); } }- 1
- 2
- 3
- 4
- 5
- 6
- 7
- 8
- 9
- 10
- 11
- 12
- 13
- 14
再次启动查看日志是否成功,然后访问页面http://localhost:8080/backend/index.html

ps:不管用的看看放的路径是否正确,启动类要在最外层

员工管理功能
后台登录功能
需求分析
http://localhost:8080/backend/page/login/login.html打开登陆页面
按下F12,点击登录按钮,发送请求并题交参数


数据模型
创建实体类Employee与数据模型(employee表)映射
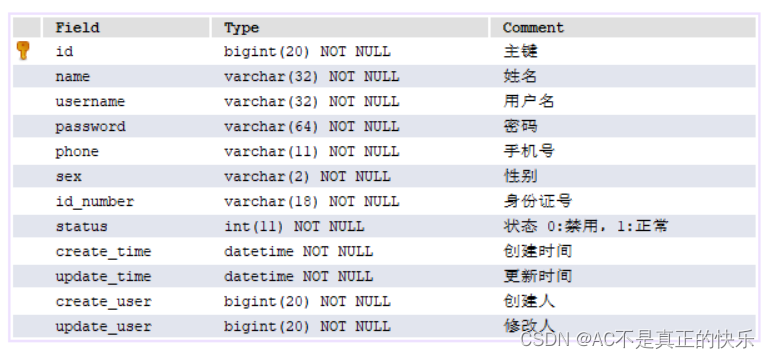
创建实体类entity / Employee.javapackage com.yjq.reggie.entity; import com.baomidou.mybatisplus.annotation.FieldFill; import com.baomidou.mybatisplus.annotation.TableField; import lombok.Data; import java.io.Serializable; import java.time.LocalDateTime; /** * 员工实体类 */ @Data public class Employee implements Serializable { private static final long serialVersionUID = 1L; private Long id; //主键 private String username; //用户名 private String name; //账号 private String password; //密码 private String phone; //手机号 private String sex; //性别 /** * 驼峰命名自动映射sql表中的下划线命名 * application.yml配置文件中配置 */ private String idNumber; // 身份证号 private Integer status; //状态 0:禁用,1:正常 @TableField(fill = FieldFill.INSERT) private LocalDateTime createTime; @TableField(fill = FieldFill.INSERT_UPDATE) private LocalDateTime updateTime; @TableField(fill = FieldFill.INSERT) private Long createUser; @TableField(fill = FieldFill.INSERT_UPDATE) private Long updateUser; }- 1
- 2
- 3
- 4
- 5
- 6
- 7
- 8
- 9
- 10
- 11
- 12
- 13
- 14
- 15
- 16
- 17
- 18
- 19
- 20
- 21
- 22
- 23
- 24
- 25
- 26
- 27
- 28
- 29
- 30
- 31
- 32
- 33
- 34
- 35
- 36
- 37
- 38
- 39
- 40
- 41
- 42
- 43
- 44
- 45
- 46
- 47
- 48
- 49
- 50
- 51
代码开发
创建mapper,service,controller层
项目结构图

mapper层
( 注意:写接口,使用MybatisPlus可继承BaseMapper<>方便简单CRUD)package com.yjq.reggie.mapper; import com.baomidou.mybatisplus.core.mapper.BaseMapper; import com.yjq.reggie.entity.Employee; import org.apache.ibatis.annotations.Mapper; @Mapper public interface EmployeeMapper extends BaseMapper<Employee> { }- 1
- 2
- 3
- 4
- 5
- 6
- 7
- 8
- 9
service层
实现通用增删改查的service接口
([service接口继承IService]
(https://blog.csdn.net/weixin_38111957/article/details/92415413))package com.yjq.reggie.service; import com.baomidou.mybatisplus.extension.service.IService; import com.yjq.reggie.entity.Employee; /*** * 通用 Service CRUD 封装IService (opens new window)接口, * 进一步封装 CRUD 采用 get 查询单行 remove 删除 list 查询集合 page 分页 * 前缀命名方式区分 Mapper 层避免混淆,(mapper用select等字眼,service用get等字眼) * 泛型 T 为任意实体对象 * 建议如果存在自定义通用 Service 方法的可能, * 请创建自己的 IBaseService 继承 Mybatis-Plus 提供的基类 ServiceImpl * 对象 Wrapper 为 条件构造器 */ public interface EmployeeService extends IService<Employee> { }- 1
- 2
- 3
- 4
- 5
- 6
- 7
- 8
- 9
- 10
- 11
- 12
- 13
- 14
- 15
- 16
自定义通用Service方法
service实现类 继承ServiceImpl
并执行EmployeeService 接口package com.yjq.reggie.service.impl; import com.baomidou.mybatisplus.extension.service.impl.ServiceImpl; import com.yjq.reggie.entity.Employee; import com.yjq.reggie.mapper.EmployeeMapper; import com.yjq.reggie.service.EmployeeService; import org.springframework.stereotype.Service; /*** * service实现类 继承mp提供通用的service基类 ServiceImpl * ServiceImpl- 1
- 2
- 3
- 4
- 5
- 6
- 7
- 8
- 9
- 10
- 11
- 12
- 13
- 14
- 15
- 16
- 17
- 18
controller层

import com.yjq.reggie.service.EmployeeService; import lombok.extern.slf4j.Slf4j; import org.springframework.beans.factory.annotation.Autowired; import org.springframework.web.bind.annotation.RequestMapping; import org.springframework.web.bind.annotation.RestController; @Slf4j @RestController @RequestMapping("/employee") //请求路径url public class EmployeeController { @Autowired private EmployeeService employeeService; }- 1
- 2
- 3
- 4
- 5
- 6
- 7
- 8
- 9
- 10
- 11
- 12
- 13
- 14
编写 通用返回结果Result类
/common / Result
(通用结果类,服务端响应的所以结果最终都会包装成各种类型返回给前端页面)

需要后端返给前端code,data,msgpackage com.yjq.reggie.common; import lombok.Data; import java.io.Serializable; import java.util.HashMap; import java.util.Map; /** * 通用结果类,服务端响应的所以结果最终都会包装成各种类型返回给前端页面 * @Data注解没写,会显示接口406错误 * @param*/ @Data public class Result<T>{ private Integer code; //编码:1成功,0和其它数字为失败 private String msg; //错误信息 private T data; //数据 private Map map = new HashMap(); //动态数据 public static <T> Result<T> success(T object) { Result<T> res = new Result<T>(); res.data = object; res.code = 1; return res; } public static <T> Result<T> error(String msg) { Result res = new Result(); res.msg = msg; res.code = 0; return res; } public Result<T> add(String key, Object value) { this.map.put(key, value); return this; } }- 1
- 2
- 3
- 4
- 5
- 6
- 7
- 8
- 9
- 10
- 11
- 12
- 13
- 14
- 15
- 16
- 17
- 18
- 19
- 20
- 21
- 22
- 23
- 24
- 25
- 26
- 27
- 28
- 29
- 30
- 31
- 32
- 33
- 34
- 35
- 36
- 37
- 38
- 39
- 40
- 41
- 42
- 43
- 44
- 45
登陆方法代码实现

根据post请求方式,请求URL@PostMapping("/login")
根据返回的Jason数据@RequestBody Employee employee需要用到request去getSession
public Result<Employee> login(HttpServletRequest request, @RequestBody Employee employee) { return null; }- 1
- 2
- 3
- 4
业务逻辑:
在controller中创建登录方法

@Autowired private EmployeeService employeeService; /** * 员工登录 * @param request * @param employee * @return */ @PostMapping("/login") // @RequestBody接收前端 发送过来的JSON风格的数据,将其转化为相应的对象 public Result<Employee> login(HttpServletRequest request, @RequestBody Employee employee){ //1.将页面提交的密码password进行md5加密 String password = employee.getPassword(); password = DigestUtils.md5DigestAsHex(password.getBytes()); //2.根据页面提交的用户名username查询数据库 LambdaQueryWrapper<Employee> queryWrapper = new LambdaQueryWrapper<>(); queryWrapper.eq(Employee::getUsername,employee.getUsername()); Employee emp = employeeService.getOne(queryWrapper);//数据唯一(表中属性为Unique) //3.如果没有查询到则返回登录失败结果 if (emp == null){ return Result.error("用户名不存在!"); } //4.密码比对,如果不一样则返回登录失败结果 if (!emp.getPassword().equals(password)){ return Result.error("用户名或密码错误!"); } //5.查看员工状态,如果已禁用状态,则返回员工已禁用结果 if (emp.getStatus() != 1){ // 账号被禁用,status == 1,账号可以正常登录 return Result.error("账号被禁用,请联系管理员或客服!"); } //6.登录成功,将用户id存入Session并返回登录成功 request.getSession().setAttribute("employee",emp.getId()); return Result.success(emp); }- 1
- 2
- 3
- 4
- 5
- 6
- 7
- 8
- 9
- 10
- 11
- 12
- 13
- 14
- 15
- 16
- 17
- 18
- 19
- 20
- 21
- 22
- 23
- 24
- 25
- 26
- 27
- 28
- 29
- 30
- 31
- 32
- 33
- 34
- 35
- 36
- 37
- 38
- 39
- 40
功能测试
完善登录功能(过滤器)
需求分析

代码开发
实现步骤:
1、创建自定义过滤器LoginCheckFilter
2、在启动类上加入注解@ServletComponentScan
3.完善过滤器的处理逻辑…/Application.java 启动类中加上
@ServletComponentScan注解package com.yjq.reggie; import lombok.extern.slf4j.Slf4j; import org.springframework.boot.SpringApplication; import org.springframework.boot.autoconfigure.SpringBootApplication; import org.springframework.boot.web.servlet.ServletComponentScan; @Slf4j //直接可使用loge @SpringBootApplication @ServletComponentScan //过滤器 public class ReggieApplication { public static void main(String[] args) { SpringApplication.run(ReggieApplication.class,args); log.info("项目启动成功..."); } }- 1
- 2
- 3
- 4
- 5
- 6
- 7
- 8
- 9
- 10
- 11
- 12
- 13
- 14
- 15
- 16
- 17
业务逻辑

package com.yjq.reggie.filter; import com.alibaba.fastjson.JSON; import com.yjq.reggie.common.Result; import lombok.extern.slf4j.Slf4j; import org.springframework.util.AntPathMatcher; import javax.servlet.*; import javax.servlet.annotation.WebFilter; import javax.servlet.http.HttpServletRequest; import javax.servlet.http.HttpServletResponse; import java.io.IOException; /** * 检查用户是否已登录 */ @Slf4j @WebFilter(filterName = "loginCheckFilter",urlPatterns = "/*") public class LoginCheckFilter implements Filter { public static final AntPathMatcher PATH_MATCHER = new AntPathMatcher(); //匹配器,专门用来路径匹配的 @Override public void doFilter(ServletRequest servletRequest, ServletResponse servletResponse, FilterChain filterChain) throws IOException, ServletException { HttpServletRequest request = (HttpServletRequest) servletRequest; HttpServletResponse response = (HttpServletResponse) servletResponse; //1.获取本次请求的URI String requestURI = request.getRequestURI(); log.info("拦截到请求:{}",requestURI); //定义不需要处理的请求路径 String[] urls = new String[]{ "/employee/login", "/employee/logout", "/backend/**", //AntPathMatcher 路径比较,通配符匹配 "/front/**" }; //2.判断本次请求是否需要处理 boolean check = check(urls,requestURI); //3.如果不需要处理,则直接放行 if(check){ log.info("本次请求{}不需要处理",requestURI); filterChain.doFilter(request,response); return; } //4.判断登录状态,如果已登录,则直接放行 if(request.getSession().getAttribute("employee") != null){ log.info("用户已登录,用户id为:{}",request.getSession().getAttribute("employee")); filterChain.doFilter(request,response); return; } log.info("用户未登录"); //5.如果未登录则返回未登录结果,通过输出流方式向客户端页面响应数据 response.getWriter().write(JSON.toJSONString(Result.error("NOTLOGIN"))); return; } /** * 路径匹配,检查本次请求是否需要放行 * @param urls * @param requestURI * @return */ public boolean check(String[] urls,String requestURI){ //遍历请求路径 for (String url : urls) { boolean match = PATH_MATCHER.match(url, requestURI); if(match){ return true; //匹配就返回true,放行 } } return false; } }- 1
- 2
- 3
- 4
- 5
- 6
- 7
- 8
- 9
- 10
- 11
- 12
- 13
- 14
- 15
- 16
- 17
- 18
- 19
- 20
- 21
- 22
- 23
- 24
- 25
- 26
- 27
- 28
- 29
- 30
- 31
- 32
- 33
- 34
- 35
- 36
- 37
- 38
- 39
- 40
- 41
- 42
- 43
- 44
- 45
- 46
- 47
- 48
- 49
- 50
- 51
- 52
- 53
- 54
- 55
- 56
- 57
- 58
- 59
- 60
- 61
- 62
- 63
- 64
- 65
- 66
- 67
- 68
- 69
- 70
- 71
- 72
- 73
- 74
- 75
- 76
- 77
- 78
- 79
- 80
注意:
response.getWriter().write(JSON.toJSONString(Result.error("NOTLOGIN")));
NOTLOGIN 与静态资源中…/js/request.js中响应拦截器里msg信息要一致不然刷新到index.html页面不会跳转到登录页面

功能测试

后台退出功能
需求分析
员工登录成功后,页面跳转到后台系统首页面(backend/indexhtml),此时会显示当前登录用户的姓名:
如果员工需要退出系统,直接点击右侧的退出按钮即可很出系统,退出系统后页面应跳转回登录页面代码开发
用户点击页面中退出按钮,发送请求,请求地址为/employee/logout,请求方式为POST。我们只需要在Controller中创建对应的处理方法即可,具体的处理逻辑:
1、清理Session中的用户id
2、返回结果/** * 退出登录 * @param request * @return */ @PostMapping("/logout") public Result<String> logout(HttpServletRequest request){ //清理用户id request.getSession().removeAttribute("employee"); return Result.success("退出成功"); }- 1
- 2
- 3
- 4
- 5
- 6
- 7
- 8
- 9
- 10
- 11
- 12
功能测试
省略
新增员工功能
需求分析

数据模型

新增用户的用户名设置为unique具有唯一属性,status状态要有默认值1不被禁用
代码开发


/** * 新增员工 * @param request * @param employee * @return */ @PostMapping public Result<String> save(HttpServletRequest request,@RequestBody Employee employee){ log.info("新增员工,员工信息:{}",employee.toString()); // 在新增员工操作中,对员工的密码进行初始化( MD5加密 ) employee.setPassword(DigestUtils.md5DigestAsHex("123456".getBytes())); //下面设置 公共属性的值(createTime、updateTime、createUser、updateUser)交给 MyMetaObjectHandler类处理 employee.setCreateTime(LocalDateTime.now()); employee.setUpdateTime(LocalDateTime.now()); Long empId = (Long) request.getSession().getAttribute("employee"); employee.setCreateUser(empId); employee.setUpdateUser(empId); employeeService.save(employee); return Result.success("成功新增员工"); }- 1
- 2
- 3
- 4
- 5
- 6
- 7
- 8
- 9
- 10
- 11
- 12
- 13
- 14
- 15
- 16
- 17
- 18
- 19
- 20
- 21
- 22
- 23
- 24
- 25
- 26

package com.yjq.reggie.common; import lombok.extern.slf4j.Slf4j; import org.springframework.stereotype.Controller; import org.springframework.web.bind.annotation.ControllerAdvice; import org.springframework.web.bind.annotation.ExceptionHandler; import org.springframework.web.bind.annotation.ResponseBody; import org.springframework.web.bind.annotation.RestController; import java.sql.SQLIntegrityConstraintViolationException; // 全局异常处理 // 如果类上加有 @RestController、@Controller注解(annotations的属性值)的类中有方法抛出异常,由GlobalExceptionHander来处理异常 @ControllerAdvice(annotations = {RestController.class, Controller.class}) @ResponseBody // 将结果封装成JSON数据并返回 @Slf4j public class GlobalExceptionHander { // 解决 字段username被唯一索引约束的情况下,添加相同的username,抛出SQLIntegrityConstraintViolationException 的全局异常 @ExceptionHandler(SQLIntegrityConstraintViolationException.class) public Result<String> exceptionHandler(SQLIntegrityConstraintViolationException e){ log.info(e.getMessage()); if (e.getMessage().contains("Duplicate entry")){ String[] split = e.getMessage().split(" "); String msg = split[2] + "已存在"; return Result.error(msg); } return Result.error("操作失败!"); } }- 1
- 2
- 3
- 4
- 5
- 6
- 7
- 8
- 9
- 10
- 11
- 12
- 13
- 14
- 15
- 16
- 17
- 18
- 19
- 20
- 21
- 22
- 23
- 24
- 25
- 26
- 27
- 28
- 29
- 30
- 31
功能测试


前端返给服务端参数,服务端返还jason数据
员工信息分页查询功能
需求分析

代码开发

…/config/MybatisPlusConfigpackage com.yjq.reggie.config; import com.baomidou.mybatisplus.extension.plugins.MybatisPlusInterceptor; import com.baomidou.mybatisplus.extension.plugins.inner.PaginationInnerInterceptor; import org.springframework.context.annotation.Bean; import org.springframework.context.annotation.Configuration; // 配置MybatisPlus的分页插件 @Configuration // 标注MybatisPlusConfig是一个配置类 public class MybatisPlusConfig { @Bean public MybatisPlusInterceptor mybatisPlusInterceptor(){ MybatisPlusInterceptor mybatisPlusInterceptor = new MybatisPlusInterceptor(); mybatisPlusInterceptor.addInnerInterceptor(new PaginationInnerInterceptor()); return mybatisPlusInterceptor; } }- 1
- 2
- 3
- 4
- 5
- 6
- 7
- 8
- 9
- 10
- 11
- 12
- 13
- 14
- 15
- 16
- 17
- 18
- 19
- 20
/** * 分页展示功能 * @param page * @param pageSize * @param name * @return */ // 1、页面发送Ajax请求,将分页查询参数(page、pageSize、name)提交到服务端 // 2、服务端Controller接收页面提交的数据 并调用Service查询数据 // 3、Service调用Mapper操作数据库,查询分页的数据 // 4、Controller将查询的分页数据 响应给页面 // 5、页面接收到分页数据并通过前端(ElementUI)的table组件展示到页面上 @GetMapping("/page") public Result<Page> pageShow(int page,int pageSize,String name){ log.info("page = {},pageSize = {},name = {}",page,pageSize,name); // 创建分页构造器对象 Page pageInfo = new Page(page,pageSize); // 构造条件构造器 LambdaQueryWrapper<Employee> queryWrapper = new LambdaQueryWrapper(); // name不为null,才会 比较 getUsername方法和前端传入的name是否匹配 的过滤条件 queryWrapper.like(StringUtils.isNotEmpty(name),Employee::getUsername,name); // 去数据库查询 employeeService.page(pageInfo,queryWrapper); return Result.success(pageInfo); } }- 1
- 2
- 3
- 4
- 5
- 6
- 7
- 8
- 9
- 10
- 11
- 12
- 13
- 14
- 15
- 16
- 17
- 18
- 19
- 20
- 21
- 22
- 23
- 24
- 25
- 26
- 27
- 28
- 29
- 30
功能测试


启用/禁用员工账号功能
需求分析

代码开发
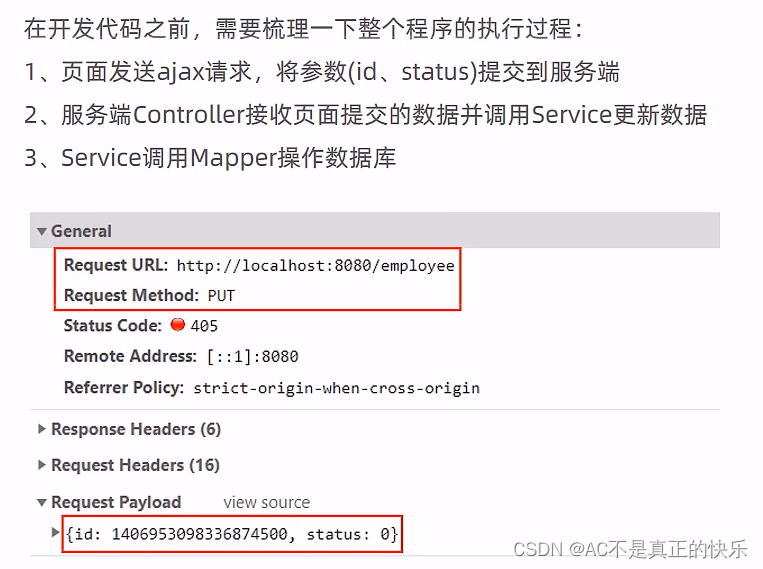
功能测试

@PutMapping // !!!! @RequestBody不要忘 public Result<String> update(HttpServletRequest request,@RequestBody Employee employee){ log.info(employee.toString()); // 下面设置 公共属性的值(createTime、updateTime、createUser、updateUser)交给 MyMetaObjectHandler类处理 Long empId = (Long) request.getSession().getAttribute("employee"); employee.setUpdateTime(LocalDateTime.now()); employee.setUpdateUser(empId); employeeService.updateById(employee); return Result.success("员工信息修改成功!"); }- 1
- 2
- 3
- 4
- 5
- 6
- 7
- 8
- 9
- 10
- 11
- 12
- 13
- 14
原来修改代码可执行但无效修改,需要修复


代码修复

…/common/JacksonObjectMapper配置类
package com.yjq.reggie.common; import com.fasterxml.jackson.databind.DeserializationFeature; import com.fasterxml.jackson.databind.ObjectMapper; import com.fasterxml.jackson.databind.module.SimpleModule; import com.fasterxml.jackson.databind.ser.std.ToStringSerializer; import com.fasterxml.jackson.datatype.jsr310.deser.LocalDateDeserializer; import com.fasterxml.jackson.datatype.jsr310.deser.LocalDateTimeDeserializer; import com.fasterxml.jackson.datatype.jsr310.deser.LocalTimeDeserializer; import com.fasterxml.jackson.datatype.jsr310.ser.LocalDateSerializer; import com.fasterxml.jackson.datatype.jsr310.ser.LocalDateTimeSerializer; import com.fasterxml.jackson.datatype.jsr310.ser.LocalTimeSerializer; import java.math.BigInteger; import java.time.LocalDate; import java.time.LocalDateTime; import java.time.LocalTime; import java.time.format.DateTimeFormatter; import static com.fasterxml.jackson.databind.DeserializationFeature.FAIL_ON_UNKNOWN_PROPERTIES; /** * 对象映射器:基于jackson将Java对象转为json,或者将json转为Java对象 * 将JSON解析为Java对象的过程称为 [从JSON反序列化Java对象] * 从Java对象生成JSON的过程称为 [序列化Java对象到JSON] */ // 将 较大值的Long类型数据 传到前端,可能会造成数值的精度丢失,将Long类型数据转化为字符串再传到前端就可以解决该问题 // 同时,在WebMvcConfig中 添加消息转换方法extendMessageConverters(List- 1
- 2
- 3
- 4
- 5
- 6
- 7
- 8
- 9
- 10
- 11
- 12
- 13
- 14
- 15
- 16
- 17
- 18
- 19
- 20
- 21
- 22
- 23
- 24
- 25
- 26
- 27
- 28
- 29
- 30
- 31
- 32
- 33
- 34
- 35
- 36
- 37
- 38
- 39
- 40
- 41
- 42
- 43
- 44
- 45
- 46
- 47
- 48
- 49
- 50
- 51
- 52
- 53
- 54
- 55
- 56
- 57
- 58
- 59
扩展SpringMvc的消息转换器
…/config/WebMvcConfig.java
/** * 扩展SpringMvc的消息转换器 * @param converters */ @Override protected void extendMessageConverters(List<HttpMessageConverter<?>> converters) { log.info("自定义消息转化器 被调用!"); // 创建消息转换器对象 MappingJackson2HttpMessageConverter messageConverter = new MappingJackson2HttpMessageConverter(); // 设置对象转换器,底层使用JackSON 将Java对象 转化为JSON messageConverter.setObjectMapper(new JacksonObjectMapper()); // 将上面的消息转换器对象追加到SpringMVC的 转换器容器 的第一个位置(优先采用下标为 0 位置的消息转换器) converters.add(0,messageConverter); }- 1
- 2
- 3
- 4
- 5
- 6
- 7
- 8
- 9
- 10
- 11
- 12
- 13
- 14
- 15
再次测试


编辑员工信息功能
需求分析

代码开发

/** * 根据id查询员工信息(编辑接口) * @param id * @return */ @GetMapping("/{id}") public Result<Employee> getById (@PathVariable Long id) { log.info("根据id查询员工信息..."); Employee employee = employeeService.getById(id); if (employee != null) { return Result.success(employee); } return Result.error("没有查询到员工信息"); }- 1
- 2
- 3
- 4
- 5
- 6
- 7
- 8
- 9
- 10
- 11
- 12
- 13
- 14
- 15
- 16
功能测试

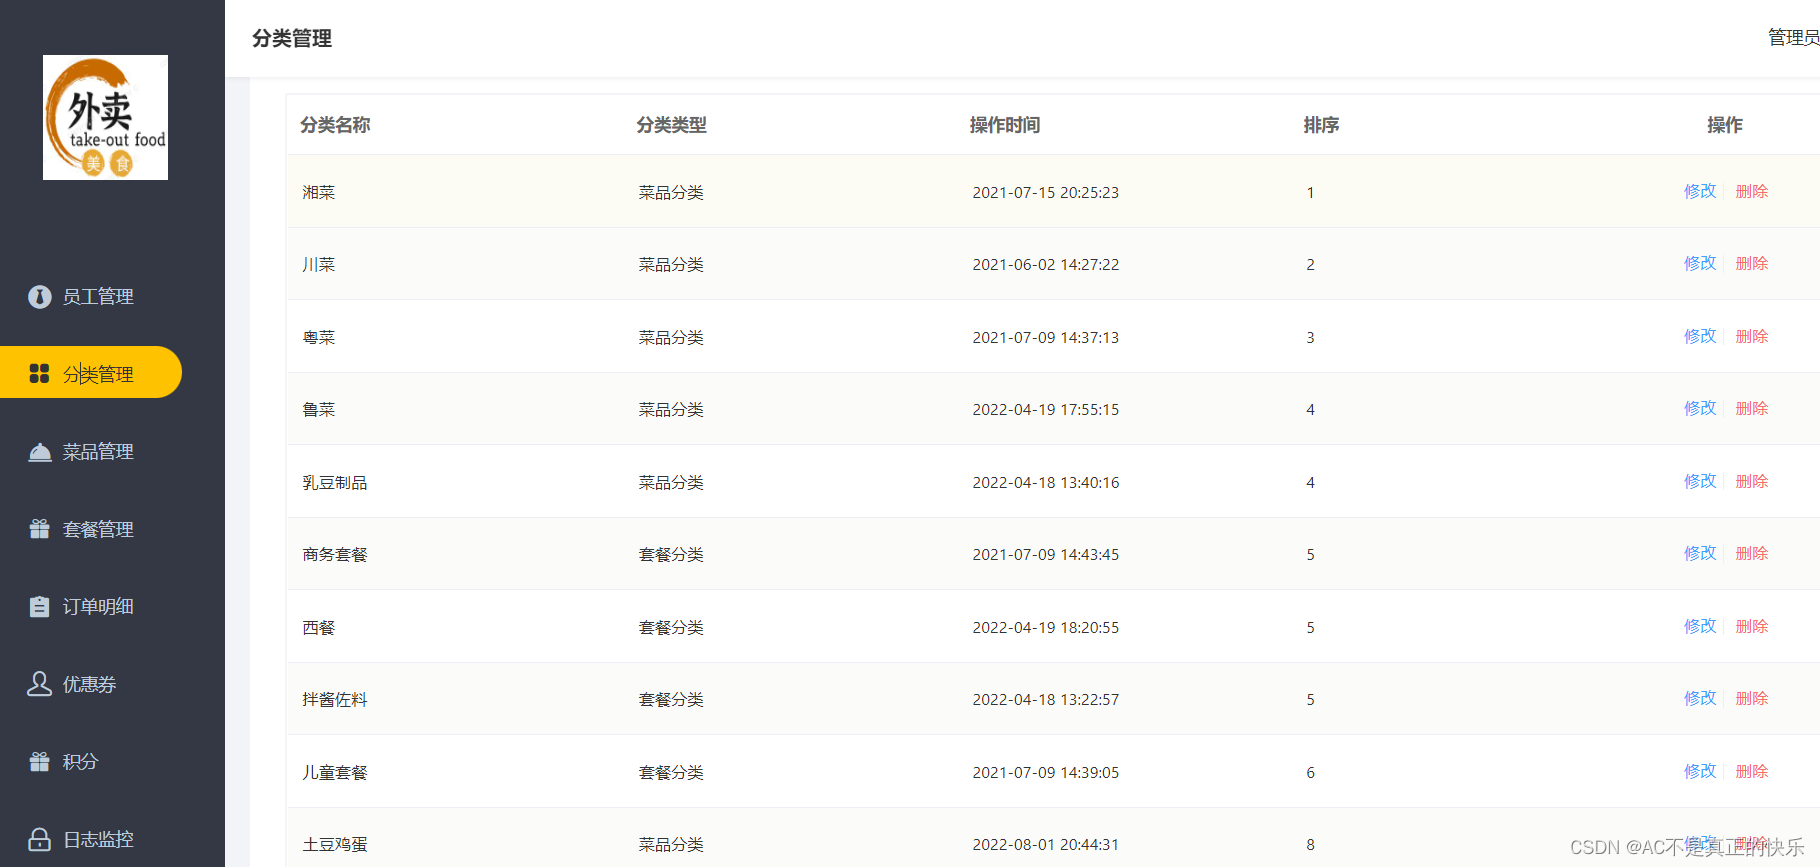
分类管理功能
公共字段自动填充功能
需求分析

代码开发

package com.yjq.reggie.entity; import com.baomidou.mybatisplus.annotation.FieldFill; import com.baomidou.mybatisplus.annotation.TableField; import lombok.Data; import java.io.Serializable; import java.time.LocalDateTime; /** * 员工实体类 */ @Data public class Employee implements Serializable { private static final long serialVersionUID = 1L; private Long id; //主键 private String username; //用户名 private String name; //账号 private String password; //密码 private String phone; //手机号 private String sex; //性别 /** * 驼峰命名自动映射sql表中的下划线命名 * application.yml配置文件中配置 */ private String idNumber; // 身份证号 private Integer status; //状态 0:禁用,1:正常 /** * 实体类属性上加上@TableField注解,自动填充公共字段 */ @TableField(fill = FieldFill.INSERT) private LocalDateTime createTime; //插入时填充字段 @TableField(fill = FieldFill.INSERT_UPDATE) private LocalDateTime updateTime; //插入和更新时填充字段 @TableField(fill = FieldFill.INSERT) private Long createUser; //插入时填充字段 @TableField(fill = FieldFill.INSERT_UPDATE) private Long updateUser; //插入和更新时填充字段 }- 1
- 2
- 3
- 4
- 5
- 6
- 7
- 8
- 9
- 10
- 11
- 12
- 13
- 14
- 15
- 16
- 17
- 18
- 19
- 20
- 21
- 22
- 23
- 24
- 25
- 26
- 27
- 28
- 29
- 30
- 31
- 32
- 33
- 34
- 35
- 36
- 37
- 38
- 39
- 40
- 41
- 42
- 43
- 44
- 45
- 46
- 47
- 48
- 49
- 50
- 51
- 52
- 53
这里先将createUser和updateUser的id值写死为1,后面完善功能会用获取的id替换
package com.yjq.reggie.common; import com.baomidou.mybatisplus.core.handlers.MetaObjectHandler; import lombok.extern.slf4j.Slf4j; import org.apache.ibatis.reflection.MetaObject; import org.springframework.stereotype.Component; import java.time.LocalDateTime; @Slf4j @Component public class MyMetaObjectHandler implements MetaObjectHandler { /** * 插入操作,自动填充 * @param metaObject */ @Override public void insertFill(MetaObject metaObject) { log.info("公共字段自动填充[insert]..."); log.info(metaObject.toString()); metaObject.setValue("createTime", LocalDateTime.now()); metaObject.setValue("updateTime", LocalDateTime.now()); metaObject.setValue("createUser", new Long(1)); metaObject.setValue("updateUser", new Long(1)); } /** * 更新操作,自动填充 * @param metaObject */ @Override public void updateFill(MetaObject metaObject) { log.info("公共字段自动填充[update]..."); log.info(metaObject.toString()); metaObject.setValue("updateTime", LocalDateTime.now()); metaObject.setValue("updateUser", new Long(1)); } }- 1
- 2
- 3
- 4
- 5
- 6
- 7
- 8
- 9
- 10
- 11
- 12
- 13
- 14
- 15
- 16
- 17
- 18
- 19
- 20
- 21
- 22
- 23
- 24
- 25
- 26
- 27
- 28
- 29
- 30
- 31
- 32
- 33
- 34
- 35
- 36
- 37
- 38
- 39
- 40
- 41
功能完善

验证一次请求,走的同一个线程把测试日志插入
LoginCheckFiter.java
EmployeeController.java
MyMetaObjectHandler.java程序中,打开修改页面保存看结果long id = Thread.currentThread().getId(); log.info("线程id:{}",id);- 1
- 2

ThreadLocal


package com.yjq.reggie.common; /** * 基于ThreadLocal 封装工具类,用户保存和获取当前登录的用户id * ThreadLocal以线程为 作用域,保存每个线程中的数据副本 */ public class BaseContext { private static ThreadLocal<Long> threadLocal = new ThreadLocal<>(); /** * 设置当前用户id值 * @param id */ public static void setCurrentId(Long id){ threadLocal.set(id); } /** * 获取当前用户id值 * @return */ public static Long getCurrentId(){ return threadLocal.get(); } }- 1
- 2
- 3
- 4
- 5
- 6
- 7
- 8
- 9
- 10
- 11
- 12
- 13
- 14
- 15
- 16
- 17
- 18
- 19
- 20
- 21
- 22
- 23
- 24
- 25
- 26
- 27
- 28

package com.yjq.reggie.common; import com.baomidou.mybatisplus.core.handlers.MetaObjectHandler; import lombok.extern.slf4j.Slf4j; import org.apache.ibatis.reflection.MetaObject; import org.springframework.stereotype.Component; import java.time.LocalDateTime; @Slf4j @Component public class MyMetaObjectHandler implements MetaObjectHandler { /** * 插入操作,自动填充 * @param metaObject */ @Override public void insertFill(MetaObject metaObject) { log.info("公共字段自动填充[insert]..."); log.info(metaObject.toString()); // long id = Thread.currentThread().getId(); // log.info("线程id:{}",id); metaObject.setValue("createTime", LocalDateTime.now()); metaObject.setValue("updateTime", LocalDateTime.now()); /** * 获取当前用户id值 */ metaObject.setValue("createUser", BaseContext.getCurrentId()); metaObject.setValue("updateUser", BaseContext.getCurrentId()); } /** * 更新操作,自动填充 * @param metaObject */ @Override public void updateFill(MetaObject metaObject) { log.info("公共字段自动填充[update]..."); log.info(metaObject.toString()); // long id = Thread.currentThread().getId(); // log.info("线程id:{}",id); metaObject.setValue("updateTime", LocalDateTime.now()); metaObject.setValue("updateUser", BaseContext.getCurrentId()); } }- 1
- 2
- 3
- 4
- 5
- 6
- 7
- 8
- 9
- 10
- 11
- 12
- 13
- 14
- 15
- 16
- 17
- 18
- 19
- 20
- 21
- 22
- 23
- 24
- 25
- 26
- 27
- 28
- 29
- 30
- 31
- 32
- 33
- 34
- 35
- 36
- 37
- 38
- 39
- 40
- 41
- 42
- 43
- 44
- 45
- 46
- 47
- 48
- 49
- 50
- 51
- 52
- 53
功能测试

新增分类功能
需求分析


数据模型


代码开发

Entity实体类
package com.yjq.reggie.entity; import com.baomidou.mybatisplus.annotation.FieldFill; import com.baomidou.mybatisplus.annotation.TableField; import lombok.Data; import java.io.Serializable; import java.time.LocalDateTime; /** * 分类 */ @Data public class Category implements Serializable { private static final long serialVersionUID = 1L; private Long id; //类型 1 菜品分类 2 套餐分类 private Integer type; //分类名称 private String name; //顺序 private Integer sort; //创建时间 @TableField(fill = FieldFill.INSERT) private LocalDateTime createTime; //更新时间 @TableField(fill = FieldFill.INSERT_UPDATE) private LocalDateTime updateTime; //创建人 @TableField(fill = FieldFill.INSERT) private Long createUser; //修改人 @TableField(fill = FieldFill.INSERT_UPDATE) private Long updateUser; // 是否删除(逻辑删除,Category表中没有isDeleted 字段) // private Integer isDeleted; }- 1
- 2
- 3
- 4
- 5
- 6
- 7
- 8
- 9
- 10
- 11
- 12
- 13
- 14
- 15
- 16
- 17
- 18
- 19
- 20
- 21
- 22
- 23
- 24
- 25
- 26
- 27
- 28
- 29
- 30
- 31
- 32
- 33
- 34
- 35
- 36
- 37
- 38
- 39
- 40
- 41
- 42
- 43
- 44
- 45
- 46
- 47
- 48
- 49
- 50
- 51
- 52
- 53
- 54
- 55
- 56
Mapper接口
package com.yjq.reggie.mapper; import com.baomidou.mybatisplus.core.mapper.BaseMapper; import com.yjq.reggie.entity.Category; import org.apache.ibatis.annotations.Mapper; @Mapper public interface CategoryMapper extends BaseMapper<Category> { }- 1
- 2
- 3
- 4
- 5
- 6
- 7
- 8
- 9
- 10
业务层Service接口
package com.yjq.reggie.service; import com.baomidou.mybatisplus.extension.service.IService; import com.yjq.reggie.entity.Category; public interface CategoryService extends IService<Category> { }- 1
- 2
- 3
- 4
- 5
- 6
- 7
- 8
- 9
业务层ServiceImpl实现类
package com.yjq.reggie.service.impl; import com.baomidou.mybatisplus.extension.service.impl.ServiceImpl; import com.yjq.reggie.entity.Category; import com.yjq.reggie.mapper.CategoryMapper; import com.yjq.reggie.service.CategoryService; import org.springframework.stereotype.Service; /*** * service实现类 继承mp提供通用的service基类 ServiceImpl * ServiceImpl- 1
- 2
- 3
- 4
- 5
- 6
- 7
- 8
- 9
- 10
- 11
- 12
- 13
- 14
- 15
- 16
- 17
- 18
- 19
Controller控制层
package com.yjq.reggie.controller; import com.yjq.reggie.entity.Category; import com.yjq.reggie.service.CategoryService; import lombok.extern.slf4j.Slf4j; import org.springframework.beans.factory.annotation.Autowired; import org.springframework.web.bind.annotation.*; /** * 分类管理 */ @Slf4j @RestController @RequestMapping("/category") public class CategoryController { @Autowired private CategoryService categoryService; }- 1
- 2
- 3
- 4
- 5
- 6
- 7
- 8
- 9
- 10
- 11
- 12
- 13
- 14
- 15
- 16
- 17
- 18
- 19
- 20

/** * 新增分类 * @param category * @return */ @PostMapping public Result<String> save(@RequestBody Category category){ log.info("category: {}",category); categoryService.save(category); return Result.success("新增分类成功"); }- 1
- 2
- 3
- 4
- 5
- 6
- 7
- 8
- 9
- 10
- 11
功能测试
分类信息分类查询功能
需求分析
代码开发

构造根据sort值排序的条件构造器/** * 分页查询 * @param page * @param pageSize * @return */ @GetMapping("/page") public Result<Page> pageShow(int page, int pageSize){ log.info("page = {},pageSize = {}",page,pageSize); // 创建分页构造器对象 Page pageInfo = new Page(page,pageSize); // 条件构造器 LambdaQueryWrapper<Category> queryWrapper = new LambdaQueryWrapper(); // 根据 Category对象的sort字段 来排序展示 queryWrapper.orderByAsc(Category::getSort); // 去数据库查询 categoryService.page(pageInfo,queryWrapper); return Result.success(pageInfo); }- 1
- 2
- 3
- 4
- 5
- 6
- 7
- 8
- 9
- 10
- 11
- 12
- 13
- 14
- 15
- 16
- 17
- 18
- 19
- 20
- 21
- 22
功能测试

删除功能
需求分析

代码开发

/** * 删除分类 * @param id * @return */ @DeleteMapping public Result<String> deleteById(Long id){ log.info("删除分类,分类id为:{}",id); categoryService.removeById(id); return Result.success("删除成功"); }- 1
- 2
- 3
- 4
- 5
- 6
- 7
- 8
- 9
- 10
- 11
- 12
- 13

这里只给Dish和Setmeal的实体类代码,剩下的接口和实现类与之前类似,此处省略package com.yjq.reggie.entity; import com.baomidou.mybatisplus.annotation.FieldFill; import com.baomidou.mybatisplus.annotation.TableField; import lombok.Data; import java.io.Serializable; import java.math.BigDecimal; import java.time.LocalDateTime; /** * 菜品分类,id为1 */ @Data public class Dish implements Serializable { private static final long serialVersionUID = 1L; private Long id; //菜品名称 private String name; //菜品分类id private Long categoryId; //菜品价格,一般存在数据库中 商品价格 往往以 分作为 基本单位(分、角、元) private BigDecimal price; //商品码 private String code; //图片 private String image; //描述信息 private String description; //0 停售 1 起售 private Integer status; //顺序 private Integer sort; @TableField(fill = FieldFill.INSERT) private LocalDateTime createTime; @TableField(fill = FieldFill.INSERT_UPDATE) private LocalDateTime updateTime; @TableField(fill = FieldFill.INSERT) private Long createUser; @TableField(fill = FieldFill.INSERT_UPDATE) private Long updateUser; //是否删除 private Integer isDeleted; }- 1
- 2
- 3
- 4
- 5
- 6
- 7
- 8
- 9
- 10
- 11
- 12
- 13
- 14
- 15
- 16
- 17
- 18
- 19
- 20
- 21
- 22
- 23
- 24
- 25
- 26
- 27
- 28
- 29
- 30
- 31
- 32
- 33
- 34
- 35
- 36
- 37
- 38
- 39
- 40
- 41
- 42
- 43
- 44
- 45
- 46
- 47
- 48
- 49
- 50
- 51
- 52
- 53
- 54
- 55
- 56
- 57
- 58
- 59
- 60
- 61
- 62
- 63
- 64
- 65
- 66
- 67
- 68
- 69
- 70
- 71
- 72
- 73
- 74
- 75
package com.yjq.reggie.entity; import com.baomidou.mybatisplus.annotation.FieldFill; import com.baomidou.mybatisplus.annotation.TableField; import lombok.Data; import java.io.Serializable; import java.math.BigDecimal; import java.time.LocalDateTime; /** * 套餐分类,id为2 */ @Data public class Setmeal implements Serializable { private static final long serialVersionUID = 1L; private Long id; //分类id private Long categoryId; //套餐名称 private String name; //套餐价格 private BigDecimal price; //状态 0:停用 1:启用 private Integer status; //编码 private String code; //描述信息 private String description; //图片 private String image; @TableField(fill = FieldFill.INSERT) private LocalDateTime createTime; @TableField(fill = FieldFill.INSERT_UPDATE) private LocalDateTime updateTime; @TableField(fill = FieldFill.INSERT) private Long createUser; @TableField(fill = FieldFill.INSERT_UPDATE) private Long updateUser; //是否删除 private Integer isDeleted; }- 1
- 2
- 3
- 4
- 5
- 6
- 7
- 8
- 9
- 10
- 11
- 12
- 13
- 14
- 15
- 16
- 17
- 18
- 19
- 20
- 21
- 22
- 23
- 24
- 25
- 26
- 27
- 28
- 29
- 30
- 31
- 32
- 33
- 34
- 35
- 36
- 37
- 38
- 39
- 40
- 41
- 42
- 43
- 44
- 45
- 46
- 47
- 48
- 49
- 50
- 51
- 52
- 53
- 54
- 55
- 56
- 57
- 58
- 59
- 60
- 61
- 62
- 63
- 64
- 65
- 66
- 67
- 68
- 69
- 70
- 71
回到categoryService层重写remove方法

public void remove(Long id);

package com.yjq.reggie.common; /** * 自定义异常 */ public class MyCustomException extends RuntimeException{ //有参构造器 public MyCustomException(String msg){ super(msg); } }- 1
- 2
- 3
- 4
- 5
- 6
- 7
- 8
- 9
- 10
- 11
- 12
在全局处理中处理异常
@ExceptionHandler(MyCustomException.class) public Result<String> exceptionHandler(MyCustomException e){ log.info(e.getMessage()); return Result.error(e.getMessage()); } ```v 在删除功能中重新调用Service的自定义remove方法 ```java /** * 删除分类 * @param id * @return */ @DeleteMapping public Result<String> deleteById(Long id){ log.info("删除分类,分类id为:{}",id); //categoryService.removeById(id); categoryService.remove(id); return Result.success("删除成功"); }- 1
- 2
- 3
- 4
- 5
- 6
- 7
- 8
- 9
- 10
- 11
- 12
- 13
- 14
- 15
- 16
- 17
- 18
- 19
- 20
- 21
- 22
- 23
- 24
- 25
- 26
功能测试

出现bug,属于前后端id名不同导致,多亏弹幕大军

然后在静态资源中找到发现,前端定义的接口参数是ids,而我们controller写的参数是id
刚开始我以为两种方式改变其中任意一个对应上就行,但改前端接口还是不行,所以只能妥协的改掉controller方法里的参数为idsps:有知道的大佬还请赐教
/** * 删除分类 * @param ids * @return */ @DeleteMapping public Result<String> deleteById(Long ids){ log.info("删除分类,分类id为:{}",ids); //categoryService.removeById(id); categoryService.remove(ids); return Result.success("删除成功"); }- 1
- 2
- 3
- 4
- 5
- 6
- 7
- 8
- 9
- 10
- 11
- 12
- 13
- 14
- 15

修改分类功能
需求分析

代码开发
/** * 根据id修改功能 * @param category * @return */ @PutMapping public Result<String> update(@RequestBody Category category){ log.info("修改分类信息:{}",category); categoryService.updateById(category); return Result.success("分类信息 修改成功!"); }- 1
- 2
- 3
- 4
- 5
- 6
- 7
- 8
- 9
- 10
- 11
- 12
- 13
- 14
功能测试


菜品管理功能
文件上传下载
简要介绍
文件上传

前端文件上传组件


文件下载

代码开发
服务端文件上传

两种方式:
1.在过滤器中添加放行路径

2.先登录再打开上传界面
package com.yjq.reggie.controller; import com.yjq.reggie.common.Result; import lombok.extern.slf4j.Slf4j; import org.springframework.beans.factory.annotation.Value; import org.springframework.web.bind.annotation.GetMapping; import org.springframework.web.bind.annotation.PostMapping; import org.springframework.web.bind.annotation.RequestMapping; import org.springframework.web.bind.annotation.RestController; import org.springframework.web.multipart.MultipartFile; import javax.servlet.ServletOutputStream; import javax.servlet.http.HttpServletResponse; import java.io.File; import java.io.FileInputStream; import java.io.IOException; import java.util.UUID; @RestController @RequestMapping("/common") @Slf4j public class CommonController { @Value("${upload.filePath}") private String basePath; // 文件上传 @PostMapping("/upload") public Result<String> upload(MultipartFile file){ // file是一个临时文件,需要转存到磁盘中的某个指定位置,否则本次请求完成后,临时文件file会删除 // upload方法名中的参数名 必须是file(文件上传表单的 中name属性值必须是file,name="file") log.info("上传的文件为: "+file.toString()); // 原始文件名 String originFileName = file.getOriginalFilename(); // 设 fileName为 abc.jpg String suffix = originFileName.substring(originFileName.lastIndexOf(".")); // suffix = .jpg // 使用UUID重新生成文件名,防止文件名重复,造成后面上传的文件覆盖前面上传的文件 String fileName = UUID.randomUUID().toString() + suffix; // 创建一个目录对象 dir File dir = new File(basePath); if (!dir.exists()){ dir.mkdirs(); } try { // 将临时文件转存到指定 位置 file.transferTo(new File(basePath + fileName)); } catch (IOException e) { e.printStackTrace(); } return Result.success(fileName); } // 文件下载 download @GetMapping("/download") public void download(String name, HttpServletResponse response) { try { // 通过输入流来读取文件内容 FileInputStream fileInputStream = new FileInputStream(new File(basePath +name)); // 通过输出流将文件写回到浏览器,并在浏览器展示图片 ServletOutputStream outputStream = response.getOutputStream(); response.setContentType("image/jpeg"); int len = 0; byte[] bytes = new byte[1024]; // 输入流读取到 内容放到 bytes数组中 while((len = fileInputStream.read(bytes)) != -1){ // 输入流还没有读取完数据 outputStream.write(bytes,0,len); outputStream.flush(); } fileInputStream.close(); outputStream.close(); } catch (IOException e) { e.printStackTrace(); } } }- 1
- 2
- 3
- 4
- 5
- 6
- 7
- 8
- 9
- 10
- 11
- 12
- 13
- 14
- 15
- 16
- 17
- 18
- 19
- 20
- 21
- 22
- 23
- 24
- 25
- 26
- 27
- 28
- 29
- 30
- 31
- 32
- 33
- 34
- 35
- 36
- 37
- 38
- 39
- 40
- 41
- 42
- 43
- 44
- 45
- 46
- 47
- 48
- 49
- 50
- 51
- 52
- 53
- 54
- 55
- 56
- 57
- 58
- 59
- 60
- 61
- 62
- 63
- 64
- 65
- 66
- 67
- 68
- 69
- 70
- 71
- 72
- 73
- 74
- 75
- 76
- 77
- 78
- 79
- 80
- 81
- 82
- 83
功能测试

新增菜品
需求分析

数据模型


代码开发
下菜品分类下拉框选项数据展示功能

…/controller/CatergoryController// 根据条件查询分类数据 @GetMapping("/list") public Result<List<Category>> categoryList(Category category){ LambdaQueryWrapper<Category> queryWrapper = new LambdaQueryWrapper<>(); // 只有当 category.getType()不为空,才会比较 前端传入的category的type和 实体类中 type属性是否相等 queryWrapper.eq(category.getType() != null, Category::getType,category.getType()); queryWrapper.orderByAsc(Category::getSort).orderByDesc(Category::getUpdateTime); List<Category> list = categoryService.list(queryWrapper); return Result.success(list); } // 前端传输到服务端的数据 和实体类中的属性 不是一一对应关系, // 需要用到DTO(Data Transfer Object)对象,即数据传输对象,一般用于Controller和Service层之间的数据传输- 1
- 2
- 3
- 4
- 5
- 6
- 7
- 8
- 9
- 10
- 11
- 12
- 13
- 14
- 15
添加菜品页面数据保存功能


DishDTo实体类(原来的Dish实体类中没有菜品口味的name和value属性)package com.yjq.reggie.dto; import com.yjq.reggie.entity.Dish; import com.yjq.reggie.entity.DishFlavor; import lombok.Data; import java.util.ArrayList; import java.util.List; // 前端传输到服务端的数据 和实体类中的属性 不是一一对应关系, // 需要用到DTO(Data Transfer Object)对象,即数据传输对象,一般用于Controller和Service层之间的数据传输 @Data public class DishDto extends Dish { // Dish 不符合前端传过来的数据,需要将其转化为DishDto // flavors: 菜品对应的口味数据 private List<DishFlavor> flavors = new ArrayList<>(); private String categoryName; private Integer copies; }- 1
- 2
- 3
- 4
- 5
- 6
- 7
- 8
- 9
- 10
- 11
- 12
- 13
- 14
- 15
- 16
- 17
- 18
- 19
- 20
在接口中自定义方法(操作两张表)
package com.yjq.reggie.service; import com.baomidou.mybatisplus.extension.service.IService; import com.yjq.reggie.dto.DishDto; import com.yjq.reggie.entity.Dish; public interface DishService extends IService<Dish> { // // 新增菜品,同时插入菜品对应的数据,需要操作两张表: dish、dish_flavor public void saveWithFlavor(DishDto dishDto); }- 1
- 2
- 3
- 4
- 5
- 6
- 7
- 8
- 9
- 10
- 11
- 12
- 13
- 14
实现类重写方法
package com.yjq.reggie.service.impl; import com.baomidou.mybatisplus.extension.service.impl.ServiceImpl; import com.yjq.reggie.dto.DishDto; import com.yjq.reggie.entity.Dish; import com.yjq.reggie.entity.DishFlavor; import com.yjq.reggie.mapper.DishMapper; import com.yjq.reggie.service.DishFlavorService; import com.yjq.reggie.service.DishService; import lombok.extern.slf4j.Slf4j; import org.springframework.beans.factory.annotation.Autowired; import org.springframework.stereotype.Service; import org.springframework.transaction.annotation.Transactional; import java.util.List; import java.util.stream.Collectors; @Slf4j @Service public class DishServiceImpl extends ServiceImpl<DishMapper, Dish> implements DishService { @Autowired private DishService dishService; @Autowired private DishFlavorService dishFlavorService; /** *新增菜品,同时保存对应的口味数据 * @param dishDto */ // 由于涉及到对dish、dish_flavor两张表的操作,应该使用 @Transactional 来标注事务 // 要让@Transactional 生效,还需在启动类添加@EnableTransactionManagement 来开启事务 @Transactional public void saveWithFlavor(DishDto dishDto) { //保存菜品的基本信息到菜品表dish this.save(dishDto); //保存菜品口味数据到菜品口味表dish_flavor Long dishId = dishDto.getId(); //菜品Id //菜品口味 List<DishFlavor> flavors = dishDto.getFlavors(); flavors = flavors.stream().map((flavor)->{ flavor.setDishId(dishId); return flavor; }).collect(Collectors.toList()); dishFlavorService.saveBatch(flavors); } }- 1
- 2
- 3
- 4
- 5
- 6
- 7
- 8
- 9
- 10
- 11
- 12
- 13
- 14
- 15
- 16
- 17
- 18
- 19
- 20
- 21
- 22
- 23
- 24
- 25
- 26
- 27
- 28
- 29
- 30
- 31
- 32
- 33
- 34
- 35
- 36
- 37
- 38
- 39
- 40
- 41
- 42
- 43
- 44
- 45
- 46
- 47
- 48
- 49
- 50
- 51
- 52
- 53
JAVA 批量修改List里面某个字段的方法
方法一:通过流的方式
List<DishFlavor> flavors = dishDto.getFlavors(); flavors = flavors.stream().map((item) -> { item.setDishId(dishId); return item; }).collect(Collectors.toList());- 1
- 2
- 3
- 4
- 5
方法二:通过forEach
List<DishFlavor> flavors = dishDto.getFlavors(); flavors.forEach(item -> item.setDishId(dishId));- 1
- 2

最后在DishController中的save方法中调用自定义方法
/** * 新增菜品 * @param dishDto * @return */ @PostMapping public Result<String> save(@RequestBody DishDto dishDto) { log.info(dishDto.toString()); dishService.saveWithFlavor(dishDto); return Result.success("新增菜品操作成功"); }- 1
- 2
- 3
- 4
- 5
- 6
- 7
- 8
- 9
- 10
- 11
功能测试

菜品信息分页查询
需求分析

代码开发

// 分页展示菜品信息 @GetMapping("/page") // dish/page?page=1&pageSize=10&name=122334,name 是搜索框中的输入值 public Result<Page> pageShow(int page,int pageSize,String name){ Page pageInfo = new Page(page,pageSize); LambdaQueryWrapper<Dish> queryWrapper = new LambdaQueryWrapper<>(); // 添加过滤条件 queryWrapper.like(name != null,Dish::getName,name); queryWrapper.orderByDesc(Dish::getUpdateTime); // 执行分页查询 dishService.page(pageInfo,queryWrapper); return Result.success(pageInfo); }- 1
- 2
- 3
- 4
- 5
- 6
- 7
- 8
- 9
- 10
- 11
- 12
- 13
- 14
- 15
- 16

菜品分类一栏没有显示,可以看到后端返回的是categoryId,应该返回categoryName菜品名称/** * 分页展示菜品信息 * @param page * @param pageSize * @param name * @return */ @GetMapping("/page") // dish/page?page=1&pageSize=10&name=122334,name 是搜索框中的输入值 public Result<Page> pageShow(int page,int pageSize,String name){ // 构造分页构造器对象 Page<Dish> dishPage = new Page(page,pageSize); Page<DishDto> dtoPage = new Page<>(); // 条件构造器 LambdaQueryWrapper<Dish> queryWrapper = new LambdaQueryWrapper<>(); // 添加过滤条件 queryWrapper.like(name != null,Dish::getName,name); // 添加排序条件 queryWrapper.orderByDesc(Dish::getUpdateTime); // 执行分页查询 dishService.page(dishPage,queryWrapper); // 将 dish 中的属性值复制到 dtoPage,但是忽略 records // records需要另外去设置 BeanUtils.copyProperties(dishPage,dtoPage,"records"); //忽略records,因为dishPage的records数据中不包括菜品名称categoryName List<Dish> records = dishPage.getRecords(); List<DishDto> dtoList = records.stream().map((dish) -> { // dish 为每个菜品对象 DishDto dishDto = new DishDto(); BeanUtils.copyProperties(dish,dishDto); Long categoryId = dish.getCategoryId(); // 菜品的分类id Category category = categoryService.getById(categoryId); //根据菜品分类的id得到菜品对象 if (category != null){ dishDto.setCategoryName(category.getName()); //根据菜品得到菜品名称 } return dishDto; }).collect(Collectors.toList()); dtoPage.setRecords(dtoList); //将包含菜品名称的list赋给dtoPage return Result.success(dtoPage); }- 1
- 2
- 3
- 4
- 5
- 6
- 7
- 8
- 9
- 10
- 11
- 12
- 13
- 14
- 15
- 16
- 17
- 18
- 19
- 20
- 21
- 22
- 23
- 24
- 25
- 26
- 27
- 28
- 29
- 30
- 31
- 32
- 33
- 34
- 35
- 36
- 37
- 38
- 39
- 40
- 41
- 42
- 43
- 44
- 45
- 46
- 47
- 48
- 49
- 50
- 51
- 52
- 53
功能测试

修改菜品
需求分析

代码开发

修改前数据回显
回显数据涉及两个表的数据,到DishService中自定义get方法(获取dish表中基本信息以及dish_flavor中对应的口味信息)
这里使用DishDto为返回对象类型,与页面数据对应
// 根据dishId查询 菜品信息和口味信息 public DishDto getByDishIdWithFlavor(Long dishId);- 1
- 2
/** * 根据id查询菜品信息和对应的口味信息 * @param dishId * @return */ @Override public DishDto getByDishIdWithFlavor(Long dishId) { // 只是关联查询两张表,没有涉及事务,不用加 @Transactional // 从dish表中查询 菜品的基本信息 Dish dish = this.getById(dishId); DishDto dishDto = new DishDto(); BeanUtils.copyProperties(dish,dishDto); // 从dish_flavor表查询 当前菜品对应的口味信息 LambdaQueryWrapper<DishFlavor> queryWrapper = new LambdaQueryWrapper<>(); queryWrapper.eq(DishFlavor::getDishId,dishId); List<DishFlavor> list = dishFlavorService.list(queryWrapper); dishDto.setFlavors(list); return dishDto; }- 1
- 2
- 3
- 4
- 5
- 6
- 7
- 8
- 9
- 10
- 11
- 12
- 13
- 14
- 15
- 16
- 17
- 18
- 19
- 20
- 21
- 22
- 23
/** * 根据id查询菜品信息和对应的口味信息 * @param id * @return */ @GetMapping("/{id}") public Result<DishDto> get(@PathVariable Long id){ DishDto dishDto = dishService.getByDishIdWithFlavor(id); return Result.success(dishDto); }- 1
- 2
- 3
- 4
- 5
- 6
- 7
- 8
- 9
- 10
- 11
- 12
回显后修改保存
功能测试
自我完善部分
菜品售卖状态修改功能(批量修改)
菜品删除功能(批量删除)
套餐管理功能
新增套餐功能
需求分析

数据模型

代码开发

SetmealDish 套餐餐品package com.yjq.reggie.entity; import com.baomidou.mybatisplus.annotation.FieldFill; import com.baomidou.mybatisplus.annotation.TableField; import lombok.Data; import java.io.Serializable; import java.math.BigDecimal; import java.time.LocalDateTime; /** * 套餐菜品关系 */ @Data public class SetmealDish implements Serializable { private static final long serialVersionUID = 1L; private Long id; //套餐id private Long setmealId; //菜品id private Long dishId; //菜品名称 (冗余字段) private String name; //菜品原价 private BigDecimal price; //菜品的份数 private Integer copies; //排序 private Integer sort; @TableField(fill = FieldFill.INSERT) private LocalDateTime createTime; @TableField(fill = FieldFill.INSERT_UPDATE) private LocalDateTime updateTime; @TableField(fill = FieldFill.INSERT) private Long createUser; @TableField(fill = FieldFill.INSERT_UPDATE) private Long updateUser; //是否删除 private Integer isDeleted; }- 1
- 2
- 3
- 4
- 5
- 6
- 7
- 8
- 9
- 10
- 11
- 12
- 13
- 14
- 15
- 16
- 17
- 18
- 19
- 20
- 21
- 22
- 23
- 24
- 25
- 26
- 27
- 28
- 29
- 30
- 31
- 32
- 33
- 34
- 35
- 36
- 37
- 38
- 39
- 40
- 41
- 42
- 43
- 44
- 45
- 46
- 47
- 48
- 49
- 50
- 51
- 52
- 53
- 54
- 55
- 56
- 57
- 58
- 59
- 60
- 61
- 62
- 63
SetmealDto 继承 Setmeal套餐的基本属性,
另外根据前端页面需求数据添加了特有属性package com.yjq.reggie.dto; import com.yjq.reggie.entity.Setmeal; import com.yjq.reggie.entity.SetmealDish; import lombok.Data; import java.util.List; @Data public class SetmealDto extends Setmeal { //新增套餐中自选菜品的集合 private List<SetmealDish> setmealDishes; //设置分页查询页面的套餐分类名称 private String categoryName; }- 1
- 2
- 3
- 4
- 5
- 6
- 7
- 8
- 9
- 10
- 11
- 12
- 13
- 14
- 15
- 16
接口和控制层省略…

1-2.套餐分类和菜品分类的数据获取(CategoryController中处理过)
3.在DishController中/** * 套餐管理/新增套餐/ * 添加菜品功能中根据套餐id查询相应的菜品 * @param dish * @return */ @GetMapping("/list") public Result<List<Dish>> list(Dish dish){ //构造条件查询 LambdaQueryWrapper<Dish> queryWrapper = new LambdaQueryWrapper<>(); //等值查询 queryWrapper.eq(dish.getCategoryId() != null,Dish::getCategoryId,dish.getCategoryId()); //必须是起售的菜品才显示 queryWrapper.eq(Dish::getStatus,1); //排序条件:根据sort升序排,根据更新时间降序排 queryWrapper.orderByAsc(Dish::getSort).orderByDesc(Dish::getUpdateTime); List<Dish> dishList = dishService.list(queryWrapper); return Result.success(dishList); }- 1
- 2
- 3
- 4
- 5
- 6
- 7
- 8
- 9
- 10
- 11
- 12
- 13
- 14
- 15
- 16
- 17
- 18
- 19
- 20
- 21
4-5.图片上传下载也已经处理过了
6.需要自定义保存方法
(原因:只操作setmeal表,套餐中的菜品信息无法保存)
在SetmealService中自定义保存方法,调用setmeal和seatmeal_dish表/** * 新增套餐,同时需要保存套餐和菜品的关联关系 * @param setmealDto */ @Transactional public void saveWithDish(SetmealDto setmealDto) { //保存套餐的基本信息,操作setmeal,执行insert操作 this.save(setmealDto); //保存套餐和菜品的关联关系,操作setmeal_dish,执行insert操作 List<SetmealDish> setmealDishes = setmealDto.getSetmealDishes(); setmealDishes.stream().map((item)->{ //setmealDto.getId()就是setmeal表中每次创建一个新的套餐分类自动生成的id //setSetmealId是SetmealDish套餐菜品关系中的setmealId属性,对应setmeal_dish表中的setmeal_id //新增套餐下的自选菜品的每个setmeal_id都会在setmeal表中的id中找到对应,大家想不通的去数据库看这两个表 item.setSetmealId(setmealDto.getId()); return item; }).collect(Collectors.toList()); //保存套餐和菜品的关联信息,操作setmeal_dish,执行insert操作 setmealDishService.saveBatch(setmealDishes); }- 1
- 2
- 3
- 4
- 5
- 6
- 7
- 8
- 9
- 10
- 11
- 12
- 13
- 14
- 15
- 16
- 17
- 18
- 19
- 20
- 21
功能测试
可选菜品展示

保存功能
setmeal套餐表

setmeal_dish套餐菜品关联表

套餐信息分页查询功能
需求分析

代码开发
/** * 套餐管理分页信息展示页面 * @param page * @param pageSize * @return */ @GetMapping("/page") // http://localhost:8080/setmeal/page?page=1&pageSize=10&name=123 public Result<Page> pageShow(int page,int pageSize,String name){ Page<Setmeal> mealPage = new Page<>(page,pageSize); Page<SetmealDto> dtoPage = new Page<>(); //为了展示 套餐分类 名称 categoryName LambdaQueryWrapper<Setmeal> queryWrapper = new LambdaQueryWrapper<>(); //分页展示面,模糊查询 queryWrapper.like(name != null,Setmeal::getName,name); //根据更新时间降序排列 queryWrapper.orderByDesc(Setmeal::getUpdateTime); setmealService.page(mealPage,queryWrapper); /* 上面可以展示套餐基本信息,除套餐分类 展示列*/ //将Setmeal中的属性复制到dtoPage,但是忽略records BeanUtils.copyProperties(mealPage,dtoPage,"records"); List<Setmeal> records = mealPage.getRecords(); List<SetmealDto> dtoList = records.stream().map((setmeal)->{ SetmealDto setmealDto = new SetmealDto(); BeanUtils.copyProperties(setmeal,setmealDto); //套餐分类id Long categoryId = setmeal.getCategoryId(); //根据套餐分类id获得套餐分类对象 Category category = categoryService.getById(categoryId); if(category != null){ setmealDto.setCategoryName(category.getName()); } return setmealDto; }).collect(Collectors.toList()); dtoPage.setRecords(dtoList); return Result.success(dtoPage); }- 1
- 2
- 3
- 4
- 5
- 6
- 7
- 8
- 9
- 10
- 11
- 12
- 13
- 14
- 15
- 16
- 17
- 18
- 19
- 20
- 21
- 22
- 23
- 24
- 25
- 26
- 27
- 28
- 29
- 30
- 31
- 32
- 33
- 34
- 35
- 36
- 37
- 38
- 39
- 40
- 41
- 42
- 43
- 44
- 45
功能测试

删除套餐
需求分析
代码开发
功能测试
短信发送功能
短信服务

阿里云短信服务

官网注册——>控制台——>云通信


了解即可,签名申请需要三证合一比较繁琐

模板详情

AccessKey 创建子用户安全系数高

创建用户


需求分析

数据模型

代码开发
导入短信发送所需maven坐标
<!--导入短信发送所需maven坐标--> <dependency> <groupId>com.aliyun</groupId> <artifactId>aliyun-java-sdk-core</artifactId> <version>4.5.16</version> </dependency> <dependency> <groupId>com.aliyun</groupId> <artifactId>aliyun-java-sdk-dysmsapi</artifactId> <version>2.1.0</version> </dependency>- 1
- 2
- 3
- 4
- 5
- 6
- 7
- 8
- 9
- 10
- 11
- 12


User实体类创建
package com.yjq.reggie.entity; import lombok.Data; import java.io.Serializable; /** * 用户信息 */ @Data public class User implements Serializable { private static final long serialVersionUID = 1L; private Long id; //姓名 private String name; //手机号 private String phone; //性别 0 女 1 男 private String sex; //身份证号 private String idNumber; //头像 private String avatar; //状态 0:禁用,1:正常 private Integer status; }- 1
- 2
- 3
- 4
- 5
- 6
- 7
- 8
- 9
- 10
- 11
- 12
- 13
- 14
- 15
- 16
- 17
- 18
- 19
- 20
- 21
- 22
- 23
- 24
- 25
- 26
- 27
- 28
- 29
- 30
- 31
- 32
- 33
- 34
- 35
- 36
- 37
- 38
- 39
- 40
- 41
短信发送SMSUtils工具类
package com.yjq.reggie.utils; import com.aliyuncs.DefaultAcsClient; import com.aliyuncs.IAcsClient; import com.aliyuncs.dysmsapi.model.v20170525.SendSmsRequest; import com.aliyuncs.dysmsapi.model.v20170525.SendSmsResponse; import com.aliyuncs.exceptions.ClientException; import com.aliyuncs.profile.DefaultProfile; import com.google.gson.Gson; import com.sun.xml.internal.ws.resources.SenderMessages; /** * 短信发送工具类 */ public class SMSUtils { /** * 发送短信 * @param signName 签名 * @param templateCode 模板 * @param phoneNumber 手机号 * @param param 参数 */ public static void sendMessage(String signName,String templateCode,String phoneNumber,String param){ //构建一个阿里云客户端, 用于发起请求。 //构建阿里云客户端时需要设置AccessKey ID和AccessKey Secret。 DefaultProfile profile = DefaultProfile.getProfile("cn-hangzhou", "" , "" ); IAcsClient client = new DefaultAcsClient(profile); //构建请求,设置请求参数。 SendSmsRequest request = new SendSmsRequest(); request.setSysRegionId("cn-hangzhou"); request.setPhoneNumbers(phoneNumber); request.setSignName(signName); request.setTemplateCode(templateCode); request.setTemplateParam("{\"code\":\""+param+"\"}"); try { SendSmsResponse response = client.getAcsResponse(request); System.out.println("短信发送成功"); } catch (ClientException e) { e.printStackTrace(); } } }- 1
- 2
- 3
- 4
- 5
- 6
- 7
- 8
- 9
- 10
- 11
- 12
- 13
- 14
- 15
- 16
- 17
- 18
- 19
- 20
- 21
- 22
- 23
- 24
- 25
- 26
- 27
- 28
- 29
- 30
- 31
- 32
- 33
- 34
- 35
- 36
- 37
- 38
- 39
- 40
- 41
- 42
- 43
- 44
随机生成验证码工具类ValidateCodeUtils工具类
package com.yjq.reggie.utils; import java.util.Random; /** * 随机生成验证码工具类 */ public class ValidateCodeUtils { /** * 随机生成验证码 * @param length 长度为4位或者6位 * @return */ public static Integer generateValidateCode(int length){ Integer code =null; if(length == 4){ code = new Random().nextInt(9999);//生成随机数,最大为9999 if(code < 1000){ code = code + 1000;//保证随机数为4位数字 } }else if(length == 6){ code = new Random().nextInt(999999);//生成随机数,最大为999999 if(code < 100000){ code = code + 100000;//保证随机数为6位数字 } }else{ throw new RuntimeException("只能生成4位或6位数字验证码"); } return code; } /** * 随机生成指定长度字符串验证码 * @param length 长度 * @return */ public static String generateValidateCode4String(int length){ Random rdm = new Random(); String hash1 = Integer.toHexString(rdm.nextInt()); String capstr = hash1.substring(0, length); return capstr; } }- 1
- 2
- 3
- 4
- 5
- 6
- 7
- 8
- 9
- 10
- 11
- 12
- 13
- 14
- 15
- 16
- 17
- 18
- 19
- 20
- 21
- 22
- 23
- 24
- 25
- 26
- 27
- 28
- 29
- 30
- 31
- 32
- 33
- 34
- 35
- 36
- 37
- 38
- 39
- 40
- 41
- 42
- 43
- 44
修改LoginCheckFilter过滤器


-
相关阅读:
Kaldi安装(Linux环境)
计算机视觉顶尖期刊和会议的段子
基于eNSP的校园网设计的仿真模拟
java版网页代码生成器系统myeclipse定制开发mysql数据库网页模式java编程jdbc生成无框架java web网页
Qt中的单例模式
springBoot依赖管理机制
基于Yolov8的工业小目标缺陷检测(7):Wasserstein Distance Loss,助力工业缺陷检测
PAM从入门到精通(二)
【数据结构】哈希表(详)
尚硅谷尚品项目汇笔记(三)
- 原文地址:https://blog.csdn.net/weixin_51673920/article/details/126073038

