-
2、CKA-简单搭建K8s集群
基础环境:
主机IP 资源 系统 主机名 192.168.100.110 4核8G Centos8 K8s-master 192.168.100.120 4核8G Centos8 K8s-node1 192.168.100.130 4核8G Centos8 K8s-node2 推荐一个小网站:https://labs.play-with-k8s.com/
其他的废话不多说,直接部署起来先~~
部署(一主多从)
1、修改主机名# 192.168.100.110 [root@localhost ~]# hostnamectl set-hostname k8s-master [root@localhost ~]# exec bash # 192.168.100.120 [root@localhost ~]# hostnamectl set-hostname k8s-node1 [root@localhost ~]# exec bash # 192.168.100.130 [root@localhost ~]# hostnamectl set-hostname k8s-node2 [root@localhost ~]# exec bash- 1
- 2
- 3
- 4
- 5
- 6
- 7
- 8
- 9
- 10
- 11
2、添加本地域名解析
# 追加三条解析 [root@k8s-master ~]# vim /etc/hosts 192.168.100.110 k8s-master 192.168.100.120 k8s-node1 192.168.100.130 k8s-node2 # 为了省时间直接用scp传过去 [root@k8s-master ~]# scp /etc/hosts root@k8s-node1:/etc/hosts [root@k8s-master ~]# scp /etc/hosts root@k8s-node2:/etc/hosts- 1
- 2
- 3
- 4
- 5
- 6
- 7
- 8
- 9
3、关闭防火墙、selinux和swapoff分区
# Master [root@k8s-master ~]# systemctl --now disable firewalld [root@k8s-master ~]# sed -i "s/SELINUX=enforcing/SELINUX=disabled/g" /etc/selinux/config [root@k8s-master ~]# setenforce 0 # 临时关闭swap [root@k8s-master ~]# swapoff -a # 永久关闭swap(默认用这个即可) [root@k8s-master ~]# sed -i 's/.swap./#&/' /etc/fstab [root@k8s-master ~]# mount -a # 检查一下swap [root@k8s-master ~]# # Master和Node都要关闭防火墙、selinux和swap !!!!!!!!!!!!!!!- 1
- 2
- 3
- 4
- 5
- 6
- 7
- 8
- 9
- 10
- 11
- 12
- 13
为什么要关闭swap分区?
swap是指虚拟内存分区,当物理内存使用完后,会把swap分区的磁盘空间虚拟成内存使用。所以启用swap会对系统性能产生负面影响。4、添加内核网桥过滤和内核转发功能
# 只需要在Master节点上创建即可 [root@k8s-master ~]# vim /etc/sysctl.d/kubernetes.conf net.bridge.bridge-nf-call-ip6tables = 1 net.bridge.bridge-nf-call-iptables = 1 [root@k8s-master ~]# modprobe br_netfilter [root@k8s-master ~]# sysctl -p [root@k8s-master ~]# sysctl --system * Applying /usr/lib/sysctl.d/00-system.conf ... .........省略中间.................... net.bridge.bridge-nf-call-ip6tables = 1 net.bridge.bridge-nf-call-iptables = 1 * Applying /etc/sysctl.conf ...- 1
- 2
- 3
- 4
- 5
- 6
- 7
- 8
- 9
- 10
- 11
- 12
5、配置yum源、docker和k8s的repo库
阿里云yum源
阿里云docker-ce源
阿里云Kubernetes源# 先安装常用命令 [root@k8s-master ~]# yum install curl wget git vim -y # 配置阿里云yum源 [root@k8s-master yum.repo.d]# mkdir repoback [root@k8s-master yum.repo.d]# mv *.repo repoback/ [root@k8s-master yum.repo.d]# wget -O /etc/yum.repos.d/CentOS-Base.repo https://mirrors.aliyun.com/repo/Centos-vault-8.5.2111.repo # 配置docker源 [root@k8s-master yum.repo.d]# yum install -y yum-utils device-mapper-persistent-data lvm2 [root@k8s-master yum.repo.d]# yum-config-manager --add-repo https://mirrors.aliyun.com/docker-ce/linux/centos/docker-ce.repo [root@k8s-master yum.repo.d]# sed -i 's+download.docker.com+mirrors.aliyun.com/docker-ce+' /etc/yum.repos.d/docker-ce.repo # 配置Kubernetes源 [root@k8s-master yum.repo.d]# cat <<EOF > /etc/yum.repos.d/kubernetes.repo [kubernetes] name=Kubernetes baseurl=https://mirrors.aliyun.com/kubernetes/yum/repos/kubernetes-el7-x86_64/ enabled=1 gpgcheck=1 repo_gpgcheck=1 gpgkey=https://mirrors.aliyun.com/kubernetes/yum/doc/yum-key.gpg https://mirrors.aliyun.com/kubernetes/yum/doc/rpm-package-key.gpg EOF # 检查是否当前yum.repo.d目录是否存在三个repo源 [root@k8s-master yum.repo.d]# ls CentOS-Base.repo docker-ce.repo kubernetes.repo repoback # makecache [root@k8s-master yum.repo.d]# yum makecache ## Node1和Node2是一样这么配置的,会Ansible的话直接批量操作,我这里不继续写下去了- 1
- 2
- 3
- 4
- 5
- 6
- 7
- 8
- 9
- 10
- 11
- 12
- 13
- 14
- 15
- 16
- 17
- 18
- 19
- 20
- 21
- 22
- 23
- 24
- 25
- 26
- 27
- 28
- 29
- 30
问题点:
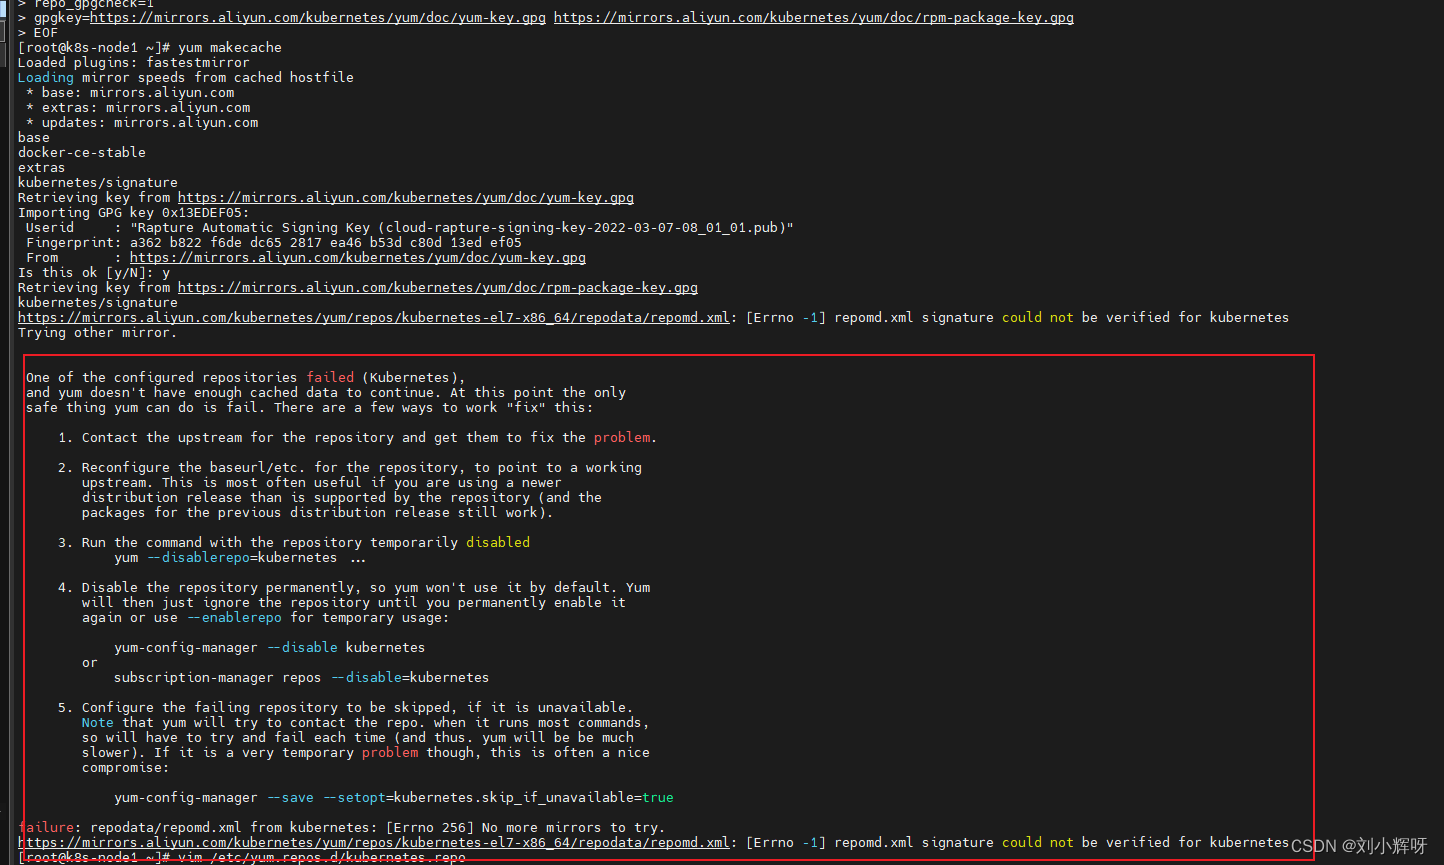
由于我用的是centos7.9系统,装载阿里云的kubernetes源出现了报错,报错原因是因为校验问题,我们将源内容改成如下即可!
解决方案:

5、安装docker-ce和kubelet,kubeadm,kubectl
# podman和docker不建议再同一台机器上,我们直接卸载podman [root@k8s-master ~]# yum earse podman buildah -y [root@k8s-master ~]# yum install docker-ce -y --allowerasing # '--allowerasing'是替换冲突的软件包 '--skip-broken'是跳过无法安装软件包 '--nobest'是不限制只使用最佳选择的软件包 [root@k8s-master ~]# systemctl --now enable docker # 查看docker版本 [root@k8s-master ~]# docker version Client: Docker Engine - Community Version: 20.10.21 ...........省略如下信息............. # 配置容器加速器及设置cgroup为systemd # 配置加速器教程:https://zhuanlan.zhihu.com/p/143085714 [root@k8s-master ~]# vim /etc/docker/daemon.json { "registry-mirrors": ["https://mirror.aliyuncs.com"], //这个地址在自己的阿里云平台有,我把关键部分移除了 "exec-opts":["native.cgroupdriver=systemd"] } [root@k8s-master ~]# systemctl restart docker # 记得Node节点也要安装docker和配置 别忘记了~~~- 1
- 2
- 3
- 4
- 5
- 6
- 7
- 8
- 9
- 10
- 11
- 12
- 13
- 14
- 15
- 16
- 17
- 18
- 19
- 20
- 21
为什么要设置cgroup为systemd?
因为K8s的自带cgroup管理器为systemd,给每个进程分配cgroup,而docker的cgroup管理器cgroupfs这样同时运行两个cgroup控制器;当资源有压力时,会导致系统出现不稳定的情况。6、安装k8s
# 查看当前有哪些版本的k8s可以安装 [root@k8s-master ~]# yum list kubelet --showduplicates | sort -r # 这里咱们选1.22.4-0版本 [root@k8s-master ~]# yum install kubelet-1.22.4-0 kubeadm-1.22.4-0 kubectl-1.22.4-0 -y [root@k8s-master ~]# systemctl --now enable kubelet.service # 记得Node节点也要安装和配置 别忘记了~~~- 1
- 2
- 3
- 4
- 5
- 6
- 7
kubelet:运行在cluster所有节点上,负责启动pod和容器
kubeadm: 初始化cluster指令
kubectl:k8s的命令行工具(部署和管理应用,可查看,创建,删除和更新资源)7、初始化master节点
[root@k8s-master ~]# kubeadm init \ --apiserver-advertise-address=192.168.100.110 \ --image-repository=registry.aliyuncs.com/google_containers \ --kubernets-version=v1.22.4 \ --service-cidr=172.16.0.0/16 \ --pod-network-cidr=10.244.0.0/16 # 普通用户使用kubectl [root@k8s-master ~]# mkdir -p $HOME/.kube [root@k8s-master ~]# sudo cp -i /etc/kubernetes/admin.conf $HOME/.kube/config [root@k8s-master ~]# sudo chown $(id -u):$(id -g) $HOME/.kube/config # 若root用户使用kubectl # master节点一般用这个 [root@k8s-master ~]# export KUBECONFIG=/etc/kubernetes/admin.conf # 查看当前节点 [root@k8s-master ~]# kubectl get node NAME STATUS ROLES AGE VERSION k8s-master NotReady control-plane,master 157m v1.22.4- 1
- 2
- 3
- 4
- 5
- 6
- 7
- 8
- 9
- 10
- 11
- 12
- 13
- 14
- 15
- 16
- 17
- 18
- 19
1、 master节点的状态为什么是NotReady?
NotReady是未就绪的意思,这个状态是因为网络插件没有配置
2、初始化集群后,默认命令不支持tab键补全
source <(kubectl completion bash)
3、初始化成功后,最后输出密钥有效期是24小时,可以使用如下生成新密钥
kubeadm token list # 查看当前密钥
kubeadm token create --print-join-command # 打印并使用标记加入集群所需要完整的’kubeadm join’标志问题点:
1、当出现kubectl使用tab键出现cabash: _get_comp_words_by_ref: command not found
CSDN大佬的链接:https://blog.csdn.net/qq_29974229/article/details/1028902678、部署calico网络插件
[root@k8s-master ~]# wget https://docs.projectcalico.org/manifests/calico.yaml [root@k8s-master ~]# vim calico.yaml # - name: CALICO_IPV4POOL_CIDR # value: "172.16.0.0/16" ######################################################################################################## # 将如上信息改为 - name: CALICO_IPV4POOL_CIDR value: "172.16.0.0/16" # 这个IP地址是初始化的这个参数的地址--service-cidr=172.16.0.0/16 - name: IP_AUTODETECTION_METHOD value: "interface=ens.*" [root@k8s-master ~]# kubectl apply -f calico.yaml- 1
- 2
- 3
- 4
- 5
- 6
- 7
- 8
- 9
- 10
- 11
9、然后等待一段时间再次查看Master节点status状态是否已经是Ready状态
[root@k8s-master ~]# kubectl get node NAME STATUS ROLES AGE VERSION k8s-master Ready control-plane,master 23h v1.22.4 [root@k8s-master ~]# kubectl get pods -n kube-system NAME READY STATUS RESTARTS AGE calico-kube-controllers-846d7f49d8-84pp2 1/1 Running 1 (23h ago) 23h calico-node-7lfcz 1/1 Running 0 23h calico-node-hmx9j 1/1 Running 1 (23h ago) 23h calico-node-v6vrm 1/1 Running 1 (23h ago) 23h coredns-7f6cbbb7b8-c588l 1/1 Running 1 (23h ago) 23h coredns-7f6cbbb7b8-dsvc5 1/1 Running 1 (23h ago) 23h etcd-k8s-master 1/1 Running 2 (23h ago) 23h kube-apiserver-k8s-master 1/1 Running 2 (23h ago) 23h kube-controller-manager-k8s-master 1/1 Running 2 (23h ago) 23h kube-proxy-hwg84 1/1 Running 1 (23h ago) 23h kube-proxy-kbzbc 1/1 Running 1 (23h ago) 23h kube-proxy-n5gtp 1/1 Running 1 (23h ago) 23h kube-scheduler-k8s-master 1/1 Running 2 (23h ago) 23h- 1
- 2
- 3
- 4
- 5
- 6
- 7
- 8
- 9
- 10
- 11
- 12
- 13
- 14
- 15
- 16
- 17
- 18
10、Node加入集群
# 由于我是昨天写的博客 所以还是重新生成一下token [root@k8s-master ~]# kubeadm token create --print-join-command kubeadm join 192.168.100.20:6443 --token 4f8iwc.oa0m00mto5p8k7vt --discovery-token-ca-cert-hash sha256:d2451f6139da5a0224547b4d3826ce1483ef54807d1e2e1a8838ada278333f21 # 切到Node节点直接运行生成出来的token [root@k8s-node1 ~]# kubeadm join 192.168.100.20:6443 --token 4f8iwc.oa0m00mto5p8k7vt --discovery-token-ca-cert-hash sha256:d2451f6139da5a0224547b4d3826ce1483ef54807d1e2e1a8838ada278333f21 # 再次到Master节点查看集群状况 [root@k8s-master ~]# kubectl get node NAME STATUS ROLES AGE VERSION k8s-master Ready control-plane,master 23h v1.22.4 k8s-node1 Ready <none> 23h v1.22.4 # 当看到Master集群的node1加入进来已经是Ready状态就说明没错了- 1
- 2
- 3
- 4
- 5
- 6
- 7
- 8
- 9
- 10
- 11
- 12
- 13
- 14
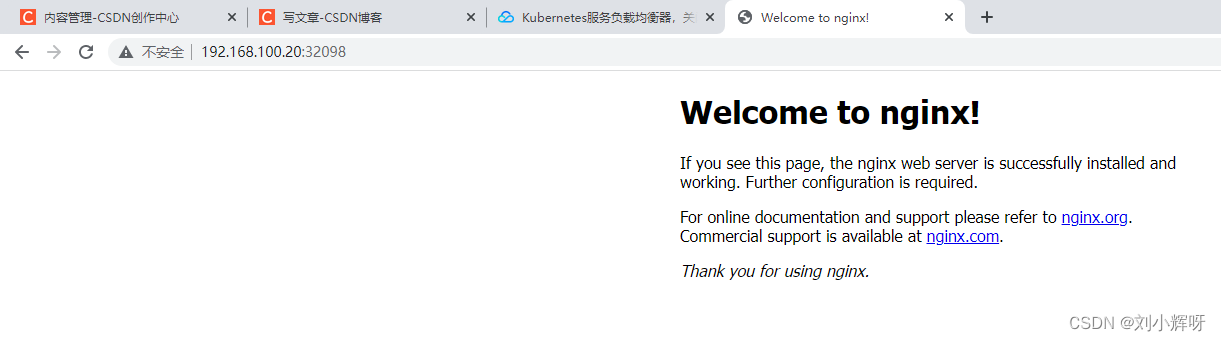
11、测试部署一个应用起来看看
# 这里我就在Master节点部署了 [root@k8s-master ~]# kubectl create deployment nginx --image=nginx deployment.apps/nginx created [root@k8s-master ~]# kubectl expose deployment nginx --port=80 --type=NodePort service/nginx exposed [root@k8s-master ~]# kubectl get service NAME TYPE CLUSTER-IP EXTERNAL-IP PORT(S) AGE kubernetes ClusterIP 172.16.0.1 <none> 443/TCP 24h nginx NodePort 172.16.183.156 <none> 80:32098/TCP 28s- 1
- 2
- 3
- 4
- 5
- 6
- 7
- 8
- 9
从上面可以看到我们运行了一个nginx应用,集群的地址是172.16.183.156,Port是80;
我们要验证的是外部能访问到这个nginx,所以IP是Master的地址+32098;即192.168.100.20:32098所以呢,我们成功部署了k8s集群(但是这只适用于测试环境,公司一般最好用二进制方式安装)
-
相关阅读:
详细介绍windows自带Hyper-V安装虚拟机(windows11 / ubuntu22 / macos12)
基于振弦式轴力计和采集仪的安全监测解决方案
选择合适的 MQTT 云服务:一文了解 EMQX Cloud Serverless、Dedicated 与 BYOC 版本
理解STM32的低功耗模式
基于PYTHON游乐场服务管理系统的设计与实现
Day23.修剪二叉搜索树、把二叉树转换为累加树
FRP进阶篇之安全认证
多线程并发Callable
(二)Celery: 分布式异步消息任务队列
【计算机网络】网络层
- 原文地址:https://blog.csdn.net/qq_42148563/article/details/127856328
