-
终极篇章1——(16000字)SpringBoot启动原理分析(第一部分)
文章目录
- Spring boot启动原理分析(源码精读)
- 0x01_入口类的注解+源码分析
- 0x02_入口类run方法
- SpringApplication初始化
- run方法
- createBootstrapContext
- configureHeadlessProperty
- getRunListeners
- listeners.starting发布应用启动事件
- new DefaultApplicationArguments(args)创建默认的应用参数类
- prepareEnvironment准备Spring应用环境
- ConfigurableEnvironment environment = getOrCreateEnvironment();
- configureEnvironment
- ConfigurationPropertySources.attach(environment);
- listeners.environmentPrepared(bootstrapContext, environment);
- DefaultPropertiesPropertySource.moveToEnd(environment);环境配置绑定
- bindToSpringApplication(environment);
- environmentConverter.convertEnvironmentIfNecessary(environment, deduceEnvironmentClass());
- ConfigurationPropertySources.attach(environment);
- 总结
- configureIgnoreBeanInfo(environment);配置忽略的bean信息
- Banner printedBanner = printBanner(environment);
- context = createApplicationContext();SpringContext的创建
Spring boot启动原理分析(源码精读)
以IDEA通过
Spring Initializer方法创建的Spring boot项目为基础,分析Spring boot的启动原理。0x01_入口类的注解+源码分析
启动类代码:
SpringApplication.run方法是整个SpringBoot启动最核心的方法。package com.bones; import org.springframework.boot.SpringApplication; import org.springframework.boot.autoconfigure.SpringBootApplication; @SpringBootApplication public class Springbootpro4Application { public static void main(String[] args) { SpringApplication.run(Springbootpro4Application.class, args); } }- 1
- 2
- 3
- 4
- 5
- 6
- 7
- 8
- 9
- 10
- 11
- 12
- 13
没有注解
@SpringBootApplication,是无法启动的,会报下面这样的错:Description: Web application could not be started as there was no org.springframework.boot.web.servlet.server.ServletWebServerFactory bean defined in the context. Action: Check your application's dependencies for a supported servlet web server. Check the configured web application type.- 1
- 2
- 3
- 4
- 5
- 6
- 7
- 8
所以来看注解
@SpringBootApplication的源码:@Target(ElementType.TYPE) @Retention(RetentionPolicy.RUNTIME) @Documented @Inherited @SpringBootConfiguration @EnableAutoConfiguration @ComponentScan(excludeFilters = { @Filter(type = FilterType.CUSTOM, classes = TypeExcludeFilter.class), @Filter(type = FilterType.CUSTOM, classes = AutoConfigurationExcludeFilter.class) }) public @interface SpringBootApplication {- 1
- 2
- 3
- 4
- 5
- 6
- 7
- 8
- 9
注解
@SpringBootApplication标记在某个类上说明这个类是SpringBoot的主要配置类,SpringBoot就应该运行这个类的主要方法来启动SpringBoot应用这个类的源码中,有很多元注解。
元注解:有4个,可以注解到别的注解上的注解,被注解的注解称之为组合注解,组合注解具备其上元注解的功能.
@Target:描述注解的使用范围(即被修饰的注解可以用在什么地方).@Retention:描述注解保留的时间范围(即:被描述的注解在它所修饰的类中可以被保留到何时).SOURCE是源文件保留,CLASS是编译器保留(默认值),RUNTIME是运行期保留,可以通过反射获取注解信息。@Documented:描述在使用javadoc工具为类生成帮助文档时是否要保留其注解信息。@Inherited:使被它修饰的注解具有继承性(如果某个类使用了被@Inherited修饰的注解,则其子类将自动具有该注解)。
除了这些注解之外,还有3个注解。可以理解为这个类是3个注解
@SpringBootConfiguration,@EnableAutoConfiguration,@ComponentScan的组合。@SpringBootConfiguration注解
这个注解:标记在某个类上,表示一个类提供了Spring Boot应用程序
@SpringBootConfiguration源码:package org.springframework.boot; import java.lang.annotation.Documented; import java.lang.annotation.ElementType; import java.lang.annotation.Retention; import java.lang.annotation.RetentionPolicy; import java.lang.annotation.Target; import org.springframework.context.annotation.Bean; import org.springframework.context.annotation.Configuration; import org.springframework.core.annotation.AliasFor; import org.springframework.stereotype.Indexed; @Target(ElementType.TYPE) @Retention(RetentionPolicy.RUNTIME) @Documented @Configuration @Indexed public @interface SpringBootConfiguration { @AliasFor(annotation = Configuration.class) boolean proxyBeanMethods() default true; }- 1
- 2
- 3
- 4
- 5
- 6
- 7
- 8
- 9
- 10
- 11
- 12
- 13
- 14
- 15
- 16
- 17
- 18
- 19
- 20
- 21
- 22
- 23
- 24
- 25
- 26
- 27
这个注解源码中可以看到还有注解
@Configuration,对于这个注解,学习过Spring零XML配置的应该不陌生。要使得项目不用XML配置,那么可以自己书写配置类,要使这个类成为一个配置类,就得加上@Configuration注解。可以详细来看一下
@Configuration注解的源码:@Target(ElementType.TYPE) @Retention(RetentionPolicy.RUNTIME) @Documented @Component public @interface Configuration { boolean proxyBeanMethods() default true; }- 1
- 2
- 3
- 4
- 5
- 6
- 7
- 8
可以简单理解为:Spring中你书写的配置类也好,Spring boot中的“配置类”也好,都相当于Spring中的配置文件,对于XML类型的配置文件,一定都没少配置过吧。
applicationContext.xml,web.xml,springmvc.xml等等。。。配置类也是容器中的一个组件,所以,在
@Configuration注解上,有注解@Component,这就代表容器也会创建配置类的对象。最后再注意一下:
@SpringBootConfiguration注解和@Configuration注解都有一个属性:boolean proxyBeanMethods() default true;- 1
默认值是true,说明这个类会被代理。(这里的代理是指用CGLIB代理)
proxyBeanMethods配置类是用来指定@Bean注解标注的方法是否使用代理,默认是true使用代理,直接从IOC容器之中取得对象;如果设置为false,也就是不使用注解,每次调用@Bean标注的方法获取到的对象和IOC容器中的都不一样,是一个新的对象,所以我们可以将此属性设置为false来提高性能@EnableAutoConfiguration注解
这个注解的源码:
@Target(ElementType.TYPE) @Retention(RetentionPolicy.RUNTIME) @Documented @Inherited @AutoConfigurationPackage @Import(AutoConfigurationImportSelector.class) public @interface EnableAutoConfiguration { String ENABLED_OVERRIDE_PROPERTY = "spring.boot.enableautoconfiguration"; Class<?>[] exclude() default {}; String[] excludeName() default {}; }- 1
- 2
- 3
- 4
- 5
- 6
- 7
- 8
- 9
- 10
- 11
- 12
- 13
- 14
- 15
这个注解告诉SpringBoot开启自动配置功能,这样自动配置才能生效
借助@import,扫描并实例化满足条件的自动配置的bean,然后加载到IOC容器中(或者说借助@Import的支持,收集和注册特定场景相关的bean定义。)
除了元注解,这个类有另外2个注解:
@AutoConfigurationPackage自动配置包注解
当没有
base packages或者base package classes指定的时候,有这个注解的类就会被注册。简单来说,这个注解就是用来包扫描的。
这个注解的源码:
@Target(ElementType.TYPE) @Retention(RetentionPolicy.RUNTIME) @Documented @Inherited @Import(AutoConfigurationPackages.Registrar.class) public @interface AutoConfigurationPackage { String[] basePackages() default {}; Class<?>[] basePackageClasses() default {}; }- 1
- 2
- 3
- 4
- 5
- 6
- 7
- 8
- 9
这里需要关注的是:
@Import(AutoConfigurationPackages.Registrar.class)这个注解:看一下
Registrar这个类的源码:它是AutoConfigurationPackages这个抽象类的一个静态内部类,static class Registrar implements ImportBeanDefinitionRegistrar, DeterminableImports { @Override public void registerBeanDefinitions(AnnotationMetadata metadata, BeanDefinitionRegistry registry) { register(registry, new PackageImports(metadata).getPackageNames().toArray(new String[0])); } @Override public Set<Object> determineImports(AnnotationMetadata metadata) { return Collections.singleton(new PackageImports(metadata)); } }- 1
- 2
- 3
- 4
- 5
- 6
- 7
- 8
- 9
- 10
- 11
- 12
- 13
可以打上断点看一下:

对于这个参数:
new PackageImports(metadata).getPackageNames()可以计算一下:

其实到这里
@AutoConfigurationPackage这个注解的阅读在Spring boot启动原理这块就可以了。简单可以理解为:
@AutoConfigurationPackage自动配置包是用来做包扫描的,里面import了
AutoConfigurationPackages.Registrar.class,这里面有一个静态内部类,会指定扫描我们项目的哪个包。@EnableAutoConfiguration还有导入了一个
EnableAutoConfigurationImportSelector.class@Import(EnableAutoConfigurationImportSelector.class):给容器中导入组件
这个类有一堆属性和方法,这里源码就不粘贴了,只看一个关键的方法:
getCandidateConfigurationsprotected List<String> getCandidateConfigurations(AnnotationMetadata metadata, AnnotationAttributes attributes) { List<String> configurations = new ArrayList<>( SpringFactoriesLoader.loadFactoryNames(getSpringFactoriesLoaderFactoryClass(), getBeanClassLoader())); ImportCandidates.load(AutoConfiguration.class, getBeanClassLoader()).forEach(configurations::add); Assert.notEmpty(configurations, "No auto configuration classes found in META-INF/spring.factories nor in META-INF/spring/org.springframework.boot.autoconfigure.AutoConfiguration.imports. If you " + "are using a custom packaging, make sure that file is correct."); return configurations; }- 1
- 2
- 3
- 4
- 5
- 6
- 7
- 8
- 9
使用select选择挑选满足条件的文件,并且使用
SpringFactoriesLoader进行实例化。最后加载到IOC容器里面,即ApplicationContext中。这里我把断点打在了:

首先跳在了抽象类
AutoConfigurationPackages内部类的Registrar的registerBeanDefinitions方法上:static class Registrar implements ImportBeanDefinitionRegistrar, DeterminableImports { @Override public void registerBeanDefinitions(AnnotationMetadata metadata, BeanDefinitionRegistry registry) { register(registry, new PackageImports(metadata).getPackageNames().toArray(new String[0])); } @Override public Set<Object> determineImports(AnnotationMetadata metadata) { return Collections.singleton(new PackageImports(metadata)); } }- 1
- 2
- 3
- 4
- 5
- 6
- 7
- 8
- 9
- 10
- 11
- 12
- 13
其中
metadata是我当前的启动类:
然后走了
public static void register(BeanDefinitionRegistry registry, String... packageNames) { if (registry.containsBeanDefinition(BEAN)) { BasePackagesBeanDefinition beanDefinition = (BasePackagesBeanDefinition) registry.getBeanDefinition(BEAN); beanDefinition.addBasePackages(packageNames); } else { registry.registerBeanDefinition(BEAN, new BasePackagesBeanDefinition(packageNames)); } }- 1
- 2
- 3
- 4
- 5
- 6
- 7
- 8
- 9
走的是else分支,其中,
packageNames是当前我项目的com.bones这个包。然后走了
ImportBeanDefinitionRegistrar这个类:(注意Registrar这个静态内部类本来就实现了ImportBeanDefinitionRegistrar这个接口),registerBeanDefinitions这个方法(ImportBeanDefinitionRegistrar的一个方法)也走完了。然后走了:
ConfigurationClassBeanDefinitionReader这个类,这个类一看就是读取配置信息的。走的方法是loadBeanDefinitionsFromRegistrars:private void loadBeanDefinitionsFromRegistrars(Map<ImportBeanDefinitionRegistrar, AnnotationMetadata> registrars) { registrars.forEach((registrar, metadata) -> registrar.registerBeanDefinitions(metadata, this.registry, this.importBeanNameGenerator)); }- 1
- 2
- 3
- 4

调用
registrar.registerBeanDefinitions方法,再调用loadBeanDefinitionsForConfigurationClass,loadBeanDefinitions方法,然后看到了我想看到的内容:
这里的
ConfigurationClass正好对应的就是getCandidateConfigurations这个方法中写到的META-INF/spring.factories中的内容:META-INF/spring.factories在哪里?找找引入的依赖:

这个
spring-boot-autoconfiguration没有再pom.xml中导入,怎么来的呢?这个就是涉及到Spring boot的配置的问题了:其实它来自spring-boot-starter-web依赖(这个依赖是我们项目导入在pom.xml中的)
回到正题:我个人认为注解
@Import(AutoConfigurationImportSelector.class)最为重要,这个注解使得SpringBoot应用将所有符合条件的@Configuration配置都加载到当前SpringBoot创建并使用的IoC容器。接着往下读:刚才走到的方法是
loadBeanDefinitionspublic void loadBeanDefinitions(SetconfigurationModel) { TrackedConditionEvaluator trackedConditionEvaluator = new TrackedConditionEvaluator(); for (ConfigurationClass configClass : configurationModel) { loadBeanDefinitionsForConfigurationClass(configClass, trackedConditionEvaluator); } } - 1
- 2
- 3
- 4
- 5
- 6
里面的for循环将遍历
configurationModel这个LinkedHashSet,对每一个配置执行loadBeanDefinitionsForConfigurationClass方法for循环走完之后这个方法走完,回到了
processConfigBeanDefinitions方法,接着走这个方法里面的alreadyParsed方法:
可以看到这里的
configClasses就是刚才for循环读取的。@ComponentScan包扫描注解
最后来看
SpringBootApplication注解的最后一个注解:@ComponentScan(excludeFilters = { @Filter(type = FilterType.CUSTOM, classes = TypeExcludeFilter.class), @Filter(type = FilterType.CUSTOM, classes = AutoConfigurationExcludeFilter.class) })- 1
- 2
自动扫描并加载符合条件的组件(比如@Component和@Repository等)或者bean定义,最终将这些bean定义加载到IOC容器中去 。
0x02_入口类run方法
回到入口类:
package com.bones; import org.springframework.boot.SpringApplication; import org.springframework.boot.autoconfigure.SpringBootApplication; @SpringBootApplication public class Springbootpro4Application { public static void main(String[] args) { SpringApplication.run(Springbootpro4Application.class, args); } }- 1
- 2
- 3
- 4
- 5
- 6
- 7
- 8
- 9
- 10
- 11
- 12
- 13
- 14
上面看的是启动类的注解
@SpringBootApplication,下面主要看SpringApplication.run方法。SpringApplication初始化
这个类可用于从
Java main方法引导和启动Spring应用程序。默认情况下,类将执行以下步骤来引导应用程序:- 创建一个合适的ApplicationContext实例(取决于你的classpath) ——创建一个容器
- 注册一个CommandLinePropertySource,将命令行参数公开为Spring属性
- 刷新应用程序上下文,加载所有单例bean
- 触发任何CommandLineRunner bean
这个类有一些重要属性和方法,列举如下:
private ResourceLoader resourceLoader;//资源加载器- 1
Resource接口是用来对配置文件进行封装的。ResourceLoader是资源加载器。
其构造方法:
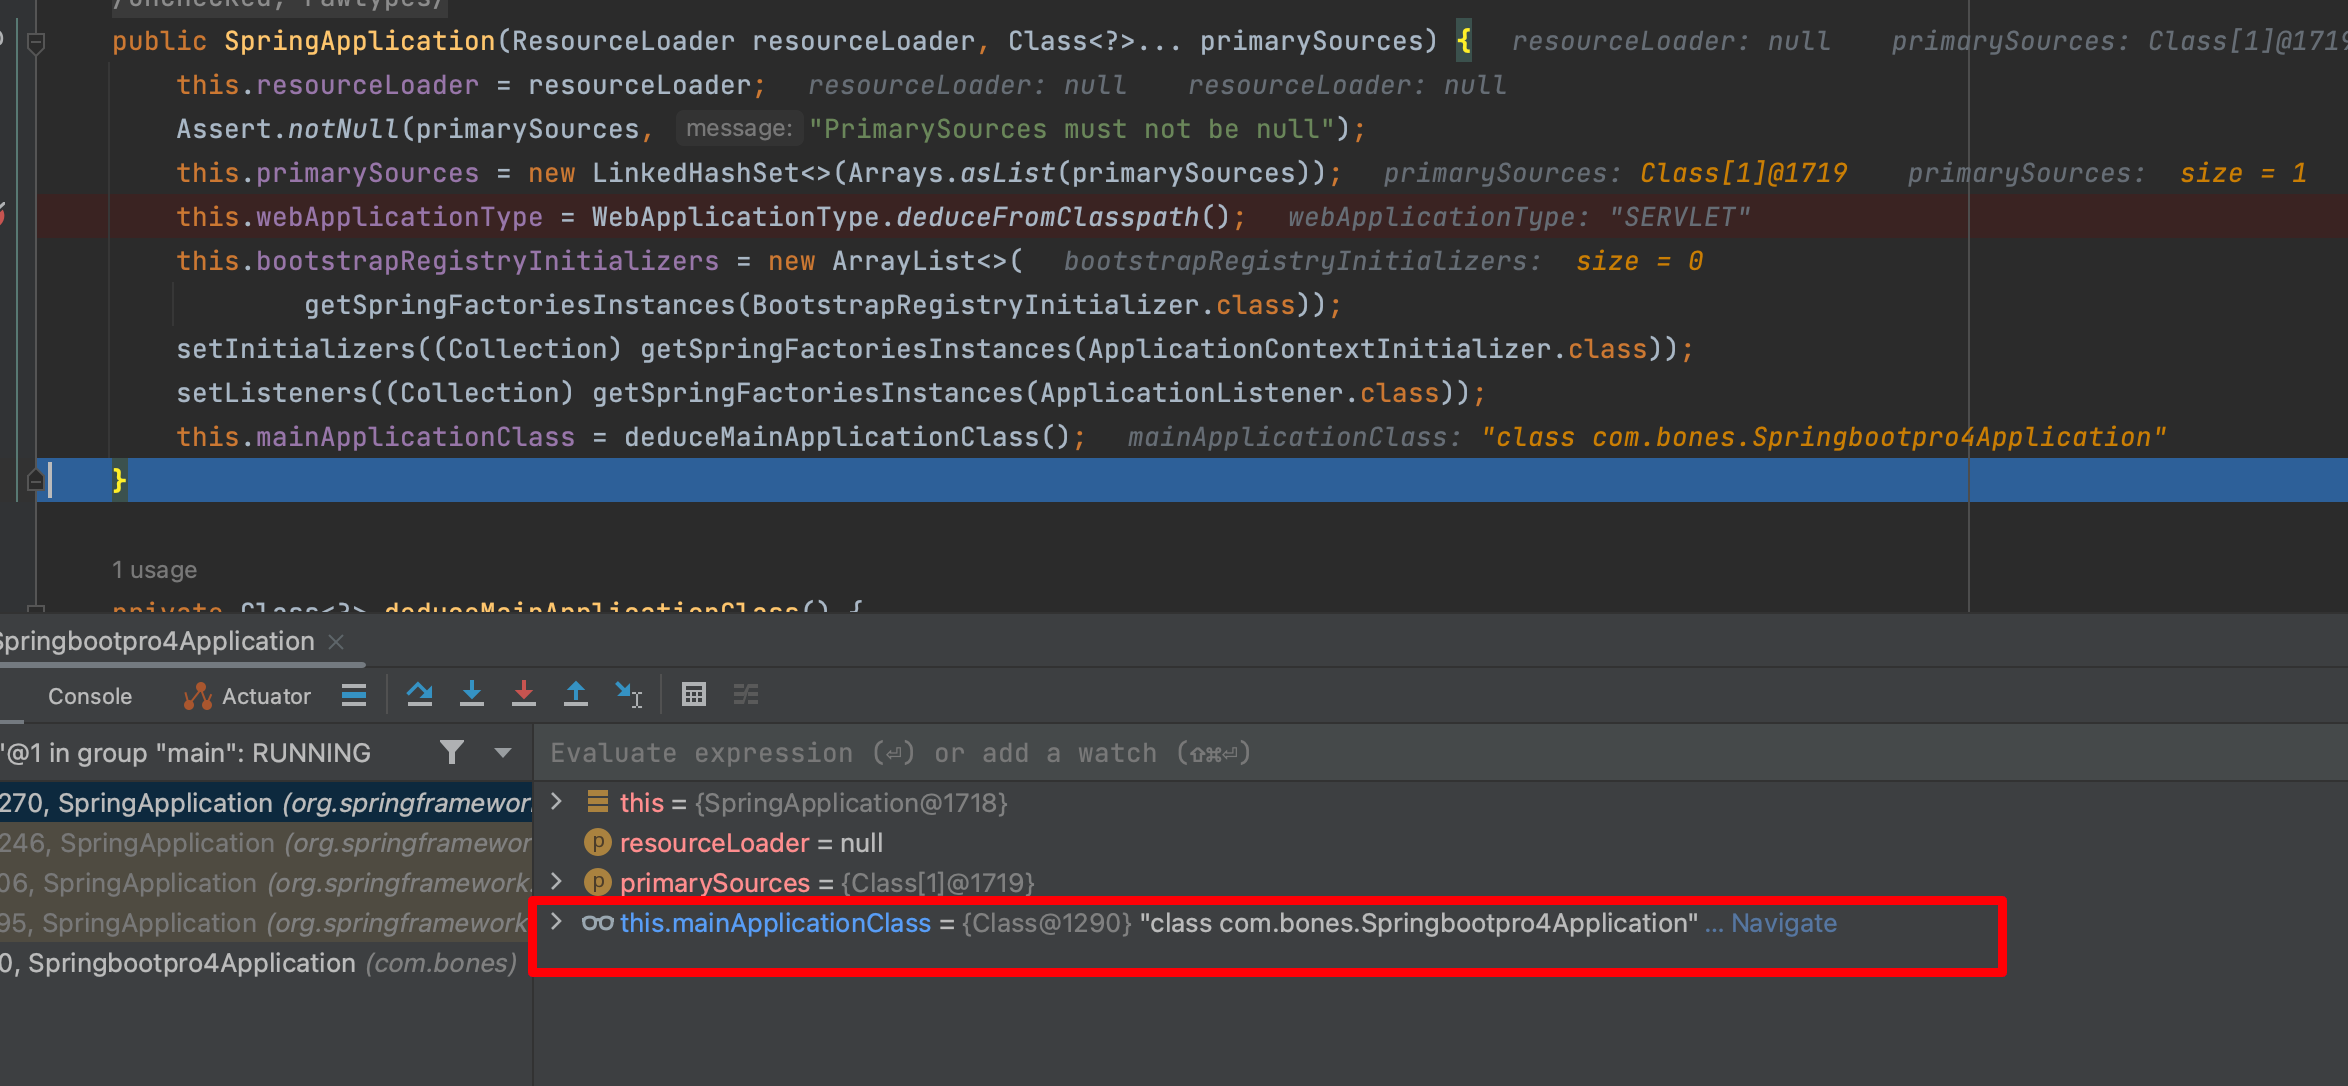
public SpringApplication(ResourceLoader resourceLoader, Class<?>... primarySources) { this.resourceLoader = resourceLoader; Assert.notNull(primarySources, "PrimarySources must not be null");//资源加载类不能为 null this.primarySources = new LinkedHashSet<>(Arrays.asList(primarySources)); 初始化加载资源类集合并去重(用了set) this.webApplicationType = WebApplicationType.deduceFromClasspath(); 推断应用程序是不是web应用 this.bootstrapRegistryInitializers = new ArrayList<>( getSpringFactoriesInstances(BootstrapRegistryInitializer.class)); setInitializers((Collection) getSpringFactoriesInstances(ApplicationContextInitializer.class)); 设置初始化器(Initializer) setListeners((Collection) getSpringFactoriesInstances(ApplicationListener.class)); 设置监听器 this.mainApplicationClass = deduceMainApplicationClass(); 推断出主应用入口类 }- 1
- 2
- 3
- 4
- 5
- 6
- 7
- 8
- 9
- 10
- 11
deduceFromClasspath()
这个方法推断应用程序是不是web应用。
下面开始debug,断点打在启动类的run方法上:

会走到构造方法的
deduceFromClasspath:
此时
primarySources只有一个:当前的启动类
下面走到
deduceFromClasspath方法中:
static WebApplicationType deduceFromClasspath() { if (ClassUtils.isPresent(WEBFLUX_INDICATOR_CLASS, null) && !ClassUtils.isPresent(WEBMVC_INDICATOR_CLASS, null) && !ClassUtils.isPresent(JERSEY_INDICATOR_CLASS, null)) { return WebApplicationType.REACTIVE; } for (String className : SERVLET_INDICATOR_CLASSES) { if (!ClassUtils.isPresent(className, null)) { return WebApplicationType.NONE; } } return WebApplicationType.SERVLET; }- 1
- 2
- 3
- 4
- 5
- 6
- 7
- 8
- 9
- 10
- 11
- 12
这里首先要拓展一下:
创建SpringBoot项目时,如果不选择starter-web,创建的SpringBoot项目可以正常运行,但运行结束程序便终止了。如果配置starter-web,则正常启动web应用。那么,SpringBoot是如何分辨出来当前应用是为web应用还是其他类型的应用呢?这就要靠枚举类
WebApplicationType.枚举类
WebApplicationType源码:package org.springframework.boot; import org.springframework.util.ClassUtils; public enum WebApplicationType { NONE, SERVLET, REACTIVE; private static final String[] SERVLET_INDICATOR_CLASSES = { "javax.servlet.Servlet", "org.springframework.web.context.ConfigurableWebApplicationContext" }; private static final String WEBMVC_INDICATOR_CLASS = "org.springframework.web.servlet.DispatcherServlet"; private static final String WEBFLUX_INDICATOR_CLASS = "org.springframework.web.reactive.DispatcherHandler"; private static final String JERSEY_INDICATOR_CLASS = "org.glassfish.jersey.servlet.ServletContainer"; static WebApplicationType deduceFromClasspath() { if (ClassUtils.isPresent(WEBFLUX_INDICATOR_CLASS, null) && !ClassUtils.isPresent(WEBMVC_INDICATOR_CLASS, null) && !ClassUtils.isPresent(JERSEY_INDICATOR_CLASS, null)) { return WebApplicationType.REACTIVE; } for (String className : SERVLET_INDICATOR_CLASSES) { if (!ClassUtils.isPresent(className, null)) { return WebApplicationType.NONE; } } return WebApplicationType.SERVLET; } }- 1
- 2
- 3
- 4
- 5
- 6
- 7
- 8
- 9
- 10
- 11
- 12
- 13
- 14
- 15
- 16
- 17
- 18
- 19
- 20
- 21
- 22
- 23
- 24
- 25
- 26
- 27
- 28
- 29
- 30
- 31
- 32
- 33
- 34
- 35
- 36
- 37
- 38
- 39
- 40
枚举类取值有3个:
NONESERVLET:最常用的类型REACTIVE响应式web容器
SpringBoot启动时,在创建
SpringApplication的构造方法内会调用枚举WebApplicationType的deduceFromClasspath方法获得应用类型并设置当前应用是普通web应用、响应式web应用还是非web应用。回到debug的
WebApplicationType.deduceFromClasspath方法:首先不走if分支:(因为不是响应式web应用)
if (ClassUtils.isPresent(WEBFLUX_INDICATOR_CLASS, null) && !ClassUtils.isPresent(WEBMVC_INDICATOR_CLASS, null) && !ClassUtils.isPresent(JERSEY_INDICATOR_CLASS, null)) { return WebApplicationType.REACTIVE;//判断为响应式web应用 }- 1
- 2
- 3
- 4
这里有几个常量,定义在
WebApplicationType中:private static final String WEBFLUX_INDICATOR_CLASS = "org.springframework.web.reactive.DispatcherHandler"; private static final String WEBMVC_INDICATOR_CLASS = "org.springframework.web.servlet.DispatcherServlet"; private static final String JERSEY_INDICATOR_CLASS = "org.glassfish.jersey.servlet.ServletContainer";- 1
- 2
- 3
- 4
- 5
- 如果应用程序存在
DispatcherHandler并且不存在DispatcherServlet和ServletContainer则为响应式web应用,需加载并启动内嵌的响应式web服务。 - 如果应用程序不包含Servlet和ConfigurableWebApplicationContext则为普通应用程序。
- 其他情况则为基于servlet的web应用,需加载并启动内嵌的web服务。
for (String className : SERVLET_INDICATOR_CLASSES) { if (!ClassUtils.isPresent(className, null)) { return WebApplicationType.NONE; } }- 1
- 2
- 3
- 4
- 5
推断的过程中重点调用了
ClassUtils.isPresent()方法,用来判断指定类名的类是否存在,是否可以进行加载。ClassUtils.isPresent()方法源代码如下:public static boolean isPresent(String className, @Nullable ClassLoader classLoader) { try { forName(className, classLoader); return true; } catch (IllegalAccessError var3) { throw new IllegalStateException("Readability mismatch in inheritance hierarchy of class [" + className + "]: " + var3.getMessage(), var3); } catch (Throwable var4) { return false; } }- 1
- 2
- 3
- 4
- 5
- 6
- 7
- 8
- 9
- 10
isPresent方法会调用forName方法,判断目标类是否存在。forName方法获得类加载器,尝试直接加载类,如果失败则尝试加载该类的内部类,如果依旧失败,则抛出异常。这里具体不再看了(不是重点)。if分支判断完不是响应式web应用,接着对
SERVLET_INDICATOR_CLASSES进行遍历,SERVLET_INDICATOR_CLASSES在这个类中进行了定义:private static final String[] SERVLET_INDICATOR_CLASSES = { "javax.servlet.Servlet", "org.springframework.web.context.ConfigurableWebApplicationContext" };- 1
- 2
如果应用程序不包含
Servlet和ConfigurableWebApplicationContext则为普通应用程序,返回WebApplicationType.NONE;如果if不满足,for循环也判断了没有返回,即既不是响应式web应用,也不是普通的应用程序,那么就是基于servlet的web应用。
[外链图片转存失败,源站可能有防盗链机制,建议将图片保存下来直接上传(img-RL9pzTpv-1668599607203)(/Users/apple/Library/Application Support/typora-user-images/image-20221115161735756.png)]
最终
deduceFromClasspath方法返回类型就是WebApplicationType.SERVLET。[外链图片转存失败,源站可能有防盗链机制,建议将图片保存下来直接上传(img-aihFfvvk-1668599607203)(/Users/apple/Library/Application Support/typora-user-images/image-20221115161857563.png)]
bootstrapRegistryInitializers()
接着,获取初始启动器,若
spring.factories存在BootstrapRegistryInitializer,则创建实例this.bootstrapRegistryInitializers = new ArrayList<>( getSpringFactoriesInstances(BootstrapRegistryInitializer.class));- 1
- 2
spring.factories是没有BootstrapRegistryInitializer的:
setInitializers()
然后获取启动器,若
spring.factories存在ApplicationContextInitializer,则创建实例setInitializers((Collection) getSpringFactoriesInstances(ApplicationContextInitializer.class));- 1
显然
spring.factories是有ApplicationContextInitializer的:
public void setInitializers(Collection<? extends ApplicationContextInitializer<?>> initializers) { this.initializers = new ArrayList<>(initializers); }- 1
- 2
- 3
- 4
实现了
ApplicationContextInitializer接口,这个接口的源码如下@FunctionalInterface public interface ApplicationContextInitializer<C extends ConfigurableApplicationContext> { /** * Initialize the given application context. * @param applicationContext the application to configure */ void initialize(C applicationContext); }- 1
- 2
- 3
- 4
- 5
- 6
- 7
- 8
- 9
- 10
initialize方法将ApplicationContextInitializer的实现类放到了context中: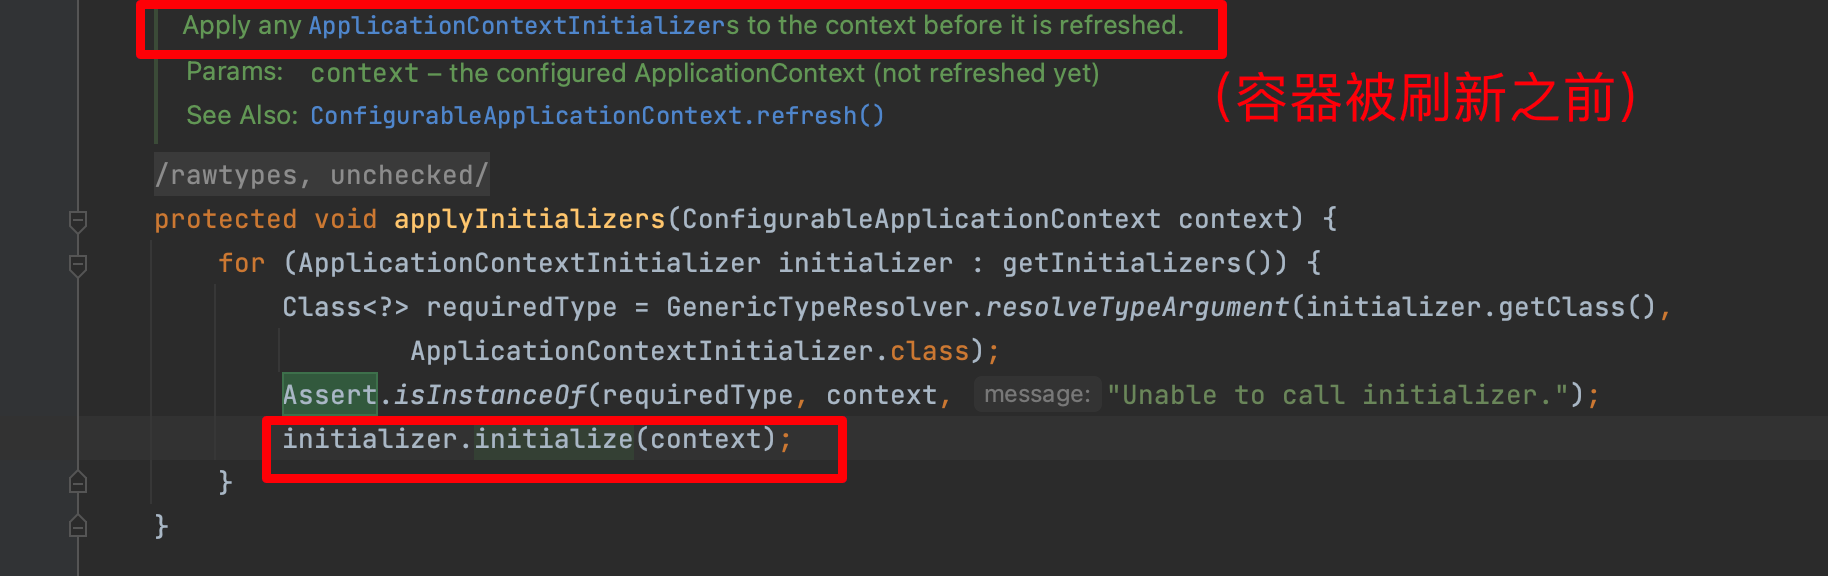
ApplicationContextInitializer接口的作用,在Spring上下文被刷新之前进行初始化的操作。典型地比如在Web应用中,注册Property Sources或者是激活Profiles。Property Sources比较好理解,就是配置文件。Profiles是Spring为了在不同环境下(如DEV,TEST,PRODUCTION等),加载不同的配置项而抽象出来的一个实体。- 调用initialize()方法,把初始化的
ApplicationContextInitializer实现加载到SpringApplication中,而getSpringFactoriesInstances(ApplicationListener.class))方法就是用来获得实现类的。
setListeners()
然后就是获得监听器:
setListeners((Collection) getSpringFactoriesInstances(ApplicationListener.class));- 1
在
spring.factories中也是有ApplicationListener的:
setListeners源码:public void setListeners(Collection<? extends ApplicationListener<?>> listeners) { this.listeners = new ArrayList<>(listeners); }- 1
- 2
- 3
- 4
继承自
ApplicationListener,ApplicationListener的源码:@FunctionalInterface public interface ApplicationListener<E extends ApplicationEvent> extends EventListener { /** * Handle an application event. * @param event the event to respond to */ void onApplicationEvent(E event); static <T> ApplicationListener<PayloadApplicationEvent<T>> forPayload(Consumer<T> consumer) { return event -> consumer.accept(event.getPayload()); }- 1
- 2
- 3
- 4
- 5
- 6
- 7
- 8
- 9
- 10
- 11
- 12
- 13
- 14
onApplicationEvent方法用了观察者模式。当被观察者发生变化的时候,观察者需要做一些操作。deduceMainApplicationClass()
最后是
this.mainApplicationClass = deduceMainApplicationClass();
private Class<?> deduceMainApplicationClass() { try { StackTraceElement[] stackTrace = new RuntimeException().getStackTrace(); for (StackTraceElement stackTraceElement : stackTrace) { if ("main".equals(stackTraceElement.getMethodName())) { return Class.forName(stackTraceElement.getClassName()); } } } catch (ClassNotFoundException ex) { // Swallow and continue } return null; }- 1
- 2
- 3
- 4
- 5
- 6
- 7
- 8
- 9
- 10
- 11
- 12
- 13
- 14
首先构造了一个异常类,并且获得栈帧的信息:
StackTraceElement[] stackTrace = new RuntimeException().getStackTrace();- 1


for循环一顿遍历,找到栈帧中methodName是"main"的进行反射实例化。

到此为止
SpringApplication的构造方法走完了,一些属性初始化完毕。然后开始走run方法:
run方法
源码在进入try之前有一些操作:
long startTime = System.nanoTime(); DefaultBootstrapContext bootstrapContext = createBootstrapContext(); ConfigurableApplicationContext context = null; configureHeadlessProperty(); SpringApplicationRunListeners listeners = getRunListeners(args); listeners.starting(bootstrapContext, this.mainApplicationClass);- 1
- 2
- 3
- 4
- 5
- 6
System.nanoTime();获得系统当前时间。便于在运行启动类时,打印初始化容器的时间。
createBootstrapContext
createBootstrapContext方法:(这个方法比较简单,就是创建一个对象,然后调用初始化方法)
private DefaultBootstrapContext createBootstrapContext() { DefaultBootstrapContext bootstrapContext = new DefaultBootstrapContext(); this.bootstrapRegistryInitializers.forEach((initializer) -> initializer.initialize(bootstrapContext)); return bootstrapContext; }- 1
- 2
- 3
- 4
- 5
创建一个
DefaultBootstrapContext对象(可以叫它“启动上下文”,是new出来的),并且启动它。(对初始化所收集到的所有bootstrapRegistryInitializers执行 initialize 方法,将 context 作为该方法的参数)一般来说context对象就是用来存储配置信息的。重点看一下这一句Lambda表达式:
this.bootstrapRegistryInitializers.forEach((initializer) -> initializer.initialize(bootstrapContext));- 1
启动扩展的初始化方法,其实构造器初始化扩展的时候,没有这个扩展:(就是
SpringApplication构造方法中的这一句)this.bootstrapRegistryInitializers = new ArrayList<>( getSpringFactoriesInstances(BootstrapRegistryInitializer.class));- 1
- 2
因为当时
spring.factories中没有。configureHeadlessProperty
configureHeadlessProperty方法:配置无头属性
Headless模式是在缺少显示屏、键盘或者鼠标的系统配置。在
java.awt.toolkit和java.awt.graphicsenvironment类中有许多方法,除了对字体、图形和打印的操作外还可以调用显示器、键盘和鼠标的方法。但是有一些类中,比如Canvas和Panel,可以在headless模式下执行。Headless模式虽然不是我们愿意见到的,但事实上我们却常常需要在该模式下工作,尤其服务器端程序开发者。因为服务器往往可能缺少前述设备,但又需要使用他们提供的功能,生成相应的数据,以提供给客户端。
一般可以用如下方式配置,这个要注意一下如果用到了
java.awt包下与图形相关的类型请不要设置为无头模式:JAVA_OPTS="-Djava.awt.headless=true"- 1
具体看一下这个
configureHeadlessProperty方法:(开启了Headless模式)private void configureHeadlessProperty() { System.setProperty(SYSTEM_PROPERTY_JAVA_AWT_HEADLESS, System.getProperty(SYSTEM_PROPERTY_JAVA_AWT_HEADLESS, Boolean.toString(this.headless))); }- 1
- 2
- 3
- 4
其中
SYSTEM_PROPERTY_JAVA_AWT_HEADLESS是java.awt.headless。设置系统属性java.awt.headless的值,默认为true
设置
java.awt.headless,如果未进行过自定义设置(如:application.setHeadless(false)、System.setProperties("java.awt.headless", false)或者 JVM 参数:java -Djava.awt.headless=true),则默认设置为 true。如果项目为非 GUI 类型的,如 console 或者 server 类型,建议设置为 true,否则设置为 false;这个方法有几个地方可以借鉴的:
- 定义了有意义的常量
- 在set之前先get以避免覆盖用户自定义配置
- 允许用户在程序中配置headless项,所以有了
this.headless变量 Boolean.toString这样的写法也是极好的,起到了规范统一的作用
从spring的代码中就可以看到设计者对我们这些普通Developer的友好。
补充一下headless模式:
在headless模式下,(awt)应用程序可以执行如下操作:
- 创建轻量级组件
- 收集关于可用的字体、字体指标和字体设置的信息
- 设置颜色来渲染准备图片
- 创造和获取图像,为渲染准备图片
- 使用
java.awt.PrintJob,java.awt.print.*,和javax.print.*类里的打印操作
简单来说,headless模式是一种声明:现在不要指望硬件的支持了,只能使用系统的运算能力来做些非可视化的处理工作。
关于这个配置在性能上的影响:
- 如果应用不需要任何head,那么有无这个配置没有任何影响;
- 如果应用有弹出窗口之类的操作,那么在headless模式下这种操作会被阻止。
总之,这是一项提示类的配置。
什么时候使用java.awt.headless模式?
对于开发者来讲常常需要在该模式下工作。因为服务器(如提供Web服务的)往往可能缺少前述设备,但又需要使用他们提供的功能,生成相应的数据,以提供给客户端(如浏览器所在的配有相关的、键盘和的主机)。
再回到源码:
SpringApplicationRunListeners listeners = getRunListeners(args);- 1
getRunListeners
getRunListeners:去spring.factroies中读取了SpringApplicationRunListener的组件, 就是用来发布事件或者运行监听器
private SpringApplicationRunListeners getRunListeners(String[] args) { Class<?>[] types = new Class<?>[] { SpringApplication.class, String[].class }; return new SpringApplicationRunListeners(logger, getSpringFactoriesInstances(SpringApplicationRunListener.class, types, this, args), this.applicationStartup); }- 1
- 2
- 3
- 4
- 5
- 6
从 META-INF/spring.factories 中获取所有的配置类,并将其封装到 SpringApplicationRunListeners 对象中去,主要创建的对象为 EventPublishingRunListener


private <T> Collection<T> getSpringFactoriesInstances(Class<T> type, Class<?>[] parameterTypes, Object... args) { //获取当前的类加载器 resourceLoader的类加载器优先 ClassLoader classLoader = getClassLoader(); // Use names and ensure unique to protect against duplicates // 借助SpringFactoriesLoader来获取所有扩展的扩展名字 Set<String> names = new LinkedHashSet<>(SpringFactoriesLoader.loadFactoryNames(type, classLoader)); // 创建所有扩展的对象,这个方法是createSpringFactoriesInstances List<T> instances = createSpringFactoriesInstances(type, parameterTypes, classLoader, args, names); // 根据Order对扩展对象进行排序 AnnotationAwareOrderComparator.sort(instances); return instances; }- 1
- 2
- 3
- 4
- 5
- 6
- 7
- 8
- 9
- 10
- 11
- 12
对于getClassLoader这一步:为什么是resourceLoader优先呢?看下面的源码
public ClassLoader getClassLoader() { if (this.resourceLoader != null) { return this.resourceLoader.getClassLoader(); } return ClassUtils.getDefaultClassLoader(); }- 1
- 2
- 3
- 4
- 5
- 6

创建扩展的对象的方法
createSpringFactoriesInstances:private <T> List<T> createSpringFactoriesInstances(Class<T> type, Class<?>[] parameterTypes, ClassLoader classLoader, Object[] args, Set<String> names) { List<T> instances = new ArrayList<>(names.size()); for (String name : names) { try { //ClassUtils.forName()这个方法通过反射机制实现动态加载 Class<?> instanceClass = ClassUtils.forName(name, classLoader); Assert.isAssignable(type, instanceClass); Constructor<?> constructor = instanceClass.getDeclaredConstructor(parameterTypes); T instance = (T) BeanUtils.instantiateClass(constructor, args); instances.add(instance); } catch (Throwable ex) { throw new IllegalArgumentException("Cannot instantiate " + type + " : " + name, ex); } } return instances; }- 1
- 2
- 3
- 4
- 5
- 6
- 7
- 8
- 9
- 10
- 11
- 12
- 13
- 14
- 15
- 16
- 17
- 18
这个方法通过
ClassUtils.forName()方法传入要加载的类的类名,和响应的类加载器,来加载类,也就是EventPublishingRunListener
try分支中其实也用到了反射创建实例(根据构造方法创建实例,因为调用的是
instanceClass.getDeclaredConstructor)注意:方法传入的参数之一:
- type:
Class类型,这里是SpringApplicationRunListener接口。
Assert.isAssignable(type, instanceClass);的第2个参数instanceClass这里是EventPublishingRunListener。这个断言的isAssignable方法是用来检查类型的。经过源码得知:public class EventPublishingRunListener implements SpringApplicationRunListener, Ordered {- 1
所以这个断言会返回true.(其实就是判断是不是指定接口)
然后还有就是在
BeanUtils.instantiateClass中创建实例的时候修改了构造器的可见性范围,并提供了对Kotlin的支持。对于这个方法的参数
parameterTypes其实是一路传过来的:在
getRunListeners中有:Class<?>[] types = new Class<?>[] { SpringApplication.class, String[].class };- 1
这个types变量一路穿过来:
getRunListeners—》getSpringFactoriesInstances(XXX,types,XXX,XXX)----》createSpringFactoriesInstances(XXX,parameterTypes,XXX,XXX)这样传过来了。
那么
BeanUtils.instantiateClass中创建实例的时候修改构造器的可见性范围是怎么看出来的呢?来看
instanceClass.getDeclaredConstructor(parameterTypes)的一系列调用:首先是getDeclaredConstructor方法:

里面会调用
getConstructor0方法
对于传入的2个参数:
- parameterTypes就是刚才说的2个
String.class和SpringApplication.class。 - which:是getDeclaredConstructor方法中传过来的
Member.DECLARED,其定义是:
public static final int DECLARED = 1;- 1
这里简单补充一下
Member这个接口里面的2个静态常量:public static final int PUBLIC = 0; public static final int DECLARED = 1;- 1
- 2
PUBLIC 会包括所有的 public 方法,包括父类的方法,而 DECLARED 会包括所有自己定义的方法,public,protected,private 都在此,但是不包括父类的方法。这也正是
getMethod和getDeclaredMethod的区别。(这个学习反射应该都有体会)。回到getConstructor0方法:
首先执行:
Constructor<T>[] constructors = privateGetDeclaredConstructors((which == Member.PUBLIC));- 1
显然
which == Member.PUBLIC返回的是false,privateGetDeclaredConstructors(false)将返回该类所有构造函数而当前这个类应该是
EventPublishingRunListener,
根据实际情况,其实也就之后一个public类型的构造方法。

所以:
Constructor[] constructors = privateGetDeclaredConstructors((which == Member.PUBLIC)); - 1
返回的Constructor类型的数组就只有一项:

然后是一个for循环:
for (Constructor<T> constructor : constructors) { if (arrayContentsEq(parameterTypes, constructor.getParameterTypes())) { return getReflectionFactory().copyConstructor(constructor); } }- 1
- 2
- 3
- 4
- 5
- 6
这里的
arrayContentsEq方法:private static boolean arrayContentsEq(Object[] a1, Object[] a2) { if (a1 == null) { return a2 == null || a2.length == 0; } if (a2 == null) { return a1.length == 0; } if (a1.length != a2.length) { return false; } for (int i = 0; i < a1.length; i++) { if (a1[i] != a2[i]) { return false; } } return true; }- 1
- 2
- 3
- 4
- 5
- 6
- 7
- 8
- 9
- 10
- 11
- 12
- 13
- 14
- 15
- 16
- 17
- 18
- 19
- 20
- 21
这是一个静态方法,其实就是轮循数组寻找参数列表类型匹配的方法。
这里插一句话:
逐个比较两个Object数组(实际是Class数组)的对应元素。反射机制无法实现类型兼容的源头正在此处,因为arrayContentsEq方法中是直接用等号比对两个Class对象,因此继承或实现接口等关系就被完全忽略了
这里显然是一致的:

找到匹配后,通过
ReflectionFactory.copyConstructor复制一份constructor返回;再回到
createSpringFactoriesInstances方法:
instanceClass.getDeclaredConstructor(parameterTypes)最后得到的就是EventPublishingRunListener的唯一的构造方法。然后执行:
T instance = (T) BeanUtils.instantiateClass(constructor, args);- 1
首先对于kotlin的支持:
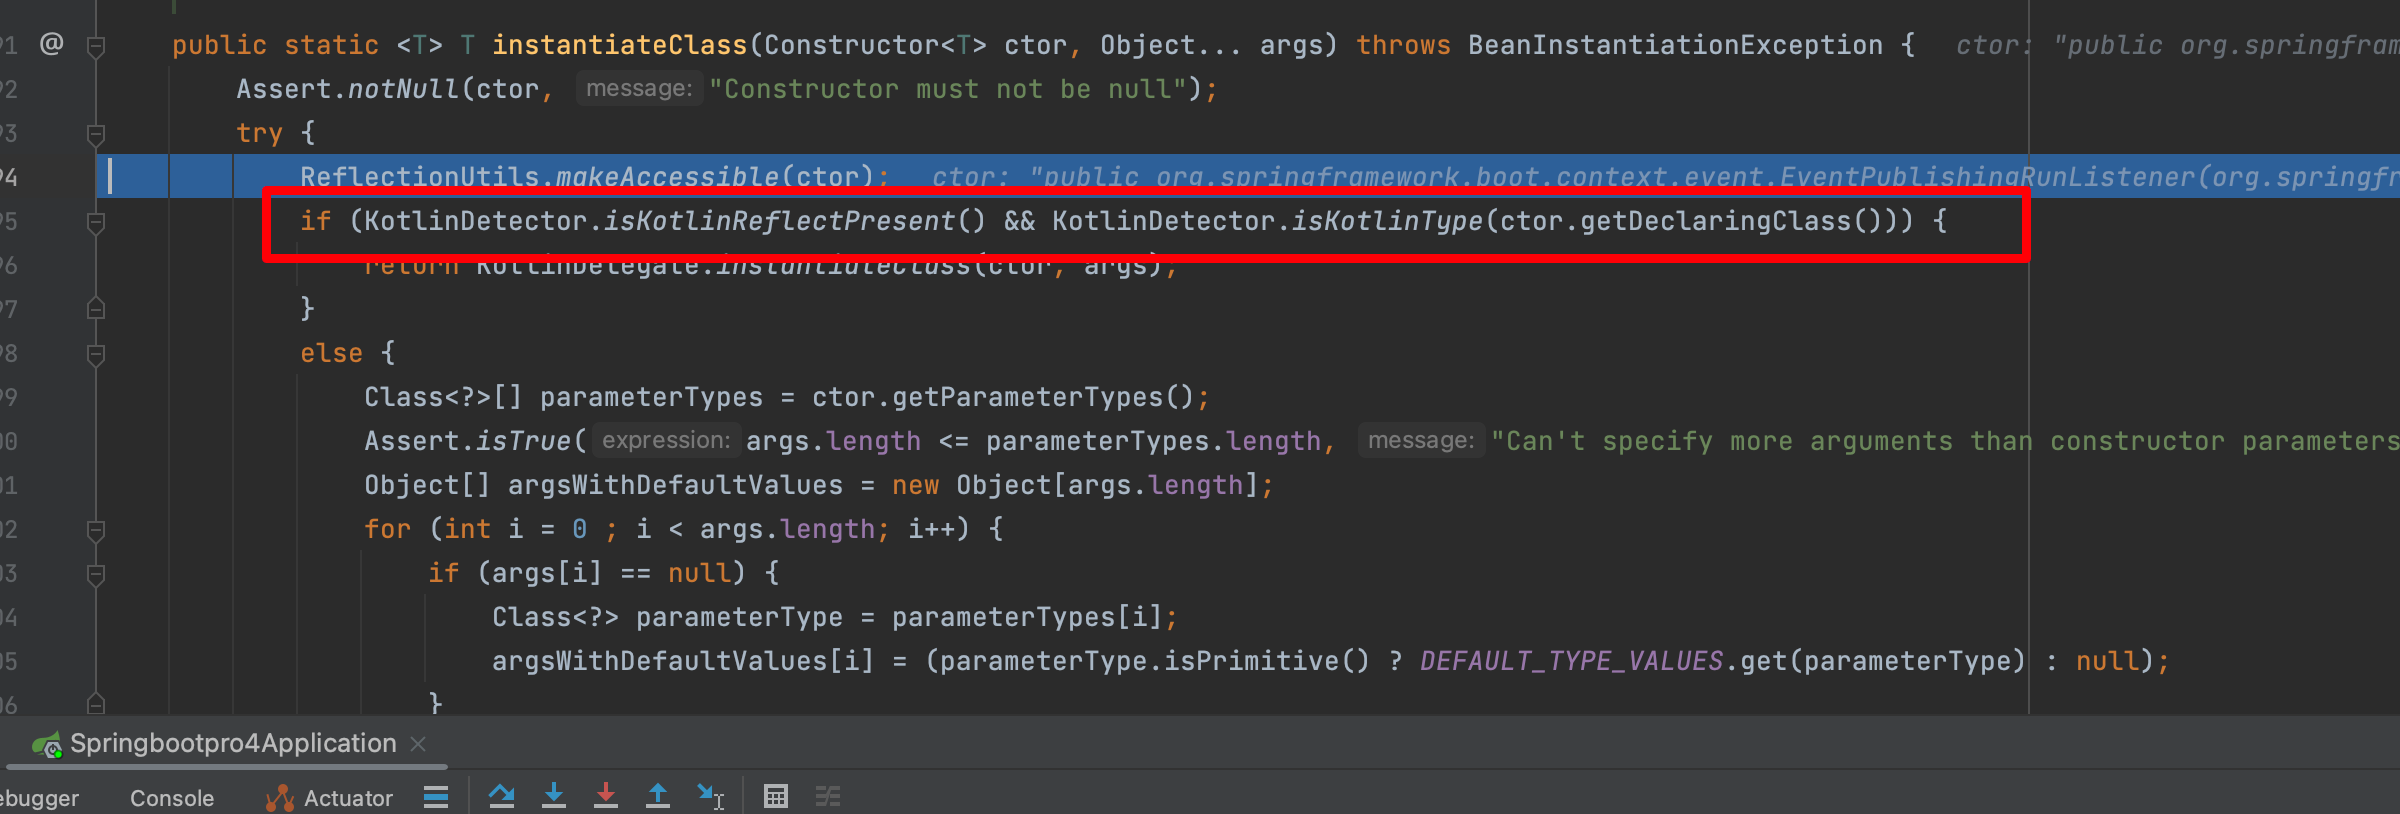
通过下面的方法获得参数列表:
Class<?>[] parameterTypes = ctor.getParameterTypes();- 1
这里参数列表就是
SpringApplication和String类型的。关于EventPublishingRunListener的构造方法:public EventPublishingRunListener(SpringApplication application, String[] args) { this.application = application; this.args = args; this.initialMulticaster = new SimpleApplicationEventMulticaster(); for (ApplicationListener<?> listener : application.getListeners()) { this.initialMulticaster.addApplicationListener(listener); } }- 1
- 2
- 3
- 4
- 5
- 6
- 7
- 8
关于这个
instantiateClass方法不细看了,最后会创建EventPublishingRunListener实例:
实例:

再回到
createSpringFactoriesInstances方法:
最后一步是将得到的唯一的
EventPublishingRunListener实例加到List中。最终返回这个list(也就是源码中的instances)。再回到:getSpringFactoriesInstances

最后还要排序,其实没必要了,因为只有一个元素:

再回到最一开始的:getRunListeners

然后执行new一个SpringApplicationRunListeners实例了,传入参数:
Log log, Collection listeners, ApplicationStartup applicationStartup- 1
- 2
这里的listeners,就是实例化的EventPublishingRunListener实例。
调用构造方法:

至此,getRunListeners方法结束了。
listeners.starting发布应用启动事件
listeners.starting(bootstrapContext, this.mainApplicationClass);- 1
 得到的SpringApplicationRunListener实例
listeners调用starting方法。注意listeners这个类型和前面获取的扩展集合是不一样的要注意,这个类型后面多了个s,前面那个没有s 这个是用来存储与管理调用那个集合的,这里所说的集合就是之前
SpringApplication构造方法得到的一堆listener:
listeners.starting需要传2个参数:bootstrapContext,this.mainApplicationClassbootstrapContext是
DefaultBootstrapContext bootstrapContext = createBootstrapContext();这一步生成的,就是“启动上下文”对象.this.mainApplicationClass:
就是当前启动类的字节码。
来看
starting方法的源码:这里涉及回调方法void starting(ConfigurableBootstrapContext bootstrapContext, Class<?> mainApplicationClass) { doWithListeners("spring.boot.application.starting", (listener) -> listener.starting(bootstrapContext), (step) -> { if (mainApplicationClass != null) { step.tag("mainApplicationClass", mainApplicationClass.getName()); } }); }- 1
- 2
- 3
- 4
- 5
- 6
- 7
- 8
调用
doWithListeners这个方法:private void doWithListeners(String stepName, Consumer<SpringApplicationRunListener> listenerAction, Consumer<StartupStep> stepAction) { StartupStep step = this.applicationStartup.start(stepName); this.listeners.forEach(listenerAction); if (stepAction != null) { stepAction.accept(step); } step.end(); }- 1
- 2
- 3
- 4
- 5
- 6
- 7
- 8
- 9
然后需要注意:
(listener) -> listener.starting(bootstrapContext)- 1
来看
listener.starting方法:@Override public void starting(ConfigurableBootstrapContext bootstrapContext) { this.initialMulticaster .multicastEvent(new ApplicationStartingEvent(bootstrapContext, this.application, this.args)); }- 1
- 2
- 3
- 4
- 5
就是广播事件。
这里的
this.initialMulticaster是SimpleApplicationEventMulticaster简单事件广播器。调用
multicastEvent方法将new创建的ApplicationStartingEvent的传入。这将涉及到Spring Event事件通知机制,这里不深究。实例化结果:

然后来看
multicastEvent方法:@Override public void multicastEvent(ApplicationEvent event) { multicastEvent(event, resolveDefaultEventType(event)); }- 1
- 2
- 3
- 4
然后又调用了重载的
multicastEvent的方法,在看这个方法之前来看一下resolveDefaultEventType,作用是获取当前事件对应的类型:private ResolvableType resolveDefaultEventType(ApplicationEvent event) { return ResolvableType.forInstance(event); }- 1
- 2
- 3
又将调用
ResolvableType.forInstance(event);public static ResolvableType forInstance(@Nullable Object instance) { if (instance instanceof ResolvableTypeProvider) { ResolvableType type = ((ResolvableTypeProvider)instance).getResolvableType(); if (type != null) { return type; } } return instance != null ? forClass(instance.getClass()) : NONE; }- 1
- 2
- 3
- 4
- 5
- 6
- 7
- 8
- 9
- 10
首先判断instance是不是ResolvableTypeProvider的实例,当前的instance是传入的event,是
ApplicationStartingEvent类型的,ApplicationStartingEvent extends SpringApplicationEvent SpringApplicationEvent extends ApplicationEvent ApplicationEvent extends EventObject EventObject implements java.io.Serializable- 1
- 2
- 3
- 4
显然这里if分支进不了,将走:
return instance != null ? forClass(instance.getClass()) : NONE;- 1
instance不是null,所以返回
forClass(instance.getClass())public static ResolvableType forClass(@Nullable Class<?> clazz) { return new ResolvableType(clazz); }- 1
- 2
- 3
其实就是调用了
ResolvableType的构造函数,返回了一个ResolvableType对象,传入的是ApplicationStartingEvent的字节码。ResolvableType的构造方法:private ResolvableType(@Nullable Class<?> clazz) { this.resolved = (clazz != null ? clazz : Object.class); this.type = this.resolved; this.typeProvider = null; this.variableResolver = null; this.componentType = null; this.hash = null; }- 1
- 2
- 3
- 4
- 5
- 6
- 7
- 8
初始化完成:

就是给type属性赋值为
ApplicationStartingEvent的字节码,其他属性值都是null。回到
multicastEvent方法:
调用重载的multicastEvent方法:
applicationStartingEvent 是 SpringBoot 框架最早执行的监听器,在该监听器执行 started 方法时,会继续发布事件,主要是基于 Spring 的事件机制
@Override public void multicastEvent(final ApplicationEvent event, @Nullable ResolvableType eventType) { ResolvableType type = (eventType != null ? eventType : resolveDefaultEventType(event)); Executor executor = getTaskExecutor(); for (ApplicationListener<?> listener : getApplicationListeners(event, type)) { if (executor != null) { executor.execute(() -> invokeListener(listener, event)); } else { invokeListener(listener, event); } } }- 1
- 2
- 3
- 4
- 5
- 6
- 7
- 8
- 9
- 10
- 11
- 12
- 13
参数列表:
event:ApplicationStartingEvent的实例- eventType:ResolvableType实例,其type属性是ApplicationStartingEvent的字节码。
首先执行:
ResolvableType type = (eventType != null ? eventType : resolveDefaultEventType(event));- 1
eventType非空,所以:
ResolvableType type = eventType = ResolvableType实例,其type属性是ApplicationStartingEvent的字节码- 1
然后执行:获取线程池
Executor executor = getTaskExecutor();- 1

此时,
SimpleApplicationEventMulticaster的taskExecutor还是null。然后会进入for循环:
for (ApplicationListener<?> listener : getApplicationListeners(event, type)) { if (executor != null) { executor.execute(() -> invokeListener(listener, event)); } else { invokeListener(listener, event); } }- 1
- 2
- 3
- 4
- 5
- 6
- 7
- 8
先来看
getApplicationListeners方法:返回与给定事件类型匹配的ApplicationListeners集合。protected Collection<ApplicationListener<?>> getApplicationListeners( ApplicationEvent event, ResolvableType eventType) { Object source = event.getSource(); Class<?> sourceType = (source != null ? source.getClass() : null); ListenerCacheKey cacheKey = new ListenerCacheKey(eventType, sourceType); // Potential new retriever to populate CachedListenerRetriever newRetriever = null; // Quick check for existing entry on ConcurrentHashMap CachedListenerRetriever existingRetriever = this.retrieverCache.get(cacheKey); if (existingRetriever == null) { // Caching a new ListenerRetriever if possible if (this.beanClassLoader == null || (ClassUtils.isCacheSafe(event.getClass(), this.beanClassLoader) && (sourceType == null || ClassUtils.isCacheSafe(sourceType, this.beanClassLoader)))) { newRetriever = new CachedListenerRetriever(); existingRetriever = this.retrieverCache.putIfAbsent(cacheKey, newRetriever); if (existingRetriever != null) { newRetriever = null; // no need to populate it in retrieveApplicationListeners } } } if (existingRetriever != null) { Collection<ApplicationListener<?>> result = existingRetriever.getApplicationListeners(); if (result != null) { return result; } // If result is null, the existing retriever is not fully populated yet by another thread. // Proceed like caching wasn't possible for this current local attempt. } return retrieveApplicationListeners(eventType, sourceType, newRetriever); }- 1
- 2
- 3
- 4
- 5
- 6
- 7
- 8
- 9
- 10
- 11
- 12
- 13
- 14
- 15
- 16
- 17
- 18
- 19
- 20
- 21
- 22
- 23
- 24
- 25
- 26
- 27
- 28
- 29
- 30
- 31
- 32
- 33
- 34
- 35
- 36
返回3个listener:

不是null的listener对每一个listener执行:异步调用执行监听器中的方法
executor.execute(() -> invokeListener(listener, event));- 1
默认情况下,spring实现的观察者模式,同步阻塞的。(如果线程池为空,则同步发送事件,否则异步发送事件)
但是这里直接调用了监听器的方法:


3个监听器都是一样的。
starting方法就差不多了。
再次回到run主线:

new DefaultApplicationArguments(args)创建默认的应用参数类
先来说说
DefaultApplicationArguments这个类:public class DefaultApplicationArguments implements ApplicationArguments- 1
ApplicationArguments接口提供对用于运行org.springframework.boot.SpringApplication的参数访问,此接口只有一个实现类DefaultApplicationArgumentspublic DefaultApplicationArguments(String... args) { Assert.notNull(args, "Args must not be null"); this.source = new Source(args); this.args = args; }- 1
- 2
- 3
- 4
- 5
走上面的构造方法的时候,传过来的
args为[],
创建完对象之后,这个
DefaultApplicationArguments对象有2个属性:- source
- args
在new 一个source实例的时候,会调用:
Source(String[] args) { super(args); }- 1
- 2
- 3
调用Source类父类的构造方法:
private static class Source extends SimpleCommandLinePropertySource- 1
即调用:
public SimpleCommandLinePropertySource(String... args) { super(new SimpleCommandLineArgsParser().parse(args)); }- 1
- 2
- 3
SimpleCommandLineArgsParser实例被传入SimpleCommandLinePropertySource的构造方法了。public CommandLinePropertySource(T source) { super(COMMAND_LINE_PROPERTY_SOURCE_NAME, source); }- 1
- 2
- 3
public EnumerablePropertySource(String name, T source) { super(name, source); }- 1
- 2
- 3
public PropertySource(String name, T source) { Assert.hasText(name, "Property source name must contain at least one character"); Assert.notNull(source, "Property source must not be null"); this.name = name; this.source = source; }- 1
- 2
- 3
- 4
- 5
- 6
最后,实例创建完毕:

关于
PropertySource这个抽象类:public abstract class PropertySource- 1
Spring框架需要处理来自各种环境的配置参数信息,比如System Property(系统属性)、Properties Property(配置文件属性)、 CommandLine Property(命令行属性)、Servlet Property(Servlet属性)等。这个带泛型参数接口的作用就是为不同环境参数定义的,其中name属性就是环境的key,source就是对应环境的具体参数信息对象。注意这个抽象类实现了equals和hashCode方法,关键属性是name,当保存到集合中时,就会以name作为主元素进行匹配和查找,这点后面就可以看到,这可能就是选择定义为抽象类而不是接口的原因之一吧。
这里不需要特别关注,因为创建这个实例用于解析简单的命令行参数,但此时传来的args是
[].prepareEnvironment准备Spring应用环境
run方法接下来要执行:
ConfigurableEnvironment environment = prepareEnvironment(listeners, bootstrapContext, applicationArguments);- 1
传入3个参数:
listenersbootstrapContextapplicationArguments

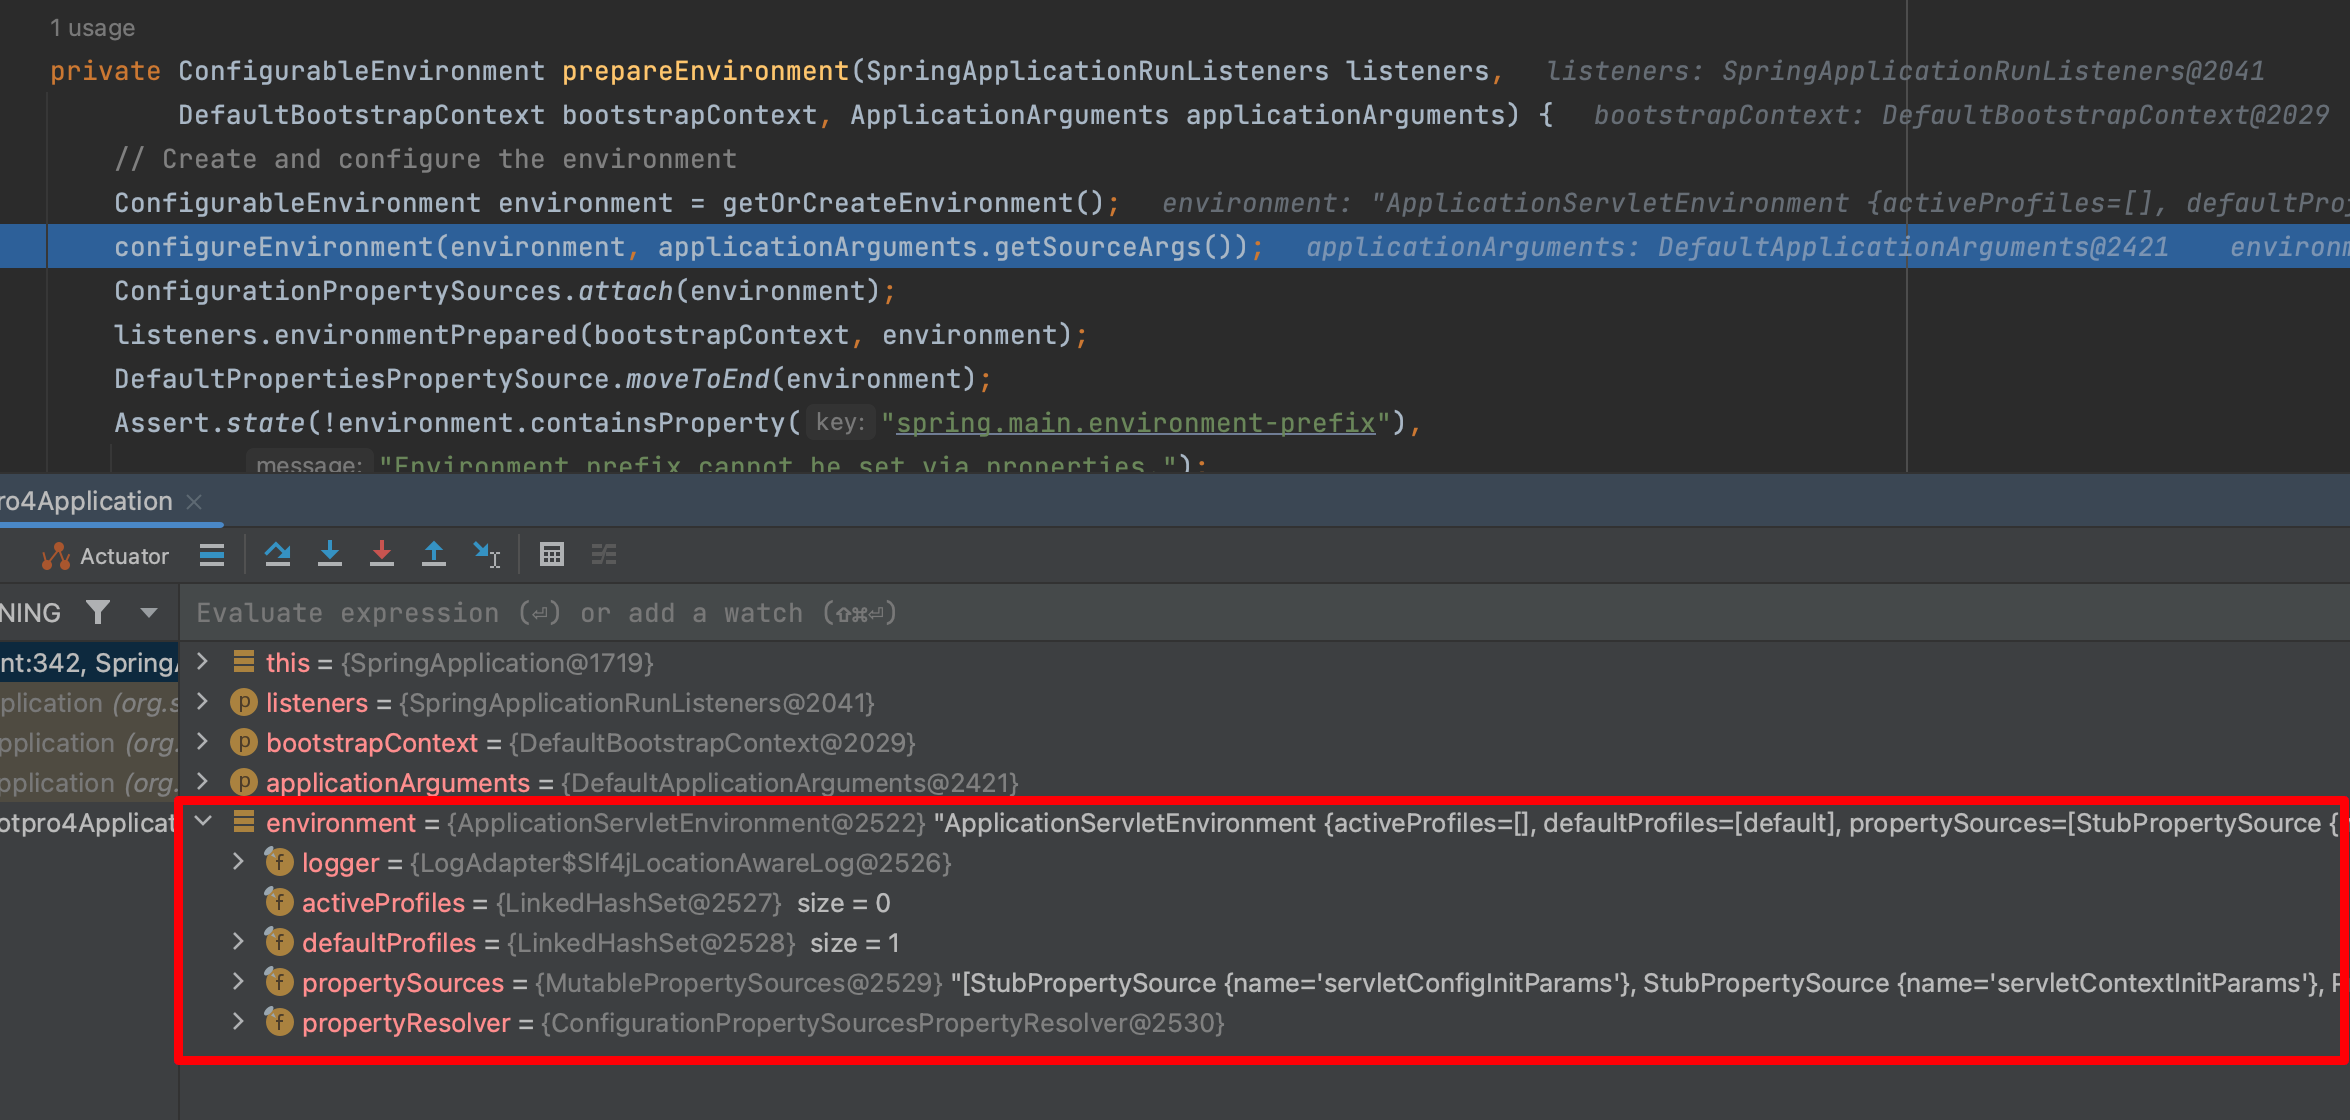
private ConfigurableEnvironment prepareEnvironment(SpringApplicationRunListeners listeners, DefaultBootstrapContext bootstrapContext, ApplicationArguments applicationArguments) { // Create and configure the environment ConfigurableEnvironment environment = getOrCreateEnvironment(); configureEnvironment(environment, applicationArguments.getSourceArgs()); ConfigurationPropertySources.attach(environment); listeners.environmentPrepared(bootstrapContext, environment); DefaultPropertiesPropertySource.moveToEnd(environment); Assert.state(!environment.containsProperty("spring.main.environment-prefix"), "Environment prefix cannot be set via properties."); bindToSpringApplication(environment); if (!this.isCustomEnvironment) { EnvironmentConverter environmentConverter = new EnvironmentConverter(getClassLoader()); environment = environmentConverter.convertEnvironmentIfNecessary(environment, deduceEnvironmentClass()); } ConfigurationPropertySources.attach(environment); return environment; }- 1
- 2
- 3
- 4
- 5
- 6
- 7
- 8
- 9
- 10
- 11
- 12
- 13
- 14
- 15
- 16
- 17
- 18
第一步:根据前面的webApplicationType决定实例化哪个环境实现类
ConfigurableEnvironment environment = getOrCreateEnvironment();
创建或者获取应用环境
private ConfigurableEnvironment getOrCreateEnvironment() { if (this.environment != null) { return this.environment; } switch (this.webApplicationType) { case SERVLET: return new ApplicationServletEnvironment(); case REACTIVE: return new ApplicationReactiveWebEnvironment(); default: return new ApplicationEnvironment(); } }- 1
- 2
- 3
- 4
- 5
- 6
- 7
- 8
- 9
- 10
- 11
- 12
- 13
这里
environment传进来是null,所以要根据web的类型创建对应的environment:显然走的case是
SERVLET,会返回一个新创建的:ApplicationServletEnvironment();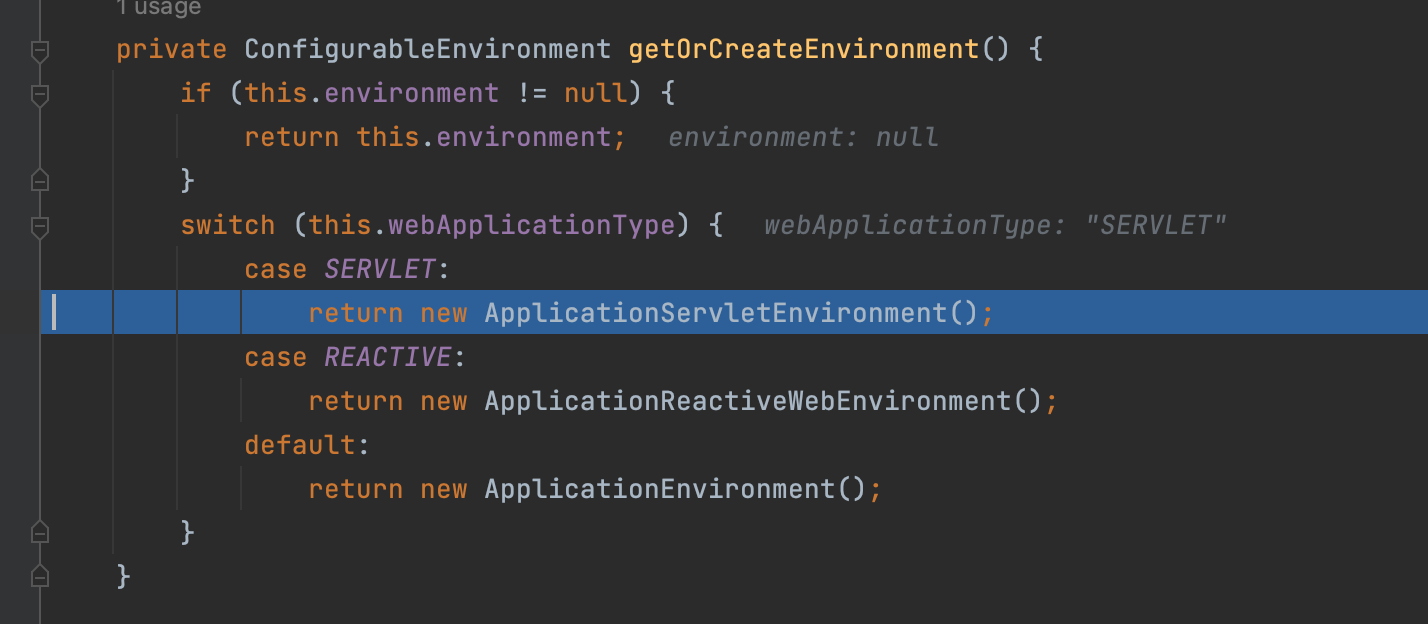
创建的细节不深究,得到的实例如下:
第2步:注册默认的转换器、格式化组件
configureEnvironment(environment, applicationArguments.getSourceArgs());- 1
传入的
applicationArguments.getSourceArgs()其实是:
来看具体的方法:(这是一个模版方法)
configureEnvironment
protected void configureEnvironment(ConfigurableEnvironment environment, String[] args) { if (this.addConversionService) { environment.setConversionService(new ApplicationConversionService()); } configurePropertySources(environment, args); configureProfiles(environment, args); }- 1
- 2
- 3
- 4
- 5
- 6
- 7
首先
this.addConversionService默认是true:
所以将执行:
environment.setConversionService(new ApplicationConversionService());- 1
先创建ApplicationConversionService对象:
public class ApplicationConversionService extends FormattingConversionService public class FormattingConversionService extends GenericConversionService implements FormatterRegistry, EmbeddedValueResolverAware public class GenericConversionService implements ConfigurableConversionService public interface ConfigurableConversionService extends ConversionService, ConverterRegistry public interface ConversionService- 1
- 2
- 3
- 4
- 5
- 6
ConversionService是一个顶级接口,是类型转换器实例化过程:
public ApplicationConversionService() { this(null); }- 1
- 2
- 3
public ApplicationConversionService(StringValueResolver embeddedValueResolver) { this(embeddedValueResolver, false); }- 1
- 2
- 3
这里的embeddedValueResolver是null
private ApplicationConversionService(StringValueResolver embeddedValueResolver, boolean unmodifiable) { // embeddedValueResolver是null,if不走 if (embeddedValueResolver != null) { setEmbeddedValueResolver(embeddedValueResolver); } configure(this); this.unmodifiable = unmodifiable; }- 1
- 2
- 3
- 4
- 5
- 6
- 7
- 8
configure(this); 注册装换器、格式化组件,源码如下
public static void configure(FormatterRegistry registry) { // 注册默认转换器组件 DefaultConversionService.addDefaultConverters(registry); // 注册默认格式化器组件 DefaultFormattingConversionService.addDefaultFormatters(registry); // 注册应用程序默认格式化器组件 addApplicationFormatters(registry); // 注册应用程序默认转换器组件 addApplicationConverters(registry); }- 1
- 2
- 3
- 4
- 5
- 6
- 7
- 8
- 9
- 10

然后赋值 :
this.unmodifiable = unmodifiable;- 1

这个false是前面方法中传进来的。
ApplicationConversionService实例化完毕:
再次回到:
protected void configureEnvironment(ConfigurableEnvironment environment, String[] args) { if (this.addConversionService) { environment.setConversionService(new ApplicationConversionService()); } configurePropertySources(environment, args); configureProfiles(environment, args); }- 1
- 2
- 3
- 4
- 5
- 6
- 7
然后执行
environment.setConversionServicepublic void setConversionService(ConfigurableConversionService conversionService) { this.propertyResolver.setConversionService(conversionService); }- 1
- 2
- 3
public void setConversionService(ConfigurableConversionService conversionService) { // 非空的判断 Assert.notNull(conversionService, "ConversionService must not be null"); this.conversionService = conversionService; }- 1
- 2
- 3
- 4
- 5
然后执行:
configurePropertySources(environment, args);(装配main方法参数)
protected void configurePropertySources(ConfigurableEnvironment environment, String[] args) { // environment.getPropertySources();此时会直接返回,作为PropertySource接口的容器 MutablePropertySources sources = environment.getPropertySources(); // this.defaultProperties = null // 也就是!CollectionUtils.isEmpty(this.defaultProperties = false // 这个if不走 if (!CollectionUtils.isEmpty(this.defaultProperties)) { DefaultPropertiesPropertySource.addOrMerge(this.defaultProperties, sources); } // this.addCommandLineProperties = true // (args.length > 0) = false,此时args = [] // (this.addCommandLineProperties && args.length > 0) = false,这个if分支也不走 if (this.addCommandLineProperties && args.length > 0) { String name = CommandLinePropertySource.COMMAND_LINE_PROPERTY_SOURCE_NAME; if (sources.contains(name)) { PropertySource<?> source = sources.get(name); CompositePropertySource composite = new CompositePropertySource(name); composite.addPropertySource( new SimpleCommandLinePropertySource("springApplicationCommandLineArgs", args)); composite.addPropertySource(source); sources.replace(name, composite); } else { sources.addFirst(new SimpleCommandLinePropertySource(args)); } } }- 1
- 2
- 3
- 4
- 5
- 6
- 7
- 8
- 9
- 10
- 11
- 12
- 13
- 14
- 15
- 16
- 17
- 18
- 19
- 20
- 21
- 22
- 23
- 24
- 25
- 26
- 27
MutablePropertySources sources = environment.getPropertySources();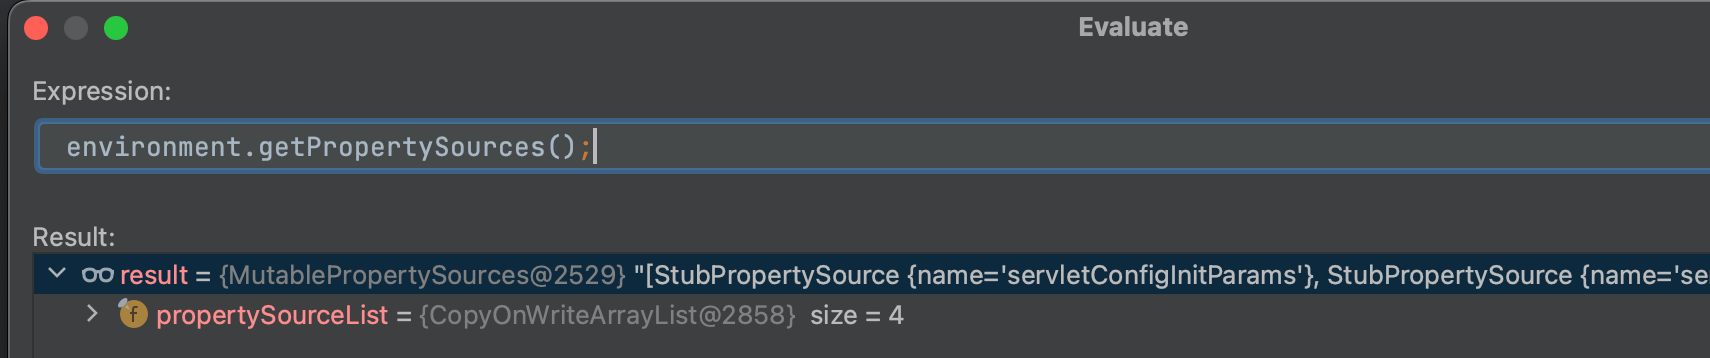
简单来说上面的这个
configurePropertySources方法的作用是:- 如果设置默认属性,则添加进去,这里没有设置(第一个if分支)
- (第二个分支)如果有命令行参数,这里将命令行参数封装后添加到key为springApplicationCommandLineArgs的
MutablePropertySources属性List中
因为此时,没什么默认参数,也没有命令行参数,就不需要做什么。
然后回到
configureEnvironment,走configureProfiles(environment, args);(装配Profiles配置)protected void configureProfiles(ConfigurableEnvironment environment, String[] args) { }- 1
- 2
发现只是平庸的实现。这样
configureEnvironment方法就走完了。回到
prepareEnvironment方法,接下来ConfigurationPropertySources.attach(environment);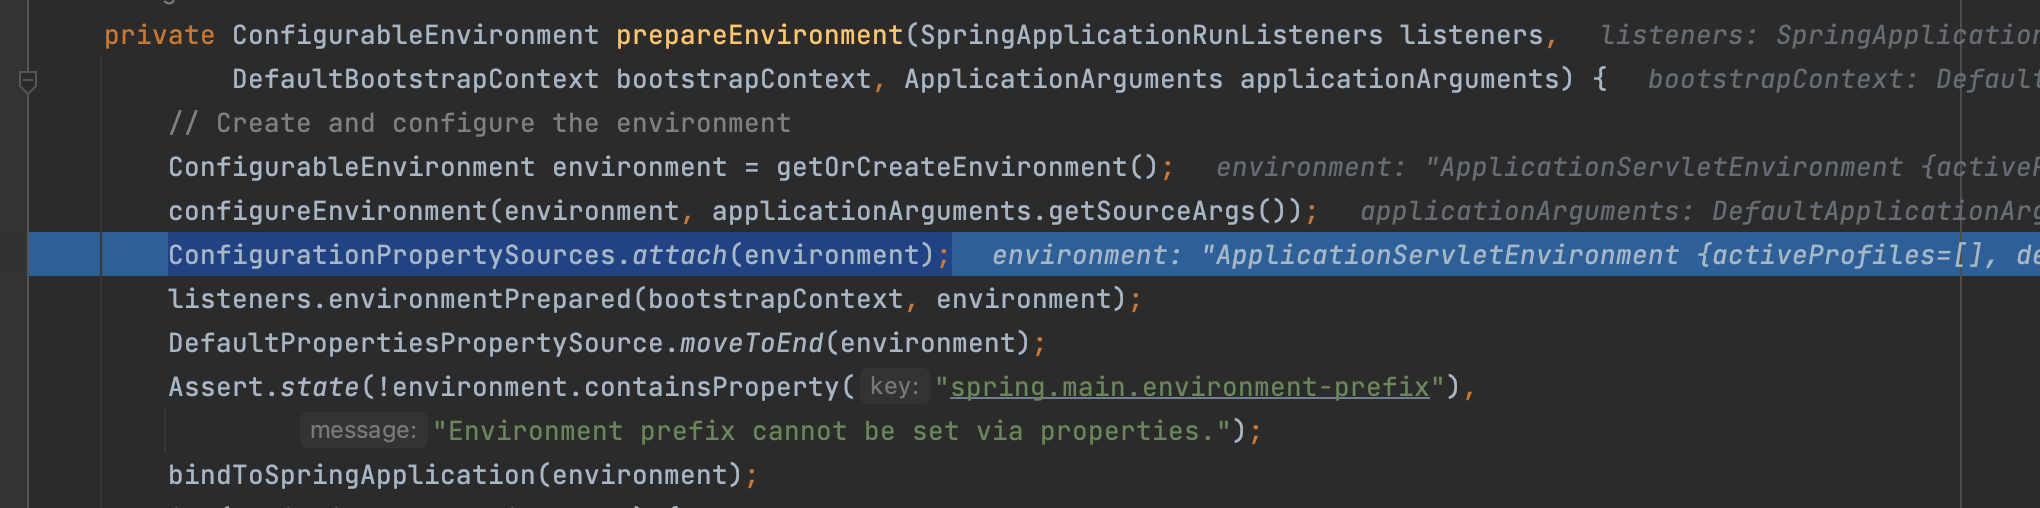
ConfigurationPropertySources.attach(environment);
这个方法用于:附加指定的环境配置
来看源码:
private static final String ATTACHED_PROPERTY_SOURCE_NAME = "configurationProperties"; public static void attach(Environment environment) { // environment是ApplicationServletEnvironment的实例 // class ApplicationServletEnvironment extends StandardServletEnvironment // public class StandardServletEnvironment extends StandardEnvironment implements ConfigurableWebEnvironment // public interface ConfigurableWebEnvironment extends ConfigurableEnvironment // 所以isInstanceOf为true Assert.isInstanceOf(ConfigurableEnvironment.class, environment); // 获取servlet和系统的一些参数,这里是4个参数,2个servlet的参数,2个系统参数(下面截图了) MutablePropertySources sources = ((ConfigurableEnvironment) environment).getPropertySources(); // attached源码看下面,逻辑解释在下面了,这里attached = null,因为没有name是configurationProperties的source PropertySource<?> attached = getAttached(sources); // isUsingSources源码在下面,isUsingSources(attached, sources) = false,所以if分支要进 if (attached == null || !isUsingSources(attached, sources)) { // 将sources封装成ConfigurationPropertySourcesPropertySource对象,name为configurationProperties,创建完成的对象截图在下面 attached = new ConfigurationPropertySourcesPropertySource(ATTACHED_PROPERTY_SOURCE_NAME, new SpringConfigurationPropertySources(sources)); } // 此时sources还是4个元素,就是上面说的servlet2个,系统的sources2个 // 所以实际上不需要remove,执行完remove方法sources还是4个元素 sources.remove(ATTACHED_PROPERTY_SOURCE_NAME); // 并把ConfigurationPropertySourcesPropertySource对象放到sources的第一位置 // 执行完addFirst,此时就有5个sources了,具体哪五个下面记录了 sources.addFirst(attached); }- 1
- 2
- 3
- 4
- 5
- 6
- 7
- 8
- 9
- 10
- 11
- 12
- 13
- 14
- 15
- 16
- 17
- 18
- 19
- 20
- 21
- 22
- 23
- 24
- 25
这个attach方法:
将
ConfigurationPropertySource支持附加到指定的环境。将环境管理的每个PropertySource适配到ConfigurationPropertySource,并允许使用配置属性名来解析经典PropertySourcesPropertyResolver调用。
附加的解析器将动态跟踪从底层环境属性源中添加或删除的任何内容。
这里看一下
((ConfigurableEnvironment) environment).getPropertySources()到底是哪4个:
所以关于attach方法:获取name为
configurationProperties的sourcesstatic PropertySource<?> getAttached(MutablePropertySources sources) { return (sources != null) ? sources.get(ATTACHED_PROPERTY_SOURCE_NAME) : null; } 其中: private static final String ATTACHED_PROPERTY_SOURCE_NAME = "configurationProperties";- 1
- 2
- 3
- 4
- 5
传入的4个source的信息如下:

显然没有name是
configurationProperties的source,所以getAttached方法返回null
private static boolean isUsingSources(PropertySource<?> attached, MutablePropertySources sources) { // attached是null ,直接返回false了 return attached instanceof ConfigurationPropertySourcesPropertySource && ((SpringConfigurationPropertySources) attached.getSource()).isUsingSources(sources); }- 1
- 2
- 3
- 4
- 5
if (attached == null || !isUsingSources(attached, sources)) { attached = new ConfigurationPropertySourcesPropertySource(ATTACHED_PROPERTY_SOURCE_NAME, new SpringConfigurationPropertySources(sources)); }- 1
- 2
- 3
- 4
创建的过程如下:
首先创建
SpringConfigurationPropertySources,对sourcess属性进行赋值。SpringConfigurationPropertySources(Iterable<PropertySource<?>> sources) { Assert.notNull(sources, "Sources must not be null"); this.sources = sources; }- 1
- 2
- 3
- 4
然后创建
ConfigurationPropertySourcesPropertySourceConfigurationPropertySourcesPropertySource(String name, Iterable<ConfigurationPropertySource> source) { super(name, source); }- 1
- 2
- 3
调用父类的的构造方法:
public PropertySource(String name, T source) { Assert.hasText(name, "Property source name must contain at least one character"); Assert.notNull(source, "Property source must not be null"); this.name = name; this.source = source; }- 1
- 2
- 3
- 4
- 5
- 6
创建得到的ConfigurationPropertySourcesPropertySource对象:

sources.addFirst(attached);- 1
这一步执行完之后,sources就有5个值了,
如下所示:
[ConfigurationPropertySourcesPropertySource {name='configurationProperties'}, StubPropertySource {name='servletConfigInitParams'}, StubPropertySource {name='servletContextInitParams'}, PropertiesPropertySource {name='systemProperties'}, SystemEnvironmentPropertySource {name='systemEnvironment'}]- 1
- 2
- 3
- 4
第一个就是name是
ATTACHED_PROPERTY_SOURCE_NAME=configurationProperties的。也就是相比之前环境配置新增了:
ConfigurationPropertySourcesPropertySource {name='configurationProperties'}并且放在了第一个。listeners.environmentPrepared(bootstrapContext, environment);
这个方法的功能:listeners 环境准备,广播 ApplicationEnvironmentPreparedEvent(通知所有监听器,环境变量已准备就绪;)
这里的listeners类型是
SpringApplicationRunListenersvoid environmentPrepared(ConfigurableBootstrapContext bootstrapContext, ConfigurableEnvironment environment) { doWithListeners("spring.boot.application.environment-prepared", (listener) -> listener.environmentPrepared(bootstrapContext, environment)); }- 1
- 2
- 3
- 4
private void doWithListeners(String stepName, Consumer<SpringApplicationRunListener> listenerAction) { doWithListeners(stepName, listenerAction, null); }- 1
- 2
- 3
private void doWithListeners(String stepName, Consumer<SpringApplicationRunListener> listenerAction, Consumer<StartupStep> stepAction) { StartupStep step = this.applicationStartup.start(stepName); this.listeners.forEach(listenerAction); if (stepAction != null) { stepAction.accept(step); } step.end(); }- 1
- 2
- 3
- 4
- 5
- 6
- 7
- 8
- 9
这里面的
stepName是“spring.boot.application.environment-prepared”DefaultPropertiesPropertySource.moveToEnd(environment);环境配置绑定
public static void moveToEnd(ConfigurableEnvironment environment) { moveToEnd(environment.getPropertySources()); }- 1
- 2
- 3
这里
environment.getPropertySources()有6个值:[ConfigurationPropertySourcesPropertySource {name='configurationProperties'}, StubPropertySource {name='servletConfigInitParams'}, StubPropertySource {name='servletContextInitParams'}, PropertiesPropertySource {name='systemProperties'}, OriginAwareSystemEnvironmentPropertySource {name='systemEnvironment'}, RandomValuePropertySource {name='random'}]- 1
- 2
- 3
public static final String NAME = "defaultProperties"; public static void moveToEnd(MutablePropertySources propertySources) { PropertySource<?> propertySource = propertySources.remove(NAME); if (propertySource != null) { propertySources.addLast(propertySource); } }- 1
- 2
- 3
- 4
- 5
- 6
- 7
首先会找name是
defaultProperties,存在则加入到MutablePropertySources列表最后public PropertySource<?> remove(String name) { synchronized (this.propertySourceList) { int index = this.propertySourceList.indexOf(PropertySource.named(name)); return (index != -1 ? this.propertySourceList.remove(index) : null); } }- 1
- 2
- 3
- 4
- 5
- 6
这个remove方法并不会移除,就是将找到的返回。
执行完之后:
[ConfigurationPropertySourcesPropertySource {name='configurationProperties'}, StubPropertySource {name='servletConfigInitParams'}, StubPropertySource {name='servletContextInitParams'}, PropertiesPropertySource {name='systemProperties'}, OriginAwareSystemEnvironmentPropertySource {name='systemEnvironment'}, RandomValuePropertySource {name='random'}]- 1
- 2
- 3
其实没啥变化。
然后执行:
Assert.state(!environment.containsProperty("spring.main.environment-prefix"), "Environment prefix cannot be set via properties.");- 1
- 2
bindToSpringApplication(environment);
这个方法底层逻辑非常多,主要逻辑是处理给定的配置开头以及要绑定的对象进行不同规则解析后进行反射赋值操作。完全是单独的配置项解析组件,后续可以作为单独章节去详细说明。
这里会重新创建一个Binder的实例,通过Binder将环境变量与
SpringApplication绑定。使用Binder是因为可以实现一些动态绑定转换的功能,后面会写一篇文章专门介绍这个Binder。protected void bindToSpringApplication(ConfigurableEnvironment environment) { try { Binder.get(environment).bind("spring.main", Bindable.ofInstance(this)); } catch (Exception ex) { throw new IllegalStateException("Cannot bind to SpringApplication", ex); } }- 1
- 2
- 3
- 4
- 5
- 6
- 7
- 8
首先关注此时,
SpringApplication.source什么都没有
首先先来看
Bindable.ofInstance(this):public static <T> Bindable<T> ofInstance(T instance) { Assert.notNull(instance, "Instance must not be null"); Class<T> type = (Class<T>) instance.getClass(); return of(type).withExistingValue(instance); }- 1
- 2
- 3
- 4
- 5
这里的
instance就是SpringApplication,首先Assert.notNull(instance, "Instance must not be null");判断非空,然后Class获取其字节码文件,type = (Class ) instance.getClass(); 
public Bindable<T> withExistingValue(T existingValue) { Assert.isTrue( existingValue == null || this.type.isArray() || this.boxedType.resolve().isInstance(existingValue), () -> "ExistingValue must be an instance of " + this.type); Supplier<T> value = (existingValue != null) ? () -> existingValue : null; return new Bindable<>(this.type, this.boxedType, value, this.annotations, this.bindRestrictions); }- 1
- 2
- 3
- 4
- 5
- 6
- 7
此时existingValue非null值,会将
existingValue赋值给value,最终返回一个Bindable的对象,构造方法如下:private Bindable(ResolvableType type, ResolvableType boxedType, Supplier<T> value, Annotation[] annotations, EnumSet<BindRestriction> bindRestrictions) { this.type = type; this.boxedType = boxedType; this.value = value; this.annotations = annotations; this.bindRestrictions = bindRestrictions; }- 1
- 2
- 3
- 4
- 5
- 6
- 7
- 8
public <T> BindResult<T> bind(String name, Bindable<T> target) { return bind(ConfigurationPropertyName.of(name), target, null); }- 1
- 2
- 3
public <T> BindResult<T> bind(ConfigurationPropertyName name, Bindable<T> target, BindHandler handler) { T bound = bind(name, target, handler, false); return BindResult.of(bound); }- 1
- 2
- 3
- 4
private <T> T bind(ConfigurationPropertyName name, Bindable<T> target, BindHandler handler, boolean create) { Assert.notNull(name, "Name must not be null"); Assert.notNull(target, "Target must not be null"); handler = (handler != null) ? handler : this.defaultBindHandler; Context context = new Context(); return bind(name, target, handler, context, false, create); }- 1
- 2
- 3
- 4
- 5
- 6
- 7
很奇怪的是,我的没有绑定上去,不过看到一些大佬读源码的时候也一样没有绑定上去,貌似也是不重要的逻辑,不深究了。
然后在
prepareEnvironment方法中有一句if判断:if (!this.isCustomEnvironment) {//是不是自定义环境 EnvironmentConverter environmentConverter = new EnvironmentConverter(getClassLoader()); environment = environmentConverter.convertEnvironmentIfNecessary(environment, deduceEnvironmentClass()); }- 1
- 2
- 3
- 4
this.isCustomEnvironment = false 所以要进if 这个参数一开始设置了false private boolean isCustomEnvironment = false; 但是set方法又设为了true(当然我们没有走过set方法) public void setEnvironment(ConfigurableEnvironment environment) { this.isCustomEnvironment = true; this.environment = environment; }- 1
- 2
- 3
- 4
- 5
- 6
- 7
- 8
if中执行了2句:首先利用类加载器,创建一个环境转换器
EnvironmentConverter environmentConverter = new EnvironmentConverter(getClassLoader());- 1
environmentConverter.convertEnvironmentIfNecessary(environment, deduceEnvironmentClass());
这行作用:根据
spring.main.web-application-type配置判断是否需要转换环境首先会执行
deduceEnvironmentClass()方法private Class<? extends StandardEnvironment> deduceEnvironmentClass() { switch (this.webApplicationType) { case SERVLET: return ApplicationServletEnvironment.class; case REACTIVE: return ApplicationReactiveWebEnvironment.class; default: return ApplicationEnvironment.class; } }- 1
- 2
- 3
- 4
- 5
- 6
- 7
- 8
- 9
- 10
此时,
this.webApplicationType不用多说就是SERVLET.所以会返回
return ApplicationServletEnvironment.class;然后执行:
environmentConverter.convertEnvironmentIfNecessaryStandardEnvironment convertEnvironmentIfNecessary(ConfigurableEnvironment environment, Class<? extends StandardEnvironment> type) { if (type.equals(environment.getClass())) { return (StandardEnvironment) environment; } return convertEnvironment(environment, type); }- 1
- 2
- 3
- 4
- 5
- 6
- 7
此处的type就是刚才得到的
ApplicationServletEnvironment.class.首先根据刚才获取的class:
ApplicationServletEnvironment.class获取标准环境,然后设置转换服务convertEnvironment(environment, type)其实就是将环境对象转换成用户设置的WebApplicationType相关类型(这里是SERVLET类型)。ConfigurationPropertySources.attach(environment);
重新添加ConfigurationPropertySource支持,配置 propertySource 对它自己的递归依赖
private static final String ATTACHED_PROPERTY_SOURCE_NAME = "configurationProperties"; public static void attach(Environment environment) { Assert.isInstanceOf(ConfigurableEnvironment.class, environment); MutablePropertySources sources = ((ConfigurableEnvironment) environment).getPropertySources(); PropertySource<?> attached = getAttached(sources); if (attached == null || !isUsingSources(attached, sources)) { attached = new ConfigurationPropertySourcesPropertySource(ATTACHED_PROPERTY_SOURCE_NAME, new SpringConfigurationPropertySources(sources)); } sources.remove(ATTACHED_PROPERTY_SOURCE_NAME); sources.addFirst(attached); }- 1
- 2
- 3
- 4
- 5
- 6
- 7
- 8
- 9
- 10
- 11
- 12
这个代码前面度过了,这里不重复写了。
添加一个
ConfigurationPropertySource的支持,任何被ConfigurationPropertySource管理的Environment都将支持ConfigurationPropertyName的格式,并且能够动态的跟踪propertySource内变量的增加或减少.添加 一套配置,配置文件到List开头,也就是默认添加了一个configurationProperties名字的PropertySource,或者说添加了一个Environment,因为Environment封装了PropertySource,这个配置从注释上看,可能是为了动态的添加和配置一些值用的,知道attach是补充了一个配置文件的对象封装就可以了,其他的暂时不是重点;
到这里prepareEnvironment方法就基本读完了。
总结
prepareEnvironment方法:private ConfigurableEnvironment prepareEnvironment(SpringApplicationRunListeners listeners, DefaultBootstrapContext bootstrapContext, ApplicationArguments applicationArguments) { // Create and configure the environment // 根据前面的webApplicationType决定实例化哪个环境实现类,此处这里的类型应该是SERVLET ConfigurableEnvironment environment = getOrCreateEnvironment(); // 注册装换器、格式化组件,注册完装配,还有装配main方法参数,装配Profiles配置 configureEnvironment(environment, applicationArguments.getSourceArgs()); // 附加指定的环境配置 ConfigurationPropertySources.attach(environment); // 发布环境准备事件 listeners.environmentPrepared(bootstrapContext, environment); // 环境配置绑定 DefaultPropertiesPropertySource.moveToEnd(environment); Assert.state(!environment.containsProperty("spring.main.environment-prefix"), "Environment prefix cannot be set via properties."); // 将获取到的environment中的spring.main配置绑定到SpringApplication的source中 bindToSpringApplication(environment); if (!this.isCustomEnvironment) { // 创建一个环境转换器 EnvironmentConverter environmentConverter = new EnvironmentConverter(getClassLoader()); // 将环境对象转换成用户设置的WebApplicationType相关类型(这里是SERVLET类型) environment = environmentConverter.convertEnvironmentIfNecessary(environment, deduceEnvironmentClass()); } // 补充了一个配置文件的对象封装 ConfigurationPropertySources.attach(environment); return environment; }- 1
- 2
- 3
- 4
- 5
- 6
- 7
- 8
- 9
- 10
- 11
- 12
- 13
- 14
- 15
- 16
- 17
- 18
- 19
- 20
- 21
- 22
- 23
- 24
- 25
- 26
- 27
把以上所有步骤执行完成之后得到的environment对象的信息摘录如下:
ApplicationServletEnvironment { activeProfiles=[], defaultProfiles=[default], propertySources=[ ConfigurationPropertySourcesPropertySource {name='configurationProperties'}, StubPropertySource {name='servletConfigInitParams'}, StubPropertySource {name='servletContextInitParams'}, PropertiesPropertySource {name='systemProperties'}, OriginAwareSystemEnvironmentPropertySource {name='systemEnvironment'}, RandomValuePropertySource {name='random'}]}- 1
- 2
- 3
- 4
- 5
- 6
- 7
configureIgnoreBeanInfo(environment);配置忽略的bean信息
public static final String IGNORE_BEANINFO_PROPERTY_NAME = "spring.beaninfo.ignore"; private void configureIgnoreBeanInfo(ConfigurableEnvironment environment) { if (System.getProperty(CachedIntrospectionResults.IGNORE_BEANINFO_PROPERTY_NAME) == null) { Boolean ignore = environment.getProperty(CachedIntrospectionResults.IGNORE_BEANINFO_PROPERTY_NAME, Boolean.class, Boolean.TRUE); System.setProperty(CachedIntrospectionResults.IGNORE_BEANINFO_PROPERTY_NAME, ignore.toString()); } }- 1
- 2
- 3
- 4
- 5
- 6
- 7
- 8
首先获取一个参数
System.getProperty(CachedIntrospectionResults.IGNORE_BEANINFO_PROPERTY_NAME):这个值就是null,所以if分支进入。
总的来说,此段较为简单,只是设置
spring.beaninfo.ignore的值。缺省为true的意思就是使用spring内置的BeanInfo,而BeanInfo又是什么,简单来说就是用来将各种前端返回的数据直接映射到JavaBean上,由于篇幅原因,这里放到以后的文章中再展开。Banner printedBanner = printBanner(environment);
这个就是打印Banner的
private Banner printBanner(ConfigurableEnvironment environment) { if (this.bannerMode == Banner.Mode.OFF) { return null; } ResourceLoader resourceLoader = (this.resourceLoader != null) ? this.resourceLoader : new DefaultResourceLoader(null); SpringApplicationBannerPrinter bannerPrinter = new SpringApplicationBannerPrinter(resourceLoader, this.banner); if (this.bannerMode == Mode.LOG) { return bannerPrinter.print(environment, this.mainApplicationClass, logger); } return bannerPrinter.print(environment, this.mainApplicationClass, System.out); }- 1
- 2
- 3
- 4
- 5
- 6
- 7
- 8
- 9
- 10
- 11
- 12
执行完这一步,如图所示:

这里补充一下:banner的位置在 resources目录下 默认为 banner.txt 和 banner命名的jpg\png\gif图片
关于Banner的打印,以后再细说,这里关注启动原理的逻辑,不在细枝末节上花时间。
context = createApplicationContext();SpringContext的创建
protected ConfigurableApplicationContext createApplicationContext() { return this.applicationContextFactory.create(this.webApplicationType); }- 1
- 2
- 3
今天先读到这里了。时间比较晚了。
-
相关阅读:
Bridge 2024 新版本 Bridge 2024 mac软件特色和功能
数据结构与算法之链表-python实现(简单好用)
动规(22)-并查集基础题——CD收藏 cd.cpp(并查集)
GeoServer:Vector Tiles-矢量瓦片制作与加载
卡片层叠Banner
【ROS机器人】Autolabor OS最新版本已上线,免费下载
VMware vSphere 中的 DRS(分布式资源调度)、HA(高可用性)和Fault Tolerance(FT,容错)区别
从408改考自主命题,211贵州大学考研改考
PHY6222系统级SOC蓝牙芯片低功耗高性能蓝牙MESH组网智能家居
Royal TSX v6.0.1(远程管理软件)
- 原文地址:https://blog.csdn.net/qq_51550750/article/details/127892049
