-
终极篇章_springMVC_文件上传和下载
SpringMVC_文件上传和下载
随着我们互联网的发展,我们的用户从直接访问网站获取信息。变为希望将自己本地的资源发送给服务器,让服务器提供给其他人使用或者查看。还有部分的用户希望可以将本地的资源上传服务器存储起来,然后再其他的电脑中可以通过访问网站来获取上传的资源,这样用户就可以打破空间的局限性,再任何时候只要有网有电脑就可以对自己的资源进行操作,比如:云存储,云编辑
springMVC中依赖的组件是
MultipartResolver。话不多说,直接开始搭建项目:
0x01_创建项目,补全目录
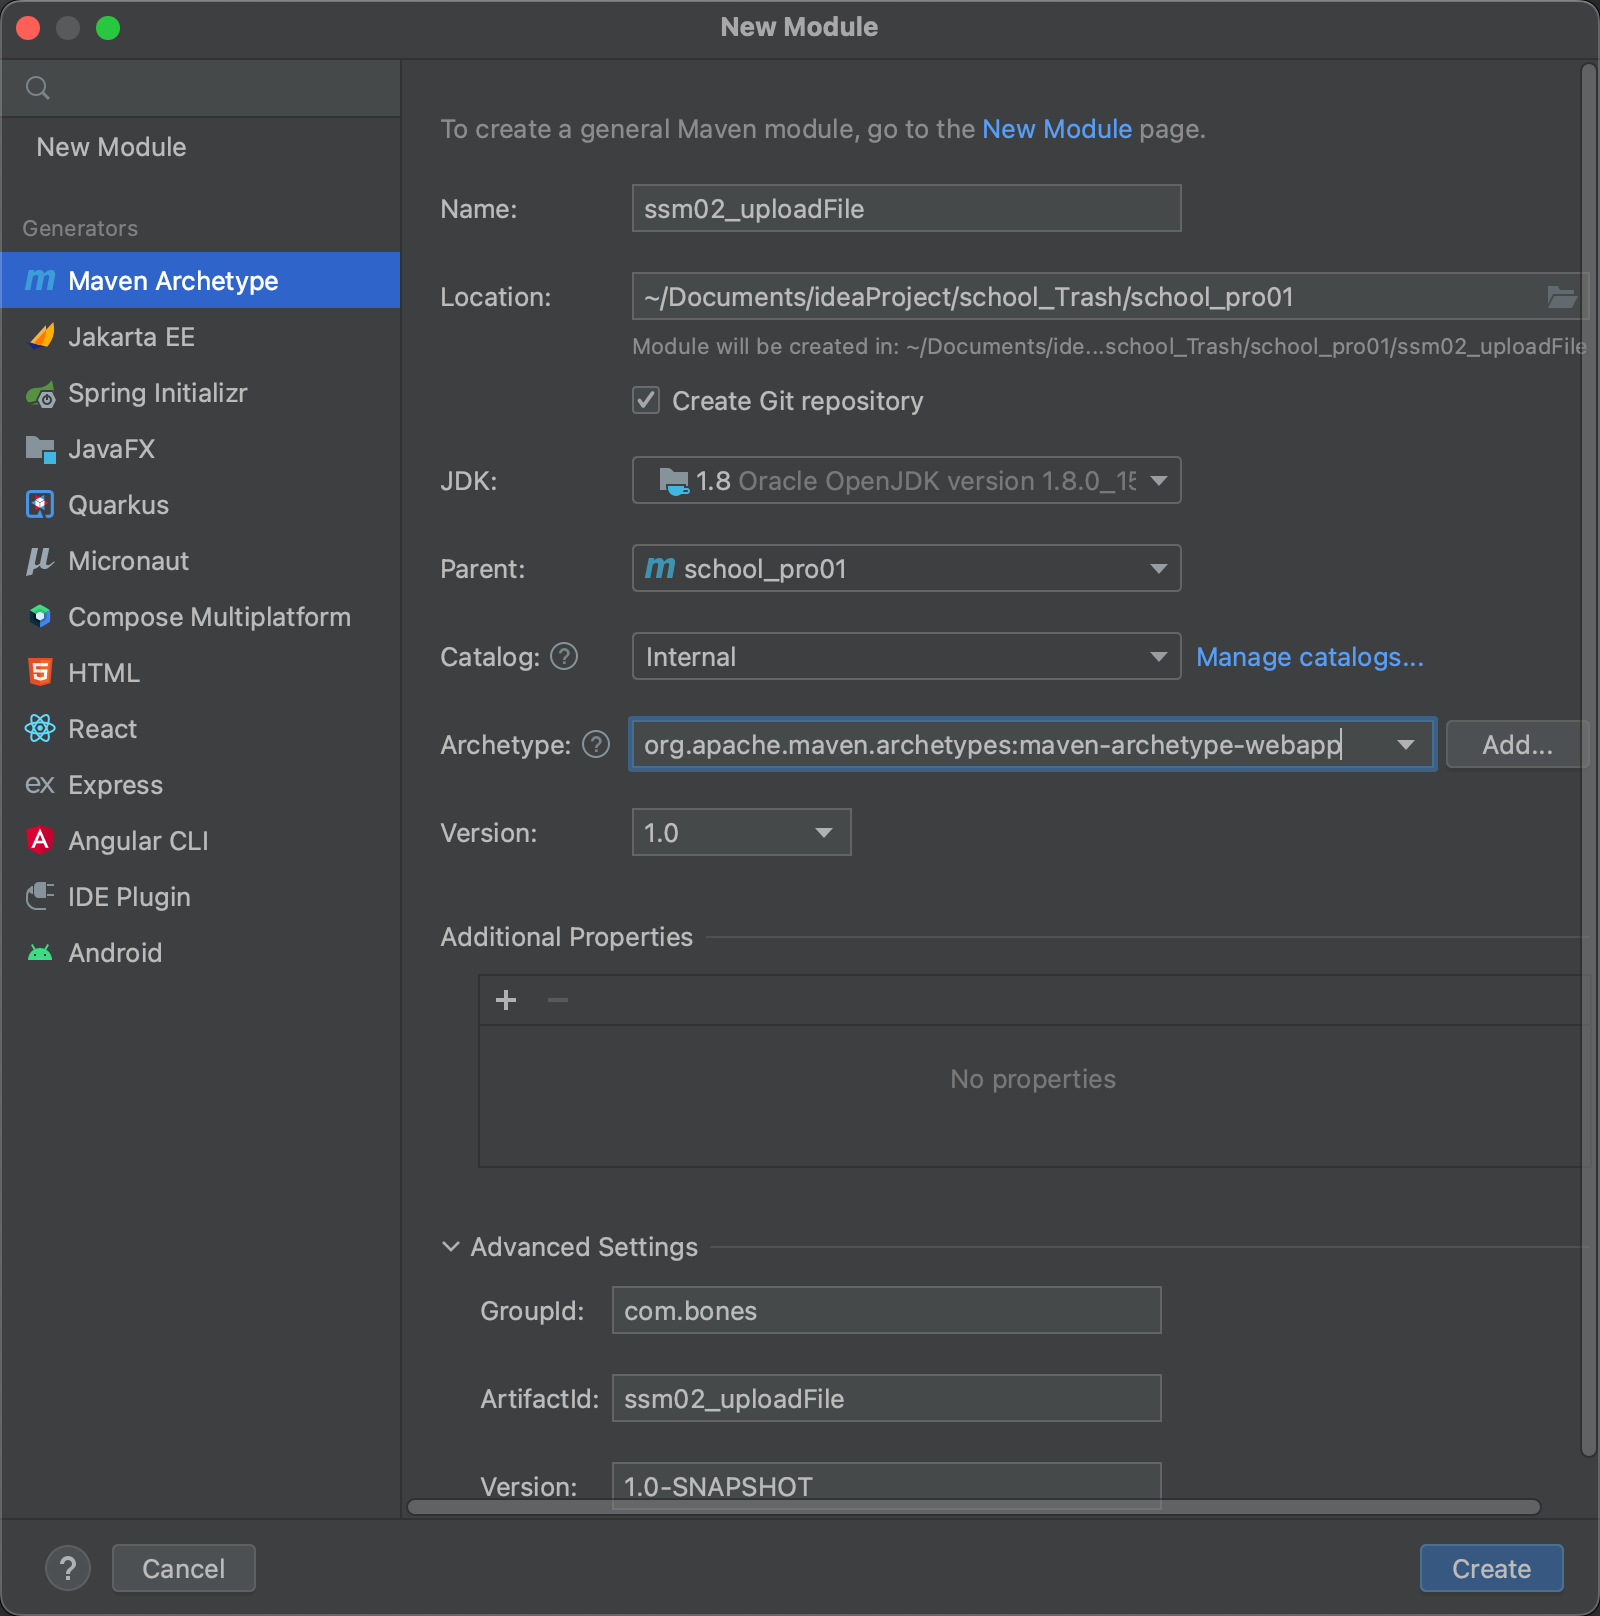
补全目录为:

0x02_准备数据库表
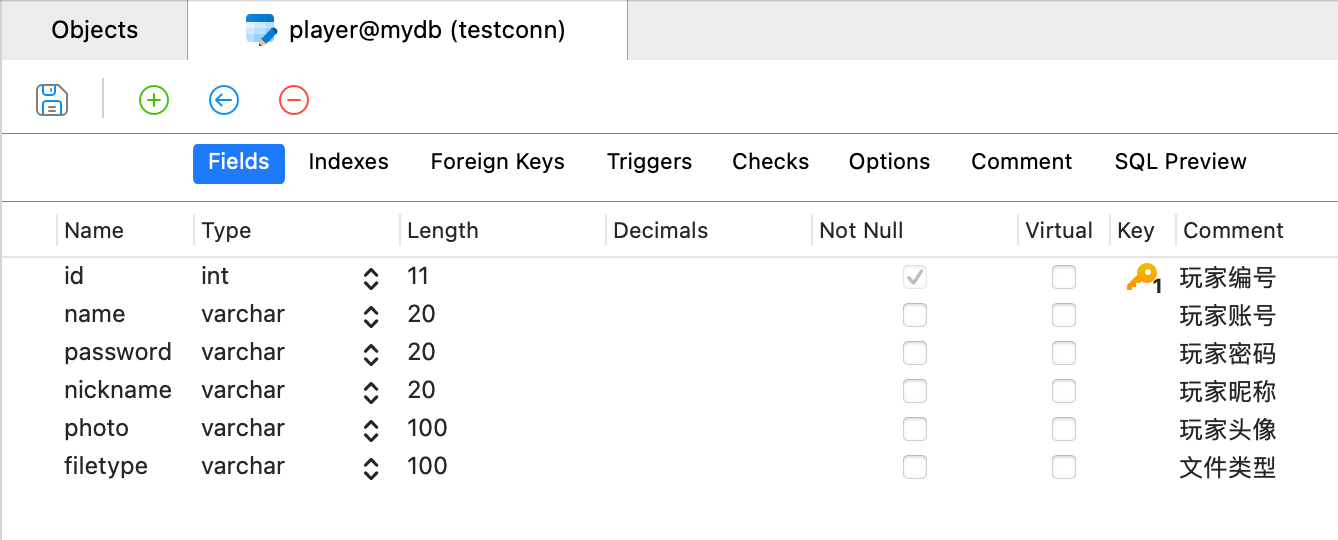
暂时不用添加任何数据,因为页面是注册功能。
0x03_导入依赖
在
pom.xml中:<dependencies> <dependency> <groupId>org.springframeworkgroupId> <artifactId>spring-contextartifactId> <version>5.3.23version> dependency> <dependency> <groupId>org.springframeworkgroupId> <artifactId>spring-aspectsartifactId> <version>5.3.23version> dependency> <dependency> <groupId>aopalliancegroupId> <artifactId>aopallianceartifactId> <version>1.0version> dependency> <dependency> <groupId>com.alibabagroupId> <artifactId>druidartifactId> <version>1.1.10version> dependency> <dependency> <groupId>mysqlgroupId> <artifactId>mysql-connector-javaartifactId> <version>8.0.30version> dependency> <dependency> <groupId>org.springframeworkgroupId> <artifactId>spring-jdbcartifactId> <version>5.3.23version> dependency> <dependency> <groupId>org.springframeworkgroupId> <artifactId>spring-txartifactId> <version>5.3.23version> dependency> <dependency> <groupId>org.springframeworkgroupId> <artifactId>spring-ormartifactId> <version>5.3.23version> dependency> <dependency> <groupId>commons-logginggroupId> <artifactId>commons-loggingartifactId> <version>1.2version> dependency> <dependency> <groupId>org.apache.logging.log4jgroupId> <artifactId>log4j-slf4j-implartifactId> <version>2.19.0version> <scope>testscope> dependency> <dependency> <groupId>org.projectlombokgroupId> <artifactId>lombokartifactId> <version>1.18.24version> <scope>providedscope> dependency> <dependency> <groupId>org.junit.jupitergroupId> <artifactId>junit-jupiter-apiartifactId> <version>5.9.1version> <scope>testscope> dependency> <dependency> <groupId>org.springframeworkgroupId> <artifactId>spring-testartifactId> <version>5.3.23version> <scope>testscope> dependency> <dependency> <groupId>org.springframeworkgroupId> <artifactId>spring-webmvcartifactId> <version>5.3.23version> dependency> <dependency> <groupId>org.springframeworkgroupId> <artifactId>spring-webartifactId> <version>5.3.23version> dependency> <dependency> <groupId>javax.servletgroupId> <artifactId>javax.servlet-apiartifactId> <version>4.0.1version> <scope>providedscope> dependency> <dependency> <groupId>javax.servlet.jspgroupId> <artifactId>jsp-apiartifactId> <version>2.2version> <scope>providedscope> dependency> <dependency> <groupId>com.fasterxml.jackson.coregroupId> <artifactId>jackson-databindartifactId> <version>2.13.4.2version> dependency> <dependency> <groupId>commons-fileuploadgroupId> <artifactId>commons-fileuploadartifactId> <version>1.4version> dependency> <dependency> <groupId>commons-iogroupId> <artifactId>commons-ioartifactId> <version>2.11.0version> dependency> dependencies>- 1
- 2
- 3
- 4
- 5
- 6
- 7
- 8
- 9
- 10
- 11
- 12
- 13
- 14
- 15
- 16
- 17
- 18
- 19
- 20
- 21
- 22
- 23
- 24
- 25
- 26
- 27
- 28
- 29
- 30
- 31
- 32
- 33
- 34
- 35
- 36
- 37
- 38
- 39
- 40
- 41
- 42
- 43
- 44
- 45
- 46
- 47
- 48
- 49
- 50
- 51
- 52
- 53
- 54
- 55
- 56
- 57
- 58
- 59
- 60
- 61
- 62
- 63
- 64
- 65
- 66
- 67
- 68
- 69
- 70
- 71
- 72
- 73
- 74
- 75
- 76
- 77
- 78
- 79
- 80
- 81
- 82
- 83
- 84
- 85
- 86
- 87
- 88
- 89
- 90
- 91
- 92
- 93
- 94
- 95
- 96
- 97
- 98
- 99
- 100
- 101
- 102
- 103
- 104
- 105
- 106
- 107
- 108
- 109
- 110
- 111
- 112
- 113
- 114
- 115
- 116
- 117
- 118
- 119
- 120
- 121
- 122
- 123
- 124
- 125
注意新增的2个文件上传的依赖:
commons-fileupload和commons-io0x04_配置文件
applicationContext.xml<beans xmlns="http://www.springframework.org/schema/beans" xmlns:xsi="http://www.w3.org/2001/XMLSchema-instance" xmlns:p="http://www.springframework.org/schema/p" xmlns:c="http://www.springframework.org/schema/c" xmlns:util="http://www.springframework.org/schema/util" xmlns:context="http://www.springframework.org/schema/context" xmlns:aop="http://www.springframework.org/schema/aop" xmlns:tx="http://www.springframework.org/schema/tx" xmlns:mvc="http://www.springframework.org/schema/mvc" xsi:schemaLocation="http://www.springframework.org/schema/beans http://www.springframework.org/schema/beans/spring-beans.xsd http://www.springframework.org/schema/util http://www.springframework.org/schema/util/spring-util.xsd http://www.springframework.org/schema/context http://www.springframework.org/schema/context/spring-context.xsd http://www.springframework.org/schema/aop http://www.springframework.org/schema/aop/spring-aop.xsd http://www.springframework.org/schema/tx http://www.springframework.org/schema/tx/spring-tx.xsd http://www.springframework.org/schema/mvc http://www.springframework.org/schema/mvc/spring-mvc.xsd "> <context:property-placeholder location="classpath:jdbc.properties"/> <context:component-scan base-package="com.bones.service"/> <bean id="dataSource" class="com.alibaba.druid.pool.DruidDataSource"> <property name="driverClassName" value="${jdbc_driver}"/> <property name="url" value="${jdbc_url}"/> <property name="username" value="${jdbc_username}"/> <property name="password" value="${jdbc_password}"/> bean> <bean id="factory" class="org.mybatis.spring.SqlSessionFactoryBean"> <property name="dataSource" ref="dataSource"/> <property name="typeAliasesPackage" value="com.bones.pojo"/> bean> <bean class="org.mybatis.spring.mapper.MapperScannerConfigurer"> <property name="sqlSessionFactoryBeanName" value="factory"/> <property name="basePackage" value="com.bones.mapper"/> bean> <bean id="transactionManager" class="org.springframework.jdbc.datasource.DataSourceTransactionManager"> <property name="dataSource" ref="dataSource"/> bean> <tx:annotation-driven/> beans>- 1
- 2
- 3
- 4
- 5
- 6
- 7
- 8
- 9
- 10
- 11
- 12
- 13
- 14
- 15
- 16
- 17
- 18
- 19
- 20
- 21
- 22
- 23
- 24
- 25
- 26
- 27
- 28
- 29
- 30
- 31
- 32
- 33
- 34
- 35
- 36
- 37
- 38
- 39
- 40
- 41
- 42
- 43
- 44
- 45
- 46
- 47
- 48
- 49
- 50
- 51
- 52
- 53
- 54
- 55
- 56
- 57
- 58
- 59
- 60
- 61
- 62
jdbc.propertiesjdbc_driver=com.mysql.cj.jdbc.Driver jdbc_url=jdbc:mysql://127.0.0.1:3306/数据库名?useSSL=false&useUnicode=true&characterEncoding=UTF-8&serverTimezone=Asia/Shanghai jdbc_username=你的用户名 jdbc_password=你的密码- 1
- 2
- 3
- 4
log4j2.xml<Configuration status="DEBUG"> <Appenders> <Console name="Console" target="SYSTEM_ERR"> <PatternLayout pattern="%d{YYYY-MM-dd HH:mm:ss} [%t] %-5p %c{1}:%L - %msg%n" /> Console> Appenders> <Loggers> <Root level="DEBUG"> <AppenderRef ref="Console" /> Root> Loggers> Configuration>- 1
- 2
- 3
- 4
- 5
- 6
- 7
- 8
- 9
- 10
- 11
- 12
- 13
- 14
springmvc.xml<beans xmlns="http://www.springframework.org/schema/beans" xmlns:xsi="http://www.w3.org/2001/XMLSchema-instance" xmlns:p="http://www.springframework.org/schema/p" xmlns:c="http://www.springframework.org/schema/c" xmlns:util="http://www.springframework.org/schema/util" xmlns:context="http://www.springframework.org/schema/context" xmlns:aop="http://www.springframework.org/schema/aop" xmlns:tx="http://www.springframework.org/schema/tx" xmlns:mvc="http://www.springframework.org/schema/mvc" xsi:schemaLocation="http://www.springframework.org/schema/beans http://www.springframework.org/schema/beans/spring-beans.xsd http://www.springframework.org/schema/util http://www.springframework.org/schema/util/spring-util.xsd http://www.springframework.org/schema/context http://www.springframework.org/schema/context/spring-context.xsd http://www.springframework.org/schema/aop http://www.springframework.org/schema/aop/spring-aop.xsd http://www.springframework.org/schema/tx http://www.springframework.org/schema/tx/spring-tx.xsd http://www.springframework.org/schema/mvc http://www.springframework.org/schema/mvc/spring-mvc.xsd "> <context:component-scan base-package="com.bones.controller"/> <mvc:annotation-driven/> <bean class="org.springframework.web.servlet.view.InternalResourceViewResolver"> bean> <mvc:resources mapping="/static/**" location="/static/">mvc:resources> <bean id="multipartResolver" class="org.springframework.web.multipart.commons.CommonsMultipartResolver"/> beans>- 1
- 2
- 3
- 4
- 5
- 6
- 7
- 8
- 9
- 10
- 11
- 12
- 13
- 14
- 15
- 16
- 17
- 18
- 19
- 20
- 21
- 22
- 23
- 24
- 25
- 26
- 27
- 28
- 29
- 30
- 31
- 32
- 33
- 34
- 35
- 36
- 37
- 38
- 39
- 40
- 41
- 42
- 43
- 44
- 45
- 46
0x05_前端页面
index.jsp
<%@ page contentType="text/html;charset=UTF-8" language="java" %>欢迎注册!
- 1
- 2
- 3
- 4
- 5
- 6
- 7
- 8
- 9
- 10
- 11
- 12
- 13
- 14
- 15
- 16
- 17
- 18
- 19
- 20
- 21
- 22
- 23
- 24
- 25
- 26
- 27
- 28
- 29
- 30
- 31
- 32
- 33
- 34
- 35
- 36
- 37
- 38
- 39
- 40
- 41
- 42
- 43
- 44
- 45
- 46
- 47
- 48
- 49
- 50
- 51
- 52
- 53
- 54
- 55
- 56
- 57
- 58
特别注意异步发送ajax的方法:
$.ajax(({ type:"post", data:formdata, url:"fileUpload.do", processData:false,//默认值是为true,但是设置为true的时候,jquery 会将数据序列化;当processData: false的时候,jquery不会对数据进行处理。 contentType:false,//为了避免 JQuery 的其他操作,从而失去分界符,而使服务器不能正常解析文件 success:function(result){ console.log(result) } }))- 1
- 2
- 3
- 4
- 5
- 6
- 7
- 8
- 9
- 10
0x06_controller层
注意几个配置防止文件上传不成功。
1.
pom.xml中的2个专门用于文件上传的依赖:<dependency> <groupId>commons-fileuploadgroupId> <artifactId>commons-fileuploadartifactId> <version>1.4version> dependency> <dependency> <groupId>commons-iogroupId> <artifactId>commons-ioartifactId> <version>2.11.0version> dependency>- 1
- 2
- 3
- 4
- 5
- 6
- 7
- 8
- 9
- 10
- 11
2.配置文件上传解析组件(
springmvc.xmlz中)<bean id="multipartResolver" class="org.springframework.web.multipart.commons.CommonsMultipartResolver"/>- 1
- 2
- 3
controller层的代码:
package com.bones.controller; import org.springframework.stereotype.Controller; import org.springframework.web.bind.annotation.RequestMapping; import org.springframework.web.multipart.MultipartFile; import java.io.File; import java.io.IOException; @Controller public class FileUploadController { @ResponseBody @RequestMapping("fileUpload.do") public String fileUpload(MultipartFile headPhoto) throws IOException {//MultipartFile:这个类主要是来实现以表单的形式进行文件上传功能,要借助前端的文件解析组件来完成 // 指定文件的上传位置 File dir = new File("/Users/apple/Documents/ideaProject/imgs"); //获取文件名: String originalFilename = headPhoto.getOriginalFilename(); //文件存储的位置: File file = new File(dir,originalFilename); //文件保存 headPhoto.transferTo(file); return "OK"; } }- 1
- 2
- 3
- 4
- 5
- 6
- 7
- 8
- 9
- 10
- 11
- 12
- 13
- 14
- 15
- 16
- 17
- 18
- 19
- 20
- 21
- 22
- 23
- 24
- 25
- 26
- 27
经过测试可以成功上传图片,前端控制台会返回“OK”。

文件也成功上传到了
/Users/apple/Documents/ideaProject/imgs目录下0x07_文件上传过程中的几个问题
问题1:中文文件名编码问题
因为文件上传一定是post请求上传的,所以要注意POST请求的乱码问题,这一点,之前已经提过,并且上面的
web.xml中也已经配置了POST请求的乱码问题:<filter> <filter-name>characterEncodingFilterfilter-name> <filter-class>org.springframework.web.filter.CharacterEncodingFilterfilter-class> <init-param> <param-name>encodingparam-name> <param-value>utf-8param-value> init-param> filter> <filter-mapping> <filter-name>characterEncodingFilterfilter-name> <url-pattern>/*url-pattern> filter-mapping>- 1
- 2
- 3
- 4
- 5
- 6
- 7
- 8
- 9
- 10
- 11
- 12
- 13
- 14
问题2:文件位置存储问题
以上案例中,存储位置是写死在本地服务器中的(写死了上传到
/Users/apple/Documents/ideaProject/imgs目录下),这样图片回显会有困难。(对于用户来说这个路径是未知的)
所以要考虑将上传位置更新到当前目录下,作为静态资源,这样就可以通过URL访问用户自己上传的图片。
package com.bones.controller; import org.springframework.stereotype.Controller; import org.springframework.web.bind.annotation.RequestMapping; import org.springframework.web.bind.annotation.ResponseBody; import org.springframework.web.multipart.MultipartFile; import javax.servlet.http.HttpServletRequest; import java.io.File; import java.io.IOException; @Controller public class FileUploadController { @ResponseBody @RequestMapping("fileUpload.do") public String fileUpload(MultipartFile headPhoto, HttpServletRequest request) throws IOException {//MultipartFile:这个类主要是来实现以表单的形式进行文件上传功能,要借助前端的文件解析组件来完成 //指定文件存储目录为项目部署环境下的upload目录 //给定一个URI,返回文件系统中URI对应的绝对路径。如果不能进行映射,返回null String realPath = request.getServletContext().getRealPath("/upload"); // 指定文件的上传位置 File dir = new File(realPath); //如果不存在则创建目录 if (!dir.exists()){ dir.mkdirs(); } //获取文件名: String originalFilename = headPhoto.getOriginalFilename(); //文件存储的位置: File file = new File(dir,originalFilename); //文件保存 headPhoto.transferTo(file); return "OK"; } }- 1
- 2
- 3
- 4
- 5
- 6
- 7
- 8
- 9
- 10
- 11
- 12
- 13
- 14
- 15
- 16
- 17
- 18
- 19
- 20
- 21
- 22
- 23
- 24
- 25
- 26
- 27
- 28
- 29
- 30
- 31
- 32
- 33
- 34
- 35
- 36
注意:
1.
request.getServletContext().getRealPath("/upload")方法:给定一个URI,返回文件系统中URI对应的绝对路径。如果不能进行映射,返回null2.测试,在浏览器上传图片,浏览器的控制台返回
OK,同时在target目录下:
创建了upload目录,并且有刚才上传的图片。
现在如果在浏览器访问刚才上传的目录:http://localhost:8080/ssm02_uploadFile_war_exploded/upload/albert.jpg
会显示404,因为没有为静态资源放行。在
springmvc.xml中给资源放行:<mvc:resources mapping="/upload/**" location="/upload/">mvc:resources>- 1
虽然在IDEA中报错,但是浏览器此时可以正常访问了:

问题3:文件名冲突问题
如果不同的用户进行文件上传时,用的文件名相同,那么相同文件名的图片会覆盖。因为文件名会有冲突,所以考虑用UUID进行文件的重命名。
什么是UUID?(摘自百度百科)
UUID 是 通用唯一识别码(
Universally Unique Identifier)的缩写,是一种软件建构的标准,亦为开放软件基金会组织在分布式计算环境领域的一部分。其目的,是让分布式系统中的所有元素,都能有唯一的辨识信息,而不需要通过中央控制端来做辨识信息的指定。如此一来,每个人都可以创建不与其它人冲突的UUID。在这样的情况下,就不需考虑数据库创建时的名称重复问题。最广泛应用的UUID,是微软公司的全局唯一标识符(GUID),而其他重要的应用,则有Linux ext2/ext3文件系统、LUKS加密分区、GNOME、KDE、Mac OS X等等。另外我们也可以在e2fsprogs包中的UUID库找到实现。简单来说UUID就是将文件名重命名,并且保证这个命名是很不容易重复的。
如果要使用UUID.
String s = UUID.randomUUID().toString();- 1
修改Controller层的代码:
package com.bones.controller; import org.springframework.stereotype.Controller; import org.springframework.web.bind.annotation.RequestMapping; import org.springframework.web.bind.annotation.ResponseBody; import org.springframework.web.multipart.MultipartFile; import javax.servlet.http.HttpServletRequest; import java.io.File; import java.io.IOException; import java.util.UUID; @Controller public class FileUploadController { @ResponseBody @RequestMapping("fileUpload.do") public String fileUpload(MultipartFile headPhoto, HttpServletRequest request) throws IOException {//MultipartFile:这个类主要是来实现以表单的形式进行文件上传功能,要借助前端的文件解析组件来完成 //指定文件存储目录为项目部署环境下的upload目录 //给定一个URI,返回文件系统中URI对应的绝对路径。如果不能进行映射,返回null String realPath = request.getServletContext().getRealPath("/upload"); // 指定文件的上传位置 File dir = new File(realPath); //如果不存在则创建目录 if (!dir.exists()){ dir.mkdirs(); } //获取文件名: String originalFilename = headPhoto.getOriginalFilename(); //为了避免文件名冲突,使用UUID进行文件名替换 String uuid = UUID.randomUUID().toString(); //获取文件扩展民: String extendsName = originalFilename.substring(originalFilename.lastIndexOf(".")); //新的文件名 String newFileName = uuid.concat(extendsName); //文件存储的位置: File file = new File(dir,newFileName); //文件保存 headPhoto.transferTo(file); return "OK"; } }- 1
- 2
- 3
- 4
- 5
- 6
- 7
- 8
- 9
- 10
- 11
- 12
- 13
- 14
- 15
- 16
- 17
- 18
- 19
- 20
- 21
- 22
- 23
- 24
- 25
- 26
- 27
- 28
- 29
- 30
- 31
- 32
- 33
- 34
- 35
- 36
- 37
- 38
- 39
- 40
- 41
- 42
- 43
关键代码:
//获取文件名: String originalFilename = headPhoto.getOriginalFilename(); //为了避免文件名冲突,使用UUID进行文件名替换 String uuid = UUID.randomUUID().toString(); //获取文件扩展名: String extendsName = originalFilename.substring(originalFilename.lastIndexOf(".")); //新的文件名 String newFileName = uuid.concat(extendsName); //文件存储的位置: File file = new File(dir,newFileName);- 1
- 2
- 3
- 4
- 5
- 6
- 7
- 8
- 9
- 10
此时上传图片进行测试:

问题4:控制文件类型
相信研究过网络安全的师傅一定清楚,控制文件类型是文件上传中必不可少的。(其实不止文件类型,文件内容的检查也需要注意)
如何在项目中检查文件的类型呢?经过
问题3:文件名冲突问题的实践,获取文件的后缀名(扩展民十分简单)//获取文件扩展名: String extendsName = originalFilename.substring(originalFilename.lastIndexOf("."));- 1
- 2
此时检查文件扩展名“或许”就可以检查文件类型(如果黑客修改扩展名,这种做法一定是不够的):
package com.bones.controller; import org.springframework.stereotype.Controller; import org.springframework.web.bind.annotation.RequestMapping; import org.springframework.web.bind.annotation.ResponseBody; import org.springframework.web.multipart.MultipartFile; import javax.servlet.http.HttpServletRequest; import java.io.File; import java.io.IOException; import java.util.HashMap; import java.util.Map; import java.util.UUID; @Controller public class FileUploadController { @ResponseBody @RequestMapping("fileUpload.do") public Map<String,String> fileUpload(MultipartFile headPhoto, HttpServletRequest request) throws IOException {//MultipartFile:这个类主要是来实现以表单的形式进行文件上传功能,要借助前端的文件解析组件来完成 Map<String,String> map = new HashMap<>(); //指定文件存储目录为项目部署环境下的upload目录 //给定一个URI,返回文件系统中URI对应的绝对路径。如果不能进行映射,返回null String realPath = request.getServletContext().getRealPath("/upload"); // 指定文件的上传位置 File dir = new File(realPath); //如果不存在则创建目录 if (!dir.exists()){ dir.mkdirs(); } //获取文件名: String originalFilename = headPhoto.getOriginalFilename(); //为了避免文件名冲突,使用UUID进行文件名替换 String uuid = UUID.randomUUID().toString(); //获取文件扩展名: String extendsName = originalFilename.substring(originalFilename.lastIndexOf(".")); if (!extendsName.equals(".jpg")){ map.put("message","文件类型必须是jpg"); return map; } //新的文件名 String newFileName = uuid.concat(extendsName); //文件存储的位置: File file = new File(dir,newFileName); //文件保存 headPhoto.transferTo(file); //上传成功,将文件名和文件类型返回给浏览器 map.put("message","上传成功"); map.put("newFileName",newFileName); map.put("fileType",headPhoto.getContentType()); return map; } }- 1
- 2
- 3
- 4
- 5
- 6
- 7
- 8
- 9
- 10
- 11
- 12
- 13
- 14
- 15
- 16
- 17
- 18
- 19
- 20
- 21
- 22
- 23
- 24
- 25
- 26
- 27
- 28
- 29
- 30
- 31
- 32
- 33
- 34
- 35
- 36
- 37
- 38
- 39
- 40
- 41
- 42
- 43
- 44
- 45
- 46
- 47
- 48
- 49
- 50
- 51
- 52
- 53
- 54
- 55
此时上传的图片类型一定是jpg(精确来说是jpg作为扩展名),并且返回类型是map,为了以类似json的格式返回给浏览器,如果用户想要得到反馈,可以修改index.jsp:
<%@ page contentType="text/html;charset=UTF-8" language="java" %>- 1
- 2
- 3
- 4
- 5
- 6
- 7
- 8
- 9
- 10
- 11
- 12
- 13
- 14
- 15
- 16
- 17
- 18
- 19
- 20
- 21
- 22
- 23
- 24
- 25
- 26
- 27
- 28
- 29
- 30
- 31
- 32
- 33
- 34
- 35
- 36
- 37
- 38
- 39
- 40
- 41
- 42
- 43
- 44
- 45
- 46
- 47
- 48
- 49
- 50
- 51
- 52
- 53
- 54
- 55
- 56
- 57
当上传类型有误时,浏览器会弹窗“文件类型必须是jpg”,成功则上传弹窗"上传成功"。
问题5:控制文件大小
通过
headPhoto.getSize()这个API获得文件大小,注意单位是字节,比如headPhoto.getSize()>1024*1024*5- 1
判断图片大小是不是大于5M。
除了以上做法之外,也可以在springmvc.xml的multipartResolver的配置中加入文件大小的判断,但是这样不利于返回信息给浏览器,不推荐这样的做法,这里不再介绍这个方法。
问题6:上传图片回显问题
修改index.jsp代码:
<%@ page contentType="text/html;charset=UTF-8" language="java" %>- 1
- 2
- 3
- 4
- 5
- 6
- 7
- 8
- 9
- 10
- 11
- 12
- 13
- 14
- 15
- 16
- 17
- 18
- 19
- 20
- 21
- 22
- 23
- 24
- 25
- 26
- 27
- 28
- 29
- 30
- 31
- 32
- 33
- 34
- 35
- 36
- 37
- 38
- 39
- 40
- 41
- 42
- 43
- 44
- 45
- 46
- 47
- 48
- 49
- 50
- 51
- 52
- 53
- 54
- 55
- 56
- 57
- 58
- 59
- 60
- 61
- 62
- 63
注意回显的路径:
$("#headImg").attr("src","upload/"+result.newFileName);- 1
其中
result.newFileName是后端返回的数据:map.put("newFileName",newFileName);- 1
问题7:进度条问题
这个是纯前端的问题,参考百度谷歌做做就行:
参考一个实现的比较简单(同时也是用落后的xhr
XMLHttpRequest实现的)案例:https://www.cnblogs.com/wuyu1787/p/8919588.html修改
index,jsp即可:<%@ page contentType="text/html;charset=UTF-8" language="java" %>- 1
- 2
- 3
- 4
- 5
- 6
- 7
- 8
- 9
- 10
- 11
- 12
- 13
- 14
- 15
- 16
- 17
- 18
- 19
- 20
- 21
- 22
- 23
- 24
- 25
- 26
- 27
- 28
- 29
- 30
- 31
- 32
- 33
- 34
- 35
- 36
- 37
- 38
- 39
- 40
- 41
- 42
- 43
- 44
- 45
- 46
- 47
- 48
- 49
- 50
- 51
- 52
- 53
- 54
- 55
- 56
- 57
- 58
- 59
- 60
- 61
- 62
- 63
- 64
- 65
- 66
- 67
- 68
- 69
- 70
- 71
- 72
- 73
- 74
- 75
- 76
- 77
- 78
- 79
- 80
- 81
- 82
- 83
- 84
- 85
- 86
- 87
- 88
- 89
- 90
- 91
- 92
- 93
- 94
- 95
- 96
- 97
- 98
效果:

问题8:文件存储服务器(跨服务文件上传)
首先要了解2个概念:
- 分布式存储
在单机时代,将文件直接存储在服务部署的服务器上,存储和数据直连,拓展性、灵活性差。而分布式存储: 通过网络使用企业中的每台机器上的磁盘空间,并将这些分散的存储资源构成一个虚拟的存储设备,数据分散的存储在企业的各个角落。
分布式存储的优点:
可扩展:分布式存储系统可以扩展到数百甚至数千个这样的集群大小,并且系统的整体性能可以线性增长。
高可用性:在分布式文件系统中,高可用性包含两层,一是整个文件系统的可用性,二是数据的完整和一致性
低成本:分布式存储系统的自动容错和自动负载平衡允许在成本较低服务器上构建分布式存储系统。此外,线性可扩展性还能够增加和降低服务器的成本。
弹性存储: 可以根据业务需要灵活地增加或缩减数据存储以及增删存储池中的资源,而不需要中断系统运行
以后我计划学习一下一个主流的分布式文件存储系统:
FastDFS- 集群
当用户请求集群系统时,集群给用户的感觉就是一个单一独立的服务器,而实际上用户请求的是一组集群服务器。
集群指的是将几台服务器集中在一起,实现同一业务。 而分布式是指将不同的业务分布在不同的地方。
项目写到目前,都是非分布式存储。现在模拟用另一个tomcat进行文件存储,实现分布式存储。
首先要开启另一个tomcat服务:(分服务器上传)
【1】单独解压一个Tomcat作为文件服务器

【2】修改文件服务器的相关的配置,防止和主要业务的服务端口等冲突:
设置远程服务器端口号 :在
conf/server.xml中修改修改2处:


【2】因为上传文件,所以要设置远程服务器非只读:
在
conf/web.xml中修改:
本来默认值是true,现在显式改为false
【3】在
webapps目录下创建upload目录用于文件上传:
【4】启动文件上传的tomcat,进行测试:
在bin目录下执行命令:
sh startup.sh- 1
如果启动成功,终端会返回
Tomcat started.信息。然后打开浏览器访问:localhost:8090

服务已经启动。
【5】在
pom.xml中导入依赖:<dependency> <groupId>com.sun.jerseygroupId> <artifactId>jersey-clientartifactId> <version>1.19.4version> dependency>- 1
- 2
- 3
- 4
- 5
- 6
【6】修改controller代码:
package com.bones.controller; import com.sun.jersey.api.client.Client; import com.sun.jersey.api.client.WebResource; import org.springframework.stereotype.Controller; import org.springframework.web.bind.annotation.RequestMapping; import org.springframework.web.bind.annotation.ResponseBody; import org.springframework.web.multipart.MultipartFile; import javax.servlet.http.HttpServletRequest; import java.io.File; import java.io.IOException; import java.util.HashMap; import java.util.Map; import java.util.UUID; @Controller public class FileUploadController { //文件存储位置 private final static String FILESERVER = "http://localhost:8090/upload/"; @ResponseBody @RequestMapping("fileUpload.do") public Map<String,String> fileUpload(MultipartFile headPhoto, HttpServletRequest request) throws IOException {//MultipartFile:这个类主要是来实现以表单的形式进行文件上传功能,要借助前端的文件解析组件来完成 Map<String,String> map = new HashMap<>(); //指定文件存储目录为项目部署环境下的upload目录 //给定一个URI,返回文件系统中URI对应的绝对路径。如果不能进行映射,返回null String realPath = request.getServletContext().getRealPath("/upload"); // 指定文件的上传位置 File dir = new File(realPath); //如果不存在则创建目录 if (!dir.exists()){ dir.mkdirs(); } //获取文件名: String originalFilename = headPhoto.getOriginalFilename(); //为了避免文件名冲突,使用UUID进行文件名替换 String uuid = UUID.randomUUID().toString(); //获取文件扩展名: String extendsName = originalFilename.substring(originalFilename.lastIndexOf(".")); if (!extendsName.equals(".jpg")){ map.put("message","文件类型必须是jpg"); return map; } //新的文件名 String newFileName = uuid.concat(extendsName); //创建sun公司提供的jersey包中的client对象 Client client = Client.create(); WebResource resource = client.resource(FILESERVER + newFileName); //将文件保存到文件服务器上去: resource.put(String.class,headPhoto.getBytes()); //上传成功,将文件名和文件类型返回给浏览器 map.put("message","上传成功"); map.put("newFileName",newFileName); map.put("fileType",headPhoto.getContentType()); return map; } }- 1
- 2
- 3
- 4
- 5
- 6
- 7
- 8
- 9
- 10
- 11
- 12
- 13
- 14
- 15
- 16
- 17
- 18
- 19
- 20
- 21
- 22
- 23
- 24
- 25
- 26
- 27
- 28
- 29
- 30
- 31
- 32
- 33
- 34
- 35
- 36
- 37
- 38
- 39
- 40
- 41
- 42
- 43
- 44
- 45
- 46
- 47
- 48
- 49
- 50
- 51
- 52
- 53
- 54
- 55
- 56
- 57
- 58
- 59
注意:
1.创建的client对象:
Client是com.sun.jersey.api.client.Client;包下的,千万别导错包图片是成功上传到了另一个服务器中,但是浏览器显示有误,是因为图片回显的代码还是指向业务的服务器,建议修改controller中的返回的
newFileName值,直接指向文件服务器的路径,不建议这个路径写在前端JSP页面中。map.put("newFileName",FILESERVER+newFileName);- 1
同时前端的jsp的ajax异步传输的success方法:
success:function(result){ alert(result.message); //图片上传成功,回显 $("#headImg").attr("src",result.newFileName); },- 1
- 2
- 3
- 4
- 5
测试图片回显是成功的。
以上功能要启动,必须远程用于存储文件的服务器也要开启服务。
0x08_完善项目的功能
项目的index.jsp页面是注册功能,需要对表单进行提交,存储信息到服务器中:

下面完善功能。
首先要处理几个地方:
1.为了数据库存入信息,需要提交form表单的时候,提交以下数据:
name,password,nickname,photo,filetype,其中name,password,nickname是可以直接由前端index.jsp提交上去的,但是photo和filetype我打算存储文件存储在服务器上面的名字(UUID技术重命名之后的名称,不包含文件服务器中文件存储的路径)和后端map返回的filetype。所以我还是将后端传回来的参数修改了一下:
这么改的话,前端的图片回显位置得修改为:

其次前端应该接收map数据的返回,将相关信息传给form表单中,在用户点击“注册”按钮时,提交信息,数据会存到服务器中。
以上的表单的提交问题可以通过2个隐藏的input元素来解决:

同时需要在异步ajax请求返回map的时候设置
photo和filetype的值:
准备PlayController类,用来处理表单的请求:
package com.bones.controller; import com.bones.pojo.Player; import org.springframework.stereotype.Controller; import org.springframework.web.bind.annotation.RequestMapping; @Controller public class PlayerController { @RequestMapping("addPlayer") public String addPlay(Player player){ System.out.println(player); return "redirect:/static/showPlayer.html"; } }- 1
- 2
- 3
- 4
- 5
- 6
- 7
- 8
- 9
- 10
- 11
- 12
- 13
- 14
- 15
浏览器测试,成功重定向到http://localhost:8080/ssm02_uploadFile_war_exploded/static/showPlayer.html页面。
下面只需要完成将数据存储到数据库即可。
PlayerControllerpackage com.bones.controller; import com.bones.pojo.Player; import com.bones.service.PlayerService; import org.springframework.beans.factory.annotation.Autowired; import org.springframework.stereotype.Controller; import org.springframework.web.bind.annotation.RequestMapping; @Controller public class PlayerController { @Autowired private PlayerService playerService; @RequestMapping("addPlayer") public String addPlay(Player player){ //System.out.println(player); playerService.addPlayer(player); return "redirect:/static/showPlayer.html"; } }- 1
- 2
- 3
- 4
- 5
- 6
- 7
- 8
- 9
- 10
- 11
- 12
- 13
- 14
- 15
- 16
- 17
- 18
- 19
- 20
PlayerMapperpackage com.bones.mapper; import com.bones.pojo.Player; public interface PlayerMapper { int addPlayer(Player player); }- 1
- 2
- 3
- 4
- 5
- 6
- 7
- 8
Player实体类package com.bones.pojo; import lombok.AllArgsConstructor; import lombok.Data; import lombok.NoArgsConstructor; import java.io.Serializable; @Data @AllArgsConstructor @NoArgsConstructor public class Player implements Serializable { private Integer id; private String name; private String password; private String nickname; private String photo; private String filetype; }- 1
- 2
- 3
- 4
- 5
- 6
- 7
- 8
- 9
- 10
- 11
- 12
- 13
- 14
- 15
- 16
- 17
- 18
- 19
- 20
- 21
PlayerServicepackage com.bones.service; import com.bones.pojo.Player; public interface PlayerService { int addPlayer(Player player); }- 1
- 2
- 3
- 4
- 5
- 6
- 7
- 8
PlayerServiceImplpackage com.bones.service.impl; import com.bones.mapper.PlayerMapper; import com.bones.pojo.Player; import com.bones.service.PlayerService; import org.springframework.beans.factory.annotation.Autowired; import org.springframework.stereotype.Service; @Service public class PlayerServiceImpl implements PlayerService { @Autowired private PlayerMapper playerMapper; @Override public int addPlayer(Player player) { return playerMapper.addPlayer(player); } }- 1
- 2
- 3
- 4
- 5
- 6
- 7
- 8
- 9
- 10
- 11
- 12
- 13
- 14
- 15
- 16
- 17
- 18
测试:

数据成功存入!
0x09_文件下载
这里提供方法:
@RequestMapping("fileDownload.do") public void fileDownLoad(String photo, String filetype, HttpServletResponse response) throws IOException { //设置响应头 // 告诉浏览器要将数据保存到磁盘上,不在浏览器上直接解析 response.setHeader("Content-Disposition", "attachment;filename="+photo); // 告诉浏览下载的文件类型 response.setContentType(filetype); // 获取一个文件的输入流 InputStream inputStream = new URL(FILESERVER + photo).openStream(); // 获取一个指向浏览器的输出流 ServletOutputStream outputStream = response.getOutputStream(); // 向浏览器响应文件即可 IOUtils.copy(inputStream, outputStream); }- 1
- 2
- 3
- 4
- 5
- 6
- 7
- 8
- 9
- 10
- 11
- 12
- 13
- 14
需要前端传入文件名称和文件存储类型。
-
相关阅读:
Java 事务
Kamiya丨Kamiya艾美捷抗-C-Myc,多克隆说明书
设计资讯 | 迷你PC:配备 Ryzen 9 芯片组和 7 英寸触摸屏,与 Mac Studio 大小相当
Android笔记:(最全)判断Item在RecyclerView中滑动到顶部或底部
贪心算法解汽车加油问题
SystemV 信号量(一) —— SystemV信号量的相关操作函数
Redis原理(一):Redis数据结构(上)
物联网之点灯app按键事件绑定,远程开灯
云实例初始化的行业标准:Cloud-Init
【MySQL高级】索引
- 原文地址:https://blog.csdn.net/qq_51550750/article/details/127858146
