-
day05 ELasticsearch搜索引擎
1、初识 ELasticsearch
ELasticsearch 是一款非常强大的开源搜索引擎,具备非常多强大的功能,可以帮助我们从海量数据中快速找到所需要的内容,可以用来实现搜索、日志统计、分析、系统监控等功能。
例如:
- 在 GitHub 上搜索代码

- 在电商网站上搜索商品

- 在谷歌搜索解决方案

- 在打车软件上搜索附近的车

ELK技术栈
elasticsearch结合kibana、Logstash、Beats,也就是elastic stack(ELK)。被广泛应用在日志数据分析、实时监控等领域:

而 elasticsearch 是 elastic stack 的核心,负责存储、搜索、分析数据。

elasticsearch和lucene
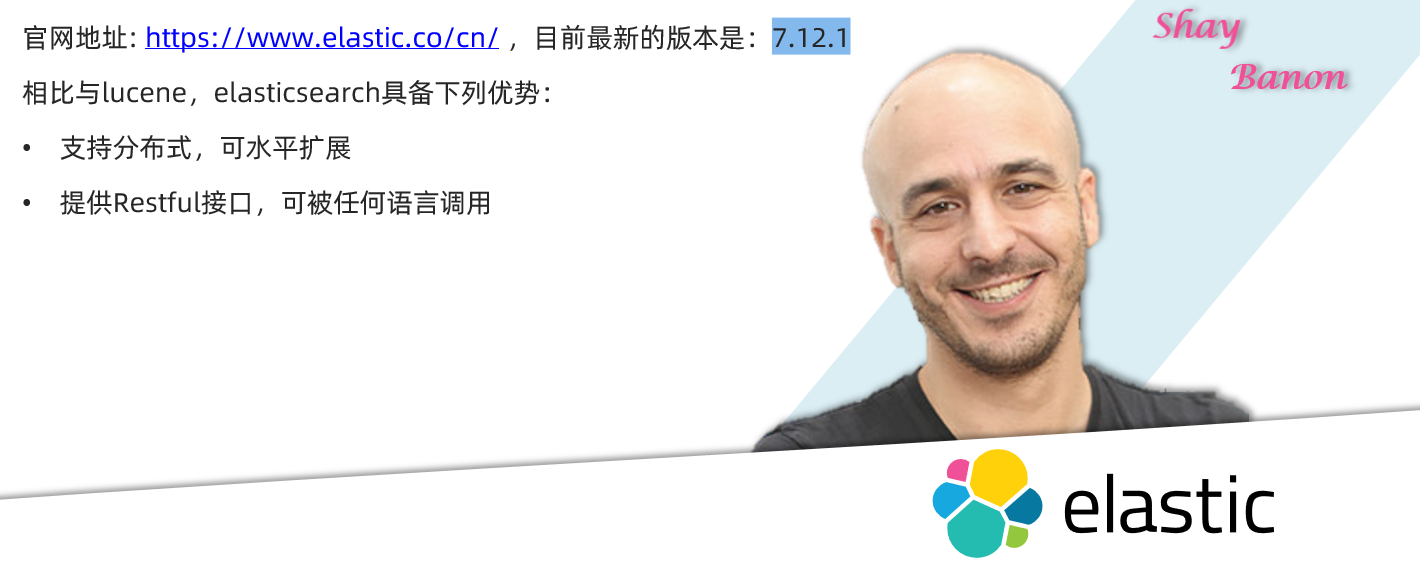
elasticsearch底层是基于lucene来实现的。
Lucene 是一个Java语言的搜索引擎类库,是Apache公司的顶级项目,由DougCutting于1999年研发。官网地址:https://lucene.apache.org/ 。

elasticsearch 的发展历史:
- 2004年Shay Banon基于Lucene开发了Compass
- 2010年Shay Banon 重写了Compass,取名为 Elasticsearch。
为什么不是其他搜索技术?
目前比较知名的搜索引擎技术排名:

虽然在早期,Apache Solr 是最主要的搜索引擎技术,但随着发展elasticsearch已经渐渐超越了Solr,独占鳌头:

小结
什么是elasticsearch?
- 一个开源的分布式搜索引擎,可以用来实现搜索、日志统计、分析、系统监控等功能
什么是elastic stack(ELK)?
- 是以elasticsearch为核心的技术栈,包括beats、Logstash、kibana、elasticsearch
什么是Lucene?
- 是Apache的开源搜索引擎类库,提供了搜索引擎的核心API
2、倒排索引
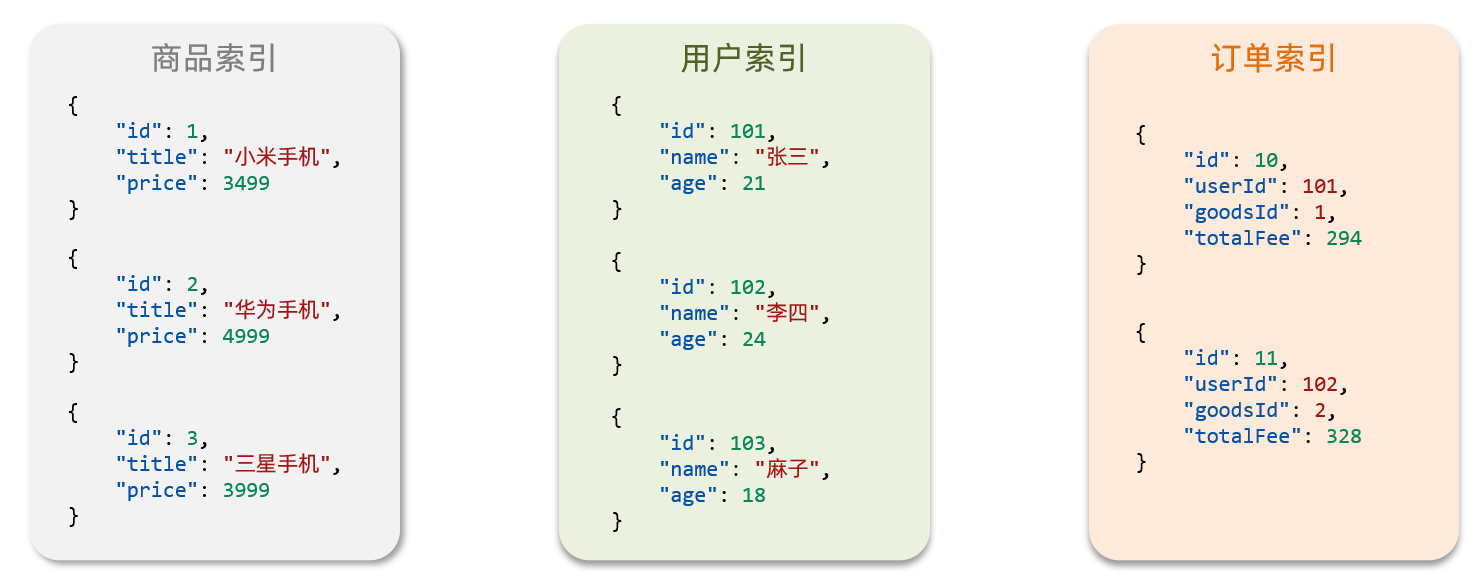
首先,倒排索引的概念是基于 MySQL 这样的正向索引而言的。
正向索引
那么什么是正向索引呢?例如给下表(tb_goods)中的 id 创建索引
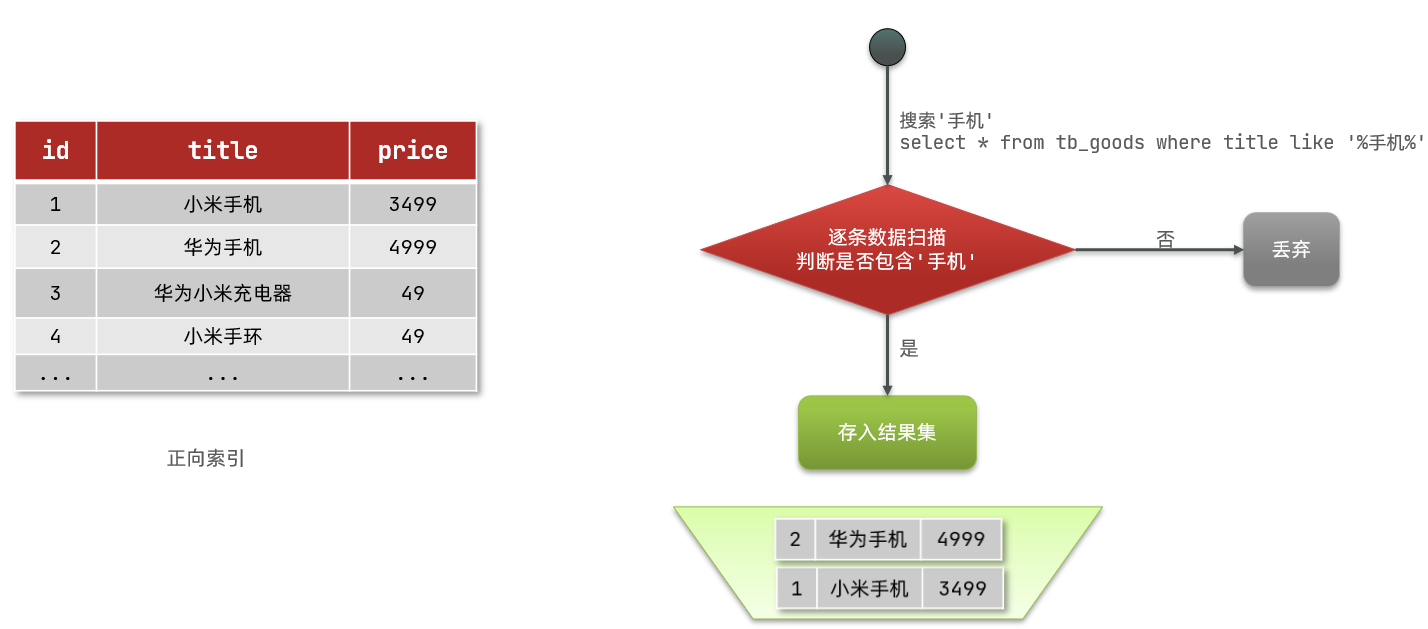
如果是根据id查询,那么直接走索引,查询速度非常快。
但如果是基于
title做模糊查询,那就只能是逐行扫描数据,流程如下:1、用户搜索数据,条件是title符合
"%手机%"2、逐行获取数据,比如id为1的数据
3、判断数据中的title是否符合用户搜索条件
4、如果符合则放入结果集,不符合则丢弃。回到步骤1
逐行扫描,也就是全表扫描,随着数据量增加,其查询效率也会越来越低。当数据量达到数百万时,就是一场灾难。
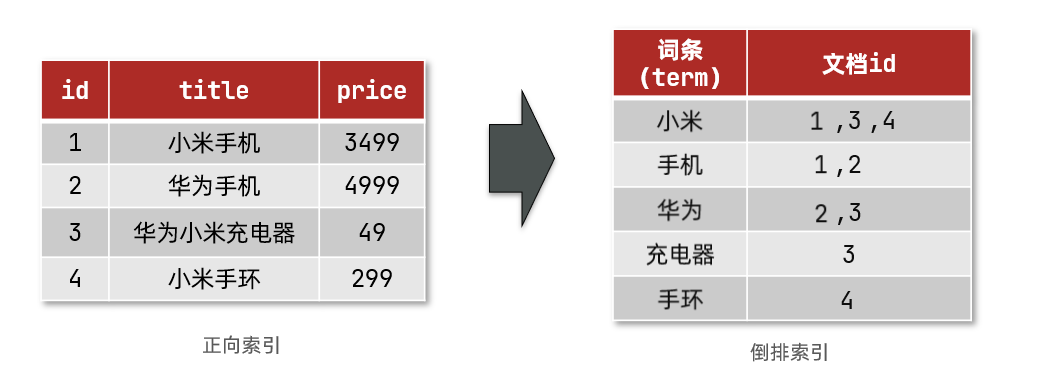
倒排索引
倒排索引中有两个非常重要的概念:
- 文档(
document):用来搜索的数据,其中的每条数据就是一个文档。例如一个网页、一个商品信息 - 词条(
term):对文档数据或用户搜索数据,利用某种算法进行分词,得到的具备含义的词语就是词条。例如:我是中国人,就可以分为:我、是、中国人、中国、国人这样的几个词条
创建倒排索引是对正向索引的一种特殊处理,流程如下:
- 将每一个文档的数据利用算法分词,得到一个个词条
- 创建表,每行数据包括词条、词条所在文档id、位置等信息
- 因为词条的唯一性,所以可以给词条创建索引,例如hash表结构索引
倒排索引的搜索流程如下(以搜索"华为手机"为例):
1、用户输入条件
"华为手机"进行搜索。2、对用户输入内容进行分词,得到词条:
华为、手机。3、拿着词条在倒排索引中查找,可以得到包含词条的文档id:1、2、3。
4、拿着文档id到正向索引中查找具体文档。
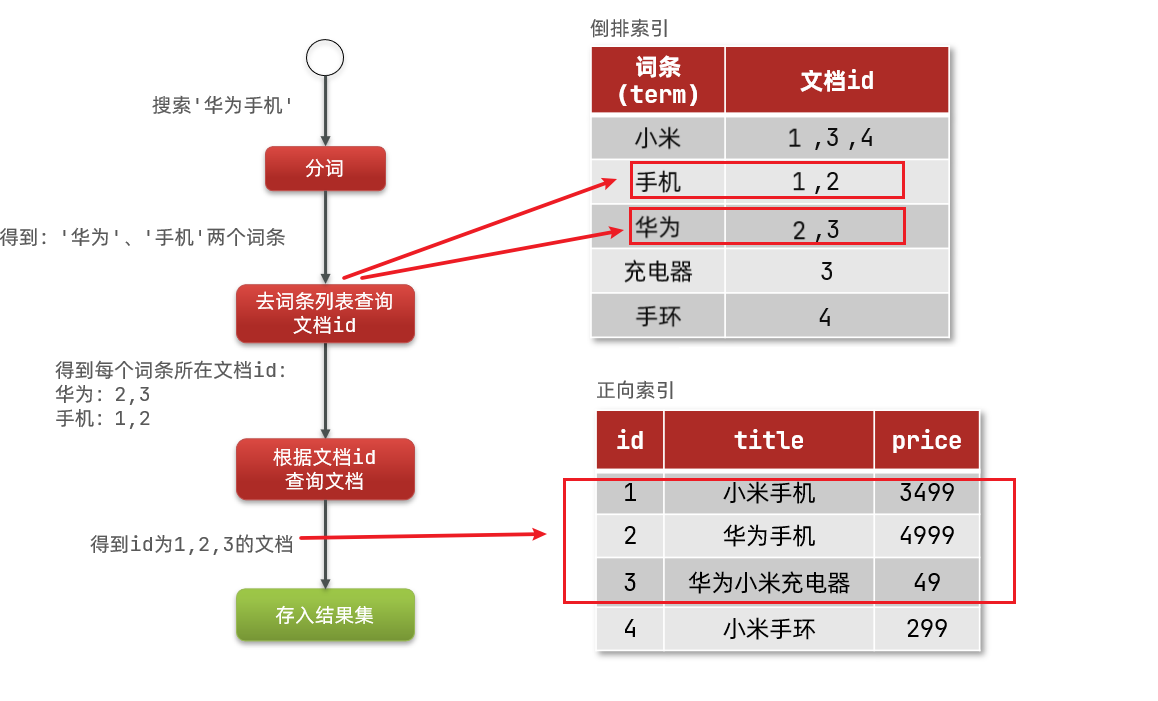
虽然要先查询倒排索引,再查询正向索引,但无论是词条还是文档id都建立了索引,查询速度非常快!无需全表扫描。
总结
什么是文档和词条?
每一条数据就是一个文档
对文档中的内容进行分词,得到的词语就是词条
什么是正向索引?
基于文档id创建索引。查询词条时必须先找到文档,而后判断是否包含词条
什么是倒排索引?
对文档内容分词,对词条创建索引,并记录词条所在文档的信息。查询时先根据词条找到文档id,而后获取到文档
那么为什么一个叫做正向索引,一个叫做倒排索引呢?
- 正向索引是最传统的,根据id索引的方式。在根据词条进行查询时,必须先逐条获取每个文档,然后判断文档中是否包含所需要的词条,是根据文档找词条的过程。
- 而倒排索引则相反,是先找到用户要搜索的词条,根据词条得到包含词条的文档id,然后根据文档id获取文档。是根据词条找文档的过程。
3、es的一些概念
3.1、文档和字段
elasticsearch是面向文档(Document)存储的,可以是数据库中的一条商品数据,一个订单信息。
文档数据会被序列化为json格式后存储在 elasticsearch 中:

而Json文档中往往包含很多的字段(Field),类似于数据库中的列。
3.2、索引和映射
索引(Index),就是相同类型的文档的集合。
例如:
- 所有用户文档,就可以组织在一起,称为用户的索引;
- 所有商品的文档,可以组织在一起,称为商品的索引;
- 所有订单的文档,可以组织在一起,称为订单的索引;
因此,我们可以把索引当做是数据库中的表。
数据库的表会有约束信息,用来定义表的结构、字段的名称、类型等信息。因此,索引库中就有映射(mapping),是索引中文档的字段约束信息,类似表的结构约束。
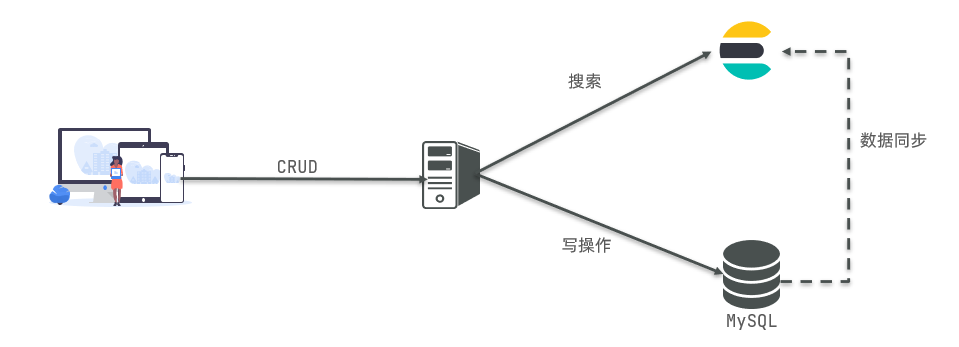
3.3、mysql与elasticsearch

- Mysql:擅长事务类型的操作,可以确保数据的安全性和一致性
- Elasticsearch:擅长海量数据的搜索、分析、计算
因此在企业中,往往是两者结合使用的:
- 对安全性要求较高的写操作,使用mysql实现
- 对查询性能要求较高的搜索需求,使用elasticsearch实现
- 两者再基于某种方式,实现数据的同步,保证一致性
4、安装Elasticsearch
4.1、创建网络
因为我们还需要部署kibana容器,因此需要让es和kibana容器互联。这里先创建一个网络:
docker network create es-net- 1
4.2、安装es镜像
docker pull elasticsearch:7.12.1- 1
4.3、运行es容器
运行docker命令,部署单点es:
docker run -d \ --name es \ -e "ES_JAVA_OPTS=-Xms512m -Xmx512m" \ -e "discovery.type=single-node" \ -v es-data:/usr/share/elasticsearch/data \ -v es-plugins:/usr/share/elasticsearch/plugins \ --privileged \ --network es-net \ -p 9200:9200 \ -p 9300:9300 \ elasticsearch:7.12.1- 1
- 2
- 3
- 4
- 5
- 6
- 7
- 8
- 9
- 10
- 11
-e "ES_JAVA_OPTS=-Xms512m -Xmx512m":配置es运行时的内存大小-e "discovery.type=single-node":非集群模式-v es-data:/usr/share/elasticsearch/data:挂载逻辑卷,绑定es的数据目录-v es-plugins:/usr/share/elasticsearch/plugins:挂载逻辑卷,绑定es的插件目录--privileged:授予逻辑卷访问权--network es-net:让 es 容器加入一个名为 es-net 的网络中-p 9200:9200:端口映射配置-e "cluster.name=es-docker-cluster":设置集群名称-e "http.host=0.0.0.0":监听的地址,可以外网访问-v es-logs:/usr/share/elasticsearch/logs:挂载逻辑卷,绑定es的日志目录
访问地址:
http://es服务器ip地址:9200,即可看到elasticsearch的响应结果:
5、安装kibana
kibana可以给我们提供一个elasticsearch的可视化界面,便于我们学习。
5.1、安装kibana镜像
docker pull kibana:7.12.1- 1
5.2、运行kibana容器
运行docker命令,部署kibana:
docker run -d \ --name kibana \ -e ELASTICSEARCH_HOSTS=http://es:9200 \ --network=es-net \ -p 5601:5601 \ kibana:7.12.1- 1
- 2
- 3
- 4
- 5
- 6
--network es-net:让 kibana 容器加入一个名为 es-net 的网络中,与 elasticsearch 在同一个网络中-e ELASTICSEARCH_HOSTS=http://es:9200":设置 elasticsearch 的地址,因为kibana已经和elasticsearch在同一个网络中,因此可以用容器名直接访问elasticsearch-p 5601:5601:端口映射配置
访问地址:http://kibana服务器ip地址:5601,即可看到结果

6、安装IK分词器
es在创建倒排索引时需要对文档进行分词。在搜索时,需要对用户输入内容分词。但默认的分词规则对中文处理并不友好。
我们在kibana的DevTools中测试:
POST /_analyze { "text": "黑马程序员学习java太棒了", "analyzer": "standard" }- 1
- 2
- 3
- 4
- 5
POST:请求方式
/_analyze:请求路径,这里省略了 http://es服务器ip地址:9200,由kibana帮我们补充请求参数,json风格:
- analyzer:分词器类型,这里是默认的standard分词器
- text:要分词的内容

可以看到,默认的分词器是通过逐字进行分词的,显然这种分词效果并不是我们想要的。
所以在处理中文分词时,一般会使用IK分词器:https://github.com/medcl/elasticsearch-analysis-ik
6.1、离线安装IK插件
由于国内访问 GitHub 较慢,我们选择离线模式安装。
1、安装插件需要知道 elasticsearch 的 plugins 目录位置,而我们用了数据卷挂载,因此需要查看 elasticsearch 的数据卷目录,通过下面命令查看:
docker volume inspect es-plugins- 1

说明 plugins 目录被挂载到了:
/var/lib/docker/volumes/es-plugins/_data这个目录中。2、解压缩分词器安装包,并上传到es容器的插件数据卷中

3、重启 es 容器
# 重启es容器 docker restart es # 查看es日志 docker logs -f es- 1
- 2
- 3
- 4
- 5
6.2、测试IK分词器
IK分词器包含两种模式:
ik_smart:智能切分,粗粒度ik_max_word:最细切分,细粒度

6.3、扩展词词典
随着互联网的发展,“造词运动”也越发的频繁。出现了很多新的词语,在原有的词汇列表中并不存在。比如:“奥力给”,“传智播客” 等等。
所以我们的词汇需要不断的更新,IK分词器也提供了扩展词汇的功能。
1、打开IK分词器 config 目录的
IKAnalyzer.cfg.xml,添加一个文件名,我们以ext.dic文件名为例。

2、创建
ext.dic文件,在其中添加热点词就好了,一个词一行。
3、重启 elasticsearch
docker restart es- 1
4、测试效果:

6.4、停用词词典
在互联网项目中,网络间传输的速度很快,所以很多语言是不允许在网络上传递的,如:关于宗教、政治等敏感词语,那么我们在搜索时也应该忽略当前词汇。
IK分词器也提供了强大的停用词功能,让我们在索引时就直接忽略掉当前的停用词汇表中的内容。
1、打开IK分词器 config 目录的
IKAnalyzer.cfg.xml,添加一个文件名,我们以stopword.dic文件名为例。2、在
stopword.dic中添加停用词
3、重启 elasticsearch
docker restart es- 1
6.5、小结
分词器的作用是什么?
- 创建倒排索引时对文档分词
- 用户搜索时,对输入的内容分词
IK分词器有几种模式?
- ik_smart:智能切分,粗粒度
- ik_max_word:最细切分,细粒度
IK分词器如何拓展词条?如何停用词条?
- 利用config目录的IkAnalyzer.cfg.xml文件添加拓展词典和停用词典
- 在词典中添加拓展词条或者停用词条
7、索引库操作
索引库就类似数据库表,mapping映射就类似表的结构。
我们要向es中存储数据,必须先创建“库”和“表”。
7.1、mapping映射属性
mapping是对索引库中文档的约束,常见的mapping属性包括:
- type:字段数据类型,常见的简单类型有:
- 字符串:text(可分词的文本)、keyword(精确值,例如:品牌、国家、ip地址)
- 数值:long、integer、short、byte、double、float、
- 布尔:boolean
- 日期:date
- 对象:object
- index:是否创建索引,默认为true
- analyzer:使用哪种分词器
- properties:该字段的子字段
例如下面的json文档:
{ "age": 21, "weight": 52.1, "isMarried": false, "info": "黑马程序员Java讲师", "email": "zy@itcast.cn", "score": [99.1, 99.5, 98.9], "name": { "firstName": "云", "lastName": "赵" } }- 1
- 2
- 3
- 4
- 5
- 6
- 7
- 8
- 9
- 10
- 11
- 12
对应的每个字段映射(mapping):
- age:类型为 Integer;参与搜索,因此需要index为true;无需分词器
- weight:类型为float;参与搜索,因此需要index为true;无需分词器
- isMarried:类型为boolean;参与搜索,因此需要index为true;无需分词器
- info:类型为字符串,需要分词,因此是text;参与搜索,因此需要index为true;分词器可以用 ik_smart
- email:类型为字符串,但是不需要分词,因此是keyword;不参与搜索,因此需要index为false;无需分词器
- score:虽然是数组,但是我们只看元素的类型,类型为float;参与搜索,因此需要index为true;无需分词器
- name:类型为object,需要定义多个子属性
- name.firstName;类型为字符串,但是不需要分词,因此是keyword;参与搜索,因此需要index为true;无需分词器
- name.lastName;类型为字符串,但是不需要分词,因此是keyword;参与搜索,因此需要index为true;无需分词器
7.2、索引库的CRUD
ES中通过Restful请求操作索引库、文档。请求内容用DSL语句来表示。
创建索引库和映射
基本语法:
- 请求方式:PUT
- 请求路径:/索引库名,可以自定义
- 请求参数:mapping映射
格式:
PUT /索引库名称 { "mappings": { "properties": { "字段名":{ "type": "text", "analyzer": "ik_smart" }, "字段名2":{ "type": "keyword", "index": "false" }, "字段名3":{ "properties": { "子字段": { "type": "keyword" } } }, // ...略 } } }- 1
- 2
- 3
- 4
- 5
- 6
- 7
- 8
- 9
- 10
- 11
- 12
- 13
- 14
- 15
- 16
- 17
- 18
- 19
- 20
- 21
- 22
- 23
示例:
# 创建索引库 PUT /xiexu { "mappings": { "properties": { "info": { "type": "text", "analyzer": "ik_smart" }, "email": { "type": "keyword", "index": false }, "name": { "type": "object", "properties": { "firstname": { "type": "keyword" }, "lastname": { "type": "keyword" } } } } } }- 1
- 2
- 3
- 4
- 5
- 6
- 7
- 8
- 9
- 10
- 11
- 12
- 13
- 14
- 15
- 16
- 17
- 18
- 19
- 20
- 21
- 22
- 23
- 24
- 25
- 26
- 27

查询索引库
基本语法:
- 请求方式:GET
- 请求路径:/索引库名
- 请求参数:无
格式:
GET /索引库名- 1
示例:
# 查询索引库 GET /xiexu- 1
- 2

删除索引库
语法:
- 请求方式:DELETE
- 请求路径:/索引库名
- 请求参数:无
格式:
DELETE /索引库名- 1
示例:
# 删除索引库 DELETE /xiexu- 1
- 2
- 3

修改索引库
倒排索引结构虽然不复杂,但是一旦数据结构改变(比如改变了分词器),就需要重新创建倒排索引,这简直就是灾难。因此索引库一旦创建,就无法修改mapping。
虽然无法修改mapping中已有的字段,但是却允许添加新的字段到mapping中,因为这不会对倒排索引产生影响。
语法说明:
PUT /索引库名/_mapping { "properties": { "新字段名":{ "type": "integer" } } }- 1
- 2
- 3
- 4
- 5
- 6
- 7
- 8
示例:
# 修改索引库,添加新字段 PUT /xiexu/_mapping { "properties": { "age": { "type": "integer" } } }- 1
- 2
- 3
- 4
- 5
- 6
- 7
- 8
- 9

8、文档操作
8.1、新增文档
语法:
POST /索引库名/_doc/文档id { "字段1": "值1", "字段2": "值2", "字段3": { "子属性1": "值3", "子属性2": "值4" }, // ... }- 1
- 2
- 3
- 4
- 5
- 6
- 7
- 8
- 9
- 10
示例:
# 插入文档 POST /xiexu/_doc/1 { "info": "小明Java讲师", "email": "1193499619@qq.com", "name": { "firstname": "云", "lastname": "赵" } }- 1
- 2
- 3
- 4
- 5
- 6
- 7
- 8
- 9
- 10

8.2、查询文档
语法:
GET /索引库名称/_doc/{id}- 1
示例:
# 查询文档 GET /xiexu/_doc/1- 1
- 2

8.3、删除文档
语法:
DELETE /索引库名/_doc/id值- 1
示例:
# 根据id删除数据 DELETE /xiexu/_doc/1- 1
- 2

8.4、修改文档
修改文档有两种方式:
- 全量修改:直接覆盖原来的文档
- 增量修改:修改文档中的部分字段
方式一:全量修改
全量修改是覆盖原来的文档,其本质是:
- 根据指定的id删除文档
- 新增一个相同id的文档
如果根据id删除时,id不存在,第二步的新增也会执行,也就是从修改变成了新增操作。
注意:如果使用全量修改时,只修改个别字段,那么其余未修改的字段数据会被删除。
语法:
PUT /{索引库名}/_doc/文档id { "字段1": "值1", "字段2": "值2", // ... 略 }- 1
- 2
- 3
- 4
- 5
- 6
示例:
# 全量修改文档 PUT /xiexu/_doc/1 { "info": "小明Java讲师", "email": "zhaoyun@qq.com", "name": { "firstname": "云", "lastname": "赵" } }- 1
- 2
- 3
- 4
- 5
- 6
- 7
- 8
- 9
- 10

方式二:增量修改
增量修改,修改指定字段的值
语法:
POST /索引库名/_update/文档id { "doc": { "字段名": "新的值", } }- 1
- 2
- 3
- 4
- 5
- 6
示例:
# 增量修改文档 POST /xiexu/_update/1 { "doc": { "email": "xiexu@11.com" } }- 1
- 2
- 3
- 4
- 5
- 6
- 7

9、RestClient操作索引库
ES官方提供了各种不同语言的客户端,用来操作 ES。这些客户端的本质就是组装DSL语句,通过http请求发送给ES。官方文档地址:https://www.elastic.co/guide/en/elasticsearch/client/index.html
其中的Java Rest Client又包括两种:
- Java Low Level Rest Client
- Java High Level Rest Client
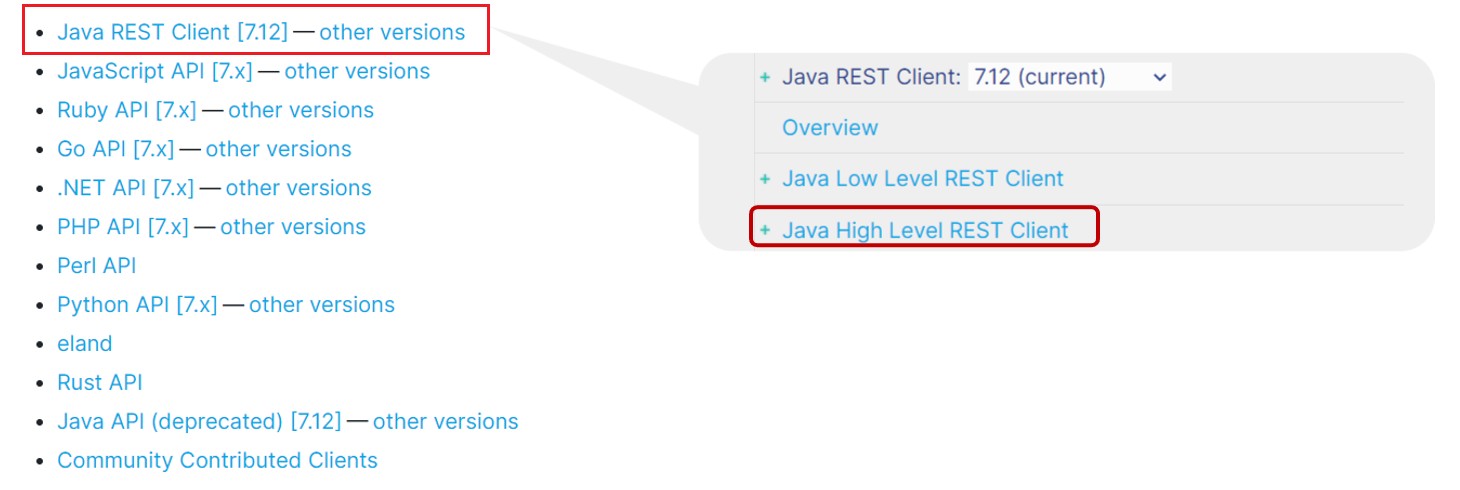
我们下面学习的是 Java HighLevel Rest Client 客户端API
9.1、mapping映射分析
数据表结构
CREATE TABLE `tb_hotel` ( `id` bigint(20) NOT NULL COMMENT '酒店id', `name` varchar(255) NOT NULL COMMENT '酒店名称;例:7天酒店', `address` varchar(255) NOT NULL COMMENT '酒店地址;例:航头路', `price` int(10) NOT NULL COMMENT '酒店价格;例:329', `score` int(2) NOT NULL COMMENT '酒店评分;例:45,就是4.5分', `brand` varchar(32) NOT NULL COMMENT '酒店品牌;例:如家', `city` varchar(32) NOT NULL COMMENT '所在城市;例:上海', `star_name` varchar(16) DEFAULT NULL COMMENT '酒店星级,从低到高分别是:1星到5星,1钻到5钻', `business` varchar(255) DEFAULT NULL COMMENT '商圈;例:虹桥', `latitude` varchar(32) NOT NULL COMMENT '纬度;例:31.2497', `longitude` varchar(32) NOT NULL COMMENT '经度;例:120.3925', `pic` varchar(255) DEFAULT NULL COMMENT '酒店图片;例:/img/1.jpg', PRIMARY KEY (`id`) ) ENGINE=InnoDB DEFAULT CHARSET=utf8mb4;- 1
- 2
- 3
- 4
- 5
- 6
- 7
- 8
- 9
- 10
- 11
- 12
- 13
- 14
- 15
创建索引库,最关键的是mapping映射,而mapping映射要考虑的信息包括:
- 字段名
- 字段数据类型
- 是否参与搜索
- 是否需要分词
- 如果分词,分词器是什么?
其中:
- 字段名、字段数据类型,可以参考数据表结构的名称和类型
- 是否参与搜索要分析业务来判断,例如图片地址,就无需参与搜索
- 是否分词呢要看内容,内容如果是一个整体就无需分词,反之则要分词
- 分词器,我们可以统一使用ik_max_word
酒店数据的索引库
# 酒店的mapping PUT /hotel { "mappings": { "properties": { "id": { "type": "keyword" }, "name": { "type": "text", "analyzer": "ik_max_word", "copy_to": "all" }, "address": { "type": "keyword", "index": false }, "price": { "type": "integer" }, "score": { "type": "integer" }, "brand": { "type": "keyword", "copy_to": "all" }, "city": { "type": "keyword" }, "starName": { "type": "keyword" }, "business": { "type": "keyword", "copy_to": "all" }, "location": { "type": "geo_point" }, "pic": { "type": "keyword", "index": false }, "all": { "type": "text", "analyzer": "ik_max_word" } } } }- 1
- 2
- 3
- 4
- 5
- 6
- 7
- 8
- 9
- 10
- 11
- 12
- 13
- 14
- 15
- 16
- 17
- 18
- 19
- 20
- 21
- 22
- 23
- 24
- 25
- 26
- 27
- 28
- 29
- 30
- 31
- 32
- 33
- 34
- 35
- 36
- 37
- 38
- 39
- 40
- 41
- 42
- 43
- 44
- 45
- 46
- 47
- 48
- 49
- 50
- 51
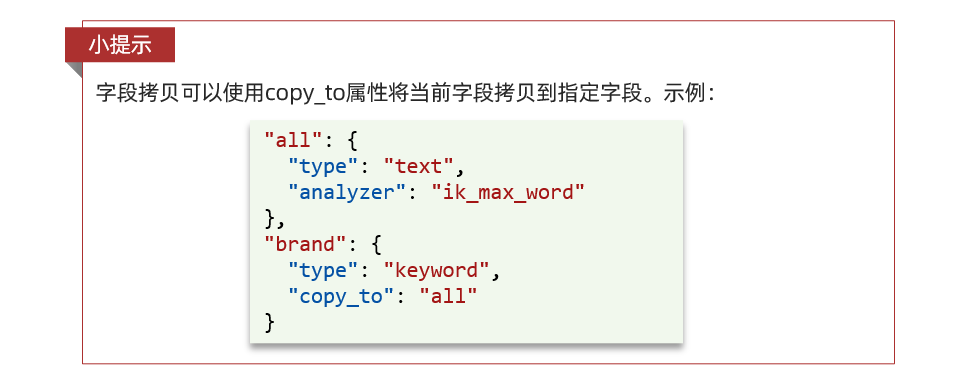
几个特殊字段说明:
- location:地理坐标,里面包含精度、纬度
- all:一个组合字段,其目的是将多个字段的值,利用 copy_to 合并,提供给用户搜索
- index:false 表示该字段不参与搜索
地理坐标说明:

copy_to说明:
9.2、初始化 RestClient
在 elasticsearch 提供的 API 中,elasticsearch 一切交互都封装在一个名为 RestHighLevelClient 的类中,必须先完成这个对象的初始化,建立与 elasticsearch 的连接。
1、引入 es 的 RestHighLevelClient 依赖:
<dependency> <groupId>org.elasticsearch.clientgroupId> <artifactId>elasticsearch-rest-high-level-clientartifactId> dependency>- 1
- 2
- 3
- 4
- 5
2、因为 SpringBoot 默认的 ES 版本是 7.6.2,所以我们需要覆盖默认的 ES 版本:
<properties> <java.version>1.8java.version> <elasticsearch.version>7.12.1elasticsearch.version> properties>- 1
- 2
- 3
- 4
3、初始化 RestHighLevelClient:
RestHighLevelClient client = new RestHighLevelClient(RestClient.builder( HttpHost.create("http://es服务器ip地址:9200") ));- 1
- 2
- 3
4、我们创建一个测试类 HotelIndexTest,然后将初始化的代码编写在
@BeforeEach方法@SpringBootTest class HotelIndexTest { private RestHighLevelClient client; @Test void testInit() { System.out.println("client = " + client); } @BeforeEach void setUp() { // 初始化客户端 this.client = new RestHighLevelClient(RestClient.builder(HttpHost.create("http://es服务器ip地址:9200"))); } @AfterEach void tearDown() throws IOException { // 关闭客户端 this.client.close(); } }- 1
- 2
- 3
- 4
- 5
- 6
- 7
- 8
- 9
- 10
- 11
- 12
- 13
- 14
- 15
- 16
- 17
- 18
- 19
- 20
- 21
- 22
- 23
9.3、创建索引库
源码解读
创建索引库的API如下:
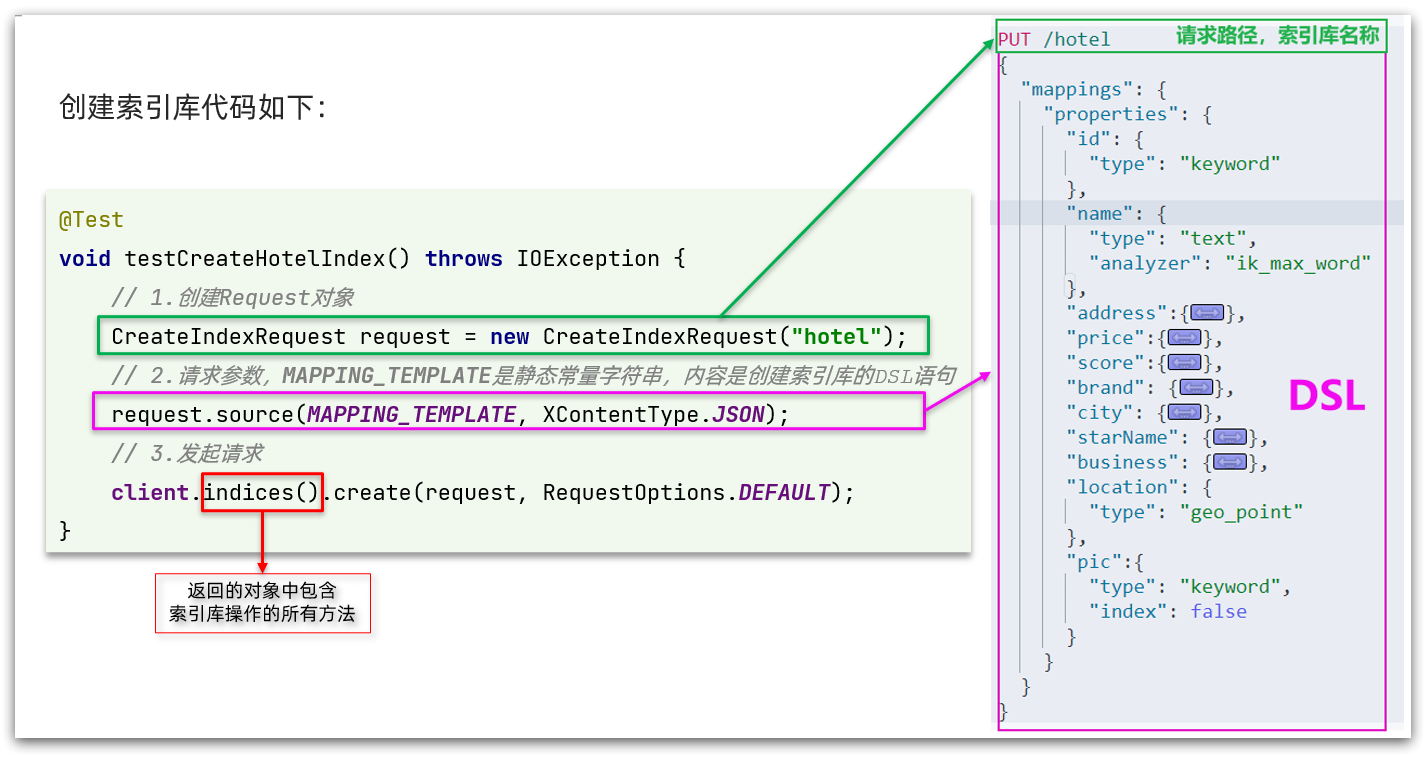
代码分为三步:
1、创建Request对象。因为是创建索引库的操作,因此Request是CreateIndexRequest。
2、添加请求参数,其实就是DSL的JSON参数部分。因为json字符串很长,这里是定义了静态字符串常量 MAPPING_TEMPLATE,让代码看起来更加优雅。
3、发送请求,
client.indices()方法的返回值是 IndicesClient 类型,封装了所有与索引库操作有关的方法。完整示例
在 hotel-demo 的
cn.itcast.hotel.constants包下,创建一个类,定义 mapping 映射的 JSON 字符串常量:public class HotelConstants { public static final String MAPPING_TEMPLATE = "{\n" + " \"mappings\": {\n" + " \"properties\": {\n" + " \"id\": {\n" + " \"type\": \"keyword\"\n" + " },\n" + " \"name\": {\n" + " \"type\": \"text\",\n" + " \"analyzer\": \"ik_max_word\",\n" + " \"copy_to\": \"all\"\n" + " },\n" + " \"address\": {\n" + " \"type\": \"keyword\",\n" + " \"index\": false\n" + " },\n" + " \"price\": {\n" + " \"type\": \"integer\"\n" + " },\n" + " \"score\": {\n" + " \"type\": \"integer\"\n" + " },\n" + " \"brand\": {\n" + " \"type\": \"keyword\",\n" + " \"copy_to\": \"all\"\n" + " },\n" + " \"city\": {\n" + " \"type\": \"keyword\"\n" + " },\n" + " \"starName\": {\n" + " \"type\": \"keyword\"\n" + " },\n" + " \"business\": {\n" + " \"type\": \"keyword\",\n" + " \"copy_to\": \"all\"\n" + " },\n" + " \"pic\": {\n" + " \"type\": \"keyword\",\n" + " \"index\": false\n" + " },\n" + " \"location\": {\n" + " \"type\": \"geo_point\"\n" + " },\n" + " \"all\": {\n" + " \"type\": \"text\",\n" + " \"analyzer\": \"ik_max_word\"\n" + " }\n" + " }\n" + " }\n" + "}"; }- 1
- 2
- 3
- 4
- 5
- 6
- 7
- 8
- 9
- 10
- 11
- 12
- 13
- 14
- 15
- 16
- 17
- 18
- 19
- 20
- 21
- 22
- 23
- 24
- 25
- 26
- 27
- 28
- 29
- 30
- 31
- 32
- 33
- 34
- 35
- 36
- 37
- 38
- 39
- 40
- 41
- 42
- 43
- 44
- 45
- 46
- 47
- 48
- 49
- 50
- 51
在 hotel-demo 中的 HotelIndexTest 测试类中,编写单元测试,实现创建索引库:
/** * 创建索引库 * * @throws IOException */ @Test void createHotelIndex() throws IOException { // 1.创建Request对象(PUT /hotel) CreateIndexRequest request = new CreateIndexRequest("hotel"); // 索引库名称 // 2.准备请求参数:DSL语句 request.source(MAPPING_TEMPLATE, XContentType.JSON); // 3.发送请求 client.indices().create(request, RequestOptions.DEFAULT); }- 1
- 2
- 3
- 4
- 5
- 6
- 7
- 8
- 9
- 10
- 11
- 12
- 13
- 14
测试:

9.4、删除索引库
/** * 删除索引库 * * @throws IOException */ @Test void testDeleteIndex() throws IOException { // 1.创建Request对象 DeleteIndexRequest request = new DeleteIndexRequest("hotel"); // 索引库名称 // 2.发送请求 client.indices().delete(request, RequestOptions.DEFAULT); }- 1
- 2
- 3
- 4
- 5
- 6
- 7
- 8
- 9
- 10
- 11
- 12
9.5、判断索引库是否存在
/** * 判断索引库是否存在 * * @throws IOException */ @Test void testExistsIndex() throws IOException { // 1.创建Request对象 GetIndexRequest request = new GetIndexRequest("hotel"); // 索引库名称 // 2.发送请求 boolean isExists = client.indices().exists(request, RequestOptions.DEFAULT); // 3.输出 System.err.println(isExists ? "索引库已经存在!" : "索引库不存在!"); }- 1
- 2
- 3
- 4
- 5
- 6
- 7
- 8
- 9
- 10
- 11
- 12
- 13
- 14
10、RestClient 操作文档
为了与索引库操作分离,我们再次创建一个测试类,做两件事情:
- 初始化RestHighLevelClient
- 我们的酒店数据在数据库,需要利用 IHotelService 去查询,所以注入这个接口
@SpringBootTest class HotelDocumentTest { @Autowired private IHotelService hotelService; private RestHighLevelClient client; @BeforeEach void setUp() { // 初始化客户端 this.client = new RestHighLevelClient(RestClient.builder(HttpHost.create("http://es服务器ip地址:9200"))); } @AfterEach void tearDown() throws IOException { // 关闭客户端 this.client.close(); } }- 1
- 2
- 3
- 4
- 5
- 6
- 7
- 8
- 9
- 10
- 11
- 12
- 13
- 14
- 15
- 16
- 17
- 18
- 19
- 20
- 21
10.1、新增文档
我们要将数据库的酒店数据查询出来,写入 elasticsearch 的 hotel 索引库中。
索引库实体类
数据库查询后的结果是一个Hotel类型的对象。结构如下:
@Data @TableName("tb_hotel") public class Hotel { @TableId(type = IdType.INPUT) private Long id; private String name; private String address; private Integer price; private Integer score; private String brand; private String city; private String starName; private String business; private String longitude; private String latitude; private String pic; }- 1
- 2
- 3
- 4
- 5
- 6
- 7
- 8
- 9
- 10
- 11
- 12
- 13
- 14
- 15
- 16
- 17
这个 Hotel 对象与我们的数据库结构完全一致,但是它与我们的索引库结构存在差异:
- longitude 和 latitude 需要合并为 location
因此,我们需要定义一个新的类型,与索引库结构吻合:
@Data @NoArgsConstructor public class HotelDoc { private Long id; private String name; private String address; private Integer price; private Integer score; private String brand; private String city; private String starName; private String business; private String location; private String pic; public HotelDoc(Hotel hotel) { this.id = hotel.getId(); this.name = hotel.getName(); this.address = hotel.getAddress(); this.price = hotel.getPrice(); this.score = hotel.getScore(); this.brand = hotel.getBrand(); this.city = hotel.getCity(); this.starName = hotel.getStarName(); this.business = hotel.getBusiness(); this.location = hotel.getLatitude() + ", " + hotel.getLongitude(); this.pic = hotel.getPic(); } }- 1
- 2
- 3
- 4
- 5
- 6
- 7
- 8
- 9
- 10
- 11
- 12
- 13
- 14
- 15
- 16
- 17
- 18
- 19
- 20
- 21
- 22
- 23
- 24
- 25
- 26
- 27
- 28
- 29
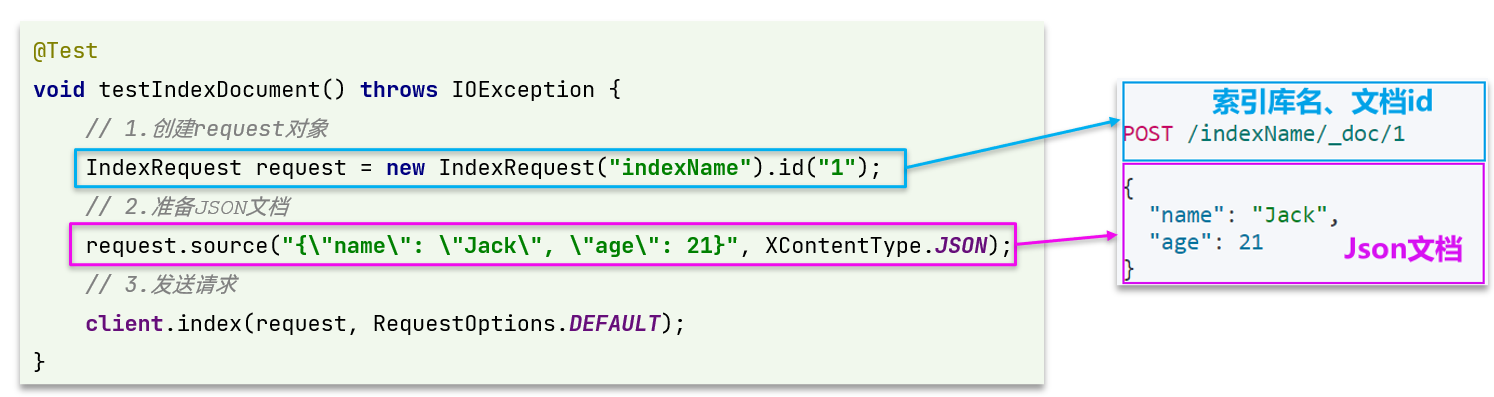
语法说明
新增文档的DSL语句如下:
POST /索引库名/_doc/1 { "name": "Jack", "age": 21 }- 1
- 2
- 3
- 4
- 5
对应的java代码如图:
完整代码
我们导入酒店数据,流程基本一致,但需要考虑几点变化:
- 酒店数据来自于数据库,我们需要先查询出来,得到hotel对象
- hotel对象需要转换成HotelDoc对象
- HotelDoc需要序列化为json格式
因此,代码整体步骤如下:
1、根据id查询酒店数据Hotel
2、将Hotel封装成HotelDoc
3、将HotelDoc序列化为JSON
4、创建IndexRequest,指定索引库名和id
5、准备请求参数,也就是JSON文档
6、发送请求
在 hotel-demo 的 HotelDocumentTest 测试类中,编写单元测试:
/** * 新增文档 * * @throws IOException */ @Test void testAddDocument() throws IOException { // 1.根据id查询酒店数据 Hotel hotel = hotelService.getById(61083L); // 2.转换为HotelDoc文档类型 HotelDoc hotelDoc = new HotelDoc(hotel); // 3.转换成JSON格式 String json = JSON.toJSONString(hotelDoc); // 1.创建Request对象 IndexRequest request = new IndexRequest("hotel").id(hotelDoc.getId().toString()); // 2.准备JSON文档 request.source(json, XContentType.JSON); // 3.发送请求 client.index(request, RequestOptions.DEFAULT); }- 1
- 2
- 3
- 4
- 5
- 6
- 7
- 8
- 9
- 10
- 11
- 12
- 13
- 14
- 15
- 16
- 17
- 18
- 19
- 20
- 21
测试:

10.2、查询文档
语法说明
查询的DSL语句如下:
GET /hotel/_doc/{id}- 1
查询的目的是得到结果,解析为HotelDoc,因此难点是结果的解析。完整代码如下:
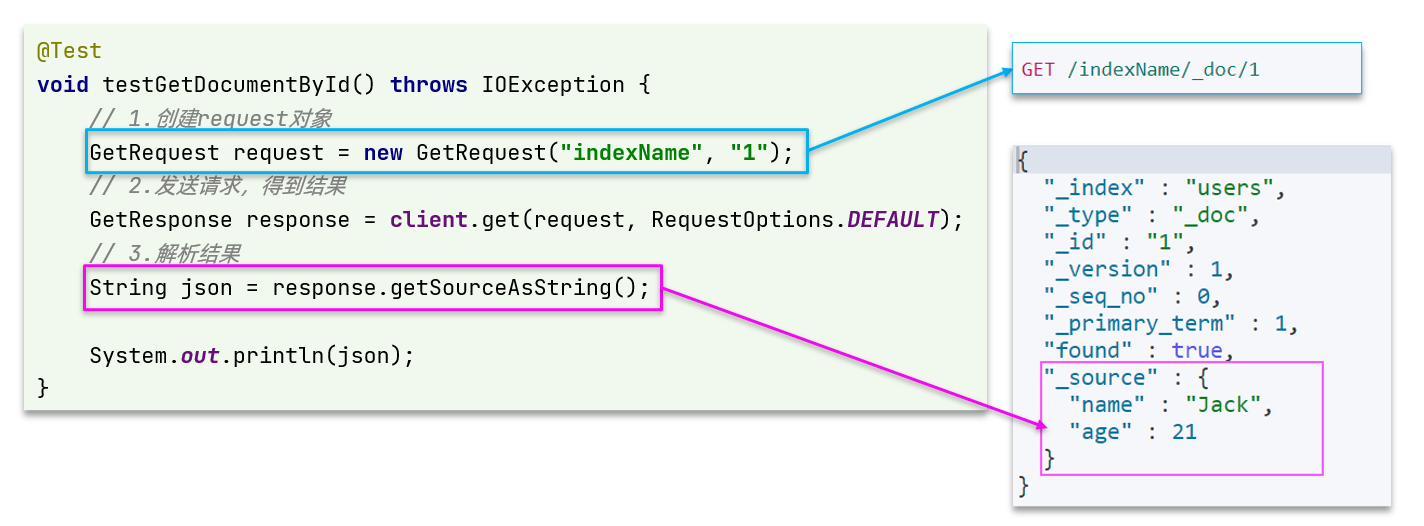
可以看到,结果是一个JSON,其中文档放在一个
_source属性中,因此解析就是拿到_source,反序列化为Java对象即可。- 3解析结果,就是对JSON做反序列化
- 2)发送请求,得到结果。因为是查询,这里调用client.get()方法
1、准备Request对象。这次是查询,所以是 GetRequest
2、发送请求,得到结果。因为是查询,这里调用
client.get()方法3、解析结果,就是对JSON做反序列化
完整代码
在 hotel-demo 的 HotelDocumentTest 测试类中,编写单元测试:
/** * 查询文档 * * @throws IOException */ @Test void testGetDocumentById() throws IOException { // 1.创建Request对象 GetRequest request = new GetRequest("hotel", "61083"); // 2.发送请求,得到响应 GetResponse response = client.get(request, RequestOptions.DEFAULT); // 3.解析响应结果 String json = response.getSourceAsString(); // 4.将json文档转换成HotelDoc对象 HotelDoc hotelDoc = JSON.parseObject(json, HotelDoc.class); System.out.println("hotelDoc = " + hotelDoc); }- 1
- 2
- 3
- 4
- 5
- 6
- 7
- 8
- 9
- 10
- 11
- 12
- 13
- 14
- 15
- 16
- 17

10.3、修改文档
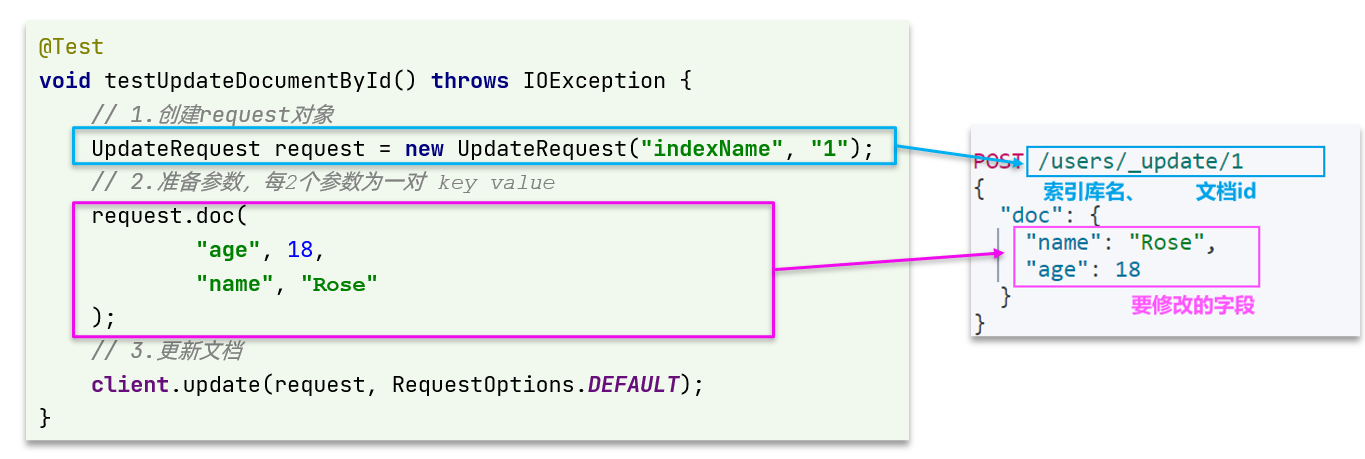
修改文档有两种方式:
1、全量修改:本质是先根据id删除,再新增
2、增量修改:修改文档中的指定字段值
在RestClient的API中,全量修改与新增的API完全一致,判断依据是ID:
- 如果新增时ID已经存在,则修改
- 如果新增时ID不存在,则新增
所以全量修改写法与新增文档一样,下面我们主要介绍增量修改。
代码示例如图:
完整代码
在 hotel-demo 的 HotelDocumentTest 测试类中,编写单元测试:
/** * 修改文档 * * @throws IOException */ @Test void testUpdateDocumentById() throws IOException { // 1.创建Request对象 UpdateRequest request = new UpdateRequest("hotel", "61083"); // 2.准备参数,每2个参数为一对 key value request.doc( "price", "88888", "starName", "四钻" ); // 3.发送请求 client.update(request, RequestOptions.DEFAULT); }- 1
- 2
- 3
- 4
- 5
- 6
- 7
- 8
- 9
- 10
- 11
- 12
- 13
- 14
- 15
- 16
- 17
10.4、删除文档
/** * 删除文档 * * @throws IOException */ @Test void testDeleteDocumentById() throws IOException { // 1.创建Request对象 DeleteRequest request = new DeleteRequest("hotel", "61083"); // 2.发送请求 client.delete(request, RequestOptions.DEFAULT); }- 1
- 2
- 3
- 4
- 5
- 6
- 7
- 8
- 9
- 10
- 11
- 12
10.5、批量导入文档
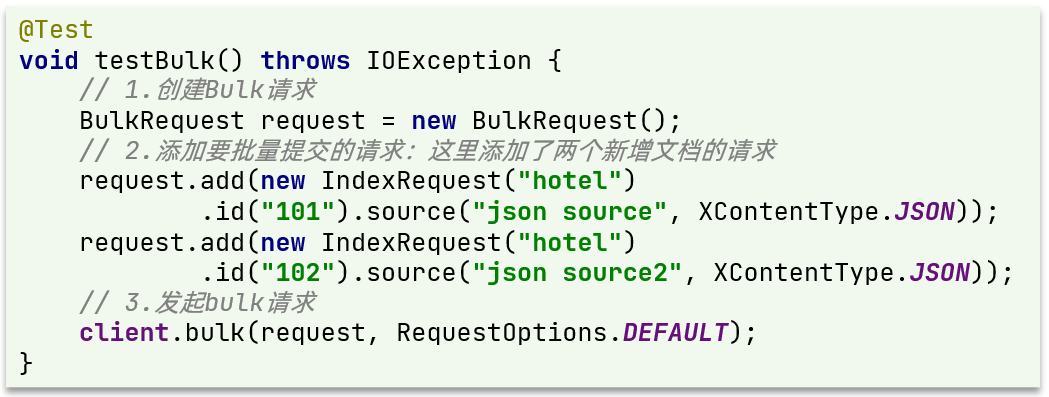
案例需求:利用BulkRequest批量将数据库数据导入到索引库中。
思路:
1、利用 mybatis-plus 查询酒店数据
2、将查询到的酒店数据(Hotel)转换为文档类型数据(HotelDoc)
3、利用JavaRestClient中的BulkRequest批处理,实现批量新增文档
语法说明
批量处理 BulkRequest,其本质就是将多个普通的 CRUD 请求组合在一起发送。
其中提供了一个add方法,用来添加其他请求:
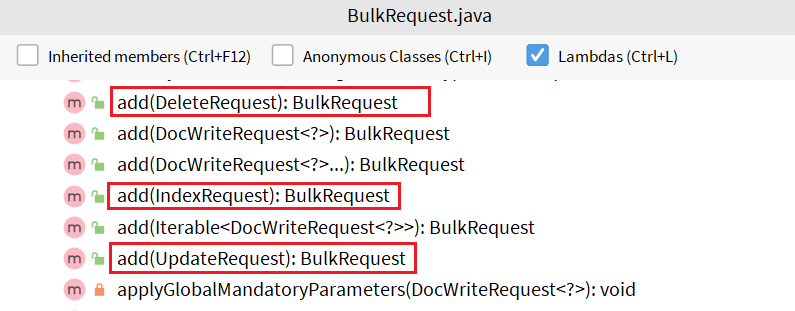
可以看到,能添加的请求包括:
- IndexRequest:批量新增
- UpdateRequest:批量修改
- DeleteRequest:批量删除
因此我们在 BulkRequest 中添加多个 IndexRequest,就是批量新增功能了。示例:
完整代码
在 hotel-demo 的 HotelDocumentTest 测试类中,编写单元测试:
/** * 批量新增文档 * * @throws IOException */ @Test void testBulkRequest() throws IOException { // 查询所有的酒店数据 List<Hotel> list = hotelService.list(); // 1.创建Request对象 BulkRequest request = new BulkRequest(); // 2.准备参数,添加多个新增的Request for (Hotel hotel : list) { // 2.1 转换为文档类型HotelDoc HotelDoc hotelDoc = new HotelDoc(hotel); // 2.2 转json String json = JSON.toJSONString(hotelDoc); // 2.3 添加请求 request.add(new IndexRequest("hotel").id(hotel.getId().toString()).source(json, XContentType.JSON)); } // 3.发送请求 client.bulk(request, RequestOptions.DEFAULT); }- 1
- 2
- 3
- 4
- 5
- 6
- 7
- 8
- 9
- 10
- 11
- 12
- 13
- 14
- 15
- 16
- 17
- 18
- 19
- 20
- 21
- 22
- 23
- 24
- 25

-
相关阅读:
Android源码下载
消息队列|RabbitMQ入门概述
RocketMq源码分析(八)--消息消费流程
open clip论文阅读摘要
Ubuntu Linux玩童年小霸王插卡游戏
JS中计算时数据有误差解决方案
经典面试题-显式等待与隐式等待
HTTP Tunnel与后门攻击
Vue绑定style和class 对象写法
Chrome浏览器删除网站cookies的解决方案
- 原文地址:https://blog.csdn.net/sj15814963053/article/details/127858415
