-
SpringCloud 集成Sentinel
SpringCloud 集成Sentinel简单使用
一、Seninel简介
1. Sentinel 的功能
Seninel是面向分布式服务框架的轻量级限流控制组件,主要以流量为切入点,从限流,流量,整形,服务降级,系统负载保护等多个维度来帮助我们保障微服务的稳点性。
2. Sentinel 的特性
- 应用场景丰富:秒杀(即将突发流量控制在系统容量可以承受的范围)、消息削峰填谷、集群流量控制、实时熔断下游不可用应用等。
- 实时监控:Sentinel 提供实时的监控功能,可以在控制台中看到接入应用的单台机器秒级数据,甚至 500 台以下规模的集群的汇总运行情况。
- 开源生态支持:Sentinel 提供开箱即用的与其它开源框架/库的整合模块,例如与 Spring Cloud、Apache Dubbo、gRPC、Quarkus 的整合。只需要引入相应的依赖并进行简单的配置即可快速地接入 Sentinel。同时 Sentinel 提供 Java/Go/C++ 等多语言的原生实现。
- SPI 扩展支持:Sentinel 提供简单易用、完善的 SPI 扩展接口。可以通过实现扩展接口来快速地定制逻辑。例如定制规则管理、适配动态数据源等。
主要特性:
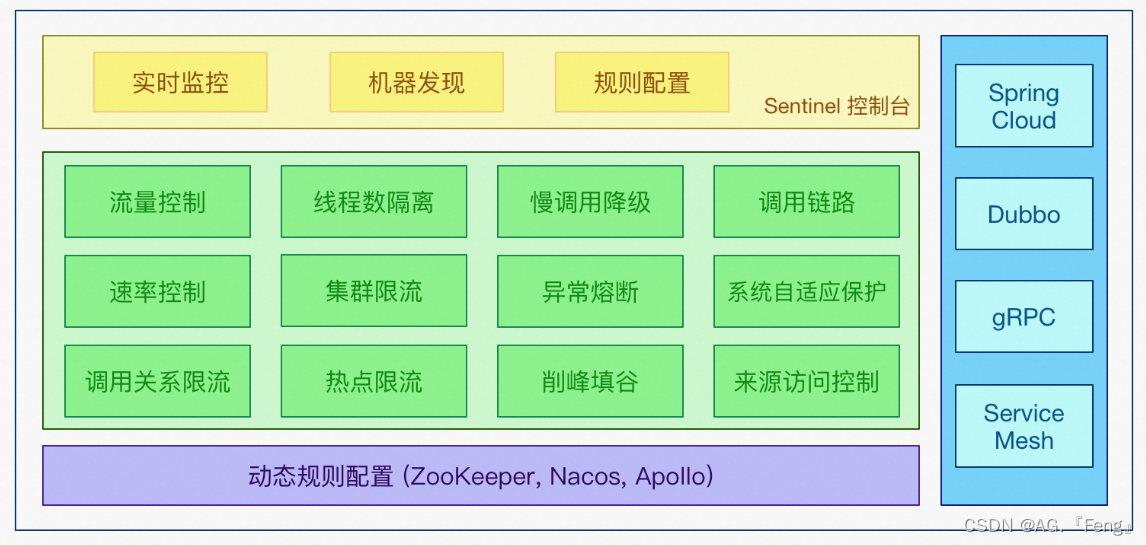
3. Sentinel 的组成
Sentinel 分为
核心库和控制台两个部分。- 核心库(java客户端):不依赖任何框架或库,能够运行于所有的Java运行环境,同时对Dubbo,Spring Cloud等框架也有较好的支持。
- 控制台:基于SpringBoot开发,打包后可以直接运行,不需要额外的Tomcat等应用容器。
4. Sentinel和Hystrix的区别

二、Sentinel可视化界面安装

终端执行以下命令:
java -jar sentinel-dashboard-1.8.6.jar
启动成功后默认端口号为8080:访问:
http://localhost:8080,页面如图所示,从Sentinel 1.6.0开始,Sentinel引入了基本的登录功能,默认用户名和密码都是sentinel。
输入用户名和密码后页面如下:

三、Sentinel接入Spring Cloud
Spring Cloud Aliibaba默认Sentinel整合了Servlet,RestTemplate,FeignClient和Spring WebFlux,它不仅补全了Hystrix在Selevet和RestTemplete这一块的空白,而且还完善兼容了Hystrix在FeignClient中限流降级的用法,并支持灵活配置和调整流控规则。
1. 引入依赖
本次演示使用的springboot和springcloud版本均为:
2.2.1.RELEASE <dependency> <groupId>com.alibaba.cloudgroupId> <artifactId>spring-cloud-starter-alibaba-sentinelartifactId> <version>2.2.1.RELEASEversion> dependency>- 1
- 2
- 3
- 4
- 5
2. yml配置
spring: application: name: student-server cloud: sentinel: transport: # 配置可视化界面地址 dashboard: localhost:8080- 1
- 2
- 3
- 4
- 5
- 6
- 7
- 8
3. 编写测试代码
/** * @author gf * @date 2022/11/13 */ @RestController @RequestMapping(path = "/api/v1/student") public class StudentController { @GetMapping("/list") public MultiResponse<String> getList() { List<String> list = new ArrayList<String>(); list.add("springboot"); list.add("springcloud"); return MultiResponse.buildSuccess(list); } }- 1
- 2
- 3
- 4
- 5
- 6
- 7
- 8
- 9
- 10
- 11
- 12
- 13
- 14
- 15
- 16
- 17
- 18
- 19
- 20
4. 查看结果
用postman对接口进行请求,然后查看可视化界面
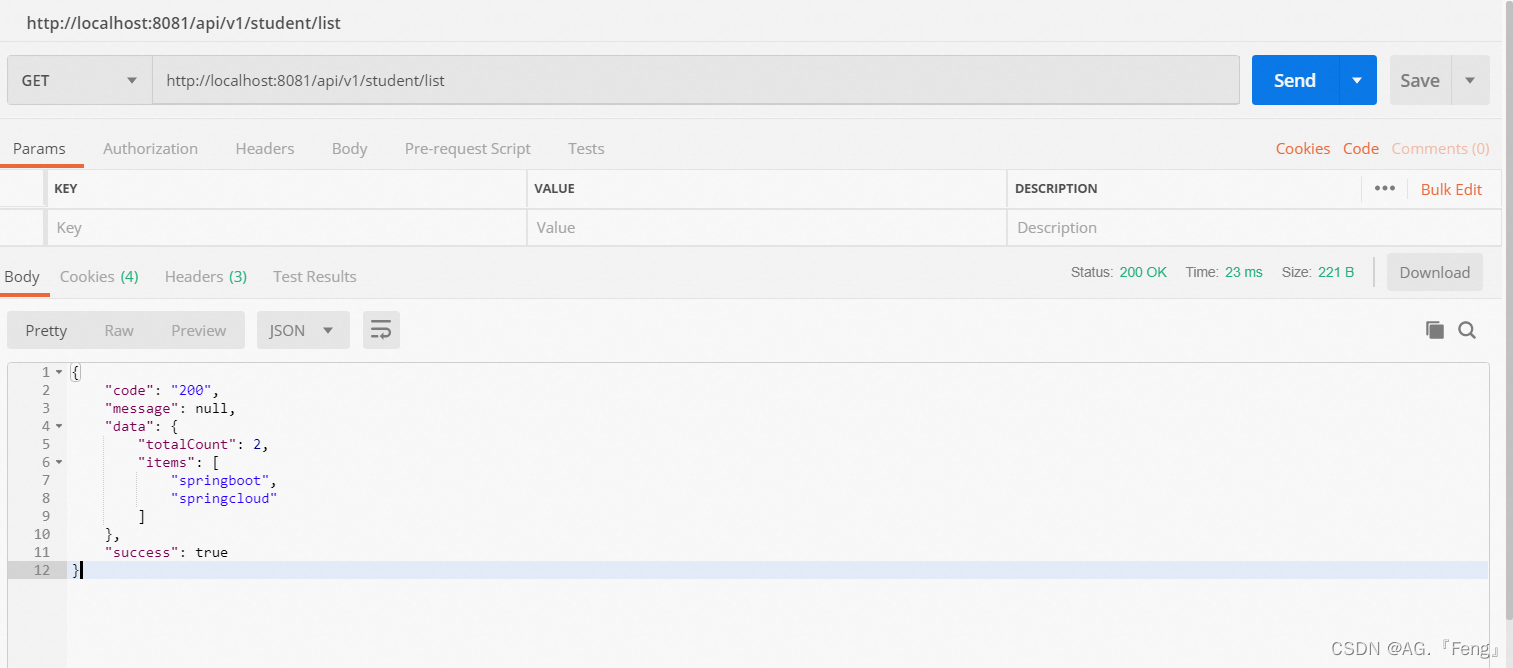

从界面上可以看到,我们能对接口一分钟请求了4次
四、OpenFeign整合Sentinel
1. 引入依赖
<dependencies> <dependency> <groupId>org.springframework.bootgroupId> <artifactId>spring-boot-starter-webartifactId> dependency> <dependency> <groupId>org.springframework.bootgroupId> <artifactId>spring-boot-starter-testartifactId> <scope>testscope> dependency> <dependency> <groupId>org.springframework.cloudgroupId> <artifactId>spring-cloud-starter-openfeignartifactId> <version>2.2.1.RELEASEversion> <dependency> <groupId>com.alibaba.cloudgroupId> <artifactId>spring-cloud-starter-alibaba-sentinelartifactId> <version>2.2.1.RELEASEversion> dependency> dependencies>- 1
- 2
- 3
- 4
- 5
- 6
- 7
- 8
- 9
- 10
- 11
- 12
- 13
- 14
- 15
- 16
- 17
- 18
- 19
- 20
- 21
- 22
2. yml配置
OpenFeign中开启Sentinel
feign: sentinel: enabled: true- 1
- 2
- 3
3. 编写接口
OpenFeign远程调用接口(为了方便测试,这里的url可以随便写一个):
@FeignClient(name = "teacher-server", url = "localhost:8085/api/v1/teacher", fallback=StudentSentinelService.class) @Component public interface StudentService { @GetMapping("/getNotice") public String getNotice(); }- 1
- 2
- 3
- 4
- 5
- 6
- 7
- 8
熔断器接口接口:
@Component public class StudentSentinelService implements StudentService { @Override public String getNotice() { return "sentinel熔断"; } }- 1
- 2
- 3
- 4
- 5
- 6
- 7
测试controller接口:
@Component public class StudentSentinelService implements StudentService { @Override public String getNotice() { return "sentinel熔断"; } }- 1
- 2
- 3
- 4
- 5
- 6
- 7
- 8
4. 启动报错解决方案
SpringCloud Alibaba Sentinel整合SpringCloud OpenFeign,启动报错解决方案
5. 测试熔断效果

熔断接口执行了。 -
相关阅读:
【算法|动态规划No.31 | 01背包问题】01背包模板题
AOP进阶-切入点表达式-@annotation
Java学习的知识笔记
无代码开发平台越来越多,企业该怎么选?这 7 点是关键!
spring的简单使用(配合Druid操作数据库)
vue+echarts项目十二:使用webSocket优化项目:合并图表到一个页面并添加 切换主题和切换全屏功能
基于element-ui的年份范围选择器
新闻稿撰写要点有哪些?记住这几点
把Stream流学透了你也能写出简洁高效的代码,来看看吧(建议收藏)
设计模式-组合模式
- 原文地址:https://blog.csdn.net/qq_44936392/article/details/127806935