-
Spring学习+Spring整合durid+Spring整合Mybatis
目录
5 创建Mybatis配置类并配置SqlSessionFactory
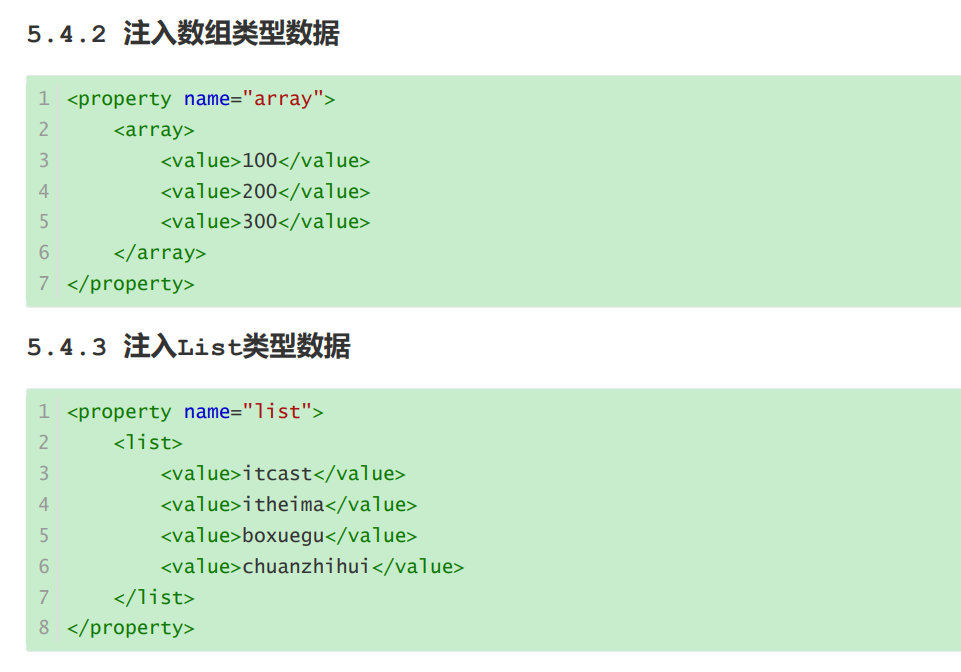
1 集合注入
总结起来就那几点
第一点使用咱的property标签 给他一个name注意这个name和咱在接口实现类中的集合类型数据的name是相对应的。
第2点在里面写入集合标签比如咱常见的array list、map set还有我们的properties List set array在标签内部使用value引入各个值, 而map使用entry里面有两个属性一个T一个value分别对应键和值,最后就是咱最常见的properties类型数据里面用专有标签prop


2 IOC/DI配置管理第三方bean
Spring整合durid
1 maven依赖
- <dependency>
- <groupId>org.springframeworkgroupId>
- <artifactId>spring-contextartifactId>
- <version>5.2.10.RELEASEversion>
- dependency>
- <dependency>
- <groupId>junitgroupId>
- <artifactId>junitartifactId>
- <version>4.12version>
- <scope>testscope>
- dependency>
- <dependency>
- <groupId>com.alibabagroupId>
- <artifactId>druidartifactId>
- <version>1.2.14version>
- dependency>
- <dependency>
- <groupId>mysqlgroupId>
- <artifactId>mysql-connector-javaartifactId>
- <version>8.0.31version>
- dependency>
2 配置第三方配置文件

- jdbc.driver=com.mysql.jdbc.Driver
- jdbc.url=jdbc:mysql://127.0.0.1:3306/task1
- jdbc.username=root
- jdbc.password=xxxz
3 配置SpringXml文件
四个要点
第1个要点引入上下文及xmlns:context,
第2个要点引入xsi
xmlns:context="http://www.springframework.org/schema/context" xsi:schemaLocation=" http://www.springframework.org/schema/beans http://www.springframework.org/schema/beans/spring-beans.xsd http://www.springframework.org/schema/context http://www.springframework.org/schema/context/spring-context.xsd">
第3个要点使用context标签将外部配置文件引入,具体就是location等于resources资源目录下的某个配置文件。
第4个就是填充一些变量喽,新建一个bean里面去将每个变量用property标签表示出来,这里填充变量用的是到刀了符大括号。
- "1.0" encoding="UTF-8"?>
- <beans xmlns="http://www.springframework.org/schema/beans"
- xmlns:xsi="http://www.w3.org/2001/XMLSchema-instance"
- xmlns:context="http://www.springframework.org/schema/context"
- xsi:schemaLocation="
- http://www.springframework.org/schema/beans
- http://www.springframework.org/schema/beans/spring-beans.xsd
- http://www.springframework.org/schema/context
- http://www.springframework.org/schema/context/spring-context.xsd">
- <context:property-placeholder location="db.properties"/>
- <bean id="dataSource" class="com.alibaba.druid.pool.DruidDataSource">
- <property name="driverClassName" value="${jdbc.driver}"/>
- <property name="url" value="${jdbc.url}"/>
- <property name="username" value="${jdbc.username}"/>
- <property name="password" value="${jdbc.password}"/>
- bean>
- beans>
编写测试类
- package org.example.Dao;
- public class BookDaoImpl implements BookDao{
- private String name;
- public void setName(String name) {
- this.name = name;
- }
- public void save() {
- System.out.println("book dao save ..." + name);
- }
- }
- package org.example.Dao;
- public interface BookDao {public void save();
- }
- @Test
- public void alibbTest()
- {
- ApplicationContext ctx = new
- ClassPathXmlApplicationContext("applicationContext.xml");
- //getBean()需要注入项的id
- DataSource dataSource = (DataSource) ctx.getBean("dataSource");
- System.out.println(dataSource);
- }
最佳实践
system-properties-mode:设置为NEVER,表示不加载系统属性
另外配置文件中的项要加上前缀
<context:property-placeholder location="" system-properties-mode="NEVER"/>3 IOC容器
1 容器创建
- //=类路径下的XML配置文件
- ApplicationContext ctx = new
- ClassPathXmlApplicationContext("applicationContext.xml");
- //文件系统下的XML配置文件
- ApplicationContext ctx2=new FileSystemXmlApplicationContext("F:\\JAVA EE Preject\\SpringLearn\\Springday2\\src\\main\\resources\\applicationContext.xml");
2 Bean的三种获取方式
- //getBean()需要注入项的id
- //1 常用方法
- DataSource dataSource = (DataSource) ctx.getBean("dataSource");
- //2 确保就类似我们之前所学习依赖注入中的按类型注入。必须要确保IOC容器中该类型对应的bean对象只有一个
- DataSource dataSource1 = ctx.getBean(DataSource.class);
- //3 推荐,第一个参数还是id,第二个是类型
- DataSource dataSource2 = ctx.getBean("dataSource", DataSource.class);
3 IOC容器创建使用BeanFactory与ApplicationContext的区别


1,2,3总结


4 IOC/DI注解开发
半注解开发
注解开发定义bean
1 使用@Componnet("id名")注释在接口的实现类上


2 配置Spring.xml使其能够扫描到注解


3 编写测试类


关于其他注解

纯注解开发模式
1 删除掉原来的Springxml配置文件

2 创建配置类

3 在来这个类中添加配置注解,同时添加包注释,需要扫描的类也要注解


- package org.example.Config;
- import org.springframework.context.annotation.ComponentScan;
- import org.springframework.context.annotation.Configuration;
- @Configuration
- @ComponentScan("org.example.Dao")
- public class SpringConfig {
- }
4 修改测试类

ApplicationContext ctx = new AnnotationConfigApplicationContext(SpringConfig.class);
5 运行

6 总结

Bean的作用范围体验生命周期


Bean的初始化与销毁
@PostConstruct //在构造方法之后执行,初始化
public void init() {
    System.out.println("init ...");
}
@PreDestroy//预销毁的意思 需要注意的是 destroy 只有在容器关闭的时候,才会执行
public void destroy() {
    System.out.println("destroy ...");
}
@PostConstruct和@PreDestroy注解如果找不到,需要导入下面的jar包== 找不到的原因是,从JDK9以后jdk中的javax.annotation包被移除了,这两个注解刚好就在这个包中
javax.annotation
javax.annotation-api
1.3.2
对应关系

自动装配
在需要的类的属性上加上
@AutoWired即可

但是如果出现接口的实现类有多个的时候,如果不去指定名称就会报错
,如果指定的名称不合法也会报错
例题
图1

情况1

可以正常注入,不会报错
情况2

会报错,因为指定的名称里面没有对应的属性名()就是实现类里面的属性名称里(看 图1)
最佳实践
在Service的实现类上使用@qualifierm来指定具体是那个DaoImpl,注意它离不开@Autowire


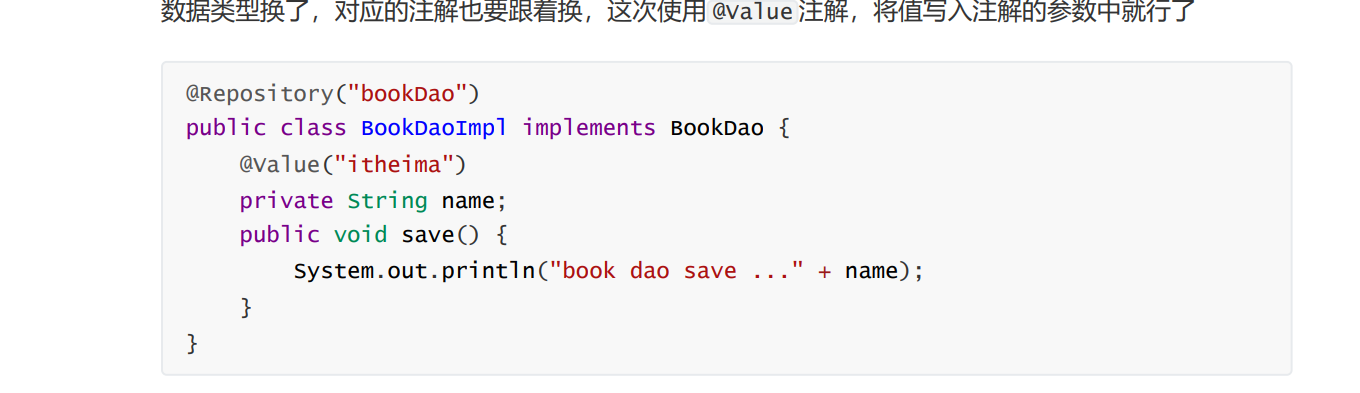
基本类型注入
@Value 一般会被用在从properties配置文件中读取内容进行使用
注解读取properties配置文件
1 准备配置文件

2 在配置类中添加注释

3 使用

IOC/DI注解开发管理第三方bean
Spring整合Mybatis
1 准备SQL,建立数据库
create database spring_db character set utf8; use spring_db; create table tbl_account( id int primary key auto_increment, name varchar(35), money double );
INSERT INTO `tbl_account` VALUES (1, '张三', 1000);
INSERT INTO `tbl_account` VALUES (2, '王五', 1090);2 依赖导入
注意顺序不能颠倒
- <dependency>
- <groupId>org.springframeworkgroupId>
- <artifactId>spring-contextartifactId>
- <version>5.2.10.RELEASEversion>
- dependency>
- <dependency>
- <groupId>com.alibabagroupId>
- <artifactId>druidartifactId>
- <version>1.1.16version>
- dependency>
- <dependency>
- <groupId>mysqlgroupId>
- <artifactId>mysql-connector-javaartifactId>
- <version>5.1.47version>
- dependency>
- <dependency>
- <groupId>org.springframeworkgroupId>
- <artifactId>spring-jdbcartifactId>
- <version>5.2.10.RELEASEversion>
- dependency>
- <dependency>
- <groupId>org.mybatisgroupId>
- <artifactId>mybatis-springartifactId>
- <version>1.3.0version>
- dependency>
- <dependency>
- <groupId>org.mybatisgroupId>
- <artifactId>mybatisartifactId>
- <version>3.5.6version>
- dependency>
3 创建以下大致目录
具体内容如下

1 entity 实体类 Account.java
- public class Account implements Serializable {
- private Integer id;
- private String name;
- private Double money;
- //setter...getter...toString...方法略
- }
2 resources 添加JDBC/mysql配置文件 db.properties
- jdbc.driver=com.mysql.jdbc.Driver
- jdbc.url=jdbc:mysql://127.0.0.1:3306/task1?useSSL=false&useUnicode=true&characterEncoding=UTF-8
- jdbc.username=root
- jdbc.password=x

useSSL:关闭MySQL的SSL连接
3 Springconfig 添加Spring配置类 SpringConfig.java

- package com.mybatis.Springconfig;
- import org.springframework.context.annotation.ComponentScan;
- import org.springframework.context.annotation.Configuration;
- //配置类注解
- @Configuration
- //包扫描,主要扫描的是项目中的AccountServiceImpl类
- @ComponentScan("com.mybatis.service")
- public class SpringConfig {
- }
4 dataSourceCofig 创建数据源的配置类 JdbcConfig.java

- package com.mybatis.dataSourceConfig;
- import com.alibaba.druid.pool.DruidDataSource;
- import org.springframework.beans.factory.annotation.Value;
- import org.springframework.context.annotation.Bean;
- import javax.sql.DataSource;
- public class JdbcConfig {
- @Value("${jdbc.driver}")
- private String driver;
- @Value("${jdbc.url}")
- private String url;
- @Value("${jdbc.username}")
- private String userName;
- @Value("${jdbc.password}")
- private String password;
- @Bean
- public DataSource dataSource(){
- DruidDataSource ds = new DruidDataSource();
- ds.setDriverClassName(driver);
- ds.setUrl(url);
- ds.setUsername(userName);
- ds.setPassword(password);
- return ds;
- }
- }
4 主配置类中读properties并引入数据源配置类

- package com.mybatis.Springconfig;
- import com.mybatis.dataSourceConfig.JdbcConfig;
- import org.springframework.context.annotation.ComponentScan;
- import org.springframework.context.annotation.Configuration;
- import org.springframework.context.annotation.Import;
- import org.springframework.context.annotation.PropertySource;
- //配置类注解
- @Configuration
- //包扫描,主要扫描的是项目中的AccountServiceImpl类
- @ComponentScan("com.mybatis.service")
- //加载配置文件内容
- @PropertySource("classpath:db.properties")
- //注入Jdbc
- @Import(JdbcConfig.class)
- public class SpringConfig {
- }
5 创建Mybatis配置类并配置SqlSessionFactory

- package com.mybatis.mybatisConfig;
- import org.mybatis.spring.SqlSessionFactoryBean;
- import org.mybatis.spring.mapper.MapperScannerConfigurer;
- import org.springframework.context.annotation.Bean;
- import javax.sql.DataSource;
- public class MybatisConfig {
- //定义bean,SqlSessionFactoryBean,用于产生SqlSessionFactory对象
- @Bean
- public SqlSessionFactoryBean sqlSessionFactory(DataSource dataSource){
- SqlSessionFactoryBean ssfb = new SqlSessionFactoryBean();
- //设置模型类的别名扫描
- ssfb.setTypeAliasesPackage("com.mybatis.domain");
- //设置数据源
- ssfb.setDataSource(dataSource);
- return ssfb;
- }
- //定义bean,返回MapperScannerConfigurer对象
- @Bean
- public MapperScannerConfigurer mapperScannerConfigurer(){
- MapperScannerConfigurer msc = new MapperScannerConfigurer();
- msc.setBasePackage("com.mybatis.dao");
- return msc;
- }
- }
6 主配置类中引入Mybatis配置类

- package com.mybatis.Springconfig;
- import com.mybatis.dataSourceConfig.JdbcConfig;
- import com.mybatis.mybatisConfig.MybatisConfig;
- import org.springframework.context.annotation.ComponentScan;
- import org.springframework.context.annotation.Configuration;
- import org.springframework.context.annotation.Import;
- import org.springframework.context.annotation.PropertySource;
- //配置类注解
- @Configuration
- //包扫描,主要扫描的是项目中的AccountServiceImpl类
- @ComponentScan("com.mybatis.service")
- //加载配置文件内容
- @PropertySource("classpath:db.properties")
- //注入Jdbc
- @Import({JdbcConfig.class, MybatisConfig.class})
- public class SpringConfig {
- }
7 编写Dao层与Service和测试文件
dao

- package com.mybatis.dao;
- import com.mybatis.entity.Account;
- import org.apache.ibatis.annotations.Delete;
- import org.apache.ibatis.annotations.Insert;
- import org.apache.ibatis.annotations.Select;
- import org.apache.ibatis.annotations.Update;
- import java.util.List;
- public interface AccountDao {
- @Insert("insert into tbl_account(name,money)values(#{name},#{money})")
- void save(Account account);
- @Delete("delete from tbl_account where id = #{id} ")
- void delete(Integer id);
- @Update("update tbl_account set name = #{name} , money = #{money} where id =#{id} ")
- void update(Account account);
- @Select("select * from tbl_account")
- List
findAll(); - @Select("select * from tbl_account where id = #{id} ")
- Account findById(Integer id);
- }
service

- package com.mybatis.service;
- import com.mybatis.entity.Account;
- import java.util.List;
- public interface AccountService {
- void save(Account account);
- void delete(Integer id);
- void update(Account account);
- List
findAll(); - Account findById(Integer id);
- }
- package com.mybatis.service;
- import com.mybatis.dao.AccountDao;
- import com.mybatis.entity.Account;
- import org.springframework.beans.factory.annotation.Autowired;
- import org.springframework.stereotype.Service;
- import java.util.List;
- @Service
- public class AccountServiceImpl implements AccountService {
- @Autowired
- private AccountDao accountDao;
- public void save(Account account) {
- accountDao.save(account);
- }
- public void update(Account account){
- accountDao.update(account);
- }
- public void delete(Integer id) {
- accountDao.delete(id);
- }
- public Account findById(Integer id) {
- return accountDao.findById(id);
- }
- public List
findAll() { - return accountDao.findAll();
- }
- }
最终结构

测试文件
- import com.mybatis.Springconfig.SpringConfig;
- import com.mybatis.entity.Account;
- import com.mybatis.service.AccountService;
- import org.junit.Test;
- import org.springframework.context.ApplicationContext;
- import org.springframework.context.annotation.AnnotationConfigApplicationContext;
- public class SpringMybatisTest {
- @Test
- public void MybatisTest()
- {
- ApplicationContext ctx = new
- AnnotationConfigApplicationContext(SpringConfig.class);
- AccountService accountService = ctx.getBean(AccountService.class);
- Account ac = accountService.findById(1);
- System.out.println(ac);
- }
- }

源码
链接:https://pan.baidu.com/s/1HTia58FluOrOzazGfz8HFw?pwd=gtt1
提取码:gtt1 -
相关阅读:
JavaSE——学习总结
mysql死锁查看
Pycharm的python Interpreter打不开
K8S集群部署问题及处理记录
Hutool 工具类之日期时间工具-DateUtil mysql日期字段
Python 物联网之用于基于 TinyFlux的物联网和分析应用程序的微型时间序列数据库
6.1810: Operating System Engineering Lab: Xv6 and Unix utilities By:Haostart
《深入浅出OCR》第三章:OCR文字检测
将json数据转换为Python字典
实验九—基本统计分析(二)
- 原文地址:https://blog.csdn.net/qq_53679247/article/details/127808841
