-
02_SpringMVC从0开始框架搭建
SpringMVC从0开始框架搭建
0x01_创建项目
为了以后SpringMVC的学习,决定将所有作为练习的demo作为模块放在一个项目中(IDEA中项目和模块的概念)
首先创建一个空的项目:

创建一个模块:archetype选择
webapp
创建完成之后,项目结构:

需要补充项目结构:

注意:
1.首先创建目录。
2.然后右键
Mark directory as:- main/java:变成
Sources Root - main/resources:变成
Resources Root - test/java:变成
Test Sources Root
3.我碰到过类似的情况:当隔段时间之后打开项目之后,项目很多目录又变成了普通目录,这时候在手动
Mark direcory as之前,可以让IDEA重新识别一下pom.xml文件,识别pom之后,会自动调整项目。(IDEA难得抽风也是正常的)完成模块创建之后,需要注意更改web.xml的内容。在没有更改之前:
DOCTYPE web-app PUBLIC "-//Sun Microsystems, Inc.//DTD Web Application 2.3//EN" "http://java.sun.com/dtd/web-app_2_3.dtd" > <web-app> <display-name>Archetype Created Web Applicationdisplay-name> web-app>- 1
- 2
- 3
- 4
- 5
- 6
- 7
- 8
版本太老了,建议改成版本4:
<web-app xmlns="http://xmlns.jcp.org/xml/ns/javaee" xmlns:xsi="http://www.w3.org/2001/XMLSchema-instance" xsi:schemaLocation="http://xmlns.jcp.org/xml/ns/javaee http://xmlns.jcp.org/xml/ns/javaee/web-app_4_0.xsd" version="4.0"> web-app>- 1
- 2
- 3
- 4
- 5
- 6
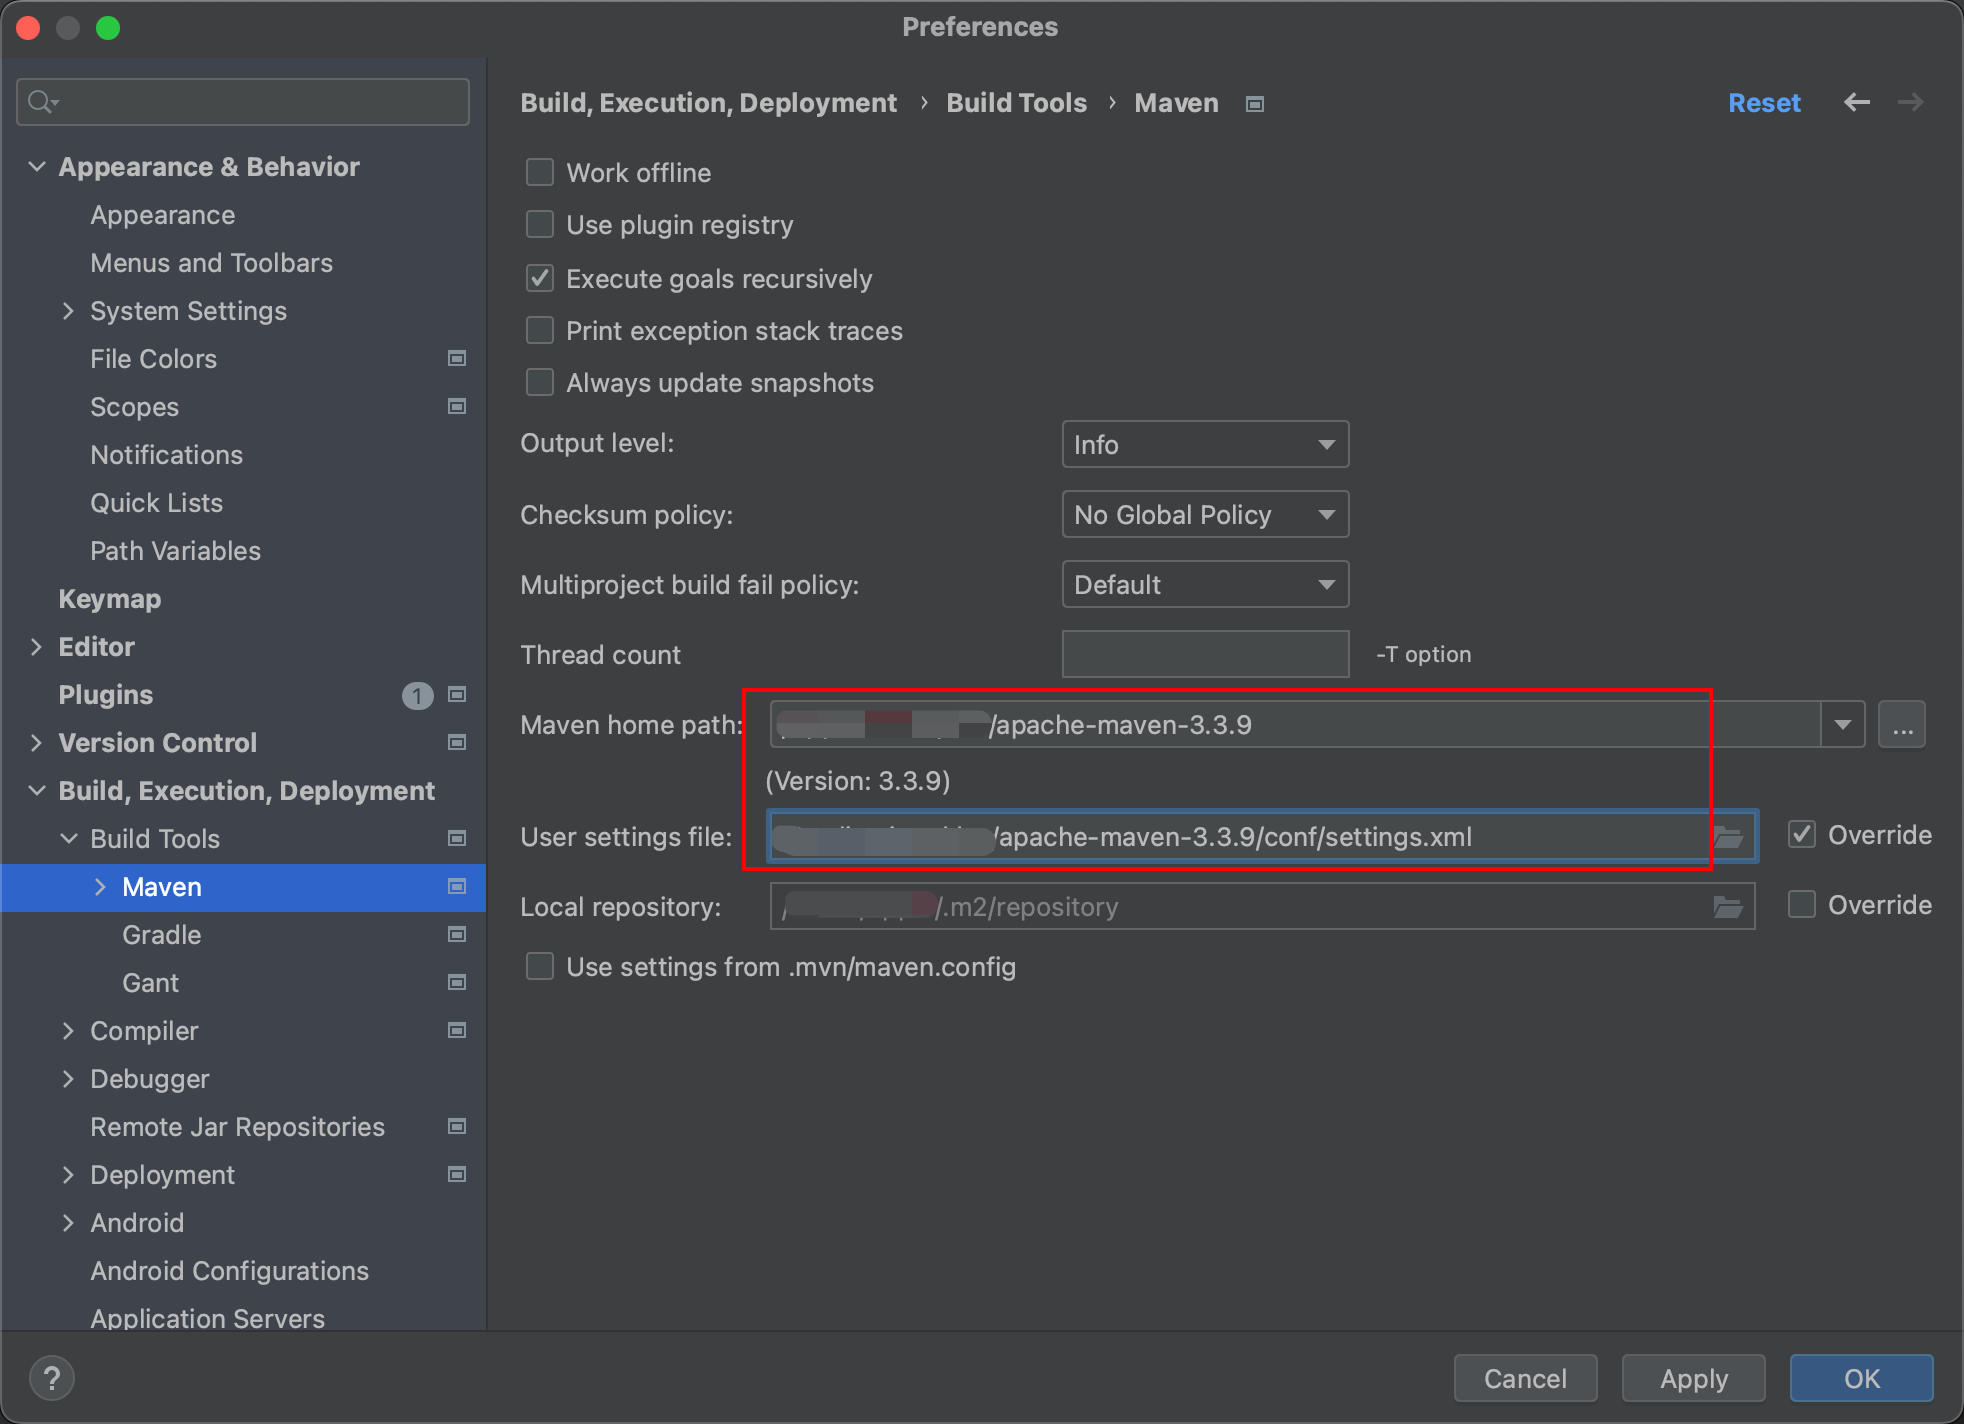
然后检查maven的配置和lombok相关的注解配置:

0x02_写点代码,测试一下tomcat
导入依赖
为了项目搭建之后,项目能够跑,先写点代码测试一下:
准备一个Servlet,完成页面的跳转(这里不需要SpringMVC的知识,学过Servlet就能理解)
在
pom.xml导入servlet-api和jsp-api的依赖(这两个依赖在tomcat中有,但是为了编程方便,需要导入依赖,但是导入的依赖不会编译进项目)注意,删除掉
pom.xml文件中version标签后的依赖或者配置,方便我们自己导入。<dependency> <groupId>javax.servletgroupId> <artifactId>javax.servlet-apiartifactId> <version>4.0.1version> <scope>providedscope> dependency> <dependency> <groupId>javax.servlet.jspgroupId> <artifactId>jsp-apiartifactId> <version>2.2version> <scope>providedscope> dependency>- 1
- 2
- 3
- 4
- 5
- 6
- 7
- 8
- 9
- 10
- 11
- 12
上面两个依赖都是
provided 导入成功:

配置Tomcat
Edit Configuration—》


apply—>OK代码

MyServletpackage com.bones.controller; import javax.servlet.ServletException; import javax.servlet.annotation.WebServlet; import javax.servlet.http.HttpServlet; import javax.servlet.http.HttpServletRequest; import javax.servlet.http.HttpServletResponse; import java.io.IOException; @WebServlet("/myServlet.do") public class MyServlet extends HttpServlet { @Override protected void service(HttpServletRequest req, HttpServletResponse resp) throws ServletException, IOException { req.getRequestDispatcher("aaa.jsp").forward(req,resp); } }- 1
- 2
- 3
- 4
- 5
- 6
- 7
- 8
- 9
- 10
- 11
- 12
- 13
- 14
- 15
- 16
- 17
aaa.jsp<%@ page contentType="text/html;charset=UTF-8" language="java" %>Title this is page aaa- 1
- 2
- 3
- 4
- 5
- 6
- 7
- 8
- 9
- 10
- 11
然后运行(绿色小三角),会自动弹出浏览器,然后访问
http://localhost:8080/SpringMVC_pro01_buildAProject_war_exploded/myServlet.do会自动请求转发至aaa.jsp
确保以上环境没有问题才可以。
0x03_SpringMVC框架搭建
导入依赖
pom.xml中的依赖如下里面可选的依赖,可以不用导入,一般都是有相互依赖关系,所以有些可以不用导入。
<dependencies> <dependency> <groupId>org.springframeworkgroupId> <artifactId>spring-contextartifactId> <version>5.3.23version> dependency> <dependency> <groupId>org.springframeworkgroupId> <artifactId>spring-aspectsartifactId> <version>5.3.23version> dependency> <dependency> <groupId>aopalliancegroupId> <artifactId>aopallianceartifactId> <version>1.0version> dependency> <dependency> <groupId>com.alibabagroupId> <artifactId>druidartifactId> <version>1.1.10version> dependency> <dependency> <groupId>mysqlgroupId> <artifactId>mysql-connector-javaartifactId> <version>8.0.30version> dependency> <dependency> <groupId>org.springframeworkgroupId> <artifactId>spring-jdbcartifactId> <version>5.3.23version> dependency> <dependency> <groupId>org.springframeworkgroupId> <artifactId>spring-txartifactId> <version>5.3.23version> dependency> <dependency> <groupId>org.springframeworkgroupId> <artifactId>spring-ormartifactId> <version>5.3.23version> dependency> <dependency> <groupId>commons-logginggroupId> <artifactId>commons-loggingartifactId> <version>1.2version> dependency> <dependency> <groupId>org.apache.logging.log4jgroupId> <artifactId>log4j-slf4j-implartifactId> <version>2.19.0version> <scope>testscope> dependency> <dependency> <groupId>org.projectlombokgroupId> <artifactId>lombokartifactId> <version>1.18.24version> <scope>providedscope> dependency> <dependency> <groupId>org.junit.jupitergroupId> <artifactId>junit-jupiter-apiartifactId> <version>5.9.1version> <scope>testscope> dependency> <dependency> <groupId>org.springframeworkgroupId> <artifactId>spring-testartifactId> <version>5.3.23version> <scope>testscope> dependency> <dependency> <groupId>org.springframeworkgroupId> <artifactId>spring-webmvcartifactId> <version>5.3.23version> dependency> <dependency> <groupId>org.springframeworkgroupId> <artifactId>spring-webartifactId> <version>5.3.23version> dependency> <dependency> <groupId>javax.servletgroupId> <artifactId>javax.servlet-apiartifactId> <version>4.0.1version> <scope>providedscope> dependency> <dependency> <groupId>javax.servlet.jspgroupId> <artifactId>jsp-apiartifactId> <version>2.2version> <scope>providedscope> dependency> dependencies>- 1
- 2
- 3
- 4
- 5
- 6
- 7
- 8
- 9
- 10
- 11
- 12
- 13
- 14
- 15
- 16
- 17
- 18
- 19
- 20
- 21
- 22
- 23
- 24
- 25
- 26
- 27
- 28
- 29
- 30
- 31
- 32
- 33
- 34
- 35
- 36
- 37
- 38
- 39
- 40
- 41
- 42
- 43
- 44
- 45
- 46
- 47
- 48
- 49
- 50
- 51
- 52
- 53
- 54
- 55
- 56
- 57
- 58
- 59
- 60
- 61
- 62
- 63
- 64
- 65
- 66
- 67
- 68
- 69
- 70
- 71
- 72
- 73
- 74
- 75
- 76
- 77
- 78
- 79
- 80
- 81
- 82
- 83
- 84
- 85
- 86
- 87
- 88
- 89
- 90
- 91
- 92
- 93
- 94
- 95
- 96
- 97
- 98
- 99
- 100
- 101
- 102
- 103
- 104
- 105
- 106
- 107
- 108
配置文件
在web.xml中配置前端控制器DispatcherServlet
<web-app xmlns="http://xmlns.jcp.org/xml/ns/javaee" xmlns:xsi="http://www.w3.org/2001/XMLSchema-instance" xsi:schemaLocation="http://xmlns.jcp.org/xml/ns/javaee http://xmlns.jcp.org/xml/ns/javaee/web-app_4_0.xsd" version="4.0"> <servlet> <servlet-name>dispatcherServletservlet-name> <servlet-class>org.springframework.web.servlet.DispatcherServletservlet-class> <init-param> <param-name>contextConfigLocationparam-name> <param-value>classpath:springmvc.xmlparam-value> init-param> <load-on-startup>1load-on-startup> servlet> <servlet-mapping> <servlet-name>dispatcherServletservlet-name> <url-pattern>/url-pattern> servlet-mapping> web-app>- 1
- 2
- 3
- 4
- 5
- 6
- 7
- 8
- 9
- 10
- 11
- 12
- 13
- 14
- 15
- 16
- 17
- 18
- 19
- 20
- 21
- 22
- 23
注意:
1.配置前端处理器(DispatcherServlet),前端控制器收到请求后自己不进行处理,而是委托给其他的解析器进行处理,作为统一访问点,进行全局的流程控制
2.前端控制器配置的
url-pattern是/,是除了JSP之外其他所有的资源;如果想要配置所有的资源,可以用/*3.DispatcherServlet可以设置参数
init-param,参数的名字是contextConfigLocation,用于定义了要装入的Spring 配置文件。这里不配置
init-param也可以,请看0x04_框架搭建的配置细节问题4.关于视图解析器的配置,见
0x04_框架搭建的配置细节问题springmvc.xml
在resources目录下创建Spring MVC的核心配置文件
springmvc.xml(文件名不强制要求)<beans xmlns="http://www.springframework.org/schema/beans" xmlns:xsi="http://www.w3.org/2001/XMLSchema-instance" xmlns:p="http://www.springframework.org/schema/p" xmlns:c="http://www.springframework.org/schema/c" xmlns:util="http://www.springframework.org/schema/util" xmlns:context="http://www.springframework.org/schema/context" xmlns:aop="http://www.springframework.org/schema/aop" xmlns:tx="http://www.springframework.org/schema/tx" xsi:schemaLocation="http://www.springframework.org/schema/beans http://www.springframework.org/schema/beans/spring-beans.xsd http://www.springframework.org/schema/util http://www.springframework.org/schema/util/spring-util.xsd http://www.springframework.org/schema/context http://www.springframework.org/schema/context/spring-context.xsd http://www.springframework.org/schema/aop http://www.springframework.org/schema/aop/spring-aop.xsd http://www.springframework.org/schema/tx http://www.springframework.org/schema/tx/spring-tx.xsd "> <context:component-scan base-package="com.bones"/> beans>- 1
- 2
- 3
- 4
- 5
- 6
- 7
- 8
- 9
- 10
- 11
- 12
- 13
- 14
- 15
- 16
- 17
- 18
- 19
- 20
- 21
- 22
- 23
- 24
删除controller层的MyServet,准备SpringMVC框架下的开发。
controller层的代码
在controller层创建MyController类。
MyControllerpackage com.bones.controller; import org.springframework.stereotype.Controller; import org.springframework.web.bind.annotation.RequestMapping; @Controller public class MyController { @RequestMapping("/aaaController.do") public String aaaControl(){ System.out.println("aaaControl invoked"); return "aaa.jsp"; } }- 1
- 2
- 3
- 4
- 5
- 6
- 7
- 8
- 9
- 10
- 11
- 12
- 13
- 14
访问
http://localhost:8080/SpringMVC_pro01_buildAProject_war_exploded/aaaController.do成功跳转到aaa.jsp
注意:
1.controller层的类加上注解
@Controller,包扫描时会当作controller2.映射路径是定义在方法上的,这个和Servlet不同:
@RequestMapping("/aaaController.do")由此,相比于Servlet,SpringMVC中只要写一个方法就可以对应一个映射路径,这样可以大大减少类的数量。
3.加上注解
@RequestMapping的方法,返回值这里写的是String,就是页面跳转的路径。0x04_框架搭建的配置细节问题
DispatcherServlet的参数
在前面的
web.xml中,配置前端控制器DispatcherServlet中的参数:<init-param> <param-name>contextConfigLocationparam-name> <param-value>classpath:springmvc.xmlparam-value> init-param>- 1
- 2
- 3
- 4
其实不配置也可以,因为
DispatcherServlet的contextConfigLocation参数有默认值:可以自定义servlet.xml配置文件的位置和名称,默认为WEB-INF目录下,名称为[]-servlet.xml,如spring-servlet.xml - 1
比如:在WEB-INF目录下有和springmvc.xml文件内容一样的配置文件
spring-servlet.xml<beans xmlns="http://www.springframework.org/schema/beans" xmlns:xsi="http://www.w3.org/2001/XMLSchema-instance" xmlns:p="http://www.springframework.org/schema/p" xmlns:c="http://www.springframework.org/schema/c" xmlns:util="http://www.springframework.org/schema/util" xmlns:context="http://www.springframework.org/schema/context" xmlns:aop="http://www.springframework.org/schema/aop" xmlns:tx="http://www.springframework.org/schema/tx" xsi:schemaLocation="http://www.springframework.org/schema/beans http://www.springframework.org/schema/beans/spring-beans.xsd http://www.springframework.org/schema/util http://www.springframework.org/schema/util/spring-util.xsd http://www.springframework.org/schema/context http://www.springframework.org/schema/context/spring-context.xsd http://www.springframework.org/schema/aop http://www.springframework.org/schema/aop/spring-aop.xsd http://www.springframework.org/schema/tx http://www.springframework.org/schema/tx/spring-tx.xsd "> <context:component-scan base-package="com.bones"/> beans>- 1
- 2
- 3
- 4
- 5
- 6
- 7
- 8
- 9
- 10
- 11
- 12
- 13
- 14
- 15
- 16
- 17
- 18
- 19
- 20
- 21
- 22
- 23
- 24
- 25
- 26
此时应该把
web.xml这么修改:<web-app xmlns="http://xmlns.jcp.org/xml/ns/javaee" xmlns:xsi="http://www.w3.org/2001/XMLSchema-instance" xsi:schemaLocation="http://xmlns.jcp.org/xml/ns/javaee http://xmlns.jcp.org/xml/ns/javaee/web-app_4_0.xsd" version="4.0"> <servlet> <servlet-name>springservlet-name> <servlet-class>org.springframework.web.servlet.DispatcherServletservlet-class> <load-on-startup>1load-on-startup> servlet> <servlet-mapping> <servlet-name>springservlet-name> <url-pattern>/url-pattern> servlet-mapping> web-app>- 1
- 2
- 3
- 4
- 5
- 6
- 7
- 8
- 9
- 10
- 11
- 12
- 13
- 14
- 15
- 16
- 17
- 18
- 19
- 20
- 21
- 22
- 23
- 24
项目一样生效
以上情况用的极少,不建议这么使用,一般会将配置放在resources目录下。
RequestMapping注解
前面的实验中,
@RequestMapping注解加在方法前,可以明确的减少类的数量。@RequestMapping也可以加在类前面,此时相当于一个命名空间,即访问该 Controller 下的任意方法都需要带上这个命名空间。比如:
package com.bones.controller; import org.springframework.stereotype.Controller; import org.springframework.web.bind.annotation.RequestMapping; @Controller @RequestMapping("/bones") public class MyController { @RequestMapping("/aaaController.do") public String aaaControl(){ System.out.println("aaaControl invoked"); return "aaa.jsp"; } }- 1
- 2
- 3
- 4
- 5
- 6
- 7
- 8
- 9
- 10
- 11
- 12
- 13
- 14
- 15
此时访问
http://localhost:8080/SpringMVC_pro01_buildAProject_war_exploded/aaaController.do- 1

显然上面的路径忽略了加在类上的命名空间,
按照命名空间的用法,如果访问
http://localhost:8080/SpringMVC_pro01_buildAProject_war_exploded/bones/aaaController.do- 1
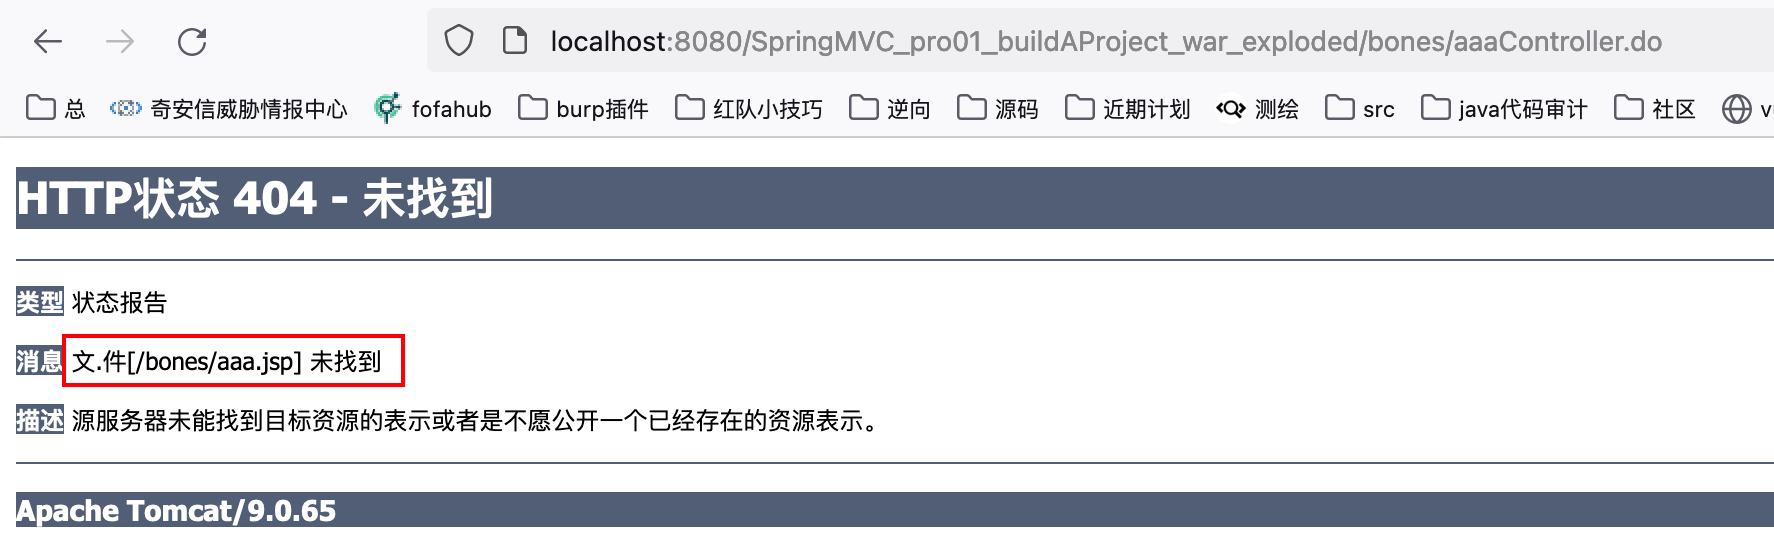
此时显示要访问(请求转发)的文件为找到,因为上面返回的是“aaa.jsp”,而不是“/aaa.jsp”。
将代码改为:
package com.bones.controller; import org.springframework.stereotype.Controller; import org.springframework.web.bind.annotation.RequestMapping; @Controller @RequestMapping("/bones") public class MyController { @RequestMapping("/aaaController.do") public String aaaControl(){ System.out.println("aaaControl invoked"); return "/aaa.jsp"; } }- 1
- 2
- 3
- 4
- 5
- 6
- 7
- 8
- 9
- 10
- 11
- 12
- 13
- 14
- 15
热部署项目之后,访问:
http://localhost:8080/SpringMVC_pro01_buildAProject_war_exploded/bones/aaaController.do- 1
可以正常访问(请求转发):

配置视图解析器
根据上面的
MyController类,就可以在springmvc.xml中配置前缀和后缀:<bean class="org.springframework.web.servlet.view.InternalResourceViewResolver"> <property name="prefix" value="/WEB-INF/view/"/> <property name="suffix" value=".jsp"/> bean>- 1
- 2
- 3
- 4

此时
MyController类中方法的return可以更加简单:package com.bones.controller; import org.springframework.stereotype.Controller; import org.springframework.web.bind.annotation.RequestMapping; @Controller @RequestMapping("/bones") public class MyController { @RequestMapping("/aaaController.do") public String aaaControl(){ System.out.println("aaaControl invoked"); return "aaa"; } }- 1
- 2
- 3
- 4
- 5
- 6
- 7
- 8
- 9
- 10
- 11
- 12
- 13
- 14
- 15
0x05_总结
- web.xml中要配置前端控制器:
<servlet> <servlet-name>dispatcherServletservlet-name> <servlet-class>org.springframework.web.servlet.DispatcherServletservlet-class> <init-param> <param-name>contextConfigLocationparam-name> <param-value>classpath:springmvc.xmlparam-value> init-param> <load-on-startup>1load-on-startup> servlet> <servlet-mapping> <servlet-name>dispatcherServletservlet-name> <url-pattern>/url-pattern> servlet-mapping>- 1
- 2
- 3
- 4
- 5
- 6
- 7
- 8
- 9
- 10
- 11
- 12
- 13
- 14
- 15
- 16
- 17
- springmvc.xml是SpringMVC框架的核心配置文件,里面需要配置包扫描和视图解析器:
<context:component-scan base-package="com.bones"/> <bean class="org.springframework.web.servlet.view.InternalResourceViewResolver"> <property name="prefix" value="/WEB-INF/view/"/> <property name="suffix" value=".jsp"/> bean>- 1
- 2
- 3
- 4
- 5
- 6
- 7
- controller层:
1.加上注解
@Controller被
@Controller标记的类实际上就是个SpringMVC Controller对象,它是一个控制器类,而@Contoller注解在org.springframework.stereotype包下。2.
@RequestMapping标记的方法会被分发处理器扫描识别,将不同的请求分发到对应的接口上。@RequestMapping注解可以加在方法上,也可以加在类上:@RequestMapping有两种标注方式,一种是标注在类级别上,一种是标注在方法级别上。标注在方法上时,value 表示访问该方法的 URL 地址。标注在类上时,value 相当于一个命名空间,即访问该 Controller 下的任意方法都需要带上这个命名空间。 - main/java:变成
-
相关阅读:
Spring boot定时任务
论文浅尝 | 基于预训练语言模型的简单问题知识图谱问答
1-十六烷基-3-三乙氧基丙基硅烷咪唑溴盐离子液体([HDTIm]Br)修饰磁性纳米颗粒(MNPs)|[HDTIm]Br-MNPs
正则表达式备忘录(全网最详细正则)
JavaCV的摄像头实战之十三:年龄检测
车联网通信中间件 -- SOME/IP协议
冯唐 成事心法
apt update和apt upgrade命令 - 有什么区别?
侯捷——2.C++标准库 体系结构与内核分析
思科C9300交换机Bundle模式转换为Install模式
- 原文地址:https://blog.csdn.net/qq_51550750/article/details/127818537
