-
Windows编译Chrome浏览器【多图警告^-^】
最近一直在研究Chrome自定义开发相关知识。现在写笔记记录一下。
准备工作
硬件配置:
Win10 + 至少16G RAM + >200G SSD(NTFS)
软件配置:
1.科学上网冲浪工具(你懂得 ^ _ ^)
2.Visual Studio 2019(或更高版本)
3.Git客户端
4.其他要求文中详细介绍这里整了个服务器,配置高点儿,省点时间。一开始使用的个人pc,晚饭后开始编译第二天起床发现还没完成。毕竟是宇宙第一开源项目,据说源代码千万级别的,刚好配得上宇宙第一IDE(手动狗头)。

//手动分割线///一、编译环境搭建
1.0 选择浏览器目标版本
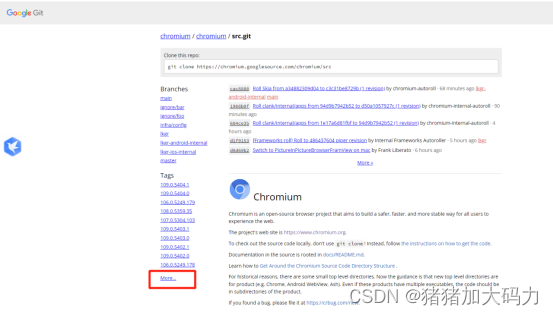
随便选个版本,点进去:
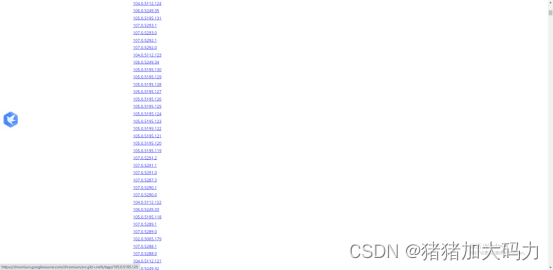
拉倒底部:

不能使用Git Clone代码,点进去看看源码获取途径的详细介绍:
这里编的win平台,点进去:
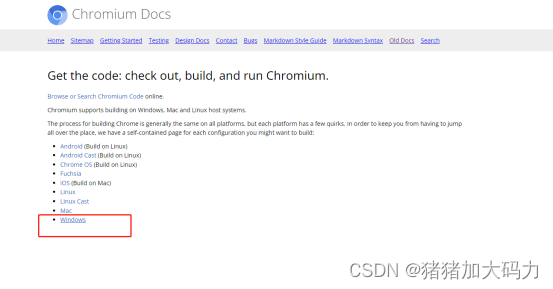
这里看到,硬件配置要求,文章开头也有讲到:
1.64位Intel机器,RAM至少8GB,强烈建议超过 16GB,越大越好。
2.NTFS格式硬盘至少100G可用空间。
3.Windows 10或更新版本。继续看下文的windows配置:

划重点:
最低需要Visual Studio 2017 (>=15.7.2) 才能构建,最好使用Visual Studio 2019 (>=16.0.0)。
我使用的是VS2019。
划重点:
必须安装 Windows 10 SDK 10.0.20348.0
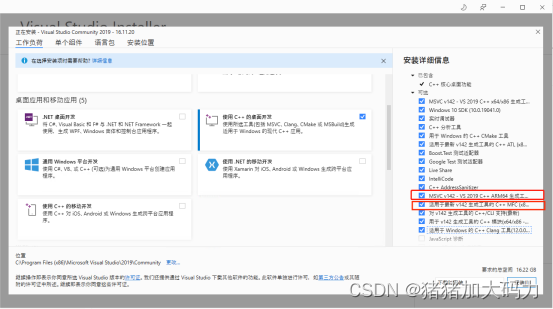
1.1 安装IDE VS2019
贴上VS的IDE下载链接:
Visual Studio官网地址
圈红的两个组件一定选上:
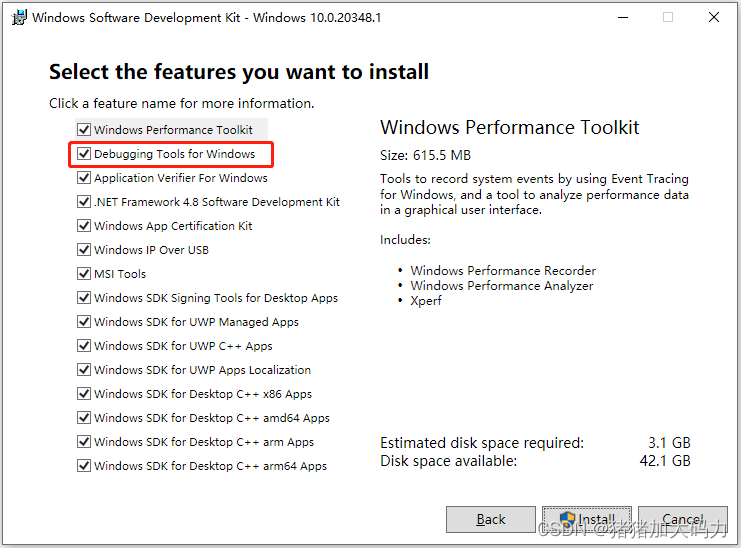
下载安装Win10SDK:
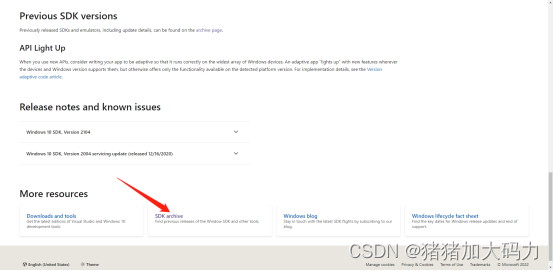
WindowsSDK打开页面拉到底部,找到老版本:

划重点:
必须保证Debugging Tools For Windows的安装
1.2 下载编译工具depot_tools

划重点:
不要使用鼠标拖拽或复制粘贴,否则其中 .git 目录可能不会正常复制过来,使用压缩工具直接解压到目标目录,就不要再移动depot_tools了。
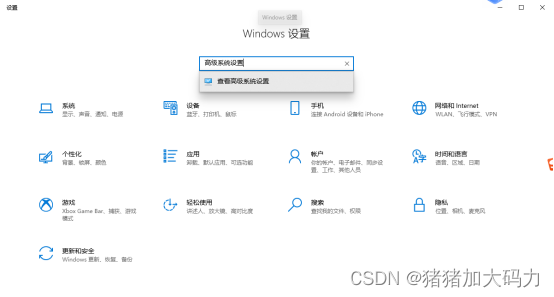
1.3 配置环境变量

Win+i,高级系统设置:

①把depot_tools工具的路径添加到环境变量path中,上移到第一条:

②设置 DEPOT_TOOLS_WIN_TOOLCHAIN=0:


③设置vs2019_install=C:\Program Files\Microsoft Visual Studio\2019\Community我安装的是Visual Studio2019,就用vs2019_install,后面对应的安装路径:
【注意,找准路径】


④设置环境变量 WINDOWSSDKDIR:

1.4 下载安装Git客户端

到这里算是编译环境准备工作完成,重启或者注销让环境变量生效,继续搞起二、构建编译
2.0 配置代理
找到梯子的代理ip

设置CMDHTTP/HTTPS代理2.1 设置CMDHTTP/HTTPS代理:
打开管理员权限的CMD,敲指令
netsh netsh>winhttp netsh winhttp>set proxy 127.0.0.1:10809 netsh winhttp>bye set http_proxy=http://127.0.0.1:10809 set https_proxy=http://127.0.0.1:10809- 1
- 2
- 3
- 4
- 5
- 6
- 7
2.2 设置git http/https代理
git config –-global http.proxy %http_proxy% git config –-global https.proxy %https_proxy%- 1
- 2
2.3 设置NO_AUTH_BOTO_CONFIG
创建文本文件C:\boto.cfg:
[Boto]
proxy=127.0.0.1
proxy_port=10809set NO_AUTH_BOTO_CONFIG=C:\boto.cfg- 1


2.4 更新depot_tools
gclient- 1

2.5 配置Git
git config --global user.name "aaaaaa" git config --global user.email "bbbbbb" git config --global core.autocrlf false git config --global core.filemode false git config --global branch.autosetuprebase always- 1
- 2
- 3
- 4
- 5
2.6 拉代码
git clone --depth 100 -b 105.0.5195.125 https://chromium.googlesource.com/chromium/src.git src- 1

2.7 配生成.gclient文件
gclient config --unmanaged https://chromium.googlesource.com/chromium/src.git- 1

2.8 同步第三方依赖
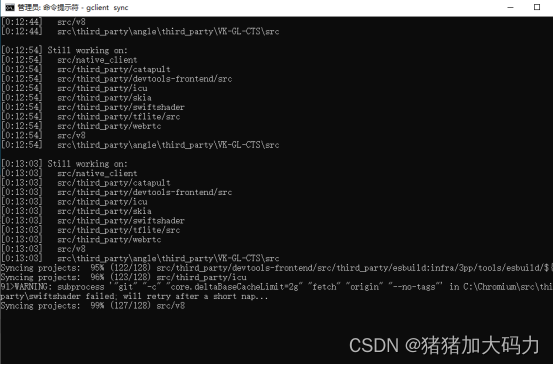
gclient sync- 1
需要下载几个 G 的依赖包,网络不快,会耗费几个小时也是正常。


2.9 构建Chromium(debug)
切换目录:
cd src- 1
生成解决方案:
gn gen out\Default- 1

编译:autoninja -C out\Default chrome- 1

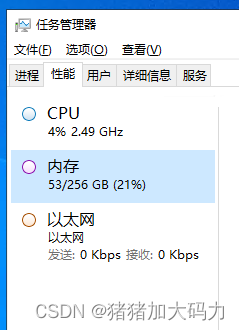
可以看的出来,确实比较耗资源:
2.10 编译成功


小结:
1>机器配置低,首次编译特别慢,晚上睡前挂上,睡醒再看吧。
2>修改代码后再编译就会快很多。
3>编译中断了,重新执行编译指令:autoninja -C out\Default chrome- 1
2.11 构建Chromium(release)
生成解决方案:
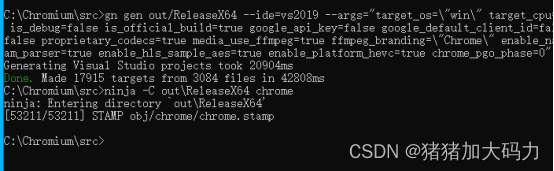
gn gen out/ReleaseX64 --ide=vs2019 --args="target_os=\"win\" target_cpu=\"x64\" is_component_build=false is_debug=false is_official_build=true google_api_key=false google_default_client_id=false google_default_client_secret=false proprietary_codecs=true media_use_ffmpeg=true ffmpeg_branding=\"Chrome\" enable_nacl=false enable_mse_mpeg2ts_stream_parser=true enable_hls_sample_aes=true enable_platform_hevc=true chrome_pgo_phase=0"- 1

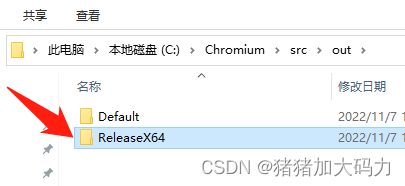
查看生成目录:
编译吧:ninja -C out\ReleaseX64 chrome- 1

查看目录:

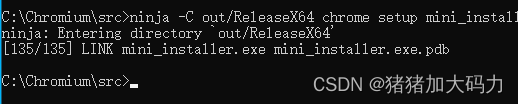
现在已经编译好release,最后打个安装包:ninja -C out/ReleaseX64 chrome setup mini_installer- 1


拖出来,直接双击安装,看看成果:


OK,收工。(长出一口气) -
相关阅读:
无胁科技-TVD每日漏洞情报-2022-7-29
项目经理必看!用一句话说明你当过项目经理
隐私计算 FATE - 多分类神经网络算法测试
电动两轮车驶入“年轻化”新赛道,新老品牌谁能率先突围?
sql性能优化以及性能测试
Webmin -- Bootup and Shutdown模块
学1000G课程后总结:如何从零做一个抖音账号并顺利变现?大纲篇
Minianaconda安装jupyter notebook遇到的问题及解决
Threejs中使用Tweenjs实现动画效果和Tweenjs使用说明文档
C++ STL之容器(使用方法)
- 原文地址:https://blog.csdn.net/Struggling_Jeff/article/details/127808741