-
【并发编程】并发工具类
1.并发工具CountDownLatch类
1.1.CountDownLatch简介
- CountDownLatch是一个同步辅助类,在完成一组正在其他线程中执行的的操作之前,他允许一个或者多个线程一直等待。
- CountDownLatch函数列表
#构造一个给定计数初始化的CountDownLatch CountDownLatch(int count) #使用当前线程在锁存器倒计数至零之前一直等待,除非线程被中断 void await() #使当前线程在锁存器倒计时至零之前一直等待,除非线程中断或者超出了指定的等待时间。 boolean await(long timeout,TimeUnit unit) #递减锁存器的计数,如果计数达到零,则释放所有等待的线程 void countDown() #返回当前计数 long getCount() #返回标识此锁存器及器状态的字符串 String toString()- 1
- 2
- 3
- 4
- 5
- 6
- 7
- 8
- 9
- 10
- 11
- 12
- 13
- 14
- 15
- 16
- 17
1.2.CountDownLatch数据结构
- CountDownLatch的UML类图:

- Count的数据结构很简单,它通过共享锁实现的 。它包含了sync对象,sync是Sync类型的实例,他继承于AQS。
3.CountDownLatch源码分析
- CountDownLatch的源码是基于JDK1.7以上的
(1)CountDownLatch(int count)
public CountDownLatch(int count){ if(count<0) throw new IllegalArgumentException("count < 0"); this.sync = nw Sync(count); }- 1
- 2
- 3
- 4
- **说明:**该函数是创建一个Sync对象,而Sync是继承于AQS类。Sync构造函数如下:
Sync(int count){ setState(count); }- 1
- 2
- 3
- setState()在AQS中实现,源码如下:
protected final void setState(long newState){ state=newState; }- 1
- 2
- 3
- **说明:**在AQS中,state是一个private volatitle long 类型的对象。对于CountDownLatch而言,state标识的“锁计数器”。CountDownLatch中getCount()最终调用的是AQS中的getState(),返回的state对象,及锁计数器。
(2)await
public void await() throw InterruptedException{ sync.acquireSharedInterruptibly(1); }- 1
- 2
- 3
- **说明:**该函数实际上是调用AQS的acquireSharedInterruptibly(1);
- AQS中的acquireSharedInterruptibly()源码如下:
public final void acquireSharedInterruptibly(long arg) throw InterruptedException{ if(Thread.interrupted()) throw new InterruptedException(); if(tryAcauireShared(arg) < 0) doAcquireSharedInterruptibly(arg); }- 1
- 2
- 3
- 4
- 5
- 6
-
**说明:**acquireSharedInterruptibly()的作用是获取共享锁。
-
如果当前线程是中断状态,则抛出异常InterruptedException。否则。调用tryAcquireShared(arg)尝试获取共享锁,尝试成功则返回,否则就调用doAcquireSharedInterruptibily()。doAcquireSharedInterruptibly()会使当前线程一直等待,直到当前线程获取到共享锁(或被中断)才返回。
-
tryAcquireShared()在CountLownLatch.java中被重写,源码如下:
protected int tryAcquireSShared(int acquiress){ return (getState() == 0)?1:-1; }- 1
- 2
- 3
- 说明:tryAcquireShared()的作用是尝试获取共享锁。
- 如果"锁计数器=0",即锁是可获取状态,则返回1;否则,锁是不可获取状态,则返回-1。
private void doAcquireSharedInterruptibly(long arg) throws InterruptedException { // 创建"当前线程"的Node节点,且Node中记录的锁是"共享锁"类型;并将该节点添加到CLH队列末尾。 final Node node = addWaiter(Node.SHARED); boolean failed = true; try { for (;;) { // 获取上一个节点。 // 如果上一节点是CLH队列的表头,则"尝试获取共享锁"。 final Node p = node.predecessor(); if (p == head) { long r = tryAcquireShared(arg); if (r >= 0) { setHeadAndPropagate(node, r); p.next = null; // help GC failed = false; return; } } // (上一节点不是CLH队列的表头) 当前线程一直等待,直到获取到共享锁。 // 如果线程在等待过程中被中断过,则再次中断该线程(还原之前的中断状态)。 if (shouldParkAfterFailedAcquire(p, node) && parkAndCheckInterrupt()) throw new InterruptedException(); } } finally { if (failed) cancelAcquire(node); } }- 1
- 2
- 3
- 4
- 5
- 6
- 7
- 8
- 9
- 10
- 11
- 12
- 13
- 14
- 15
- 16
- 17
- 18
- 19
- 20
- 21
- 22
- 23
- 24
- 25
- 26
- 27
- 28
- 29
- 30
- addWaiter(Node.SHARED)的作用是,创建”当前线程“的Node节点,且Node中记录的锁的类型是”共享锁“(Node.SHARED);并将该节点添加到CLH队列末尾。
- node.predecessor()的作用是,获取上一个节点。如果上一节点是CLH队列的表头,则”尝试获取共享锁“。
- houldParkAfterFailedAcquire()的作用和它的名称一样,如果在尝试获取锁失败之后,线程应该等待,则返回true;否则,返回false。
- 当shouldParkAfterFailedAcquire()返回ture时,则调用parkAndCheckInterrupt(),当前线程会进入等待状态,直到获取到共享锁才继续运行。
(3)countDown()
public void countDown(){ sync.releaseShared(1); }- 1
- 2
- 3
- 说明:该函数实际上嗲用releaseShared(1)释放共享锁。
- releaseShared()在AQS中实现,源码如下:
public final boolean releaseShared(int arg){ if(tryReleaseShared(arg)){ doReleaseShared(); return true; } return false; }- 1
- 2
- 3
- 4
- 5
- 6
- 7
- 说明:releaseShared()的目的是让当前线程释放它锁持有的共享锁。
- 它首先会通过tryReleaseShared()去尝试释放共享锁,尝试成功,则直接返回成功,尝试失败,则通过doReleaseShared()取释放共享锁。
- tryReleaseShared()在CountDownLatch.java中被重写,源码如下:
protected boolean tryReleaseShared(int releases){ for(;;){ //获取“锁计数器”的状态 int c = getState(); if( c == 0) return false; //“锁计数器”-1 int nextc = c-1; //通过CAS函数进行赋值 if(compareAndSetState(c,nextc)) return nextc == 0; } }- 1
- 2
- 3
- 4
- 5
- 6
- 7
- 8
- 9
- 10
- 11
- 12
- 13
-
**说明:**tryReleaseShared()的作用是释放共享锁,将“锁计数器”的值-1;
-
**总结:**CountDownLatch是通过“共享锁”实现的。在创建CountDownLatch中时,会传递一个int类型参数count,该参数是“锁计数器”的初始状态,表示该“共享锁”最多能被count个线程同时获取。当某线程调用该CountDownLatch对象的await()方法时,该线程会等待“共享锁”可用时,才能获取“共享锁”而运行。而“共享锁”可用条件,就是“锁计数器”的值为0,而“锁计数器”的初始值为count,每当一个线程调用该CountDownLatch对象的countDown()方法时,才将“锁计数器”-1,通过这种方式,必须有count个线程调用countDown()之后,"锁计数器"才为0,等待的线程才能继续运行。
4.CountDownLatch案例
- 启动20个线程,只有当20个线程执行完成之后,才会执行目标线程。
public class CountDownLatchDemo{ private static CountDownLatch countDownLatch = new CountDownLatch(20); public static void main(String[] args) { new Thread(()->{ try { countDownLatch.await(); System.out.println(Thread.currentThread().getName()+":等待其他线程全部运行完成,完成解锁"); } catch (InterruptedException e) { e.printStackTrace(); } }).start(); for (int i = 0; i < 10; i++) { new Thread(()->{ System.out.println(Thread.currentThread().getName()+":线程运行"); countDownLatch.countDown(); }).start(); } for (int i = 0; i < 10; i++) { new Thread(()->{ System.out.println(Thread.currentThread().getName()+":线程运行"); countDownLatch.countDown(); }).start(); } } }- 1
- 2
- 3
- 4
- 5
- 6
- 7
- 8
- 9
- 10
- 11
- 12
- 13
- 14
- 15
- 16
- 17
- 18
- 19
- 20
- 21
- 22
- 23
- 24
- 25
- 26
- 27
- 28
- 29
- 30
- 31
- 32
- 运行结果:

2.并发工具Semaphore类
2.1.Semaphore是什么
-
Semaphore通常我们叫它信号量,可以用来控制同时访问特定资源的线程数量,通过协调各个线程,以保证合理的使用资源。
-
可以把他简单的理解成我们停车场入口立着的那个显示屏,每有一辆车进入停车场显示屏就会显示剩余车位减1,每有一辆车从停车场出去,显示屏上显示的剩余车辆就会加1,当显示屏上的剩余车辆为0时,停车场入口的栏杆就不会在打开,车辆就无法进入停车场,直到有一辆车从停车场出去为止。
-
Semaphore使用场景
-
通常用于那些资源有明确访问数量限制的场景,常用于限流。
-
比如:数据库连接池,同时进行连接的线程有数量限制,连接不能超过一定的数量,当连接达到了限制数量后,后面的线程只能排队等前面的线程释放了数据库连接才能获取到数据库连接。
-
2.2.Semaphore常用的方法
//获取一个令牌,在获取到令牌、或者被其他线程调用中断之前线程一直处于阻塞状态 acquire() //获取一个令牌,在获取令牌、或者被其他线程调用中断、或超时之前线程处于阻塞状态 acquire(int permits) //获取一个令牌,在获取到令牌之前线程一直处于阻塞状态(忽略中断) acquireUninterruptibly() //尝试获取令牌,返回获取令牌成功或失败,不阻塞线程 tryAcquire() //尝试获得令牌,在超时时间内循环尝试获取,直到尝试获取成功或超时返回,不阻塞线程 tryAcquire(long timeout,TimeUnit unit) //释放一个令牌,唤醒一个获取令牌不成功的阻塞线程 release() //等待队列里是否还存在等待线程 hasQueuedThreads() //获取等待队列里阻塞的线程数 getQueueLength() //清空令牌把可用令牌数置为0,返回清空令牌数量 drainPermits() //返回可用的令牌数量 availablePermits()- 1
- 2
- 3
- 4
- 5
- 6
- 7
- 8
- 9
- 10
- 11
- 12
- 13
- 14
- 15
- 16
- 17
- 18
- 19
- 20
- 21
- 22
- 23
- 24
- 25
- 26
- 27
- 28
- 29
2.3.Semaphore案例实战
-
每个停车场入口都有一个提示牌,上面显示着停车场的剩余车位还有多少,当剩余车位为0时,不允许车辆进入停车场,直到停车场里面有车离开停车场,这时提示牌上会显示新的剩余车位数。
-
业务场景:
- 停车场容纳总停车量10。
- 当一辆车进入停车场后,显示牌的剩余车位数响应的减1.
- 每有一辆车驶出停车场后,显示牌的剩余车位数响应的加1。
- 停车场剩余车位不足时,车辆只能在外面等待。
-
编码实战
public class SemaphoreDemo { private static Semaphore semaphore = new Semaphore(10); public static void main(String[] args) { //模拟100辆汽车进入停车场 for (int i = 0; i < 100; i++) { Thread thread = new Thread(()->{ try{ System.out.println("===="+Thread.currentThread().getName()+"来到停车场"); if (semaphore.availablePermits() == 0){ System.out.println("车位不足,请耐心等待"); } semaphore.acquire(); //获取令牌进入停车场 System.out.println(Thread.currentThread().getName()+"成功进入停车场"); Thread.sleep(10000L); System.out.println(Thread.currentThread().getName()+"驶出停车场"); semaphore.release(); //释放令牌。腾出停车场车位 }catch(Exception e){ e.printStackTrace(); } },i+"号车"); thread.start(); } } }- 1
- 2
- 3
- 4
- 5
- 6
- 7
- 8
- 9
- 10
- 11
- 12
- 13
- 14
- 15
- 16
- 17
- 18
- 19
- 20
- 21
- 22
- 23
- 24


3.并发工具CyclicBarrier类
3.1.CyclicBarrier是什么
-
从字面上的意思就可以知道,这个类的中文意思是”循环栅栏“。大概的意思就是一个可循环利用的屏障。
-
它的作用就是会让所有线程都等待完成之后才会继续执行下一步行动。
-
举个例子,就像生活中我们会约朋友到某个餐厅一起吃饭,有些朋友会早到,有些朋友会晚到,但是这个餐厅规定必须人到齐了才可以让我们进去,这里的朋友们就是各个线程,餐厅就是CyclicBarrier。
3.2.CyclicBarrier常用的方法
(1)构造方法
public CyclicBarrier(int parties) public CyclicBarrier(int parties,Runnable barrierAction)- 1
- 2
- 3
-
parties是参与线程的个数
-
第二个构造方法有一个Runnable参数,这个参数的意思是最后一个到达线程要做的任务
(2)常用方法
//线程调用 await() 表示自己已经到达栅栏 public int await() throws InterruptedException, BrokenBarrierException //线程调用 await() 表示自己已经到达栅栏 public int await(long timeout, TimeUnit unit) throws InterruptedException, BrokenBarrierException, TimeoutException //返回当前在屏障处等待的参与者数目 int getNumberWaiting() //返回要求启动此barrier的参与者数目 int getParties() //查询此屏障是否处于损坏状态 boolean isBroken() //将屏障设为初始化状态 void reset()- 1
- 2
- 3
- 4
- 5
- 6
- 7
- 8
- 9
- 10
- 11
- 12
- 13
- 14
- 15
- 16
- 17
- BrokenBarrierException 表示栅栏已经被破坏,破坏的原因可能是其中一个线程 await() 时被中断或者超时。
- 线程调用 await() 表示自己已经到达栅栏。
3.3.CyclicBarrier案例实战
(1)案例实战
- 一个线程组的线程需要等待所有线程完成任务后再继续执行下一次任务
public class CyclicBarrierDemo extends Thread { private CyclicBarrier cyclicBarrier; public CyclicBarrierDemo(CyclicBarrier cyclicBarrier) { this.cyclicBarrier = cyclicBarrier; } @Override public void run() { try { Thread.sleep(1000); System.out.println(getName() + " 达到栅栏 A"); cyclicBarrier.await(); System.out.println(getName() + " 冲破栅栏 A"); Thread.sleep(2000); System.out.println(getName() + " 达到栅栏 B"); cyclicBarrier.await(); System.out.println(getName() + " 冲破栅栏 B"); } catch (InterruptedException | BrokenBarrierException e) { e.printStackTrace(); } } public static void main(String[] args) { int threadNum = 5; CyclicBarrier barrier = new CyclicBarrier(threadNum,()->{ System.out.println(Thread.currentThread().getName()+" 完成最后任务"); }); for (int i = 0; i < threadNum; i++) { new CyclicBarrierDemo(barrier).start(); } } }- 1
- 2
- 3
- 4
- 5
- 6
- 7
- 8
- 9
- 10
- 11
- 12
- 13
- 14
- 15
- 16
- 17
- 18
- 19
- 20
- 21
- 22
- 23
- 24
- 25
- 26
- 27
- 28
- 29
- 30
- 31
- 32
- 33
- 34
- 35
- 36
- 37
- 38

4.并发工具Exchanger类
4.1.Exchanger是什么
- Exchanger(交换者)是一个用于线程间协作的工具类。Exchanger用于进行线程间的数据交换。它提供了一个共同点,在这个同步点两个线程可以交换彼此的数据。这两个线程通过exchange方法交换数据,如果第一个线程限制性exchange方法,他会一直等待第二个线程也执行exchange,当两个线程都达到同步点时,这两个线程就可以交换数据,将本线程产出来的数据传递给对方。
4.2.Exchanger核心方法
//值传递,将数据传给对方线程 exchange(V x); //值传递,将数据传给对方线程,超过指定的时间内,没有传递成功,报超时异常 exchange(V x,long timeout,TimeUnit unit)- 1
- 2
- 3
- 4
- 5
4.3.Exchanger案例实战
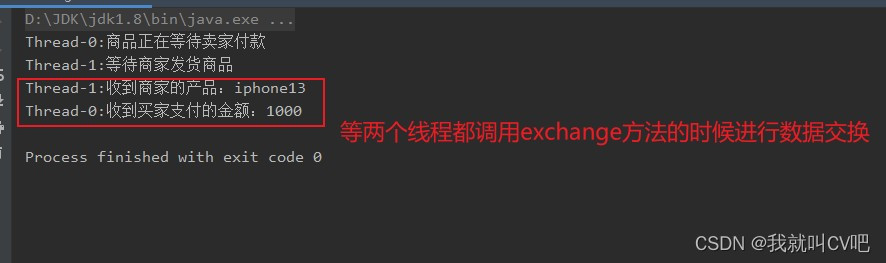
- 模拟买家支付,商家发货,数据交换。
public class ExchangerDemo { //Exchanger实例 private static final Exchanger<String> exchanger = new Exchanger<>(); public static void main(String[] args) { //商家线程 new Thread(()->{ try { String phone = "iphone13"; System.out.println(Thread.currentThread().getName()+":商品正在等待卖家付款"); //阻塞,模拟买家支付的过程 Thread.sleep(2000); String money = exchanger.exchange(phone); System.out.println(Thread.currentThread().getName()+":收到买家支付的金额:"+money); }catch (Exception e){ e.printStackTrace(); } }).start(); new Thread(()->{ try { String money = "1000"; System.out.println(Thread.currentThread().getName()+":等待商家发货商品"); //阻塞,模拟商家发货的过程 Thread.sleep(2000); String phone = exchanger.exchange(money); System.out.println(Thread.currentThread().getName()+":收到商家的产品:"+phone); }catch (Exception e){ e.printStackTrace(); } }).start(); } }- 1
- 2
- 3
- 4
- 5
- 6
- 7
- 8
- 9
- 10
- 11
- 12
- 13
- 14
- 15
- 16
- 17
- 18
- 19
- 20
- 21
- 22
- 23
- 24
- 25
- 26
- 27
- 28
- 29
- 30
- 31
- 32
- 33
- 34
- Exchanger也可以用于校对工作,比如我们需要将纸制银流通过人工的方式录入成电子银行流水,为了避免错误,采用AB岗两人进行录入,录入到Excel之后,系统需要加载这两个Excel,并对这两个Excel数据进行校对,看看是否录入的一致。
public class ExchangerDemo { private static final Exchanger<String> exchanger = new Exchanger<>(); private static ExecutorService executorService = Executors.newFixedThreadPool(2); public static void main(String[] args) { executorService.execute(()->{ try { String A = "银行流水A"; //A录入银行的流水数据 exchanger.exchange(A); } catch (InterruptedException e) { e.printStackTrace(); } }); executorService.execute(()->{ try { String B= "银行流水B"; String A = exchanger.exchange(B); System.out.println("A和B的数据是否一致:"+A.equals(B)); }catch (InterruptedException e){ e.printStackTrace(); } }); executorService.shutdown(); } }- 1
- 2
- 3
- 4
- 5
- 6
- 7
- 8
- 9
- 10
- 11
- 12
- 13
- 14
- 15
- 16
- 17
- 18
- 19
- 20
- 21
- 22
- 23
- 24
- 25
- 26
- 27
- 28
- 29
- 30
- 31

-
相关阅读:
更适合爬虫的正则表达式
披头士最经典的那张唱片封面,竟是传奇哈苏所拍
PostgreSQL数据库统计信息——examine_attribute单列预分析
Go学习第三章——运算符与进制
web安全学习笔记(11)
HTML5期末大作业:游戏网站设计与实现——基于bootstrap响应式游戏资讯网站制作HTML+CSS+JavaScript
使用RocketMQ 实现基于标签过滤的消息队列生产和消费
一文讲透 RocketMQ 消费者是如何负载均衡的
Scala 基础 (四):函数式编程【从基础到高阶应用】
Django模版层
- 原文地址:https://blog.csdn.net/weixin_47533244/article/details/127804195