-
Android仿QQ消息拖拽效果(一)(二阶贝塞尔曲线使用)
前言
本文参考辉哥的贝塞尔曲线 - QQ消息汽包拖拽,很适合初学贝塞尔知识,大家可以去看看原文。
最终效果

实现思路
效果分析- 整体分为两个圆点,一个是固定圆点(当手指按下时就已经确定了位置),一个是移动圆点(跟随手指移动变化位置),这里通过重写
onTouchEvent事件,监听move事件时改变圆点坐标即可实现。 - 当移动圆点移动时,固定圆点半径会慢慢变小,当移动到一定距离后,半径不再变化,当更远时,不再绘制固定点以及旁边贝塞尔连线。
贝塞尔曲线坐标计算
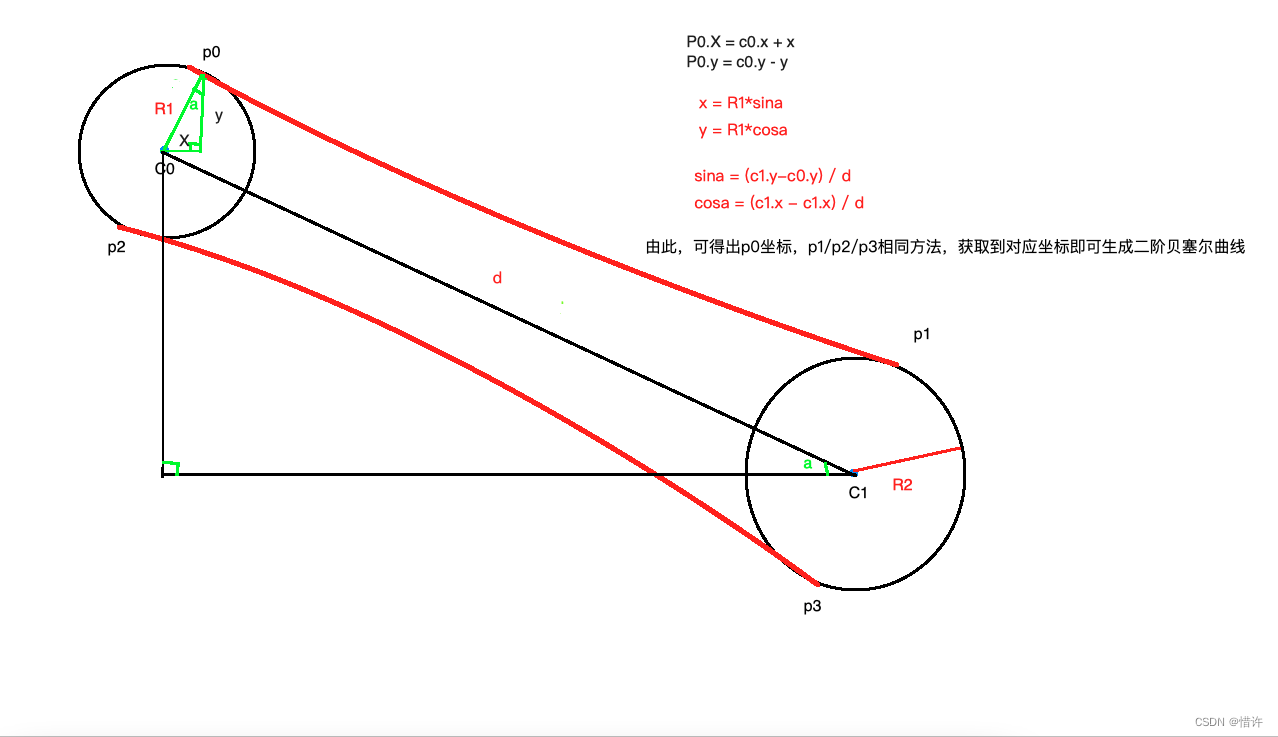
通过上面的公式,我们可以分别计算出P0、P1、P2、P3对应点坐标,同时我们选择c0和c1的中心点(centerX,centerY)作为贝塞尔曲线的控制点,使用path.quadTo方法进行二阶贝塞尔曲线绘制。相关代码
package com.crystal.view.animation import android.content.Context import android.graphics.* import android.util.AttributeSet import android.util.TypedValue import android.view.MotionEvent import android.view.View import kotlin.math.sqrt /** * 仿qq消息拖拽效果【二阶贝塞尔曲线学习】 * on 2022/11/10 */ class BesselView : View { //画笔工具 private val paint = Paint() //固定点 private var fixPoint: PointF? = null //跟随手指移动点 private var movePoint: PointF? = null //固定点半径【当移动点距离远时,会逐渐变小】 private var fixPointRadius = 0f //固定点半径最小值 private var fixPointMinRadius = 0f //固定圆半径最大值 private var fixPointMaxRadius = 0f //移动点半径 private var movePointRadius = 0f constructor(context: Context) : this(context, null) constructor(context: Context, attrs: AttributeSet?) : this(context, attrs, 0) constructor(context: Context, attrs: AttributeSet?, defStyleAttr: Int) : super( context, attrs, defStyleAttr ) { paint.color = Color.RED paint.isDither = true paint.isAntiAlias = true fixPointMinRadius = dp2px(3f) fixPointMaxRadius = dp2px(7f) movePointRadius = dp2px(8f) } override fun onTouchEvent(event: MotionEvent): Boolean { when (event.action) { MotionEvent.ACTION_DOWN -> { if (fixPoint == null) { fixPoint = PointF() } fixPoint?.x = event.x fixPoint?.y = event.y } MotionEvent.ACTION_MOVE -> { if (movePoint == null) { movePoint = PointF() } movePoint?.x = event.x movePoint?.y = event.y fixPointRadius = (fixPointMaxRadius - getPointCenterDistance() / 14f).toFloat() } MotionEvent.ACTION_UP -> { fixPoint = null movePoint = null invalidate() return super.onTouchEvent(event) } } //坐标变化时,不断重绘 invalidate() return true } override fun onDraw(canvas: Canvas) { if (fixPoint == null || movePoint == null) { return } //绘制移动点 canvas.drawCircle(movePoint!!.x, movePoint!!.y, movePointRadius, paint) //绘制固定点和贝塞尔曲线【当距离过大时,不绘制贝塞尔曲线和固定点】 if (fixPointRadius > fixPointMinRadius) { canvas.drawCircle(fixPoint!!.x, fixPoint!!.y, fixPointRadius, paint) drawBesselLine(canvas) } } /** * 绘制二阶贝塞尔曲线 */ private fun drawBesselLine(canvas: Canvas) { //分别计算角a的sin值和cos值 val sina = (movePoint!!.y - fixPoint!!.y) / getPointCenterDistance() val cosa = (movePoint!!.x - fixPoint!!.x) / getPointCenterDistance() //求出p0点坐标 val p0 = PointF( (fixPoint!!.x + fixPointRadius * sina).toFloat(), (fixPoint!!.y - fixPointRadius * cosa).toFloat() ) //求出p2点坐标 val p2 = PointF( (fixPoint!!.x - fixPointRadius * sina).toFloat(), (fixPoint!!.y + fixPointRadius * cosa).toFloat() ) //求出p1点坐标 val p1 = PointF( (movePoint!!.x + movePointRadius * sina).toFloat(), (movePoint!!.y - movePointRadius * cosa).toFloat() ) //求出p3点坐标 val p3 = PointF( (movePoint!!.x - movePointRadius * sina).toFloat(), (movePoint!!.y + movePointRadius * cosa).toFloat() ) //绘制贝塞尔曲线 val path = Path() path.moveTo(p0.x, p0.y) path.quadTo(getCircleCenterPoint().x, getCircleCenterPoint().y, p1.x, p1.y) path.lineTo(p3.x, p3.y) path.quadTo(getCircleCenterPoint().x, getCircleCenterPoint().y, p2.x, p2.y) path.close() canvas.drawPath(path, paint) } /** * dp 转 px */ private fun dp2px(dp: Float): Float { return TypedValue.applyDimension(TypedValue.COMPLEX_UNIT_DIP, dp, resources.displayMetrics) } /** * 计算两点距离 */ private fun getPointCenterDistance(): Double { val dx = movePoint!!.x - fixPoint!!.x val dy = movePoint!!.y - fixPoint!!.y return sqrt((dx * dx + dy * dy).toDouble()) } /** * 计算两个圆心连接中心点坐标 作为二阶贝塞尔曲线的控制点 */ private fun getCircleCenterPoint(): PointF { val centerX = (movePoint!!.x + fixPoint!!.x) / 2 val centerY = (movePoint!!.y + fixPoint!!.y) / 2 return PointF(centerX, centerY) } }- 1
- 2
- 3
- 4
- 5
- 6
- 7
- 8
- 9
- 10
- 11
- 12
- 13
- 14
- 15
- 16
- 17
- 18
- 19
- 20
- 21
- 22
- 23
- 24
- 25
- 26
- 27
- 28
- 29
- 30
- 31
- 32
- 33
- 34
- 35
- 36
- 37
- 38
- 39
- 40
- 41
- 42
- 43
- 44
- 45
- 46
- 47
- 48
- 49
- 50
- 51
- 52
- 53
- 54
- 55
- 56
- 57
- 58
- 59
- 60
- 61
- 62
- 63
- 64
- 65
- 66
- 67
- 68
- 69
- 70
- 71
- 72
- 73
- 74
- 75
- 76
- 77
- 78
- 79
- 80
- 81
- 82
- 83
- 84
- 85
- 86
- 87
- 88
- 89
- 90
- 91
- 92
- 93
- 94
- 95
- 96
- 97
- 98
- 99
- 100
- 101
- 102
- 103
- 104
- 105
- 106
- 107
- 108
- 109
- 110
- 111
- 112
- 113
- 114
- 115
- 116
- 117
- 118
- 119
- 120
- 121
- 122
- 123
- 124
- 125
- 126
- 127
- 128
- 129
- 130
- 131
- 132
- 133
- 134
- 135
- 136
- 137
- 138
- 139
- 140
- 141
- 142
- 143
- 144
- 145
- 146
- 147
- 148
- 149
- 150
- 151
- 152
- 153
- 154
- 155
- 156
- 157
- 158
- 159
- 160
总结
通过本文中的效果实现,学习了
二阶贝塞尔曲线的绘制,对于自定义View而言,最重要的还是将效果进行拆分细化,拆分后每一步实现其实很简单!结语
如果以上文章对您有一点点帮助,希望您不要吝啬的点个赞加个关注,您每一次小小的举动都是我坚持写作的不懈动力!ღ( ´・ᴗ・` )
- 整体分为两个圆点,一个是固定圆点(当手指按下时就已经确定了位置),一个是移动圆点(跟随手指移动变化位置),这里通过重写
-
相关阅读:
利用OGG实现PostgreSQL实时同步
<C++>深度学习多态
【C++】线程库
【 Docker 容器详细介绍和说明】
springboot基于web儿童教育网站111123
【网页前端】CSS的基本样式边框、布局、字体
【ML on Kubernetes】第 7 章:模型部署和自动化
数据结构 - 跳表
Java进阶篇--死锁
大型网站前端架构,深入每个网页本身,处理适配性和兼容性问题
- 原文地址:https://blog.csdn.net/a734474820/article/details/127790960
