-
linux安装CUDA、cuDNN以及ytorch-gpu
安装包
在VMware中安装Ubuntu 18
待补充
linux环境配置
安装miniconda
-
安装:
sh Miniconda3-4.6.14-Linux-x86_64.sh,一直enter,根据提示输入yes,最后会安装在当前目录下的/home/bigdata/miniconda3中

-
验证是否安装成功:
conda --version,如果显示找不到命令,表示环境变量还没有配置 -
配置环境变量:在用户目录下,打开
vim /home/bigdata/.bashrc文件,添加export PATH="/home/bigdata/miniconda3/bin:$PATH",再source /home/bigdata/.bashrc使修改生效 -
添加清华镜像源:
# 添加清华镜像源 conda config --add channels http://mirrors.tuna.tsinghua.edu.cn/anaconda/pkgs/main conda config --add channels http://mirrors.tuna.tsinghua.edu.cn/anaconda/pkgs/free conda config --add channels http://mirrors.tuna.tsinghua.edu.cn/anaconda/pkgs/r conda config --add channels http://mirrors.tuna.tsinghua.edu.cn/anaconda/pkgs/pro conda config --add channels http://mirrors.tuna.tsinghua.edu.cn/anaconda/pkgs/msys2 # 移除默认的 conda config --remove channels defaults #显示检索路径 conda config --set show_channel_urls yes #显示镜像通道 conda config --show channels- 1
- 2
- 3
- 4
- 5
- 6
- 7
- 8
- 9
- 10
- 11
- 12
- 13
- 14
- 15

安装CUDA+cudnn
安装CUDA显卡驱动
1. 准备工作,验证是否具有安装环境
(1)查看显卡的驱动版本以及支持的最大cuda版本:
nvidia-smi,可以看到是10.2版本
(2)是否有一个cuda功能的GPU:lspci | grep -i nvidia
(3)linux版本是否支持:uname -m && cat /etc/*release
(4)GCC是否安装:gcc --version
(5)系统安装了正确的内核头文件和开发包:uname -r


2. 下载CUDA安装包:
Release Notes :: CUDA Toolkit Documentation (nvidia.com)
CUDA Toolkit Archive | NVIDIA Developer
ppc64,ppc64le,ARM,AMD,X86,i386,x86_64(AMD64),AArch64的概念_ac.char的博客-CSDN博客_ppc64le
下载命令:
wget https://developer.download.nvidia.com/compute/cuda/10.2/Prod/local_installers/cuda_10.2.89_440.33.01_linux.run# 下载命令(根据网页提示): wget https://developer.download.nvidia.com/compute/cuda/10.2/Prod/local_installers/cuda_10.2.89_440.33.01_linux.run # 安装命令: sudo sh cuda_10.2.89_440.33.01_linux.run # 注意要输入accept,等会光标移到Driver项,enter键,取消选择([ ]中为空,不要安驱动,否则会替换已有的驱动),然后光标移到install,enter键,开始安装 # 安装结束后,屏幕可以看到一下信息,这是cuda安装目录 - PATH includes /usr/local/cuda-10.2/bin - LD_LIBRARY_PATH includes /usr/local/cuda-10.2/lib64, or, add /usr/local/cuda-10.2/lib64 to /etc/ld.so.conf and run ldconfig as root- 1
- 2
- 3
- 4
- 5
- 6
- 7
- 8
- 9
- 10
- 11


3. 配置环境变量
命令行输入命令
sudo vim /etc/profile, 按下i键进入insert模式export LD_LABRARY_PATH=$LD_LIBRARY_PATH:/usr/local/cuda-10.2/lib64 export PATH=$PATH:/usr/local/cuda-10.2/bin export CUDA_HOME=$CUDA_HOME:/usr/local/cuda-10.2- 1
- 2
- 3
按下ESC键,:键,输入wq保存退出。输入命令
source /etc/profile激活环境变量

4. 验证是否安装成功:nvcc -V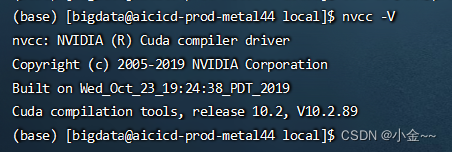- 1
安装cuDNN
-
选择版本7.6.5,以及对应的CUDA10.2,登录(XXX),下载
-
安装,切换到文件目录下,解压下载的文件,进行复制以及更改文件属性
# 解压cudnn文件 tar -xvf cudnn-10.2-linux-x64-v7.6.5.32.tgz # 将解压后的文件拷贝到CUDA对应的安装目录下(见上步安装CUDA,一般在/usr/local),并更改文件属性 sudo cp cuda/include/cudnn.h /usr/local/cuda-10.2/include/ sudo cp cuda/lib64/libcudnn* /usr/local/cuda-10.2/lib64/ # 为所有用户设置读取权限 sudo chmod a+r /usr/local/cuda-10.2/include/cudnn.h /usr/local/cuda-10.2/lib64/libcudnn*- 1
- 2
- 3
- 4
- 5
- 6
- 7
- 8
- 9
- 10

-
查看cuDNN版本
# 查看cudnn版本,前三个数字表示版本号7.6.5 cat /usr/local/cuda/include/cudnn.h | grep CUDNN_MAJOR -A 2 # 输出如下 #define CUDNN_MAJOR 7 #define CUDNN_MINOR 6 #define CUDNN_PATCHLEVEL 5 -- #define CUDNN_VERSION (CUDNN_MAJOR * 1000 + CUDNN_MINOR * 100 + CUDNN_PATCHLEVEL) #include "driver_types.h" # 如果是cudnn 8版本以上的使用下面命令 cat /usr/local/cuda/include/cudnn_version.h | grep CUDNN_MAJOR -A 2- 1
- 2
- 3
- 4
- 5
- 6
- 7
- 8
- 9
- 10
- 11
- 12
- 13
- 14

安装torch
-
创建一个专属环境:
conda create -n trafficJob python=3.8.13 -
切换环境:
conda activate trafficJob

-
安装pytorch=1.12版本
(1)在线安装: Previous PyTorch Versions | PyTorch
# CUDA 10.2 conda install pytorch==1.12.1 torchvision==0.13.1 torchaudio==0.12.1 cudatoolkit=10.2 -c pytorch # CPU Only conda install pytorch==1.12.1 torchvision==0.13.1 torchaudio==0.12.1 cpuonly -c pytorch- 1
- 2
- 3
- 4
- 5
(2)离线安装(torch=1.12版本未试过):
https://download.pytorch.org/whl/torch_stable.html
https://download.pytorch.org/whl下载安装文件,注意cuda版本,python版本,以及系统
查看torch与torchvision版本对应关系:https://github.com/pytorch/vision#installation
pip install torch-1.10.0+cu102-cp37-cp37m-linux_x86_64.whl
pip install torchaudio-0.10.0+cu102-cp37-cp37m-linux_x86_64.whl
pip install torchvision-0.11.1+cu102-cp37-cp37m-linux_x86_64.whl
安装:`pip install torch-0.4.1-cp37-cp37m-linux_x86_64.whl


-
验证是否安装成功
import torch torch.cuda.is_available()- 1
- 2

-
安装其他包
pip安装时,下载较慢:
pip install -i https://pypi.tuna.tsinghua.edu.cn/simple 包名清华:https://pypi.tuna.tsinghua.edu.cn/simple
阿里云:http://mirrors.aliyun.com/pypi/simple/
中国科技大学 https://pypi.mirrors.ustc.edu.cn/simple/
华中理工大学:http://pypi.hustunique.com/
山东理工大学:http://pypi.sdutlinux.org/
豆瓣:http://pypi.douban.com/simple/conda install numpy==1.23.1 conda install pandas==1.2.4 conda install scipy==1.9.0 conda install tensorboardX==2.5.1- 1
- 2
- 3
- 4
-
-
相关阅读:
Java参数校验详解:使用@Valid注解和自定义注解进行参数验证
百问C/C++
Dijsktra算法解析
JS中script标签defer和async属性的区别
openssl学习——消息认证码原理
openpose脚部标注问题梳理
pointnet点云分类,matlab,程序可用,修改一个参数
《机器学习核心算法》分类算法 - 朴素贝叶斯 MultinomialNB
Nginx的概述和配置
【数据结构】:队列的实现
- 原文地址:https://blog.csdn.net/qq_33682559/article/details/127784820
