-
Spring Boot集成Restful Api在线文档接口调试工具 Swagger
一、Swagger简介
Swagger的目标是为REST API 定义一个标准的,与语言无关的接口,使人和计算机在看不到源码或者看不到文档或者不能通过网络流量检测的情况下能发现和理解各种服务的功能。当服务通过Swagger定义,消费者就能与远程的服务互动通过少量的实现逻辑。类似于低级编程接口,Swagger去掉了调用服务时的很多猜测。
Swagger 是一个用于生成、描述和调用 RESTful 接口的 Web 服务。通俗的来讲,Swagger 就是将项目中所有(想要暴露的)接口展现在页面上,并且可以进行接口调用和测试的服务。
Swagger官网地址:https://swagger.io/

Swagger有什么用?
- 将项目中所有的接口展现在页面上,这样后端程序员就不需要专门为前端使用者编写专门的接口文档;
- 当接口更新之后,只需要修改代码中的 Swagger 描述就可以实时生成新的接口文档了,从而规避了接口文档老旧不能使用的问题;
- 通过 Swagger 页面,我们可以直接进行接口调用,降低了项目开发阶段的调试成本。

二、环境准备
在开始开发之前,我们需要准备一些环境配置:
- jdk 1.8 或其他更高版本
- 开发工具 IDEA
- 管理依赖 Maven
三、构建Spring Boot工程
打开i
dea -> file -> Nwe -> Project ,如图,勾选填写相关的配置信息:
勾选一些初始化的依赖配置:

工程搭建完成:

四、引入Swagger依赖
首先,我们要去 mvnrepository 查询 Swagger 的依赖

将依赖引入工程中:
<dependency> <groupId>io.springfoxgroupId> <artifactId>springfox-swagger2artifactId> <version>2.7.0version> dependency> <dependency> <groupId>io.springfoxgroupId> <artifactId>springfox-swagger-uiartifactId> <version>2.7.0version> dependency>- 1
- 2
- 3
- 4
- 5
- 6
- 7
- 8
- 9
- 10
- 11
- 12
- 13
五、编写一个Test控制器
package com.example.swagger_test.controller; import org.springframework.web.bind.annotation.GetMapping; import org.springframework.web.bind.annotation.RestController; /** * @author xiaoZhao * @date 2022/10/24 * @describe */ @RestController public class TestController { @GetMapping("hello") public String hello(){ return "hello swagger"; } }- 1
- 2
- 3
- 4
- 5
- 6
- 7
- 8
- 9
- 10
- 11
- 12
- 13
- 14
- 15
- 16
- 17
- 18
- 19


六、配置Swagger
编写Swagger配置类:
import org.springframework.context.annotation.Configuration; import springfox.documentation.swagger2.annotations.EnableSwagger2; /** * @author xiaoZhao * @date 2022/10/24 * @describe */ @Configuration @EnableSwagger2 // 开启Swagger2 public class SwaggerConfig { // 使用默认配置 }- 1
- 2
- 3
- 4
- 5
- 6
- 7
- 8
- 9
- 10
- 11
- 12
- 13
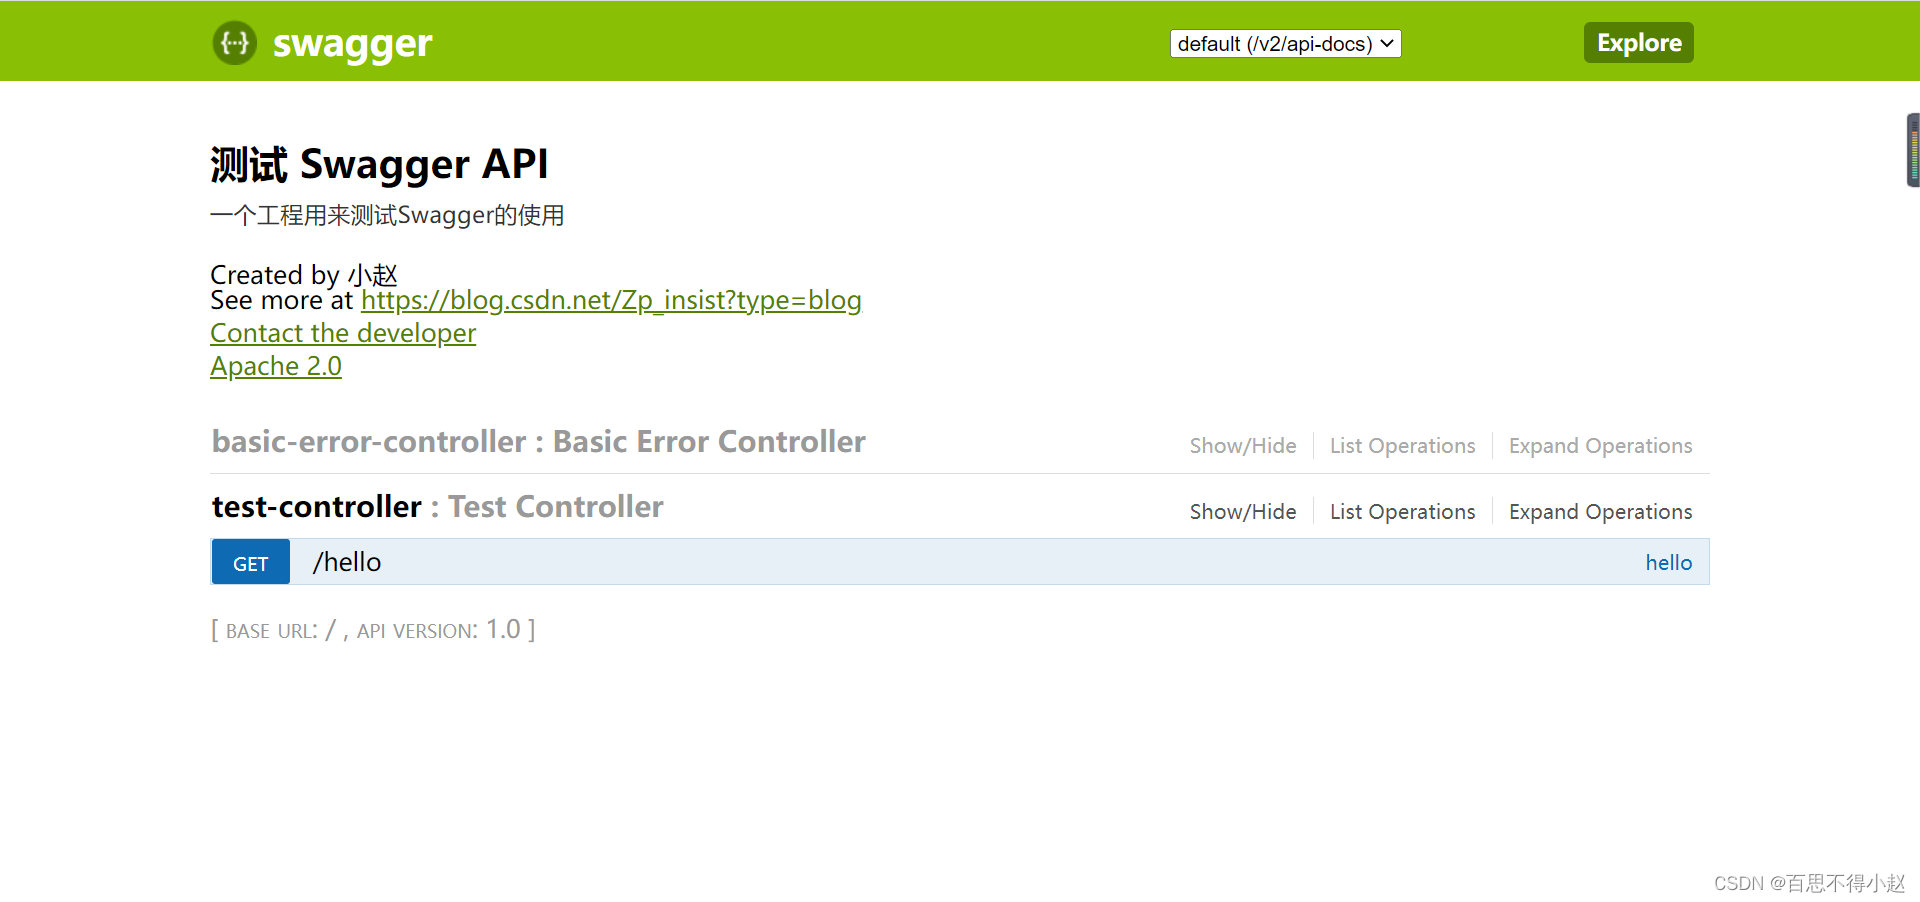
访问:http://localhost:8080/swagger-ui.html 进入Swagger管理页面

从上图可以看到,接口文档详细信息、接口信息等
配置Swagger信息:
package com.example.swagger_test.config; import org.springframework.context.annotation.Bean; import org.springframework.context.annotation.Configuration; import springfox.documentation.service.ApiInfo; import springfox.documentation.service.Contact; import springfox.documentation.service.VendorExtension; import springfox.documentation.spi.DocumentationType; import springfox.documentation.spring.web.plugins.Docket; import springfox.documentation.swagger2.annotations.EnableSwagger2; import java.util.ArrayList; /** * @author xiaoZhao * @date 2022/10/24 * @describe */ @Configuration @EnableSwagger2 // 开启Swagger2 public class SwaggerConfig { // 配置Swagger Docket @Bean public Docket docket(){ return new Docket(DocumentationType.SWAGGER_2) .apiInfo(apiInfo()); } // 配置Swagger信息 private ApiInfo apiInfo(){ // 作者信息 Contact contact = new Contact("小赵", "https://blog.csdn.net/Zp_insist?type=blog", "test@qq.com"); return new ApiInfo("测试 Swagger API", "一个工程用来测试Swagger的使用", "1.0", "https://blog.csdn.net/Zp_insist?type=blog", contact, "Apache 2.0", "http://www.apache.org/licenses/LICENSE-2.0", new ArrayList<VendorExtension>()); } }- 1
- 2
- 3
- 4
- 5
- 6
- 7
- 8
- 9
- 10
- 11
- 12
- 13
- 14
- 15
- 16
- 17
- 18
- 19
- 20
- 21
- 22
- 23
- 24
- 25
- 26
- 27
- 28
- 29
- 30
- 31
- 32
- 33
- 34
- 35
- 36
- 37
- 38
- 39
- 40
- 41
- 42
- 43
- 44
- 45
七、最终测试
重启工程进入Swagger管理页面
-
相关阅读:
【前端设计模式】之迭代器模式
推荐系统实践读书笔记-08评分预测问题
vue基础知识六:v-show和v-if有什么区别?使用场景分别是什么?
【Linux】进程控制
从“pmp::indextype“转换到“const storageindex &“需要收缩转换
Java之泛型与包装类
Ruo-Yi前后端分离的数据过滤
分布式文件系统
求一个网页设计作业——个人博客(HTML+CSS)
3.yolov5训练前的图片处理详解(python)
- 原文地址:https://blog.csdn.net/Zp_insist/article/details/127488057
