-
SpringBoot集成腾讯云云点播服务/视频上传
前言
该文章会先简单的介绍一下腾讯云的云点播功能,然后演示如何在SpringBoot项目中集成视频点播,每一步都有记录,保证初学者也能看懂。
1、腾讯云点播介绍
腾讯云点播(Video on Demand,VOD)基于腾讯多年技术积累与基础设施建设,为有音视频应用相关需求的客户提供包括音视频存储管理、音视频转码处理、音视频加速播放和音视频通信服务的一站式解决方案。

文档中心:https://cloud.tencent.com/document/product/2661.1、开通"云点播"服务
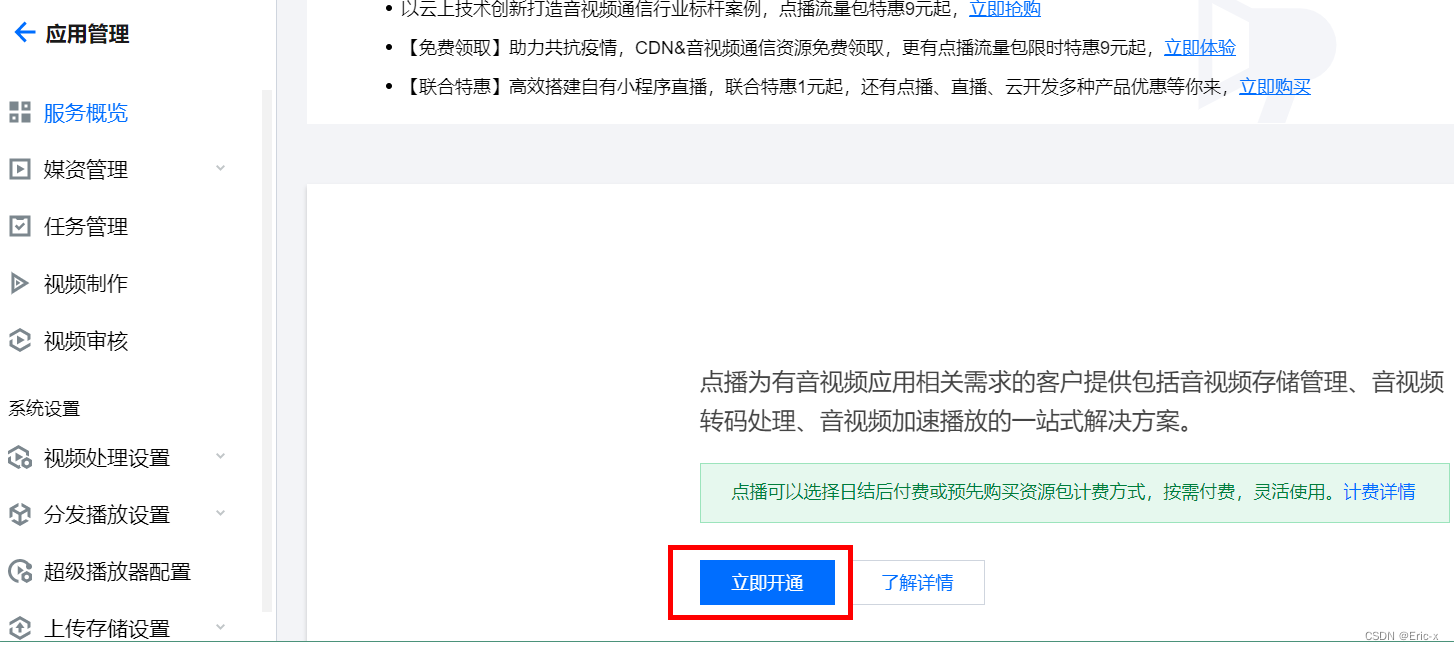
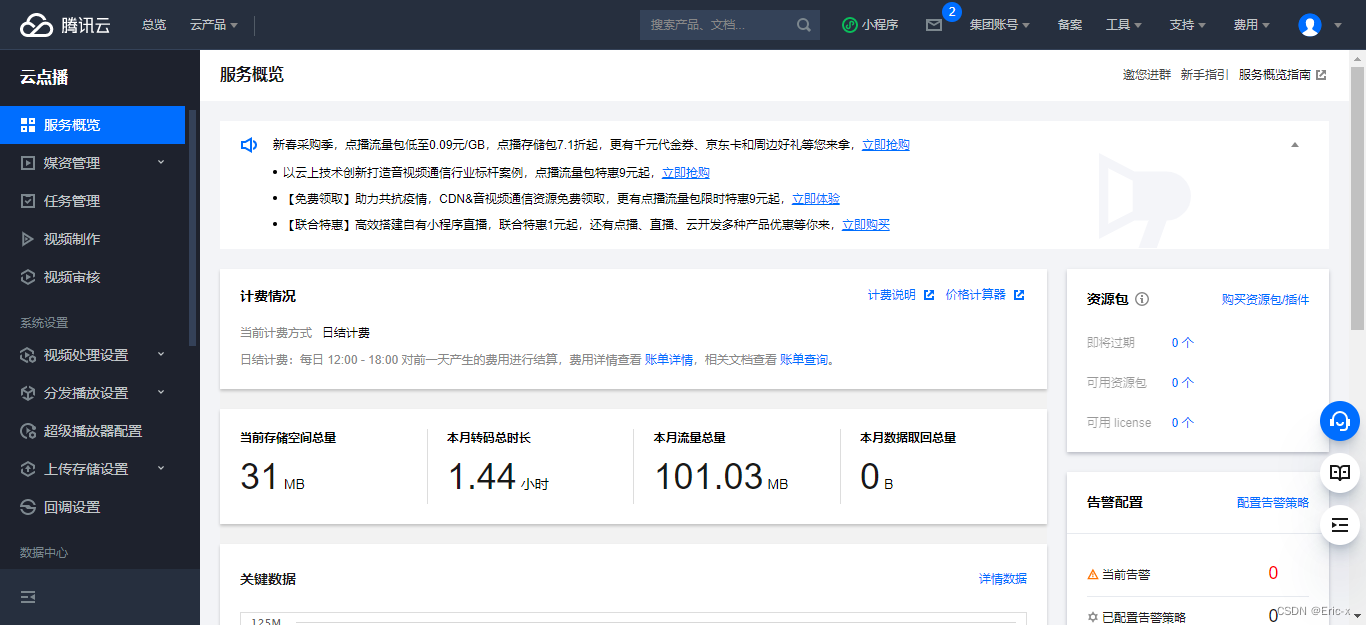
1.2、管理控制台
1.3、上传视频
上传视频可将视频上传到云点播的存储中,以进行后续的处理和分发等。
- 单击左侧菜单栏【媒资管理 > 视频管理】,默认展示【已上传】标签页;
- 点击【上传视频】按钮;
- 单击【选择视频】,选择本地视频文件;
- 单击【开始上传】;
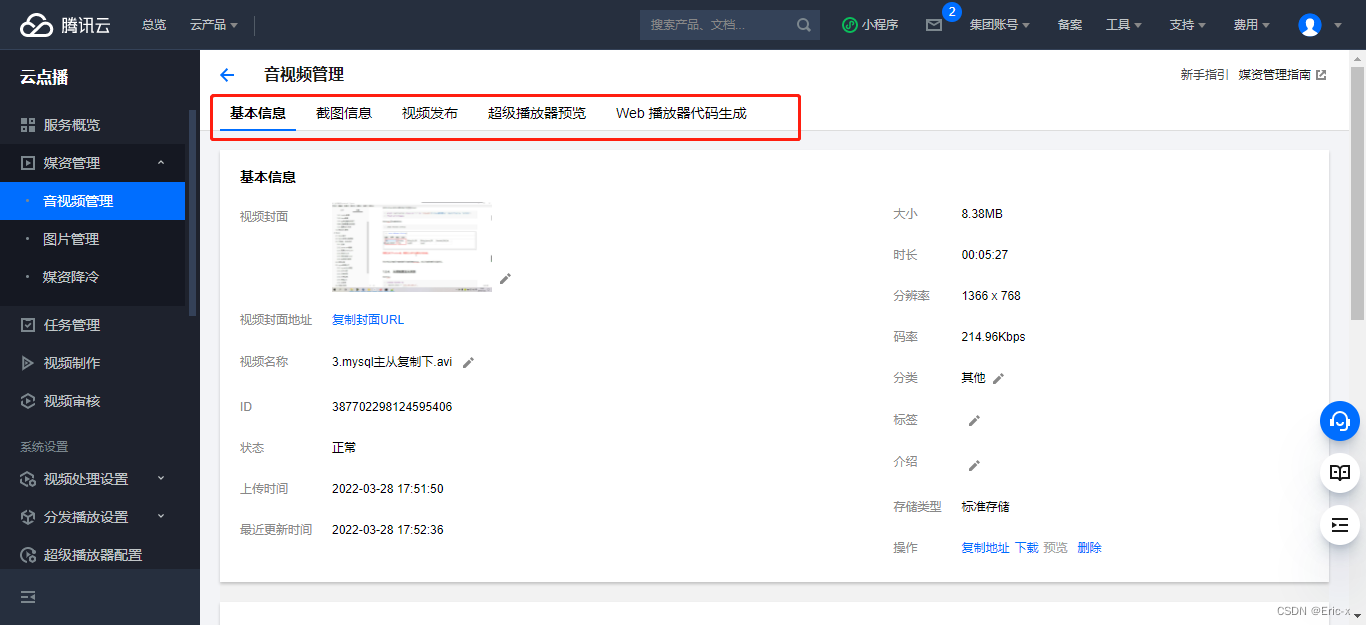
- 页面将自动跳转至【正在上传】标签页, 本地文件所在行【状态】栏为“上传成功”时,单击【已上传】标签页,可见完成上传的视频;
 单击【管理】,可以查看视频详情;
1.4、前端集成
前端集成有两种方式,使用“超级播放器预览”与“web播放器预览”,或者代码已经不更新,推荐使用前者,因此“web播放器预览”仅做了解。
1、查看“web播放器预览”;
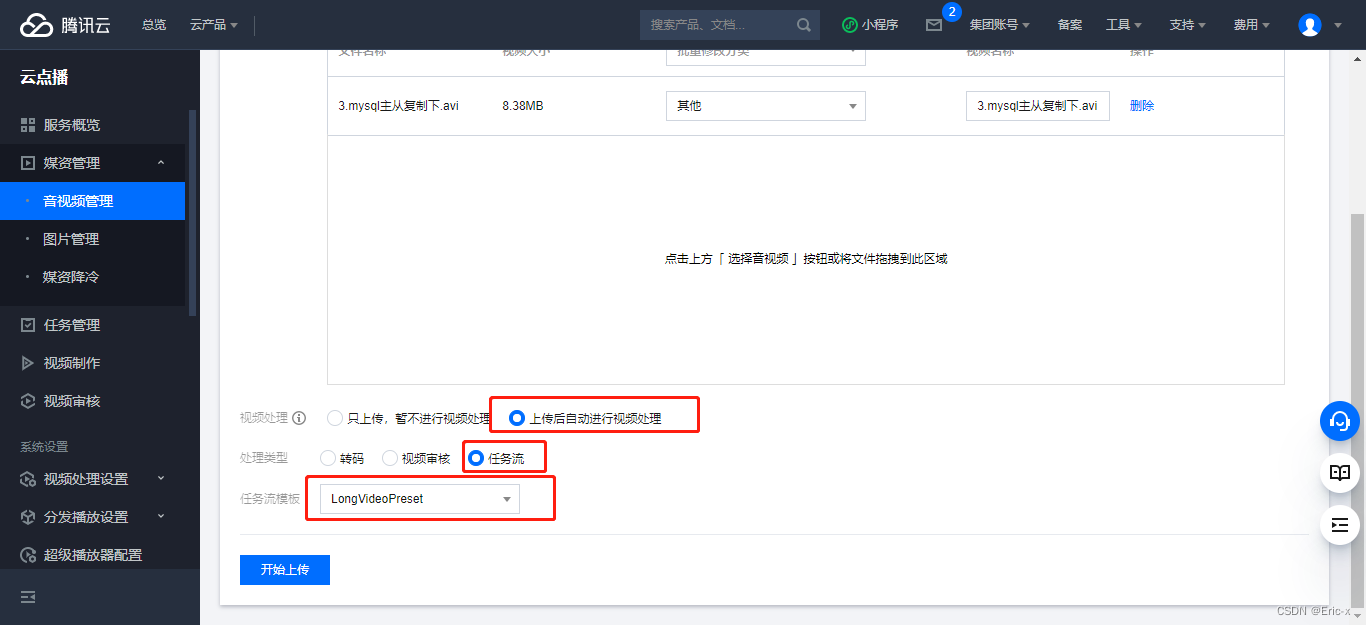
 说明:需要将视频进行转码,才能支持超级播放器播放,转码为:自适应码流(这个很重要)
2、查看“任务流设置”

腾讯云的云点播默认帮我们配置好了很多模板,我们可以直接拿来使用,也可以自定义模板。3、查看详情

当前任务流就是系统默认的“自适应码流”任务流4、在【音视频管理】重新上传视频
5、查看详情

6、复制代码index.html到项目,即可播放2、SpringBoot集成云点播
2.1、方式一:上传本地文件(有限制)
1、引入依赖
<dependency> <groupId>com.qcloud</groupId> <artifactId>vod_api</artifactId> <version>2.1.4</version> <exclusions> <exclusion> <groupId>org.slf4j</groupId> <artifactId>slf4j-log4j12</artifactId> </exclusion> </exclusions> </dependency>- 1
- 2
- 3
- 4
- 5
- 6
- 7
- 8
- 9
- 10
- 11
2、在接口中定义方法
public interface VodService { //上传视频 String uploadVideo(InputStream inputStream, String originalFilename); //删除视频 void removeVideo(String videoSourceId); }- 1
- 2
- 3
- 4
- 5
- 6
3、实现类中(serviceImpl)
@Service public class VodServiceImpl implements VodService { //上传视频 @Override public String uploadVideo(InputStream inputStream, String originalFilename) { try { VodUploadClient client = new VodUploadClient(ConstantPropertiesUtil.ACCESS_KEY_ID, ConstantPropertiesUtil.ACCESS_KEY_SECRET); VodUploadRequest request = new VodUploadRequest(); //视频本地地址 request.setMediaFilePath("D:\\001.mp4"); //指定任务流 request.setProcedure("LongVideoPreset"); //调用上传方法,传入接入点地域及上传请求。 VodUploadResponse response = client.upload("ap-guangzhou", request); //返回文件id保存到业务表,用于控制视频播放 String fileId = response.getFileId(); System.out.println("Upload FileId = {}"+response.getFileId()); return fileId; } catch (Exception e) { System.out.println(e.toString()); } return null; } //删除视频 @Override public void removeVideo(String videoSourceId) { try{ // 实例化一个认证对象,入参需要传入腾讯云账户secretId,secretKey,此处还需注意密钥对的保密 Credential cred = new Credential(ConstantPropertiesUtil.ACCESS_KEY_ID, ConstantPropertiesUtil.ACCESS_KEY_SECRET); // 实例化要请求产品的client对象,clientProfile是可选的 VodClient client = new VodClient(cred, ""); // 实例化一个请求对象,每个接口都会对应一个request对象 DeleteMediaRequest req = new DeleteMediaRequest(); req.setFileId(videoSourceId); // 返回的resp是一个DeleteMediaResponse的实例,与请求对象对应 DeleteMediaResponse resp = client.DeleteMedia(req); // 输出json格式的字符串回包 System.out.println(DeleteMediaResponse.toJsonString(resp)); } catch (TencentCloudSDKException e) { System.out.println(e.toString()); } } }- 1
- 2
- 3
- 4
- 5
- 6
- 7
- 8
- 9
- 10
- 11
- 12
- 13
- 14
- 15
- 16
- 17
- 18
- 19
- 20
- 21
- 22
- 23
- 24
- 25
- 26
- 27
- 28
- 29
- 30
- 31
- 32
- 33
- 34
- 35
- 36
- 37
- 38
- 39
- 40
- 41
- 42
- 43
- 44
- 45
- 46
- 47
- 48
- 49
然后就可以使用swagger进行接口测试,但是这种方式只能上传指定文件,有很大的局限性,所以不推荐。
2.1、方式二:通过签名上传视频(推荐)
1、引入依赖
<dependency> <groupId>com.qcloud</groupId> <artifactId>vod_api</artifactId> <version>2.1.4</version> <exclusions> <exclusion> <groupId>org.slf4j</groupId> <artifactId>slf4j-log4j12</artifactId> </exclusion> </exclusions> </dependency>- 1
- 2
- 3
- 4
- 5
- 6
- 7
- 8
- 9
- 10
- 11
2、编写工具类获取云点播签名
import sun.misc.BASE64Encoder; import javax.crypto.Mac; import javax.crypto.spec.SecretKeySpec; // 签名工具类 public class Signature { private String secretId; private String secretKey; private long currentTime; private int random; private int signValidDuration; private static final String HMAC_ALGORITHM = "HmacSHA1"; //签名算法 private static final String CONTENT_CHARSET = "UTF-8"; public static byte[] byteMerger(byte[] byte1, byte[] byte2) { byte[] byte3 = new byte[byte1.length + byte2.length]; System.arraycopy(byte1, 0, byte3, 0, byte1.length); System.arraycopy(byte2, 0, byte3, byte1.length, byte2.length); return byte3; } // 获取签名 public String getUploadSignature() throws Exception { String strSign = ""; String contextStr = ""; // 生成原始参数字符串 long endTime = (currentTime + signValidDuration); contextStr += "secretId=" + java.net.URLEncoder.encode(secretId, "utf8"); contextStr += "¤tTimeStamp=" + currentTime; contextStr += "&expireTime=" + endTime; contextStr += "&random=" + random; //设置转码任务流(如果没有这个参数那么视频播放不了,后面的值是任务流模板的值) contextStr += "&procedure=LongVideoPreset"; try { Mac mac = Mac.getInstance(HMAC_ALGORITHM); SecretKeySpec secretKey = new SecretKeySpec(this.secretKey.getBytes(CONTENT_CHARSET), mac.getAlgorithm()); mac.init(secretKey); byte[] hash = mac.doFinal(contextStr.getBytes(CONTENT_CHARSET)); byte[] sigBuf = byteMerger(hash, contextStr.getBytes("utf8")); strSign = base64Encode(sigBuf); strSign = strSign.replace(" ", "").replace("\n", "").replace("\r", ""); } catch (Exception e) { throw e; } return strSign; } private String base64Encode(byte[] buffer) { BASE64Encoder encoder = new BASE64Encoder(); return encoder.encode(buffer); } public void setSecretId(String secretId) { this.secretId = secretId; } public void setSecretKey(String secretKey) { this.secretKey = secretKey; } public void setCurrentTime(long currentTime) { this.currentTime = currentTime; } public void setRandom(int random) { this.random = random; } public void setSignValidDuration(int signValidDuration) { this.signValidDuration = signValidDuration; } }- 1
- 2
- 3
- 4
- 5
- 6
- 7
- 8
- 9
- 10
- 11
- 12
- 13
- 14
- 15
- 16
- 17
- 18
- 19
- 20
- 21
- 22
- 23
- 24
- 25
- 26
- 27
- 28
- 29
- 30
- 31
- 32
- 33
- 34
- 35
- 36
- 37
- 38
- 39
- 40
- 41
- 42
- 43
- 44
- 45
- 46
- 47
- 48
- 49
- 50
- 51
- 52
- 53
- 54
- 55
- 56
- 57
- 58
- 59
- 60
- 61
- 62
- 63
- 64
- 65
- 66
- 67
3、编写接口,获取签名
@GetMapping("sign") public Result sign() { Signature sign = new Signature(); // 设置 App 的云 API 密钥 sign.setSecretId(ConstantPropertiesUtil.ACCESS_KEY_ID); sign.setSecretKey(ConstantPropertiesUtil.ACCESS_KEY_SECRET); sign.setCurrentTime(System.currentTimeMillis() / 1000); sign.setRandom(new Random().nextInt(java.lang.Integer.MAX_VALUE)); sign.setSignValidDuration(3600 * 24 * 2); // 签名有效期:2天 try { String signature = sign.getUploadSignature(); System.out.println("signature : " + signature); return Result.ok(signature); } catch (Exception e) { System.out.print("获取签名失败"); e.printStackTrace(); return Result.fail(null); } }- 1
- 2
- 3
- 4
- 5
- 6
- 7
- 8
- 9
- 10
- 11
- 12
- 13
- 14
- 15
- 16
- 17
- 18
- 19
4、然后前端通过云点播提供的Web模板直接使用即可
DOCTYPE html> <html> <head> <meta charset="utf-8"> <meta http-equiv="Content-Type" content="text/html; charset=UTF-8" /> <meta http-equiv="X-UA-Compatible" content="IE=edge"> <meta name="viewport" content="width=device-width, initial-scale=1"> <title>QCloud VIDEO UGC UPLOAD SDKtitle> <link href="//cdnjs.cloudflare.com/ajax/libs/twitter-bootstrap/3.3.5/css/bootstrap.min.css" rel="stylesheet"> <style type="text/css"> .text-danger { color: red; } .control-label { text-align: left !important; } #resultBox { width: 100%; height: 300px; border: 1px solid #888; padding: 5px; overflow: auto; margin-bottom: 20px; } .uploaderMsgBox { width: 100%; border-bottom: 1px solid #888; } .cancel-upload { text-decoration: none; cursor: pointer; } style> head> <body> <div id="content"> <div class="container"> <h1>UGC-Uploaderh1> div> div> <div class="container" id="main-area"> <div class="row" style="padding:10px;"> <p> 示例1点击“直接上传视频”按钮即可上传视频。<br>。 p> div> <form ref="vExample"> <input type="file" style="display:none;" ref="vExampleFile" @change="vExampleUpload" /> form> <div class="row" style="padding:10px;"> <h4>示例1:直接上传视频h4> <a href="javascript:void(0);" class="btn btn-default" @click="vExampleAdd">直接上传视频a> div> <div class="uploaderMsgBox" v-for="uploaderInfo in uploaderInfos"> <div v-if="uploaderInfo.videoInfo"> 视频名称:{{uploaderInfo.videoInfo.name + '.' + uploaderInfo.videoInfo.type}}; 上传进度:{{Math.floor(uploaderInfo.progress * 100) + '%'}}; fileId:{{uploaderInfo.fileId}}; 上传结果:{{uploaderInfo.isVideoUploadCancel ? '已取消' : uploaderInfo.isVideoUploadSuccess ? '上传成功' : '上传中'}}; <br> 地址:{{uploaderInfo.videoUrl}}; <a href="javascript:void(0);" class="cancel-upload" v-if="!uploaderInfo.isVideoUploadSuccess && !uploaderInfo.isVideoUploadCancel" @click="uploaderInfo.cancel()">取消上传a><br> div> <div v-if="uploaderInfo.coverInfo"> 封面名称:{{uploaderInfo.coverInfo.name}}; 上传进度:{{Math.floor(uploaderInfo.coverProgress * 100) + '%'}}; 上传结果:{{uploaderInfo.isCoverUploadSuccess ? '上传成功' : '上传中'}}; <br> 地址:{{uploaderInfo.coverUrl}}; <br> div> div> div> <script src="https://cdn.jsdelivr.net/npm/es6-promise@4/dist/es6-promise.auto.js">script> <script src="//cdnjs.cloudflare.com/ajax/libs/vue/2.5.21/vue.js">script> <script src="//cdnjs.cloudflare.com/ajax/libs/axios/0.18.0/axios.js">script> <script src="https://cdn-go.cn/cdn/vod-js-sdk-v6/latest/vod-js-sdk-v6.js">script> <script type="text/javascript"> ;(function () { /** * 计算签名。调用签名接口获取 **/ function getSignature() { return axios.get("http://localhost:8301/admin/vod/user/sign").then(response =>{ return response.data.data }) }; var app = new Vue({ el: '#main-area', data: { uploaderInfos: [], vcExampleVideoName: '', vcExampleCoverName: '', cExampleFileId: '', }, created: function () { this.tcVod = new TcVod.default({ getSignature: getSignature }) }, methods: { /** * vExample示例。添加视频 **/ vExampleAdd: function () { this.$refs.vExampleFile.click() }, /** * vExample示例。上传视频过程。 **/ vExampleUpload: function () { var self = this; var mediaFile = this.$refs.vExampleFile.files[0] var uploader = this.tcVod.upload({ mediaFile: mediaFile, }) uploader.on('media_progress', function (info) { uploaderInfo.progress = info.percent; }) uploader.on('media_upload', function (info) { uploaderInfo.isVideoUploadSuccess = true; }) console.log(uploader, 'uploader') var uploaderInfo = { videoInfo: uploader.videoInfo, isVideoUploadSuccess: false, isVideoUploadCancel: false, progress: 0, fileId: '', videoUrl: '', cancel: function() { uploaderInfo.isVideoUploadCancel = true; uploader.cancel() }, } this.uploaderInfos.push(uploaderInfo) uploader.done().then(function(doneResult) { console.log('doneResult', doneResult) uploaderInfo.fileId = doneResult.fileId; return doneResult.video.url; }).then(function (videoUrl) { uploaderInfo.videoUrl = videoUrl self.$refs.vExample.reset(); }) }, // cExample 上传过程 cExampleUpload: function() { var self = this; var coverFile = this.$refs.cExampleCover.files[0]; var uploader = this.tcVod.upload({ fileId: this.cExampleFileId, coverFile: coverFile, }) uploader.on('cover_progress', function(info) { uploaderInfo.coverProgress = info.percent; }) uploader.on('cover_upload', function(info) { uploaderInfo.isCoverUploadSuccess = true; }) console.log(uploader, 'uploader') var uploaderInfo = { coverInfo: uploader.coverInfo, isCoverUploadSuccess: false, coverProgress: 0, coverUrl: '', cancel: function () { uploader.cancel() }, } this.uploaderInfos.push(uploaderInfo) uploader.done().then(function (doneResult) { console.log('doneResult', doneResult) uploaderInfo.coverUrl = doneResult.cover.url; self.$refs.cExample.reset(); }) }, }, }) })(); script> <script async src="https://www.googletagmanager.com/gtag/js?id=UA-26476625-7">script> <script> // add by alsotang@gmail.com window.dataLayer = window.dataLayer || []; function gtag(){dataLayer.push(arguments);} gtag('js', new Date()); gtag('config', 'UA-26476625-7'); script> body> html>- 1
- 2
- 3
- 4
- 5
- 6
- 7
- 8
- 9
- 10
- 11
- 12
- 13
- 14
- 15
- 16
- 17
- 18
- 19
- 20
- 21
- 22
- 23
- 24
- 25
- 26
- 27
- 28
- 29
- 30
- 31
- 32
- 33
- 34
- 35
- 36
- 37
- 38
- 39
- 40
- 41
- 42
- 43
- 44
- 45
- 46
- 47
- 48
- 49
- 50
- 51
- 52
- 53
- 54
- 55
- 56
- 57
- 58
- 59
- 60
- 61
- 62
- 63
- 64
- 65
- 66
- 67
- 68
- 69
- 70
- 71
- 72
- 73
- 74
- 75
- 76
- 77
- 78
- 79
- 80
- 81
- 82
- 83
- 84
- 85
- 86
- 87
- 88
- 89
- 90
- 91
- 92
- 93
- 94
- 95
- 96
- 97
- 98
- 99
- 100
- 101
- 102
- 103
- 104
- 105
- 106
- 107
- 108
- 109
- 110
- 111
- 112
- 113
- 114
- 115
- 116
- 117
- 118
- 119
- 120
- 121
- 122
- 123
- 124
- 125
- 126
- 127
- 128
- 129
- 130
- 131
- 132
- 133
- 134
- 135
- 136
- 137
- 138
- 139
- 140
- 141
- 142
- 143
- 144
- 145
- 146
- 147
- 148
- 149
- 150
- 151
- 152
- 153
- 154
- 155
- 156
- 157
- 158
- 159
- 160
- 161
- 162
- 163
- 164
- 165
- 166
- 167
- 168
- 169
- 170
- 171
- 172
- 173
- 174
- 175
- 176
- 177
- 178
- 179
- 180
- 181
- 182
- 183
- 184
- 185
- 186
- 187
- 188
- 189
- 190
- 191
- 192
- 193
- 194
- 195
- 196
- 197
- 198
- 199
- 200
- 201
- 202
- 203
- 204
- 205
- 206
- 207
- 208
- 209
- 210
页面效果如下:

腾讯云官方文档参考:https://cloud.tencent.com/document/product/266/9219这种方式只需要向服务器拿个签名即可,都不需要通过服务器来上传文件了,非常的方便和高效,
总结
到这里就完了, 怎么样,是不是特别简单。
扩展:
SpringBoot集成 腾讯云云点播服务 /视频上传:https://blog.csdn.net/weixin_47316183/article/details/127739422?spm=1001.2014.3001.5502
SpringBoot集成 腾讯云存储COS 服务:https://blog.csdn.net/weixin_47316183/article/details/127739385?spm=1001.2014.3001.5502
SpringBoot集成 阿里云视频播服务 /视频上传:https://blog.csdn.net/weixin_47316183/article/details/124768041
SpringBoot集成 阿里云存储OSS 服务:https://blog.csdn.net/weixin_47316183/article/details/124512424
-
相关阅读:
电脑被删除的文件怎么恢复?2023年数据恢复方法分享
读书笔记|《数据压缩入门》—— 柯尔特·麦克安利斯 亚历克斯·海奇
leetcode136,137,260:只出现一次的数字 | || |||
系列十二、强引用、软引用、弱引用、虚引用分别是什么?
Kafka、ActiveMQ、RabbitMQ、RocketMQ 的区别
【自律】如何长期自律-迎难而上
Vue 模板字符串碰到script无法识别,报错Parsing error: Unterminated template.
坪山区关于开展2022年度科技创新专项资金申报工作的通知
训练神经网络gpu占用率低,gpu为什么适合神经网络
UE5.3报错
- 原文地址:https://blog.csdn.net/weixin_47316183/article/details/127739422
