-
SpringSecurity Oauth2实战 - 05 /oauth/token请求认证流程源码分析
文章目录
1. 自定义 AuthProvide 实现认证登录
因为这一讲内容和上一讲内容关联较大,这里再把上一讲内容的核心点过一遍,关于资源服务器和认证服务器项目结构的搭建就不多说了,前面已经讲解过。
1. 登录成功后返回给前端的响应类 AuthenticationInfo
@Data public class AuthenticationInfo { /*令牌对象*/ private AuthToken authToken; /*用户详情*/ private User user; }- 1
- 2
- 3
- 4
- 5
- 6
- 7
- 8
- 9
/** * SpringSecurity Oauth2 认证成功返回的AccessToken */ @Data public class AuthToken { /*令牌*/ private String accessToken; /*令牌类型*/ private String tokenType; /*刷新使用的令牌*/ private String refreshToken; /*过期时间长,单位:秒*/ private Integer expiresIn; /*令牌的作用范围*/ private String scope; }- 1
- 2
- 3
- 4
- 5
- 6
- 7
- 8
- 9
- 10
- 11
- 12
- 13
- 14
- 15
- 16
- 17
- 18
- 19
- 20
- 21
/** * (User)实体类 */ @Data public class User implements Serializable { private static final long serialVersionUID = 160958617672077663L; /** * 用户id */ private String id; /** * 账户名称 */ private String username; /** * 用户密码密文 */ private String password; /** * 手机号码 */ private String phone; /** * 创建时间 */ private Date createTime; }- 1
- 2
- 3
- 4
- 5
- 6
- 7
- 8
- 9
- 10
- 11
- 12
- 13
- 14
- 15
- 16
- 17
- 18
- 19
- 20
- 21
- 22
- 23
- 24
- 25
- 26
- 27
2. 认证登录控制层入口 AuthController
@Slf4j @RestController @RequestMapping("/api/v1") public class AuthController { @Autowired private LoginService loginService; @PostMapping("/login") public ApiResponse<AuthenticationInfo> authority( @Validated @RequestBody LoginQo loginQo) { AuthenticationInfo authenticationInfo = loginService.checkAndAuth( loginQo); return new ApiResponse<>(0,"success",authenticationInfo); } }- 1
- 2
- 3
- 4
- 5
- 6
- 7
- 8
- 9
- 10
- 11
- 12
- 13
- 14
3. 认证登录业务逻辑 LoginServiceImpl
/** * 认证的主体 */ @Data @Builder public class AuthJwtPrincipal implements Serializable { private String userId; }- 1
- 2
- 3
- 4
- 5
- 6
- 7
- 8
@Service @Slf4j public class LoginServiceImpl implements LoginService { @Autowired private UserService userService; @Autowired private RestTemplate restTemplate; /** * 登录认证 * @param loginQo 登录请求体 * @return AuthenticationInfo */ @Override public AuthenticationInfo checkAndAuth(LoginQo loginQo) { // 密码认证:数据库中的密码是经过bcrypt加密算法存储的 User user = userService.queryByName(loginQo.getName()); String dbEncryptPwd = user.getPassword(); boolean isPassed = BcryptUtil.bEncryptMatch(loginQo.getPassword(), dbEncryptPwd); // 登陆失败 if (!isPassed) { log.info("the user: {} login failed, account or password is wrong", user.getId()); throw new RuntimeException("用户账号或者密码错误"); } // 登录成功,获取用户认证信息 AuthJwtPrincipal authJwtPrincipal = AuthJwtPrincipal.builder().userId(user.getId()).build(); AuthenticationInfo authenticationInfo = obtainAuthenticationInfo(authJwtPrincipal,user); String accessToken = authenticationInfo.getAuthToken().getAccessToken(); if(StringUtils.isBlank(accessToken)){ throw new RuntimeException("用户账号或者密码错误"); } return authenticationInfo; } /** * 获取认证信息 * @param authJwtPrincipal 认证主体 * @param user 用户信息 * @return AuthenticationInfo */ private AuthenticationInfo obtainAuthenticationInfo(AuthJwtPrincipal authJwtPrincipal,User user) { AuthenticationInfo authenticationInfo = new AuthenticationInfo(); // SpringSecurity Oauth2获取access_token AuthToken authToken = getAccessToken(authJwtPrincipal); authenticationInfo.setAuthToken(authToken); authenticationInfo.setUser(user); return authenticationInfo; } /** * 通过登陆信息获取相应的令牌对象 * @param authJwtPrincipal 认证主体 * @return AuthToken */ public AuthToken getAccessToken(AuthJwtPrincipal authJwtPrincipal) { String loginJsonString = JSON.toJSONString(authJwtPrincipal); MultiValueMap<String, String> map = new LinkedMultiValueMap<>(); map.add("username", loginJsonString); // 因为使用的是自定义认证方式 CustomerAuthProvider,密码用不到,所以设为一个空值即可 map.add("password", StringUtils.EMPTY); map.add("client_id", "client_id"); map.add("client_secret","client_secret"); map.add("grant_type", "password"); map.add("scope", "all"); // 这里会进行Oauth2.0的请求,在CustomerAuthProvider进行认证处理 Map response = restTemplate.postForObject("http://127.0.0.1:8081/oauth/token", map, Map.class); if (MapUtil.isEmpty(response)) { return null; } // 封装返回 AuthToken authToken = new AuthToken(); authToken.setAccessToken((String) response.get("access_token")); authToken.setExpiresIn((Integer) response.get("expires_in")); authToken.setRefreshToken((String) response.get("refresh_token")); authToken.setTokenType((String) response.get("token_type")); authToken.setScope((String) response.get("scope")); return authToken; } }- 1
- 2
- 3
- 4
- 5
- 6
- 7
- 8
- 9
- 10
- 11
- 12
- 13
- 14
- 15
- 16
- 17
- 18
- 19
- 20
- 21
- 22
- 23
- 24
- 25
- 26
- 27
- 28
- 29
- 30
- 31
- 32
- 33
- 34
- 35
- 36
- 37
- 38
- 39
- 40
- 41
- 42
- 43
- 44
- 45
- 46
- 47
- 48
- 49
- 50
- 51
- 52
- 53
- 54
- 55
- 56
- 57
- 58
- 59
- 60
- 61
- 62
- 63
- 64
- 65
- 66
- 67
- 68
- 69
- 70
- 71
- 72
- 73
- 74
- 75
- 76
- 77
- 78
- 79
- 80
- 81
4. 自定义认证管理器 CustomAuthProvider
@Slf4j @Component public class CustomAuthProvider implements AuthenticationProvider { @Autowired private CustomUserDetailService customUserDetailService; /** * 认证 * @param authentication 待认证的对象 principal:loginJsonString, credentials:"" * @return Authentication 认证成功后填充的对象 * @throws AuthenticationException 异常 */ @Override public Authentication authenticate(Authentication authentication) throws AuthenticationException { // loginJsonString String contentJsonStr = Objects.isNull(authentication.getPrincipal()) ? StringUtils.EMPTY : authentication.getName(); // 通过authentication获取登录用户信息AuthUser AuthUser authUser = customUserDetailService.loadUserByContent(contentJsonStr); // principal:authUser,credentials:"",authorities UsernamePasswordAuthenticationToken result = new UsernamePasswordAuthenticationToken( authUser, authentication.getCredentials(), authUser.getAuthorities() ); result.setDetails(authentication.getDetails()); return result; } @Override public boolean supports(Class<?> authentication) { return UsernamePasswordAuthenticationToken.class.isAssignableFrom(authentication); } }- 1
- 2
- 3
- 4
- 5
- 6
- 7
- 8
- 9
- 10
- 11
- 12
- 13
- 14
- 15
- 16
- 17
- 18
- 19
- 20
- 21
- 22
- 23
- 24
- 25
- 26
- 27
- 28
- 29
- 30
- 31
- 32
- 33
认证成功后的 AuthUser:
/** * 认证成功后的用户对象 */ @AllArgsConstructor @NoArgsConstructor public class AuthUser implements UserDetails { @Setter private String username; @Setter private String password; @Setter @Getter private UserInfo userInfo; // 登录用户具备的权限 @Setter private Set<GrantedAuthority> authorities; public AuthUser(String username, String password){ this.username = username; this.password = password; } public AuthUser(String username, String password, Set<GrantedAuthority> authorities){ this(username,password); this.authorities = authorities; } @Override public Collection<? extends GrantedAuthority> getAuthorities() { return authorities; } @Override public String getPassword() { return password; } @Override public String getUsername() { return username; } @Override public boolean isAccountNonExpired() { return true; } @Override public boolean isAccountNonLocked() { return true; } @Override public boolean isCredentialsNonExpired() { return true; } @Override public boolean isEnabled() { return true; } }- 1
- 2
- 3
- 4
- 5
- 6
- 7
- 8
- 9
- 10
- 11
- 12
- 13
- 14
- 15
- 16
- 17
- 18
- 19
- 20
- 21
- 22
- 23
- 24
- 25
- 26
- 27
- 28
- 29
- 30
- 31
- 32
- 33
- 34
- 35
- 36
- 37
- 38
- 39
- 40
- 41
- 42
- 43
- 44
- 45
- 46
- 47
- 48
- 49
- 50
- 51
- 52
- 53
- 54
- 55
- 56
- 57
- 58
- 59
- 60
- 61
- 62
- 63
- 64
- 65
用户信息 UserInfo:
@Data public class UserInfo implements Serializable { private static final long serialVersionUID = 671647501342140183L; private String id; private String username; private List<String> roleIds; private List<String> policyName; }- 1
- 2
- 3
- 4
- 5
- 6
- 7
- 8
5. 自定义UserDetailService实现类 CustomUserDetailService
@Slf4j @Service("customUserDetailService") public class CustomUserDetailService{ @Autowired private UserService userService; @Autowired private PolicyService policyService; @Autowired private PasswordEncoder passwordEncoder; /** * 通过用户ID获取相应的角色信息 */ public AuthUser loadUserByContent(String content) throws UsernameNotFoundException { if (StringUtils.isBlank(content)) { throw new UsernameNotFoundException("exceptions.authentication.principal.error"); } // content是loginJsonString,可以转为AuthJwtPrincipal AuthJwtPrincipal authJwtPrincipal = JSON.parseObject(content, AuthJwtPrincipal.class); String userId = authJwtPrincipal.getUserId(); // 获取登录用户信息 User user = userService.queryById(userId); if (Objects.isNull(user)) { throw new UsernameNotFoundException("exceptions.authentication.principal.error"); } // 获取登录用户的角色信息 List<UserRole> userRoleList = userService.getUserRoleByUserId(userId); List<String> roleIds = userRoleList.stream().map(UserRole::getRoleId).collect(Collectors.toList()); // 获取登录用户的权限信息 List<Policy> policyList = policyService.getPolicyByRoleIds(roleIds); if (CollectionUtils.isEmpty(policyList)) { throw new UsernameNotFoundException("contact.administrator.to.assign.policy"); } List<String> policyNames = policyList.stream().map(Policy::getName).collect(Collectors.toList()); Set<GrantedAuthority> grantedAuthoritySet = policyList.stream() .map(policyEntity -> new SimpleGrantedAuthority(policyEntity.getName())) .collect(Collectors.toSet()); // 存储本地用户信息 UserInfo userInfo = new UserInfo(); userInfo.setId(user.getId()); userInfo.setUsername(user.getUsername()); userInfo.setRoleIds(roleIds); userInfo.setPolicyName(policyNames); String encodePasswordStr = passwordEncoder.encode("password"); return new AuthUser(userId, encodePasswordStr, userInfo, grantedAuthoritySet); } }- 1
- 2
- 3
- 4
- 5
- 6
- 7
- 8
- 9
- 10
- 11
- 12
- 13
- 14
- 15
- 16
- 17
- 18
- 19
- 20
- 21
- 22
- 23
- 24
- 25
- 26
- 27
- 28
- 29
- 30
- 31
- 32
- 33
- 34
- 35
- 36
- 37
- 38
- 39
- 40
- 41
- 42
- 43
- 44
- 45
- 46
- 47
- 48
- 49
- 50
- 51
- 52
- 53
- 54
6. 安全配置类 WebSecurityConfig 中添加自定义认证管理器
@Configuration @EnableGlobalMethodSecurity(prePostEnabled = true) @EnableWebSecurity public class WebSecurityConfig extends WebSecurityConfigurerAdapter { @Autowired private PasswordEncoder passwordEncoder; /** * 登陆认证相关 */ @Autowired private CustomAuthProvider customAuthProvider; @Override protected void configure(HttpSecurity http) throws Exception { super.configure(http); } // 自定义AuthenticationManager:并没有在工厂中暴露出来 // 使用AuthenticationManagerBuilder来自定义AuthenticationManager,覆盖默认的AuthenticationManager @Override protected void configure(AuthenticationManagerBuilder auth) { auth.authenticationProvider(customAuthProvider); } // 如需使用AuthenticationManager, 则可以通过覆盖此方法,将configure(AuthenticationManagerBuilder)方法构造的AuthenticationManager暴露为Bean。 @Bean @Override public AuthenticationManager authenticationManagerBean() throws Exception { return super.authenticationManagerBean(); } }- 1
- 2
- 3
- 4
- 5
- 6
- 7
- 8
- 9
- 10
- 11
- 12
- 13
- 14
- 15
- 16
- 17
- 18
- 19
- 20
- 21
- 22
- 23
- 24
- 25
- 26
- 27
- 28
- 29
- 30
- 31
- 32
- 33
7. 资源服务器配置类ResourceServerAutoConfiguration 放行/login请求的认证
@Slf4j @Configuration @EnableResourceServer @EnableGlobalMethodSecurity(prePostEnabled = true) public class ResourceServerAutoConfiguration extends ResourceServerConfigurerAdapter { @Autowired private TokenStore tokenStore; @Value("${spring.application.name}") private String appName; @Override public void configure(ResourceServerSecurityConfigurer resources) { resources.resourceId(appName); resources.tokenStore(tokenStore); } @Override public void configure(HttpSecurity http) throws Exception { http.authorizeRequests() // 放行的请求 .antMatchers("/api/v1/token").permitAll() .antMatchers("/api/v1/login").permitAll() // 其他请求必须认证才能访问 .anyRequest().authenticated() .and() .csrf().disable(); } }- 1
- 2
- 3
- 4
- 5
- 6
- 7
- 8
- 9
- 10
- 11
- 12
- 13
- 14
- 15
- 16
- 17
- 18
- 19
- 20
- 21
- 22
- 23
- 24
- 25
- 26
- 27
- 28
- 29
- 30
8. 启动项目测试
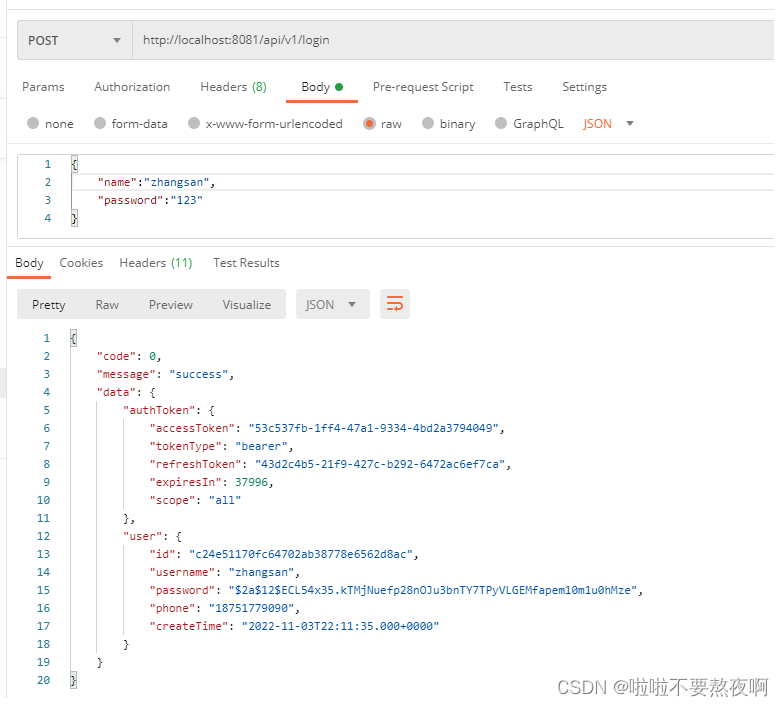
2. SpringSecurity Oauth2 认证流程分析
1. 未认证:认证登录获取 access_token
资源服务器配置类 ResourceServerAutoConfiguration 中放行 /api/v1/login 请求:

debug分析认证登录请求过程。
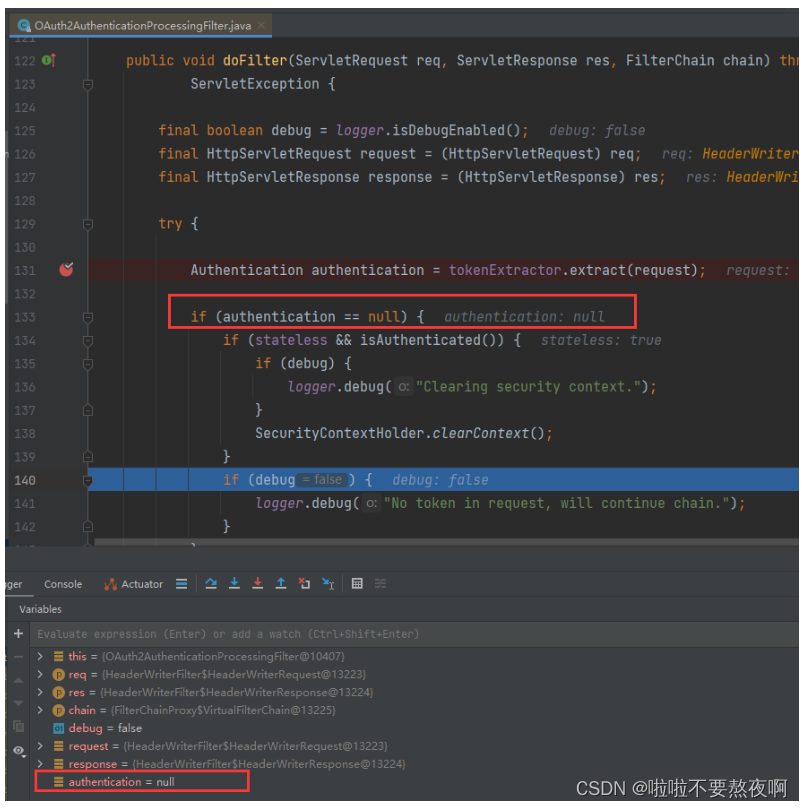
1. 进入过滤器 OAuth2AuthenticationProcessingFilter#doFilter方法
- 调用 BearerTokenExtractor#extract 方法从request请求中提取token并获取Authentication认证对象;
- 如果 Authentication==null 说明用户未认证,调用 chain.doFilter(request, response) 放行该请求;
public class OAuth2AuthenticationProcessingFilter implements Filter, InitializingBean { public void doFilter(ServletRequest req, ServletResponse res, FilterChain chain) throws IOException, ServletException { final boolean debug = logger.isDebugEnabled(); final HttpServletRequest request = (HttpServletRequest) req; final HttpServletResponse response = (HttpServletResponse) res; try { // 从请求中获取认证对象Authentication Authentication authentication = tokenExtractor.extract(request); if (authentication == null) { if (stateless && isAuthenticated()) { SecurityContextHolder.clearContext(); } } else { request.setAttribute(OAuth2AuthenticationDetails.ACCESS_TOKEN_VALUE, authentication.getPrincipal()); if (authentication instanceof AbstractAuthenticationToken) { AbstractAuthenticationToken needsDetails = (AbstractAuthenticationToken) authentication; needsDetails.setDetails(authenticationDetailsSource.buildDetails(request)); } Authentication authResult = authenticationManager.authenticate(authentication); eventPublisher.publishAuthenticationSuccess(authResult); SecurityContextHolder.getContext().setAuthentication(authResult); } } catch (OAuth2Exception failed) { // 异常处理 SecurityContextHolder.clearContext(); eventPublisher.publishAuthenticationFailure(new BadCredentialsException(failed.getMessage(), failed),new PreAuthenticatedAuthenticationToken("access-token", "N/A")); authenticationEntryPoint.commence(request, response, new InsufficientAuthenticationException(failed.getMessage(), failed)); return; } chain.doFilter(request, response); } }- 1
- 2
- 3
- 4
- 5
- 6
- 7
- 8
- 9
- 10
- 11
- 12
- 13
- 14
- 15
- 16
- 17
- 18
- 19
- 20
- 21
- 22
- 23
- 24
- 25
- 26
- 27
- 28
- 29
- 30
- 31
- 32
- 33
- 34
- 35
- 36
- 37
2. 进入认证登录控制层 AuthController#login方法
/api/v1/login请求进入 AuthController#login方法:

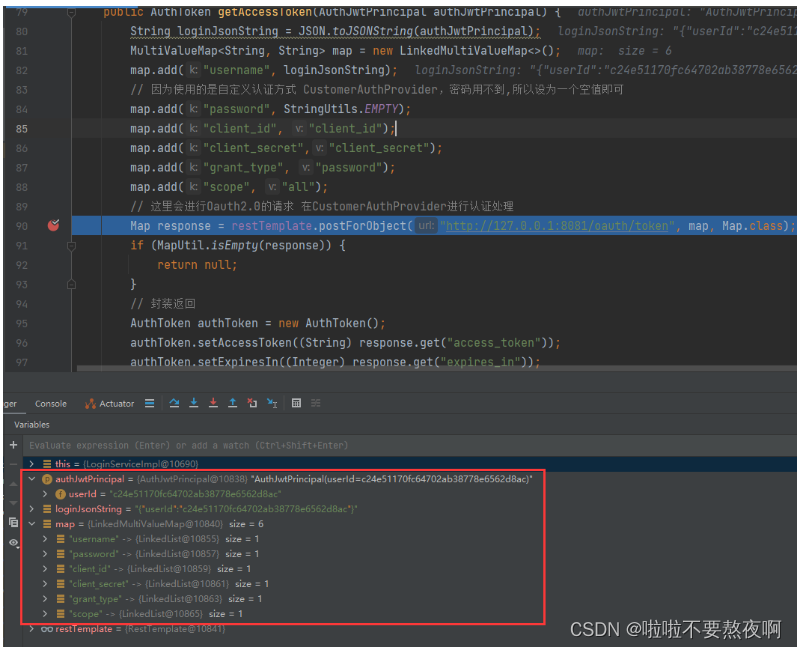
3. 进入业务层 LoginserviceImpl#checkAndAuth方法获取令牌access_token
请求进入LoginserviceImpl#checkAndAuth方法,调用获取认证access_token令牌的请求:http://127.0.0.1:8081/oauth/token
4. 进入认证管理器 ProviderManager#authenticate方法认证
请求进入ProviderManager#authenticate方法:
public class ProviderManager implements AuthenticationManager, MessageSourceAware, InitializingBean { public Authentication authenticate(Authentication authentication) throws AuthenticationException { // ..... } }- 1
- 2
- 3
- 4
- 5
- 6

5. 进入自定义认证管理器CustomAuthProvider#authenticate 方法
⑤ 请求进入自定义认证管理器 CustomAuthProvider#authenticate方法:

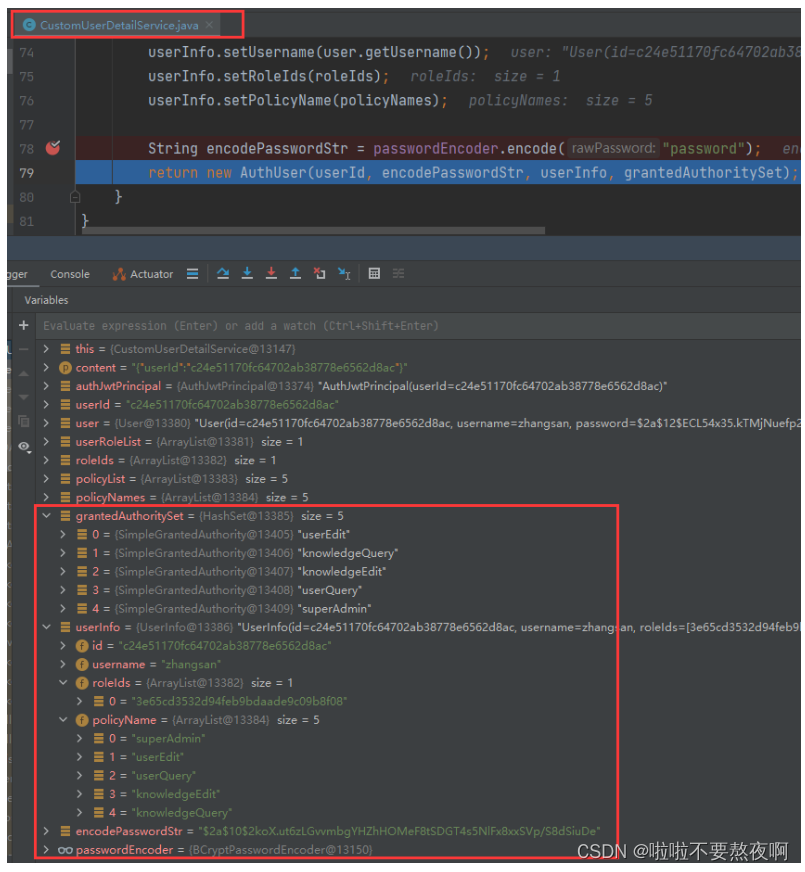
6. 进入自定义 CustomUserDetailService#loadUserByContent 方法
请求进入自定义UserDetailService实现类 CustomUserDetailService#loadUserByContent方法,填充认证对象信息:
2. 已认证:通过 access_token 访问受限资源
用户已经认证获取访问令牌access_token ,通过access_token访问受限资源:

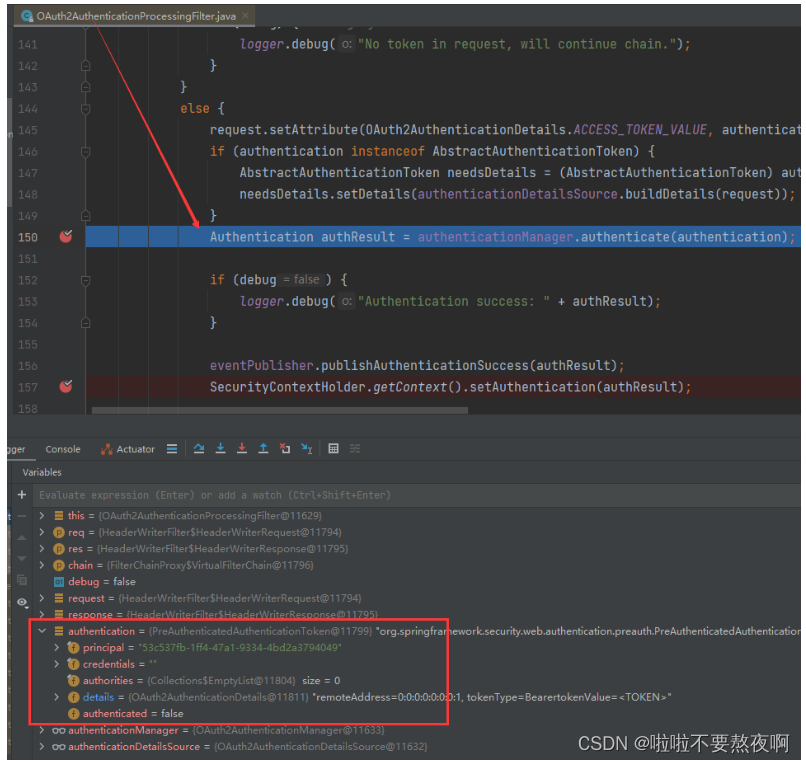
1. 进入过滤器 OAuth2AuthenticationProcessingFilter#doFilter方法
- 调用 BearerTokenExtractor#extract 方法从request请求中提取token并获取Authentication认证对象;
- 如果 Authentication!=null 说明用户已认证,获取填充用户信息的Authentication认证对象;
public class OAuth2AuthenticationProcessingFilter implements Filter, InitializingBean { public void doFilter(ServletRequest req, ServletResponse res, FilterChain chain) throws IOException, ServletException { final boolean debug = logger.isDebugEnabled(); final HttpServletRequest request = (HttpServletRequest) req; final HttpServletResponse response = (HttpServletResponse) res; try { // 从请求中获取认证对象Authentication Authentication authentication = tokenExtractor.extract(request); if (authentication == null) { if (stateless && isAuthenticated()) { SecurityContextHolder.clearContext(); } } else { request.setAttribute(OAuth2AuthenticationDetails.ACCESS_TOKEN_VALUE, authentication.getPrincipal()); if (authentication instanceof AbstractAuthenticationToken) { AbstractAuthenticationToken needsDetails = (AbstractAuthenticationToken) authentication; needsDetails.setDetails(authenticationDetailsSource.buildDetails(request)); } Authentication authResult = authenticationManager.authenticate(authentication); eventPublisher.publishAuthenticationSuccess(authResult); SecurityContextHolder.getContext().setAuthentication(authResult); } } catch (OAuth2Exception failed) { // 异常处理 SecurityContextHolder.clearContext(); eventPublisher.publishAuthenticationFailure(new BadCredentialsException(failed.getMessage(), failed),new PreAuthenticatedAuthenticationToken("access-token", "N/A")); authenticationEntryPoint.commence(request, response, new InsufficientAuthenticationException(failed.getMessage(), failed)); return; } chain.doFilter(request, response); } }- 1
- 2
- 3
- 4
- 5
- 6
- 7
- 8
- 9
- 10
- 11
- 12
- 13
- 14
- 15
- 16
- 17
- 18
- 19
- 20
- 21
- 22
- 23
- 24
- 25
- 26
- 27
- 28
- 29
- 30
- 31
- 32
- 33
- 34
- 35
- 36
- 37

通过待认证的Authentication对象到tokenStore中获取填充后的Authentication认证对象:
2. 进入OAuth2AuthenticationManager#authenticate方法获取Authentication对象
public class OAuth2AuthenticationManager implements AuthenticationManager, InitializingBean { private ResourceServerTokenServices tokenServices; private ClientDetailsService clientDetailsService; private String resourceId; public void afterPropertiesSet() { Assert.state(tokenServices != null, "TokenServices are required"); } public Authentication authenticate(Authentication authentication) throws AuthenticationException { if (authentication == null) { throw new InvalidTokenException("Invalid token (token not found)"); } String token = (String) authentication.getPrincipal(); OAuth2Authentication auth = tokenServices.loadAuthentication(token); if (auth == null) { throw new InvalidTokenException("Invalid token: " + token); } Collection<String> resourceIds = auth.getOAuth2Request().getResourceIds(); if (resourceId != null && resourceIds != null && !resourceIds.isEmpty() && !resourceIds.contains(resourceId)) { throw new OAuth2AccessDeniedException("Invalid token does not contain resource id (" + resourceId + ")"); } checkClientDetails(auth); if (authentication.getDetails() instanceof OAuth2AuthenticationDetails) { OAuth2AuthenticationDetails details = (OAuth2AuthenticationDetails) authentication.getDetails(); // Guard against a cached copy of the same details if (!details.equals(auth.getDetails())) { // Preserve the authentication details from the one loaded by token services details.setDecodedDetails(auth.getDetails()); } } auth.setDetails(authentication.getDetails()); auth.setAuthenticated(true); return auth; } }- 1
- 2
- 3
- 4
- 5
- 6
- 7
- 8
- 9
- 10
- 11
- 12
- 13
- 14
- 15
- 16
- 17
- 18
- 19
- 20
- 21
- 22
- 23
- 24
- 25
- 26
- 27
- 28
- 29
- 30
- 31
- 32
- 33
- 34
- 35
- 36
- 37
- 38
- 39
- 40
- 41
- 42
3. 进入 DefaultTokenServices#loadAuthentication方法获取OAuth2Authentication对象
public class DefaultTokenServices implements AuthorizationServerTokenServices, ResourceServerTokenServices, ConsumerTokenServices, InitializingBean { public OAuth2AccessToken readAccessToken(String accessToken) { return tokenStore.readAccessToken(accessToken); } public OAuth2Authentication loadAuthentication(String accessTokenValue) throws AuthenticationException,InvalidTokenException { OAuth2AccessToken accessToken = tokenStore.readAccessToken(accessTokenValue); if (accessToken == null) { throw new InvalidTokenException("Invalid access token: " + accessTokenValue); } else if (accessToken.isExpired()) { tokenStore.removeAccessToken(accessToken); throw new InvalidTokenException("Access token expired: " + accessTokenValue); } OAuth2Authentication result = tokenStore.readAuthentication(accessToken); if (result == null) { throw new InvalidTokenException("Invalid access token: " + accessTokenValue); } if (clientDetailsService != null) { String clientId = result.getOAuth2Request().getClientId(); try { clientDetailsService.loadClientByClientId(clientId); } catch (ClientRegistrationException e) { throw new InvalidTokenException("Client not valid: " + clientId, e); } } return result; } }- 1
- 2
- 3
- 4
- 5
- 6
- 7
- 8
- 9
- 10
- 11
- 12
- 13
- 14
- 15
- 16
- 17
- 18
- 19
- 20
- 21
- 22
- 23
- 24
- 25
- 26
- 27
- 28
- 29
- 30
- 31
4. 回到过滤器 OAuth2AuthenticationProcessingFilter#doFilter方法
SecurityContextHolder.getContext().setAuthentication(authResult);

5. 请求进入 HelloController#hello方法
@RestController @RequestMapping("/api/v1") public class HelloController { @GetMapping("/hello") public String hello(HttpServletRequest request){ return "username"; } }- 1
- 2
- 3
- 4
- 5
- 6
- 7
- 8
- 9
-
相关阅读:
parquet-go的CSVWriter
记录学习--分页时会查两遍数据库吗
针对海量数据的存储与访问瓶颈的解决方案
在 kubernetes 环境中实现 gRPC 负载均衡
Codeforces Round 826 (Div. 3) D 遍历暴力求解
Postman:API测试之Postman使用完全指南
安装向量数据库milvus及其Attu
Xilinx FPGA管脚约束语法规则(UCF和XDC文件)
windows编程之位图绘制
【故障公告】1个存储过程拖垮整个数据库
- 原文地址:https://blog.csdn.net/qq_42764468/article/details/127716421